Ansible介绍
ansible是新出现的自动化运维工具,基于Python开发,集合了众多运维工具(puppet、cfengine、chef、func、fabric)的优点,实现了批量系统配置、批量程序部署、批量运行命令等功能。无客户端。
Ansible三个核心概念
- Inventory
- 对于管理设备的清单与列表,对列表进行分组,列表可以比较复杂,也可以比较简单。
- Playbook
- 对于Inventory清单中的分组,对于不同分组,执行不同并且多个Task
- Module
- 自带的模块,用于用户和Playbook调用。
Ansible 特点
(1)Ansible不需要安装客户端,通过sshd去通信(无密钥登录)。
(2)Ansible基于模块工作,模块可以由任何语言开发。
(3)Ansible不仅支持命令行使用模块,也支持编写Yaml格式的playbook,易于编写和阅读。
(4)Ansible安装十分简单,CentOS上可直接Yum安装。
(5)Ansible有提供UI(浏览器图形化)www.ansible.com/tower,收费的官方文档 http://docs.ansible.com/ansible/latest/index.html。
Ansible已经被RedHat公司收购,它在Github(https://github.com/ansible/ansible)上是一个非常受欢迎的开源软件。
Ansible 特性
1> 模块化:调用特定的模块,完成特定任务 2> Paramiko(python对ssh的实现),PyYAML,Jinja2(模板语言)三个关键模块 3> 支持自定义模块 4> 基于Python语言实现 5> 部署简单,基于python和SSH(默认已安装),agentless 6> 安全,基于OpenSSH 7> 支持playbook编排任务 8> 幂等性:一个任务执行1遍和执行n遍效果一样,不因重复执行带来意外情况 9> 无需代理不依赖PKI(无需ssl) 10> 可使用任何编程语言写模块 11> YAML格式,编排任务,支持丰富的数据结构 12> 较强大的多层解决方案
自动化运维应用场景
文件传输 应用部署 配置管理 任务流编排
Ansible 主要组成部分
ANSIBLE PLAYBOOKS: 任务剧本(任务集),编排定义Ansible任务集的配置文件,由Ansible顺序依次执行,通常是JSON格式的YML文件 INVENTORY: Ansible管理主机的清单 /etc/anaible/hosts,也可以自定义hosts位置,但需要特殊配置 MODULES: Ansible执行命令的功能模块,多数为内置核心模块,也可自定义 PLUGINS: 模块功能的补充,如连接类型插件、循环插件、变量插件、过滤插件等,该功能不常用 API: 供第三方程序调用的应用程序编程接口 ANSIBLE: 组合INVENTORY、API、MODULES、PLUGINS的绿框,可以理解为是ansible命令工具,其为核心执行工具
基础安装与配置
1.安装
| 版本 | 配置 | 名称 |
|---|---|---|
| centos7.9 | 2h2g 50G | ans1 |
| centos7.9 | 2h2g 50G | ans2 |
| centos7.9 | 2h2g 50G | ans3 |
yum安装
#第一台机器hostnamectl set-hostname ans-con#第二台机器hostnamectl set-hostname ans-node1#第三台机器hostnamectl set-hostname ans-node2#三台机器分别添加到hosts192.168.218.161 ans1192.168.218.162 ans2192.168.218.163 ans3#yum安装ansibleyum install epel* -yyum install ansible -y
编译安装
yum -y install python-jinja2 PyYAML python-paramiko python-babelpython-cryptotar xf ansible-1.5.4.tar.gz #建议到官网/github下载最新稳定版cd ansible-1.5.4python setup.py buildpython setup.py installmkdir /etc/ansiblecp -r examples/* /etc/ansible
Git安装
git clone git://github.com/ansible/ansible.git --recursivecd ./ansiblesource ./hacking/env-setup
Pip安装
yum install python-pip python-develyum install gcc glibc-devel zibl-devel rpm-bulid openssl-develpip install --upgrade pippip install ansible --upgrade
2.配置文件同步
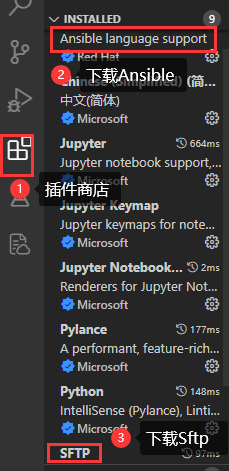
如果在linux中配置需要使用vim等编辑工具,使用vscode,下载sftp工具,就可以将文件内容同步。(xftp也可以实现该功能)
- 下载vscode
- 插件商店,安装Ansible,安装Sftp
- 连接Linux
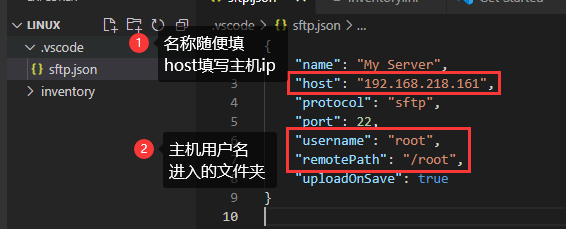
- 创建一个文件,指定到某文件夹中
- ctrl+shift+p,SFTP:config,点击后创建sftp.json文件
- ctrl+shift+p,SFTP:Sync Local -> Remote,连接Linux,输入密码连接成功。并且文件也同步了,此时就不用点什么,Ctrl+s保存就会同步到服务器。


点击SFTP 此时显示的就是/root文件夹的内容。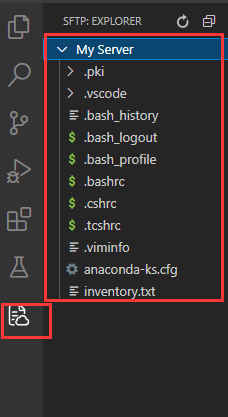
Linux中我们并没有创建,此时给我们创建了文件夹.。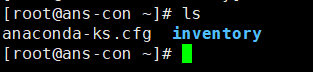
配置文件解释
Inventory 主机清单
1> ansible的主要功用在于批量主机操作,为了便捷地使用其中的部分主机,可以在inventory file中将其分组命名
2> 默认的inventory file为/etc/ansible/hosts
3> inventory file可以有多个,且也可以通过Dynamic Inventory来动态生成
/etc/ansible/hosts文件格式
inventory文件遵循INI文件风格,中括号中的字符为组名。
可以将同一个主机同时归并到多个不同的组中;
此外,当如若目标主机使用了非默认的SSH端口,还可以在主机名称之后使用冒号加端口号来标明
ntp.magedu.com 不分组,直接加[webservers] webservers组www1.magedu.com:2222 可以指定端口www2.magedu.com[dbservers]db1.magedu.comdb2.magedu.comdb3.magedu.com
如果主机名称遵循相似的命名模式,还可以使用列表的方式标识各主机
[websrvs]www[1:100].example.com ip: 1-100[dbsrvs]db-[a:f].example.com dba-dbff
ansible.cfg 配置文件
我们在启动时,我们需要指定host文件,playbook文件,比较麻烦。我们可以通过修改ansible.cfg文件让执行命令更方便。
ansible.cfg常放隐私性的内容,比如ssh秘钥等。
Ansible 配置文件/etc/ansible/ansible.cfg (一般保持默认)
vim /etc/ansible/ansible.cfg[defaults]#inventory = /etc/ansible/hosts # 主机列表配置文件#library = /usr/share/my_modules/ # 库文件存放目录#remote_tmp = $HOME/.ansible/tmp # 临时py命令文件存放在远程主机目录#local_tmp = $HOME/.ansible/tmp # 本机的临时命令执行目录#forks = 5 # 默认并发数,同时可以执行5次#sudo_user = root # 默认sudo 用户#ask_sudo_pass = True # 每次执行ansible命令是否询问ssh密码#ask_pass = True # 每次执行ansible命令是否询问ssh口令#remote_port = 22 # 远程主机的端口号(默认22)#建议优化项:host_key_checking = False # 检查对应服务器的host_key,建议取消注释log_path=/var/log/ansible.log # 日志文件,建议取消注释module_name = command # 默认模块
ansible优先级
- 当前文件夹下的ansible.cfg
- 全局变量配置的ANSIBLE_CONFIG 路径
- 每个用户的home文件夹下的 ansible.cfg
- /etc/ansible配置文件夹下的ansible.cfg
相关文件
| 文件名/文件夹/命令 | 作用 | | —- | —- | | ansible.cfg | 主配置文件,配置ansible工作特性(一般无需修改) | | hosts | 主机清单(将被管理的主机放到此文件) | | roles | 存放角色的目录 | |
|
| | ansible | 主程序,临时命令执行工具 | | ansible-doc | 查看配置文档,模块功能查看工具 | | ansible-galaxy | 下载/上传优秀代码或Roles模块的官网平台 | | ansible-playbook | 定制自动化任务,编排剧本工具 | | ansible-pull | 远程执行命令的工具 | | ansible-vault | 文件加密工具 | | ansible-console | 基于Console界面与用户交互的执行工具 |
Ansible基础命令
- Ansible主要操作对象
- HOSTS主机
- NETWORKING网络设备
- 注意事项:
- 执行ansible的主机一般称为主控端,中控,master或堡垒机
- 主控端Python版本需要2.6或以上
- 被控端Python版本小于2.4需要安装python-simplejson
- 被控端如开启SELinux需要安装libselinux-python
- windows不能做为主控端
- ansible不是服务,不会一直启动,只是需要的时候启动
ansible通过ssh实现配置管理、应用部署、任务执行等功能,建议配置ansible端能基于密钥认证的方式联系各被管理节点ansible <host-pattern> [-m module_name] [-a args]ansible +被管理的主机(ALL) +模块 +参数--version 显示版本-m module 指定模块,默认为command-v 详细过程 –vv -vvv更详细--list-hosts 显示主机列表,可简写 --list-k, --ask-pass 提示输入ssh连接密码,默认Key验证-C, --check 检查,并不执行-T, --timeout=TIMEOUT 执行命令的超时时间,默认10s-u, --user=REMOTE_USER 执行远程执行的用户-b, --become 代替旧版的sudo切换--become-user=USERNAME 指定sudo的runas用户,默认为root-K, --ask-become-pass 提示输入sudo时的口令
ansible all --list 列出所有主机ping模块: 探测网络中被管理主机是否能够正常使用 走ssh协议如果对方主机网络正常,返回pongansible-doc -s ping 查看ping模块的语法检测所有主机的网络状态1> 默认情况下连接被管理的主机是ssh基于key验证,如果没有配置key,权限将会被拒绝因此需要指定以谁的身份连接,输入用户密码,必须保证被管理主机用户密码一致ansible all -m ping -k2> 或者实现基于key验证 将公钥ssh-copy-id到被管理的主机上 , 实现免密登录ansible all -m ping
vim inventory.ini #inventory 主机清单ans2 ansible_connection=ssh ansible_user=root ansible_ssh_pass=mly118235ans3 ansible_connection=ssh ansible_user=root ansible_ssh_pass=mly118235#建议使用字母+数字的密码ansible all -m ping -i inventory.ini #ansible,ping命令#出现以下命令就是执行成功ans3 | SUCCESS => {"ansible_facts": {"discovered_interpreter_python": "/usr/bin/python"},"changed": false,"ping": "pong"}ans2 | SUCCESS => {"ansible_facts": {"discovered_interpreter_python": "/usr/bin/python"},"changed": false,"ping": "pong"}ansible ans3 -m ping -i inventory.ini #单独ping ans3
此时ping并不是普通的ping,而是ansible ping代表ansible可以连接到linux。
- all 对于inventory文件中的所有命令进行ping操作
1.设置分组并且ping
vim inventory.ini[test1]ans2 ansible_connection=ssh ansible_user=root ansible_ssh_pass=mly118235[test2]ans3 ansible_connection=ssh ansible_user=root ansible_ssh_pass=mly118235ansible test2 -m ping -i inventory.inians3 | SUCCESS => {"ansible_facts": {"discovered_interpreter_python": "/usr/bin/python"},"changed": false,"ping": "pong"}
2.多机器匹配
vim inventory.ini[test1]ans[2:3] ansible_connection=ssh ansible_user=root ansible_ssh_pass=mly118235 #匹配ans2到3#ans3 ansible_connection=ssh ansible_user=root ansible_ssh_pass=mly118235ansible test1 -m ping -i inventory.inians3 | SUCCESS => {"ansible_facts": {"discovered_interpreter_python": "/usr/bin/python"},"changed": false,"ping": "pong"}ans2 | SUCCESS => {"ansible_facts": {"discovered_interpreter_python": "/usr/bin/python"},"changed": false,"ping": "pong"}
3.SSH KEY认证方式的实现
在inventory.ini中,上面我们的ping都是通过密码连接的,如果文件泄露我们的服务器密码也就泄露了,所以我们可以通过SSH KEY来进行安全进入
# ssh-keygen #创建秘钥Generating public/private rsa key pair.Enter file in which to save the key (/root/.ssh/id_rsa): /root/.ssh/ansible #设置秘钥的位置与名称Enter passphrase (empty for no passphrase):Enter same passphrase again: #不设置密码Your identification has been saved in /root/.ssh/ansible.Your public key has been saved in /root/.ssh/ansible.pub.The key fingerprint is:SHA256:/2r5xOqF/pqkpMhl2MY1BNyWNH2VbTkkXXzPDfkLOok root@ans-conThe key's randomart image is:+---[RSA 2048]----+| ..ooo o+*+|| ..+.. . =+=|| .. . ==|| . . =|| S . o . .|| + . E * . || . * . +.= || . = o +o* || o . .oB=+ |+----[SHA256]-----+'[root@ans-con ~]# ssh-copy-id -i .ssh/ansible ans2 #将秘钥添加到ans2服务器中/usr/bin/ssh-copy-id: INFO: Source of key(s) to be installed: ".ssh/ansible.pub"/usr/bin/ssh-copy-id: INFO: attempting to log in with the new key(s), to filter out any that are already installed/usr/bin/ssh-copy-id: INFO: 1 key(s) remain to be installed -- if you are prompted now it is to install the new keysroot@ans2's password: 'Number of key(s) added: 1Now try logging into the machine, with: "ssh 'ans2'"and check to make sure that only the key(s) you wanted were added.[root@ans-con ~]# ssh-copy-id -i .ssh/ansible ans3 #将秘钥添加到ans3服务器中/usr/bin/ssh-copy-id: INFO: Source of key(s) to be installed: ".ssh/ansible.pub"/usr/bin/ssh-copy-id: INFO: attempting to log in with the new key(s), to filter out any that are already installed/usr/bin/ssh-copy-id: INFO: 1 key(s) remain to be installed -- if you are prompted now it is to install the new keysroot@ans3's password: 'Number of key(s) added: 1Now try logging into the machine, with: "ssh 'ans3'"and check to make sure that only the key(s) you wanted were added.ssh -i .ssh/ansible ans2 #此时输入能直接登录ssh -i .ssh/ansible ans3vim inventory.ini[test1]ans2 ansible_connection=ssh ansible_user=rootans3 ansible_connection=ssh ansible_user=rootansible all -m ping -i inventory/inventory.ini --private-key=/root/.ssh/ansible #
4. ansible 命令执行过程
ansible命令执行过程1. 加载自己的配置文件 默认/etc/ansible/ansible.cfg2. 加载自己对应的模块文件,如command3. 通过ansible将模块或命令生成对应的临时py文件,并将该文件传输至远程服务器的对应执行用户$HOME/.ansible/tmp/ansible-tmp-数字/XXX.PY文件4. 给文件+x执行5. 执行并返回结果6. 删除临时py文件,sleep 0退出执行状态:绿色:执行成功并且不需要做改变的操作黄色:执行成功并且对目标主机做变更红色:执行失败
PlayBook
playbook是Ansible的配置、部署和编制语言。每个playbook由一个列表中的一个或多个”palys”组成。
- Ansible-playbook(剧本)执行过程
- 将已有编排好的任务集写入Ansible-Playbook
- 通过ansible-playbook命令分拆任务集至逐条ansible命令,按预定规则逐条执行
案例样式
name: "Ansible"version: 2.4python_version: 2.7module:- "Network"- "Linux Server"- "Windows Server"plugins:action_plugin: truecache_plugin: trueshell_plugin: false
ansible 演示 palyload
vim host1.yaml- hosts: test1 #组名称,或者host名称name: play-test #设置该host组的名称gather_facts: notasks: #设置任务- name: check host connection #任务名称ping: #使用ping模块
debug模块
平时我们在使用ansible编写playbook时,经常会遇到错误,很多时候有不知道问题在哪里 。这个时候可以使用-vvv参数打印出来详细信息,不过很多时候-vvv参数里很多东西并不是我们想要的,这时候就可以使用官方提供的debug模块来查找问题出现在哪里。
| debug参数 | 作用 |
|---|---|
| msg | 调试输出的消息 |
| var | 将某个任务执行的输出作为变量传递给debug模块,debug会直接将其打印输出 |
| verbosity | debug的级别(默认是0级,全部显示,写其他数字则跳过) 加上-vvv 显示详细的debug参数 |
常见的变量:
- {{ansible_hostname}} #显示hostname
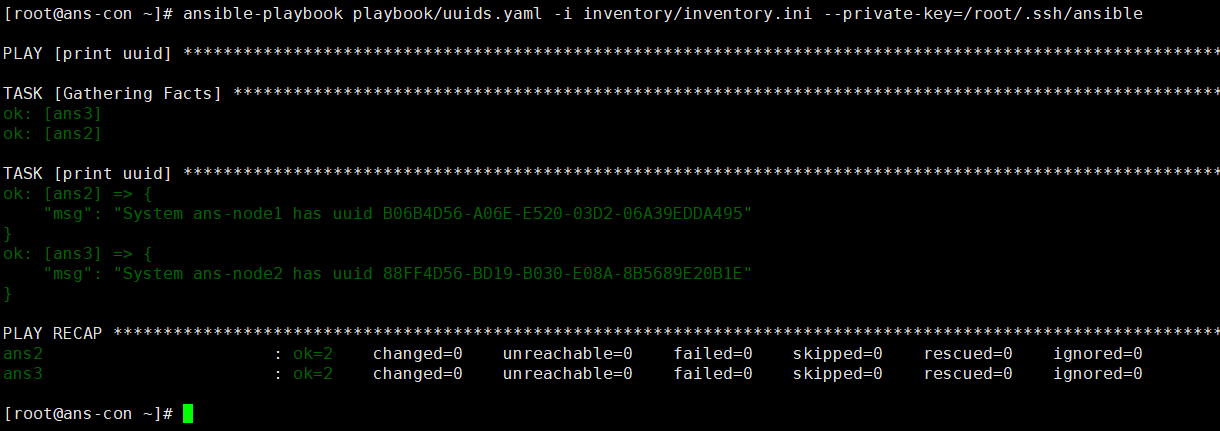
- {{ansible_product_uuid}} #显示机器的uuid
```shell vim helloworld.yamlname: Hello world hosts: localhost #只检查本地 gather_facts: no
tasks:
- name: Hello world debug: msg: “hello ansible” #msg默认打印hello world verbosity: 0 ansible-playbook playbook/helloworkd.yml -vvv #调用debug模块运行
vim uuids.yaml
name: Hello world hosts: localhost
tasks:
- name: Hello world debug: msg: “hello ansible” verbosity: 0 ```
var变量的使用
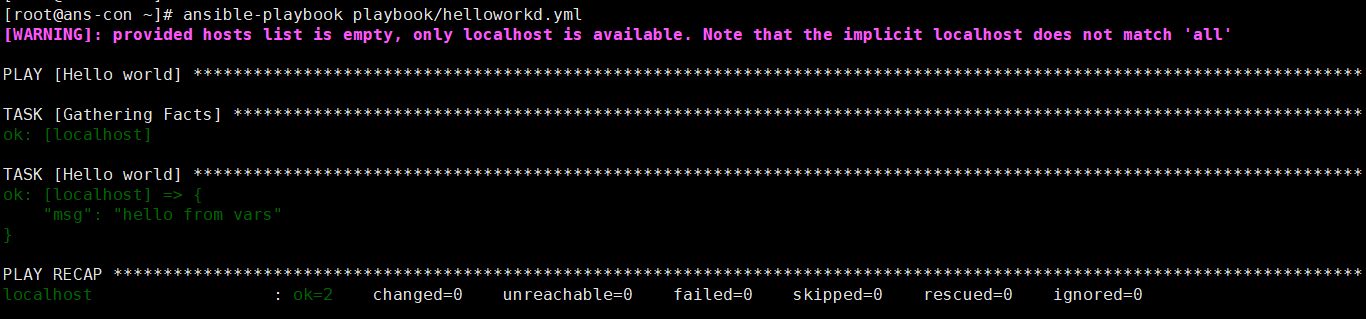
vim heeloworld.yaml- name: Hello worldhosts: localhostgather_facts: novars:grettings: "hello from vars"tasks:- name: Hello worlddebug:msg: "{{grettings}}"verbosity: 0ansible-playbook playbook/helloworkld.yml
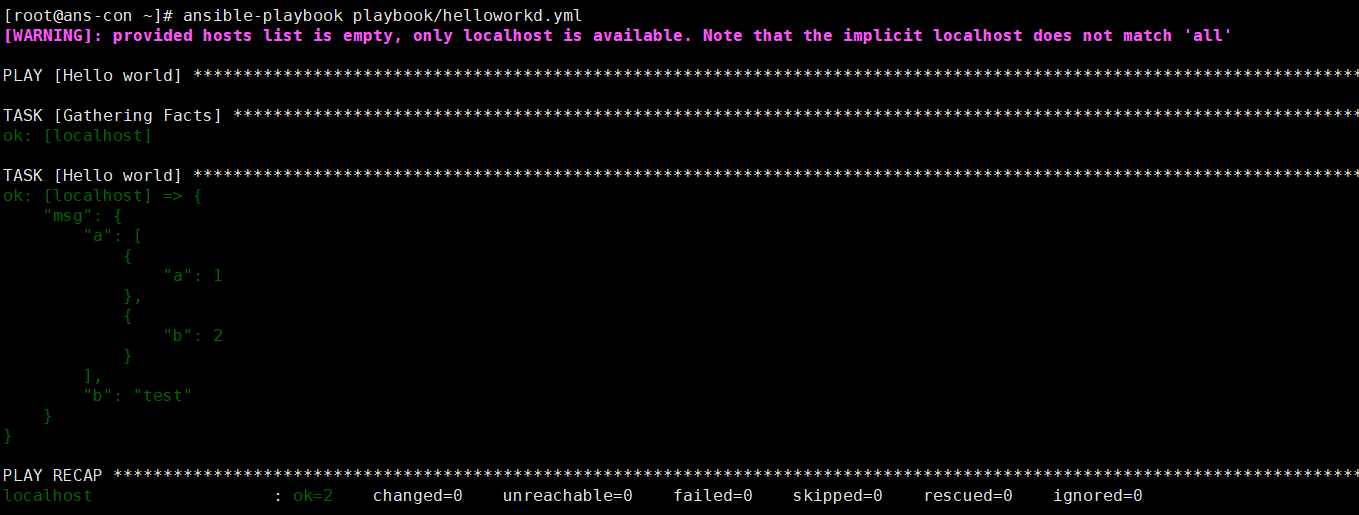
- name: Hello worldhosts: localhostvars:grettings: "hello from vars"demo:a:- a: 1- b: 2b: testtasks:- name: Hello worlddebug:msg: "{{demo}}"verbosity: 0ansible-playbook playbook/helloworkd.yml
设置变量文件
如果我们将变量在每个文件中创建,文件会变得臃肿,并且占用内存更多,无法重复利用。我们可以将变量创建到某个具体文件中。
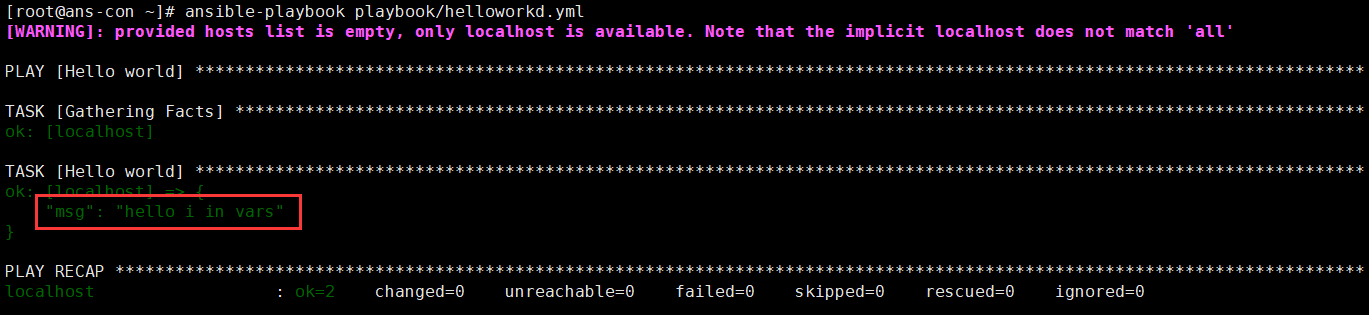
mkdir /root/varsvim deno_vars.ymlgrettings: "hello i in vars"vim helloworld.yml- name: Hello worldhosts: localhostvars_files:- "../vars/demo_vars.yml"tasks:- name: Hello worlddebug:msg: "{{grettings}}"verbosity: 0
注意:关于vars_files的优先级。本地创建<先调用文件<后调用文件
var变量循环
单循环
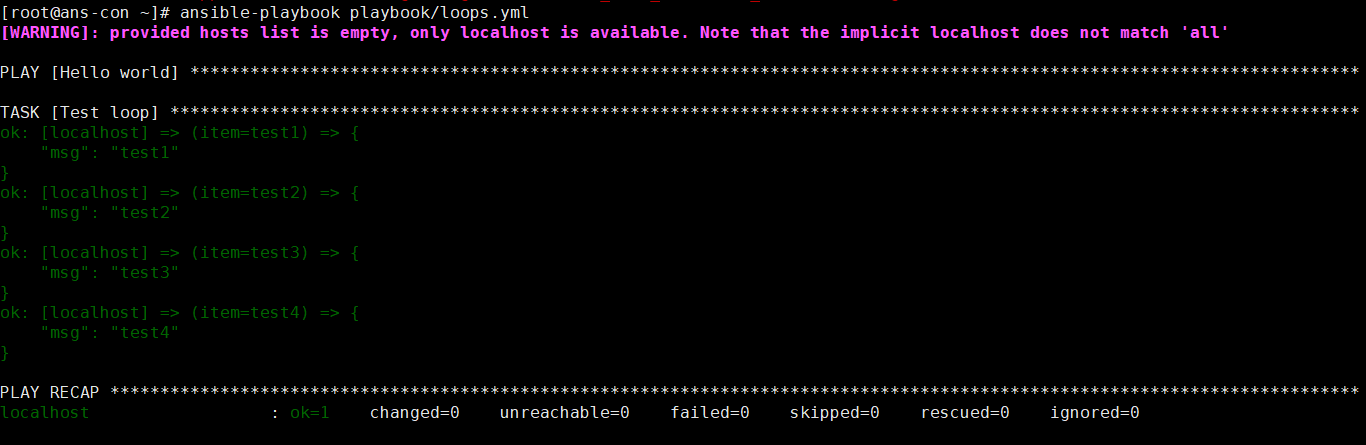
vim loops.yml- name: loop onehosts: localhostgather_facts: novars:test:- test1- test2- test3- test4tasks:- name: Test loopdebug:msg: "{{item}}"verbosity: 0with_items: "{{test}}" #创建一个with_items,其中写入变量
多层循环
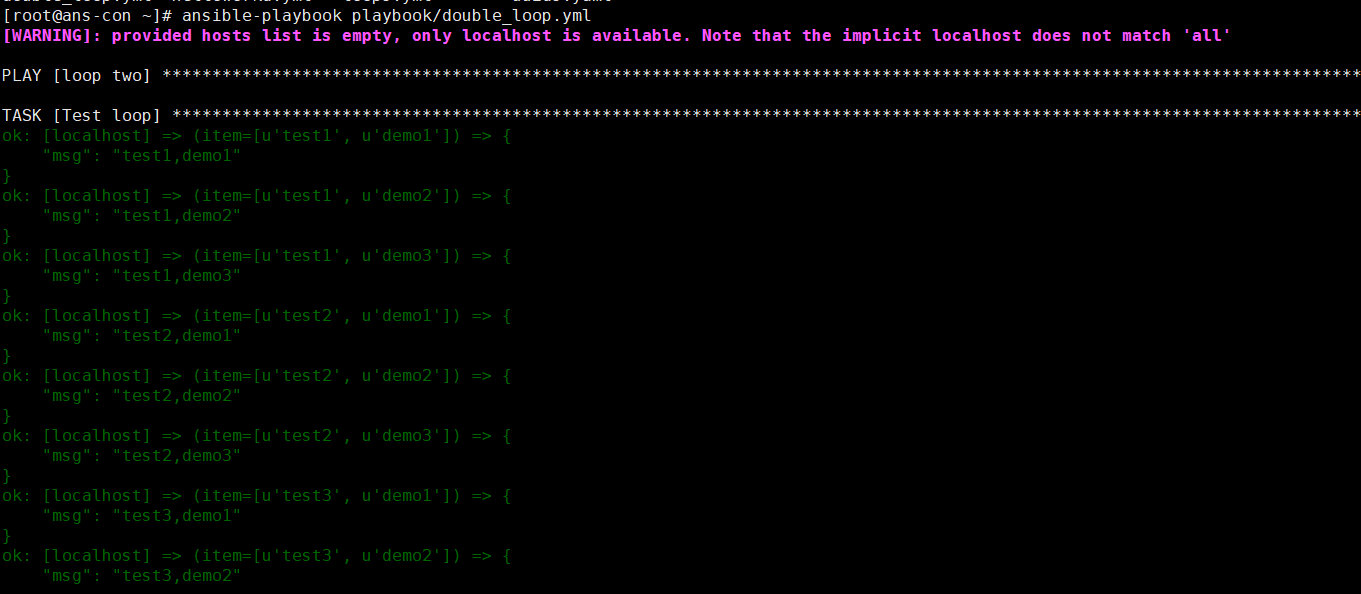
- name: loop twohosts: localhostgather_facts: novars:test:- test1- test2- test3- test4demo:- demo1- demo2- demo3tasks:- name: Test loopdebug:msg: "{{item[0]}},{{item[1]}}"verbosity: 0#with_items: "{{test}}"with_nested: #可以以该格式,多次循环下去- "{{test}}"- "{{demo}}"
条件语句
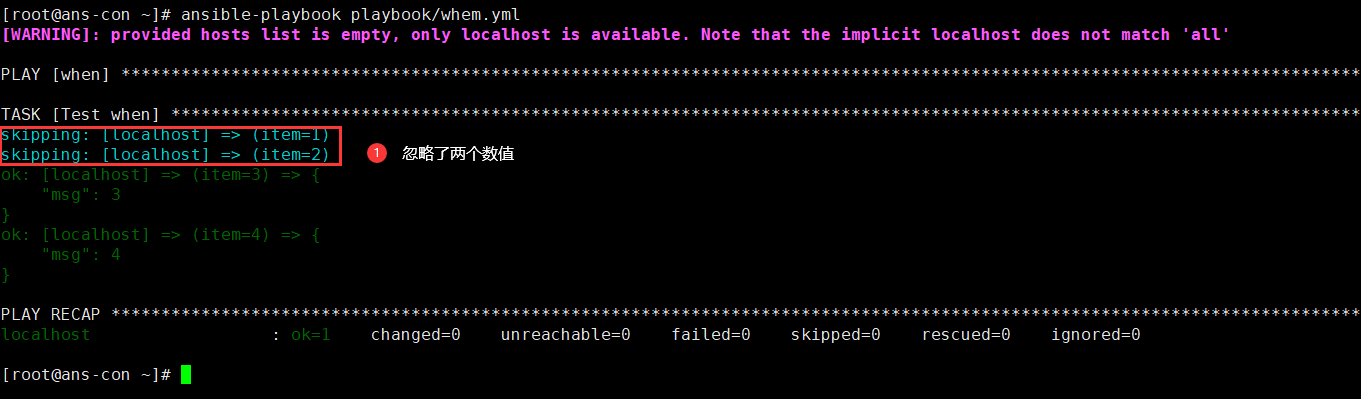
- name: whenhosts: localhostgather_facts: novars:seq:- 1- 2- 3- 4tasks:- name: Test whendebug:msg: "{{item}}"verbosity: 0with_items: "{{seq}}"when: item >2 #当数值大于2时打印
Group和Host变量
在主机配置文件中,也可以设置变量,并且变量使多个服务器使用或重复利用。
方式1:在一个文件中设置
这种大多情况下是在配置几乎相同,没有差别变量时
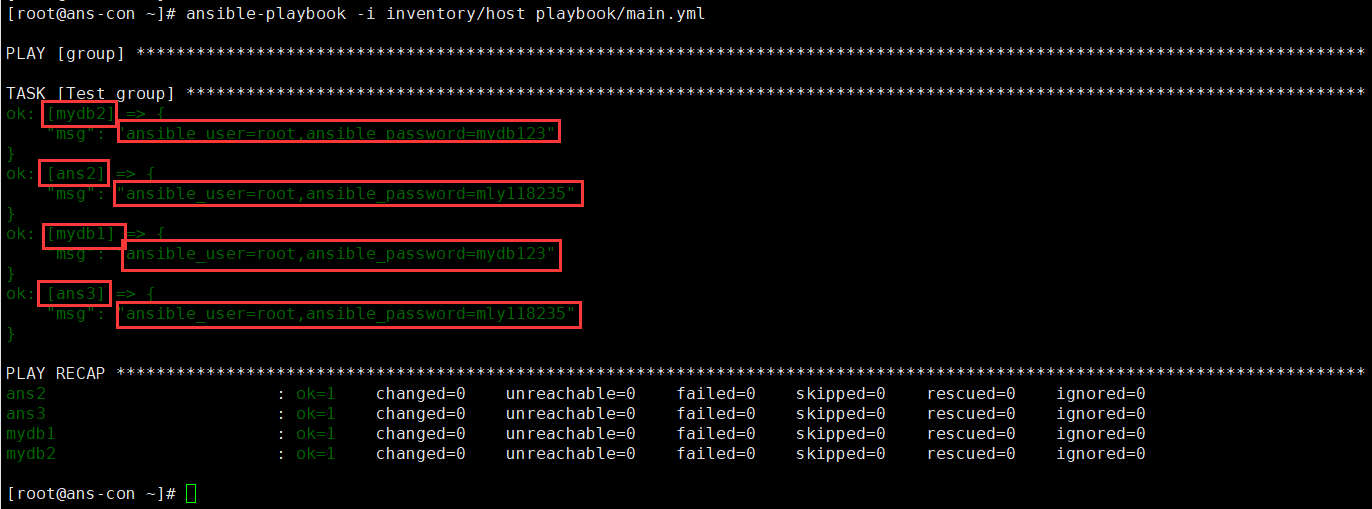
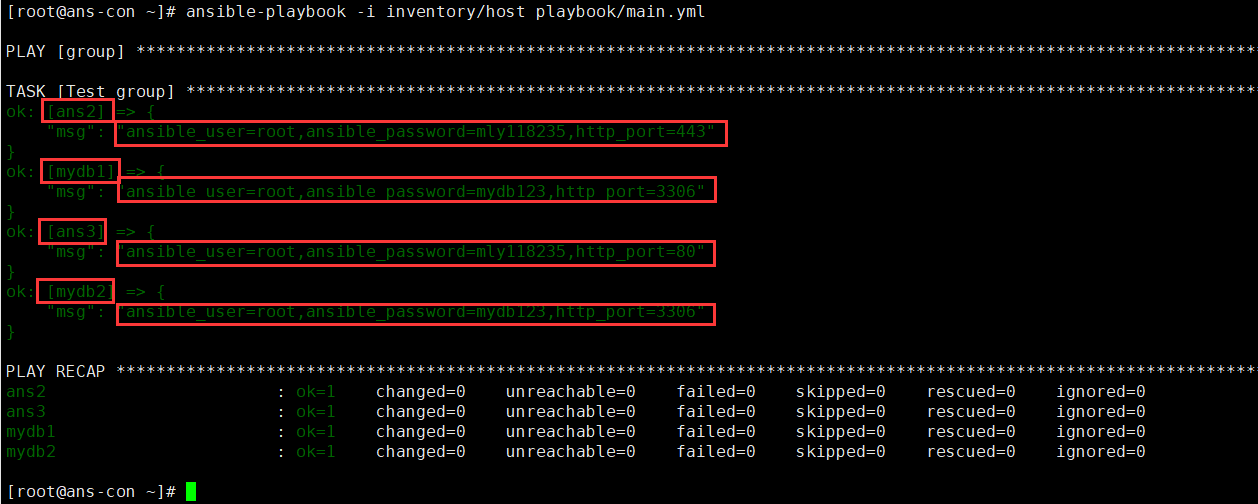
vim host #创建host文件,其中创建主机和所需变量[ans]ans2ans3[mydb]mydb1mydb2[ans:var] #此时创建的变量,就被ans中全部的服务器使用ansible_connection: sshansible_user: rootansible_password: mly118235[mydb:var] #此时创建的变量,就被var中全部的服务器使用ansible_connection: sshansible_user: rootansible_password: mydb123http_port: 3306vim main.yml #创建playbook文件- name: grouphosts: allgather_facts: notasks:- name: Test groupdebug:msg: "ansible_user={{ansible_user}},ansible_password={{ansible_password}}"ansible-playbook -i inventory/host playbook/main.yml
方式2:在不同文件中设置
vim host[all]ans2ans3[mydb]mydb1mydb2#只需要创建服务器名称,必须要再创建变量了mkdir group_vars #创建文件夹,方便管理变量。文件夹名称没限制,但是需要和host文件在同一个文件夹中vim group_vars/ans.yml #文件名必须是host文件中的组名ansible_connection: sshansible_user: rootansible_password: mly118235vim group_vars/mydb.ymlansible_connection: sshansible_user: rootansible_password: mydb123http_port: 3306mkdir host_vars #创建文件夹,该文件夹存放不同的变量,依然会共用group_vars中的变量。vim host_vars/ans2.yml #文件名必须是host的名称http_port: 443 #此时就是单独创建的变量vim host_vars/ans3.ymlhttp_port: 80#两个端口不一样vim main.yml- name: grouphosts: allgather_facts: notasks:- name: Test groupdebug:msg: "ansible_user={{ansible_user}},ansible_password={{ansible_password}},http_port={{http_port}}"#输出用户名,用户名密码,端口号
ansible.cfg 免去填写文件路径
vim /root/playbook/ansible.cfg #将ansible.cfg放入到和main.yml一个文件夹[defaults]inventory= /root/inventory/hostansible-playbook main.yml
模块的使用
File 文件模块
Copy 从主控端复制文件到远程主机
src : 源文件 指定拷贝文件的本地路径 (如果有/ 则拷贝目录内容,比拷贝目录本身)<br /> dest: 指定目标路径<br /> mode: 设置权限<br /> backup: 备份源文件<br /> content: 代替src 指定本机文件内容,生成目标主机文件<br />owner: 设置拥有者
- name: copy filehosts: allgather_facts: nobecome: yes #设置是否以root用户执行操作- name: copy files from local to remotecopy: #粘贴文件src: /root/test.txt #当前机器文件路径dest: /opt/test/test.txt #服务器文件路径backup: yes #如果文件同名或者更改内容再粘贴时,创建一个备份mode: 600 #设置权限位600
File 设置/创建文件
path: 要管理的文件路径 (强制添加)<br /> recurse: 递归,文件夹要用递归<br /> src: 创建硬链接,软链接时,指定源目标,配合'state=link' 'state=hard' 设置软链接,硬链接<br /> state: 状态<br /> absent: 缺席,删除<br /> owner: 设置拥有者<br /> mode: 设置权限
- name: create filehosts: allgather_facts: nobecome: yes #设置是否以root用户执行操作tasks:- name: create a directory if it does not exitsfile: #创建文件path: /opt/test #设置路径state: directory #文件类型为文件夹 touch 是文件ansible all -m file -a 'path=/app/test.txt state=touch' #创建文件ansible all -m file -a 'src=/data/testfile dest=/data/testfile-link state=link' #创建软链接
- name: file modulehosts: allgather_facts: nobecome: yes #设置是否以root用户执行操作tasks:- name: create a directory if it does not exitsfile: #创建文件path: /opt/test #设置路径state: directory #文件类型为文件夹 touch 是文件- name: copy files from local to remotecopy: #粘贴文件src: /root/test.txt #当前机器文件路径dest: /opt/test/test.txt #服务器文件路径backup: yes #如果文件同名或者更改内容再粘贴时,创建一个备份mode: 600 #设置权限位600
template 创建模板
基础模板
使用的jinja语法
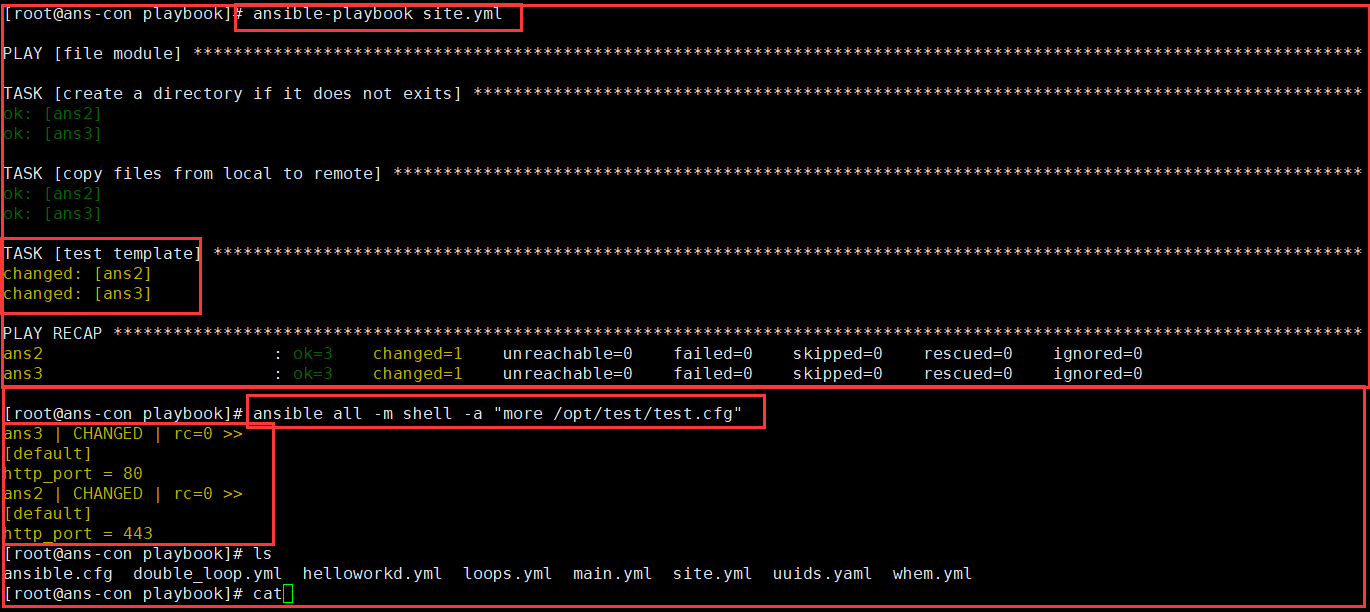
vim site.yml- name: file modulehosts: allgather_facts: nobecome: yestasks:- name: test templatetemplate: #使用模板模块src: ../templates/test.j2dest: /opt/test/test.cfgmkdir templates #创建模板文件夹vim test.j2 #创建cfg模板[default]http_port = {{http_port}} #取出host文件中的变量ansible-playbook site.yml #运行
vim test.j2 #创建cfg模板[default]http_port = {{http_port}}[demo]{% for id in range(201,211) %}{{ host_prefix }}{{ "%02d" | format(id-200) }} = {{ ip_prefix }}{{ id }}{% endfor %}
Unarchive 文件解压
1、将ansible主机上的压缩包传到远程主机后解压缩至特定目录,设置copy=yes.<br /> 2、将远程主机上的某个压缩包解压缩到指定路径下,设置copy=no<br />**copy=yes 当前主机压缩包到远程,copy=no 远程主机解压到远程**copy:默认为yes,当copy=yes,拷贝的文件是从ansible主机复制到远程主机上,<br /> 如果设置为copy=no,会在远程主机上寻找src源文件<br /> src: 源路径,可以是ansible主机上的路径,也可以是远程主机上的路径,<br /> 如果是远程主机上的路径,则需要设置copy=no<br /> dest:远程主机上的目标路径<br /> mode:设置解压缩后的文件权限
- name:unarchive: #根据后缀进行解压src: /root/Python-3.10.4.tgz #文件路径dest: /usr/local/ #解压位置remote_src: yes #是否使用的是服务器目录,默认是no,no就是使用本地路径文件,用本地就无须下载。
Fetch 远程拉取文件
- name: fetchhosts: allbecome: yestasks:- name: fetch a filefetch: #调用远程拉取模块src: /etc/passwd #服务器的路径dest: ./tmp/ #当前路径flat: yes #是否创建文件夹
Archive 打包压缩
将远程主机目录打包 <br /> path: 指定路径<br /> dest: 指定目标文件<br /> format: 指定打包格式<br /> owner: 指定所属者<br /> mode: 设置权限
- name: archivehosts: allgather_facts: notasks:- name: archivearchive: #设置打包压缩path: /etc/passwd #设置文件/设置文件夹dest: /opt/test.tar.bz2 #压缩包位置format: bz2 #设置压缩格式
System 系统模块
ping和get_facts
ping 上面演示过,这里就不错演示
ansible all -m gather_facts #获取机器中的全部参数,API。其中包含的参数非常多ansible all -m gather_facts --tree ./facts #创建一个文件夹,会将打印的参数,添加到文件中。文件名就是设置的hosts名称#其中的变量,也是无需我们创建,能够直接访问的变量,此时我们来调用一下vim site.yml- name: file modulehosts: all#gather_facts no #一定不要写这个,否则这些参数就无法使用了。become: yestasks:- name: print factsdebug:msg: "{{ ansible_date_time }}"- name: print ipv4debug:msg: "{{ ansible_default_ipv4 }}"
User的添加与删除
home 指定家目录路径<br /> system 指定系统账号<br /> group 指定组<br /> remove 清除账户<br /> shell 指定shell类型
ansible all -m user -a 'name=liao comment="创建liao" uid=2048 home=/home/liao1 group=root'#创建用户为liao 设置注释 uid设置为2048 home目录为/home/liao1 组为roottasks:- name: create system useruser:name: sysuser1system: yes #指定是否为系统账号home: /app/sysuser1- name: create usersuser:name: appuid: 88system: yes #是否为系统用户home: /home/appgroups: rootshell: /sbin/nologin #设置为nologinpasswd: "{{ 'appuser1' | password_hash('sha512') }}" #设置密码- name: remove useruser:name: liaostate: absentremove: yes
安装mkpasswd <br /> yum insatll expect <br /> mkpasswd 生成口令<br /> openssl passwd -1 生成加密口令
Group的创建与删除
- name: group managerhosts: allbecome: yestasks:- name: create groupgroup: #调用组模块name: liao118235 #组名称state: present #状态为创建- name: delete groupgroup: #调用组模块name: liao118235 #组名称state: absent #状态为删除ansible-playbook site.yml #执行ansible all -m shell -a "tail /etc/passwd" #查看用户ansible all -m shell -a "tail /etc/group" #查看组
Service 服务的启动与关闭
- name: install nginx and start nginxhosts: allbecome: yestasks:- name: install packageyum:name:- epel* #安装epel工具包state: present- name: install nginxyum:name:- nginx #安装nginxstate: present- name: start nginxservice: #使用service模块name: nginxenabled: yes #是否设置开机自启state: started #启动nginx- name:service:name: nginxstate: stopped
- 重载 reloaded
- 重新启动 restarted
- 启动 started
- 停止 stopped
Hostname 管理主机名
ansible appsrvs -m hostname -a "name=app.adong.com" #更改一组的主机名ansible 192.168.38.103 -m hostname -a "name=app2.adong.com" #更改单个主机名
Cron 计划任务
支持时间:minute,hour,day,month,weekday
name: 任务计划名称
cron_file: 替换客户端该用户的任务计划的文件
minute: 分(0-59, ,/2)
hour: 时(0-23, ,/2)
day: 日(1-31, ,/2)
month: 月(1-12, , /2)
weekday: 周(0-6或1-7, *)
job: 任何计划执行的命令,state要等于present
backup: 是否备份之前的任务计划
user: 新建任务计划的用户
state: 指定任务计划present、absent
ansible all -m cron -a "minute=*/5 job='/usr/sbin/ntpdate 172.16.0.1 &>/dev/null' name=Synctime" #创建任务ansible all -m cron -a 'state=absent name=Synctime' #删除任务ansible all -m cron -a 'minute=*/10 job='/usr/sbin/ntpdate 172.30.0.100" name=synctime disabled=yes"#注释任务,不在生效
Package 包模块
Yum安装工具
- name: yum Installhosts: allbecome: yestasks:- name: yum installyum: #调用yum模块name: git #安装单个包gitstate: present #状态为创建- name: yum unstallyum:name: gitstate: absent #状态为删除- name: yum install moreyum:name: {{packages}}vars: #安装多个包packages: #配置一个变量,方便管理- httpd- http-tools- name:yum:name:- wget- nginx- name: rpm install urlyum:name: https://artifacts.elastic.co/downloads/kibana/kibana-6.0.0-x86_64.rpm #以网站的形式下载并安装rpm包stats: present- name: rpm install pathyum:name: /root/kibana-6.0.0-x86_64.rpm #从路径查询包并安装stats: present- name: upgrade all packagesyum:name: '*' #更新所有的包state: latest
apt安装工具
用法其实和yum差不多,我们只看当服务器有centos和ubuntu时,需要分开使用命令的情况
- name: yum Installhosts: allbecome: yestasks:- name: yum installyum: #调用yum模块name: git #安装单个包gitstate: present #状态为创建when: ansible_faces["distribution"] == 'CentOS' #判定是否为Centos- name: apt getapt:name: gitstate: present #状态为创建when: ansible_faces["distribution"] == 'Ubuntu' #判定是否为Ubuntu
package 自动选择合适的安装命令
模块会自动识别服务器的发行版版本,进行不同的命令安装。
但是,部分包名称并不是一样的,所以还是需要进行上面的单独写。
- name: package modulehosts: allbecome: yestasks:- name: yum installpackage:name: gitstate: presentforce_apt_get: yes #强制使用apt get
pip安装
- name: install python3hosts: allbecome: yestasks:- name: yum install pythonpackage:name: #安装python3和一些工具包- python3- python3-devel- python3-pip- python-setuptoolsstate: present- name: yum install pythonpip:name: flask #需要安装的包#requirements: ~/flask-ansible-demo/requirements.txt #设置以文件-r 拉取pip包virtualenv: /root/vir/ #虚拟环境路径virtualenv_command: /usr/bin/python3 -m venv #进入虚拟路径的命令
git
拉取
- name: get gitgit:repo: 'https://github.com/xiaopeng163/flask-ansible-demo' #填写git仓库的网址dest: ~/flask-ansible-demo #拉取到后 存放位置
Net tools 模块
get_url 通过url下载文件
- name: download tar.gzhosts: allbecome: yestasks:- name: download pythonget_url:url: https://www.python.org/ftp/python/3.10.4/Python-3.10.4.tgz #填写下载地址dest: /root/ #下载路径checksum: md5:7011fa5e61dc467ac9a98c3d62cfe2be #检查md5- name:unarchive: #根据后缀进行解压src: /root/Python-3.10.4.tgz #文件路径dest: /usr/local/ #解压位置remote_src: yes #是否使用的是服务器目录,默认是no,no就是使用本地路径文件,用本地就无须下载。
uri 查看访问网页参数
- name: curl webhosts: allbecome: yestasks:- name: checkuri: #调用uriurl: http://www.example.com #设置访问网页return_content: yes #设置是否返回网页内容register: result #注册返回值- debug:var: result #输出返回值
Command 命令模块
Command 命令模块
前面演示了shell命令的使用,shell模块与command模块的区别是,shell模块可以引用变量和使用一些比较符号。command模块建议使用一些单行命令
- name: use commandhosts: allbecome: yestasks:- name:command: cat /etc/passwd #执行的命令register: passwd_list #注册返回值,将命令的输入赋值到该变量中,此时变量就可以被引用了。- debug:msg: "{{passwd_list}}" #打印出返回值
Shell 命令模块
ansible all -m shell -a 'getenforce' #查看SELINUX状态ansible all -m shell -a "sed -i 's/SELINUX=.*/SELINUX=disabled' /etc/selinux/config" #修改SELINUXvim /etc/ansible/ansible.cfgmodule_name = shell #修改配置文件,使shell作为默认模块ansible all -a 'cat /etc/passwd'
调用bash执行命令,可能依然出现错误,所以建议写到脚本时,copy到远程执行,再把需要的结果拉回执行命令的机器
vim /etc/ansible/ansible.cfgmodule_name = shell #修改配置文件,使shell作为默认模块
Script 脚本模块
在远程主机上运行ansible服务器上的脚本
ansible all -m script -a /tmp/data.sh #将当前服务器data.sh脚本咋在其他服务器上运行
Ansible Vault 加密
对文件进行加密解密
- encrypt 加密
- decrypt 解密
- view 查看
- edit 编辑
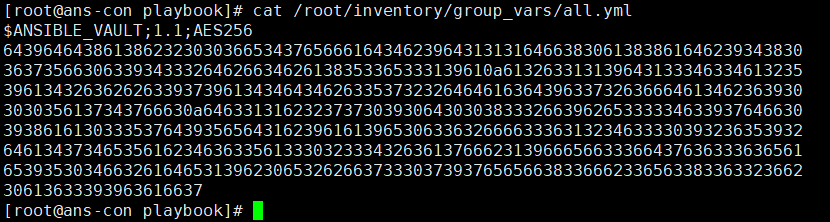
ansible-vault encrypt /root/inventory/group_vars/all.yml #加密文件,设置密码ansible-vault decrypt /root/inventory/group_vars/all.yml #解密文件,输入密码解密
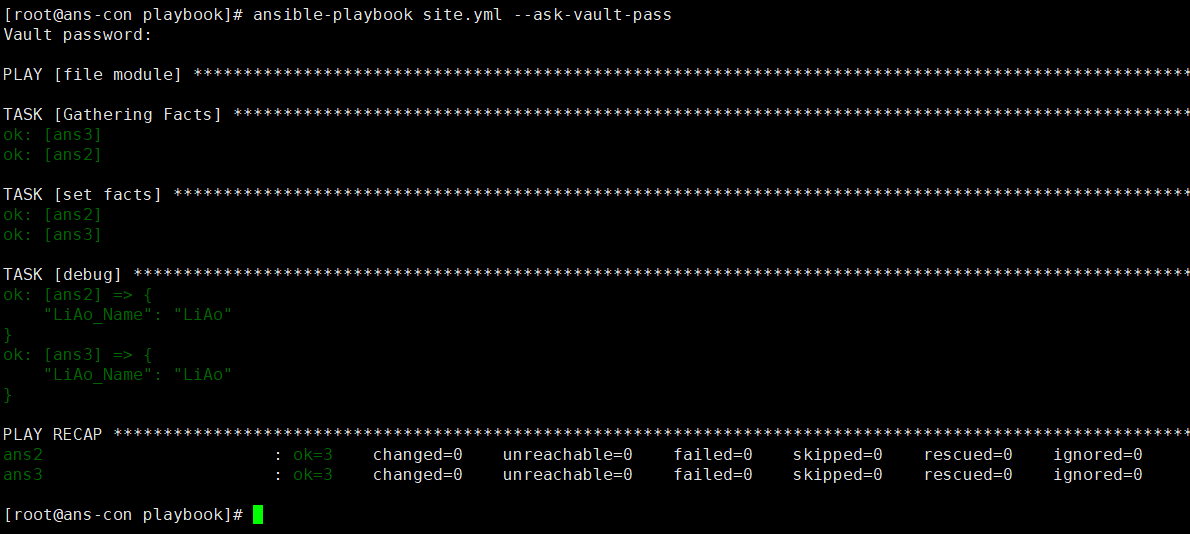
ansible-vault view /root/inventory/group_vars/all.yml #输入密码,查看加密文件ansible-vault edit /root/inventory/group_vars/all.yml #输入密码,修改加密文件ansible-playbook site.yml --ask-vault-pass #执行加密的playbook

对变量进行加密
ansible-vault encrypt_string "mly118235" --name "ansible_password"ansible_password: !vault |$ANSIBLE_VAULT;1.1;AES256356262303137633239346231306364366666613963386166643039623837336638616564323166623631633730303232326138643162316364306239303238620a336637313737353732323138633866333236653930363161383536333362346361326162386461376332633764623939653935383364626632373263333938360a3135646665393464373636343732393639663836393066323535383835303962#只需将这段代码覆盖掉 ansible_password: mly118235 即可!#加密了执行时,需要输入密码
set_fact 模块
自定义
自定义变量,或者将获取的参数设置为变量。
- name: file modulehosts: allbecome: yestasks:- name: set factsset_fact: #创建factLiAo_Name: 'LiAo' #创建key- debug:var: LiAo_Name #打印输出key
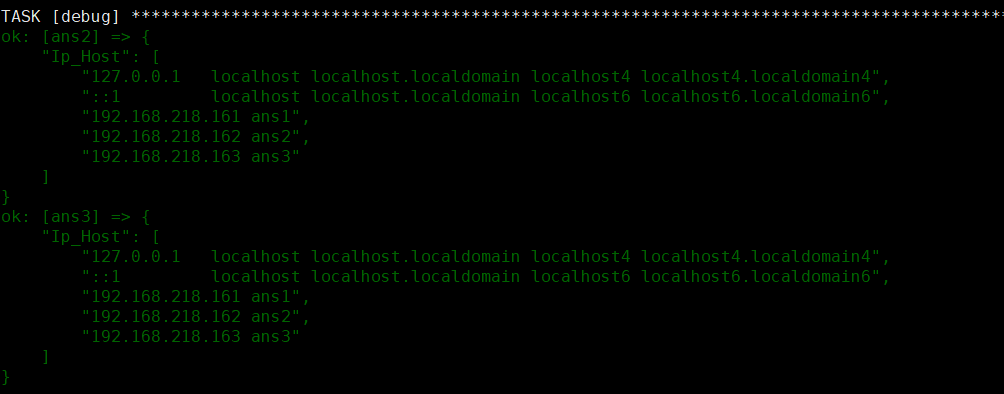
设置系统变量
- name: file modulehosts: allbecome: yestasks:- name: command get hostscommand: cat /etc/hosts #执行命令register: host_results #注册返回值- name: set factsset_fact: #创建factIp_Host: "{{host_results['stdout_lines']}}" #创建key,设置值- debug:var: Ip_Host #打印值
Ansible工具
asnible-lint yml文件检查
对于ansible风格进行检查,类似python的PEP8。
pip3 install ansible-lint -i https://pypi.tuna.tsinghua.edu.cn/simple #pip安装ansible-lint site.yml #检查yml 无任何输出就是书写规范。ansible-lint *.yml #检查当前文件夹全部的yml文件
Ansible-doc 获取模块信息
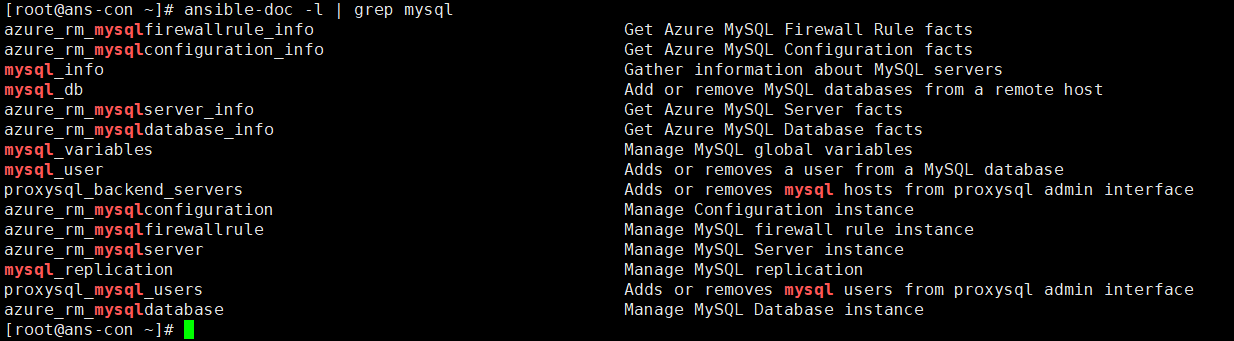
ansible-doc -l | grep mysql
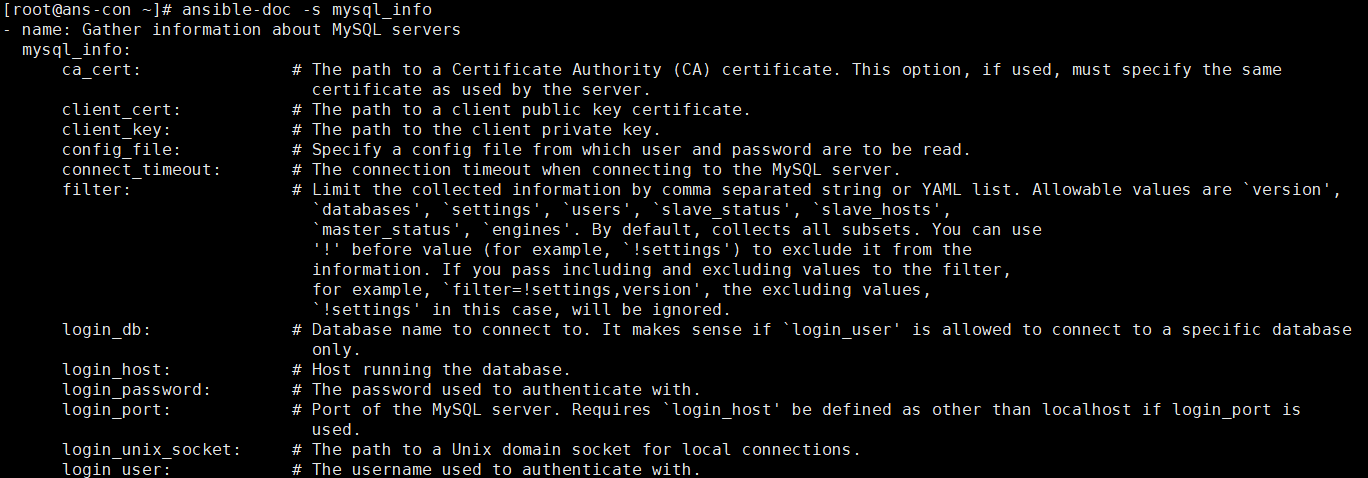
ansible-doc -s mysql_info #查看该模块的用法
Blocks 区间 任务段
类似编程中的 try catch finally
- name: error blockshosts: allbecome: yestasks:- block: #设置区间- name: excuting commandcommand: /bin/tests #设置错误的命令rescue: #当发生错误时,执行的task,没发生错误就不执行- name: error messagedebug:msg: "命令产生错误,我执行了"always: #不管是否发生错误都执行的task- name: always excutingdebug:msg: "管你错没错,我执行了"
Role 角色/函数
类似函数功能,目的是需要我们能够重复利用代码。
简单的项目案例
拉取github上的包。并且设置为一键搭建。
文件架构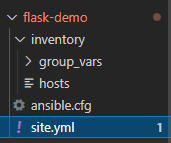
- 创建flask-demo 文件夹,存放项目
- 创建inventory 文件夹 放服务器信息和变量
- 创建group_vars 文件夹 存放变量
- 创建 hosts 存放服务器host
- 创建ansible.cfg 指定默认的host文件
- 创建site.yml playbook文件
- 创建inventory 文件夹 放服务器信息和变量
vim site.yml- name: flask demohosts: allgather_facts: notasks:- name: yum install pythonpackage:name:- python3- python3-devel- python3-pip- python-setuptools- gitstate: present- name: yum install pythonpip:name: flaskvirtualenv: /root/vir/virtualenv_command: /usr/bin/python3 -m venv- name: get gitgit:repo: 'https://github.com/xiaopeng163/flask-ansible-demo'dest: ~/flask-ansible-demo- name: pip installpip:requirements: ~/flask-ansible-demo/requirements.txtstate: presentvirtualenv: ~/flask-ansible-demo/.envvirtualenv_command: /usr/bin/python3 -m venv- name: start flask appshell: nohup ~/flask-ansible-demo/.env/bin/python ~/flask-ansible-demo/wsgi.py ®ister: myoutput- name: print stdoutdebug:var: myoutput
Role的创建与调用
角色目录结构
j
- roles 角色文件夹
- deploy-code 角色名文件夹,yml调用时的名称
- install-python 角色名文件夹,yml调用时的名称
# playbookssite.ymlwebservers.ymlfooservers.ymlroles/common/tasks/handlers/library/files/templates/vars/defaults/meta/webservers/tasks/defaults/meta/
- tasks/main.yml- 角色执行的任务的主列表。
- handlers/main.yml- 处理程序,可以在此角色内部或外部使用。
- library/my_module.py- 模块,可在此角色中使用(有关详细信息,请参阅在角色中嵌入模块和插件)。
- defaults/main.yml- 角色的默认变量(有关详细信息,请参阅使用变量)。这些变量在所有可用变量中具有最低的优先级,并且可以很容易地被任何其他变量(包括库存变量)覆盖。
- vars/main.yml- 角色的其他变量(有关详细信息,请参阅使用变量)。
- files/main.yml- 角色部署的文件。
- templates/main.yml- 角色部署的模板。
- meta/main.yml- 角色的元数据,包括角色依赖关系。
文件内容配置
install-python/tasks/main.yml
- name: yum install pythonpackage:name:- python3- python3-devel- python3-pip- python-setuptools- gitstate: present- name: into virpip:name: flaskvirtualenv: /root/vir/virtualenv_command: /usr/bin/python3 -m venv
deploy-code/tasks/main.yml
- name: get gitgit:repo: 'https://github.com/xiaopeng163/flask-ansible-demo'dest: ~/flask-ansible-demo- name: pip installpip:requirements: ~/flask-ansible-demo/requirements.txtstate: presentvirtualenv: ~/flask-ansible-demo/.envvirtualenv_command: /usr/bin/python3 -m venv
调用role
site.yml
- name: flask demohosts: allroles: #roles,第一种调用,直接写路径- role: '/root/flask-demo/inventory/roles/install-python/'gather_facts: notasks:- include_role: #include_role 直接调用 但是name中 需要是site.yml和roles文件夹在同一级name: deploy-code- name: start flask appshell: nohup ~/flask-ansible-demo/.env/bin/python ~/flask-ansible-demo/wsgi.py ®ister: myoutput- name: print stdoutdebug:var: myoutput
- roles 最经典的调用,填写文件夹名,简单,并且对于文件排版没要求,并且不写在tasks
- include_role 常是动态调用,写在tasks中。对于排版有一定要求。
调用vars
- 在deploy-code文件夹下,创建vars文件夹
- 创建main.yml 添加以下内容 ```yaml repo_url: https://github.com/xiaopeng163/flask-ansible-demo #此时就创建了repo_url
vim /root/flask-demo/inventory/roles/deploy-code/tasks/main.yml
- name: get gitgit:repo: '{{repo_url}}'dest: ~/flask-ansible-demo
<a name="pESZZ"></a>### 内部调用tasks我们创建了main.yml文件夹,是直接会被调用。但是为了精简,我们可以写更多的yml文件。- 在install-python/tasks文件夹下创建pip.yml- pip.yml中只需要填写任务,而main.yml中只需用include 包含进去即可```yamlvim pip.yml- name: into virpip:name: flaskvirtualenv: /root/vir/virtualenv_command: /usr/bin/python3 -m venvvim main.yml- name: yum install pythonpackage:name:- python3- python3-devel- python3-pip- python-setuptools- gitstate: present- include: #直接包含即可,将文件+后缀输入pip.yml
Handler 的创建与使用
当tasks是changed时执行的tasks。比如说拉取了新的nginx配置文件,需要重启nginx。
vim /root/flask-demo/inventory/roles/deploy-code/tasks/main.yml- name: get gitgit:repo: '{{repo_url}}'dest: ~/flask-ansible-demonotify: test handler #添加一个notify,拉取github时会覆盖原有的文件,所以需要handler做通知或者重启mkdir /root/flask-demo/inventory/roles/deploy-code/handlersvim /root/flask-demo/inventory/roles/deploy-code/handlers/main.yml- name: test handlerdebug:msg: "repo new install"
Ansible-galaxy 操作role模板
在当前目录一键创建/删除/列出/搜索/导入/安装等操作
cd /root/flask-demo/inventory/roles #进入role模板目录ansible-galaxy role init ansible-gl-demo #创建模板- Role ansible-gl-demo was created successfully

创建的非常齐全,并且能够直接拿来使用。
从Github安装role到本地
- 创建requirements.yml 文件
```yaml
vim requirements.yml
roles: #roles规则
- src: https://github.com/xiaopeng163/ansible-galaxy-demo #github路径 scm: git #复制使用的工具/类型 version: master #版本分支
ansible-galaxy install -r requirements.yml #拉取roles
- extracting ansible-galaxy-demo to /root/.ansible/roles/ansible-galaxy-demo
- ansible-galaxy-demo (master) was installed successfully ```
从Ansible Galaxy 安装Role到本地
Ansible Galaxy平台 该平台时Ansible团队搭建的,我们可以使用github账号登录,并且上传Role,一键下载。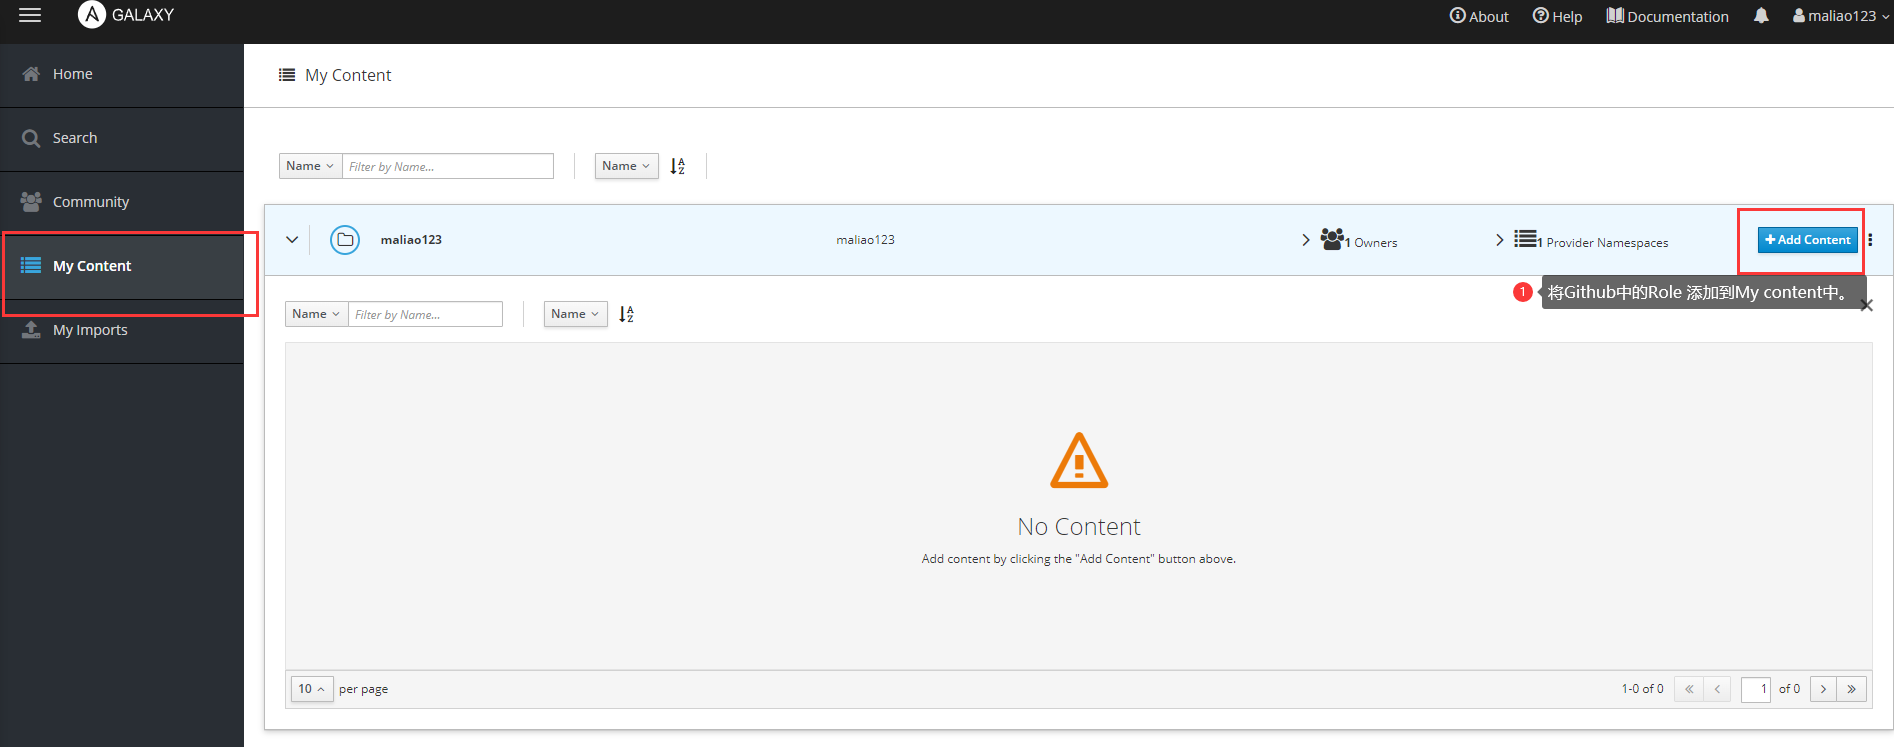
或者从 Search 搜索别人的Role项目下载安装
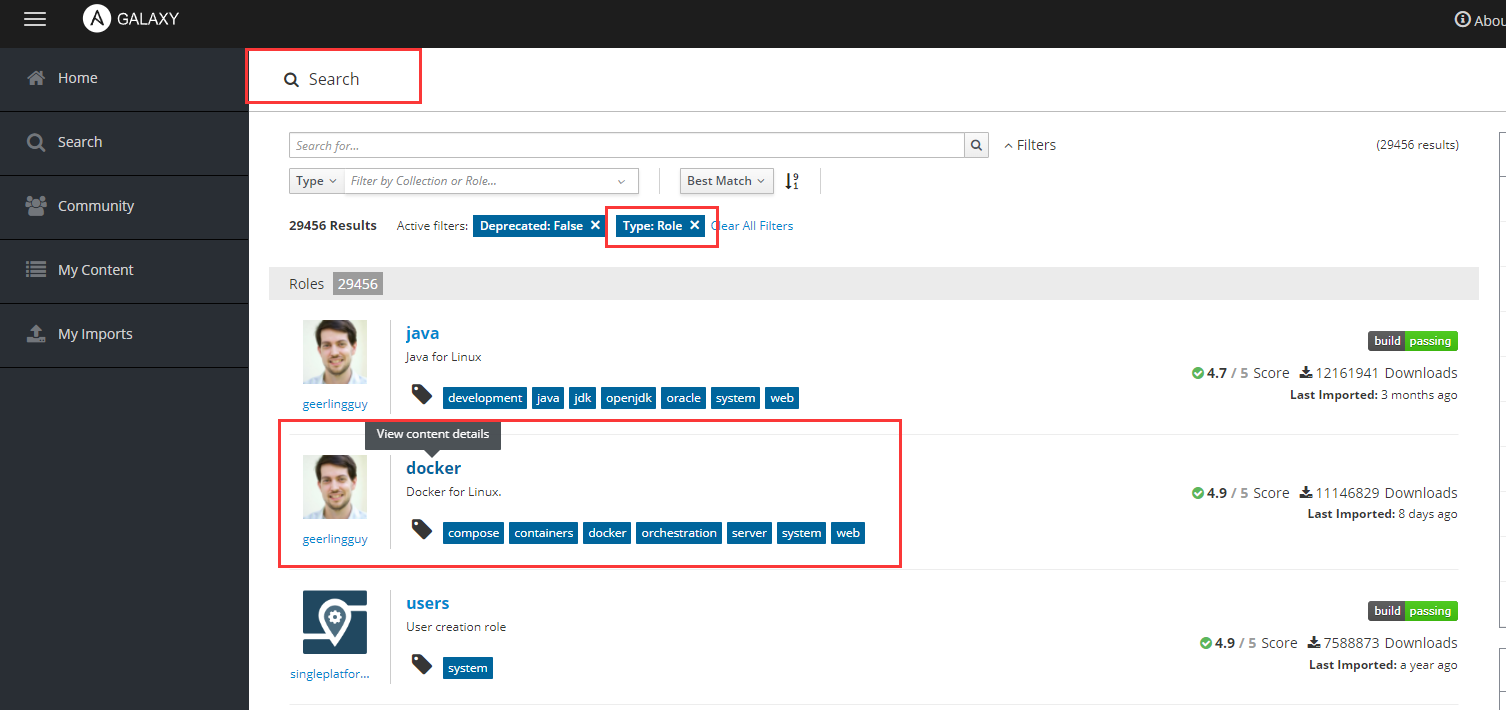

ansible-galaxy install geerlingguy.docker #就能直接下载#甚至在 requirements.yml 中 拉取也更方便了vim requirements.yml.roles:- src: https://github.com/xiaopeng163/ansible-galaxy-demoscm: gitversion: master- src: geerlingguy.dockerversion: 2.4ansible-galaxy install -r requirements.yml #能够直接拉取
Collection 集合
collection是一种可以包含playbook、role、模块和plugin的 Ansible 内容的发行格式。当模块从核心 Ansible 存储库移动到集合时
Ansible Tower 收费!!

若有收获,就点个赞吧
0 人点赞
