问题
当我们决定存储某种数据时,在创建索引的时候需要数据结构完整确定下来,与此同时索引的设定和很多固定配置将不能改变。
当需要改变数据结构时就需要重建索引,为此,Elasticsearch团队提供了辅助工具帮助开发人员进行索引重建。
方案一: 外部数据导入
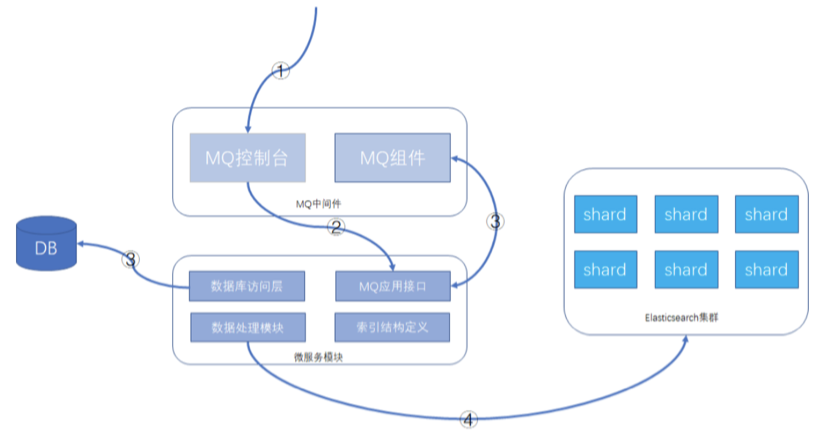
系统架构设计中,有关系型数据库用来存储数据,Elasticsearch在系统架构里起到查询加速的作用,如果遇到索引重建的操作,待系统模块发布新版本后,可以从数据库将数据查询出来,重新灌到 Elasticsearch即可
具体步骤
数据库 + MQ + 应用模块 + Elasticsearch,可以在MQ控制台发送MQ消息来触发重导数据,按批次对数据进行导入,整个过程异步化处理
- 通过MQ的web控制台或cli命令行,发送指定的MQ消息
- MQ消息被微服务模块的消费者消费,触发ES数据重新导入功能
- 微服务模块从数据库里查询数据的总数及批次信息,并将每个数据批次的分页信息重新发送给MQ 消息,分页信息包含查询条件和偏移量,此MQ消息还是会被微服务的MQ消息者接收处理。
- 微服务根据接收的查询条件和分页信息,从数据库获取到数据后,根据索引结构的定义,将数据组 装成ES支持的JSON格式,并执行bulk命令,将数据发送给Elasticsearch集群。
这样就可以完成索引的重建工作。
缺点
- 数据库读取压力
- 带宽占用高
- 重建时间长, 和数据量有关系
方案二: 基于scroll+bulk+索引别名
利用Elasticsearch自带的一些工具完成索引的重建工作,当然在方案实际落地时,可能也会依赖客户端 的一些功能,比如用Java客户端持续的做scroll查询、bulk命令的封装等。数据完全自给自足,不依赖其他数据源
执行步骤
假设原索引名称是book,新的索引名称为book_new,Java客户端使用别名book_alias连接 Elasticsearch,该别名指向原索引book。
- 若Java客户端没有使用别名,需要给客户端分配一个:
PUT /book/_alias/book_alias - 新建索引
book_new,将mapping信息,settings信息等按新的要求全部定义好。 - 使用scroll api将数据批量查询出来
为了使用 scroll,初始搜索请求应该在查询中指定scroll参数,这可以告诉 Elasticsearch 需要
保持搜索的上下文环境多久,1m 就是一分钟。
# size是一页显示几条GET /book/_search?scroll=1m{"query": {"match_all": {}},"sort": ["_doc"],"size": 2}
采用bulk api将scoll查出来的一批数据,批量写入新索引
POST /_bulk
{ "index": { "_index": "book_new", "_id": "对应的id值" }}
{ 查询出来的数据值 }
反复执行修改后的步骤3和步骤4,查询一批导入一批,以后可以借助Java Client或其他语言的API
支持。
注意做3时需要指定上一次查询的 scroll_id
GET /_search/scroll
{
    "scroll": "1m",
    "scroll_id" : "步骤三中查询出来的值"
}
切换别名book_alias到新的索引book_new上面,此时Java客户端仍然使用别名访问,也不需要修改任何代码,不需要停机。
POST /_aliases
{
"actions": [
 {
   "remove": {
     "index": "book",
     "alias": "book_alias"
   }
 },
 {
   "add": {
     "index": "book_new",
     "alias": "book_alias"
   }
 }
]
}
验证别名查询的是否为新索引的数据
方案特点
在数据传输上基本自给自足,不依赖于其他数据源,Java客户端不需要停机等待数据迁移,网络传输占用带宽较小。只是scroll查询和bulk提交这部分,数据量大时需要依赖一些客户端工具。
补充一点
在Java客户端或其他客户端访问Elasticsearch集群时,使用别名是一个好习惯。
方案三:Reindex API方案
Elasticsearch v6.3.1已经支持Reindex API,它对scroll、bulk做了一层封装,能够对文档重建索引而不 需要任何插件或外部工具。
注意: 如果不手动创建新索引book_new的mapping信息,那么Elasticsearch将启动自动映射模板对数 据进行类型映射,可能不是期望的类型,这点要注意一下
POST _reindex?wait_for_completion=false
{
  "source": {
    "index": "book"
  },
  "dest": {
    "index": "book_new"
  }
}
输出
{
  "took": 180,
  "timed_out": false,
  "total": 4,
  "updated": 0,
  "created": 4,
  "deleted": 0,
  "batches": 1,
  "version_conflicts": 0,
  "noops": 0,
  "retries": {
    "bulk": 0,
    "search": 0
  },
  "throttled_millis": 0,
  "requests_per_second": -1,
  "throttled_until_millis": 0,
  "failures": []
}
重建特定字段
POST _reindex?wait_for_completion=false
{
  "source": {
    "index": "my_index_name",
    "_source": ["field_name_1", "field_name_2"]
  },
  "dest": {
    "index": "my_index_name_new"
  }
}
version_type 属性
使用reindex api也是创建快照后再执行迁移的,这样目标索引的数据可能会与原索引有差异, version_type属性可以决定乐观锁并发处理的规则。
reindex api可以设置version_type属性,如下:
POST _reindex?wait_for_completion=false
{
  "source": {
    "index": "book"
  },
  "dest": {
    "index": "book_new",
    "version_type": "internal"
  }
}
version_type属性含义如下:
- internal:直接拷贝文档到目标索引,对相同的type、文档ID直接进行覆盖,默认值
external:迁移文档到目标索引时,保留version信息,对目标索引中不存在的文档进行创建,已 存在的文档按version进行更新,遵循乐观锁机制。
op_type 属性和conflicts 属性
如果op_type设置为create,那么迁移时只在目标索引中创建ID不存在的文档,已存在的文档,会提示 错误,如下请求:
POST _reindex?wait_for_completion=false
{
"source": {
  "index": "book"
},
"dest": {
  "index": "book_new",
  "op_type": "create"
}
}
有错误提示的响应,节选部分:
{
"took": 11,
"timed_out": false,
"total": 5,
"updated": 0,
"created": 1,
"deleted": 0,
"batches": 1,
"version_conflicts": 4,
"noops": 0,
"retries": {
  "bulk": 0,
  "search": 0
},
"throttled_millis": 0,
"requests_per_second": -1,
"throttled_until_millis": 0,
"failures": [
  {
    "index": "book_new",
    "type": "children",
    "id": "2",
    "cause": {
      "type": "version_conflict_engine_exception",
      "reason": "[children][2]: version conflict, document already exists (current version [17])",
      "index_uuid": "dODetUbATTaRL-p8DAEzdA",
      "shard": "2",
      "index": "book_new"
    },
    "status": 409
  }
]
}
默认情况下,版本冲突会导致 reindex 终止
如果加上”conflicts”: “proceed”配置项,那么冲突信息将不展示,只展示冲突的文档数量,请求和响应
结果将变成这样:
请求:POST _reindex?wait_for_completion=false { "conflicts": "proceed", "source": { "index": "book" }, "dest": { "index": "book_new", "op_type": "create" } }响应
{
"took": 12,
"timed_out": false,
"total": 5,
"updated": 0,
"created": 1,
"deleted": 0,
"batches": 1,
"version_conflicts": 4,
"noops": 0,
"retries": {
  "bulk": 0,
  "search": 0
},
"throttled_millis": 0,
"requests_per_second": -1,
"throttled_until_millis": 0,
"failures": []
}
query支持
reindex api支持数据过滤、数据排序、size设置、_source选择等,也支持脚本执行
POST _reindex?wait_for_completion=false
{
"size": 100,
"source": {
  "index": "book",
  "query": {
    "term": {
      "language": "english"
    }
  },
  "sort": {
    "likes": "desc"
  }
},
"dest": {
  "index": "book_new"
}
}
迁移过程中修改文档
reindex 操作支持通过脚本修改文档,不同于 _update_by_query 的是,允许通过脚本修改文档元数据。
增加源索引中 field_value 字段值等于 value 的源文档的版本号,并删除此字段,然后再把数据复制到目标索引POST _reindex { "conflicts": "proceed", "source": { "index": "source_index" }, "dest": { "index": "target_index", "version_type": "external" }, "script": { "inline": "if (ctx._source.field_value == 'value') {ctx._version++; ctx._source.remove('field_value')}", "lang": "painless" } }修改字段名称
将文档从源索引复制到目标索引,同时修改源索引中 old_field 字段名称为 new_field 后,再写入目标索引:
POST _reindex
{
"conflicts": "proceed",
"source": {
  "index": "source_index"
},
"dest": {
  "index": "target_index"
},
"script":{
  "inline":"ctx._source.new_field = ctx._source.remove(\"old_field\")"
}
}
多并发迁移
Reindex 支持 Sliced Scroll,分两种方式:
Manual slicing(手动切片)
- Automatic slicing(自动切片)
将文档从源索引复制到目标索引,5 个并发同时 reindex:
POST _reindex?slices=5
{
  "conflicts": "proceed",
  "source": {
    "index": "source_index"
  },
  "dest": {
    "index": "target_index"
  }
}
注意:
slices 后面的数字,建议与源索引的主分片数保持一致,这样 reindex 速度最快。
ES 官方对 slices 的一些建议:
- 不要使用较大的数字,500 有可能导致 CPU 崩溃;
- 从查询性能角度看,在源索引中使用分片数量的倍数更有效;
- 从查询性能角度看,使用与源索引中分片数量一样多的 slices 最有效。
设置副本
es中,数据的分片数是不允许被修改的,因为涉及路由的问题,但是副本数是可以被修改的。
数据写入的同时,会同时生成副本。如果一台主机,既要写入主数据,又要写入其他数据的副本数据,这个写入性能肯定是要打折扣的,所以,副本可以在写入操作的时候进行关闭。
等数据写完之后,重新设置副本数,这时候就只需要进行简单的数据复制就可以了,也不会有倒排索引等操作。
PUT /websites/_settings
{
    "number_of_replicas": 0
}
提升批量写入的大小值
默认情况下,_reindex使用1000进行批量操作,您可以在source中调整batch_size
POST _reindex
{
  "source": {
    "index": "source",
    "size": 5000
  },
  "dest": {
    "index": "dest",
    "routing": "=cat"
  }
}
从远程集群reindex
reindex 操作支持从远程 ES 集群进行文档复制:
POST _reindex
{
  "source": {
    "remote": {
      "host": "http://otherhost:9200",
      "username": "user",
      "password": "pass"
    },
    "index": "source",
    "query": {
      "match_all": {}
    }
  },
  "dest": {
    "index": "dest"
  }
}
host 参数必须包含 scheme,host,port(eg:https://hostsname:http_port);用户名和密码是可选参数,如果存在,reindex 将使用 basic auth 连接远程 ES 节点,使用 basic auth 时务必使用 https,否则密码将以纯文本发送。
其中,源集群(远程集群)必须在 elasticsearch.yml 配置文件中添加白名单:
reindex.remote.whitelist: ["host1:http_port,host2:http_port,127.0.10.*:http_port"]
使用跨集群迁移的方式,可以从任何版本的远程集群复制数据,在当前集群重新索引文档。
从远程服务器重新索引时使用堆上缓冲区,该缓冲区默认最大 100MB,如果远程索引包含非常大的文档时,默认每批次 size 为 1000,可能会报异常【Remote responded with a chunk that was too large.Use a smaller batch size.】,此时需要设置更小的批 size。
还可以使用 socket_timeout 设置远程连接的套接字读取超时,使用 connect_timeout 设置连接超时。两者默认都是 30s。
POST _reindex
{
  "source": {
    "remote": {
      "host": "http://otherhost:9200",
      "socket_timeout": "1m",
      "connect_timeout": "10s",
      "size": 100
    },
    "index": "source",
    "query": {
      "match_all": {}
    }
  },
  "dest": {
    "index": "dest"
  }
}
每批次迁移 5-15MB 数据时效率最高,与文档数量无关; 跨集群迁移,不支持设置多个 remote host,也不支持多并发迁移。
URL参数
除了 pretty 等标准参数外,Reindex API 还支持 refresh,wait_for_completion,wait_for_active_shards,timeout,requests_per_second 。
wait_for_active_shards
这个参数是指,索引请求返回前需要等待多少个分片写入成功,默认是1,只要主分片写入成功就返回,最大值是副本是加1(number_of_replicas+1),也就是等待主分片和副本都写入成功,请求才返回,代价当然是写入线程会阻塞
发送 refresh url 参数时,会刷新请求写入的所有索引。与 Index API 的 refresh 参数不同,后者只刷新接收到新数据的 shard
[
](https://blog.csdn.net/qingmou_csdn/article/details/106275097)
多索引多类型
POST _reindex
{
  "conflicts": "proceed",
  "source": {
    "index": ["source_index_1","source_index_2"],
    "type": ["source_index_1_type","source_index_2_type"]
  },
  "dest": {
    "index": "target_index_together"
  }
}
将 source_index_1/source_index_1_type 和 source_index_2/source_index_2_type 的文档复制到 target_index_together 索引中。
如果两个索引中存在主键相同的文档,因迭代顺序无法确定,亦无法预测目标索引中哪个文档将继续存在。
重命名
# 创建
POST /_aliases
{
    "actions" : [
        { "add" : { "index" : "test1", "alias" : "alias1" } }
    ]
}

# 删除
POST /_aliases
{
    "actions" : [
        { "remove" : { "index" : "test1", "alias" : "alias1" } }
    ]
}

# 重命名
# 重命名别名是一个简单的删除然后指向新的索引。这个操作是原子性的,因此不需要担心短时间内的别名不指向一个索引
POST /_aliases
{
    "actions" : [
        { "remove" : { "index" : "test1", "alias" : "alias1" } },
        { "add" : { "index" : "test2", "alias" : "alias1" } }
    ]
}
查看结果
GET book_new/_count
Task API
GET Task
当需要复制的文档数量很庞大时(30s 无法结束时就会返回超时信息),需要从集群中获取当前正在执行的 reindex 任务:
GET _tasks?actions=*reindex
GET _tasks?detailed=true&actions=*reindex
detailed=true:表示返回详细信息,包括 reindex 操作开始的时间、持续时间、复制流向、已复制文档数等
使用任务 ID 直接查找任务:
GET _tasks/taskId:number
使用任务 ID 直接查找任务时,可以与 wait_for_completion=false 集成。如果任务已完成,并且对其设置了 wait_for_completion=false,则返回结果或错误信息。而此功能的代价则是将任务信息存储在 ES 系统索引 .tasks/task/${taskId} 中,由操作者来决定何时删除此文件。
POST _reindex?wait_for_completion=false
{
  "conflicts":"proceed",
  "source":{
    "index":"intest01"
  },
  "dest":{
    "index":"intest08"
  }
}
返回:
{
  "task": "9f3iS6DOQEifLfECqTM9Fw:546249049"
}
使用任务 ID 直接查找任务:
GET _tasks/9f3iS6DOQEifLfECqTM9Fw:546249049
返回:
{
  "completed": true,
  "task": {
    "node": "9f3iS6DOQEifLfECqTM9Fw",
    "id": 546249049,
    "type": "transport",
    "action": "indices:data/write/reindex",
    "status": {
      "total": 5,
      "updated": 5,
      "created": 0,
      "deleted": 0,
      "batches": 1,
      "version_conflicts": 0,
      "noops": 0,
      "retries": {
        "bulk": 0,
        "search": 0
      },
      "throttled_millis": 0,
      "requests_per_second": -1,
      "throttled_until_millis": 0
    },
    "description": "reindex from [intest01] to [intest08]",
    "start_time_in_millis": 1590110224192,
    "running_time_in_nanos": 33214557,
    "cancellable": true
  },
  "response": {
    "took": 33,
    "timed_out": false,
    "total": 5,
    "updated": 5,
    "created": 0,
    "deleted": 0,
    "batches": 1,
    "version_conflicts": 0,
    "noops": 0,
    "retries": {
      "bulk": 0,
      "search": 0
    },
    "throttled_millis": 0,
    "requests_per_second": -1,
    "throttled_until_millis": 0,
    "failures": []
  }
}
此时有个大坑,官方文档中如此描述是存在问题的:
stackoverflow 对此的讨论:https://stackoverflow.com/questions/49439374/get-status-of-a-task-elasticsearch-for-a-long-running-update-query/50807976#50807976

The cost of this feature is the document that wait_for_completion=false creates at .tasks/task/${taskId}. It is up to you to delete that document.

当时试了 n 种方式,包括 Post _tasks/taskId:number/_cancel 取消任务,均无法删除上述操作中返回的任务(“task”: “9f3iS6DOQEifLfECqTM9Fw:546249049”)。而且通过 GET _cat/tasks?v 命令,也可以清晰的看到存在此任务:
action                         task_id                          parent_task_id                   type      start_time    timestamp running_time ip           node
cluster:monitor/tasks/lists    9f3iS6DOQEifLfECqTM9Fw:546282163 -                                transport * *  *  * *
cluster:monitor/tasks/lists[n] 9f3iS6DOQEifLfECqTM9Fw:546282164 9f3iS6DOQEifLfECqTM9Fw:546282163 direct    * *  *  * *
cluster:monitor/tasks/lists[n] JlmEFzeISZur8HYnmVnBRw:259590685 9f3iS6DOQEifLfECqTM9Fw:546282163 netty     * *  *  * *
cluster:monitor/tasks/lists[n] i3Vgp2ntSj-5sl3VuQROJw:244517045 9f3iS6DOQEifLfECqTM9Fw:546282163 netty     * *  *  * *


后来通过直接查询系统索引 GET .tasks/_search ,才发现 ${taskId} 实际指的是 task_id:number(9f3iS6DOQEifLfECqTM9Fw:546249049),而非 546249049 。

删除任务:DELETE .tasks/task/9f3iS6DOQEifLfECqTM9Fw:546249049
使用 cat 命令获取任务列表:
GET _cat/tasks
GET _cat/tasks?detailed
Cancel Task
取消某个正在运行的任务:
POST _tasks/node_id:task_id/_cancel
注意:
不是所有正在运行的任务,都可以取消,reindex 和 delete_by_query 可以取消,像 merge 操作就不可取消。在获取到正在运行的任务信息时,其中参数 “cancellable”: true 为 true 才表示此任务可以取消。
另外,多并发 reindex 时,会返回很多个 task,其中有一个 parent task,如果取消了 parent task,则此次 reindex 的所有 task 都会取消,如果只想取消单个 task 以降低 reindex 的速度,则要注意不要选中了 parent task(任务信息中有相关参数描述此 task_id 是否是 parent task)。
查看当前所有迁移任务
GET _tasks?detailed=true&actions=*reindex

取消单个迁移任务
POST _tasks/node_id:task_id/_cancel

取消节点 node_id1, node_id2 上的所有迁移任务
POST _tasks/_cancel?nodes=node_id1,node_id2&actions=*reindex

取消全部的迁移任务
POST _tasks/_cancel?actions=*reindex

取消全部的删除数据任务
POST _tasks/_cancel?actions=*delete/byquery
Wait for a specific task to complete
阻塞 10s,直到 node_id:task_id 任务完成:
GET _tasks/node_id:task_id?wait_for_completion=true&timeout=10s
阻塞 10s,直到所有的 reindex 任务完成:
GET _tasks?actions=*reindex&wait_for_completion=true&timeout=10s

若有收获,就点个赞吧
0 人点赞
