1. Day10 购物车渲染
2. SpringSecurity权限控制

用户每次访问微服务的时候,先去oauth2.0服务登录,登录后再访问微服务网关,微服务网关将请求转发给其他微服务处理。
由于我们项目使用了微服务,任何用户都有可能使用任意微服务,此时我们需要控制相关权限,例如:普通用户角色不能使用用户的删除操作,只有管理员才可以使用,那么这个时候就需要使用到SpringSecurity的权限控制功能了。
2.1. 角色权限控制
在每个微服务中,需要获取用户的角色,然后根据角色识别是否允许操作指定的方法,Spring Security中定义了四个支持权限控制的表达式注解,分别是@PreAuthorize、@PostAuthorize、@PreFilter和@PostFilter。其中前两者可以用来在方法调用前或者调用后进行权限检查,后两者可以用来对集合类型的参数或者返回值进行过滤。在需要控制权限的方法上,我们可以添加@PreAuthorize注解,用于方法执行前进行权限检查,校验用户当前角色是否能访问该方法。
开启@PreAuthorize
在changgou-user-service的ResourceServerConfig类上添加@EnableGlobalMethodSecurity注解,用于开启@PreAuthorize的支持,
方法权限控制
在changgoug-service-user微服务的com.changgou.user.controller.UserController类的delete()方法上添加权限控制注解@PreAuthorize
测试接口 由于我们令牌用户不是admin无法进行服务访问

如果希望一个方法能被多个角色访问,置:@PreAuthorize("hasAnyAuthority('admin','user')")
如果希望一个类都能被多个角色访问,在类上配置:@PreAuthorize("hasAnyAuthority('admin','user')")
3. 购物车
购物车分为用户登录购物车和未登录购物车操作,国内知名电商京东用户登录和不登录都可以操作购物车,如果用户不登录,操作购物车可以将数据存储到Cookie,用户登录后购物车数据可以存储到Redis中,再将之前未登录加入的购物车合并到Redis中即可。
淘宝天猫则采用了另外一种实现方案,用户要想将商品加入购物车,必须先登录才能操作购物车。
我们今天实现的购物车是天猫解决方案,即用户必须先登录才能使用购物车功能。
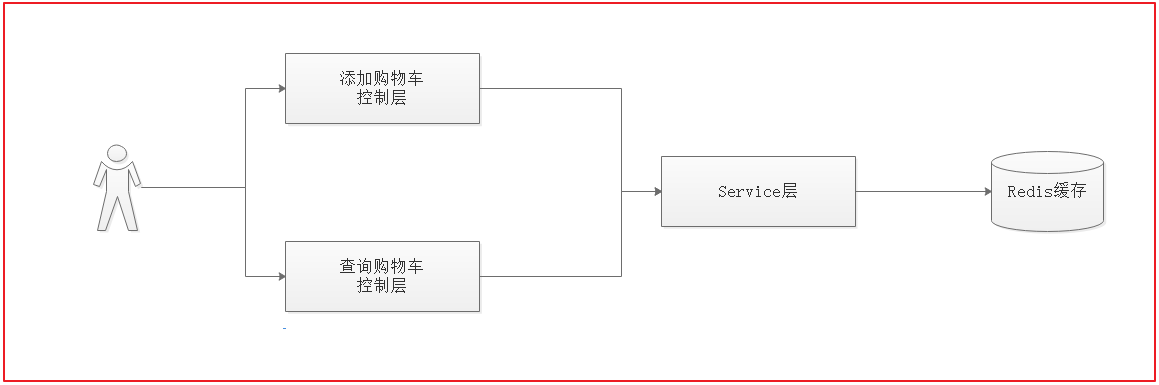
我们实现的是用户登录后的购物车,用户将商品加入购物车的时候,直接将要加入购物车的详情存入到Redis即可。每次查看购物车的时候直接从Redis中获取。
用户登录后将商品加入购物车,需要存储商品详情以及购买数量,购物车详情表如下:
changgou_order数据中tb_order_item表:
CREATE TABLE `tb_order_item` (`id` varchar(20) COLLATE utf8_bin NOT NULL COMMENT 'ID',`category_id1` int(11) DEFAULT NULL COMMENT '1级分类',`category_id2` int(11) DEFAULT NULL COMMENT '2级分类',`category_id3` int(11) DEFAULT NULL COMMENT '3级分类',`spu_id` varchar(20) COLLATE utf8_bin DEFAULT NULL COMMENT 'SPU_ID',`sku_id` bigint(20) NOT NULL COMMENT 'SKU_ID',`order_id` bigint(20) NOT NULL COMMENT '订单ID',`name` varchar(200) COLLATE utf8_bin DEFAULT NULL COMMENT '商品名称',`price` int(20) DEFAULT NULL COMMENT '单价',`num` int(10) DEFAULT NULL COMMENT '数量',`money` int(20) DEFAULT NULL COMMENT '总金额',`pay_money` int(11) DEFAULT NULL COMMENT '实付金额',`image` varchar(200) COLLATE utf8_bin DEFAULT NULL COMMENT '图片地址',`weight` int(11) DEFAULT NULL COMMENT '重量',`post_fee` int(11) DEFAULT NULL COMMENT '运费',`is_return` char(1) COLLATE utf8_bin DEFAULT NULL COMMENT '是否退货',PRIMARY KEY (`id`),KEY `item_id` (`sku_id`),KEY `order_id` (`order_id`)) ENGINE=InnoDB DEFAULT CHARSET=utf8 COLLATE=utf8_bin;
3.1. 添加购物车
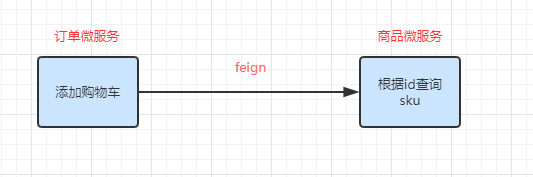
- 定义feign接口
在changou_service_goods_api下的feign包的SkuFeign添加方法@GetMapping("/sku/{id}")public Result findById(@PathVariable String id);
- 订单服务添加依赖 changgou_service_order添加依赖
<dependency><groupId>com.changgou</groupId><artifactId>changgou_service_goods_api</artifactId><version>1.0-SNAPSHOT</version></dependency>
- 在 changgou_service_order启动类添加开启feign扫描
@EnableFeignClients(basePackages = "com.changgou.goods.feign")
- 订单服务新建cartService 实现添加购物车 ```java package com.changgou.order.service;
import java.util.Map;
public interface CartService {
//添加购物车void addCart(String skuId, Integer num, String username);//查询购物车数据Map list(String username);
}
5.impl```javapackage com.changgou.order.service.impl;import com.changgou.goods.feign.SkuFeign;import com.changgou.goods.feign.SpuFeign;import com.changgou.goods.pojo.Sku;import com.changgou.goods.pojo.Spu;import com.changgou.order.pojo.OrderItem;import com.changgou.order.service.CartService;import org.springframework.beans.factory.annotation.Autowired;import org.springframework.data.redis.core.RedisTemplate;import org.springframework.stereotype.Service;import java.util.HashMap;import java.util.List;import java.util.Map;@Servicepublic class CartServiceImpl implements CartService {private static final String CART = "cart_";@Autowiredprivate RedisTemplate redisTemplate;@Autowiredprivate SkuFeign skuFeign;@Autowiredprivate SpuFeign spuFeign;@Overridepublic void addCart(String skuId, Integer num, String username) {//1.查询redis中相对应的商品信息OrderItem orderItem = (OrderItem) redisTemplate.boundHashOps(CART + username).get(skuId);if (orderItem != null) {//2.如果当前商品在redis中存在 则更新商品的数量和价格orderItem.setNum(orderItem.getNum() + num); //更新数量orderItem.setMoney(orderItem.getNum() * orderItem.getPrice()); //总价orderItem.setPayMoney(orderItem.getNum() * orderItem.getPrice()); //实付金额} else {//3.如果当前商品在redis中不存在 将商品添加到redis中Sku sku = skuFeign.findById(skuId).getData();Spu spu = spuFeign.findSpuById(sku.getSpuId()).getData();//封装orderItemorderItem = this.sku2OrderItem(sku, spu, num);}//3.将orderItem添加到redis中redisTemplate.boundHashOps(CART + username).put(skuId, orderItem);}//查询购物车列表数据@Overridepublic Map list(String username) {Map map = new HashMap();List<OrderItem> orderItemList = redisTemplate.boundHashOps(CART + username).values();map.put("orderItemList", orderItemList);//商品的总数量和总价格Integer totalNum = 0;Integer totalMoney = 0;for (OrderItem orderItem : orderItemList) {totalMoney += orderItem.getMoney();totalNum += orderItem.getNum();}map.put("totalNum",totalNum);map.put("totalMoney",totalMoney);return map;}private OrderItem sku2OrderItem(Sku sku, Spu spu, Integer num) {OrderItem orderItem = new OrderItem();orderItem.setCategoryId1(spu.getCategory1Id());orderItem.setCategoryId2(spu.getCategory2Id());orderItem.setCategoryId3(spu.getCategory3Id());orderItem.setSpuId(spu.getId());orderItem.setSkuId(sku.getId());orderItem.setName(sku.getName());orderItem.setPrice(sku.getPrice());orderItem.setNum(num);orderItem.setMoney(orderItem.getPrice() * num);orderItem.setPayMoney(orderItem.getPrice() * num);orderItem.setImage(sku.getImage());orderItem.setWeight(sku.getWeight() * num);return orderItem;}}
- controller ```java package com.changgou.order.controller;
import com.changgou.entity.Result; import com.changgou.entity.StatusCode; import com.changgou.order.service.CartService; import org.springframework.beans.factory.annotation.Autowired; import org.springframework.web.bind.annotation.*;
import java.util.Map;
@RestController @RequestMapping(“/cart”) public class CartController {
@Autowiredprivate CartService cartService;@GetMapping("/addCart")public Result addCart(@RequestParam("skuId") String skuId, @RequestParam("num") Integer num) {//动态获取当前人信息String username = "itheima";cartService.addCart(skuId, num, username);return new Result(true, StatusCode.OK, "加入购物车成功");}@GetMapping("/list")public Map list() {//动态获取当前用户信息String username = "itheima";Map map = cartService.list(username);return map;}
}
<a name="d2a9589e"></a># 4. 购物车渲染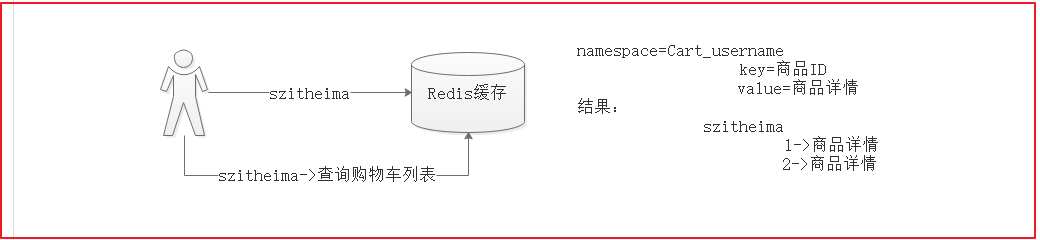接着我们实现一次购物车列表操作。因为存的时候是根据用户名往Redis中存储用户的购物车数据的,所以我们这里可以将用户的名字作为key去Redis中查询对应的数据。在changgou_web中搭建订单购物车微服务工程`changgou_web_order`,该工程主要实现购物车和订单的渲染操作。 pom.xml依赖```xml<dependencies><dependency><groupId>com.changgou</groupId><artifactId>changgou_service_order_api</artifactId><version>1.0-SNAPSHOT</version></dependency><dependency><groupId>com.changgou</groupId><artifactId>changgou_common</artifactId><version>1.0-SNAPSHOT</version></dependency><dependency><groupId>org.springframework.boot</groupId><artifactId>spring-boot-starter-thymeleaf</artifactId></dependency></dependencies>
application
server:port: 9011spring:application:name: order-webmain:allow-bean-definition-overriding: true #当遇到同样名字的时候,是否允许覆盖注册thymeleaf:cache: falseeureka:client:service-url:defaultZone: http://127.0.0.1:6868/eurekainstance:prefer-ip-address: truefeign:hystrix:enabled: trueclient:config:default: #配置全局的feign的调用超时时间 如果 有指定的服务配置 默认的配置不会生效connectTimeout: 60000 # 指定的是 消费者 连接服务提供者的连接超时时间 是否能连接 单位是毫秒readTimeout: 80000 # 指定的是调用服务提供者的 服务 的超时时间() 单位是毫秒#hystrix 配置hystrix:command:default:execution:timeout:#如果enabled设置为false,则请求超时交给ribbon控制enabled: trueisolation:strategy: SEMAPHOREthread:# 熔断器超时时间,默认:1000/毫秒timeoutInMilliseconds: 80000#请求处理的超时时间ribbon:ReadTimeout: 4000#请求连接的超时时间ConnectTimeout: 3000
启动类 OrderWebApplication
package com.changgou.web.order;import org.springframework.boot.SpringApplication;import org.springframework.boot.autoconfigure.SpringBootApplication;import org.springframework.cloud.netflix.eureka.EnableEurekaClient;import org.springframework.cloud.openfeign.EnableFeignClients;@SpringBootApplication@EnableEurekaClient@EnableFeignClients(basePackages = {"com.changgou.order.feign"})public class OrderWebApplication {public static void main(String[] args) {SpringApplication.run(OrderWebApplication.class,args);}}
静态资源拷贝

4.1. 购物车列表渲染
在changgou_service_order_api中添加CartFeign接口,并在接口中创建添加购物车和查询购物车列表
package com.changgou.order.feign;import com.changgou.entity.Result;import org.springframework.cloud.openfeign.FeignClient;import org.springframework.web.bind.annotation.GetMapping;import org.springframework.web.bind.annotation.RequestParam;import java.util.Map;@FeignClient(name = "order")public interface CartFeign {@GetMapping("/cart/addCart")Result addCart(@RequestParam("skuId") String skuId, @RequestParam("num") Integer num);@GetMapping("/cart/list")public Map list();}
在changgou_web_order中创建com.changgou.order.controller.CartController
package com.changgou.web.order.controller;import com.changgou.entity.Result;import com.changgou.entity.StatusCode;import com.changgou.order.feign.CartFeign;import org.springframework.beans.factory.annotation.Autowired;import org.springframework.stereotype.Controller;import org.springframework.ui.Model;import org.springframework.web.bind.annotation.GetMapping;import org.springframework.web.bind.annotation.RequestMapping;import org.springframework.web.bind.annotation.ResponseBody;import org.springframework.web.bind.annotation.RestController;import java.util.HashMap;import java.util.Map;@Controller@RequestMapping("/wcart")public class CartController {@Autowiredprivate CartFeign cartFeign;//查询购物车@GetMapping("/list")public String list(Model model) {Map map = cartFeign.list();model.addAttribute("items", map);return "cart";}//添加购物车@GetMapping("/add")@ResponseBodypublic Result<Map> add(String id, Integer num) {cartFeign.addCart(id, num);Map map = cartFeign.list();return new Result<>(true, StatusCode.OK, "添加购物车成功", map);}}
4.2. 前端页面
第126行
<!-- vue loadlist --><div class="cart-list" v-for="item in items.orderItemList" :key="item.index"><ul class="goods-list yui3-g"><li class="yui3-u-1-24"><input type="checkbox" name="chk_list" id="" value="" /></li><li class="yui3-u-6-24"><div class="good-item"><div class="item-img"><img :src="item.image" /></div><div class="item-msg"></div></div></li><li class="yui3-u-5-24"><div class="item-txt">{{item.name}}</div></li><li class="yui3-u-1-8"><span class="price">{{item.price}}</span></li><li class="yui3-u-1-8"><a href="javascript:void(0)" @click="add(item.skuId,-1)" class="increment mins">-</a><input autocomplete="off" type="text" v-model="item.num" @blur="add(item.skuId,item.num)" value="1" minnum="1" class="itxt" /><a href="javascript:void(0)" @click="add(item.skuId,1)" class="increment plus">+</a></li><li class="yui3-u-1-8"><span class="sum">{{item.num*item.price}}</span></li><li class="yui3-u-1-8"><a href="#none">删除</a><br /><a href="#none">移到收藏</a></li></ul></div></div></div></div><div class="cart-tool"><div class="select-all"><input class="chooseAll" type="checkbox" /><span>全选</span></div><div class="option"><a href="#none">删除选中的商品</a><a href="#none">移到我的关注</a><a href="#none">清除下柜商品</a></div><div class="money-box"><div class="chosed">已选择<span>{{items.totalNum}}</span>件商品</div><div class="sumprice"><span><em>总价(不含运费) :</em><i class="summoney">¥{{items.totalMoney}}</i></span><span><em>已节省:</em><i>-¥20.00</i></span></div><div class="sumbtn"><a class="sum-btn" href="getOrderInfo.html" target="_blank">结算</a></div></div></div>
vue实例
<script th:inline="javascript">var app = new Vue({el: '#app',data() {return {items: [[${items}]]}},methods:{add:function (skuId, num) {axios.get("/api/wcart/add?id="+skuId+"&num="+num).then(function (response) {if (response.data.flag){app.items=response.data.data}})}}})</script>
4.3. 购物车渲染服务、订单服务对接网关
添加两个微服务路由
#订单微服务- id: changgou_order_routeuri: lb://orderpredicates:- Path=/api/cart/**,/api/categoryReport/**,/api/orderConfig/**,/api/order/**,/api/orderItem/**,/api/orderLog/**,/api/preferential/**,/api/returnCause/**,/api/returnOrder/**,/api/returnOrderItem/**filters:- StripPrefix=1#购物车订单渲染微服务- id: changgou_order_web_routeuri: lb://order-webpredicates:- Path=/api/wcart/**,/api/worder/**filters:- StripPrefix=1
4.4. 如果商品数小于0则删除商品
我们发现个问题,就是用户将商品加入购物车,无论数量是正负,都会执行添加购物车,如果数量如果<=0,应该移除该商品的。
修改changgou-service-order的com.changgou.order.service.impl.CartServiceImpl的add方法
添加以下逻辑代码
if (orderItem.getNum() <= 0) {//删除改商品redisTemplate.boundHashOps(CART + username).delete(skuId);return;}
方法完整代码
@Overridepublic void addCart(String skuId, Integer num, String username) {//1.查询redis中相对应的商品信息OrderItem orderItem = (OrderItem) redisTemplate.boundHashOps(CART + username).get(skuId);if (orderItem != null) {//2.如果当前商品在redis中存在 则更新商品的数量和价格orderItem.setNum(orderItem.getNum() + num); //更新数量if (orderItem.getNum() <= 0) {//删除改商品redisTemplate.boundHashOps(CART + username).delete(skuId);return;}orderItem.setMoney(orderItem.getNum() * orderItem.getPrice()); //总价orderItem.setPayMoney(orderItem.getNum() * orderItem.getPrice()); //实付金额} else {//3.如果当前商品在redis中不存在 将商品添加到redis中Sku sku = skuFeign.findById(skuId).getData();Spu spu = spuFeign.findSpuById(sku.getSpuId()).getData();//封装orderItemorderItem = this.sku2OrderItem(sku, spu, num);}//3.将orderItem添加到redis中redisTemplate.boundHashOps(CART + username).put(skuId, orderItem);}
5. 订单服务对接oauth
将公钥复制到 changgou_service_order
添加依赖
<dependency><groupId>org.springframework.cloud</groupId><artifactId>spring-cloud-starter-oauth2</artifactId></dependency>
在order包下新建config包 创建 ResourceServerConfig
package com.changgou.order.config;import org.springframework.context.annotation.Bean;import org.springframework.context.annotation.Configuration;import org.springframework.core.io.ClassPathResource;import org.springframework.core.io.Resource;import org.springframework.security.config.annotation.method.configuration.EnableGlobalMethodSecurity;import org.springframework.security.config.annotation.web.builders.HttpSecurity;import org.springframework.security.oauth2.config.annotation.web.configuration.EnableResourceServer;import org.springframework.security.oauth2.config.annotation.web.configuration.ResourceServerConfigurerAdapter;import org.springframework.security.oauth2.provider.token.TokenStore;import org.springframework.security.oauth2.provider.token.store.JwtAccessTokenConverter;import org.springframework.security.oauth2.provider.token.store.JwtTokenStore;import java.io.BufferedReader;import java.io.IOException;import java.io.InputStreamReader;import java.util.stream.Collectors;@Configuration@EnableResourceServer//开启方法上的PreAuthorize注解@EnableGlobalMethodSecurity(prePostEnabled = true, securedEnabled = true)public class ResourceServerConfig extends ResourceServerConfigurerAdapter {//公钥private static final String PUBLIC_KEY = "public.key";/**** 定义JwtTokenStore* @param jwtAccessTokenConverter* @return*/@Beanpublic TokenStore tokenStore(JwtAccessTokenConverter jwtAccessTokenConverter) {return new JwtTokenStore(jwtAccessTokenConverter);}/**** 定义JJwtAccessTokenConverter* @return*/@Beanpublic JwtAccessTokenConverter jwtAccessTokenConverter() {JwtAccessTokenConverter converter = new JwtAccessTokenConverter();converter.setVerifierKey(getPubKey());return converter;}/*** 获取非对称加密公钥 Key* @return 公钥 Key*/private String getPubKey() {Resource resource = new ClassPathResource(PUBLIC_KEY);try {InputStreamReader inputStreamReader = new InputStreamReader(resource.getInputStream());BufferedReader br = new BufferedReader(inputStreamReader);return br.lines().collect(Collectors.joining("\n"));} catch (IOException ioe) {return null;}}/**** Http安全配置,对每个到达系统的http请求链接进行校验* @param http* @throws Exception*/@Overridepublic void configure(HttpSecurity http) throws Exception {//所有请求必须认证通过http.authorizeRequests().anyRequest().authenticated(); //其他地址需要认证授权}}
5.1. 微服务间认证

因为微服务之间并没有传递头文件,所以我们可以定义一个拦截器,每次微服务调用之前都先检查下头文件,将请求的头文件中的令牌数据再放入到header中,再调用其他微服务即可。

在changgou_common服务中创建一个com.changgou.interceptor.FeignInterceptor拦截器,并将所有头文件数据再次加入到Feign请求的微服务头文件中
package com.changgou.interceptor;import feign.RequestInterceptor;import feign.RequestTemplate;import org.springframework.stereotype.Component;import org.springframework.web.context.request.RequestAttributes;import org.springframework.web.context.request.RequestContextHolder;import org.springframework.web.context.request.ServletRequestAttributes;import javax.servlet.http.HttpServletRequest;import java.util.Enumeration;@Componentpublic class FeignInterceptor implements RequestInterceptor {@Overridepublic void apply(RequestTemplate requestTemplate) {//传递令牌RequestAttributes requestAttributes = RequestContextHolder.getRequestAttributes();if (requestAttributes != null) {HttpServletRequest request = ((ServletRequestAttributes) requestAttributes).getRequest();if (request != null) {Enumeration<String> headerNames = request.getHeaderNames();while (headerNames.hasMoreElements()) {String headerName = headerNames.nextElement();if ("authorization".equals(headerName)) {String headerValue = request.getHeader(headerName); //jwt令牌//传递令牌requestTemplate.header(headerName, headerValue);}}}}}}
更改changgou_order_web启动类,添加拦截器声明
@Beanpublic FeignInterceptor feignInterceptor() {return new FeignInterceptor();}
6. 动态获取当前登陆人
在changgou-common工程中引入鉴权包
<!--鉴权--><dependency><groupId>io.jsonwebtoken</groupId><artifactId>jjwt</artifactId><version>0.9.0</version><scope>provided</scope></dependency>
添加资源中的TokenDecode工具类到changgou-service-order微服务config包下,用于解密令牌信息
package com.changgou.order.config;import com.alibaba.fastjson.JSON;import org.springframework.core.io.ClassPathResource;import org.springframework.core.io.Resource;import org.springframework.security.core.context.SecurityContextHolder;import org.springframework.security.jwt.Jwt;import org.springframework.security.jwt.JwtHelper;import org.springframework.security.jwt.crypto.sign.RsaVerifier;import org.springframework.security.oauth2.provider.authentication.OAuth2AuthenticationDetails;import org.springframework.util.StringUtils;import java.io.BufferedReader;import java.io.IOException;import java.io.InputStreamReader;import java.util.Map;import java.util.stream.Collectors;public class TokenDecode {//公钥private static final String PUBLIC_KEY = "public.key";private static String publickey="";/**** 获取用户信息* @return*/public Map<String,String> getUserInfo(){//获取授权信息OAuth2AuthenticationDetails details = (OAuth2AuthenticationDetails) SecurityContextHolder.getContext().getAuthentication().getDetails();//令牌解码return dcodeToken(details.getTokenValue());}/**** 读取令牌数据*/public Map<String,String> dcodeToken(String token){//校验JwtJwt jwt = JwtHelper.decodeAndVerify(token, new RsaVerifier(getPubKey()));//获取Jwt原始内容String claims = jwt.getClaims();return JSON.parseObject(claims,Map.class);}/*** 获取非对称加密公钥 Key* @return 公钥 Key*/public String getPubKey() {if(!StringUtils.isEmpty(publickey)){return publickey;}Resource resource = new ClassPathResource(PUBLIC_KEY);try {InputStreamReader inputStreamReader = new InputStreamReader(resource.getInputStream());BufferedReader br = new BufferedReader(inputStreamReader);publickey = br.lines().collect(Collectors.joining("\n"));return publickey;} catch (IOException ioe) {return null;}}}
将该工具类以bean的形式声明到order服务中
package com.changgou;import com.changgou.order.config.TokenDecode;import org.springframework.boot.SpringApplication;import org.springframework.boot.autoconfigure.SpringBootApplication;import org.springframework.cloud.netflix.eureka.EnableEurekaClient;import org.springframework.cloud.openfeign.EnableFeignClients;import org.springframework.context.annotation.Bean;import tk.mybatis.spring.annotation.MapperScan;@SpringBootApplication@EnableEurekaClient@MapperScan(basePackages = {"com.changgou.order.dao"})@EnableFeignClients(basePackages = "com.changgou.goods.feign")public class OrderApplication {public static void main(String[] args) {SpringApplication.run( OrderApplication.class);}@Beanpublic TokenDecode tokenDecode(){return new TokenDecode();}}
在CartController中注入TokenDecode,并调用TokenDecode的getUserInfo方法获取用户信息,代码如下:
注入TokenDecode:
@Autowiredprivate TokenDecode tokenDecode;
@GetMapping("/addCart")public Result addCart(@RequestParam("skuId") String skuId, @RequestParam("num") Integer num) {//动态获取当前人信息// String username = "itheima";String username = tokenDecode.getUserInfo().get("username");cartService.addCart(skuId, num, username);return new Result(true, StatusCode.OK, "加入购物车成功");}@GetMapping("/list")public Map list() {//动态获取当前用户信息// String username = "itheima";String username = tokenDecode.getUserInfo().get("username");Map map = cartService.list(username);return map;}
7. 页面配置
7.1. 未登录时登录跳转
在用户没有登录的情况下,直接访问购物车页面,返回的只是个错误状态码,这个毫无意义,我们应该重定向到登录页面,让用户登录,我们可以修改网关的头文件,让用户每次没登录的时候,都跳转到登录页面。
修改changgou-gateway-web的com.changgou.filter.AuthorizeFilter
private static final String LOGIN_URL = "http://localhost:8001/api/oauth/toLogin";//跳转登陆页面private Mono<Void> toLoginPage(String loginUrl, ServerWebExchange exchange) {ServerHttpResponse response = exchange.getResponse();response.setStatusCode(HttpStatus.SEE_OTHER); //302response.getHeaders().set("Location", loginUrl);return response.setComplete();}
完整代码
package com.changgou.web.gateway.filter;import com.changgou.web.gateway.service.AuthService;import org.apache.commons.lang.StringUtils;import org.springframework.beans.factory.annotation.Autowired;import org.springframework.cloud.gateway.filter.GatewayFilterChain;import org.springframework.cloud.gateway.filter.GlobalFilter;import org.springframework.core.Ordered;import org.springframework.http.HttpStatus;import org.springframework.http.server.reactive.ServerHttpRequest;import org.springframework.http.server.reactive.ServerHttpResponse;import org.springframework.stereotype.Component;import org.springframework.web.server.ServerWebExchange;import reactor.core.publisher.Mono;@Componentpublic class AuthFilter implements GlobalFilter, Ordered {private static final String LOGIN_URL = "http://localhost:8001/api/oauth/toLogin";@Autowiredprivate AuthService authService;@Overridepublic Mono<Void> filter(ServerWebExchange exchange, GatewayFilterChain chain) {ServerHttpRequest request = exchange.getRequest();ServerHttpResponse response = exchange.getResponse();//1.判断请求路径是否为登陆请求 如果是 则直接放行String path = request.getURI().getPath();if ("/api/oauth/login".equals(path) || !URLFilter.hasAuthorize(path)) {//直接放行return chain.filter(exchange);}//2.不是登陆请求 从cookie中获取jti的值 如果值不存在 拒绝本次访问String jti = authService.getJtiFromCookie(request);if (StringUtils.isEmpty(jti)) {//为空 拒绝访问// response.setStatusCode(HttpStatus.UNAUTHORIZED);// return response.setComplete();//跳转到登陆页面return this.toLoginPage(LOGIN_URL, exchange);}//3.如果cookie中有jti的值 从redis中获取jwt的值 如果值不存在 拒绝本次访问String jwt = authService.getJwtFromRedis(jti);if (StringUtils.isEmpty(jwt)) {//过期或不存在 拒绝访问// response.setStatusCode(HttpStatus.UNAUTHORIZED);// return response.setComplete();//跳转到登陆页面return this.toLoginPage(LOGIN_URL, exchange);}//对当前的请求对象进行增强 让它携带令牌的信息request.mutate().header("Authorization", "Bearer " + jwt);return chain.filter(exchange);}//跳转登陆页面private Mono<Void> toLoginPage(String loginUrl, ServerWebExchange exchange) {ServerHttpResponse response = exchange.getResponse();response.setStatusCode(HttpStatus.SEE_OTHER); //302response.getHeaders().set("Location", loginUrl);return response.setComplete();}@Overridepublic int getOrder() {return 0;}}
7.1.1. 登录成功跳转原地址
刚才已经实现了未登录时跳转登录页,但是当登录成功后,并没有跳转到用户本来要访问的页面。
要实现这个功能的话,可以将用户要访问的页面作为参数传递到登录控制器,由登录控制器根据参数完成路径跳转
修改网关携带当前访问URI
修改changgou-gateway-web的com.changgou.filter.AuthorizeFilter,在之前的URL后面添加FROM参数以及FROM参数的值为request.getURI()
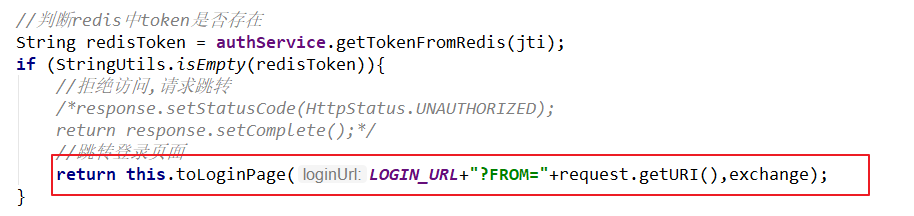
package com.changgou.web.gateway.filter;import com.changgou.web.gateway.service.AuthService;import org.apache.commons.lang.StringUtils;import org.springframework.beans.factory.annotation.Autowired;import org.springframework.cloud.gateway.filter.GatewayFilterChain;import org.springframework.cloud.gateway.filter.GlobalFilter;import org.springframework.core.Ordered;import org.springframework.http.HttpStatus;import org.springframework.http.server.reactive.ServerHttpRequest;import org.springframework.http.server.reactive.ServerHttpResponse;import org.springframework.stereotype.Component;import org.springframework.web.server.ServerWebExchange;import reactor.core.publisher.Mono;@Componentpublic class AuthFilter implements GlobalFilter, Ordered {private static final String LOGIN_URL = "http://localhost:8001/api/oauth/toLogin";@Autowiredprivate AuthService authService;@Overridepublic Mono<Void> filter(ServerWebExchange exchange, GatewayFilterChain chain) {ServerHttpRequest request = exchange.getRequest();ServerHttpResponse response = exchange.getResponse();//1.判断请求路径是否为登陆请求 如果是 则直接放行String path = request.getURI().getPath();if ("/api/oauth/login".equals(path) || !URLFilter.hasAuthorize(path)) {//直接放行return chain.filter(exchange);}//2.不是登陆请求 从cookie中获取jti的值 如果值不存在 拒绝本次访问String jti = authService.getJtiFromCookie(request);if (StringUtils.isEmpty(jti)) {//为空 拒绝访问// response.setStatusCode(HttpStatus.UNAUTHORIZED);// return response.setComplete();//跳转到登陆页面return this.toLoginPage(LOGIN_URL+"?FROM="+request.getURI().getPath(), exchange);}//3.如果cookie中有jti的值 从redis中获取jwt的值 如果值不存在 拒绝本次访问String jwt = authService.getJwtFromRedis(jti);if (StringUtils.isEmpty(jwt)) {//过期或不存在 拒绝访问// response.setStatusCode(HttpStatus.UNAUTHORIZED);// return response.setComplete();//跳转到登陆页面return this.toLoginPage(LOGIN_URL, exchange);}//对当前的请求对象进行增强 让它携带令牌的信息request.mutate().header("Authorization", "Bearer " + jwt);return chain.filter(exchange);}//跳转登陆页面private Mono<Void> toLoginPage(String loginUrl, ServerWebExchange exchange) {ServerHttpResponse response = exchange.getResponse();response.setStatusCode(HttpStatus.SEE_OTHER); //302response.getHeaders().set("Location", loginUrl);return response.setComplete();}@Overridepublic int getOrder() {return 0;}}
登录控制器获取参数
修改changgou-user-oauth的com.changgou.oauth.controller.LoginRedirect记录访问来源页
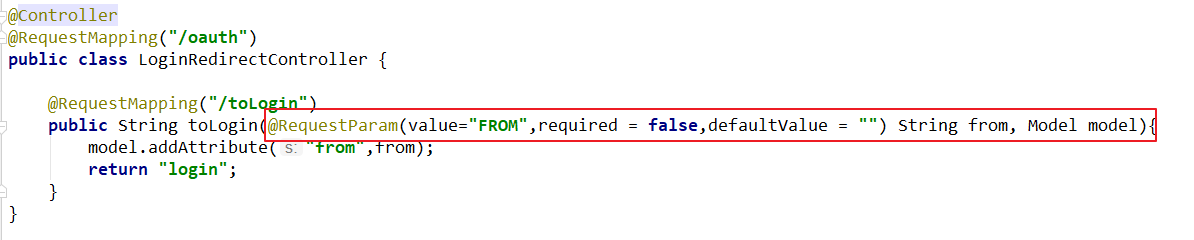
@RequestMapping("/toLogin")public String toLogin(@RequestParam(value = "FROM",required = false,defaultValue = "") String from, Model model){model.addAttribute("from",from);return "login";}
修改页面,获取来源页信息,并存到from变量中,登录成功后跳转到该地址

<script th:inline="javascript">var app = new Vue({el: "#app",data: {username: "",password: "",msg: "",from: [[${from}]],},methods: {login: function () {app.msg = "正在登录";axios.post("/api/oauth/login?username=" + app.username + "&password=" + app.password).then(function (response) {if (response.data.flag) {app.msg = "登录成功";//跳转原地址location.href = app.from} else {app.msg = "登录失败";}})}}})</script>

若有收获,就点个赞吧
0 人点赞
