- 1. Spring Cloud
- 2. 微服务
- 3. Spring Cloud 与 Dubbo 对比
- 4. 服务治理
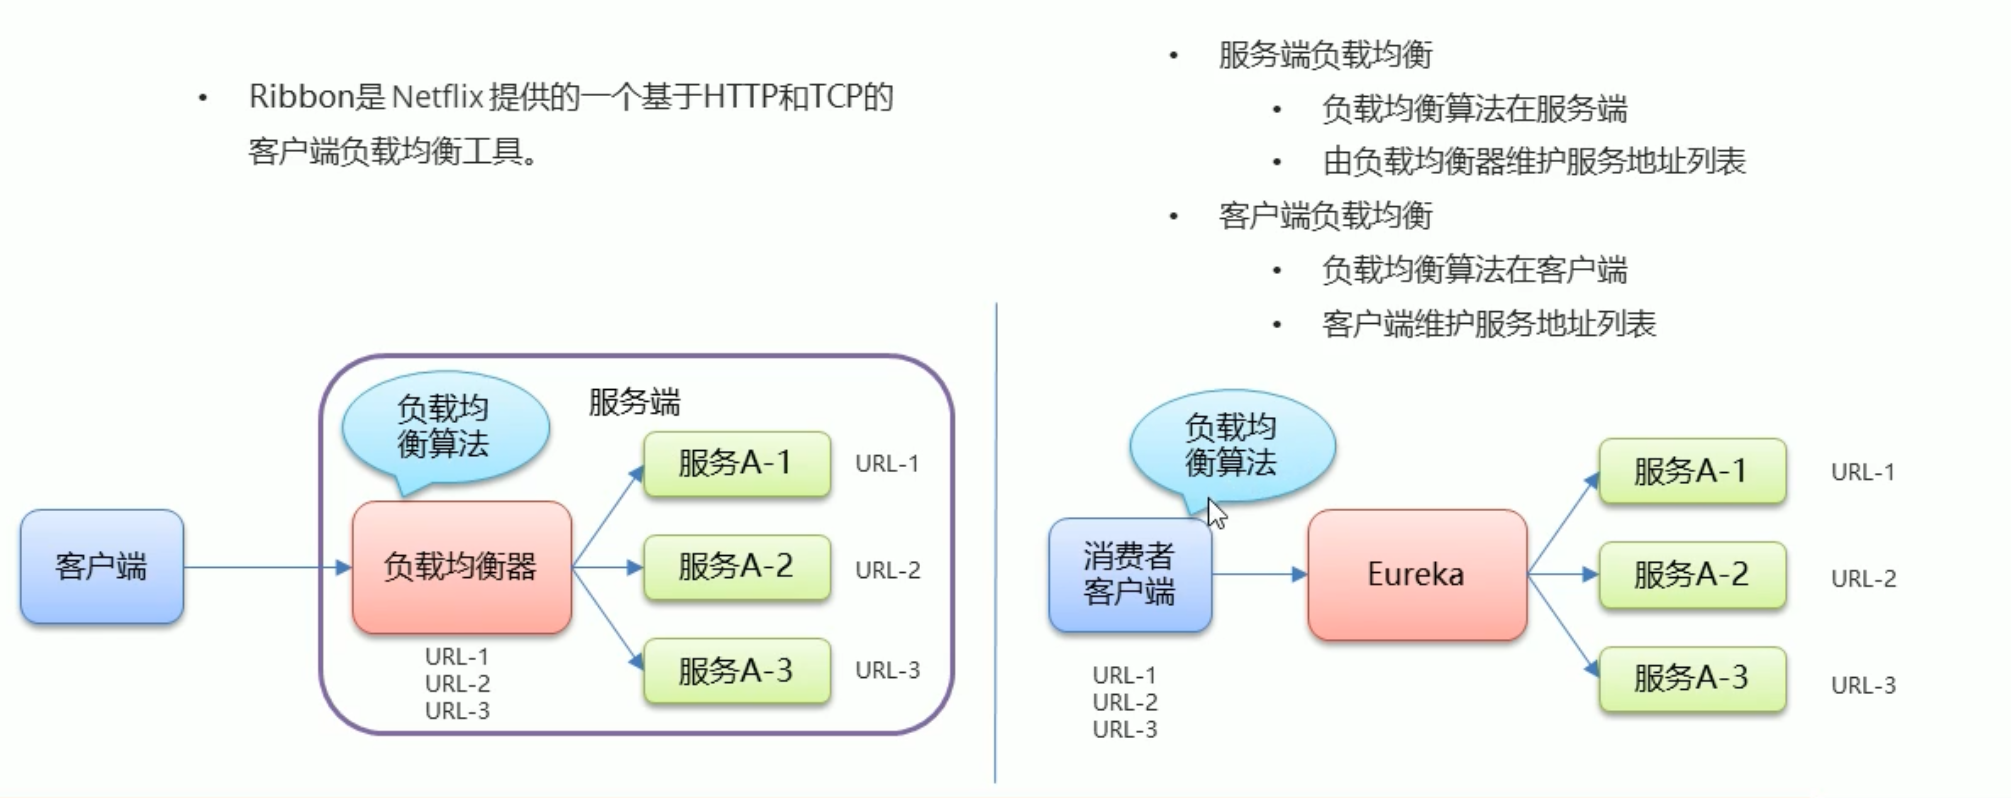
- 5. Ribbon 负载均衡
- 6. Feign 声明式服务调用
- 7. Hystrix 熔断器
- 网关配置
- 路由配置: 转发规则
- http://localhost:8001/ # 转发路径 服务提供方访问路径">uri: http://localhost:8001/ # 转发路径 服务提供方访问路径
- http://localhost:9000/ # 转发路径 服务提供方访问路径">uri: http://localhost:9000/ # 转发路径 服务提供方访问路径
- username: #如果是私有仓库则需要配置git的账号和密码
- password:
- 10. Bus 消息总线
- 11. Stream 消息驱动
- 12. Sleuth+Zipkin 链路追踪
1. Spring Cloud
Spring Cloud是一系列框架的有序集合
通过 Spring Boot 风格进行再封装屏蔽掉了复杂的配置和实现原理 最终给开发者留出了一套简单易懂 易部署 易维护的分布式系统开发工具包
2. 微服务

微服务它将一个原本独立的系统 拆分成为多个小型服务 并且这些小型服务都可以独立运行 服务之间可以进行通信协作
3. Spring Cloud 与 Dubbo 对比

- Dubbo只是实现了服务治理 而spring cloud子项目分别覆盖了微服务架构下的众多部件
- Dubbo使用 RPC 通信协议 Spring Cloud 使用 RESTful 完成通信 Dubbo 效率略高于 Spring Cloud
4. 服务治理
4.1. Eureka
Eureka 是 Netflix 公司开源的一个服务注册与发现的组件
Eureka 和 其他Netflix 公司的服务组件(如负载均衡 熔断器 网关等) 一起 被spring cloud 社区整合为 Spring-Cloud-Netflix 模块
Eureka 包含 Eueka Server(注册中心) 和 Eureka Client(服务提供者 服务器消费者)
4.1.1. server
引入eureka-server 和 spring web
<dependencies><dependency><groupId>org.springframework.boot</groupId><artifactId>spring-boot-starter-web</artifactId></dependency><!-- eureka-server --><dependency><groupId>org.springframework.cloud</groupId><artifactId>spring-cloud-starter-netflix-eureka-server</artifactId></dependency></dependencies>
application
server:port: 8761# eureka 配置#1.dashboard :eureka的web控制台配置#2.server :eureka的服务端配置#3.client :eureka的客户端配置#4.instance :eureka的实例配置eureka:instance:hostname: localhost # 主机名dashboard:enabled: true # 是否启用web控制台 默认为开启path: / # 默认路径为/ 访问http://localhost:8761/即可client:service-url:defaultZone: http://${eureka.instance.hostname}:${server.port}/eureka # eureka服务端地址 客户端用于访问服务端的地址register-with-eureka: false # 是否将自己的路径 注册到eureka上 默认为true 一般情况下只有provider client需要fetch-registry: false # 是否需要从eureka中抓取路径 默认为true 一般只有consumer client需要
启动类
package com.itheima.eureka;import org.springframework.boot.SpringApplication;import org.springframework.boot.autoconfigure.SpringBootApplication;import org.springframework.cloud.netflix.eureka.server.EnableEurekaServer;@SpringBootApplication//启用EurekaServer@EnableEurekaServerpublic class EurekaApp {public static void main(String[] args) {SpringApplication.run(EurekaApp.class, args);}}
4.1.2. provider
引入 eureka-client 和 spring web
<dependencies><dependency><groupId>org.springframework.boot</groupId><artifactId>spring-boot-starter-web</artifactId></dependency><!-- eureka-client --><dependency><groupId>org.springframework.cloud</groupId><artifactId>spring-cloud-starter-netflix-eureka-client</artifactId></dependency></dependencies>
application
server:port: 8000eureka:instance:hostname: localhost # 主机名client:service-url:defaultZone: http://localhost:8761/eureka # eureka服务端地址 客户端用于访问服务端的地址spring:application:name: eureka-provider # 设置当前应用的名称 将来在eureka的web控制台Application显示为该名称 将来需要该名称来获取路径
启动类
package com.itheima.provider;import org.springframework.boot.SpringApplication;import org.springframework.boot.autoconfigure.SpringBootApplication;import org.springframework.cloud.netflix.eureka.EnableEurekaClient;@SpringBootApplication//标记为 Eureka 客户端 在新版本中自动标记@EnableEurekaClientpublic class ProviderApp {public static void main(String[] args) {SpringApplication.run(ProviderApp.class, args);}}
并编写对应的dao层 domian对象 service层 controller层
并且能够远程调用获取数据 此时为了在Eureka上注册为应用使其他应用能够远程调用该服务
4.1.3. consumer
引入 eureka-client 和 spring web
<dependencies><dependency><groupId>org.springframework.boot</groupId><artifactId>spring-boot-starter-web</artifactId></dependency><!-- eureka-client --><dependency><groupId>org.springframework.cloud</groupId><artifactId>spring-cloud-starter-netflix-eureka-client</artifactId></dependency></dependencies>
application
server:port: 9000eureka:instance:hostname: localhost # 主机名client:service-url:defaultZone: http://localhost:8761/eureka # eureka服务端地址 客户端用于访问服务端的地址spring:application:name: eureka-consumer # 设置当前应用的名称 将来在eureka的web控制台Application显示为该名称 将来需要该名称来获取路径
启动类
package com.itheima.consumer;import org.springframework.boot.SpringApplication;import org.springframework.boot.autoconfigure.SpringBootApplication;import org.springframework.cloud.client.discovery.EnableDiscoveryClient;import org.springframework.cloud.netflix.eureka.EnableEurekaClient;@SpringBootApplication@EnableEurekaClient@EnableDiscoveryClient //激活DiscoveryClient 新版本可以忽略 自动激活public class ConsumerApp {public static void main(String[] args) {SpringApplication.run(ConsumerApp.class, args);}}
RestTemplateConfig类
package com.itheima.consumer.cnfig;import org.springframework.context.annotation.Bean;import org.springframework.context.annotation.Configuration;import org.springframework.web.client.RestTemplate;@Configurationpublic class RestTemplateConfig {@Beanpublic RestTemplate restTemplate(){return new RestTemplate();}}
controller层
package com.itheima.consumer.controller;import com.itheima.consumer.domain.Goods;import org.springframework.beans.factory.annotation.Autowired;import org.springframework.cloud.client.ServiceInstance;import org.springframework.cloud.client.discovery.DiscoveryClient;import org.springframework.web.bind.annotation.GetMapping;import org.springframework.web.bind.annotation.PathVariable;import org.springframework.web.bind.annotation.RequestMapping;import org.springframework.web.bind.annotation.RestController;import org.springframework.web.client.RestTemplate;import java.util.List;@RestController@RequestMapping("/order")public class OrderController {@Autowiredprivate RestTemplate restTemplate;@Autowiredprivate DiscoveryClient discoveryClient;@GetMapping("/goods/{id}")public Goods findGoodsById(@PathVariable("id") int id) {/*远程调用goods服务中的findone接口使用RestTemplate1.定义bean2.注入bean3.调用方法*//*动态从 Eureka server 中获取provide 的 ip 和端口1. 注入 DiscoveryClient 并在启动类注解激活2. 调用方法*/List<ServiceInstance> instances = discoveryClient.getInstances("EUREKA-PROVIDER"); //根据应用名在Eureka服务端中获取应用集合if (instances == null || instances.size() == 0) { //判断是否为空return null;}ServiceInstance instance = instances.get(0); //此处只有一个所以使用第一个String host = instance.getHost(); //获取ipint port = instance.getPort(); //获取端口System.out.println(host);System.out.println(port);String url = "http://" + host + ":" + port + "goods/findOne/" + id;Goods goods = restTemplate.getForObject(url, Goods.class);return goods;}}
4.1.4. 配置属性
4.1.4.1. instance

eureka:instance:hostname: localhost # 主机名prefer-ip-address: true # 以ip地址形式注册到eureka server中 默认为false 注册为主机名instance-id: ${eureka.instance.prefer-ip-address}:${spring.application.name}:${server.port} #设置在web控制台中应用id的名称
4.1.1. server

4.1.5. 高可用
每个server都是镜像相同的注册应用 如果其中一个宕机了 另外一个server仍然存活
设置多个eureka server 相互注册
server:port: 8762eureka:instance:hostname: eureka-server2 # 主机名dashboard:enabled: true # 是否启用web控制台 默认为开启path: / # 默认路径为/ 访问http://localhost:8761/即可client:service-url:defaultZone: http://127.0.0.1:8761/eureka # 两个eureka相互注册register-with-eureka: true # 是否将自己的路径 注册到eureka上 默认为true 一般情况下只有provider client需要fetch-registry: true # 是否需要从eureka中抓取路径 默认为true 一般只有consumer client需要spring:application:name: eureka-server-ha
在client中在多个server注册应用
server:port: 8000eureka:instance:hostname: localhost # 主机名client:service-url:defaultZone: http://localhost:8761/eureka,http://localhost:8762/eureka # eureka服务端地址 客户端用于访问服务端的地址spring:application:name: eureka-provider # 设置当前应用的名称 将来在eureka的web控制台Application显示为该名称 将来需要该名称来获取路径
4.2. Consul
Consul 是 由 HashiCorp 基于 Go 语言开发 支持多数据中心 分布式高可用的服务发布和注册服务软件
这里我们使用windows中的exe执行程序
启动
.\consul agent -dev
打开web管理界面
- 搭建provider 和 Consumer 服务
- 并配置好 RestTemplate 完成远程调用
consul客户端坐标 必须导入actuator组件
<!-- consul-client --><dependency><groupId>org.springframework.cloud</groupId><artifactId>spring-cloud-starter-consul-discovery</artifactId></dependency><dependency><groupId>org.springframework.boot</groupId><artifactId>spring-boot-starter-actuator</artifactId></dependency>
不需要在启动类中标价
只需要在application配置好consul属性
provider配置
server:port: 8000spring:cloud:consul:host: localhost # consul服务端 ipport: 8500 # 端口discovery:service-name: ${spring.application.name} # 应用名称prefer-ip-address: true # 以ip注册application:name: consul-provider # 应用名称
consumer配置
server:port: 9000spring:cloud:consul:host: localhost # consul服务端 ipport: 8500 # 端口discovery:service-name: ${spring.application.name} # 应用名称prefer-ip-address: true # 以ip注册application:name: consul-consumer # 应用名称
consumer的controller层还是一致
package com.itheima.consumer.controller;import com.itheima.consumer.domain.Goods;import org.springframework.beans.factory.annotation.Autowired;import org.springframework.cloud.client.ServiceInstance;import org.springframework.cloud.client.discovery.DiscoveryClient;import org.springframework.web.bind.annotation.GetMapping;import org.springframework.web.bind.annotation.PathVariable;import org.springframework.web.bind.annotation.RequestMapping;import org.springframework.web.bind.annotation.RestController;import org.springframework.web.client.RestTemplate;import java.util.List;@RestController@RequestMapping("/order")public class OrderController {@Autowiredprivate RestTemplate restTemplate;@Autowiredprivate DiscoveryClient discoveryClient;@GetMapping("/goods/{id}")public Goods findGoodsById(@PathVariable("id") int id) {/*远程调用goods服务中的findone接口使用RestTemplate1.定义bean2.注入bean3.调用方法*//*动态从 Eureka server 中获取provide 的 ip 和端口1. 注入 DiscoveryClient 并在启动类注解激活2. 调用方法*/List<ServiceInstance> instances = discoveryClient.getInstances("consul-provider"); //根据应用名在Eureka服务端中获取应用集合if (instances == null || instances.size() == 0) { //判断是否为空return null;}ServiceInstance instance = instances.get(0); //此处只有一个所以使用第一个String host = instance.getHost(); //获取ipint port = instance.getPort(); //获取端口System.out.println(host);System.out.println(port);String url = "http://" + host + ":" + port + "goods/findOne/" + id;Goods goods = restTemplate.getForObject(url, Goods.class);return goods;}}
consumer的controller层还是一致
4.3. Nacos
Nacos 是阿里巴巴的开源项目 专注于服务发现和配置管理微服务
Nacos = Spring Cloud 注册中心 + Spring Cloud配置中心
4.3.1. 启动
在bin目录下 以单机形式运行
启动命令(standalone代表着单机模式运行,非集群模式):
startup.cmd -m standalone
web管理页面
默认用户密码 为nacos
4.3.2. 入门案例
nacos坐标
<dependency><groupId>org.springframework.cloud</groupId><artifactId>spring-cloud-starter-alibaba-nacos-discovery</artifactId><version>0.2.2.RELEASE</version></dependency><dependency><groupId>com.alibaba.nacos</groupId><artifactId>nacos-client</artifactId><version>2.0.3</version></dependency>
provider配置
server:port: 8000spring:cloud:nacos:discovery:server-addr: 127.0.0.1:8848 # 配置nacos服务端地址和端口application:name: nacos-provider # 服务名称
consumer配置
server:port: 9000spring:cloud:nacos:discovery:server-addr: 127.0.0.1:8848 # 配置nacos服务端地址和端口application:name: nacos-consumer # 服务名称
consumer启动类
package com.itheima.consumer;import org.springframework.boot.SpringApplication;import org.springframework.boot.autoconfigure.SpringBootApplication;import org.springframework.cloud.client.discovery.EnableDiscoveryClient;@SpringBootApplication@EnableDiscoveryClientpublic class ConsumerApp {public static void main(String[] args) {SpringApplication.run(ConsumerApp.class, args);}}
5. Ribbon 负载均衡
5.1. 简化ResTemplate调用
之前我们Eureka通过ResTemplate获取一个应用集合, 获取一个应用对象 的 地址 和端口,并拼接成一个url调用服务方的应用 使用Ribbon只需要将ip:端口换成应用名称即可以远程调用 应用
- 在ResTemplate的Bean绑定中加上 @LoadBalanced 注解 ```java package com.itheima.consumer.cnfig;
import org.springframework.cloud.client.loadbalancer.LoadBalanced; import org.springframework.context.annotation.Bean; import org.springframework.context.annotation.Configuration; import org.springframework.web.client.RestTemplate;
@Configuration public class RestTemplateConfig {
@LoadBalanced@Beanpublic RestTemplate restTemplate(){return new RestTemplate();}
}
2.将url中的ip:端口 换成应用名称```java/*使用 Ribbon 简化调用1.在声明restTemplate的Bean时 添加一个@LoadBalanced 注解2.在使用在声明restTemplate 发请求时 需要定义url时 host:port可以换成 服务端提供的应用名称*/@GetMapping("/goods2/{id}")public Goods findGoodsById2(@PathVariable("id") int id) {String url = "http://EUREKA-PROVIDER/goods/findOne/" + id;Goods goods = restTemplate.getForObject(url, Goods.class);return goods;}
5.2. 负载均衡
通过在ResTemplate的Bean绑定中加上 @LoadBalanced 注解后,如果当前用于有个多个服务提供方,则Ribbon会自动帮我们负载均衡,默认为轮询策略,策略配置在消费者一端 即客户端负载均衡

5.2.1. 配置类形式配置负载策略
- 定义配置类 使用Bean绑定并返回一个IRule接口的实现类 ```java package com.itheima.consumer.cnfig;
import com.netflix.loadbalancer.IRule; import com.netflix.loadbalancer.RandomRule; import org.springframework.context.annotation.Bean; import org.springframework.context.annotation.Configuration;
@Configuration public class MyRule {
@Beanpublic IRule rule(){return new RandomRule();}
}
2.在启动类中 使用[@RibbonClient ](/RibbonClient ) 定义应用名称和配置类```javapackage com.itheima.consumer;import com.itheima.consumer.cnfig.MyRule;import org.springframework.boot.SpringApplication;import org.springframework.boot.autoconfigure.SpringBootApplication;import org.springframework.cloud.client.discovery.EnableDiscoveryClient;import org.springframework.cloud.netflix.eureka.EnableEurekaClient;import org.springframework.cloud.netflix.ribbon.RibbonClient;@SpringBootApplication@EnableEurekaClient@EnableDiscoveryClient //激活DiscoveryClient 新版本可以忽略 自动激活/*配置Ribbon 负载均衡策略name :设置服务提供方的 应用名称configuration : 设置负载均衡的Bean*/@RibbonClient(name ="EUREKA-PROVIDER",configuration = MyRule.class)public class ConsumerApp {public static void main(String[] args) {SpringApplication.run(ConsumerApp.class, args);}}
5.2.2. 配置方式设置
在application中设置该属性
EUREKA-PROVIDER: # 应用名称ribbon:NFloadBalancerRuleClassName: com.netflix.loadbalancer.RandomRule # 负载均衡策略实现类的引用路径
6. Feign 声明式服务调用
Feign 是一个声明式的REST客户端 它基于接口的注解方式 很方便实现客户端配置
- 在消费者端导入坐标
<dependency><groupId>org.springframework.cloud</groupId><artifactId>spring-cloud-starter-openfeign</artifactId></dependency>
- 消费者启动类中加上 @EnableFeignClients 启用Feign ```java package com.itheima.consumer;
import org.springframework.boot.SpringApplication; import org.springframework.boot.autoconfigure.SpringBootApplication; import org.springframework.cloud.client.discovery.EnableDiscoveryClient; import org.springframework.cloud.netflix.eureka.EnableEurekaClient; import org.springframework.cloud.openfeign.EnableFeignClients;
@EnableDiscoveryClient // 激活DiscoveryClient @EnableEurekaClient @SpringBootApplication
@EnableFeignClients //开启Feign的功能 public class ConsumerApp {
public static void main(String[] args) {SpringApplication.run(ConsumerApp.class,args);}
}
3.在消费者中定义一个feign声明接口```javapackage com.itheima.consumer.feign;import com.itheima.consumer.domain.Goods;import org.springframework.cloud.openfeign.FeignClient;import org.springframework.web.bind.annotation.GetMapping;import org.springframework.web.bind.annotation.PathVariable;/*** feign声明式接口 发起远程调用的* 1.定义接口* 2.接口上添加 @FeignClient value属性为 应用名称* 3.编写调用接口 接口的声明规则 和 提供方接口保持一致* 4.注入该接口对象 调用接口方法完成远程调用*/@FeignClient(value = "feign-provider")public interface GoodsFeignClient {@GetMapping("/goods/findOne/{id}")Goods findGoodsById(@PathVariable("id") int id);}
- 注入 声明接口对象 调用接口方法 ```java package com.itheima.consumer.controller;
import com.itheima.consumer.domain.Goods; import com.itheima.consumer.feign.GoodsFeignClient; import org.springframework.beans.factory.annotation.Autowired; import org.springframework.web.bind.annotation.GetMapping; import org.springframework.web.bind.annotation.PathVariable; import org.springframework.web.bind.annotation.RequestMapping; import org.springframework.web.bind.annotation.RestController; import org.springframework.web.client.RestTemplate;
@RestController @RequestMapping(“/order”) public class OrderController {
@Autowiredprivate RestTemplate restTemplate;@Autowiredprivate GoodsFeignClient goodsFeignClient;@GetMapping("/goods/{id}")public Goods findGoodsById(@PathVariable("id") int id){/*String url = "http://FEIGN-PROVIDER/goods/findOne/"+id;// 3. 调用方法Goods goods = restTemplate.getForObject(url, Goods.class);*/Goods goods = goodsFeignClient.findGoodsById(id);return goods;}
}
<a name="3e58adf8"></a>## 6.1. 超时设置Feign 底层依赖于 Ribbon 实现负载均衡和远程调用Ribbon默认1秒超时在consumer的配置文件中配置```yamlribbon:ConnectTimeout: 1000 # 设置连接超时时间 默认为1000毫秒ReadTimeout: 3000 # 逻辑处理的超时时间 默认为1000毫秒
6.2. 日志记录
Feign 只能记录 debug 级别的日志信息
- 设置consumer的日志级别 为该路径下所有的类为debug级别
logging:level:com.itheima: debug # 键位类路径
- 在consumer中定义配置类 ```java package com.itheima.consumer.config;
import feign.Logger; import org.springframework.context.annotation.Bean; import org.springframework.context.annotation.Configuration;
@Configuration public class FeignLogConfig {
@Beanpublic Logger.Level level(){/*** NONE 不记录* BASIC 记录基本的请求行 响应状态码数据* HEADERS 记录基本的请求行 响应状态码数据 响应头信息* FULL 记录完整的信息*/return Logger.Level.FULL;}
}
3.在声明式接口中的@FeignClient注解 引入配置类```javapackage com.itheima.consumer.feign;import com.itheima.consumer.config.FeignLogConfig;import com.itheima.consumer.domain.Goods;import org.springframework.cloud.openfeign.FeignClient;import org.springframework.web.bind.annotation.GetMapping;import org.springframework.web.bind.annotation.PathVariable;/*** feign声明式接口 发起远程调用的* 1.定义接口* 2.接口上添加 @FeignClient value属性为 应用名称 configuration 为日志配置类* 3.编写调用接口 接口的声明规则 和 提供方接口保持一致* 4.注入该接口对象 调用接口方法完成远程调用*/@FeignClient(value = "feign-provider",configuration = FeignLogConfig.class)public interface GoodsFeignClient {@GetMapping("/goods/findOne/{id}")Goods findGoodsById(@PathVariable("id") int id);}
7. Hystrix 熔断器
Hystrix 是Netflix 开源的一个延迟和容错库 用于隔离访问远程服务 第三方库 防止出现级联失败(雪崩)
雪崩: 一个服务失败 导致整条链路的服务都失败的情况
隔离
- 线程池隔离 默认值
- 信号量隔离
- 降级
- 熔断
- 限流
7.1. 服务方降级
当服务发生异常或调用超时,返回默认数据
- 在服务方导入坐标
<dependency><groupId>org.springframework.cloud</groupId><artifactId>spring-cloud-starter-netflix-hystrix</artifactId></dependency>
- 在服务方启动类中加上@EnableCircuitBreaker注解 ```java package com.itheima.provider;
import org.springframework.boot.SpringApplication; import org.springframework.boot.autoconfigure.SpringBootApplication; import org.springframework.cloud.client.circuitbreaker.EnableCircuitBreaker; import org.springframework.cloud.netflix.eureka.EnableEurekaClient;
/**
- 启动类 */
@EnableEurekaClient //该注解 在新版本中可以省略 @SpringBootApplication
@EnableCircuitBreaker //开启Hystrix功能 public class ProviderApp {
public static void main(String[] args) {SpringApplication.run(ProviderApp.class,args);}
}
3.在服务方controller层 中定降级方法(降级方法需要与原方法参数返回值一致),并且在原方法中加上注解[@HystrixCommand(fallbackMethod ](/HystrixCommand(fallbackMethod ) = "降级方法名")```java/***降级*1.出现异常* 2.服务调用超时*/@GetMapping("/findOne/{id}")@HystrixCommand(fallbackMethod = "findOne_fallback",commandProperties = {//设置Hystrix的超时时间默认为1000毫秒@HystrixProperty(name = "execution.isolation.thread.interruptOnTimeout",value = "3000")}) //指定降级后调用的方法 commandProperties为设置指定规则public Goods findOne(@PathVariable("id") int id){Goods goods = goodsService.findOne(id);goods.setTitle(goods.getTitle() + ":" + port);//将端口号,设置到了 商品标题上return goods;}/*** 定义降级方法* 1. 方法的返回值和参数要与原方法一致*/public Goods findOne_fallback(@PathVariable("id") int id){Goods goods = new Goods();goods.setTitle("降级了");return goods;}
7.2. 消费方降级
Feign已经提供了Hystrix 无需导入 Hystrix 坐标
- 在消费方配置文件中开启Hystrix
feign:hystrix:enabled: true# 开启 feign对hystrix的支持 默认为false
- 定义声明式接口的实现类 ```java package com.itheima.consumer.feign;
import com.itheima.consumer.domain.Goods; import org.springframework.stereotype.Component; /* 降级处理类 1.定义类实现feign客户端接口 2.使用@Component注解 加入IOC容器中
*/ @Component public class GoodsFeignClientFallback implements GoodsFeignClient{ @Override public Goods findGoodsById(int id) { Goods goods = new Goods(); goods.setTitle(“降级了”); return goods; } }
3.在声明式接口@FeignClient注解 设置fallback属性为降级类的字节码```javapackage com.itheima.consumer.feign;import com.itheima.consumer.domain.Goods;import org.springframework.cloud.openfeign.FeignClient;import org.springframework.web.bind.annotation.GetMapping;import org.springframework.web.bind.annotation.PathVariable;@FeignClient(value = "HYSTRIX-PROVIDER",fallback = GoodsFeignClientFallback.class)public interface GoodsFeignClient {@GetMapping("/goods/findOne/{id}")public Goods findGoodsById(@PathVariable("id") int id);}
7.3. 熔断机制
当降级的情况情况达到预定的阈值(默认为5秒20次),则会打开断路器,拒绝所有请求,直到服务恢复正常为止


@HystrixCommand(fallbackMethod = "findOne_fallback",commandProperties = {//设置Hystrix的超时时间默认为1000毫秒@HystrixProperty(name = "execution.isolation.thread.interruptOnTimeout",value = "3000"),@HystrixProperty(name = "circuitBreaker.sleepWindowInMilliseconds",value = "5000"), //监控时间 默认为5000毫秒@HystrixProperty(name = "circuitBreaker.requestVolumeThreshold",value = "20"), //失败次数 默认20次@HystrixProperty(name = "circuitBreaker.errorThresholdPercentage",value = "50"), //失败率 默认为百分之50}) //指定降级后调用的方法 commandProperties为设置指定规则
7.4. Turbine 熔断监控
Hystrix 提供了 Hystrix-dashboard功能 用于实时监控微服务运行状态 Hystrix-dashboard 只能监控一个微服务
Netflix 提供了Turbine 进行聚合监控
新建模块并导入坐标 ```xml
org.springframework.cloud spring-cloud-starter-netflix-hystrix-dashboard org.springframework.cloud spring-cloud-starter-netflix-turbine org.springframework.boot spring-boot-starter-actuator org.springframework.cloud spring-cloud-starter-netflix-eureka-client org.springframework.boot spring-boot-starter-test test
2.创建application.yml```yamlspring:application.name: hystrix-monitorserver:port: 8769turbine:combine-host-port: true# 配置需要监控的服务名称列表app-config: hystrix-provider,hystrix-consumercluster-name-expression: "'default'"aggregator:cluster-config: default#instanceUrlSuffix: /actuator/hystrix.streameureka:client:serviceUrl:defaultZone: http://localhost:8761/eureka/
- 创建启动类 ```java package com.itheima;
import org.springframework.boot.SpringApplication; import org.springframework.boot.autoconfigure.SpringBootApplication; import org.springframework.cloud.netflix.eureka.EnableEurekaClient; import org.springframework.cloud.netflix.hystrix.dashboard.EnableHystrixDashboard; import org.springframework.cloud.netflix.turbine.EnableTurbine;
@SpringBootApplication @EnableEurekaClient
@EnableTurbine //开启Turbine 很聚合监控功能 @EnableHystrixDashboard //开启Hystrix仪表盘监控功能 public class HystrixMonitorApp {
public static void main(String[] args) {SpringApplication.run(HystrixMonitorApp.class, args);}
}
4.修改被监控的模块 需要分别修改 hystrix-provider 和 hystrix-consumer 模块1.导入坐标```xml<dependency><groupId>org.springframework.boot</groupId><artifactId>spring-boot-starter-actuator</artifactId></dependency><dependency><groupId>org.springframework.cloud</groupId><artifactId>spring-cloud-starter-netflix-hystrix</artifactId></dependency><dependency><groupId>org.springframework.cloud</groupId><artifactId>spring-cloud-starter-netflix-hystrix-dashboard</artifactId></dependency>
- 配置Bean
@Beanpublic ServletRegistrationBean getServlet() {HystrixMetricsStreamServlet streamServlet = new HystrixMetricsStreamServlet();ServletRegistrationBean registrationBean = new ServletRegistrationBean(streamServlet);registrationBean.setLoadOnStartup(1);registrationBean.addUrlMappings("/actuator/hystrix.stream");registrationBean.setName("HystrixMetricsStreamServlet");return registrationBean;}
- 在启动类上添加注解@EnableHystrixDashboard ```java package com.itheima.provider;
import com.netflix.hystrix.contrib.metrics.eventstream.HystrixMetricsStreamServlet; import org.springframework.boot.SpringApplication; import org.springframework.boot.autoconfigure.SpringBootApplication; import org.springframework.boot.web.servlet.ServletRegistrationBean; import org.springframework.cloud.client.circuitbreaker.EnableCircuitBreaker; import org.springframework.cloud.netflix.eureka.EnableEurekaClient; import org.springframework.cloud.netflix.hystrix.dashboard.EnableHystrixDashboard; import org.springframework.context.annotation.Bean;
/**
- 启动类 */
@EnableEurekaClient //该注解 在新版本中可以省略 @SpringBootApplication
@EnableCircuitBreaker //开启Hystrix功能 @EnableHystrixDashboard public class ProviderApp {
public static void main(String[] args) {SpringApplication.run(ProviderApp.class, args);}@Beanpublic ServletRegistrationBean getServlet() {HystrixMetricsStreamServlet streamServlet = new HystrixMetricsStreamServlet();ServletRegistrationBean registrationBean = new ServletRegistrationBean(streamServlet);registrationBean.setLoadOnStartup(1);registrationBean.addUrlMappings("/actuator/hystrix.stream");registrationBean.setName("HystrixMetricsStreamServlet");return registrationBean;}
}
5.启动服务- eureka-server- hystrix-provider- hystrix-consumer- hystrix-monitor6.访问 [http://localhost:8769/hystrix/](http://localhost:8769/hystrix/)<br />监控Url地址为 [http://localhost:8769/turbine.stream](http://localhost:8769/turbine.stream)<br />记得访问一次 接口否则没有数据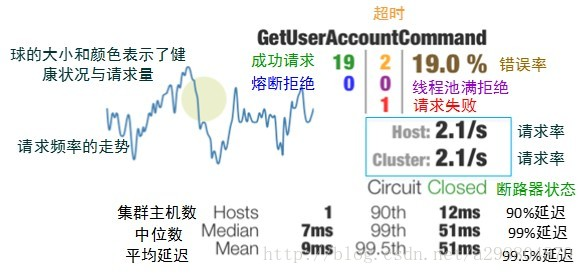<a name="04fe42f9"></a># 8. Gateway 网关网关是为微服务架构提供一种简单而有效的统一的API路由管理方式<a name="a7f91198"></a>## 8.1. 入门案例1.创建gateway模块 导入坐标```xml<dependencies><!--引入gateway 网关--><dependency><groupId>org.springframework.cloud</groupId><artifactId>spring-cloud-starter-gateway</artifactId></dependency><!-- eureka-client --><dependency><groupId>org.springframework.cloud</groupId><artifactId>spring-cloud-starter-netflix-eureka-client</artifactId></dependency></dependencies>
- 创建启动类 ```java package com.itheima.gateway;
import org.springframework.boot.SpringApplication; import org.springframework.boot.autoconfigure.SpringBootApplication; import org.springframework.cloud.netflix.eureka.EnableEurekaClient;
@SpringBootApplication @EnableEurekaClient public class ApiGatewayApp { public static void main(String[] args) { SpringApplication.run(ApiGatewayApp.class, args); } }
3.编写application.yml```ymlserver:port: 80spring:application:name: api-geteway-servercloud:# 网关配置gateway:# 路由配置: 转发规则routes: # 集合- id: gateway-provider # 唯一标识 默认为随机UUIDuri: http://localhost:8001/ # 转发路径 服务提供方访问路径predicates: # 条件 用于请求网关路径的匹配规则- Path=/goods/**
- 启动模块和服务治理 服务提供方 消费方 只要访问http://localhost:80/goods/* 地址则转发为
8.2. 静态路由
通过routes转发规则 配置多个集合对象
server:port: 80spring:application:name: api-geteway-servercloud:# 网关配置gateway:# 路由配置: 转发规则routes: # 集合- id: gateway-provider # 唯一标识 默认为随机UUIDuri: http://localhost:8001/ # 转发路径 服务提供方访问路径predicates: # 条件 用于请求网关路径的匹配规则- Path=/goods/**- id: gateway-consumer # 转发规则2uri: http://localhost:9000/ # 转发路径 服务提供方访问路径predicates: # 条件 用于请求网关路径的匹配规则- Path=/order/**
但不推荐此方法配置
8.3. 动态路由
从eureka 动态获取
引入eureka client 并在启动类中加上@EnableEurekaClient注解
配置eureka服务地址 并将Gateway的uri 改成 lb://应用名称 ```yaml server: port: 80 spring: application: name: api-geteway-server cloud:
网关配置
gateway:
路由配置: 转发规则
routes: # 集合
id: gateway-provider # 唯一标识 默认为随机UUID
uri: http://localhost:8001/ # 转发路径 服务提供方访问路径
uri: lb://gateway-provider predicates: # 条件 用于请求网关路径的匹配规则
- Path=/goods/**
id: gateway-consumer # 转发规则2
uri: http://localhost:9000/ # 转发路径 服务提供方访问路径
uri: lb://gateway-consumer predicates: # 条件 用于请求网关路径的匹配规则
- Path=/order/**
eureka: client: service-url: defaultZone: http://localhost:8761/eureka
<a name="63755a99"></a>## 8.4. 微服务名称配置Gateway网关中 默认不启用由Eureka应用名拼接的URL转发访问我们通过 sping.cloud.discovery.locator.enabled 开启之后可以通过 [http://localhost/gateway-consumer/order/goods/2](http://localhost/gateway-consumer/order/goods/2) 来转发访问 方便我们更好的区分应用 当然http://localhost/order/goods/2 不加应用名称拼接也是可以转发访问```ymlserver:port: 80spring:application:name: api-geteway-servercloud:# 网关配置gateway:# 路由配置: 转发规则routes: # 集合- id: gateway-provider # 唯一标识 默认为随机UUID# uri: http://localhost:8001/ # 转发路径 服务提供方访问路径uri: lb://gateway-providerpredicates: # 条件 用于请求网关路径的匹配规则- Path=/goods/**- id: gateway-consumer # 转发规则2# uri: http://localhost:9000/ # 转发路径 服务提供方访问路径uri: lb://gateway-consumerpredicates: # 条件 用于请求网关路径的匹配规则- Path=/order/**discovery:locator:enabled: true # 开启微服务发现功能lower-case-service-id: true # 请求路径上的应用名称允许小写eureka:client:service-url:defaultZone: http://localhost:8761/eureka
8.5. 网关过滤器
过滤器 对请求或响应进行拦截 完成一些通用操作
Gateway 提供 两种过滤器方式 pre 和 post
- pre 过滤器 在转发之前执行 可以做参数校验 权限校验 流量监控 日志输出 协议转换等
- post过滤器 在响应之前执行 可以用对响应内容 响应头的修改 日志的输出 流量监控等
同时还提供了两种类型过滤器
- GatewayFilter 局部过滤器 针对单个路由
- GlobalFilter 全局过滤器 针对所有路由
8.5.1. 局部过滤器
| 过滤器工厂 | 作用 | 参数 |
|---|---|---|
| AddRequestHeader | 为原始请求添加Header | Header的名称及值 |
| AddRequestParameter | 为原始请求添加请求参数 | 参数名称及值 |
| AddResponseHeader | 为原始响应添加Header | Header的名称及值 |
| DedupeResponseHeader | 剔除响应头中重复的值 | 需要去重的Header名称及去重策略 |
| Hystrix | 为路由引入Hystrix的断路器保护 | HystrixCommand的名称 |
| FallbackHeaders | 为fallbackUri的请求头中添加具体的异常信息 | Header的名称 |
| PrefixPath | 为原始请求路径添加前缀 | 前缀路径 |
| PreserveHostHeader | 为请求添加一个preserveHostHeader=true的属性,路由过滤器会检查该属性以决定是否要发送原始的Host | 无 |
| RequestRateLimiter | 用于对请求限流,限流算法为令牌桶 | keyResolver、rateLimiter、statusCode、denyEmptyKey、emptyKeyStatus |
| RedirectTo | 将原始请求重定向到指定的URL | http状态码及重定向的url |
| RemoveHopByHopHeadersFilter | 为原始请求删除IETF组织规定的一系列Header | 默认就会启用,可以通过配置指定仅删除哪些Header |
| RemoveRequestHeader | 为原始请求删除某个Header | Header名称 |
| RemoveResponseHeader | 为原始响应删除某个Header | Header名称 |
| RewritePath | 重写原始的请求路径 | 原始路径正则表达式以及重写后路径的正则表达式 |
| RewriteResponseHeader | 重写原始响应中的某个Header | Header名称,值的正则表达式,重写后的值 |
| SaveSession | 在转发请求之前,强制执行WebSession::save操作 |
无 |
| secureHeaders | 为原始响应添加一系列起安全作用的响应头 | 无,支持修改这些安全响应头的值 |
| SetPath | 修改原始的请求路径 | 修改后的路径 |
| SetResponseHeader | 修改原始响应中某个Header的值 | Header名称,修改后的值 |
| SetStatus | 修改原始响应的状态码 | HTTP 状态码,可以是数字,也可以是字符串 |
| StripPrefix | 用于截断原始请求的路径 | 使用数字表示要截断的路径的数量 |
| Retry | 针对不同的响应进行重试 | retries、statuses、methods、series |
| RequestSize | 设置允许接收最大请求包的大小。如果请求包大小超过设置的值,则返回 413 Payload Too Large |
请求包大小,单位为字节,默认值为5M |
| ModifyRequestBody | 在转发请求之前修改原始请求体内容 | 修改后的请求体内容 |
| ModifyResponseBody | 修改原始响应体的内容 | 修改后的响应体内容 |
| Default | 为所有路由添加过滤器 | 过滤器工厂名称及值 |
在配置文件中通过 sping.cloud.gateway.routes.filters 设置
spring:application:name: api-geteway-servercloud:# 网关配置gateway:# 路由配置: 转发规则routes: # 集合- id: gateway-provider # 唯一标识 默认为随机UUID# uri: http://localhost:8001/ # 转发路径 服务提供方访问路径uri: lb://gateway-providerpredicates: # 条件 用于请求网关路径的匹配规则- Path=/goods/**filters:- AddRequestHeader=username,zhansan
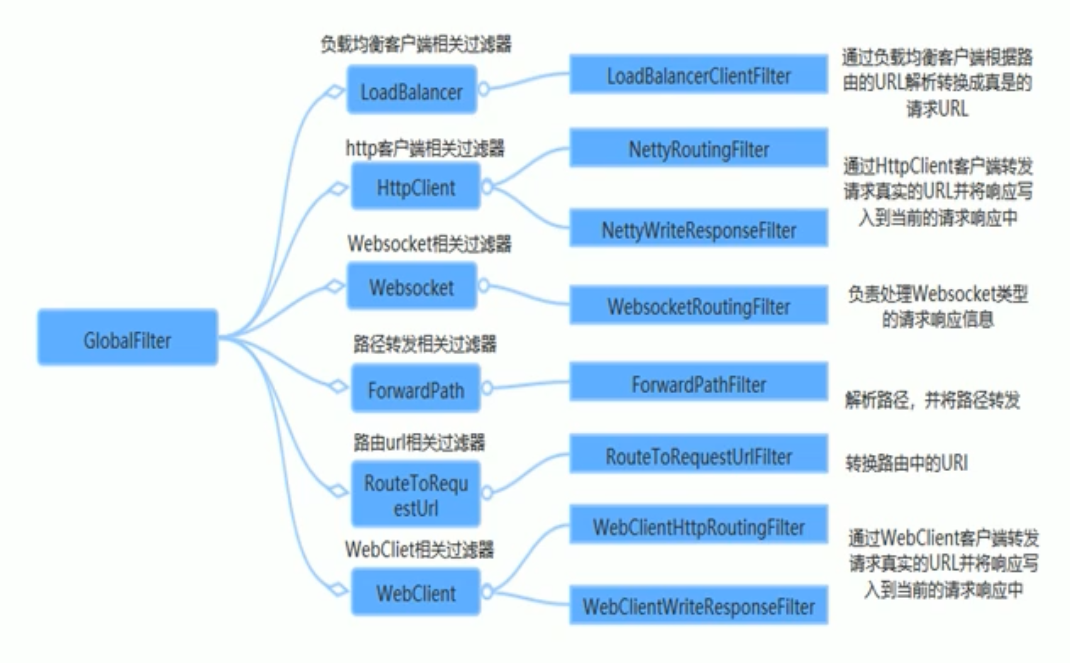
8.5.2. 全局过滤器
全局过滤器不需要在配置文件中配置 系统初始化时加载 并作用在每个路由上
- 在gateway模块中 编写自定义过滤器类 并实现 GlobalFilter, Ordered 接口 ```java package com.itheima.gateway.filter;
import org.springframework.cloud.gateway.filter.GatewayFilterChain; import org.springframework.cloud.gateway.filter.GlobalFilter; import org.springframework.core.Ordered; import org.springframework.stereotype.Component; import org.springframework.web.server.ServerWebExchange; import reactor.core.publisher.Mono;
@Component
public class MyFilter implements GlobalFilter, Ordered {
@Override
public Mono
/*** 过滤器排序* @return 数值越小 越先执行*/@Overridepublic int getOrder() {return 0;}
}
<a name="c49af0cf"></a># 9. Config 分布式配置中心Config 解决了在分布式场景下多环境配置文件的管理和维护1.在github或者gitee创建一个存放config配置的仓库2.创建config-server 模块 并导入坐标```xml<!-- config-server --><dependency><groupId>org.springframework.cloud</groupId><artifactId>spring-cloud-config-server</artifactId></dependency></dependencies>
- 创建启动类并使用 @EnableConfigServer 注解启用 config server ```java package com.itheima.config;
import org.springframework.boot.SpringApplication; import org.springframework.boot.autoconfigure.SpringBootApplication; import org.springframework.cloud.config.server.EnableConfigServer;
@SpringBootApplication @EnableConfigServer //启用config server功能 public class ConfigServerApp { public static void main(String[] args) { SpringApplication.run(ConfigServerApp.class,args); } }
4.配置application.yml```yamlserver:port: 8888spring:application:name: config-servercloud:config:server:git:uri: https://gitee.com/Iekrwh/configs.git # 仓库地址# username: #如果是私有仓库则需要配置git的账号和密码# password:default-label: master # 分支配置
- 在服务提供方中 导入 config client坐标
<!-- config client --><dependency><groupId>org.springframework.cloud</groupId><artifactId>spring-cloud-starter-config</artifactId></dependency>
- 在创建配置文件 bootstrap.yml 优先级高于application.yml
spring:cloud:config:uri: http://localhost:8888 # 配置config server地址name: config # 文件名称label: master # 分支profile: dev # -后面的版本名称
- 此时在服务提供方中 可以读取config 配置文件提供的值
9.1. 客户端刷新
当远程仓库中的配置文件发生改变事 我们的config server 会自动更新
但我们的config client并不会自动更新内容
- 客户端引入actuator依赖
<dependency><groupId>org.springframework.boot</groupId><artifactId>spring-boot-starter-actuator</artifactId></dependency>
获取配置信息的类上 加上@RefreshScope 注解
在bootstrap.yml 添加 management.endpoints.web.exposure.include
spring:cloud:config:uri: http://localhost:8888 # 配置config server地址name: config # 文件名称label: master # 分支profile: dev # -后面的版本名称management:endpoints:web:exposure:include: '*'
- 在cmd中 向http://localhost:8001/actuator/refresh 发送post请求
curl -X POST http://localhost:8001/actuator/refresh
但是每次更新 需要发送一次请求 后面结合bus才能解决此问题
9.2. 集成Eureka
通过上面例子 我们发现 config客户端访问服务端 地址是固定写死 非常不灵活
我们可以通过Eureka 使服务端在上面注册应用 自动获取应用的地址
- config-server 导入Eureka坐标
<!-- eureka-client --><dependency><groupId>org.springframework.cloud</groupId><artifactId>spring-cloud-starter-netflix-eureka-client</artifactId></dependency>
- config-server 配置 加上Eureka的地址 ```yml server: port: 8888
spring: application: name: config-server
cloud: config: server: git: uri: https://gitee.com/Iekrwh/configs.git # 仓库地址
username: #如果是私有仓库则需要配置git的账号和密码
password:
default-label: master # 分支配置
eureka: client: service-url: defaultZone: http://localhost:8761/eureka
3.在config serve 启动类加上 [@EnableEurekaClient ](/EnableEurekaClient ) 注解4.在config client 配置文件中 将 config uri 改为 Eurka服务地址```yamlspring:cloud:config:# uri: http://localhost:8888 # 配置config server地址name: config # 文件名称label: master # 分支profile: dev # -后面的版本名称discovery:enabled: true # 从注册中心寻找config server 地址service-id: config-server # config server 注册的应用名management:endpoints:web:exposure:include: '*'
10. Bus 消息总线
Spring Cloud 是用轻量的消息中间件将分布式的节点连接起来 用于广播配置文件的更改或者服务的监控管理
Spring Cloud Bus 可选的消息中间件包括RabbitMQ和 Kafka
- 在config-server 和 config-client中 引入 bus依赖
<!-- bus --><dependency><groupId>org.springframework.cloud</groupId><artifactId>spring-cloud-starter-bus-amqp</artifactId></dependency><dependency><groupId>org.springframework.boot</groupId><artifactId>spring-boot-starter-actuator</artifactId></dependency>
- 在config-server 和 config-client中 分别配置RabbitMQ
spring:rabbitmq:host: 192.168.130.124 # mq服务器地址port: 5672username: iekrpassword: iekrvirtual-host: /itcast
- 在config-server 中 设置暴露监控断电 bus-refresh
management:endpoints:web:exposure:include: 'bus-refresh' # 暴露bus的刷新端点
- 更新则发送指令 curl -X post config-server地址:端口/actuator/bus-refresh
curl -X post http://localhost:8888/actuator/bus-refresh
11. Stream 消息驱动
Spring Clou Stream 是一个构建消息驱动微服务应用的框架
Stream 对消息中间件的进一步封装 可以做到代码层面对中间件的无感知 甚至动态切换中间件
Stream 构建的应用程序与消息中间件之间是通过绑定器 Binder 相关联的
11.1. 消息生产者
- 创建生产者模块 导入坐标
```xml
<!--spring boot web--><dependency><groupId>org.springframework.boot</groupId><artifactId>spring-boot-starter-web</artifactId></dependency>
<!-- stream --><dependency><groupId>org.springframework.cloud</groupId><artifactId>spring-cloud-starter-stream-rabbit</artifactId></dependency>
2.编写配置文件```yamlserver:port: 8000spring:cloud:stream:# 定义绑定器,绑定到哪个消息中间件上binders:itheima_binder: # 自定义的绑定器名称type: rabbit # 绑定器类型environment: # 指定mq的环境spring:rabbitmq:host: 192.168.130.124port: 5672username: guestpassword: guestvirtual-host: /bindings:output: # channel名称binder: itheima_binder #指定使用哪一个绑定器(自定义的绑定器名称)destination: itheima_exchange # 消息目的地
- 定义发送消息类 并在类上开启Binding绑定为配置文件 ```java package com.itheima.stream.producer;
import org.springframework.beans.factory.annotation.Autowired; import org.springframework.cloud.stream.annotation.EnableBinding; import org.springframework.cloud.stream.messaging.Source; import org.springframework.messaging.MessageChannel; import org.springframework.messaging.support.MessageBuilder; import org.springframework.stereotype.Component;
@Component @EnableBinding(Source.class) public class MessageProducer {
@Autowiredprivate MessageChannel output;public void send(){String msessage = "hello stream~~~";//发送消息output.send(MessageBuilder.withPayload(msessage).build());System.out.println("消息发送成功~~~");}
}
4.创建一个接口用于测试 是否能发送消息给mq```javapackage com.itheima.stream.producer;import org.springframework.beans.factory.annotation.Autowired;import org.springframework.web.bind.annotation.RequestMapping;import org.springframework.web.bind.annotation.RestController;@RestControllerpublic class ProducerController {@Autowiredprivate MessageProducer producer;@RequestMapping("/send")public String sendMsg(){producer.send();return "success";}}
11.2. 消息消费者
- 创建消费者模块 导入坐标
```xml
<!--spring boot web--><dependency><groupId>org.springframework.boot</groupId><artifactId>spring-boot-starter-web</artifactId></dependency>
<!-- stream --><dependency><groupId>org.springframework.cloud</groupId><artifactId>spring-cloud-starter-stream-rabbit</artifactId></dependency>
2.编写配置文件 主要把端口和 bindings设置为输出还是输入模式```yamlserver:port: 9000spring:cloud:stream:# 定义绑定器,绑定到哪个消息中间件上binders:itheima_binder: # 自定义的绑定器名称type: rabbit # 绑定器类型environment: # 指定mq的环境spring:rabbitmq:host: localhostport: 5672username: guestpassword: guestvirtual-host: /bindings:input: # channel名称binder: itheima_binder #指定使用哪一个binderdestination: itheima_exchange # 消息目的地
- 创建消息接收类 在类开启binding注解 并在接收方法中定义 @StreamListener(Sink.INPUT) ```java package com.itheima.stream.consumer;
import org.springframework.cloud.stream.annotation.EnableBinding; import org.springframework.cloud.stream.annotation.StreamListener; import org.springframework.cloud.stream.messaging.Sink; import org.springframework.messaging.Message; import org.springframework.stereotype.Component;
/**
消息接收类 */ @EnableBinding({Sink.class}) @Component public class MessageListener {
@StreamListener(Sink.INPUT) public void receive(Message message){
System.out.println(message);System.out.println(message.getPayload());
} } ```
12. Sleuth+Zipkin 链路追踪
Spring Cloud Sleuth 它在分布式中能跟踪一个用户请求的过程 捕获这些跟踪数据 就能构建微服务的整个调用链的视图 它是调试和监控微服务的关键工具
- 安装启动zipkin 访问http://localhost:9411/
java -jar zipkin.jar
- 在服务提供方和消费方法 引入 zipkin 坐标
<dependency><groupId>org.springframework.cloud</groupId><artifactId>spring-cloud-starter-zipkin</artifactId></dependency>
- 配置文件 ```yaml server: port: 8001
eureka: client: service-url: defaultZone: http://localhost:8761/eureka spring: application: name: feign-provider zipkin: base-url: http://localhost:9411/ # 设置zipkin的服务端路径
sleuth: sampler: probability: 1 # 采集率 默认 0.1 百分之十。 ```

若有收获,就点个赞吧
0 人点赞
