1. Yarn
2. windows向yarn提交源码任务
- 在Configuration配置文件添加yarn的配置属性
- 用Maven 构建jar
- 修改job加载驱动类为 打包后的jar包
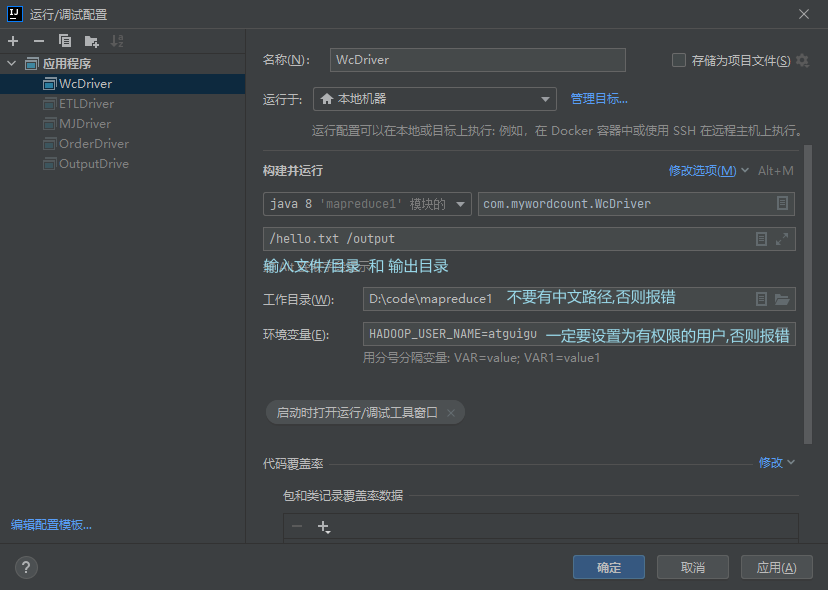
驱动类编码
package com.mywordcount;import java.io.IOException;import org.apache.hadoop.conf.Configuration;import org.apache.hadoop.fs.Path;import org.apache.hadoop.io.IntWritable;import org.apache.hadoop.io.Text;import org.apache.hadoop.mapreduce.Job;import org.apache.hadoop.mapreduce.lib.input.FileInputFormat;import org.apache.hadoop.mapreduce.lib.output.FileOutputFormat;public class WcDriver {public static void main(String[] args) throws IOException, ClassNotFoundException, InterruptedException {// 1 获取配置信息以及封装任务Configuration configuration = new Configuration();configuration.set("fs.defaultFS", "hdfs://hadoop102:8020");configuration.set("mapreduce.framework.name", "yarn");configuration.set("mapreduce.app-submission.cross-platform", "true");configuration.set("yarn.resourcemanager.hostname", "hadoop103");Job job = Job.getInstance(configuration);// 2 设置jar加载路径// job.setJarByClass(WcDriver.class);job.setJar("D:\\code\\mapreduce1\\target\\mapreduce1-1.0-SNAPSHOT.jar");// 3 设置map和reduce类job.setMapperClass(WcMapper.class);job.setReducerClass(WcReducer.class);// 4 设置map输出job.setMapOutputKeyClass(Text.class);job.setMapOutputValueClass(IntWritable.class);// 5 设置最终输出kv类型job.setOutputKeyClass(Text.class);job.setOutputValueClass(IntWritable.class);// 6 设置输入和输出路径FileInputFormat.setInputPaths(job, new Path(args[0]));FileOutputFormat.setOutputPath(job, new Path(args[1]));// 7 提交boolean result = job.waitForCompletion(true);System.exit(result ? 0 : 1);}}
3. 数据压缩
采用压缩技术减少了磁盘IO 但同时增加了CPU运算负担 所以压缩特性运用得当能提高性能 但运用不当也可能降低性能
| 压缩格式 | hadoop自带? | 算法 | 文件扩展名 | 是否可切分 | 换成压缩格式后,原来的程序是否需要修改 |
|---|---|---|---|---|---|
| DEFLATE | 是,直接使用 | DEFLATE | .deflate | 否 | 和文本处理一样,不需要修改 |
| Gzip | 是,直接使用 | DEFLATE | .gz | 否 | 和文本处理一样,不需要修改 |
| bzip2 | 是,直接使用 | bzip2 | .bz2 | 是 | 和文本处理一样,不需要修改 |
| LZO | 否,需要安装 | LZO | .lzo | 是 | 需要建索引,还需要指定输入格式 |
| Snappy | 否,需要安装 | Snappy | .snappy | 否 | 和文本处理一样,不需要修改 |
常用Snappy压缩 因为较高 其次是LZO
不同阶段开启压缩:
如果输入阶段时为压缩包 则直接传递即可无需更改 Hadoop自动解压缩并处理
shuffle阶段 在驱动类设置开启压缩 并指定压缩格式
//开启压缩模式configuration.setBoolean("mapreduce.map.output.compress", true);//压缩格式为configuration.setClass("mapreduce.map.output.compress.codec", BZip2Codec.class,CompressionCodec.class);
- reduce阶段 输出压缩
//reduce阶段压缩configuration.setBoolean("mapreduce.output.fileoutputformat.compress", true);//指定压缩格式configuration.setClass("mapreduce.output.fileoutputformat.compress.codec", SnappyCodec.class,CompressionCodec.class);
3.1. Hadoop压缩和解压
package com.compression;import org.apache.hadoop.conf.Configuration;import org.apache.hadoop.fs.FSDataInputStream;import org.apache.hadoop.fs.FSDataOutputStream;import org.apache.hadoop.fs.FileSystem;import org.apache.hadoop.fs.Path;import org.apache.hadoop.io.IOUtils;import org.apache.hadoop.io.compress.*;import org.apache.hadoop.util.ReflectionUtils;import java.io.IOException;public class TestCompression {public static void main(String[] args) throws IOException {compress("d:/phone_data.txt", BZip2Codec.class);decompress("d:/phone_data.txt.bz2");}//解压private static void decompress(String file) throws IOException {Configuration configuration = new Configuration();//生成压缩格式工厂对象CompressionCodecFactory codecFactory = new CompressionCodecFactory(configuration);//根据压缩格式工厂获取压缩对象CompressionCodec codec = codecFactory.getCodec(new Path(file));//输入流FileSystem fileSystem = FileSystem.get(configuration);FSDataInputStream fsDataInputStream = fileSystem.open(new Path(file));CompressionInputStream cis = codec.createInputStream(fsDataInputStream);//输出流String outputFile = file.substring(0, file.length() - codec.getDefaultExtension().length()); //获取文件名FSDataOutputStream fos = fileSystem.create(new Path(outputFile));IOUtils.copyBytes(cis, fos, 1024);//复制流 缓存为1024字节//关闭流IOUtils.closeStream(cis);IOUtils.closeStream(fos);}//压缩private static void compress(String file, Class<? extends CompressionCodec> codecClass) throws IOException {Configuration configuration = new Configuration();FileSystem fileSystem = FileSystem.get(configuration);//生成压缩格式对象CompressionCodec codec = ReflectionUtils.newInstance(codecClass, configuration);//开输入流FSDataInputStream fis = fileSystem.open(new Path(file));//输出流FSDataOutputStream fos = fileSystem.create(new Path(file + codec.getDefaultExtension()));//用压缩格式包装输出流CompressionOutputStream cos = codec.createOutputStream(fos);IOUtils.copyBytes(fis, cos, 1024);IOUtils.closeStream(fis);IOUtils.closeStream(cos);}}
4. Yarn架构
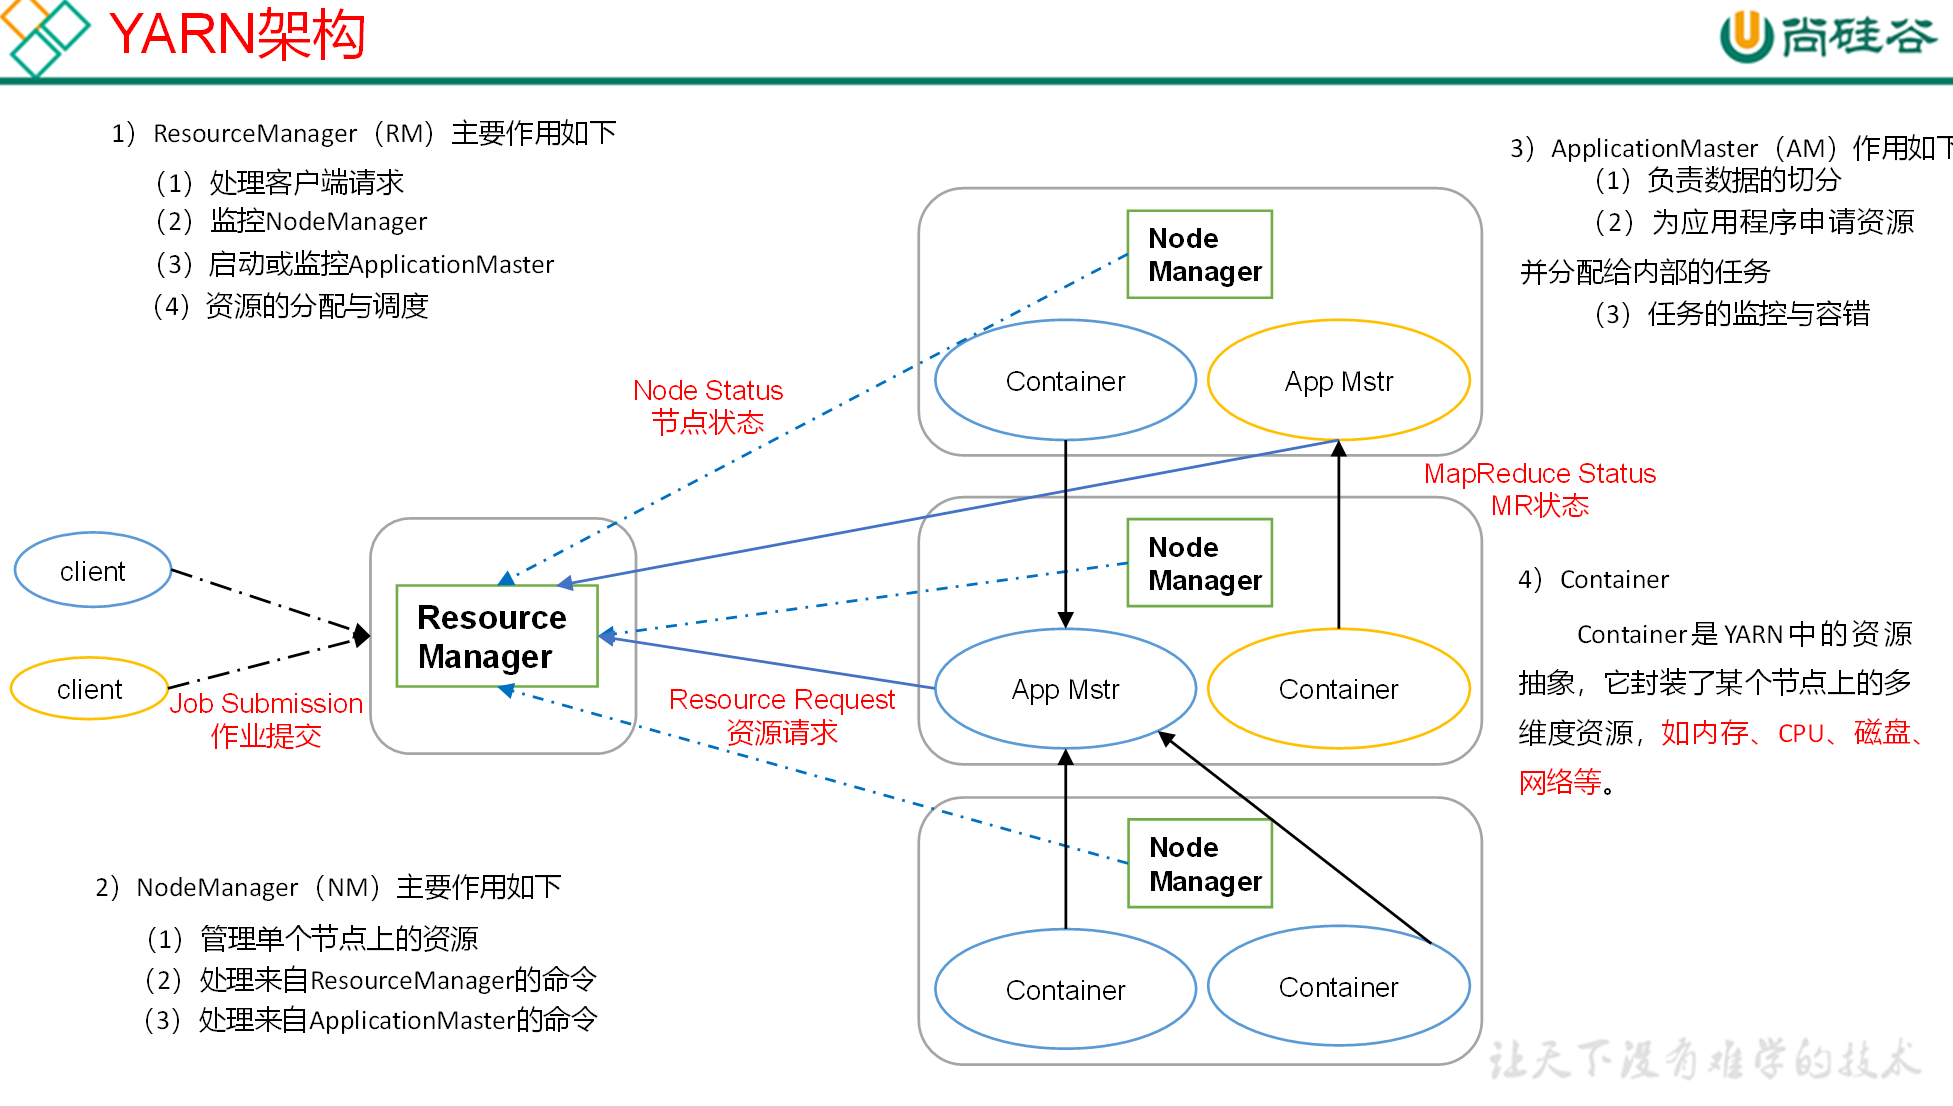
YARN主要由ResourceManager、NodeManager、ApplicationMaster和Container等组件构成。
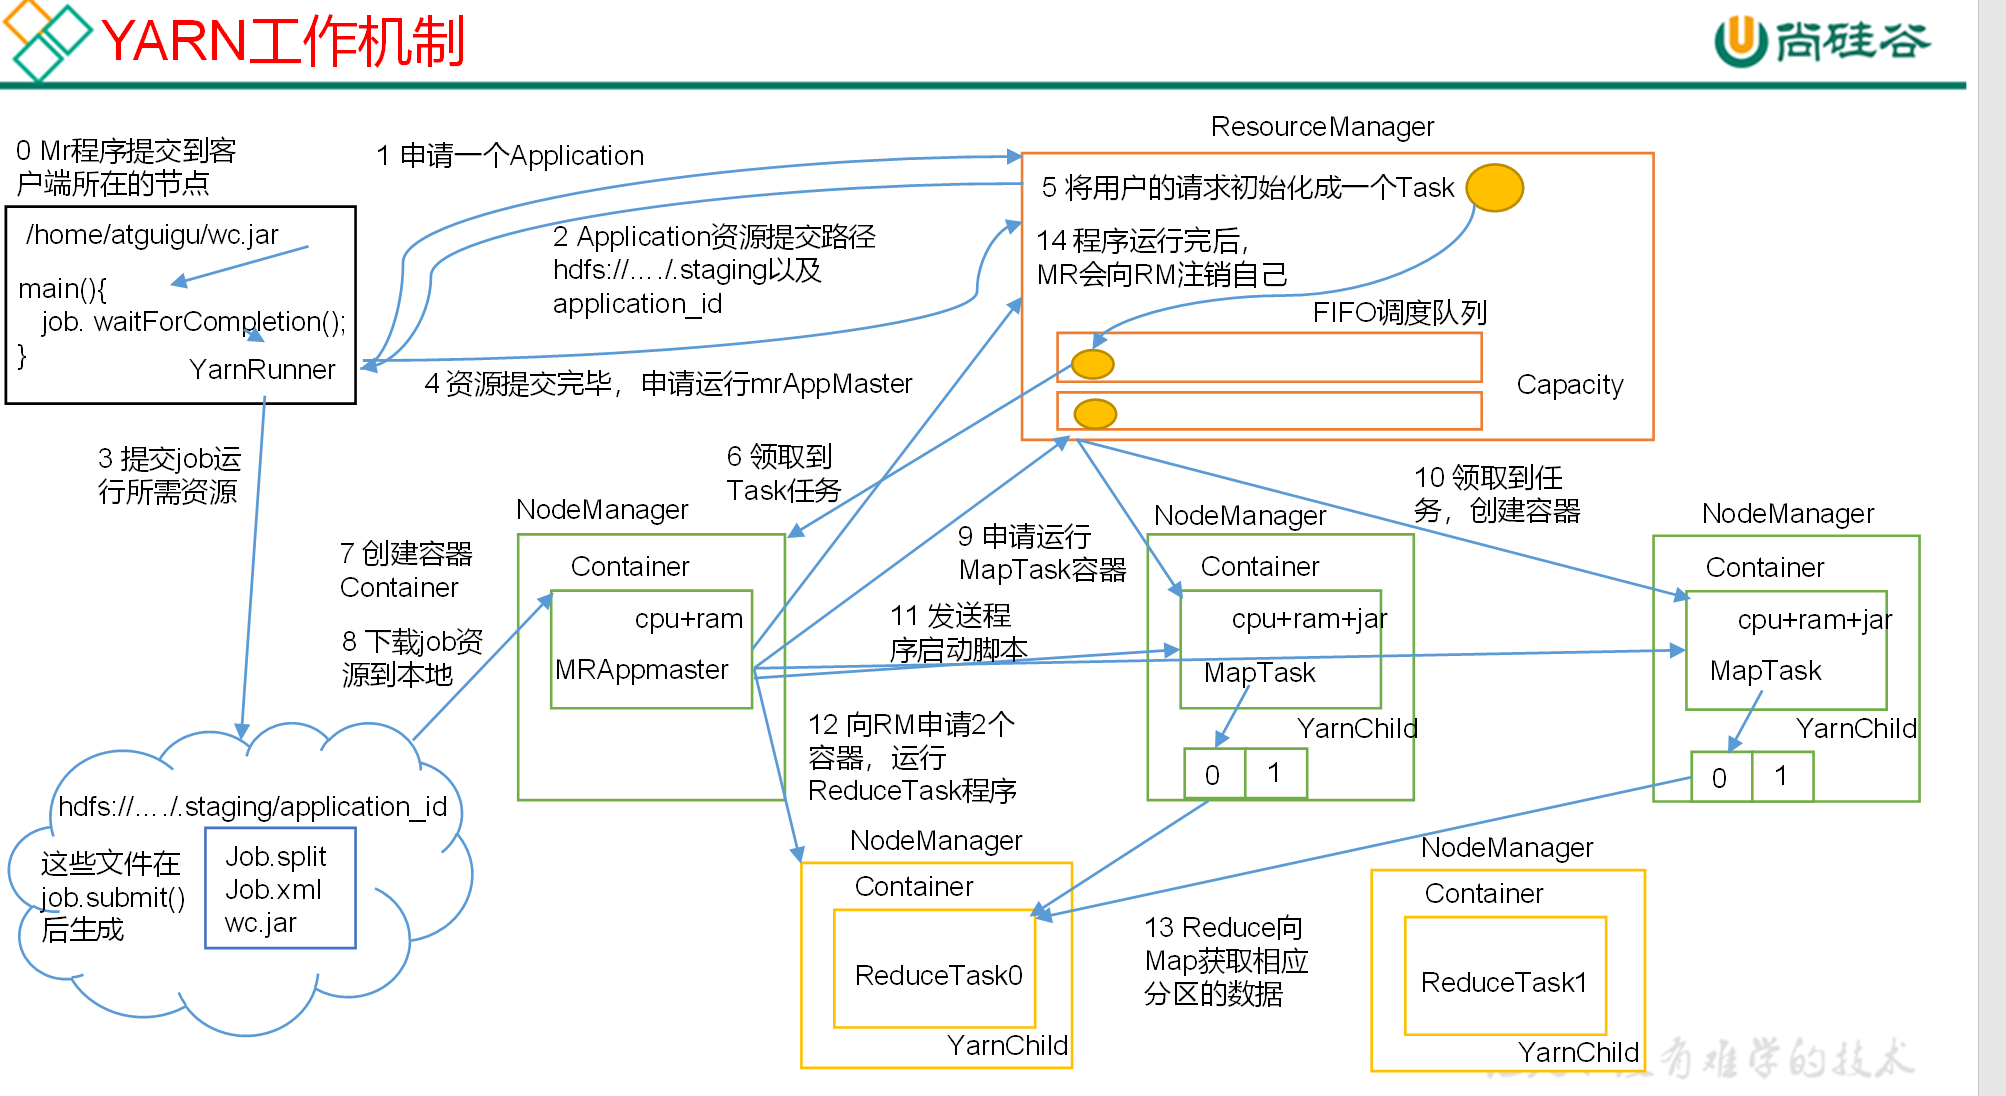
- MR程序提交到客户端所在的节点。
- YarnRunner向ResourceManager申请一个Application。
- RM将该应用程序的资源路径返回给YarnRunner。
- 该程序将运行所需资源提交到HDFS上。
- 程序资源提交完毕后,申请运行mrAppMaster。
- RM将用户的请求初始化成一个Task。
- 其中一个NodeManager领取到Task任务。
- 该NodeManager创建容器Container,并产生MRAppmaster。
- Container从HDFS上拷贝资源到本地。
- MRAppmaster向RM 申请运行MapTask资源。
- RM将运行MapTask任务分配给另外两个NodeManager,另两个NodeManager分别领取任务并创建容器。
- MR向两个接收到任务的NodeManager发送程序启动脚本,这两个NodeManager分别启动MapTask,MapTask对数据分区排序。
- MrAppMaster等待所有MapTask运行完毕后,向RM申请容器,运行ReduceTask。
- ReduceTask向MapTask获取相应分区的数据。
- 程序运行完毕后,MR会向RM申请注销自己。
5. 资源调度器
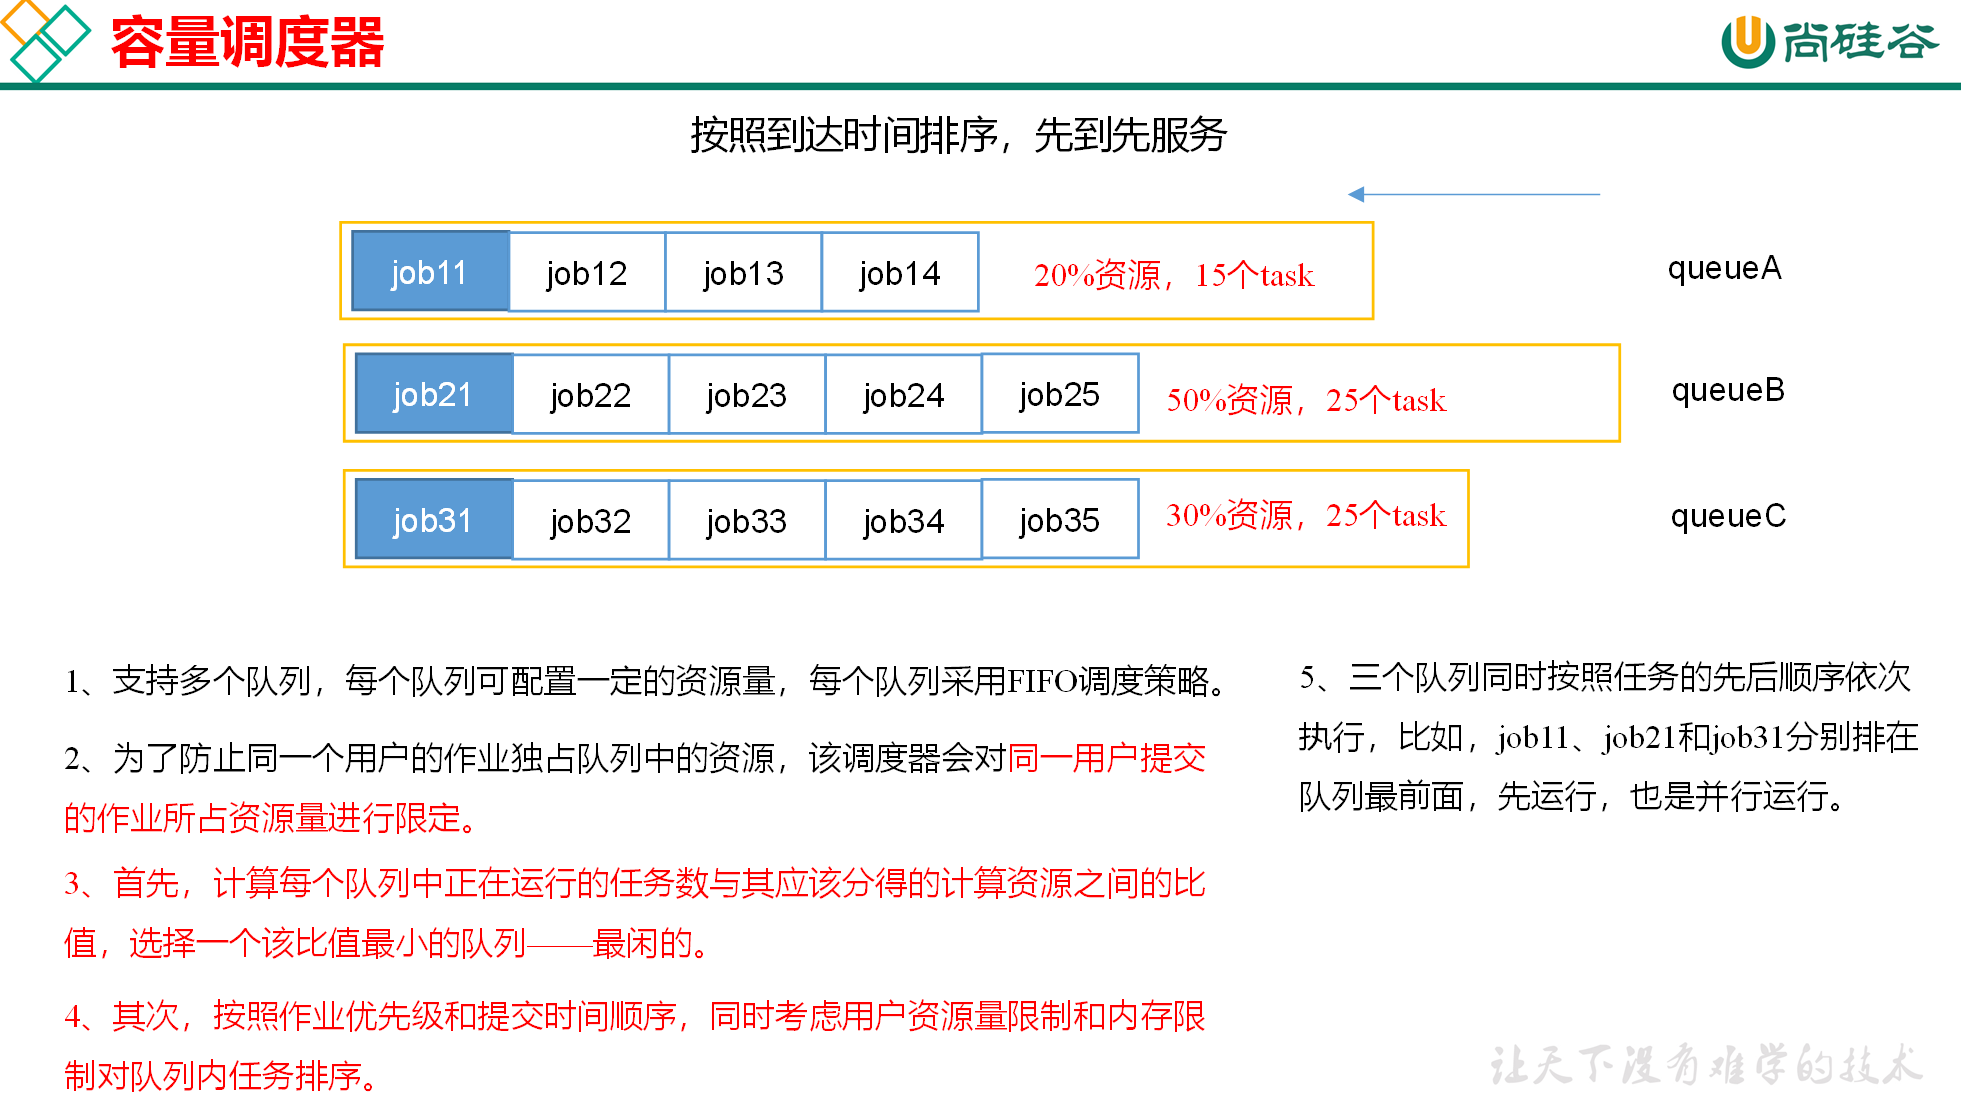
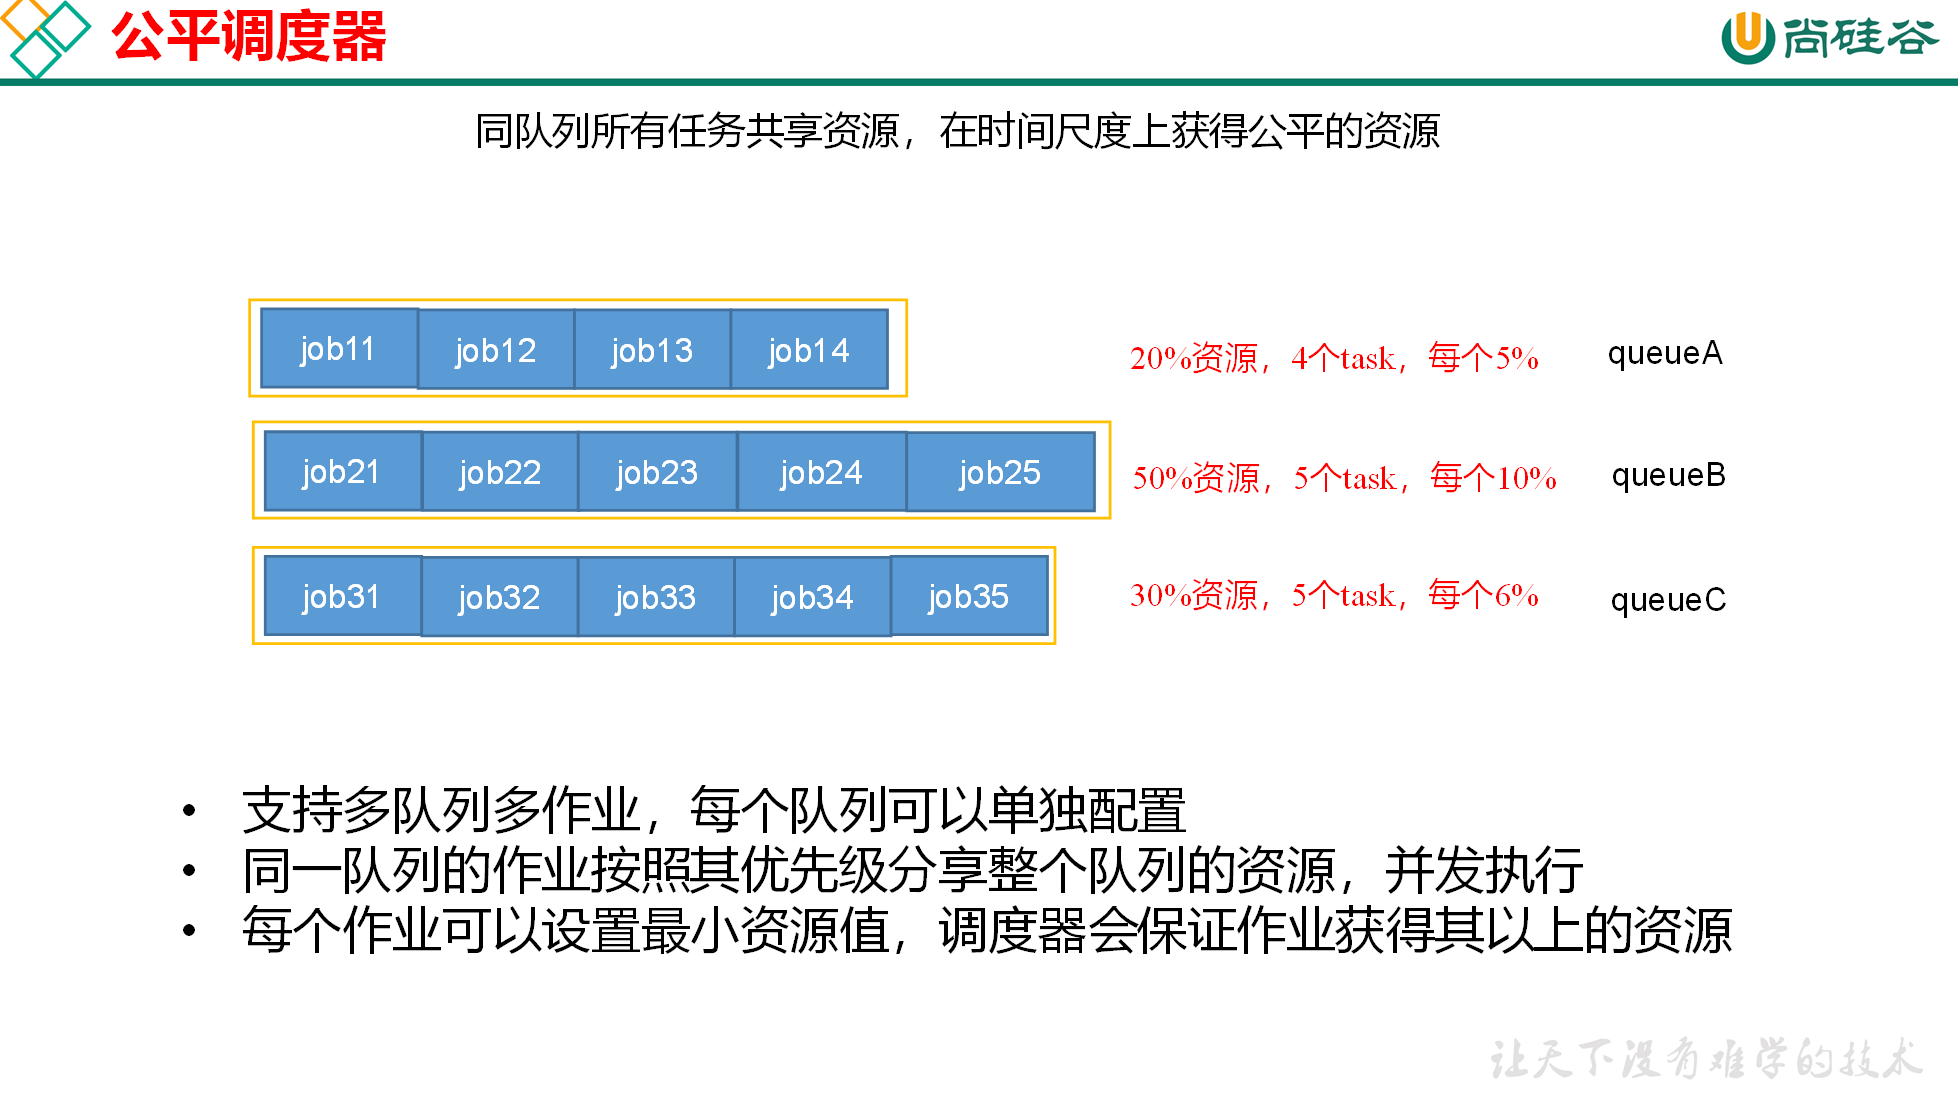
目前,Hadoop作业调度器主要有三种:FIFO、Capacity Scheduler和Fair Scheduler。Hadoop3.1.3默认的资源调度器是Capacity Scheduler。
通过yarn-default.xml配置
<property><description>The class to use as the resource scheduler.</description><name>yarn.resourcemanager.scheduler.class</name><value>org.apache.hadoop.yarn.server.resourcemanager.scheduler.capacity.CapacityScheduler</value></property>
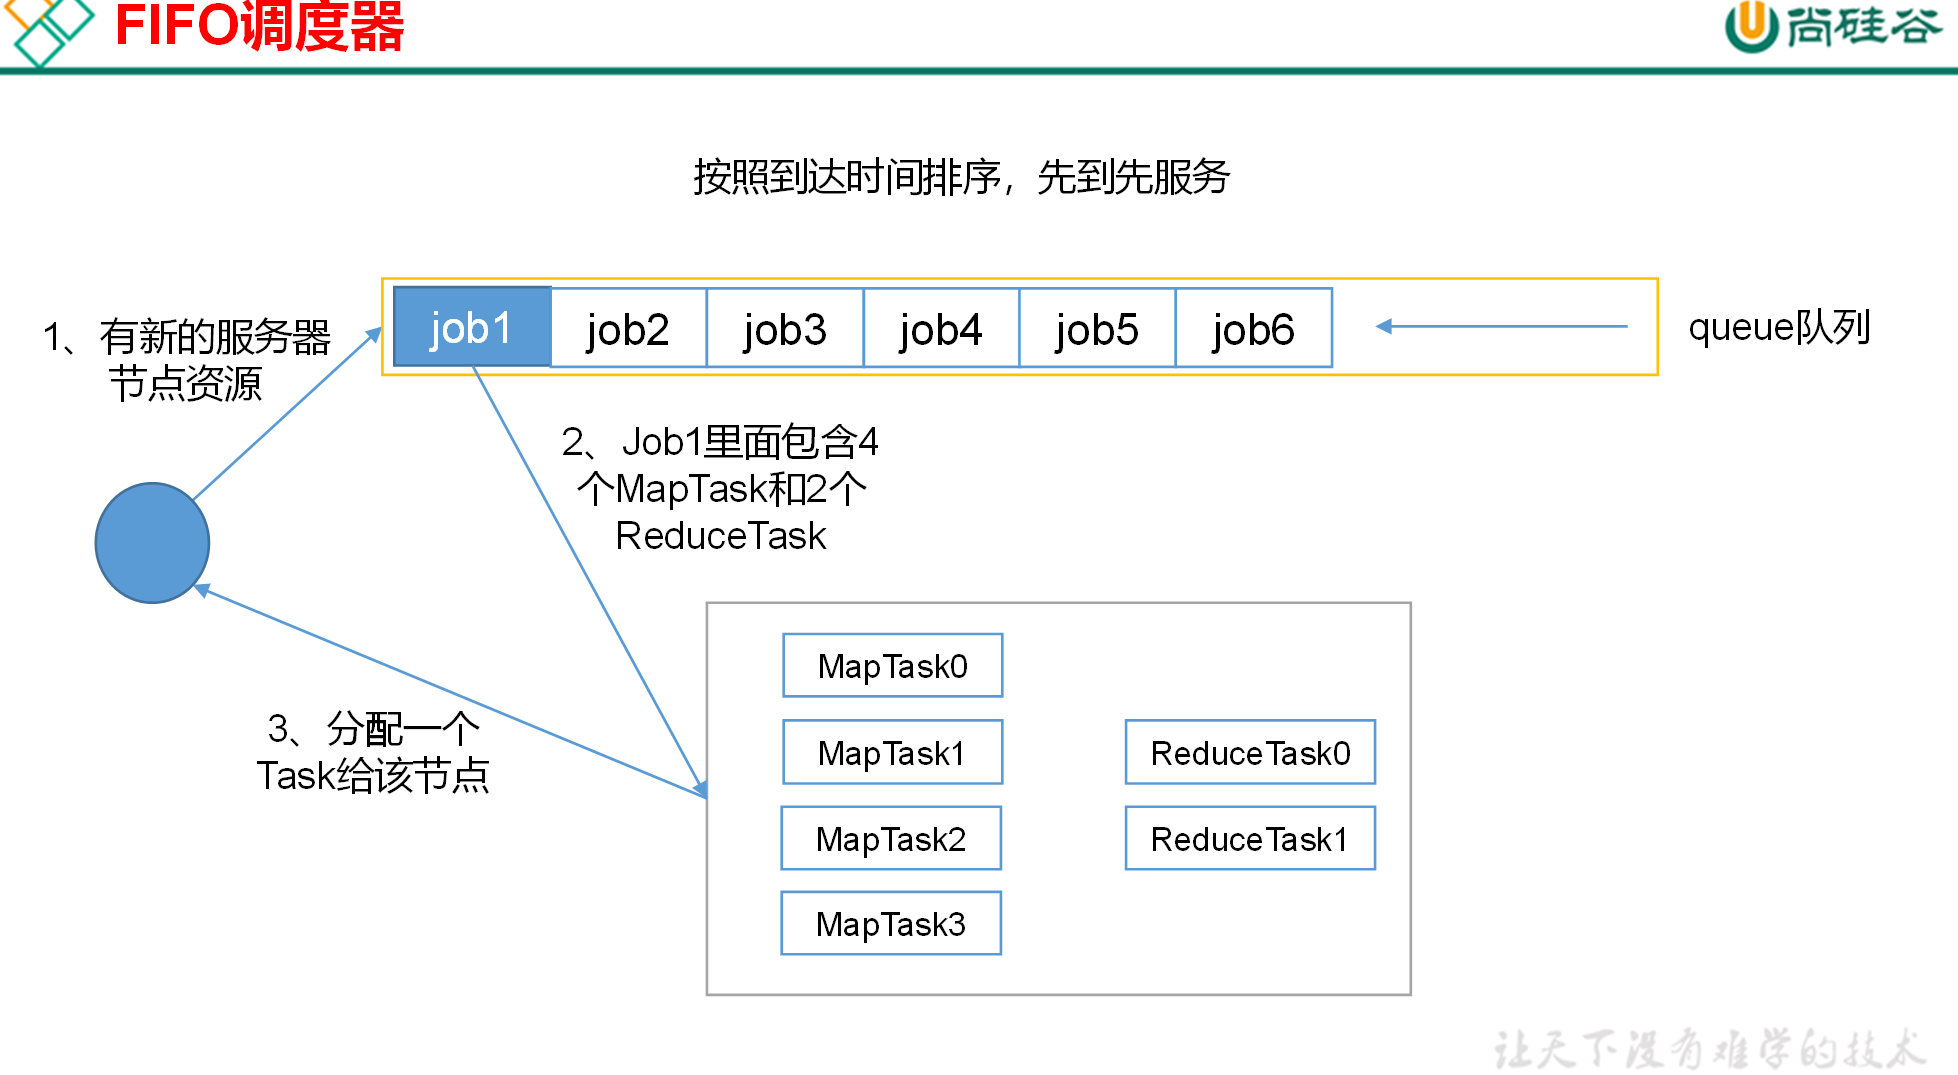
先进先出调度器(FIFO)
容量调度器(Capacity Scheduler)
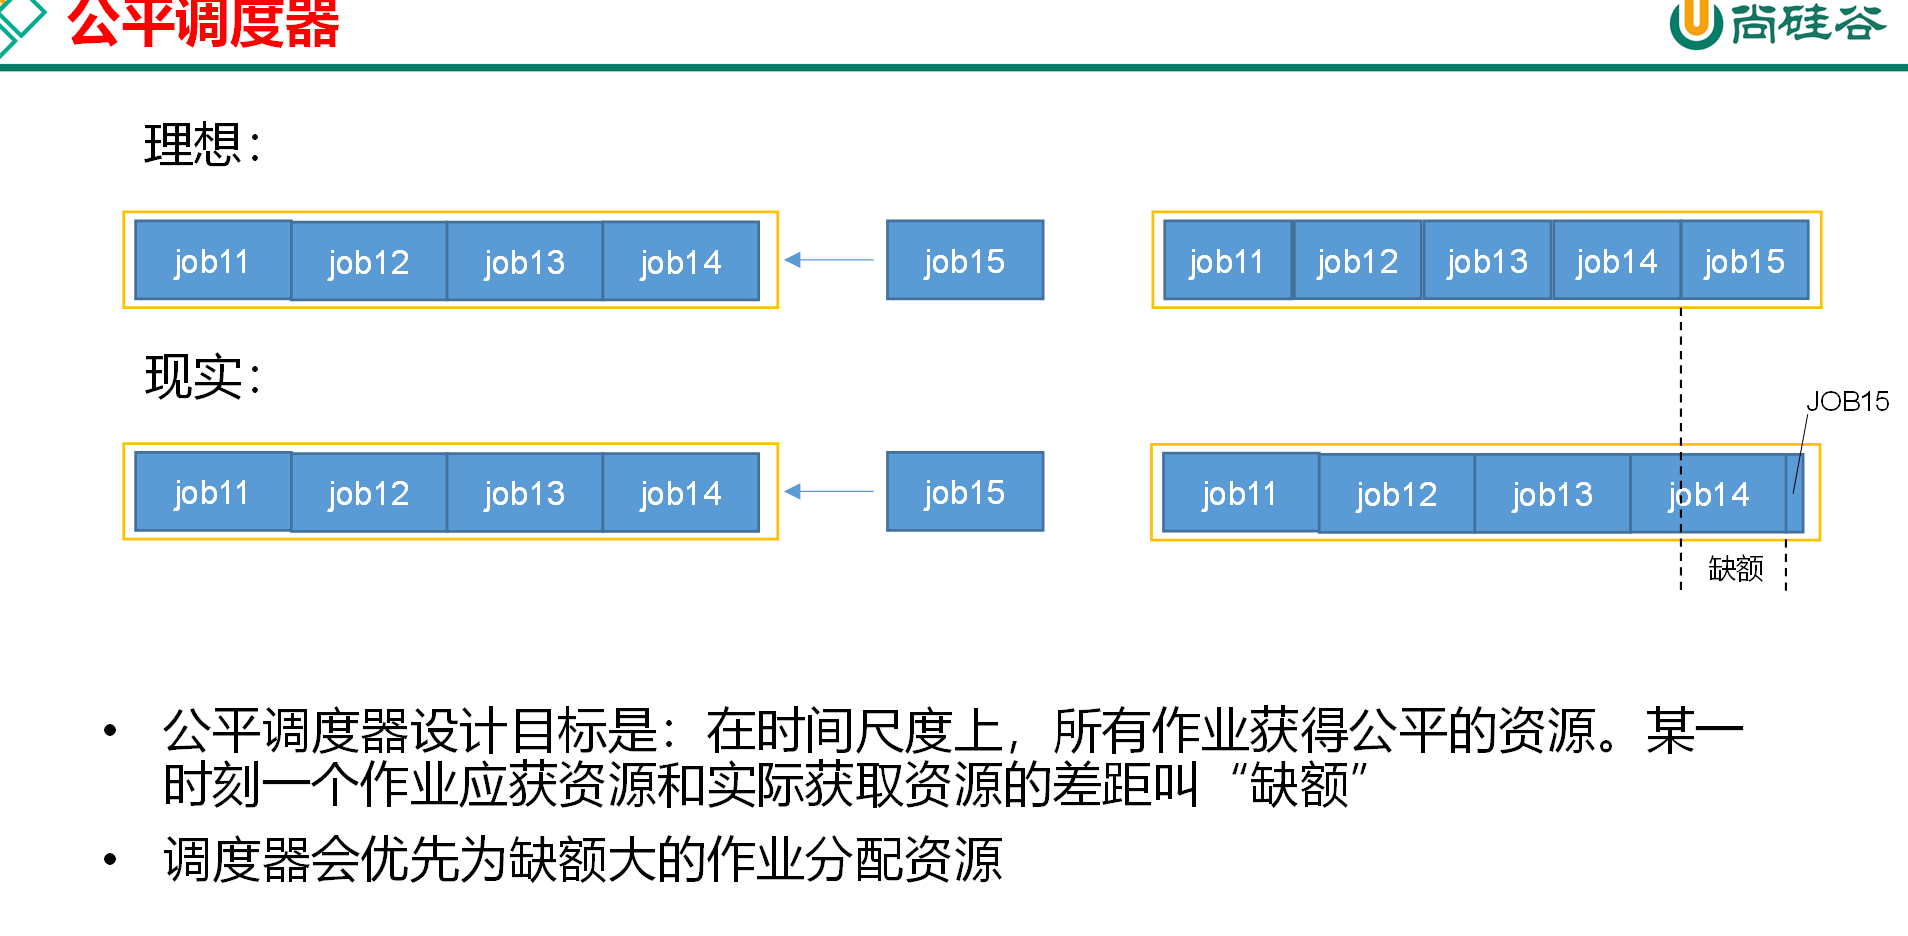
公平调度器(Fair Scheduler)
6. 容器调度器多队列配置
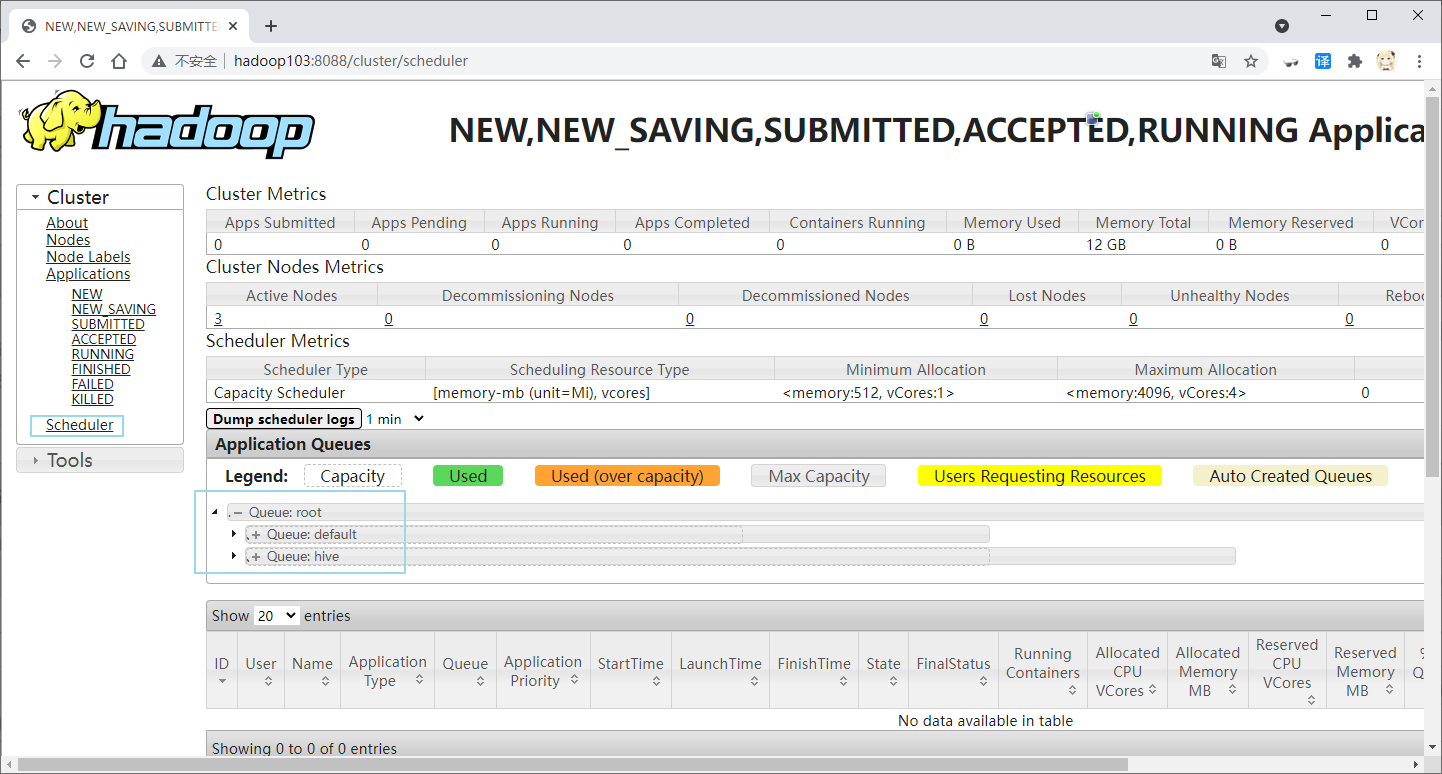
容量调度器默认为1个队列 default 通过修改capacity-scheduler.xml文件来配置多队列
vim /opt/module/hadoop-3.1.3/etc/hadoop/capacity-scheduler.xml #建议用图像界面
- 修改yarn.scheduler.capacity.root.queues的value 添加新的队列
<!-- 默认为default队列 可以设置多条队列--><property><name>yarn.scheduler.capacity.root.queues</name><value>default,hive</value><description>The queues at the this level (root is the root queue).</description></property>
- 修改default队列占比为40
<!-- default队列默认占比为100 改为百分之40 剩下交给hive --><property><name>yarn.scheduler.capacity.root.default.capacity</name><value>40</value><description>Default queue target capacity.</description></property>
- 修改default队列允许的最大占比为60
<!--default队列最大占比默认为100 改为60 --><property><name>yarn.scheduler.capacity.root.default.maximum-capacity</name><value>60</value><description>The maximum capacity of the default queue.</description></property>
把default队列的配置属性复制一份 修改为新增队列名hive 并删除其中的description标签
<!--hive队列设置--><property><name>yarn.scheduler.capacity.root.hive.capacity</name><value>60</value></property><property><name>yarn.scheduler.capacity.root.hive.user-limit-factor</name><value>1</value></property><property><name>yarn.scheduler.capacity.root.hive.maximum-capacity</name><value>80</value></property><property><name>yarn.scheduler.capacity.root.hive.state</name><value>RUNNING</value></property><property><name>yarn.scheduler.capacity.root.hive.acl_submit_applications</name><value>*</value></property><property><name>yarn.scheduler.capacity.root.hive.acl_administer_queue</name><value>*</value></property><property><name>yarn.scheduler.capacity.root.hive.acl_application_max_priority</name><value>*</value></property><property><name>yarn.scheduler.capacity.root.hive.maximum-application-lifetime</name><value>-1</value></property><property><name>yarn.scheduler.capacity.root.hive.default-application-lifetime</name><value>-1</value></property><!--hive队列设置结束-->
- 同步到其他集群中
xsync /opt/module/hadoop-3.1.3/etc/hadoop/capacity-scheduler.xml
- 重启hadoop yarn
stop-yarn.sh #103中start-yarn.sh
6.1. 多队列提交任务
通过configuration设置 mapred.job.queue.name为指定队列名
configuration.set("mapred.job.queue.name","hive");
7. 任务的推测执行
推测执行机制
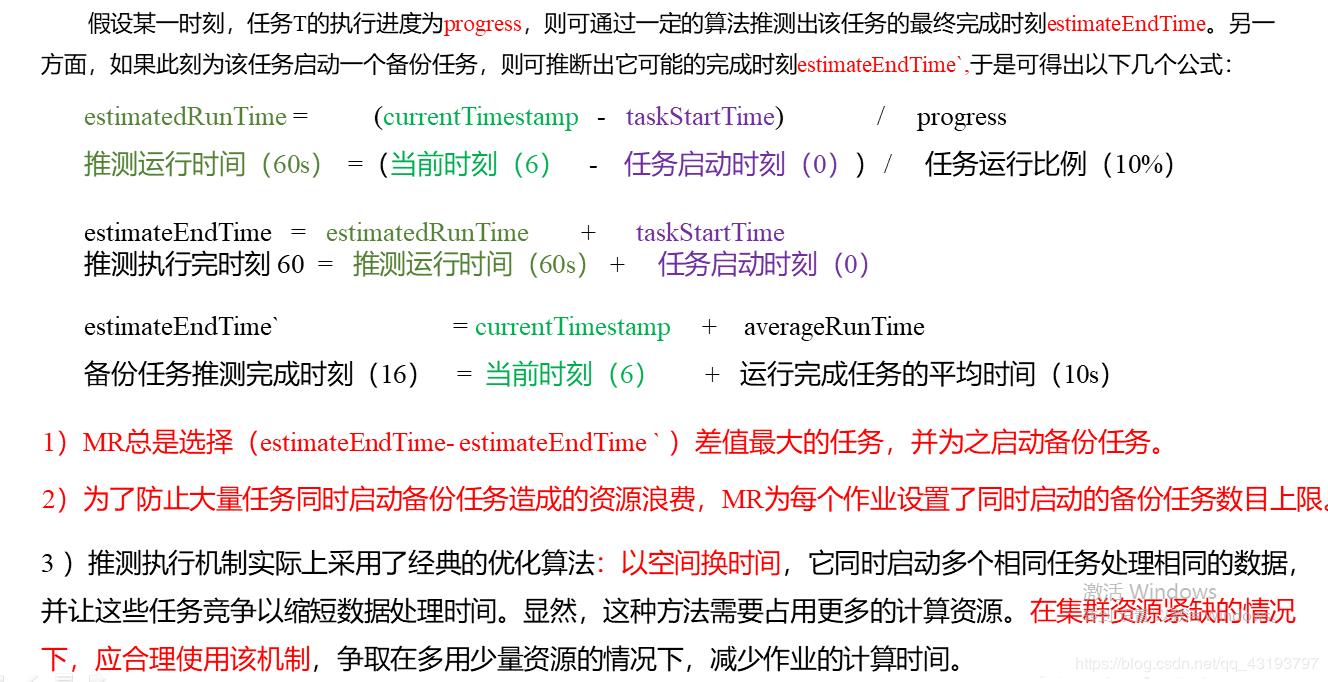
APPmstr 会监控任务的运行速度如果某个任务运行速度远慢于平均任务 则为拖后腿的任务启动一个备份任务同时运行 谁先运行完 则采取谁的结果执行推测任务的前提
每个task只能有一个备份任务
当前job已经完成的task必须不小于 5%
开启了推测执行设置 默认为打开的 在mapred-site.xml设置
<property><name>mapreduce.map.speculative</name><value>true</value></property><property><name>mapreduce.reduce.speculative</name><value>true</value></property>
不能启用推测执行机制情况
- 任务间存在严重的负载倾斜
- 特殊任务 如任务向数据库中写数据

若有收获,就点个赞吧
0 人点赞


