1. day05 广告缓存
2. lua
lua 语言具有以下特性
- 支持面向过程(procedure-oriented)编程和函数式编程(functional programming);
- 自动内存管理;只提供了一种通用类型的表(table),用它可以实现数组,哈希表,集合,对象;
- 语言内置模式匹配;闭包(closure);函数也可以看做一个值;提供多线程(协同进程,并非操作系统所支持的线程)支持;
- 通过闭包和table可以很方便地支持面向对象编程所需要的一些关键机制,比如数据抽象,虚函数,继承和重载等。
2.1. lua的安装
yum install -y gccyum install libtermcap-devel ncurses-devel libevent-devel readline-develcurl -R -O http://www.lua.org/ftp/lua-5.3.5.tar.gztar -zxf lua-5.3.5.tar.gzcd lua-5.3.5make linux testmake install
2.2. 编写helloword
创建hello.lua文件,内容为
print("hello");
执行
lua helloworld.lua
#或者直接lua 直接进入命令行模式luaprint("hello");
2.3. 基本用法
lua有交互式编程和脚本式编程。
交互式编程就是直接输入语法,就能执行。
脚本式编程需要编写脚本文件,然后再执行。
一般采用脚本式编程。(例如:编写一个hello.lua的文件,输入文件内容,并执行lua hell.lua即可)
2.4. 注释
-- 单行注释--[[多行注释1多行注释2--]]
2.5. 关键字
| and | break | do | else |
| elseif | end | false | for |
| function | if | in | local |
| nil | not | or | repeat |
| return | then | true | until |
| while |
2.6. 定义变量
变量默认为全局变量 如果需要局部变量需要声明为local
a = 1local b = 2 -- 局部变量
如果变量没有初始化:则 它的值为nil 这和java中的null不同。
2.7. 数据类型
Lua 是动态类型语言,变量不要类型定义,只需要为变量赋值 值可以存储在变量中,作为参数传递或结果返回。
Lua 中有 8 个基本类型:
| 数据类型 | 描述 |
|---|---|
| nil | 这个最简单,只有值nil属于该类,表示一个无效值(在条件表达式中相当于false)。 |
| boolean | 包含两个值:false和true。 |
| number | 表示双精度类型的实浮点数 |
| string | 字符串由一对双引号或单引号来表示 |
| function | 由 C 或 Lua 编写的函数 |
| userdata | 表示任意存储在变量中的C数据结构 |
| thread | 表示执行的独立线路,用于执行协同程序 |
| table | Lua 中的表(table)其实是一个”关联数组”(associative arrays),数组的索引可以是数字、字符串或表类型。在 Lua 里,table 的创建是通过”构造表达式”来完成,最简单构造表达式是{},用来创建一个空表。 |
2.8. 流程控制
--[ 0 为 true ]if(0) thenprint("0 为 true")elseprint("0 不为true")end
2.9. 函数
--[[ 函数返回两个值的最大值 --]]function max(num1, num2)if (num1 > num2) thenresult = num1;elseresult = num2;endreturn result;end-- 调用函数print("两值比较最大值为 ",max(10,4))print("两值比较最大值为 ",max(5,6))
2.10. require 函数
require 用于 引入其他的模块,类似于import
require "<模块名>"
3. nginx+lua+redis实现广告缓存
3.1. OpenResty
OpenResty(又称:ngx_openresty) 是一个基于 NGINX 的可伸缩的 Web 平台,由中国人章亦春发起,提供了很多高质量的第三方模块。
OpenResty 是一个强大的 Web 应用服务器,Web 开发人员可以使用 Lua 脚本语言调动 Nginx 支持的各种 C 以及 Lua 模块,更主要的是在性能方面,OpenResty可以 快速构造出足以胜任 10K 乃至1000K以上并发连接响应的超高性能 Web 应用系统。
OpenResty 简单理解,就相当于封装了nginx,并且集成了LUA脚本,开发人员只需要简单的其提供了模块就可以实现相关的逻辑,而不再像之前,还需要在nginx中自己编写lua的脚本,再进行调用了。
安装
yum install yum-utilsyum-config-manager --add-repo https://openresty.org/package/centos/openresty.repoyum install openresty #yum安装路径为/usr/local/openresty
OpenResty 内置nginx 我们需要修改一下nginx配置 ,将配置文件使用的根设置为root,目的就是将来要使用lua脚本的时候 ,直接可以加载在root下的lua脚本。
vim /usr/local/openresty/nginx/conf/nginx.conf#user nobody; 配置文件第一行原来为这样, 现改为下面的配置user root root;
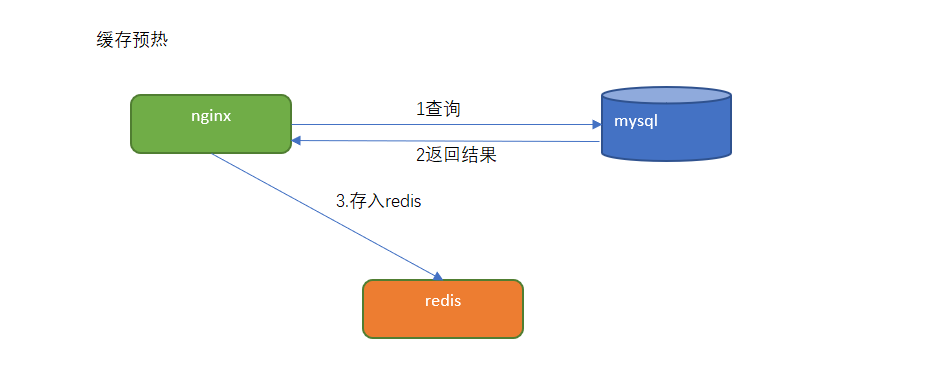
3.2. 缓存预热与二级缓存查询
编写lua脚本实现缓存预热(将mysql里的数据查询出来存入redis
编写lua脚本实现二级缓存读取
3.3. 代码实现
3.3.1. 缓存预热
实现思路:
定义请求:用于查询数据库中的数据更新到redis中。
- 连接mysql ,按照广告分类ID读取广告列表,转换为json字符串。
- 连接redis,将广告列表json字符串存入redis 。
定义请求:
请求:/ad_update参数:position --指定广告位置返回值:json
在/root/lua目录下创建ad_load.lua ,实现连接mysql 查询数据 并存储到redis中。
cd /rootmkdir luacd luavim ad_load.lua
ngx.header.content_type="application/json;charset=utf8"local cjson = require("cjson")local mysql = require("resty.mysql")local uri_args = ngx.req.get_uri_args()local position = uri_args["position"]local db = mysql:new()db:set_timeout(1000)local props = {host = "192.168.130.128",port = 3306,database = "changgou_business",user = "root",password = "root"}local res = db:connect(props)local select_sql = "select url,image from tb_ad where status ='1' and position='"..position.."' and start_time<= NOW() AND end_time>= NOW()"res = db:query(select_sql)db:close()local redis = require("resty.redis")local red = redis:new()red:set_timeout(2000)local ip ="192.168.130.128"local port = 6379red:connect(ip,port)red:set("ad_"..position,cjson.encode(res))red:close()ngx.say("{flag:true}")
修改/usr/local/openresty/nginx/conf/nginx.conf文件
vim /usr/local/openresty/nginx/conf/nginx.conf
在server下添加以下内容
# 添加广告 在mysql中查询广告信息 并缓存到redis中location /ad_update {content_by_lua_file /root/lua/ad_load.lua;}
完整配置文件
#user nobody;user root root;worker_processes 1;#error_log logs/error.log;#error_log logs/error.log notice;#error_log logs/error.log info;#pid logs/nginx.pid;events {worker_connections 1024;}http {include mime.types;default_type application/octet-stream;sendfile on;#tcp_nopush on;#keepalive_timeout 0;keepalive_timeout 65;#gzip on;server {listen 80;server_name localhost;charset utf-8;#access_log logs/host.access.log main;# 添加广告 在mysql中查询广告信息 并缓存到redis中location /ad_update {content_by_lua_file /root/lua/ad_load.lua;}# redirect server error pages to the static page /50x.html#error_page 500 502 503 504 /50x.html;location = /50x.html {root html;}}}
重启nginx
cd /usr/local/openresty/nginx/sbin/./nginx -s reload
访问http://192.168.130.128/ad_update?position=web_index_lb测试
如果返回{flag:true} 则成功
可以查看redis中ad_web_index_lb 是否有数据 如无数据 请到数据库中更改ad结束时间
3.3.2. 广告缓存读取
通过lua脚本直接从redis中获取数据即可。
定义请求:
请求:/ad_read参数:position返回值:json
在/root/lua目录下创建ad_read.lua
vim /root/lua/ad_read.lua
ngx.header.content_type="application/json;charset=utf8"local uri_args = ngx.req.get_uri_args();local position = uri_args["position"];local redis = require("resty.redis");local red = redis:new()red:set_timeout(2000)local ok, err = red:connect("192.168.130.128", 6379)local rescontent=red:get("ad_"..position)ngx.say(rescontent)red:close()
在/usr/local/openresty/nginx/conf/nginx.conf中server下添加配置
vim /usr/local/openresty/nginx/conf/nginx.conf
#从redis 读取广告location /ad_read {content_by_lua_file /root/lua/ad_read.lua;}
重启nginx
cd /usr/local/openresty/nginx/sbin/./nginx -s reload
测试 http://192.168.130.128/ad_read?position=web_index_lb 输出
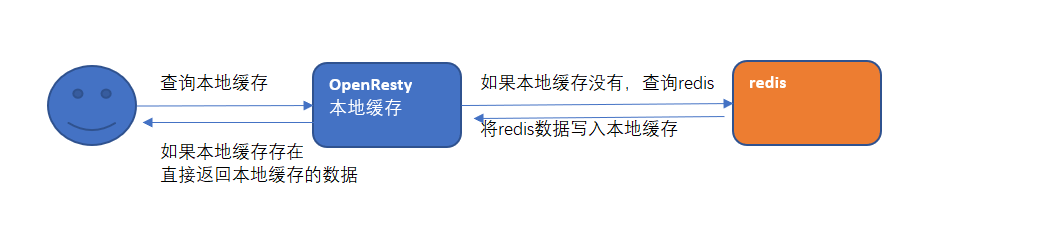
3.3.3. 二级缓存-加入openresty本地缓存
先查询openresty本地缓存 如果没有再查询redis中的数据
修改/root/lua目录下ad_read文件,
ngx.header.content_type="application/json;charset=utf8"local uri_args = ngx.req.get_uri_args();local position = uri_args["position"];local cache_ngx = ngx.shared.dis_cache;local adCache = cache_ngx:get('ad_cache_'..position);if adCache == "" or adCache == nil thenlocal redis = require("resty.redis");local red = redis:new()red:set_timeout(2000)local ok, err = red:connect("192.168.130.128", 6379)local rescontent=red:get("ad_"..position)ngx.say(rescontent)red:close()cache_ngx:set('ad_cache_'..position, rescontent, 10*60);elsengx.say(adCache)end
修改nginx配置文件vi /usr/local/openresty/nginx/conf/nginx.conf ,http节点下添加配置:
#包含redis初始化模块lua_shared_dict dis_cache 5m; #共享内存开启
3.3.4. 前端页面实现
修改index.html,编写脚本
<script>new Vue({el: '#app',data: {ad: {web_index_lb:[]}},methods: {adRead: function(position) {axios.get('ad_read?position='+position).then(response =>{this.ad[position]=response.data})}},created(){this.adRead('web_index_lb')}})</script>
修改index.html 渲染广告轮播图
<div id="myCarousel" data-ride="carousel" data-interval="4000" class="sui-carousel slide"><ol class="carousel-indicators"><li data-target="#myCarousel" data-slide-to="0" class="active" v-for="item in ad.web_index_lb"></li></ol><div class="carousel-inner" id="lbt"><div class="item" v-for="item in contentList"><a :href="item.url"><img :src="item.pic" /></a></div></div><a href="#myCarousel" data-slide="prev" class="carousel-control left">‹</a><a href="#myCarousel" data-slide="next" class="carousel-control right">›</a></div>
将整个前端项目 上传到nginx下的html中
3.4. nginx限流
一般情况下,首页的并发量是比较大的,即使有了多级缓存,如果有大量恶意的请求,也会对系统造成影响。而限流就是保护措施之一。
nginx提供两种限流的方式:
- 一是控制速率
- 二是控制并发连接数
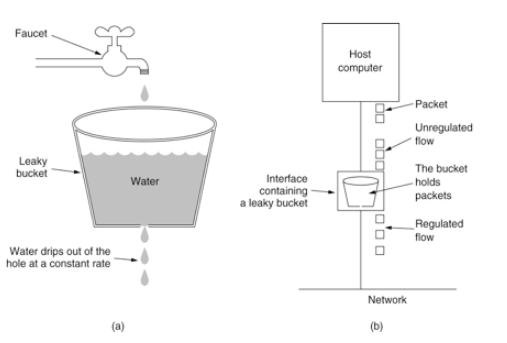
3.4.1. 漏桶算法实现控制速率限流
控制速率的方式之一就是采用漏桶算法。
漏桶(Leaky Bucket)算法思路很简单,水(请求)先进入到漏桶里,漏桶以一定的速度出水(接口有响应速率),当水流入速度过大会直接溢出(访问频率超过接口响应速率),然后就拒绝请求,可以看出漏桶算法能强行限制数据的传输速率.示意图如下:
nginx的配置 将以下内容添加到http节点下
limit_req_zone $binary_remote_addr zone=myRateLimit:10m rate=2r/s;server {listen 8081;server_name localhost;charset utf-8;location / {limit_req zone=myRateLimit;root html;index index.html index.htm;}}
- binaryremote_addr 是一种key,表示基于 remote_addr(客户端IP) 来做限流,binary 的目的是压缩内存占用量。
- zone:定义共享内存区来存储访问信息, myRateLimit:10m 表示一个大小为10M,名字为myRateLimit的内存区域。1M能存储16000 IP地址的访问信息,10M可以存储16W IP地址访问信息。
- rate 用于设置最大访问速率,rate=10r/s 表示每秒最多处理10个请求。Nginx 实际上以毫秒为粒度来跟踪请求信息,因此 10r/s 实际上是限制:每100毫秒处理一个请求。这意味着,自上一个请求处理完后,若后续100毫秒内又有请求到达,将拒绝处理该请求.我们这里设置成2 方便测试。
完整配置
#user nobody;user root root;worker_processes 1;#error_log logs/error.log;#error_log logs/error.log notice;#error_log logs/error.log info;#pid logs/nginx.pid;events {worker_connections 1024;}http {include mime.types;default_type application/octet-stream;#log_format main '$remote_addr - $remote_user [$time_local] "$request" '# '$status $body_bytes_sent "$http_referer" '# '"$http_user_agent" "$http_x_forwarded_for"';#access_log logs/access.log main;sendfile on;#tcp_nopush on;#keepalive_timeout 0;keepalive_timeout 65;#gzip on;limit_req_zone $binary_remote_addr zone=myRateLimit:10m rate=2r/s;server {listen 8081;server_name localhost;charset utf-8;location / {limit_req zone=myRateLimit;root html;index index.html index.htm;}}}
访问http://192.168.130.128:8081/测试 限流则服务返回503错误
3.4.2. 处理突发流量
上面例子限制 2r/s,如果有时正常流量突然增大,超出的请求将被拒绝,无法处理突发流量,可以结合 burst 参数使用来解决该问题。
server {location / {limit_req zone=myRateLimit burst=5;root html;index index.html index.htm;}}
burst 译为突发、爆发,表示在超过设定的处理速率后能额外处理的请求数,当 rate=2r/s 时,将1s拆成2份,即每500ms可处理1个请求。
此处,burst=5 ,若同时有6个请求到达,Nginx 会处理第一个请求,剩余5个请求将放入队列,然后每隔500ms从队列中获取一个请求进行处理。若请求数大于6,将拒绝处理多余的请求,直接返回503.
不过,单独使用 burst 参数并不实用。假设 burst=50 ,rate为10r/s,排队中的50个请求虽然每100ms会处理一个,但第50个请求却需要等待 50 * 100ms即 5s,这么长的处理时间自然难以接受。
因此,burst 往往结合 nodelay 一起使用。
server {location / {limit_req zone=myRateLimit burst=5 nodelay;root html;index index.html index.htm;}}
处理突发5个请求的时候,没有延迟,等到完成之后,按照正常的速率处理。
如上两种配置结合就达到了速率稳定,但突然流量也能正常处理的效果
在1秒钟之内可以刷新5次,正常处理 但是超过之后,连续刷新5次,抛出异常。

若有收获,就点个赞吧
0 人点赞
