1. ElasticSearch
ElasticSearch是基于 Lucene的搜索服务器 是一个分布式 高扩展 高实时的搜索与数据分析引擎
基于RESTful web接口
ElasticSearch是用java开发 并作为apache的开源项目
一般用于 海量数据的查询 日志数据分析 实时数据分析
2. 倒排索引
将各个文档中内容.进行分词 形成词条 记录词条和数据的唯一标识(id)的对应关系 形成的产物
3. ElasticSearch搜索和传统数据库查询的区别
- 传统关系型数据 使用模糊查询 左边有通配符 不会走索引 会全表扫描 性能低
- 只能以一个关键字作为查询条件 而ElasticSearch会把一个关键字拆分为多个词 进行查询
- ElasticSearch 以关键字 生成的倒排索引 词条会排序 形成一颗树形结构 提升词条的查询速度
- Mysql有事务性 而ElasticSearch 没有事务性 所以删了的数据是无法恢复的
- ElasticSearch 没有物理外键这个特性 如果数据的一致性要求比较高 不建议使用
- ElasticSearch和Mysql 分工不同 Mysql负责存储数据 ElasticSearch负责搜索数据
4. 安装ElasticSearch
tar -zxvf elasticsearch-7.15.0-linux-x86_64.tar.gz -C /opt#编辑配置vim /opt/elasticsearch-7.15.0/config/elasticsearch.yml#追加以下内容cluster.name: my-applicationnode.name: node-1network.host: 0.0.0.0http.port: 9200cluster.initial_master_nodes: ["node-1"]#出于安全问题ElasticSearch不允许root用户直接运行useradd iekrpasswd 123456#授权chown -R iekr:iekr /opt/elasticsearch-7.15.0/
新建的用户最大创建文件和最大虚拟内存太小 需要修改配置文件
#修改最大创建文件数vim /etc/security/limits.conf#追加内容iekr soft nofile 65536iekr hard nofile 65536vim /etc/security/limits.d/20-nproc.conf#追加内容iekr soft nofile 65536iekr hard nofile 65536* hard nproc 4096#修改虚拟内容大小vim /etc/sysctl.conf#追加内容vm.max_map_count=655360#重载sysctl -pfirewall-cmd --zone=public --add-port=9200/tcp --permanent
启动
su iekrcd /opt/elasticsearch-7.15.0/bin/./elasticsearch -d #-d后台运行
访问 http://192.168.130.124:9200/ 出现json字符串则启动成功
4.1. 安装辅助工具Kibana
https://www.elastic.co/cn/kibana/
tar -zxvf kibana-7.15.0-linux-x86_64.tar.gz -C /opt#配置vim /opt/kibana-7.15.0-linux-x86_64/config/kibana.yml#追加内容server.port: 5601server.host: "0.0.0.0"server.name: "your-hostname" #自定义名称elasticsearch.hosts: ["http://localhost:9200"]elasticsearch.requestTimeout: 30000 #连接ES超时时间i18n.locale: "zh-CN" #设置为中文#授权chown -R iekr:iekr /opt/kibana-7.15.0-linux-x86_64/firewall-cmd --zone=public --add-port=5601/tcp --permanent
启动
su iekrcd /opt/kibana-7.15.0-linux-x86_64/bin/nohup ./kibana & #后台运行 前台./kibana
5. ElasticSearch 核心概念
索引(index)
ElasticSearch存储数据的地方 可以理解为关系型数据库中的数据库概念映射(mapping)
mapping定义了每个字段的类型 字段所使用的分词器等 相定义关系型数据库中的表结构文档(document)
ElasticSearch中的最小数据单元 以json格式显示 一个document相当于 关系型数据库的一行数据倒排索引
一个倒排索引由文档中所有不重复此的列表构成 对应其中每个词 对应一个包含它的文档id列表类型(type)
一种type就像一类表 如用户表 角色表等
在ElasticSearch7.x type默认为_doc
5.x中一个index可以有多种type
6.x中一个index只能有一种type
6. 操作ElasticSearch
6.1. RESTful风格
REST 表述性状态转移 是一组架构约束条件和原则 满足这些约束条件和原则的应用程序或设计就是RESTful 是与只能怪定义接口的规范
6.2. 操作索引
以下操作使用postman工具发送请求
6.2.1. 添加索引
使用PUT请求 在uri地址后加上索引名称
192.168.130.124:9200/goods_index
6.2.2. 查询索引
使用GET请求 在uri地址后加上索引名称
192.168.130.124:9200/goods_index
查询多个使用逗号分隔
192.168.130.124:9200/goods_index,goods_index2
查询全部使用_all
192.168.130.124:9200/_all
6.2.3. 删除索引
使用DELETE请求 在uri地址后加上索引名称
192.168.130.124:9200/goods_index
6.2.4. 关闭指定索引
关闭后只是无法使用 并不会删除此索引
192.168.130.124:9200/goods_index/_close
打开索引
192.168.130.124:9200/goods_index/_open
6.3. 操作映射
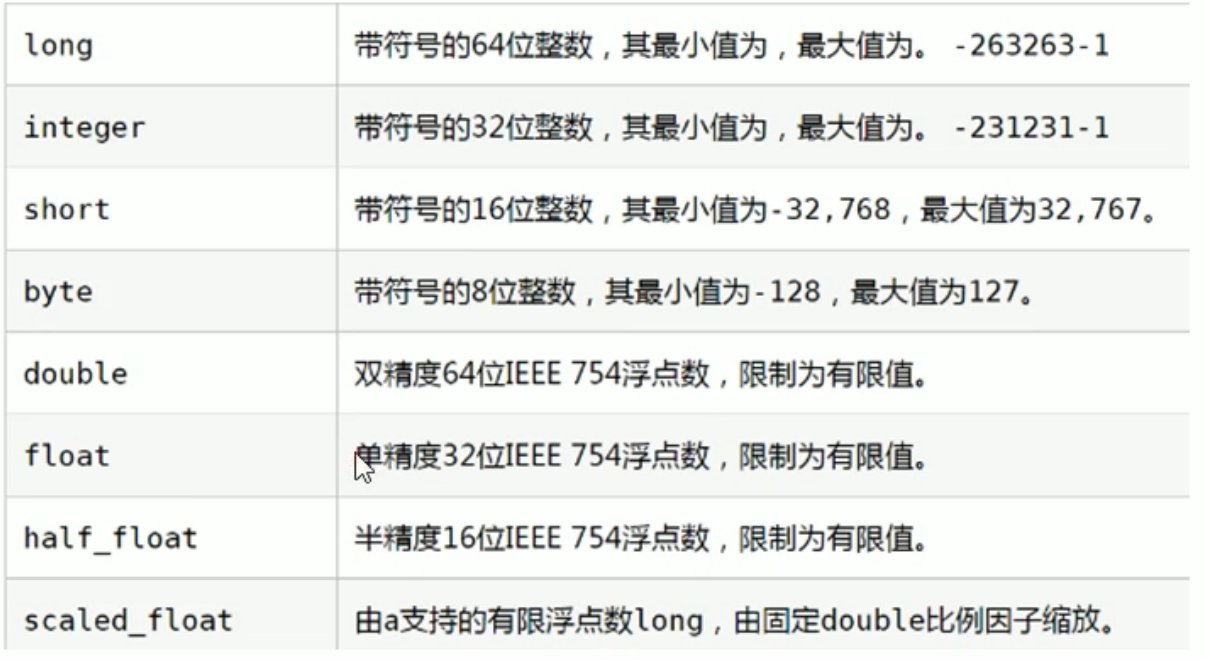
简单数据类型
字符串
- text 会分词,不支持聚合
- keyword 不会分词 将全部内容作为一个词条 支持聚合
数组
- 布尔
二进制
- binary
范围类型
- integer_range
- float_range
- long_range
- double_range
- date_range
- 日期
复杂数据类型
- 数组:[]
- 对象:{}
6.3.1. 添加映射
以下操作使用Kibana操作
http://192.168.130.124:5601/app/dev_tools#/console
# 创建索引PUT person# 查询索引GET person# 添加映射PUT person/_mapping{"properties":{"name":{"type":"keyword"},"age":{"type":"integer"}}}# 查询映射GET person/_mapping# 删除索引DELETE person# 创建索引并添加映射PUT person{"mappings": {"properties": {"name":{"type":"keyword"},"age":{"type":"integer"}}}}# 查询索引GET person# 添加字段PUT person/_mapping{"properties":{"address":{"type":"text"}}}
6.4. 操作文档
# 查询索引GET person# 添加文档 指定id 可以使用PUT或POST请求PUT person/_doc/1{"name":"zhangsan","age":20,"address":"北京"}# 添加文档 不指定id 必须为POST请求POST person/_doc{"name":"李四","age":30,"address":"广东"}# 根据id查询文档GET person/_doc/1# 查询所有文档GET person/_search# 修改文档 必须为PUT请求 如果id存在则修改 不存在则自动创建PUT person/_doc/1{"name":"wangwu","age":20,"address":"北京"}# 根据ID删除文档DELETE person/_doc/1
7. 分词器
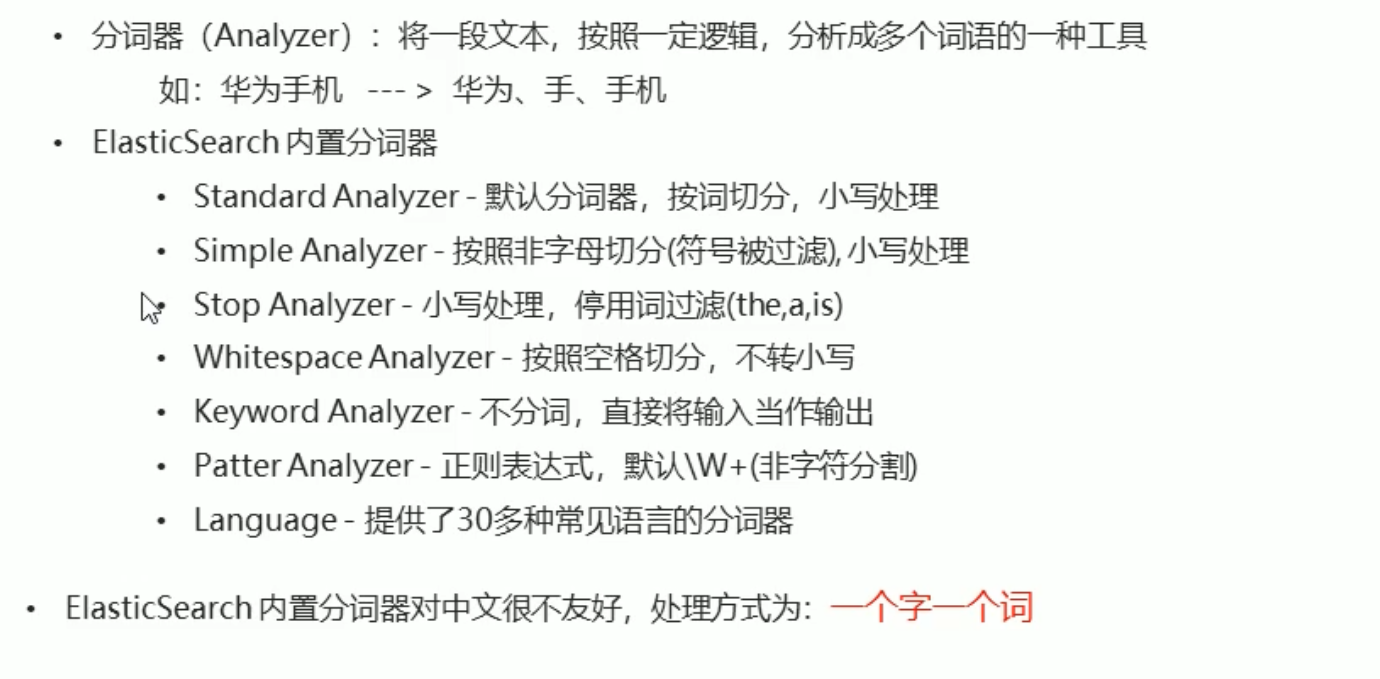
但ES原始的分词器对中文不太友好
8. IK分词器
IKAnalyzer是一个开源的 基于java语言开发的轻量级的中文分词工具包
是一个基于Maven构建的项目 具有60万字/秒的高速处理能力 支持用户词典扩展定义
https://github.com/medcl/elasticsearch-analysis-ik
8.1. 安装
- 安装JDK 由于ES内置了JDK 我们将ES内置的JDK设置为系统环境变量
vim /etc/profileexport JAVA_HOME=/opt/elasticsearch-7.15.0/jdkexport PATH=$PATH:${JAVA_HOME}/binsource /etc/profile
- 安装Maven — 已不需要
wget https://mirrors.bfsu.edu.cn/apache/maven/maven-3/3.8.3/binaries/apache-maven-3.8.3-bin.tar.gztar -zxvf apache-maven-3.8.3-bin.tar.gzln -s apache-maven-3.8.3 maven#配置环境变量vim /etc/profile.d/maven.shexport MAVEN_HOME=/root/mavenexport PATH=${MAVEN_HOME}/bin:${PATH}source /etc/profile.d/maven.shmvn -v
- 安装IK分词器 —已不需要
wget https://github.com/medcl/elasticsearch-analysis-ik/archive/refs/tags/v7.15.0.zip #这里下载的是源码# 由于是zip文件所以需要unzip命令yum install -y zipyum install -y unzip#解压unzip v7.15.0.zipcd /root/elasticsearch-analysis-ik-7.15.0/#编译打包mvn package
- 将编译好的插件导入到ES中
cd /opt/elasticsearch-7.15.0/plugins/mkdir analysis-ikcd analysis-ik/#重启es
8.2. 使用
# ES内置分词器GET _analyze{"analyzer": "standard","text": "你是试试水"}# ik分词器,粗粒度分词GET _analyze{"analyzer": "ik_smart","text": "你是试试水"}# ik分词器,粗粒度分词GET _analyze{"analyzer": "ik_max_word","text": "你是试试水"}
8.2.1. 查询文档
词条查询:tern
- 词条查询不会分析查询条件 只有当词条和查询字符串完全匹配时才匹配搜索
全文查询:match
- 全文查询会分析查询条件 先将查询条件进行分词 然后查询 求并集
PUT person/_doc/2{"name":"李四","age":30,"address":"华为5G手机"}GET person/_doc/2# term 词条查询 查询条件字符串和词条要完全匹配# es默认使用的分词器是standard 一个子一个词GET person/_search{"query":{"term": {"address": {"value": "手机"}}}}DELETE person# 创建索引 添加映射 指定使用ik分词器PUT person{"mappings": {"properties": {"name":{"type": "keyword"},"address":{"type": "text","analyzer": "ik_max_word"}}}}GET person# 添加文档PUT person/_doc/1{"name":"张三","age":30,"address":"华为5G手机"}PUT person/_doc/2{"name":"李四","age":30,"address":"广东"}PUT person/_doc/3{"name":"王五","age":30,"address":"小米5G手机"}GET person/_search# 查询 term词条查询GET person/_search{"query":{"term": {"address": {"value": "手机"}}}}# match 先会对查询的字符串进行分词 在查询 求交集GET person/_search{"query": {"match": {"address": "苹果手机"}}}
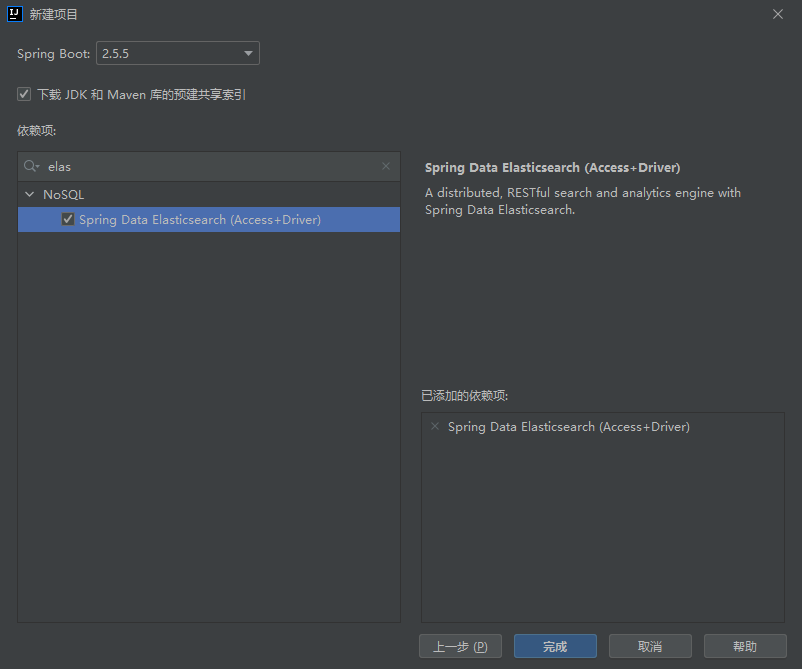
9. JavaApi
创建springboot项目 并引入ES
创建application.yml 配置文件
elasticsearch:host: 192.168.130.124port: 9200
- 创建ElasticSearchConfig配置类 加载配置文件 并返回一个es客户端对象 ```java package com.itheima.elasticsearchdemo.config;
import org.apache.http.HttpHost; import org.elasticsearch.client.RestClient; import org.elasticsearch.client.RestHighLevelClient; import org.springframework.boot.context.properties.ConfigurationProperties; import org.springframework.context.annotation.Bean; import org.springframework.context.annotation.Configuration;
@Configuration @ConfigurationProperties(prefix = “elasticsearch”) public class ElasticSearchConfig {
private String host;private int port;public String getHost() {return host;}public void setHost(String host) {this.host = host;}public int getPort() {return port;}public void setPort(int port) {this.port = port;}@Beanpublic RestHighLevelClient client(){return new RestHighLevelClient(RestClient.builder(new HttpHost(host,port,"http")));}
}
4.注入对象 使用```java//1.创建es客户端对象@Autowiredprivate RestHighLevelClient restHighLevelClient;
9.1. 添加索引
//添加索引@Testvoid addIndex() throws IOException {//获取操作索引的对象IndicesClient indices = restHighLevelClient.indices();//添加CreateIndexRequest createIndex = new CreateIndexRequest("itheima"); //索引名称CreateIndexResponse createIndexResponse = indices.create(createIndex, RequestOptions.DEFAULT);//根据返回值判断结果System.out.println(createIndexResponse.isAcknowledged());}
- 添加索引并添加映射
//添加索引并添加映射@Testvoid addIndexAndMapping() throws IOException {//获取操作索引的对象IndicesClient indices = restHighLevelClient.indices();CreateIndexRequest request = new CreateIndexRequest("twitter");// 向索引添加映射request.source("{\n" +" \"settings\" : {\n" +" \"number_of_shards\" : 3,\n" +" \"number_of_replicas\" : 2\n" +" },\n" +" \"mappings\" : {\n" +" \"tweet\" : {\n" +" \"properties\" : {\n" +" \"message\" : { \"type\" : \"text\" }\n" +" }\n" +" }\n" +" },\n" +" \"aliases\" : {\n" +" \"twitter_alias\" : {}\n" +" }\n" +"}", XContentType.JSON);CreateIndexResponse createIndexResponse = indices.create(request, RequestOptions.DEFAULT);//根据返回值判断结果System.out.println(createIndexResponse.isAcknowledged());}
6.2.2. 查询索引
//查询索引@Testpublic void queryIndex() throws IOException {GetIndexRequest request = new GetIndexRequest("twitter");GetIndexResponse getIndexResponse = restHighLevelClient.indices().get(request, RequestOptions.DEFAULT);System.out.println(getIndexResponse.getAliases());System.out.println(getIndexResponse.getMappings());}
6.2.3. 删除索引
//删除索引@Testpublic void deleteIndex() throws IOException {IndicesClient indices = restHighLevelClient.indices();DeleteIndexRequest deleteIndexRequest = new DeleteIndexRequest("itheima");AcknowledgedResponse acknowledgedResponse = indices.delete(deleteIndexRequest, RequestOptions.DEFAULT);System.out.println(acknowledgedResponse.isAcknowledged());}
9.1.3. 判断索引是否存在
//判断索引是否存在@Testpublic void existIndex() throws IOException {IndicesClient indices = restHighLevelClient.indices();GetIndexRequest getRequest = new GetIndexRequest("itheima");boolean exists = indices.exists(getRequest, RequestOptions.DEFAULT);System.out.println(exists);}
9.2. 添加/修改文档
当id存在时则修改 不存在时则添加
9.2.1. Map
//添加/修改 map@Testpublic void addDoc() throws IOException {//添加数据对象 mapMap<String, String> data = new HashMap<>();data.put("address","背景");data.put("name","钻石");data.put("age","11");//1.获取文档对象IndexRequest indexRequest = new IndexRequest("twitter").id("1").source(data);//添加数据IndexResponse index = restHighLevelClient.index(indexRequest, RequestOptions.DEFAULT);//打印响应结果System.out.println(index.getId());}
9.2.2. JSON
//添加/修改 json@Testpublic void addDoc2() throws IOException {//创建对象Person p =new Person();p.setId("2");p.setName("iekr");p.setAge(15);p.setAddress("广东");String json = JSON.toJSONString(p);//1.获取文档对象IndexRequest indexRequest = new IndexRequest("twitter").id(p.getId()).source(json,XContentType.JSON);//添加数据IndexResponse index = restHighLevelClient.index(indexRequest, RequestOptions.DEFAULT);//打印响应结果System.out.println(index.getId());}
9.3. 查询文档
//根据id查询文档@Testpublic void findDocById() throws IOException {GetRequest getRequest = new GetRequest("twitter", "1");// getRequest.id("1"); //单独指定idGetResponse documentFields = restHighLevelClient.get(getRequest, RequestOptions.DEFAULT);System.out.println(documentFields.getSourceAsString()); //获取JSON字符串}
9.4. 删除文档
//根据id删除文档@Testpublic void delDoc() throws IOException {DeleteRequest delete = new DeleteRequest("twitter", "1");DeleteResponse response = restHighLevelClient.delete(delete, RequestOptions.DEFAULT);System.out.println(response.getId());}

若有收获,就点个赞吧
0 人点赞
