精灵)就是渲染一个2D图像。在cocos中,则限制为渲染一个2D矩形图像,图像数据可以是一个纹理或者是纹理的sub-rectangle(子区域)。
一、数据结构
class CC_DLL Sprite : public Node, public TextureProtocol{// *******************************************************// 以下是当通过SpriteSheet创建渲染Sprite时用的数据:// *******************************************************// SpriteBatchNode,相关学习见;https://www.yuque.com/tvvhealth/cs/ix2yzsTextureAtlas* _textureAtlas; // SpriteBatchNode texture atlas (weak reference,即并没有retain)ssize_t _atlasIndex; // Absolute (real) Index on the SpriteSheetSpriteBatchNode* _batchNode; // Used batch node (weak reference,即并没有retain)bool _dirty; // 是否需要重新计算矩阵bool _recursiveDirty; // 是否需要递归子节点bool _shouldBeHidden; // should not be drawn because one of the ancestors is not visibleMat4 _transformToBatch; // 一般仿射变换矩阵// *******************************************************// 以下是self-rendered的Sprite使用到的数据// 一般就是指不通过SpriteSheet创建的。// *******************************************************BlendFunc _blendFunc; // 混合算法Texture2D* _texture; // 渲染时用到的采样纹理,在片段着色中采样。SpriteFrame* _spriteFrame; // createWithSpriteFrameTrianglesCommand _trianglesCommand; // Sprite的绘制指令#if CC_SPRITE_DEBUG_DRAWDrawNode * _debugDrawNode; // 绘制出三角形的边,如果是一个矩形图像,则会绘制两个拼在一起的三角形#endif //CC_SPRITE_DEBUG_DRAW// *******************************************************// 以下则是共享的数据// *******************************************************// textureRect _rect; // texture中要渲染的区域,是设计分辨率标准下bool _rectRotated; // Whether the texture is rotatedRect _centerRectNormalized; // Rectangle to implement "slice 9"// Quad: Renders the sprite using 2 triangles (1 rectangle):// uses small memory, but renders empty pixels (slow)//// Slice9: Renders the sprite using 18 triangles (9 rectangles).// Useful to to scale buttons an other rectangular sprites//// Polygon: Renders the sprite using many triangles (depending on the setting):// Uses more memory, but doesn't render so much empty pixels (faster)//// Quad_Batchnode: Renders the sprite using 2 triangles (1 rectangle) with a static batch,// which has some limitations (see below)RenderMode _renderMode; // Sprite的渲染模式,有以上几种Vec2 _stretchFactor; // stretch factor to match the contentSize.// for 1- and 9- slice spritesSize _originalContentSize; // 纹理的大小(设计分辨率)// Offset Position (used by Zwoptex)Vec2 _offsetPosition;Vec2 _unflippedOffsetPositionFromCenter;// 顶点数据V3F_C4B_T2F_Quad _quad; // 四边形(2个三角形)的四个顶点数据V3F_C4B_T2F* _trianglesVertex; // 一个中间变量,存储一系列的顶点。unsigned short* _trianglesIndex; // 存储上面对应位置顶点的索引。PolygonInfo _polyInfo; // 存储最终的顶点数据// opacity and RGB protocolbool _opacityModifyRGB; // 是否启用displayOpacityRGB// image is flippedbool _flippedX; // Whether the sprite is flipped horizontally or notbool _flippedY; // Whether the sprite is flipped vertically or notbool _insideBounds; // whether or not the sprite was inside bounds the previous framestd::string _fileName; // create(fileName)int _fileType; // 目前看,没鸟用bool _stretchEnabled; // 是否开启延展,用于九宫图}
二、创建
1、create with file
class CC_DLL Sprite : public Node, public TextureProtocol{// 渲染整张纹理static Sprite* create(const std::string& filename);// 渲染纹理的一部分区域// 纹理的左下角为(0.0, 0.0)// 假设width、height为纹理宽高,则(width, height)表示纹理右上角。static Sprite* create(const std::string& filename, const Rect& rect);}
2、create with texture
class CC_DLL Sprite : public Node, public TextureProtocol{// auto sprite = Sprite::create(fileName)// 与下面等价:// auto texture = Director::getInstance()->getTextureCache()->addImage(fileName);// auto sprite = Sprite::createWithTexture(texture)static Sprite* createWithTexture(Texture2D *texture);// 渲染texture的指定区域rect// texture A pointer to an existing Texture2D object.// rect Only the contents inside the rect of this texture will be applied for this sprite.// rotated Whether or not the rect is rotated.static Sprite* createWithTexture(Texture2D *texture, const Rect& rect, bool rotated=false);}
3、create with sprite frame
class CC_DLL Sprite : public Node, public TextureProtocol{// A sprite frame involves a texture and a rect.static Sprite* createWithSpriteFrame(SpriteFrame *spriteFrame);/*** Creates a sprite with an sprite frame name.** A SpriteFrame will be fetched from the SpriteFrameCache by spriteFrameName param.* If the SpriteFrame doesn't exist it will raise an exception.*/static Sprite* createWithSpriteFrameName(const std::string& spriteFrameName);}
例子一:plist
SpriteFrameCache::getInstance()->addSpriteFramesWithFile( "animations/ghosts.plist" );auto father = Sprite::createWithSpriteFrameName( "father.gif" );auto father = Sprite::createWithSpriteFrameName( "sister1.gif" );auto father = Sprite::createWithSpriteFrameName( "sister2.gif" );auto father = Sprite::createWithSpriteFrameName( "child1.gif" );
ghosts.plist文件一定对应一个同名的png文件。
png文件是由多个纹理通过工具合成的一张大纹理。
plist则是对每个小纹理的描述信息,格式如下:
<!-- **************************************************************** --><!-- *************************plist文件格式*************************** --><!-- **************************************************************** --><?xml version="1.0" encoding="UTF-8"?><!DOCTYPE plist PUBLIC "-//Apple//DTD PLIST 1.0//EN" "http://www.apple.com/DTDs/PropertyList-1.0.dtd"><plist version="1.0"><dict> <!-- 内容都在一个dict标签中,其实就可以看成是一个字典 --><key>texture</key> <!-- key标签后面接了一个dict标签,通过这个key可以找到这个dict --><dict><key>width</key> <!-- key标签后面接了一个integer标签,通过这个key可以找到这个integer--><integer>256</integer><key>height</key><integer>256</integer></dict></dict></plist><!-- **************************************************************** --><!-- *************************对应字典如下:*************************** --><!-- **************************************************************** -->{texture : {width : 256,height : 256}}
例子二
grossini_polygon.plist.txt
grossini_polygon.png
string plist = nullptr;Data imageData = nullptr;Image* image = nullptr;Texture2D* texture = nullptr;plist = FileUtils::getInstance()->getStringFromFile("grossini_polygon.plist" );imageData = FileUtils::getInstance()->getDataFromFile( "grossini_polygon.png" );image = new( std::nothrow ) Image();texture = new( std::nothrow ) Texture2D();image->initWithImageData( ( const uint8_t * )imageData.getBytes(), imageData.getSize() );texture->initWithImage( image );texture->autorelease();CC_SAFE_RELEASE( image );SpriteFrameCache::getInstance():->addSpriteFramesWithFileContent( plist, texture );
4、create with polygon info
class CC_DLL Sprite : public Node, public TextureProtocol{// 普通的Sprite是一个矩形,2个三角形,4个顶点。// 可以将Sprite细化成更多个小三角形,这样就可以减少绘制空白区域了。// 相比于普通Sprite,绘制更少的像素提高绘制效率,但会消耗更多的内存(更多的顶点数据)// 如果一张图有大量的空白,且图本身又比较大的时候可以考虑使用。static Sprite* create(const PolygonInfo& info);}
Polygon Sprite和普通Sprite对比效果如下: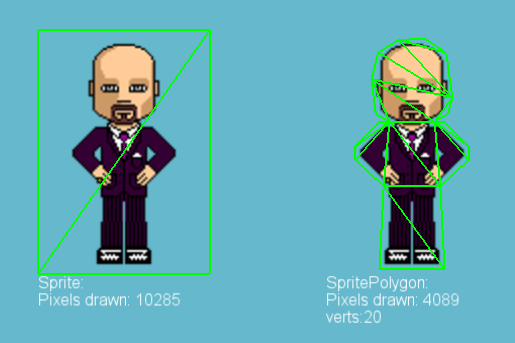
Pixels draw:表示光栅化(rasterization)时生成的像素数量,数量越多,则绘制越慢。
verts:表示绘制的定点数量,越多则内存消耗越大。
绿色框框是开启了CC_SPRITE_DEBUG_DRAW,将GL三角形绘制出来。
下面是使用例子。
auto scaleFactor = Director::getInstance()->getContentScaleFactor();auto filename = "Images/grossini.png";auto ap = AutoPolygon(filename);auto head = Rect(30,25,25,25); // 头部区域auto epsilon = 2.0f; // 越小,三角形越细化,顶点越多,绘制空白越少auto threhold = 0.0f; // alpha>threhold的像素被认为是不透明的_polygonSprite = Sprite::create(ap.generateTriangles()); // 多边形Sprite_normalSprite = Sprite::create(filename); // 普通Sprite// 只绘制头部区域_polygonSprite = Sprite::create(ap.generateTriangles(head));_normalSprite = Sprite::create(filename, head);// 只绘制头部区域,设置参数动态改变顶点数量_polygonSprite->setPolygonInfo(ap.generateTriangles(head, epsilon, threhold));auto polygonInfo = ap.generateTriangles();auto size = polygonInfo.getRect().size / scaleFactor;// 通过polygonInfo绘制的Sprite的顶点数量auto vertCount = polygonInfo.getVertCount;// 通过polygonInfo绘制的Sprite的像素 与 Sprite::create(filename)的像素的比// 看看像素减少了多少。auto percent = polygonInfo.getArea() / (size.width * size.height) * 100;
5、create with etc1
原理参见:
// etc1格式的扩展名:pkm、ktx,gles2.0均支持。
auto etc1 = “Images/etc1-alpha.pkm”;
// 方法一 auto etc1_sprite = Sprite::create(etc1); // 触发了TextureCache::addImage
// 方法二 auto etcTexture = director->getTextureCache()->addImage(etc1); auto etc1_sprite = Sprite::create(); etc1_sprite->initWithTexture(etcTexture);
// TextureCache::addImage逻辑中,增加了etc1逻辑 // 假如是etc1格式,则会检查是否存在alpha texture,路径为:et1+”@alpha”,即: // Images/etc1-alpha.pkm@alpha,如果存在,则加载。
<a name="SskRW"></a># 三、绘制```cppvoid Sprite::draw(Renderer *renderer, const Mat4 &transform, uint32_t flags){if (_texture == nullptr){return;}// 程序级剪裁(Culling),再发送指令给GL之前,在应用程序中做一个剪裁测试// 在窗口之外的顶点将不会被绘制,这样可以提升一些性能// 更好的做法是我们设计的时候自己注意不要有超出屏幕的顶点,这样我们可以关闭CC_USE_CULLING#if CC_USE_CULLING......#endif{// 精灵的绘制实际是绘制一个或者多个三角形。_trianglesCommand.init(_globalZOrder, // globalOrder用于绘制栈全局排序_texture, // 采样的纹理getGLProgramState(), // 着色器的状态数据_blendFunc, // 采用的混合方程_polyInfo.triangles, // 三角形的顶点数据和顶点索引,用于绘制transform, // 本节点的MV,通过父节点MV*本节点坐标系的变换矩阵得到flags); // 标记renderer->addCommand(&_trianglesCommand);// 按绘制顺序依次画出构成Sprite的三角形#if CC_SPRITE_DEBUG_DRAW_debugDrawNode->clear();auto count = _polyInfo.triangles.indexCount/3;auto indices = _polyInfo.triangles.indices;auto verts = _polyInfo.triangles.verts;for(ssize_t i = 0; i < count; i++){//draw 3 linesVec3 from =verts[indices[i*3]].vertices;Vec3 to = verts[indices[i*3+1]].vertices;_debugDrawNode->drawLine(Vec2(from.x, from.y), Vec2(to.x,to.y), Color4F::WHITE);from =verts[indices[i*3+1]].vertices;to = verts[indices[i*3+2]].vertices;_debugDrawNode->drawLine(Vec2(from.x, from.y), Vec2(to.x,to.y), Color4F::WHITE);from =verts[indices[i*3+2]].vertices;to = verts[indices[i*3]].vertices;_debugDrawNode->drawLine(Vec2(from.x, from.y), Vec2(to.x,to.y), Color4F::WHITE);}#endif //CC_SPRITE_DEBUG_DRAW}}
从上面我们可以知道,绘制Sprite其实就是OpenGL中的绘制三角形。
四、混合:Blending
就是指的OpenGL的混合阶段。
语雀内容
相关源码如下:
// cocos中对混合的封装struct CC_DLL BlendFunc{// 混合算法包含两部分:源片段的混合、目标片段的混合// 源片段指光栅化新生成的片段,目标片段指颜色缓冲区中的对应片段。GLenum src; // 源片段混合算法,可能枚举值参考上面部分。GLenum dst; // 目标片段混合算法,// 下面是cocos预定义的混合类型static const BlendFunc DISABLE; // {GL_ONE, GL_ZERO},关闭透明度// alpha预乘,{GL_ONE, GL_ONE_MINUS_SRC_ALPHA}// 源片段的色值已经是乘以了alpha,因此在GL 混合阶段无需再计算源片段的部分static const BlendFunc ALPHA_PREMULTIPLIED;// 关闭alpha预乘,{GL_SRC_ALPHA, GL_ONE_MINUS_SRC_ALPHA}// 混合计算工作全部在混合阶段完成static const BlendFunc ALPHA_NON_PREMULTIPLIED;// {GL_SRC_ALPHA, GL_ONE}static const BlendFunc ADDITIVE;};class CC_DLL Sprite : public Node, public TextureProtocol{// 设置混合函数void setBlendFunc(const BlendFunc &blendFunc) override;const BlendFunc& getBlendFunc() const override { return _blendFunc; }void Sprite::updateBlendFunc(void){CCASSERT(_renderMode != RenderMode::QUAD_BATCHNODE, "CCSprite: updateBlendFunc doesn't work when the sprite is rendered using a SpriteBatchNode");// it is possible to have an untextured spriteif (! _texture || ! _texture->hasPremultipliedAlpha()){_blendFunc = BlendFunc::ALPHA_NON_PREMULTIPLIED;setOpacityModifyRGB(false);}else{_blendFunc = BlendFunc::ALPHA_PREMULTIPLIED;setOpacityModifyRGB(true);}}}
五、颜色叠加
1、Node颜色叠加
相关数据结构:
class CC_DLL Node : public Ref{Color3B _displayedColor; // 顶点中的颜色数据(rgb)Color3B _realColor; // 给节点设置的颜色属性,通过setColor设置。// setColor时,_displayedColor = _realColorGLubyte _displayedOpacity; // 顶点中的颜色数据(alpha)GLubyte _realOpacity; // 同上,setOpacity// displayColor = parent.displayColor * realColor// true: parent.displayColor = parent.displayColor// false: parent.displayColor = WHITEbool _cascadeColorEnabled;// displayOpacity = parent.displayOpacity * realOpacity// true: parent.displayOpacity = parent.displayOpacity// false: parent.displayOpacity = 255bool _cascadeOpacityEnabled;bool _opacityModifyRGB; // 主要是为了实现alpha预乘,见下面的伪代码// 注意在node中并没有,供node子节点自行实现}// 这么多数据,无非就是为了计算最终颜色,计算过程如下:伪代码// realColor = displayColor = WHITE;// realOpacity = displayOpacity = WHITE;// setcolor(...); // realColor = displayColor = ...// setOpacity(...); // realOpacity = displayOpacity = ...// parentDisplayColor = WHITE;// if(cascadeColor)// parentDisplayColor = parent.DisplayColor;// displayColor = parentDisplayColor * realColor; // 计算出displayColor// parentDisplayOpacity = 255;// if(cascadeOpacity)// parentDisplayOpacity = parent.DisplayOpacity;// displayOpacity = parentDisplayOpacity * realOpacity; // 计算出displayOpacity// if(opacityModifyRGB)// displayColor *= displayOpacity;//// vertexColor = color(displayColor, displayOpacity); // 顶点数据中的颜色数据// 进入片段着色器// 输出到屏幕的最终颜色 = vertexColor * textureColor; // textureColor是纹理颜色// 当然也可能没有纹理颜色,比如LayerColor// Sprite就有纹理
相关函数方法:
class CC_DLL Node : public Ref{// 下面是color相关的函数,opacity的函数类似,color该Opacity即可virtual void setColor(const Color3B& color); // 初始化realColor = displayColor = color,然后计算最终displayColorvirtual void updateDisplayedColor( const Color3B& parentColor); // 根据parentColor,计算出displayColorvirtual void setCascadeColorEnabled(bool cascadeColorEnabled); // 设置cascadevirtual void disableCascadeColor(); // 非常蛋疼的函数,糟糕的设计virtual void updateCascadeColor(); // 根据cascade,决定parent.displayColor的值,计算displayColorvirtual void setOpacityModifyRGB(bool value); // 需要子类自行实现,意义见上面伪代码virtual void updateColor() {} // 子类字形实现,将displayColor、displayOpacity更新到顶点数据中virtual const Color3B& getColor() const;virtual const Color3B& getDisplayedColor() const;virtual bool isCascadeColorEnabled() const;virtual bool isOpacityModifyRGB() const;}
2、Sprite颜色叠加
Sprite覆盖实现了上面的几个函数:
- updateColor
- setOpacityModifyRGB
- isOpacityModifyRGB ```cpp
void Sprite::updateColor(void) { Color4B color4( _displayedColor.r, _displayedColor.g, _displayedColor.b, _displayedOpacity );
// alpha预乘,提前计算到displayColor中,在混合阶段则无需再计算源片段的混合if (_opacityModifyRGB) {color4.r *= _displayedOpacity/255.0f;color4.g *= _displayedOpacity/255.0f;color4.b *= _displayedOpacity/255.0f;}// 将颜色数据更新到顶点数据中。for (ssize_t i = 0; i < _polyInfo.triangles.vertCount; i++) {_polyInfo.triangles.verts[i].colors = color4;}......
}
void Sprite::setOpacityModifyRGB(bool modify) { if (_opacityModifyRGB != modify) { _opacityModifyRGB = modify; updateColor(); } }
bool Sprite::isOpacityModifyRGB(void) const { return _opacityModifyRGB; }
```

若有收获,就点个赞吧
0 人点赞
