4.0launcher源码详细分析
从今天起傻蛋打算做一个系列文章,对最新的Android 4.0 系统中的Launcher,也就是Android 4.0原生的桌面程序,进行一个深入浅出的分析,从而引领Android系统的编程爱好者对 Launcher的设计思想,实现方式来做一个研究,从而能够通过这个实例最掌握到目前世界领先的设计方法,同时在程序中加入我们的一些新的实现。众所周知,对一些优秀源代码的分析,是提高编程水平的一条便捷的方式,希望本系列文章能够给大家带来一定的启发,同时欢迎大家和作者一起讨论,作者的微博是:http://weibo.com/zuiniuwang/
先从整体上对Launcher布局作一个分析,让我们通过查看Launcher.xml 和使用hierarchyviewer布局查看工具两者结合的方法来对Launcher的整体结构有个了解。通过hierarchyviewer来对整个桌面做个截图,如下: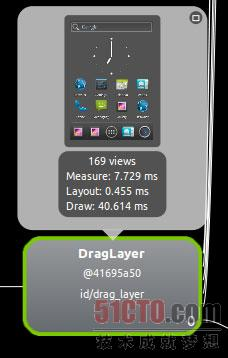
放大后如下所示: 可以看到整个桌面包含的元素,最上面是Google的搜索框,下面是一个始终插件,然后是图标,再有就是一个分隔线,最后是dock。请注意,桌面程序其实并不包含桌面壁纸,桌面壁纸其实是由 WallpaperManagerService来提供,整个桌面其实是叠加在整个桌面壁纸上的另外一个层。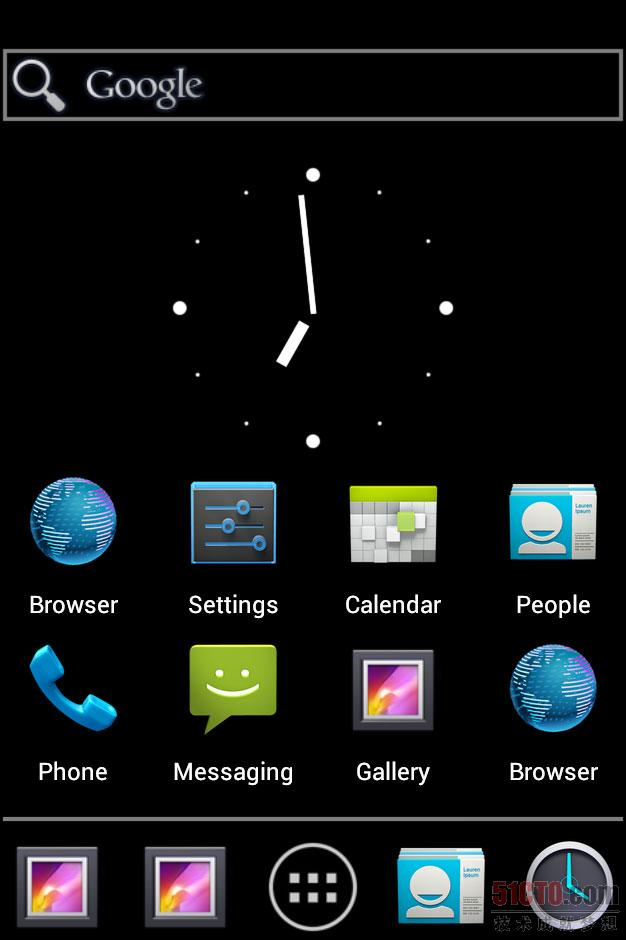
整个Launcher.xml布局文件如下:
1.<com.android.launcher2.DragLayer2.xmlns:android="http://schemas.android.com/apk/res/android";3.xmlns:launcher="http://schemas.android.com/apk/res/com.android.launcher";4.5.android:id="@+id/drag_layer"6.android:layout_width="match_parent"7.android:layout_height="match_parent">8.9.<!-- Keep these behind the workspace so that they are not visible when10.we go into AllApps -->11.<include12.android:id="@+id/dock_divider"13.layout="@layout/workspace_divider"14.android:layout_width="match_parent"15.android:layout_height="wrap_content"16.android:layout_marginBottom="@dimen/button_bar_height"17.android:layout_gravity="bottom" />18.<include19.android:id="@+id/paged_view_indicator"20.layout="@layout/scroll_indicator"21.android:layout_width="wrap_content"22.android:layout_height="wrap_content"23.android:layout_gravity="bottom"24.android:layout_marginBottom="@dimen/button_bar_height" />25.26.<!-- The workspace contains 5 screens of cells -->27.<com.android.launcher2.Workspace28.android:id="@+id/workspace"29.android:layout_width="match_parent"30.android:layout_height="match_parent"31.android:paddingTop="@dimen/qsb_bar_height_inset"32.android:paddingBottom="@dimen/button_bar_height"33.launcher:defaultScreen="2"34.launcher:cellCountX="4"35.launcher:cellCountY="4"36.launcher:pageSpacing="@dimen/workspace_page_spacing"37.launcher:scrollIndicatorPaddingLeft="@dimen/workspace_divider_padding_left"38.launcher:scrollIndicatorPaddingRight="@dimen/workspace_divider_padding_right">39.40.<include android:id="@+id/cell1" layout="@layout/workspace_screen" />41.<include android:id="@+id/cell2" layout="@layout/workspace_screen" />42.<include android:id="@+id/cell3" layout="@layout/workspace_screen" />43.<include android:id="@+id/cell4" layout="@layout/workspace_screen" />44.<include android:id="@+id/cell5" layout="@layout/workspace_screen" />45.</com.android.launcher2.Workspace>46.47.<include layout="@layout/hotseat"48.android:id="@+id/hotseat"49.android:layout_width="match_parent"50.android:layout_height="@dimen/button_bar_height_plus_padding"51.android:layout_gravity="bottom" />52.53.<include54.android:id="@+id/qsb_bar"55.layout="@layout/qsb_bar" />56.57.<include layout="@layout/apps_customize_pane"58.android:id="@+id/apps_customize_pane"59.android:layout_width="match_parent"60.android:layout_height="match_parent"61.android:visibility="invisible" />62.63.<include layout="@layout/workspace_cling"64.android:id="@+id/workspace_cling"65.android:layout_width="match_parent"66.android:layout_height="match_parent"67.android:visibility="gone" />68.69.<include layout="@layout/folder_cling"70.android:id="@+id/folder_cling"71.android:layout_width="match_parent"72.android:layout_height="match_parent"73.android:visibility="gone" />74.</com.android.launcher2.DragLayer>
Launcher整个布局的根是DragLayer,DragLayer继承了FrameLayout,所以DragLayer本身可以看作是一个FrameLayout。下面是 dock_divider,它通过include关键字包含了另外一个布局文件workspace_divider.xml ,而这个workspace_divider.xml包含了一ImageView,其实dock_divider就是dock区域上面的那条直线。 再下面是paged_view_indicator,同样它包含了scroll_indicator.xml,其中包含了一个ImageView,显示的是一个.9的png文件。实际上就是当Launcher滚动翻页的时候,那个淡蓝色的页面指示条。 然后桌面的核心容器WorkSpace,如下图所示,当然你看到的只是Workspace的一部分,其实是一个workspace_screen,通过 Launcher.xml可以看到,整个workspace由5个workspace_screen组成,每个workspace_screen其实就是对应桌面一页。而每个workspace_screen包含了一个CellLayout,这是一个自定义控件,继承自ViewGroup,所以它算是一个用来布局的控件,在这里主要用来承载我们每页的桌面图标、widget和文件夹。
通过查看如下的布局结构(由于图太大只截取了一部分)可以看到,Workspace包含了序号从0到4的5个CellLayout。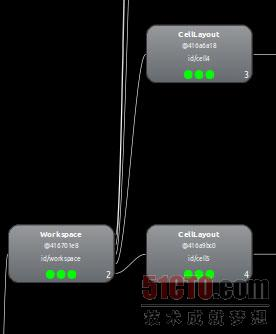
接下来是一个Hotseat,其实就是这块dock区域了。如图所示: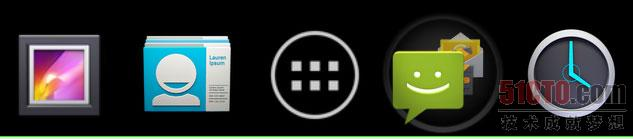
从如下的布局图我们可以看到,这个Hotseat其实还是包含了一个CellLayout,用来承载4个图标和中间启动所有程序的按钮。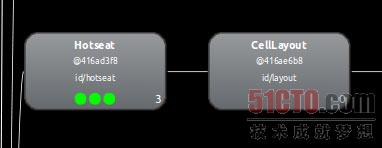
再下来就是那个qsb_bar,就是屏幕最顶端的Google搜索框。这个搜索框是独立于图标界面的,所以当我们对桌面进行翻页的时候,这个搜索框会巍然不动滴固定在最顶端,如下所示:
紧接着是3个初始化时被隐藏的界面。
apps_customize_pane,点击dock中显示所有应用程序的按钮后才会从隐藏状态转换为显示状态,如下图所示,显示了所有应用程序和所有插件的界面。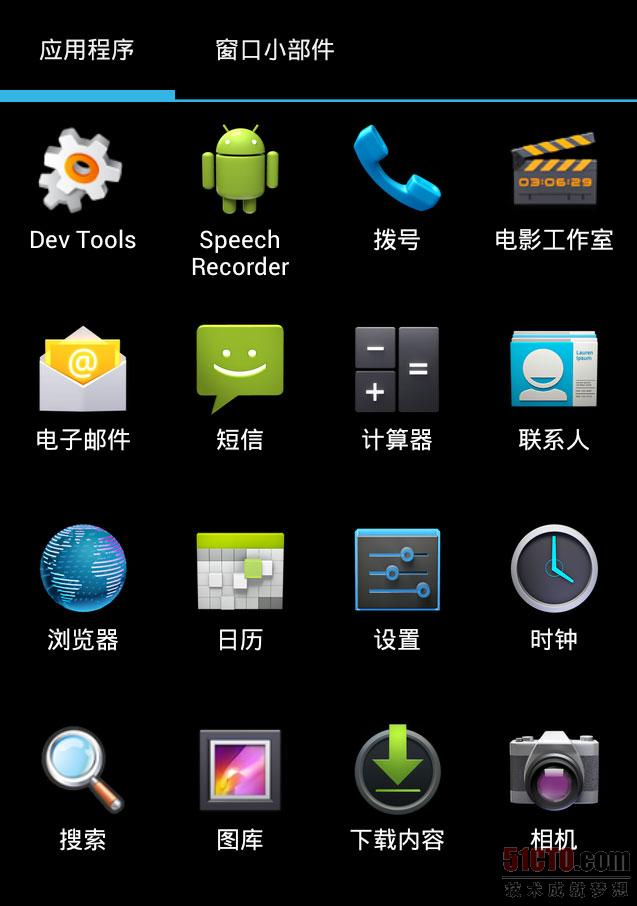
通过查看apps_customize_pane.xml ,我们可以看到apps_customize_pane主要由两部分组成:tabs_container 和tabcontent。tabs部分,用来让我们选择是添加应用程序还是widget,如下图所示:
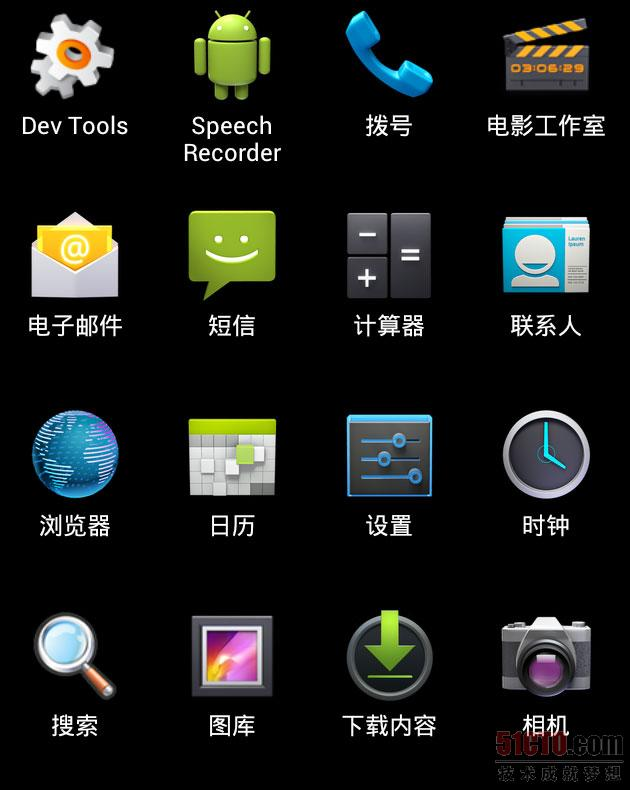
tabcontent,选择了相应的tab之后,下面的部分就会相应的显示应用程序或是widget了,如下图所示:
workspace_cling 和 folder_cling 是刚刷完机后,进入桌面时,显示的使用向导界面,介绍怎么使用workspace和folder,跳过以后就再也不会出现了,这里就不截图了。
上一节我们研究了Launcher的整体结构,这一节我们看看整个Laucher的入口点,同时Laucher在加载了它的布局文件Laucher.xml时都干了些什么。
我们在源代码中可以找到LauncherApplication, 它继承了Application类,当整个Launcher启动时,它就是整个程序的入口。我们先来看它们在AndroidManifest.xml中是怎么配置的。
- android:name=”com.android.launcher2.LauncherApplication”
- android:label=”@string/application_name”
- android:icon=”@drawable/ic_launcher_home”
- android:hardwareAccelerated=”@bool/config_hardwareAccelerated”
- android:largeHeap=”@bool/config_largeHeap”>
首先通过android:name指定了整个Launcher的Application也就是入口是在 com.android.launcher2.LauncherApplication这个路径下,android:lable指定了桌面的名字是叫 Launcher,如果要改名字就改values文件夹的string.xml中的相应属性就可以了。android:icon指定了Laucher的图标,这个图标可以在应用程序管理器中看见,如下图所示,是个可爱机器人住在一个小房子里面,如果需要更改Laucher的图片,重新设置这个属性就可以了。

android:hardwareAccelerated=”@bool/config_hardwareAccelerated” 指定了整个应用程序是启用硬件加速的,这样整个应用程序的运行速度会更快。
android:largeHeap=”@bool/config_largeHeap” 指定了应用程序使用了大的堆内存,能在一定程度上避免,对内存out of memory错误的出现。我们可以在values文件夹的config.xml中看到对是否启用硬件加速和大内存的配置。如下所示:
- <bool name=”config_hardwareAccelerated”>true
- <bool name=”config_largeHeap”>false
在Application中onCreate()方法通过:sIsScreenLarge = screenSize == Configuration.SCREENLAYOUT_SIZE_LARGE || screenSize == Configuration.SCREENLAYOUT_SIZE_XLARGE; 和sScreenDensity = getResources().getDisplayMetrics().density;来判断是否是大屏幕,同时得到它的屏幕密度。同时通过mIconCache = new IconCache(this); 来设置了应用程序的图标的cache,然后申明了LauncherModel,mModel = new LauncherModel(this, mIconCache); LauncherModel主要用于加载桌面的图标、插件和文件夹,同时LaucherModel是一个广播接收器,在程序包发生改变、区域、或者配置文件发生改变时,都会发送广播给LaucherModel,LaucherModel会根据不同的广播来做相应加载操作,此部分会在后面做详细介绍。
在LauncherApplication完成初始化工作之后,我们就来到了Launcher.java的onCreate()方法,同样是启动桌面时的一系列初始化工作。
首先需要注意的是在加载launcher布局文件时的一个TraceView的调试方法,它能够对在他们之间的方法进行图形化的性能分析,并且能够具体到method 代码如下:
1.
if (PROFILE_STARTUP) {
2.
android.os.Debug.startMethodTracing(
3.
Environment.getDataDirectory() + “/data/com.android.launcher/launcher”);
4.
}
5.
if (PROFILE_STARTUP) {
6.
android.os.Debug.stopMethodTracing();
7.
}
我指定的生成性能分析的路径是:/data/data/com.android.launcher/launcher,启动launcher后我们会发现在指定的目录下生成了launcher.trace文件,如下图所示:
把launcher.trace文件通过DDMS pull到电脑上,在SDK的tools目录里,执行traceview工具来打开launcher.trace .如下图所示:
可以看到setContentView使用了448.623ms,占整个跟踪代码时间的62%,所以说在加载布局文件时,肯定经过了一系列的加载运算,我们接着分析。
当加载launcher布局文件的过程时,最为关键的时对整个workspace的加载,workspace是一个自定义组件,它的继承关系如下所示,可以看到Workspace实际上也是一个ViewGroup,可以加入其他控件。
当ViewGroup组件进行加载的时候首先会读取本控件对应的XML文件,然后Framework层会执行它的onMeasure()方法,根据它所包含的子控件大小来计算出整个控件要在屏幕上占的大小。Workspace重写了ViewGroup的onMeasure方法(在PagedView中),在workspace中是对5个子CellLayout进行测量,的方法如下, 具体含义请看注释:
1.
@Override
2.
protected void onMeasure(int widthMeasureSpec, int heightMeasureSpec) {
3.
if (!mIsDataReady) {
4.
super.onMeasure(widthMeasureSpec, heightMeasureSpec);
5.
return;
6.
}
7.
//得到宽度的模式(在配置文件中对应的是match_parent 或者 wrap_content)和其大小
8.
final int widthMode = MeasureSpec.getMode(widthMeasureSpec);
9.
final int widthSize = MeasureSpec.getSize(widthMeasureSpec);
10.
//宽度必须是match_parent,否则会抛出异常。
11.
if (widthMode != MeasureSpec.EXACTLY) {
12.
throw new IllegalStateException(“Workspace can only be used in EXACTLY mode.”);
13.
}
14.
15.
/* Allow the height to be set as WRAP_CONTENT. This allows the particular case
16.
- of the All apps view on XLarge displays to not take up more space then it needs. Width
- is still not allowed to be set as WRAP_CONTENT since many parts of the code expect
- each page to have the same width.
*/
20.
//高度允许是wrap_content,因为在大屏幕的情况下,会占了多余的位置
21.
final int heightMode = MeasureSpec.getMode(heightMeasureSpec);
22.
int heightSize = MeasureSpec.getSize(heightMeasureSpec);
23.
int maxChildHeight = 0;
24.
//得到在竖值方向上和水平方向上的Padding
25.
final int verticalPadding = mPaddingTop + mPaddingBottom;
26.
final int horizontalPadding = mPaddingLeft + mPaddingRight;
27.
28.29.// The children are given the same width and height as the workspace30.// unless they were set to WRAP_CONTENT31.if (DEBUG) Log.d(TAG, "PagedView.onMeasure(): " + widthSize + ", " + heightSize + " mPaddingTop="+mPaddingTop + " mPaddingBottom="+mPaddingBottom);32.final int childCount = getChildCount();33.//对workspace的子View进行遍历,从而对它的几个子view进行测量。34.for (int i = 0; i < childCount; i++) {35.// disallowing padding in paged view (just pass 0)36.final View child = getPageAt(i);37.final LayoutParams lp = (LayoutParams) child.getLayoutParams();38.39.int childWidthMode;40.if (lp.width == LayoutParams.WRAP_CONTENT) {41.childWidthMode = MeasureSpec.AT_MOST;42.} else {43.childWidthMode = MeasureSpec.EXACTLY;44.}45.46.int childHeightMode;47.if (lp.height == LayoutParams.WRAP_CONTENT) {48.childHeightMode = MeasureSpec.AT_MOST;49.} else {50.childHeightMode = MeasureSpec.EXACTLY;51.}52.53.final int childWidthMeasureSpec =54.MeasureSpec.makeMeasureSpec(widthSize - horizontalPadding, childWidthMode);55.final int childHeightMeasureSpec =56.MeasureSpec.makeMeasureSpec(heightSize - verticalPadding, childHeightMode);57.//对子View的大小进行设置,传入width和height参数58.child.measure(childWidthMeasureSpec, childHeightMeasureSpec);59.maxChildHeight = Math.max(maxChildHeight, child.getMeasuredHeight());60.if (DEBUG) Log.d(TAG, "\tmeasure-child" + i + ": " + child.getMeasuredWidth() + ", "61.+ child.getMeasuredHeight());62.}63.64.if (heightMode == MeasureSpec.AT_MOST) {65.heightSize = maxChildHeight + verticalPadding;66.}67.//存储测量后的宽度和高度68.setMeasuredDimension(widthSize, heightSize);69.70.// We can't call getChildOffset/getRelativeChildOffset until we set the measured dimensions.71.// We also wait until we set the measured dimensions before flushing the cache as well, to72.// ensure that the cache is filled with good values.73.invalidateCachedOffsets();74.updateScrollingIndicatorPosition();75.76.if (childCount > 0) {77.mMaxScrollX = getChildOffset(childCount - 1) - getRelativeChildOffset(childCount - 1);78.} else {79.mMaxScrollX = 0;80.}81.}
测量完毕之后就可以对子控件进行布局了,这时候Framework层会调用PagedView中重写的onLayout方法。
1.
@Override
2.
protected void onLayout(boolean changed, int left, int top, int right, int bottom) {
3.
if (!mIsDataReady) {
4.
return;
5.
}
6.
7.if (DEBUG) Log.d(TAG, "PagedView.onLayout()");8.//竖值方向的Padding9.final int verticalPadding = mPaddingTop + mPaddingBottom;10.final int childCount = getChildCount();11.int childLeft = 0;12.if (childCount > 0) {13.if (DEBUG) Log.d(TAG, "getRelativeChildOffset(): " + getMeasuredWidth() + ", "14.+ getChildWidth(0));15.childLeft = getRelativeChildOffset(0);16.//偏移量为017.if (DEBUG) Log.d(TAG, "childLeft:"+childLeft);18.19.// Calculate the variable page spacing if necessary20.// 如果mPageSpacing小于0的话,就重新计算mPageSpacing,并且给它赋值。21.if (mPageSpacing < 0) {22.setPageSpacing(((right - left) - getChildAt(0).getMeasuredWidth()) / 2);23.}24.}25.26.for (int i = 0; i < childCount; i++) {27.final View child = getPageAt(i);28.if (child.getVisibility() != View.GONE) {29.final int childWidth = getScaledMeasuredWidth(child);30.final int childchildHeight = child.getMeasuredHeight();31.int childTop = mPaddingTop;32.if (mCenterPagesVertically) {33.childTop += ((getMeasuredHeight() - verticalPadding) - childHeight) / 2;34.}35.36.if (DEBUG) Log.d(TAG, "\tlayout-child" + i + ": " + childLeft + ", " + childTop);37.//把5个CellLayout布局到相应的位置,layout的4个参数分别是 左、上、右、下。38.child.layout(childLeft, childTop,39.childLeft + child.getMeasuredWidth(), childTop + childHeight);40.childLeft += childWidth + mPageSpacing;41.}42.}43.//第一次布局完毕之后,就根据当前页偏移量(当前页距离Workspace最左边的距离)滚动到默认的页面去,第一次布局时44.//默认的当前页是3,则它的便宜量就是两个CellLayout的宽度。45.if (mFirstLayout && mCurrentPage >= 0 && mCurrentPage < getChildCount()) {46.setHorizontalScrollBarEnabled(false);47.int newX = getChildOffset(mCurrentPage) - getRelativeChildOffset(mCurrentPage);48.//滚动到指定的位置49.scrollTo(newX, 0);50.mScroller.setFinalX(newX);51.if (DEBUG) Log.d(TAG, "newX is "+newX);52.setHorizontalScrollBarEnabled(true);53.mFirstLayout = false;54.}55.56.if (mFirstLayout && mCurrentPage >= 0 && mCurrentPage < getChildCount()) {57.mFirstLayout = false;58.}59.
}
首先傻蛋先画了个图来再来阐述一下WorkSpace的结构。如下图:
桌面的左右滑动功能主要是在PagedView类中实现的,而WorkSpace是PagedView类的子类,所以会继承PagedView中的方法。当我们的手指点击WorkSpace时,首先就会触发PageView中的onInterceptTouchEvent()方法,会根据相应的条件来判断是否对Touch事件进行拦截,如果onInterceptTouchEvent()方法返回为true,则会对Touch事件进行拦截,PageView类的onTouch方法会进行响应从而得到调用。如果返回false,就分两钟情况:(1)我们是点击在它的子控键上进行滑动时,比如我们是点击在桌面的图标上进行左右滑动的,workspace则会把Touch事件分发给它的子控件。(2)而如果仅仅是点击到桌面的空白出Touch事件就不会发生响应。
在我们手指第一次触摸到屏幕时,首先会对onInterceptTouchEvent中的事件进行判断,如果是按下事件(MotionEvent.ACTION_DOWN), 则会记录按下时的X坐标、Y坐标等等数据,同时改变现在Workspace的状态为滚动状态(OUCH_STATE_SCROLLING),这时会返回ture,把事件交给onTouchEvent函数来处理,onTouchEvent中同样会对事件类型进行判断,当事件方法为(otionEvent.ACTION_DOWN)的时候,就可以开始显示滚动的指示条了(就是Hotseat上显示第几屏的屏点)。当我们按着屏幕不放进行滑动的时候,又会在onInterceptTouchEvent进行事件拦截,但是现在的事件类型变为了 MotionEvent.ACTION_MOVE,因为是移动的操作,所以会在拦截的时候取消桌面长按的事件的响应,同时转到onTouchEvent中对ACTION_MOVE事件的响应中,判断我们移动了多少距离,使用scrollBy方法来对桌面进行移动,并刷新屏幕。最后我们放开手后会触发onTouchEvent中的MotionEvent.ACTION_UP事件,这时会根据滑动的情况来判断是朝左滑动还是朝右滑动,如果手指只滑动了屏幕宽度的少一半距离,则会弹回原来的页面,滑动多于屏幕宽度的一半则会进行翻页。同时要注意无论在什么情况下触发了WorkSpace滑动的事件,则系统会不断调用computeScroll()方法,我们重写这个方法同时在这个方法中调用刷新界面等操作。
滑动过程中所要注意的主要方法如下,具体见代码注释。
1.
//对Touch事件进行拦截 主要用于在拦截各种Touch事件时,设置mTouchState的各种状态
2.
@Override
3.
public boolean onInterceptTouchEvent(MotionEvent ev) {
4.
/
5.
This method JUST determines whether we want to intercept the motion.
6.
If we return true, onTouchEvent will be called and we do the actual
7.
scrolling there.
8.
这个方法仅仅决定了我们是否愿意去对滑动事件进行拦截,如果返回为true,则会调用onTouchEvent我们将会在那里进行事件处理
9.
/
10.
//对滑动的速率进行跟踪。
11.
12.acquireVelocityTrackerAndAddMovement(ev);13.14.// Skip touch handling if there are no pages to swipe15.// 如果没有页面,则跳过操作。16.if (getChildCount() <= 0) return super.onInterceptTouchEvent(ev);17.18./*19.* Shortcut the most recurring case: the user is in the dragging20.* state and he is moving his finger. We want to intercept this21.* motion.22.* shortcut最常见的情况是:用户处于拖动的状态下,同时在移动它的手指,这时候我们需要拦截这个动作。23.*/24.final int action = ev.getAction();25.//如果是在MOVE的情况下,则进行Touch事件拦截26.if ((action == MotionEvent.ACTION_MOVE) &&27.(mTouchState == TOUCH_STATE_SCROLLING)) {28.return true;29.}30.31.switch (action & MotionEvent.ACTION_MASK) {32.case MotionEvent.ACTION_MOVE: {33./*34.* mIsBeingDragged == false, otherwise the shortcut would have caught it. Check35.* whether the user has moved far enough from his original down touch.36.* 如果mIsBeingDragged==false ,否则快捷方式应该捕获到该事件,检查一下用户从它点击的地方位移是否足够37.*/38.if (mActivePointerId != INVALID_POINTER) {39.//根据移动的距离判断是翻页还是移动一段位移,同时设置lastMotionX或者mTouchState这些值。同时取消桌面长按事件。40.determineScrollingStart(ev);41.break;42.}43.// if mActivePointerId is INVALID_POINTER, then we must have missed an ACTION_DOWN44.// event. in that case, treat the first occurence of a move event as a ACTION_DOWN45.// i.e. fall through to the next case (don't break)46.// (We sometimes miss ACTION_DOWN events in Workspace because it ignores all events47.// while it's small- this was causing a crash before we checked for INVALID_POINTER)48.// 如果mActivePointerId 是 INVALID_POINTER,这时候我们应该已经错过了ACTION_DOWN事件。在这种情况下,把49.// 第一次发生移动的事件当作ACTION——DOWN事件,直接进入下一个情况下。
//我们有时候会错过workspace中的ACTION_DOWN事件,因为在workspace变小的时候会忽略掉所有的件。
1.
}
2.
3.case MotionEvent.ACTION_DOWN: {4.final float x = ev.getX();5.final float y = ev.getY();6.// Remember location of down touch7.// 记录按下的位置8.mDownMotionX = x;9.mLastMotionX = x;10.mLastMotionY = y;11.mLastMotionXRemainder = 0;12.mTotalMotionX = 0;13.//Return the pointer identifier associated with a particular pointer data index is this event.14.//The identifier tells you the actual pointer number associated with the data,15.//accounting for individual pointers going up and down since the start of the current gesture.16.//返回和这个事件关联的触点数据id,计算单独点的id会上下浮动,因为手势的起始位置挥发声改变。17.mActivePointerId = ev.getPointerId(0);18.mAllowLongPress = true;19.20./*21.* If being flinged and user touches the screen, initiate drag;22.* otherwise don't. mScroller.isFinished should be false when23.* being flinged.24.* 如果被拖动同时用户触摸到了屏幕,就开始初始化拖动,否则便不会。25.* 当拖动完成后mScroller.isFinished就应该设置为false.26.*/27.final int xDist = Math.abs(mScroller.getFinalX() - mScroller.getCurrX());28.29.final boolean finishedScrolling = (mScroller.isFinished() || xDist < mTouchSlop);30.if (finishedScrolling) {31.//标记为TOUCH_STATE_REST状态32.mTouchState = TOUCH_STATE_REST;33.//取消滚动动画34.mScroller.abortAnimation();35.} else {36.//状态为TOUCH_STATE_SCROLLING37.mTouchState = TOUCH_STATE_SCROLLING;38.}39.40.// check if this can be the beginning of a tap on the side of the pages41.// to scroll the current page42.// 检测此事件是不是开始于点击页面的边缘来对当前页面进行滚动。43.if (mTouchState != TOUCH_STATE_PREV_PAGE && mTouchState != TOUCH_STATE_NEXT_PAGE) {44.if (getChildCount() > 0) {45.//根据触点的点位来判断是否点击到上一页,从而更新相应的状态46.if (hitsPreviousPage(x, y)) {47.mTouchState = TOUCH_STATE_PREV_PAGE;48.} else if (hitsNextPage(x, y)) {49.mTouchState = TOUCH_STATE_NEXT_PAGE;50.}51.}52.}53.break;54.}55.56.case MotionEvent.ACTION_UP:57.case MotionEvent.ACTION_CANCEL:58.//触点不被相应时,所做的动作59.mTouchState = TOUCH_STATE_REST;60.mAllowLongPress = false;61.mActivePointerId = INVALID_POINTER;62.//释放速率跟踪63.releaseVelocityTracker();64.break;65.66.case MotionEvent.ACTION_POINTER_UP:67.onSecondaryPointerUp(ev);68.releaseVelocityTracker();69.break;70.}71.72./*73.* The only time we want to intercept motion events is if we are in the74.* drag mode.75.* 我们唯一会去对移动事件进行拦截的情况时我们在拖动模式下76.*/77.if(DEBUG) Log.d(TAG, "onInterceptTouchEvent "+(mTouchState != TOUCH_STATE_REST));78.//只要是mTouchState的状态不为TOUCH_STATE_REST,那么就进行事件拦截79.return mTouchState != TOUCH_STATE_REST;80.
}
onTouchEvent方法,详细见代码注释:
1.
@Override
2.
public boolean onTouchEvent(MotionEvent ev) {
3.
// Skip touch handling if there are no pages to swipe
4.
// 如果没有子页面,就直接跳过
5.
if (getChildCount() <= 0) return super.onTouchEvent(ev);
6.
7.acquireVelocityTrackerAndAddMovement(ev);8.9.final int action = ev.getAction();10.11.switch (action & MotionEvent.ACTION_MASK) {12.case MotionEvent.ACTION_DOWN:13./*14.* If being flinged and user touches, stop the fling. isFinished15.* will be false if being flinged.16.* 如果在滑动的过程中下用户又点击桌面,则取消滑动,从而响应当前的点击。17.* 在滑动的isFinished将返回false.18.*/19.if (!mScroller.isFinished()) {20.mScroller.abortAnimation();21.}22.23.// Remember where the motion event started24.mDownMotionX = mLastMotionX = ev.getX();25.mLastMotionXRemainder = 0;26.mTotalMotionX = 0;27.mActivePointerId = ev.getPointerId(0);28.//主要用来显示滚动条,表明要开始滚动了,这里可以进行调整,滚动条时逐渐显示还是立刻显示。29.if (mTouchState == TOUCH_STATE_SCROLLING) {30.pageBeginMoving();31.}32.break;33.34.case MotionEvent.ACTION_MOVE:35.if (mTouchState == TOUCH_STATE_SCROLLING) {36.// Scroll to follow the motion event37.final int pointerIndex = ev.findPointerIndex(mActivePointerId);38.final float x = ev.getX(pointerIndex);39.final float deltaX = mLastMotionX + mLastMotionXRemainder - x;40.//总共移动的距离41.mTotalMotionX += Math.abs(deltaX);42.43.// Only scroll and update mLastMotionX if we have moved some discrete amount. We // keep the remainder because we are actually testing if we've moved from the last44.// scrolled position (which is discrete).45.// 如果我们移动了一小段距离,我们则移动和更新mLastMotionX 。我们保存Remainder变量是因为会检测我们46.47.//是否是从最后的滚动点位移动的。48.if (Math.abs(deltaX) >= 1.0f) {49.mTouchX += deltaX;50.mSmoothingTime = System.nanoTime() / NANOTIME_DIV;51.if (!mDeferScrollUpdate) {52.scrollBy((int) deltaX, 0);53.if (DEBUG) Log.d(TAG, "onTouchEvent().Scrolling: " + deltaX);54.} else {55.invalidate();56.}57.mLastMotionX = x;58.mLastMotionXRemainder = deltaX - (int) deltaX;59.} else {60.
//Trigger the scrollbars to draw. When invoked this method starts an animation to fade the //scrollbars out after a default delay. If a subclass provides animated scrolling, //the start delay should equal the duration of the scrolling animation.
61.
//触发scrollbar进行绘制。 使用这个方法来启动一个动画来使scrollbars经过一段时间淡出。
62.
//如果子类提供了滚动的动画,则延迟的时间等于动画滚动的时间。
63.
awakenScrollBars();
64.
}
65.
} else {
66.
determineScrollingStart(ev);
67.
}
68.
break;
69.
70.case MotionEvent.ACTION_UP:71.if (mTouchState == TOUCH_STATE_SCROLLING) {72.final int activePointerId = mActivePointerId;73.final int pointerIndex = ev.findPointerIndex(activePointerId);74.final float x = ev.getX(pointerIndex);75.final VelocityTracker velocityTracker = mVelocityTracker;76.velocityTracker.computeCurrentVelocity(1000, mMaximumVelocity);77.int velocityX = (int) velocityTracker.getXVelocity(activePointerId);78.final int deltaX = (int) (x - mDownMotionX);79.final int pageWidth = getScaledMeasuredWidth(getPageAt(mCurrentPage));80.// 屏幕的宽度*0.4f81.boolean isSignificantMove = Math.abs(deltaX) > pageWidth *82.SIGNIFICANT_MOVE_THRESHOLD;83.final int snapVelocity = mSnapVelocity;84.85.mTotalMotionX += Math.abs(mLastMotionX + mLastMotionXRemainder - x);86.87.boolean isFling = mTotalMotionX > MIN_LENGTH_FOR_FLING &&88.Math.abs(velocityX) > snapVelocity;89.90.// In the case that the page is moved far to one direction and then is flung91.// in the opposite direction, we use a threshold to determine whether we should // just return to the starting page, or if we should skip one further.
//这钟情况是页面朝一个方向移动了一段距离,然后又弹回去了。我们使用一个阀值来判断是进行翻页还是返回到初始页面
1.
boolean returnToOriginalPage = false;
2.
if (Math.abs(deltaX) > pageWidth * RETURN_TO_ORIGINAL_PAGE_THRESHOLD &&
3.
Math.signum(velocityX) != Math.signum(deltaX) && isFling) {
4.
returnToOriginalPage = true;
5.
}
6.
7.int finalPage;8.// We give flings precedence over large moves, which is why we short-circuit our9.// test for a large move if a fling has been registered. That is, a large10.// move to the left and fling to the right will register as a fling to the right.11.//朝右移动12.if (((isSignificantMove && deltaX > 0 && !isFling) ||13.(isFling && velocityX > 0)) && mCurrentPage > 0) {14.finalPage = returnToOriginalPage ? mCurrentPage : mCurrentPage - 1;15.snapToPageWithVelocity(finalPage, velocityX);16.//朝左移动17.} else if (((isSignificantMove && deltaX < 0 && !isFling) ||18.(isFling && velocityX < 0)) &&19.mCurrentPage < getChildCount() - 1) {20.finalPage = returnToOriginalPage ? mCurrentPage : mCurrentPage + 1;21.snapToPageWithVelocity(finalPage, velocityX);22.//寻找离屏幕中心最近的页面移动23.} else {24.snapToDestination();25.}26.}27.//直接移动到前一页28.else if (mTouchState == TOUCH_STATE_PREV_PAGE) {29.// at this point we have not moved beyond the touch slop30.// (otherwise mTouchState would be TOUCH_STATE_SCROLLING), so31.// we can just page32.int nextPage = Math.max(0, mCurrentPage - 1);33.if (nextPage != mCurrentPage) {34.snapToPage(nextPage);35.} else {36.snapToDestination();37.}38.}39.//直接移动到下一页40.else if (mTouchState == TOUCH_STATE_NEXT_PAGE) {41.// at this point we have not moved beyond the touch slop42.// (otherwise mTouchState would be TOUCH_STATE_SCROLLING), so43.// we can just page44.int nextPage = Math.min(getChildCount() - 1, mCurrentPage + 1);45.if (nextPage != mCurrentPage) {46.snapToPage(nextPage);47.} else {48.snapToDestination();49.}50.} else {51.onUnhandledTap(ev);52.}53.mTouchState = TOUCH_STATE_REST;54.mActivePointerId = INVALID_POINTER;55.releaseVelocityTracker();56.break;57.//对事件不响应58.case MotionEvent.ACTION_CANCEL:59.if (mTouchState == TOUCH_STATE_SCROLLING) {60.snapToDestination();61.}62.mTouchState = TOUCH_STATE_REST;63.mActivePointerId = INVALID_POINTER;64.releaseVelocityTracker();65.break;66.67.case MotionEvent.ACTION_POINTER_UP:68.onSecondaryPointerUp(ev);69.break;70.}71.72.return true;73.
}
最后有个小知识点要搞清楚,不少网友都问到过我。就是scrollTo和scrollBy的区别。我们查看View类的源代码如下所示,mScrollX记录的是当前View针对屏幕坐标在水平方向上的偏移量,而mScrollY则是记录的时当前View针对屏幕在竖值方向上的偏移量。
从以下代码我们可以得知,scrollTo就是把View移动到屏幕的X和Y位置,也就是绝对位置。而scrollBy其实就是调用的 scrollTo,但是参数是当前mScrollX和mScrollY加上X和Y的位置,所以ScrollBy调用的是相对于mScrollX和mScrollY的位置。我们在上面的代码中可以看到当我们手指不放移动屏幕时,就会调用scrollBy来移动一段相对的距离。而当我们手指松开后,会调用 mScroller.startScroll(mUnboundedScrollX, 0, delta, 0, duration); 来产生一段动画来移动到相应的页面,在这个过程中系统回不断调用computeScroll(),我们再使用scrollTo来把View移动到当前Scroller所在的绝对位置。
1.
/**
2.
- Set the scrolled position of your view. This will cause a call to
3.
- {@link #onScrollChanged(int, int, int, int)} and the view will be
4.
- invalidated.
5.
- @param x the x position to scroll to
6.
- @param y the y position to scroll to
7.
/
8.
public void scrollTo(int x, int y) {
9.
if (mScrollX != x || mScrollY != y) {
10.
int oldX = mScrollX;
11.
int oldY = mScrollY;
12.
mScrollX = x;
13.
mScrollY = y;
14.
invalidateParentCaches();
15.
onScrollChanged(mScrollX, mScrollY, oldX, oldY);
16.
if (!awakenScrollBars()) {
17.
invalidate(true);
18.
}
19.
}
20.
}
21.
/*
22.
- Move the scrolled position of your view. This will cause a call to
23.
- {@link #onScrollChanged(int, int, int, int)} and the view will be
24.
- invalidated.
25.
- @param x the amount of pixels to scroll by horizontally
26.
- @param y the amount of pixels to scroll by vertically
27.
*/
28.
public void scrollBy(int x, int y) {
29.
scrollTo(mScrollX + x, mScrollY + y);
30.
}

若有收获,就点个赞吧
0 人点赞
