- 相关文档
- SR-IOV(Single Root I/O Virtualization)-重点
- SRIOV中断管理
- 常见问题:
- CONFIG_CALGARY_IOMMU is not set #IBM平台相关
- CONFIG_INTEL_IOMMU_DEFAULT_ON is not set#Intel平台的VT-d是否默认打开。这里没有选上,需要在kernel boot parameter中加上“intel_iommu=on”
- CONFIG_IOMMU_DEBUG is not set
- CONFIG_IOMMU_STRESS is not set
- CONFIG_VFIO_PCI_VGA is not set #这个是for显卡的VT-d
相关文档
- 部署 SR-IOV 时需要考虑的硬件因素
- PCI-SIG SR-IOV Primer: An Introduction to SR-IOV Technology
- IOMMU group and ACS cap
SR-IOV(Single Root I/O Virtualization)-重点
建议:在看完PCIE部分在学习,因为SR-IOV是PCIE的特性
参考:
- 《KVM实战原理、进阶与实战调优》6.2节,或者 基础扫盲 (大神从书上抄过来了)
如何开启PC的SR-IOV?
必备条件:
- [*]在AMD机器上,需要使能svm和IOMMU
- [*]设备端支持SR-IOV (个人用支持可能性比较少,必须确认设备端支持)
# Intel系列CPU支持虚拟化的标志为“vmx”,AMD系列CPU的标志为“svm”baiy@baiy-ThinkPad-E470c:~$ grep -E 'svm|vmx' /proc/cpuinfoflags : ..... vmx .....# 支持SR-IOV的功能[root@node1 ~]# lspci -nn | grep Eth08:00.0 Ethernet controller [0200]: Intel Corporation I350 Gigabit Network Connection [8086:1521] (rev 01)08:00.1 Ethernet controller [0200]: Intel Corporation I350 Gigabit Network Connection [8086:1521] (rev 01)[root@node1 ~]# lspci -s 08:00.0 -vvv | grep CapabilitiesCapabilities: [40] Power Management version 3Capabilities: [50] MSI: Enable- Count=1/1 Maskable+ 64bit+Capabilities: [70] MSI-X: Enable+ Count=10 Masked-Capabilities: [a0] Express (v2) Endpoint, MSI 00Capabilities: [100 v2] Advanced Error ReportingCapabilities: [140 v1] Device Serial Number f8-0f-41-ff-ff-f4-af-6cCapabilities: [150 v1] Alternative Routing-ID Interpretation (ARI)Capabilities: [160 v1] Single Root I/O Virtualization (SR-IOV) ******Capabilities: [1a0 v1] Transaction Processing HintsCapabilities: [1c0 v1] Latency Tolerance ReportingCapabilities: [1d0 v1] Access Control Services
可惜我的设备不支持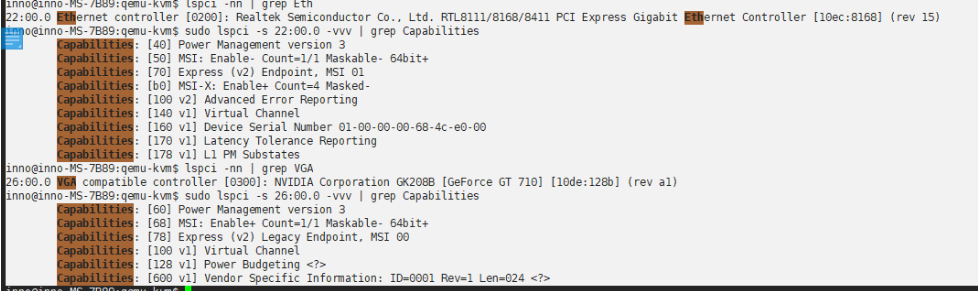
怎么确定自己的BIOS是否开启了SR-IOV?
要设备支持SR-IOV,INTEL必须支持VT-X和VT-D,AMD必须支持VMX和IOMMU。
检查BIOS / UEFI中是否已启用VT-D / IOMMU ,这里ubuntu需要安装 sysfsutils 包
baiy@internal:baiy$ dmesg | grep "DMAR-IR: Enabled IRQ remapping"[ 0.004000] DMAR-IR: Enabled IRQ remapping in x2apic modebaiy@internal:baiy$ kvm-okINFO: /dev/kvm existsKVM acceleration can be used
注:《kvm实战:原理..》中6.2节,描述了如何识别设备是否启动了IOMMU,与这个方式一样,别嫌low,没办法。
/etc/default/grub中加入:
GRUB_CMDLINE_LINUX_DEFAULT="intel_iommu=on iommu=pt"或者GRUB_CMDLINE_LINUX_DEFAULT="amd_iommu=on iommu=pt"
执行 sudo update grub && sudo update grub2
什么是PCIE直通模式和SR-IOV?
- 好文推荐: PCIE直通和SR-IOV模式
- 好文推荐: SR-IOV——网卡直通技术
- 好文推荐: ReadHat-SRIOV
- 好文推荐: xilinx PCIE SRIOV 以及 配套测试代码 和 配置文档 P300
- PCIE SRIOV测试代码
可以看到:
- 直通模式就是 虚拟机这种将设备从主机分离,链接到虚拟机。
- SR-IOV模式就是 PCIE内部可以有 多个PF+N个VF(每个PF可以支持多路VF), PF提供资源使用和管理,VF只能使用PF分给的资源。
直通模式和SR-IOV模式操作方式基本类似。都是先将驱动导入到vfio中,然后在链接到设备里。
PF和VF
- 物理功能 (Physical Function, PF)
用于支持 SR-IOV 功能的 PCI 功能,如 SR-IOV 规范中定义。PF 包含 SR-IOV 功能结构,用于管理 SR-IOV 功能。PF 是全功能的 PCIe 功能,可以像其他任何 PCIe 设备一样进行发现、管理和处理。PF 拥有完全配置资源,可以用于配置或控制 PCIe 设备。 - 虚拟功能 (Virtual Function, VF)
与物理功能关联的一种功能。VF 是一种轻量级 PCIe 功能,可以与物理功能以及与同一物理功能关联的其他 VF 共享一个或多个物理资源。VF 仅允许拥有用于其自身行为的配置资源。
每个 SR-IOV 设备都可有一个物理功能 (Physical Function, PF),并且每个 PF 最多可有 64,000 个与其关联的虚拟功能 (Virtual Function, VF)。
PF 可以通过寄存器创建 VF,这些寄存器设计有专用于此目的的属性。
一旦在 PF 中启用了 SR-IOV,就可以通过 PF 的总线、设备和功能编号(路由 ID)访问各个 VF 的 PCI 配置空间。每个 VF 都具有一个 PCI 内存空间,用于映射其寄存器集。
VF 设备驱动程序对寄存器集进行操作以启用其功能,并且显示为实际存在的 PCI 设备。创建 VF 后,可以直接将其指定给 IO 来宾域或各个应用程序(如裸机平台上的 Oracle Solaris Zones)。此功能使得虚拟功能可以共享物理设备,并在没有 CPU 和虚拟机管理程序软件开销的情况下执行 I/O。
SR-IOV的使用
PCIE设备信息
注:PCIE支持SR-IOV的话,必须支持0x100-0xFFF扩展配置空间,且这部分配置在扩展配置空间中。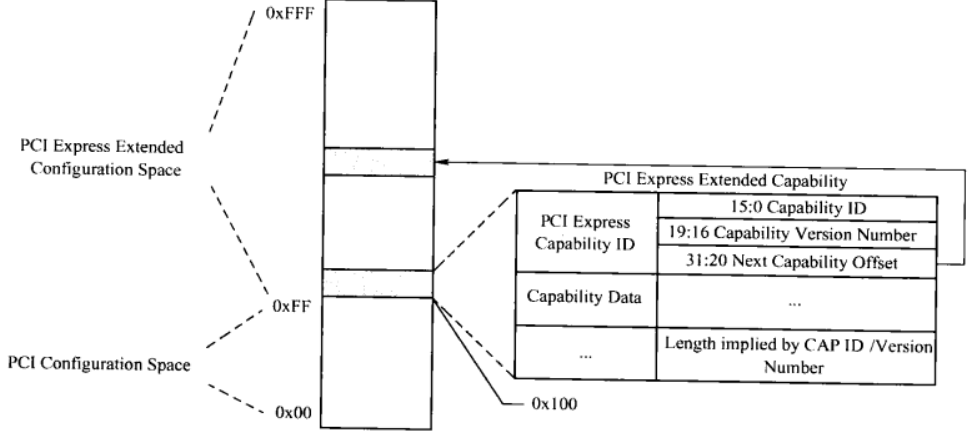
### pcie详细信息pcie_13_test$ sudo lspci -s 26:00.0 -vvv26:00.0 Memory controller: Xilinx Corporation Device 9032 (rev 03)Subsystem: Xilinx Corporation Device 9032Control: I/O- Mem- BusMaster- SpecCycle- MemWINV- VGASnoop- ParErr- Stepping- SERR- FastB2B- DisINTx-Status: Cap+ 66MHz- UDF- FastB2B- ParErr- DEVSEL=fast >TAbort- <TAbort- <MAbort- >SERR- <PERR- INTx-Interrupt: pin A routed to IRQ 10Region 0: Memory at f0000000 (32-bit, non-prefetchable) [disabled] [size=16M]Region 2: Memory at e0000000 (32-bit, non-prefetchable) [disabled] [size=256M]Expansion ROM at f1000000 [disabled] [size=512K]Capabilities: [40] Power Management version 3Flags: PMEClk- DSI- D1- D2- AuxCurrent=0mA PME(D0-,D1-,D2-,D3hot-,D3cold-)Status: D0 NoSoftRst+ PME-Enable- DSel=0 DScale=0 PME-Capabilities: [60] MSI-X: Enable- Count=2 Masked-Vector table: BAR=0 offset=00000040PBA: BAR=0 offset=00000050Capabilities: [70] Express (v2) Endpoint, MSI 00DevCap: MaxPayload 512 bytes, PhantFunc 0, Latency L0s <64ns, L1 <1usExtTag- AttnBtn- AttnInd- PwrInd- RBE+ FLReset- SlotPowerLimit 0.000WDevCtl: Report errors: Correctable- Non-Fatal- Fatal- Unsupported-RlxdOrd+ ExtTag- PhantFunc- AuxPwr- NoSnoop+MaxPayload 512 bytes, MaxReadReq 512 bytesDevSta: CorrErr+ UncorrErr- FatalErr- UnsuppReq+ AuxPwr- TransPend-LnkCap: Port #0, Speed 8GT/s, Width x2, ASPM not supported, Exit Latency L0s unlimited, L1 unlimitedClockPM- Surprise- LLActRep- BwNot- ASPMOptComp+LnkCtl: ASPM Disabled; RCB 64 bytes Disabled- CommClk+ExtSynch- ClockPM- AutWidDis- BWInt- AutBWInt-LnkSta: Speed 8GT/s, Width x2, TrErr- Train- SlotClk+ DLActive- BWMgmt- ABWMgmt-DevCap2: Completion Timeout: Range BC, TimeoutDis+, LTR-, OBFF Not SupportedDevCtl2: Completion Timeout: 50us to 50ms, TimeoutDis-, LTR-, OBFF DisabledLnkCtl2: Target Link Speed: 8GT/s, EnterCompliance- SpeedDis-Transmit Margin: Normal Operating Range, EnterModifiedCompliance- ComplianceSOS-Compliance De-emphasis: -6dBLnkSta2: Current De-emphasis Level: -6dB, EqualizationComplete+, EqualizationPhase1+EqualizationPhase2+, EqualizationPhase3+, LinkEqualizationRequest-Capabilities: [100 v1] Advanced Error ReportingUESta: DLP- SDES- TLP- FCP- CmpltTO- CmpltAbrt- UnxCmplt- RxOF- MalfTLP- ECRC- UnsupReq- ACSViol-UEMsk: DLP- SDES- TLP- FCP- CmpltTO- CmpltAbrt- UnxCmplt- RxOF- MalfTLP- ECRC- UnsupReq- ACSViol-UESvrt: DLP+ SDES+ TLP- FCP+ CmpltTO- CmpltAbrt- UnxCmplt- RxOF+ MalfTLP+ ECRC- UnsupReq- ACSViol-CESta: RxErr- BadTLP- BadDLLP- Rollover- Timeout- NonFatalErr-CEMsk: RxErr- BadTLP- BadDLLP- Rollover- Timeout- NonFatalErr+AERCap: First Error Pointer: 00, GenCap- CGenEn- ChkCap- ChkEn-Capabilities: [140 v1] Single Root I/O Virtualization (SR-IOV)IOVCap: Migration-, Interrupt Message Number: 000IOVCtl: Enable- Migration- Interrupt- MSE- ARIHierarchy-IOVSta: Migration-Initial VFs: 4, Total VFs: 4, Number of VFs: 0, Function Dependency Link: 00VF offset: 4, stride: 1, Device ID: 0000Supported Page Size: 00000553, System Page Size: 00000001Region 0: Memory at f1080000 (32-bit, non-prefetchable)VF Migration: offset: 00000000, BIR: 0Capabilities: [180 v1] Alternative Routing-ID Interpretation (ARI)ARICap: MFVC- ACS-, Next Function: 0ARICtl: MFVC- ACS-, Function Group: 0Capabilities: [1c0 v1] #19### pcie配置信息pcie_13_test$ sudo lspci -s 26:00.0 -xxx26:00.0 Memory controller: Xilinx Corporation Device 9032 (rev 03)00: ee 10 32 90 00 00 10 00 03 00 80 05 10 00 00 0010: 00 00 00 f0 00 00 00 00 00 00 00 e0 00 00 00 0020: 00 00 00 00 00 00 00 00 00 00 00 00 ee 10 32 9030: 00 00 00 f1 40 00 00 00 00 00 00 00 0a 01 00 0040: 01 60 03 00 08 00 00 00 05 60 80 01 00 00 00 0050: 00 00 00 00 00 00 00 00 00 00 00 00 00 00 00 0060: 11 70 01 00 40 00 00 00 50 00 00 00 00 00 00 0070: 10 00 02 00 02 80 00 00 50 28 09 00 23 f0 43 0080: 40 00 23 10 00 00 00 00 00 00 00 00 00 00 00 0090: 00 00 00 00 16 00 00 00 00 00 00 00 0e 00 00 00a0: 03 00 1e 00 00 00 00 00 00 00 00 00 00 00 00 00b0: 00 00 00 00 00 00 00 00 00 00 00 00 00 00 00 00c0: 00 00 00 00 00 00 00 00 00 00 00 00 00 00 00 00d0: 00 00 00 00 00 00 00 00 00 00 00 00 00 00 00 00e0: 00 00 00 00 00 00 00 00 00 00 00 00 00 00 00 00f0: 00 00 00 00 00 00 00 00 00 00 00 00 00 00 00 00### pcie资源信息[ 1179.857932] driver_pcie_test: loading out-of-tree module taints kernel.[ 1179.857975] driver_pcie_test: module verification failed: signature and/or required key missing - tainting kernel[ 1179.858697] driver_pcie_test: init [E][ 1179.858806] driver_pcie_test: prbe [E][ 1179.858816] demo-pcie 0000:26:00.0: enabling device (0000 -> 0002)[ 1179.858914] resource: start:0xf0000000,end:0xf0ffffff,name:0000:26:00.0,flags:0x40200,desc:0x0[ 1179.858916] resource: start:0x0,end:0x0,name:0000:26:00.0,flags:0x0,desc:0x0[ 1179.858916] resource: start:0xe0000000,end:0xefffffff,name:0000:26:00.0,flags:0x40200,desc:0x0[ 1179.858917] resource: start:0x0,end:0x0,name:0000:26:00.0,flags:0x0,desc:0x0[ 1179.858918] resource: start:0x0,end:0x0,name:0000:26:00.0,flags:0x0,desc:0x0[ 1179.858918] resource: start:0x0,end:0x0,name:0000:26:00.0,flags:0x0,desc:0x0[ 1179.858919] resource: start:0xf1000000,end:0xf107ffff,name:0000:26:00.0,flags:0x46200,desc:0x0[ 1179.858920] resource: start:0xf1080000,end:0xf1083fff,name:0000:26:00.0,flags:0x40200,desc:0x0[ 1179.858921] resource: start:0x0,end:0x0,name:0000:26:00.0,flags:0x0,desc:0x0[ 1179.858921] resource: start:0x0,end:0x0,name:0000:26:00.0,flags:0x0,desc:0x0[ 1179.858922] resource: start:0x0,end:0x0,name:0000:26:00.0,flags:0x0,desc:0x0[ 1179.858922] resource: start:0x0,end:0x0,name:0000:26:00.0,flags:0x0,desc:0x0[ 1179.858923] resource: start:0x0,end:0x0,name:0000:26:00.0,flags:0x0,desc:0x0[ 1179.858924] resource: start:0x0,end:0x0,name:(null),flags:0x0,desc:0x0[ 1179.858925] resource: start:0x0,end:0x0,name:(null),flags:0x0,desc:0x0[ 1179.858925] resource: start:0x0,end:0x0,name:(null),flags:0x0,desc:0x0[ 1179.858926] resource: start:0x0,end:0x0,name:(null),flags:0x0,desc:0x0[ 1179.858959] driver_pcie_test: prbe [X]
驱动中使能SR-IOV(软件)
这部分放在pci_enable_device之前即可
可以参考:pci-iov-howto.rst, 后边有个简化版本的pcie使能sriov的例程。
#define NUMBER_OF_VFS (4) # 根据自己设备所支持的最大数确定// 这部分代码最好参考:linux-4.14.48/drivers/net/ethernet/cisco/enic/enic_main.c// 中probe和remove函数实现static int dev_probe(struct pci_dev *dev, const struct pci_device_id *id){#ifdef CONFIG_PCI_IOVint pos = 0;unsigned int num_vfs;pos = pci_find_ext_capability(dev, PCI_EXT_CAP_ID_SRIOV);/* Get number of subvnics */pos = pci_find_ext_capability(dev, PCI_EXT_CAP_ID_SRIOV);if (pos) {pci_read_config_word(dev, pos + PCI_SRIOV_TOTAL_VF,&num_vfs);if (num_vfs) {err = pci_enable_sriov(pdev, num_vfs);if (err) {dev_err(dev, "SRIOV enable failed, aborting."" pci_enable_sriov() returned %d\n",err);goto xxx;}enic->priv_flags |= ENIC_SRIOV_ENABLED;num_pps = enic->num_vfs;}}#endif...return 0;}static void dev_remove(struct pci_dev *dev){#ifdef CONFIG_PCI_IOVif (enic_sriov_enabled(enic)) {pci_disable_sriov(pdev);enic->priv_flags &= ~ENIC_SRIOV_ENABLED;}#endif...}// 为了支持sysfs来使能sriovstatic int dev_sriov_configure(struct pci_dev *dev, int numvfs){if (numvfs > 0) {...pci_enable_sriov(dev, numvfs);...return numvfs;}if (numvfs == 0) {....pci_disable_sriov(dev);...return 0;}}static struct pci_driver dev_driver = {.name = "SR-IOV Physical Function driver",.id_table = dev_id_table,.......sriov_configure = dev_sriov_configure,};
理论上sysfs也可以使能sriov,需要确认
使能SR-IOV后pci设备变化
注:这个9032是DEVICE_ID
lspci37 26:00.0 Memory controller: Xilinx Corporation Device 9032 (rev 03)38 26:00.4 Memory controller: Xilinx Corporation Device 9031 (rev 03)39 26:00.5 Memory controller: Xilinx Corporation Device 9031 (rev 03)40 26:00.6 Memory controller: Xilinx Corporation Device 9031 (rev 03)41 26:00.7 Memory controller: Xilinx Corporation Device 9031 (rev 03)
可以看到一个设备出来了4个VF+1个PF
qemu-system-centos$ virsh nodedev-list --treecomputer...| || +- pci_0000_26_00_0| +- pci_0000_26_00_4| +- pci_0000_26_00_5| +- pci_0000_26_00_6| +- pci_0000_26_00_7|qemu-system-centos$ lshw*-pci:2description: PCI bridgeproduct: Advanced Micro Devices, Inc. [AMD]vendor: Advanced Micro Devices, Inc. [AMD]physical id: 3.1bus info: pci@0000:00:03.1version: 00width: 32 bitsclock: 33MHzcapabilities: pci normal_decode bus_master cap_listconfiguration: driver=pcieportresources: irq:28 memory:e0000000-f10fffff*-memory:0description: Memory controllerproduct: Xilinx Corporationvendor: Xilinx Corporationphysical id: 0bus info: pci@0000:26:00.0version: 03width: 32 bitsclock: 33MHz (30.3ns)capabilities: bus_master cap_list romconfiguration: driver=demo-pcie latency=0resources: irq:96 memory:f0000000-f0ffffff memory:e0000000-efffffff memory:f1000000-f107ffff memory:f1080000-f1083fff*-memory:1 UNCLAIMEDdescription: Memory controllerproduct: Illegal Vendor IDvendor: Illegal Vendor IDphysical id: 0.4bus info: pci@0000:26:00.4version: 03width: 32 bitsclock: 33MHz (30.3ns)capabilities: cap_listconfiguration: latency=0resources: memory:f1080000-f1080fff*-memory:2 UNCLAIMEDdescription: Memory controllerproduct: Illegal Vendor IDvendor: Illegal Vendor IDphysical id: 0.5bus info: pci@0000:26:00.5version: 03width: 32 bitsclock: 33MHz (30.3ns)capabilities: cap_listconfiguration: latency=0resources: memory:f1081000-f1081fff*-memory:3 UNCLAIMEDdescription: Memory controllerproduct: Illegal Vendor IDvendor: Illegal Vendor IDphysical id: 0.6bus info: pci@0000:26:00.6version: 03width: 32 bitsclock: 33MHz (30.3ns)capabilities: cap_listconfiguration: latency=0resources: memory:f1082000-f1082fff*-memory:4 UNCLAIMEDdescription: Memory controllerproduct: Illegal Vendor IDvendor: Illegal Vendor IDphysical id: 0.7bus info: pci@0000:26:00.7version: 03width: 32 bitsclock: 33MHz (30.3ns)capabilities: cap_listconfiguration: latency=0resources: memory:f1083000-f1083fff
SR-IOV的使用
virsh分离pci设备(常用)
- 列出pci设备
qemu-system-centos$ virsh nodedev-list --treecomputer...| || +- pci_0000_26_00_0| +- pci_0000_26_00_4| +- pci_0000_26_00_5| +- pci_0000_26_00_6| +- pci_0000_26_00_7|
- 从主机分离pci设备
virsh nodedev-detach pci_0000_26_00_7
- 设备添加和分离虚拟机
virsh可以通过修改虚拟机配置脚本来指定
在KVM中配置SR-IOV
为了方便的话,可以直接在virt-manager去添加pci设备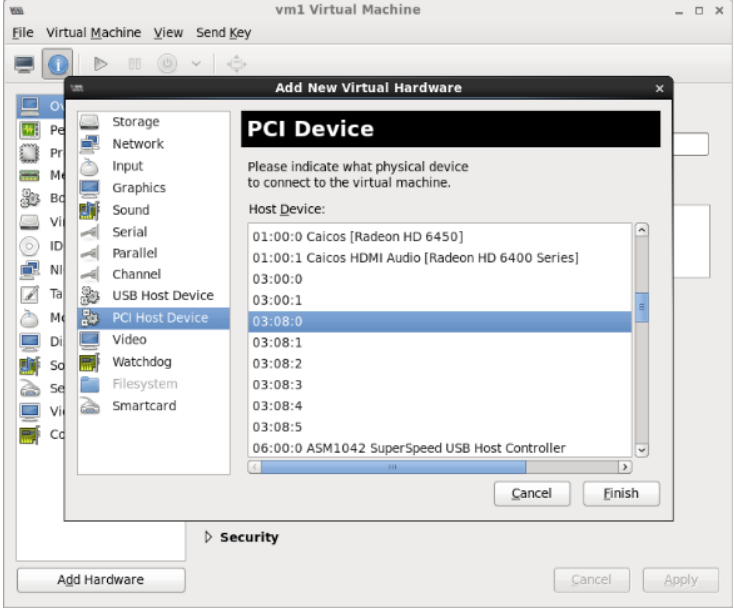
- virsh将VF恢复到主机
virsh nodedev-reattach pci_0000_26_00_7
qemu创建虚拟机时使用VF
参考:基础扫盲 一步步来即可。
绑定指定设备到vfio-pci驱动
#!/bin/bash# A script to hide/unhide PCI/PCIe device for KVM (using 'vfio-pci')#set -xhide_dev=0unhide_dev=0driver=0# check if the device existsfunction dev_exist(){local line_num=$(lspci -s "$1" 2>/dev/null | wc -l)if [ $line_num = 0 ]; thenecho "Device $pcidev doesn't exists. Please check your system or your command line."exit 1elsereturn 0fi}# output a format "<domain>:<bus>:<slot>.<func>" (e.g. 0000:01:10.0) of devicefunction canon() {f='expr "$1" : '.*\.\(.\)''d='expr "$1" : ".*:\(.*\).$f"'b='expr "$1" : "\(.*\):$d\.$f"'if [ 'expr "$d" : '..'' == 0 ]thend=0$dfiif [ 'expr "$b" : '.*:'' != 0 ]thenp='expr "$b" : '\(.*\):''b='expr "$b" : '.*:\(.*\)''elsep=0000fiif [ 'expr "$b" : '..'' == 0 ]thenb=0$bfiecho $p:$b:$d.$f}# output the device ID and vendor IDfunction show_id() {lspci -Dn -s "$1" | awk '{print $3}' | sed "s/:/ /" > /dev/null 2>&1if [ $? -eq 0 ]; thenlspci -Dn -s "$1" | awk '{print $3}' | sed "s/:/ /"elseecho "Can't find device id and vendor id for device $1"exit 1fi}# hide a device using 'vfio-pci' driver/modulefunction hide_pci(){local pre_driver=NULLlocal pcidev=$(canon $1)local pciid=$(show_id $pcidev)dev_exist $pcidevif [ -e /sys/bus/pci/drivers/vfio-pci ]; thenpre_driver=$(basename $(readlink /sys/bus/pci/devices/"$pcidev"/driver))echo "Unbinding $pcidev from $pre_driver"echo -n "$pciid" > /sys/bus/pci/drivers/vfio-pci/new_idecho -n "$pcidev" > /sys/bus/pci/devices/"$pcidev"/driver/unbindfiecho "Binding $pcidev to vfio-pci"echo -n "$pcidev" > /sys/bus/pci/drivers/vfio-pci/bindreturn $?}function unhide_pci() {local driver=$2local pcidev='canon $1'local pciid='show_id $pcidev'if [ $driver != 0 -a ! -d /sys/bus/pci/drivers/$driver ]; thenecho "No $driver interface under sys, return fail"exit 1fiif [ -h /sys/bus/pci/devices/"$pcidev"/driver ]; thenlocal tmpdriver='basename $(readlink /sys/bus/pci/devices/"$pcidev"/driver)'if [ "$tmpdriver" = "$driver" ]; thenecho "$1 has been already bind with $driver, no need to unhide"exit 1elif [ "$tmpdriver" != "vfio-pci" ]; thenecho "$1 is not bind with vfio-pci, it is bind with $tmpdriver, no need to unhide"exit 1elseecho "Unbinding $pcidev from" $(basename $(readlink /sys/bus/pci/devices/"$pcidev"/driver))echo -n "$pcidev" > /sys/bus/pci/drivers/vfio-pci/unbindif [ $? -ne 0 ]; thenreturn $?fififiif [ $driver != 0 ]; thenecho "Binding $pcidev to $driver"echo -n "$pcidev" > /sys/bus/pci/drivers/$driver/bindfireturn $?}function usage(){echo "Usage: vfio-pci.sh -h pcidev "echo " -h pcidev: <pcidev> is BDF number of the device you want to hide"echo " -u pcidev: Optional. <pcidev> is BDF number of the device you want to unhide."echo " -d driver: Optional. When unhiding the device, bind the device with <driver>. The option should be used together with '-u' option"echo ""echo "Example1: sh vfio-pci.sh -h 06:10.0 Hide device 06:10.0 to 'vfio-pci' driver"echo "Example2: sh vfio-pci.sh -u 08:00.0 -d e1000e Unhide device 08:00.0 and bind the device with 'e1000e' driver"exit 1}if [ $# -eq 0 ] ; thenusagefi# parse the options in the command lineOPTIND=1while getopts ":h:u:d:" Optiondocase $Option inh ) hide_dev=$OPTARG;;u ) unhide_dev=$OPTARG;;d ) driver=$OPTARG;;* ) usage ;;esacdoneif [ ! -d /sys/bus/pci/drivers/vfio-pci ]; thenmodprobe vfio_pciecho 0if [ ! -d /sys/bus/pci/drivers/vfio-pci ]; thenecho "There's no 'vfio-pci' module? Please check your kernel config."exit 1fifiif [ $hide_dev != 0 -a $unhide_dev != 0 ]; thenecho "Do not use -h and -u option together."exit 1fiif [ $unhide_dev = 0 -a $driver != 0 ]; thenecho "You should set -u option if you want to use -d option to unhide a device and bind it with a specific driver"exit 1fiif [ $hide_dev != 0 ]; thenhide_pci $hide_develif [ $unhide_dev != 0 ]; thenunhide_pci $unhide_dev $driverfiexit $?
qemu创建得虚拟机,可以在运行时添加下边参数:
-device vfio-pci,host=0000:26:00.7
# common usual/usr/local/qemu_x86/bin/qemu-system-x86_64 \-smp 2 \-cpu host \-enable-kvm \-m 512M \-kernel linux/arch/x86/boot/bzImage \-hda ./x86_64.img \-hdb ./Freeze.img \-nographic \-append "root=/dev/sda rw rootfstype=ext4 console=ttyS0 init=linuxrc loglevel=8"
通过sysfs去操作SR-IOV
在上边这种方式,需要自己写驱动去使能SR-IOV,是否可以通过pci的sysfs去配置?
可以,但PF端驱动必须实现接口,也就是上边的 驱动中使能SR-IOV。
/sys/bus/pci/devices/0000:26:00.0$ lsaer_dev_correctable broken_parity_status current_link_speed dma_mask_bits iommu_group max_link_speed numa_node reset revision sriov_offset subsystem vendoraer_dev_fatal class current_link_width driver_override irq max_link_width power resource rom sriov_stride subsystem_deviceaer_dev_nonfatal config d3cold_allowed enable local_cpulist modalias remove resource0 sriov_drivers_autoprobe sriov_totalvfs subsystem_vendorari_enabled consistent_dma_mask_bits device iommu local_cpus msi_bus rescan resource2 sriov_numvfs sriov_vf_device uevent
先分析下代码: linux-5.7.14\drivers\pci\pci-sysfs.c
const struct attribute_group sriov_dev_attr_group = {.attrs = sriov_dev_attrs,.is_visible = sriov_attrs_are_visible,};pci_alloc_devdev->dev.type = &pci_dev_type;pci_sysfs_initdrivers\pci\iov.c # 中关于sriov的操作接口sriov_numvfs_store #sriov_numvfs_show # 这两个操作sriov_numvfs,store必须驱动支持sriov_numvfs_store/* is PF driver loaded w/callback */ // PF端驱动必须要sr-iov的初始化代码if (!pdev->driver || !pdev->driver->sriov_configure) {pci_info(pdev, "Driver does not support SRIOV configuration via sysfs\n");ret = -ENOENT;goto exit;}
SR-IOV代码分析
linux-5.4.51/drivers/pci/iov.c
static int sriov_enable(struct pci_dev *dev, int nr_virtfn)struct pci_sriov *iov = dev->sriov;pci_read_config_word(dev, iov->pos + PCI_SRIOV_INITIAL_VF, &initial);
sriov_enable
/* Single Root I/O Virtualization */struct pci_sriov {int pos; /* Capability position */int nres; /* Number of resources */u32 cap; /* SR-IOV Capabilities */u16 ctrl; /* SR-IOV Control */u16 total_VFs; /* Total VFs associated with the PF */u16 initial_VFs; /* Initial VFs associated with the PF */u16 num_VFs; /* Number of VFs available */u16 offset; /* First VF Routing ID offset */u16 stride; /* Following VF stride */u16 vf_device; /* VF device ID */u32 pgsz; /* Page size for BAR alignment */u8 link; /* Function Dependency Link */u8 max_VF_buses; /* Max buses consumed by VFs */u16 driver_max_VFs; /* Max num VFs driver supports */struct pci_dev *dev; /* Lowest numbered PF */struct pci_dev *self; /* This PF */u32 class; /* VF device */u8 hdr_type; /* VF header type */u16 subsystem_vendor; /* VF subsystem vendor */u16 subsystem_device; /* VF subsystem device */resource_size_t barsz[PCI_SRIOV_NUM_BARS]; /* VF BAR size */bool drivers_autoprobe; /* Auto probing of VFs by driver */};int sriov_enable(struct pci_dev *dev, int nr_virtfn)
SRIOV中断管理
常见问题:
问题优先定位方式
环境问题
先确定硬件是否支持虚拟化和iommu
baiy@internal:baiy$ dmesg | grep "DMAR-IR: Enabled IRQ remapping"[ 0.004000] DMAR-IR: Enabled IRQ remapping in x2apic modebaiy@internal:baiy$ kvm-okINFO: /dev/kvm existsKVM acceleration can be used
内核配置是否支持,是否加载vfio模块,驱动是否正常加载 ```bash CONFIG_GART_IOMMU=y #AMD平台相关
CONFIG_CALGARY_IOMMU is not set #IBM平台相关
CONFIG_IOMMU_HELPER=y CONFIG_VFIO_IOMMU_TYPE1=m CONFIG_VFIO_NOIOMMU=y CONFIG_IOMMU_API=y CONFIG_IOMMU_SUPPORT=y CONFIG_IOMMU_IOVA=y CONFIG_AMD_IOMMU=y #AMD平台的IOMMU设置 CONFIG_AMD_IOMMU_STATS=y CONFIG_AMD_IOMMU_V2=m CONFIG_INTEL_IOMMU=y #Intel平台的VT-d设置
CONFIG_INTEL_IOMMU_DEFAULT_ON is not set#Intel平台的VT-d是否默认打开。这里没有选上,需要在kernel boot parameter中加上“intel_iommu=on”
CONFIG_INTEL_IOMMU_FLOPPY_WA=y
CONFIG_IOMMU_DEBUG is not set
CONFIG_IOMMU_STRESS is not set
CONFIG_VFIO_IOMMU_TYPE1=m CONFIG_VFIO=m CONFIG_VFIO_NOIOMMU=y #支持用户空间的VFIO框架 CONFIG_VFIO_PCI=m
CONFIG_VFIO_PCI_VGA is not set #这个是for显卡的VT-d
CONFIG_VFIO_PCI_MMAP=y CONFIG_VFIO_PCI_INTX=y CONFIG_KVM_VFIO=y
注:3.0以下版本配置略有不同,不考虑。注:很多设备默认没安装vfio驱动(可以通过 /sys/bus/pci/drivers/vfio-pci/ 是否存在来判断 ),所以我们需要安装vfio驱动```bash[root@gerrylee ~]# modprobe vfio-pci[root@gerrylee ~]# lsmod | grep vfio-pcivfio_pci 41268 0vfio 32657 2 vfio_iommu_type1,vfio_pciirqbypass 13503 2 kvm,vfio_pci[root@gerrylee ~]# ls /sys/bus/pci/drivers/vfio-pci/bind module new_id remove_id uevent unbind
注:加载到启动脚本中,让内核启动时加载驱动
vi /etc/moudles 添加模块名称:# 将驱动放到对应目录# /lib/modules/$(uname -r)/kernel/drivers/pci/
- 确定硬件是否支持SR-IOV
[root@node1 ~]# lspci -s 08:00.0 -vvv | grep CapabilitiesCapabilities: [40] Power Management version 3Capabilities: [50] MSI: Enable- Count=1/1 Maskable+ 64bit+Capabilities: [70] MSI-X: Enable+ Count=10 Masked-Capabilities: [a0] Express (v2) Endpoint, MSI 00Capabilities: [100 v2] Advanced Error ReportingCapabilities: [140 v1] Device Serial Number f8-0f-41-ff-ff-f4-af-6cCapabilities: [150 v1] Alternative Routing-ID Interpretation (ARI)Capabilities: [160 v1] Single Root I/O Virtualization (SR-IOV) ******Capabilities: [1a0 v1] Transaction Processing HintsCapabilities: [1c0 v1] Latency Tolerance ReportingCapabilities: [1d0 v1] Access Control Services
device_add失败
internal error: unable to execute QEMU command 'device_add': vfio error: 0000:26:00.7: failed to add PCI capability 0x11[0x10]@0x60: table & pba overlap, or they don't fit in BARs, or don't alignTraceback (most recent call last):File "/usr/share/virt-manager/virtManager/addhardware.py", line 1318, in _add_deviceself.vm.attach_device(self._dev)File "/usr/share/virt-manager/virtManager/domain.py", line 1093, in attach_deviceself._backend.attachDevice(devxml)File "/usr/lib/python2.7/dist-packages/libvirt.py", line 563, in attachDeviceif ret == -1: raise libvirtError ('virDomainAttachDevice() failed', dom=self)libvirtError: internal error: unable to execute QEMU command 'device_add': vfio error: 0000:26:00.7:failed to add PCI capability 0x11[0x10]@0x60: table & pba overlap, or they don't fit in BARs, or don't align
解决方式:BUG记录
This is because the msix table is overlapping with pba. According to below'lspci -vv' from host, the distance between msix table offset and pba offset isonly 0x100, although there are 22 entries supported (22 entries need 0x160).Looks qemu supports at most 0x800.# sudo lspci -vv... ...01:00.0 Non-Volatile memory controller: Intel Corporation Device f1a6 (rev 03) (prog-if 02 [NVM Express])Subsystem: Intel Corporation Device 390b... ...Capabilities: [b0] MSI-X: Enable- Count=22 Masked-Vector table: BAR=0 offset=00002000PBA: BAR=0 offset=00002100
我上边的PCIE配置空间也有这个问题:
MSI-X: Enable- Count=22, 但向量表和PBA只有0x100,实际上一个向量表在BAR空间需要占16字节。 所以这个位置要预留够。
PF端看VF的ID信息是0xFFFF(正常)
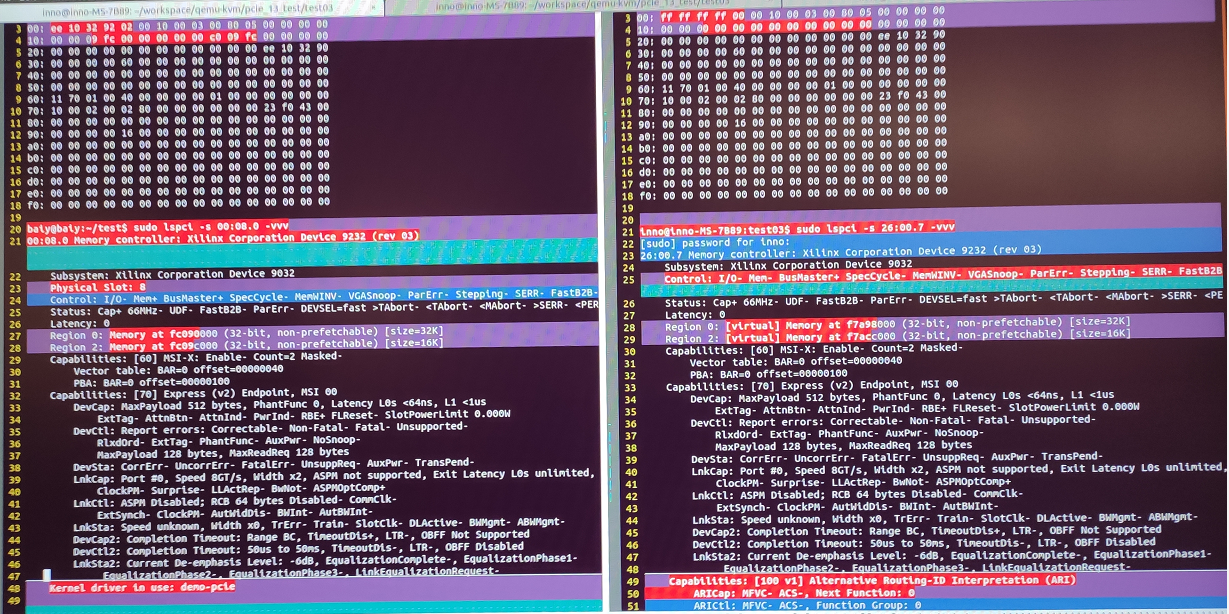
之前测试,发现主机端(右)读取VF的config空间(lspci -xxx或者sysfs/…/config),发现VENDOR ID和DEVICE ID都是0xFFFFFFFF,但导入客户机(左)却正常;但主机端lspci 获取的pci id正确。
注:不是问题,别人得也是这样现象
VFIO启动时,FLR异常
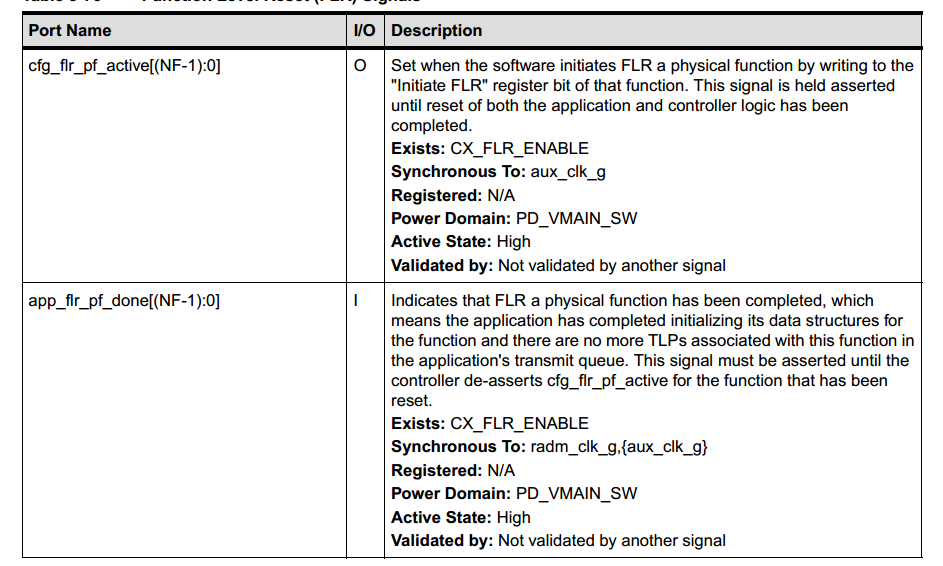
设计问题, PCIE规范中规定 FLR必须100ms内完成,但设计需要手动去修改app_flr_vf_done,但在不修改内核的情况实现不了,因此让改内核。详情参考 FLR学习
SRIOV添加出现问题
[38387.414287] driver_pcie_test: init [E][38387.414392] driver_pcie_test: prbe [E][38387.522112] pci 0000:25:00.4: [10ee:9232] type 00 class 0x058000[38387.522818] pci 0000:25:00.4: Adding to iommu group 17[38387.522923] pci 0000:25:00.5: [10ee:9232] type 00 class 0x058000[38387.523121] pci 0000:25:00.5: Adding to iommu group 17[38387.523162] pci 0000:25:00.6: [10ee:9232] type 00 class 0x058000[38387.523357] pci 0000:25:00.6: Adding to iommu group 17[38387.523395] pci 0000:25:00.7: [10ee:9232] type 00 class 0x058000[38387.523592] pci 0000:25:00.7: Adding to iommu group 17[38387.523706] resource: start:0xf7560000,end:0xf757ffff,name:0000:25:00.0,flags:0x40200,desc:0x0[38387.523708] resource: start:0x0,end:0x0,name:0000:25:00.0,flags:0x0,desc:0x0[38387.523709] resource: start:0xf7540000,end:0xf755ffff,name:0000:25:00.0,flags:0x40200,desc:0x0[38387.523710] resource: start:0x0,end:0x0,name:0000:25:00.0,flags:0x0,desc:0x0[38387.523711] resource: start:0x0,end:0x0,name:0000:25:00.0,flags:0x0,desc:0x0[38387.523712] resource: start:0x0,end:0x0,name:0000:25:00.0,flags:0x0,desc:0x0[38387.523713] resource: start:0xf75e0000,end:0xf75e07ff,name:0000:25:00.0,flags:0x46200,desc:0x0[38387.523714] resource: start:0xf7580000,end:0xf759ffff,name:0000:25:00.0,flags:0x40200,desc:0x0[38387.523715] resource: start:0x0,end:0x0,name:0000:25:00.0,flags:0x0,desc:0x0[38387.523716] resource: start:0xf75c0000,end:0xf75cffff,name:0000:25:00.0,flags:0x40200,desc:0x0[38387.523717] resource: start:0x0,end:0x0,name:0000:25:00.0,flags:0x0,desc:0x0[38387.523718] resource: start:0x0,end:0x0,name:0000:25:00.0,flags:0x0,desc:0x0[38387.523719] resource: start:0x0,end:0x0,name:0000:25:00.0,flags:0x0,desc:0x0[38387.523720] resource: start:0x0,end:0x0,name:(null),flags:0x0,desc:0x0[38387.523721] resource: start:0x0,end:0x0,name:(null),flags:0x0,desc:0x0[38387.523722] resource: start:0x0,end:0x0,name:(null),flags:0x0,desc:0x0[38387.523723] resource: start:0x0,end:0x0,name:(null),flags:0x0,desc:0x0[38387.523762] resource sanity check: requesting [mem 0xf7580000-0xf759ffff], which spans more than 0000:25:00.4 [mem 0xf7580000-0xf7587fff][38387.523766] caller pci_iomap_range+0x63/0x80 mapping multiple BARs[38387.523774] resource sanity check: requesting [mem 0xf75c0000-0xf75cffff], which spans more than 0000:25:00.4 [mem 0xf75c0000-0xf75c3fff][38387.523776] caller pci_iomap_range+0x63/0x80 mapping multiple BARs[38387.523777] driver_pcie_test: prbe [X][38851.805101] kauditd_printk_skb: 14 callbacks suppressed[38851.805103] audit: type=1400 audit(1606393021.635:122): apparmor="STATUS" operation="profile_load" profile="unconfined" name="libvirt-da077ee4-5562-46ed-8f43-020ddf3410e5" pid=14424 comm="apparmor_parser"[38851.923570] audit: type=1400 audit(1606393021.755:123): apparmor="STATUS" operation="profile_replace" profile="unconfined" name="libvirt-da077ee4-5562-46ed-8f43-020ddf3410e5" pid=14427 comm="apparmor_parser"[38852.038165] audit: type=1400 audit(1606393021.867:124): apparmor="STATUS" operation="profile_replace" profile="unconfined" name="libvirt-da077ee4-5562-46ed-8f43-020ddf3410e5" pid=14430 comm="apparmor_parser"[38852.153167] audit: type=1400 audit(1606393021.983:125): apparmor="STATUS" operation="profile_replace" info="same as current profile, skipping" profile="unconfined" name="libvirt-da077ee4-5562-46ed-8f43-020ddf3410e5" pid=14433 comm="apparmor_parser"[38852.167053] virbr0: port 2(vnet0) entered blocking state[38852.167057] virbr0: port 2(vnet0) entered disabled state[38852.167122] device vnet0 entered promiscuous mode[38852.167329] virbr0: port 2(vnet0) entered blocking state[38852.167332] virbr0: port 2(vnet0) entered listening state[38852.286598] audit: type=1400 audit(1606393022.119:126): apparmor="STATUS" operation="profile_replace" profile="unconfined" name="libvirt-da077ee4-5562-46ed-8f43-020ddf3410e5" pid=14465 comm="apparmor_parser"[38852.404461] audit: type=1400 audit(1606393022.235:127): apparmor="STATUS" operation="profile_replace" profile="unconfined" name="libvirt-da077ee4-5562-46ed-8f43-020ddf3410e5" pid=14514 comm="apparmor_parser"[38852.534855] virbr0: port 2(vnet0) entered disabled state[38852.537183] device vnet0 left promiscuous mode[38852.537188] virbr0: port 2(vnet0) entered disabled state[38852.895392] audit: type=1400 audit(1606393022.727:128): apparmor="STATUS" operation="profile_remove" profile="unconfined" name="libvirt-da077ee4-5562-46ed-8f43-020ddf3410e5" pid=14573 comm="apparmor_parser"
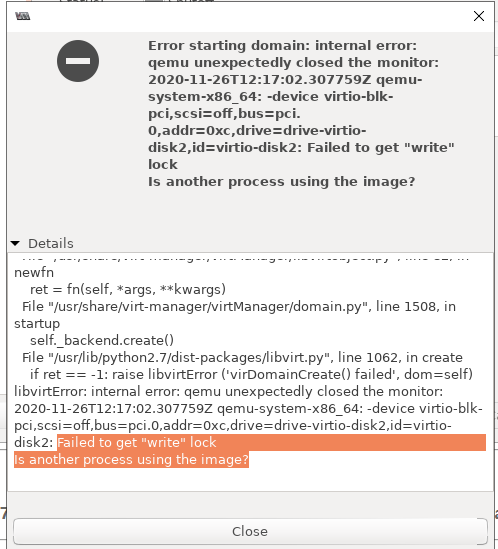
Error starting domain: internal error: qemu unexpectedly closed the monitor: 2020-11-26T12:17:02.307759Z qemu-system-x86_64: -device virtio-blk-pci,scsi=off,bus=pci.0,addr=0xc,drive=drive-virtio-disk2,id=virtio-disk2: Failed to get "write" lockIs another process using the image?Traceback (most recent call last):File "/usr/share/virt-manager/virtManager/asyncjob.py", line 89, in cb_wrappercallback(asyncjob, *args, **kwargs)File "/usr/share/virt-manager/virtManager/asyncjob.py", line 125, in tmpcbcallback(*args, **kwargs)File "/usr/share/virt-manager/virtManager/libvirtobject.py", line 82, in newfnret = fn(self, *args, **kwargs)File "/usr/share/virt-manager/virtManager/domain.py", line 1508, in startupself._backend.create()File "/usr/lib/python2.7/dist-packages/libvirt.py", line 1062, in createif ret == -1: raise libvirtError ('virDomainCreate() failed', dom=self)libvirtError: internal error: qemu unexpectedly closed the monitor: 2020-11-26T12:17:02.307759Z qemu-system-x86_64: -device virtio-blk-pci,scsi=off,bus=pci.0,addr=0xc,drive=drive-virtio-disk2,id=virtio-disk2: Failed to get "write" lockIs another process using the image?

若有收获,就点个赞吧
0 人点赞
