PCI设备初始化流程
pci 主桥总线的初始化
根BUS的创建!!!bus = pci_create_root_bus(NULL, busnum, ops->pci_ops,sysdata, &info->resources);这里创建struct bus * bus ,其中bus->sysdata = bridge->sysdata;bus->msi = bridge->msi;bus->ops = bridge->ops;bus->number = bus->busn_res.start = bridge->busnr; // 就是当前主桥所管理的PCI BUS second.start,也就是起始总线
pci_scan_child_bus 主桥子设备检测
关键点复述:
我们这里复习 《PCI+Express体系结构》中了解到:
一个PCI总线树(主桥)上,最多可以挂接256个PCI设备,包括PCI桥:
- 每一条PCI总线,可以挂接32个PCI总线接口芯片(桥片)。
- 每个PCI设备都是通过一个PCI总线接口芯片连接到PCI主线上。
- 每个PCI设备最多8个功能(0~7,在Linux下每一个都看做一个物理设备);
- 这32个总线接口芯片(桥片)可以做成插槽,也可以直接在主板上。
#define PCI_CONF1_ADDRESS(bus, devfn, reg) \(0x80000000 | ((reg & 0xF00) << 16) | (bus << 16) \| (devfn << 8) | (reg & 0xFC))
所以CONFIG_ADDRESS[15:8] 是devfn,占8bit, 其中devfn[7:3]就是PCI总线接口芯片; devfn[2:0]是功能号。
unsigned int pci_scan_child_bus(struct pci_bus *bus){unsigned int devfn, pass, max = bus->busn_res.start; // bus号从当前主桥的起始bus号开始计算/* Go find them, Rover! 遍历一条PCI总线上的所有子总线,一条总线有32个接口,一个接口有8个子功能,所以这里只能以8递增 */for (devfn = 0; devfn < 0x100; devfn += 8) // 去遍历32个PCI总线设备- 同一个bus下最多支持 256个设备(32个总线接口芯片)pci_scan_slot(bus, devfn);max += pci_iov_bus_range(bus); // max 为总线最大个数,这里需要给sriov的vf预留足够的空间/*据说是需要调用两次pci_scan_bridge,第一次配置,第二次遍历*/for (pass = 0; pass < 2; pass++)list_for_each_entry(dev, &bus->devices, bus_list) {if (pci_is_bridge(dev))max = pci_scan_bridge(bus, dev, max, pass);}}
pci_scan_slot(32个子设备扫描)
pci_scan_slot(bus, devfn) // 注:这里的devfn=0,8,16,....,248dev = pci_scan_single_device(bus, devfn); //*** 超级重点*****,下边单独跟下这个函数for (fn = next_fn(bus, dev, 0); fn > 0; fn = next_fn(bus, dev, fn)) {// 如果桥片上的所有设备pci_scan_single_device(bus, devfn + fn);}// 这两部分都调用pci_scan_single_device 进行查找和初始化。pci_scan_single_devicepci_get_slot(bus, devfn);pci_scan_device(bus, devfn); // *** 重点pci_device_add(dev, bus); // *** 重点pci_scan_device// 读取vendorID,并判断是否有效; (超时时间60*1000 )pci_bus_read_dev_vendor_id(bus, devfn, &l, 60*1000);// 分配struct pci_dev结构体struct pci_dev * dev = pci_alloc_dev(bus);// 初始化pci_devpci_setup_device(dev)// 以总线号,设备号,功能号等方式来分配pci设备名称 pci_dev->device->init_namedev_set_name(&dev->dev, "%04x:%02x:%02x.%d",...);// 获取配置空间大小 ***重点函数之一dev->cfg_size = pci_cfg_space_size(dev);switch (dev->hdr_type) {case PCI_HEADER_TYPE_NORMAL:pci_read_irq(dev); // 读取irq信息pci_read_bases(dev, 6, PCI_ROM_ADDRESS); // 重点***资源分配管理...break;case PCI_HEADER_TYPE_BRIDGE:...break;.....}
pci_read_bases
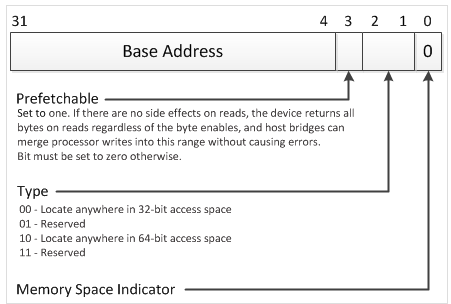
相关概念:
bar空间地址属性
pci_read_bases // 读取6个bar空间和rom资源函数for (pos = 0; pos < howmany; pos++) { // *********读取bar空间和资源分配*****struct resource *res = &dev->resource[pos];reg = PCI_BASE_ADDRESS_0 + (pos << 2);pos += __pci_read_base(dev, pci_bar_unknown, res, reg); // 重点}if (rom) { // rom信息,先跳过......}__pci_read_base// 先读取地址数据,然后写全1,读取长度,写回地址数据pci_read_config_dword(dev, pos, &l);pci_write_config_dword(dev, pos, l | mask);pci_read_config_dword(dev, pos, &sz);pci_write_config_dword(dev, pos, l);if (type == pci_bar_unknown) {// 这里获取bar的属性:64bit/32bit,IO/MEM,PREFETCH等属性res->flags = decode_bar(dev, l);res->flags |= IORESOURCE_SIZEALIGN;}if (res->flags & IORESOURCE_MEM_64) { // 64-bit地址牵扯到地址和长度拼接,pci_read_config_dword(dev, pos + 4, &l);pci_write_config_dword(dev, pos + 4, ~0);pci_read_config_dword(dev, pos + 4, &sz);pci_write_config_dword(dev, pos + 4, l);l64 |= ((u64)l << 32);sz64 |= ((u64)sz << 32);mask64 |= ((u64)~0 << 32);}//*******总线地址--存储域地址转换部分/* 获取到资源起始地址和长度,分配总线地址属性 */region.start = l64;region.end = l64 + sz64 - 1;pcibios_bus_to_resource(dev->bus, res, ®ion);pcibios_resource_to_bus(dev->bus, &inverted_region, res)/*注:window的offset才是 总线域到CPU域会一一映射,中间偏移window->offset*/pcibios_bus_to_resourceresource_list_for_each_entry(window, &bridge->windows) {// 主桥对应的存储区域范围 *** 参考主桥分配bus_region.start = window->res->start - window->offset;bus_region.end = window->res->end - window->offset;// 判断是物理地址区域if (region_contains(&bus_region, region)) {offset = window->offset;break;}}
pci_bar_size
如何计算pci_bar_size?
在vfio-mdev 的 mtty.c 中,有个模拟pci的设备,可以看到:
mtty_create_config_space函数
STORE_LE32((u32 *) &mdev_state->vconfig[0x10], 0x000000); // Memory空间mdev_state->bar_mask[0] = ~(MTTY_MMIO_BAR_SIZE) + 1; // 长度掩码空间pr_info("bar 0 mask is %#x\n",mdev_state->bar_mask[0]);
那么问题来了, 比如 长度8的掩码 ~(MTTY_MMIO_BAR_SIZE) + 1; 是 0xFFFF_FFF8,是怎么计算出8的 ?
这里MTTY_MMIO_BAR_SIZE 肯定是2^n
static u64 pci_size(u64 base, u64 maxbase, u64 mask){u64 size = mask & maxbase; /* Find the significant bits */if (!size)return 0;/* Get the lowest of them to find the decode size, andfrom that the extent. */size = (size & ~(size-1)) - 1;/* base == maxbase can be valid only if the BAR hasalready been programmed with all 1s. */if (base == maxbase && ((base | size) & mask) != mask)return 0;return size;}
可见, size = (size & ~(size-1)) - 1; 可以完美计算出真实size大小
pci_cfg_space_size
pci_cfg_space_size // 获取配置空间大小// 桥和pci-x暂时不考虑if (pci_is_pcie(dev)) // 根据前边获取到的信息,判断是否是pcie设备return pci_cfg_space_size_ext(dev); // 这里边就是尝试读取下0x100以后的数据,return PCI_CFG_SPACE_SIZE;
pci_device_add
pci_device_addpci_configure_device(dev); // 配置PCI设备pci_init_capabilities(dev); // capabilities初始化pci_msi_setup_pci_dev(dev);pci_configure_ari(dev);pci_iov_init(dev);
pci_acpi_init 初始化中断接口
pci_acpi_initpcibios_enable_irq = acpi_pci_irq_enable;pcibios_disable_irq = acpi_pci_irq_disable;x86_init.pci.init_irq = x86_init_noop;

