本文参加了由公众号@若川视野 发起的每周源码共读活动,点击了解详情一起参与。
1. 前言
1.1 这个库,是干啥的
如果你项目中要用到一个非常大的数组,并且你经常需要使用这两个操作:
Array.push()在末端添加一个元素.Array.shift()在取出队列首端的一个元素,整个队列往前移,这样原先排第二的元素现在排在了第一
如果学过数据结构,就会敏锐地发现,诶这两个操作,不就是在模拟队列吗
queue 队列是一个有序的元素列表,其中一个元素插入到队列的末尾,然后从队列的前面移除。队列的工作原理是先进先出(FIFO)。
JS 没有queue这个数据结构,用数组模拟就好了,真方便!
nonono,回到开头,当数据量较小的时候,似乎没什么影响,但如果数据量较大,性能就会严重下降
这是因为在底层实现中,数组是顺序存储的,当你shift的时候,会先取出队列首端的一个元素,整个队列往前移——整个操作的事件时间复杂度是**O(n)**
如果你的项目正如上面我所说的情况,那么你很可能就需要这个包 yocto-queue,它能让你的shift操作时间复杂度降为O(1)。(在这库里面shift用的是dequeue方法)
1.2 你能学到
- ES6 中的
class - 链表和数组的区别,时间复杂度
- JS 实现链表的方法
- 学习 Symbol.iterator 的使用场景
- 调试源码
2. 准备
2.1 了解API
import Queue from 'yocto-queue';const queue = new Queue();queue.enqueue('🦄');queue.enqueue('🌈');console.log(queue.size);//=> 2console.log(...queue);//=> '🦄 🌈'console.log(queue.dequeue());//=> '🦄'console.log(queue.dequeue());//=> '🌈'
queue = new Queue()
The instance is an Iterable, which means you can iterate over the queue front to back with a “for…of” loop, or use spreading to convert the queue to an array. Don’t do this unless you really need to though, since it’s slow.
该实例是可枚举的,也就是说 你可以用for...of来遍历,并且可以用扩展运算符将其变为数组,但是尽量不要这样做,这样性能很差
.enqueue(value)
.dequeue()
删去队头,并返回被删除的值 || 或者是 undefined(队列本来就已经为空的情况)
.clear()
.size
3 看看 源码
3.1 环境准备
# 克隆官方仓库git clone https://github.com/sindresorhus/yocto-queue.gitcd .\yocto-queue\npm installcode .
3.3 调试源码
查看 package.json文件来确定主入口为 index.js
demo
新建文件夹examples,存放 demo index.js
// yocto-queue/examples/index.jsimport Queue from "../index.js";const queue = new Queue(); //此处打断点queue.enqueue("⛵");queue.enqueue("🌊");console.log(queue.dequeue());console.log(queue.size);for (let q of queue) {console.log(q);}queue.clear();
node examples/index.js或者直接F5也可以即可开始调试源码,其实这个代码复杂度不手动调试也可以的,但是通过调试可以让你很明确地看到哪一步代码用到了哪里的东西
3.4 理解源码
源码
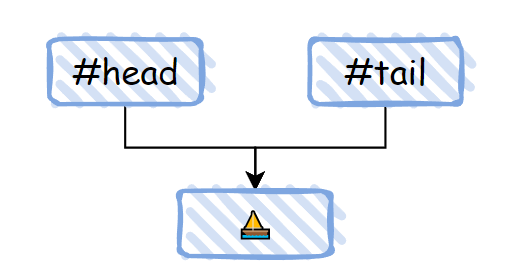
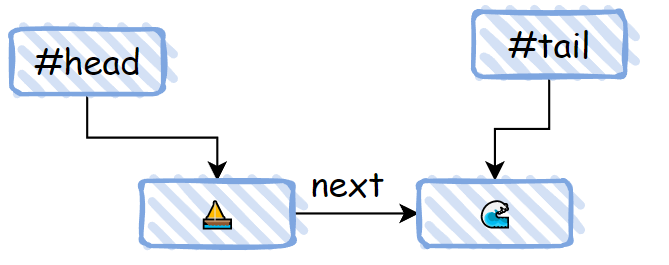
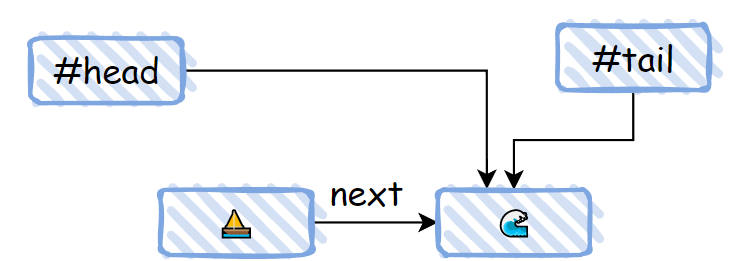
Queue中,#head和#tail可以视作虚拟结点,只是分别用来指向头和尾结点的。每次遍历的时候先找到头结点(#head指向的结点),然后通过每个结点的next指针往后走。即使只有头结点也能组成该链表——慢慢遍历总能到最后面,但是显然这样效率就低了,所以还有一个专门的尾指针#tail,方便尾部插入结点
源码总览:
class Node {value;next;constructor(value) {this.value = value;}}export default class Queue {#head;#tail;#size;constructor() {this.clear();}enqueue(value) {const node = new Node(value);if (this.#head) {this.#tail.next = node;this.#tail = node;} else {this.#head = node;this.#tail = node;}this.#size++;}dequeue() {const current = this.#head;if (!current) {return;}this.#head = this.#head.next;this.#size--;return current.value;}clear() {this.#head = undefined;this.#tail = undefined;this.#size = 0;}get size() {return this.#size;}* [Symbol.iterator]() {let current = this.#head;while (current) {yield current.value;current = current.next;}}}
分步解析
enqueue
queue.enqueue("⛵");时,会创造Queue中第一个实例node,第一个结点自然头和尾都指向他自己
if (this.#head) {//...} else {this.#head = node;this.#tail = node;}
queue.enqueue("🌊");随后我们添加第二个结点
if (this.#head) {this.#tail.next = node;this.#tail = node;} else {//...}
dequeue
console.log(queue.dequeue());
dequeue() {const current = this.#head; //获取当前if (!current) {return;}this.#head = this.#head.next;this.#size--;return current.value;}
size
console.log(queue.size);
get size() {return this.#size;}
这里用到了 class 中 getters
⭐for…of
这里是本文的一个重点
这里实现了Queue这个对象可以通过for...of来进行遍历,即让它可以迭代。
想要让对象可迭代,需要添加一个Symbol.iterator方法,这个方法专门用来使对象可迭代的内建symbol。
通过调试我们也可以知道,当进入for...of,他就会进入Symbol.iterator这个方法,(如果没找到,就会报错,像数组那些对象都是有内置该方法的),该方法必须返回一个迭代器—— 一个有next方法的对象。
像这样使用:
let range = {from: 1,to: 5,[Symbol.iterator]() { // 在 for..of 循环开始时被调用一次return {current: this.from,last: this.to,next() { // 每次迭代时都会被调用,来获取下一个值if (this.current <= this.last) {return { done: false, value: this.current++ };} else {return { done: true };}}};}};for(let value of range) {alert(value); // 1,然后 2,然后 3,然后 4,然后 5}
而源码中并不是这样的,而是这样:
* [Symbol.iterator]() {let current = this.#head; //通过current记录当前迭代进程while (current) { //循环取值,直到没有yield current.value; //取值,并返回current = current.next;//通过next往下一个走}}
⭐生成器
生成器是 ES6 新增的一个极为灵活的结构,拥有在一个函数块内暂停和恢复代码执行的能力。这种能力具有深远的影响,比如使用生成器可以自定义迭代器和实现协程。
在函数前面加一个星号*,则表示它是一个生成器。调用生成器函数会产生一个生成器对象,其一开始处于暂停状态,该对象也实现了Iterator接口,通过调next()使其转为开始或者恢复执行状态。生成器函数在遇到yield关键字前会正常执行,遇到该关键字后,执行会停止,函数作用域的状态被保留 —— 有点像函数的中间返回语句,它能让函数返回一个值出去,但是函数仍能继续执行。随后通过在生成器对象上调用next方法恢复执行。
实际上,很少在生成器对象上显式调用next(),而是将其作为可迭代对象——
function* generatorFn(){yield 1;yield 2;yield 3;}for(let i of generatorFn()){console.log(i)}//1//2//3
让我们回到源码中
for (let q of queue) {console.log(q);}
结合上面对Symbol.iterator的理解
当进入
for...of,他就会进入Symbol.iterator这个方法
也就是说 这样调用时,实际上就是
for (let q of queue[Symbol.iterator]()) {console.log(q);}
让[Symbol.iterator]这个函数变为了生成器函数,并将其作为可迭代对象!大大地减少了代码量~
clear
clear() {this.#head = undefined;this.#tail = undefined;this.#size = 0;}
很简单,直接将头指针和尾指针指向的值改为undefined,size也设置为0,剩下的就靠JS自身的垃圾回收机制了,本文就不涉及了。
4. 学习资源
- 数组
- class
- Symbol.iterator
- 垃圾回收机制
-
5. 总结 & 收获
复习了 ES6 中的
class以及相关语法- 链表和数组的区别,时间复杂度,通过指针的空间 来省下按顺序遍历的时间——一种空间换时间的性能优化策略
- JS 实现链表的方法,有了
class这个语法后,和其他语言差不多了Node结点,存当前value以及与用于相邻结点相连的指针
- 复习
Symbol.iterator的使用场景 以及 生成器这个平时可能用的较少的知识点🌊如果有所帮助,欢迎点赞关注,一起进步⛵

若有收获,就点个赞吧
0 人点赞
