NTD NETBASE DAY02
1 案例1:认识网线和交换机
1.1 问题
本例要求了解网线和交换机的品牌、规格、市场报价等信息,相关说明如下。
- 访问电商网站,了解双绞线、光缆的规格及报价,包括6类非屏蔽网线/箱(安普网联、秋叶原)、3米单模双芯光纤跳线(胜为、麦森特)
访问电商网站,了解交换机的规格及报价,包括24口千兆 非网管型交换机(普联、水星、华为)、24口千兆 网管型交换机(华为、思科、华三)
1.2 步骤
实现此案例需要按照如下步骤进行。
步骤一:双绞线、光缆的规格及市场报价
1)原装6类非屏蔽双绞线(305米/箱)
安普网联,如图-1所示。
图-1
秋叶原,如图-2所示。
图-2
2)3米单模双芯光纤跳线
胜为,如图-3所示
图-3
麦森特,如图-4所示。
图-4
步骤二:了解交换机的规格及市场报价
1)24口千兆非网管型交换机
普联(TP-Link),如图-5所示。
图-5
水星(Mercury),如图-6所示。
图-6
华为(Huawei),如图-7所示。
图-7
2)24口千兆网管型交换机
华为(Huawei),如图-8所示。
图-8
思科(Cisco),如图-9所示。
图-9
华三(H3C),如图-10所示。
图-10
2 案例2:部署及使用eNSP平台
2.1 问题
本例要求安装华为eNSP模拟器平台,并熟悉eNSP操作环境,相关说明如下。
安装华为eNSP网络模拟平台(出现Windows防火墙提示时要允许)
- 打开eNSP平台,新建拓扑并绘制网络
-
2.2 步骤
实现此案例需要按照如下步骤进行。
步骤一:安装eNSP模拟器
1)启动安装程序
鼠标右键以管理员身份运行安装程序 “eNSP_1.2_Setup.exe”,出现eNSP安装向导,如图-11所示。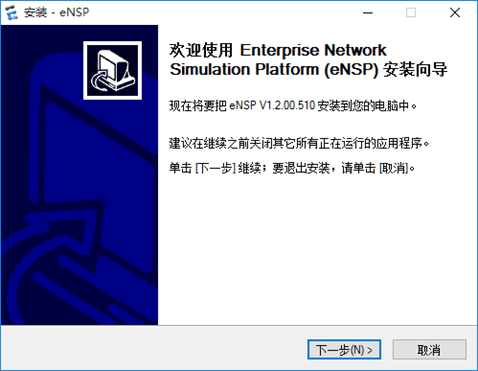
图-11
2)配置安装内容
在“选择安装其他程序”界面,全部勾选,如图-12示。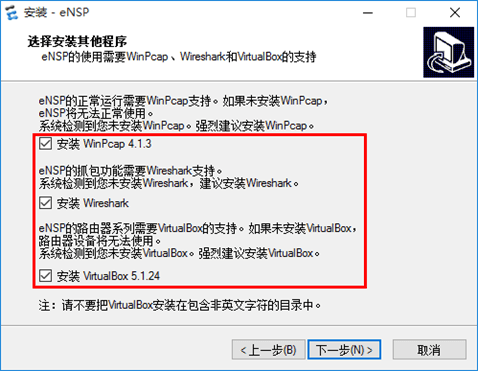
图-12
3)防护墙要允许eNSP程序的网络通信
特别提示:可能需要启用防火墙,并放行eNSP程序通信。
必要时Win+R快速调用firewall.cpl命令,启用防火墙,并通过“高级设置”放行访问eNSP的网络通信,如图-13所示。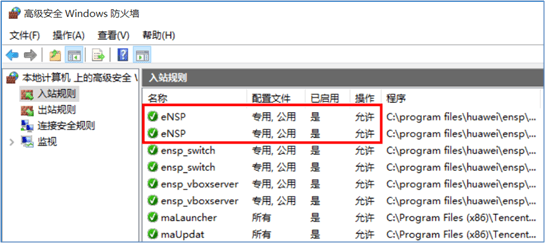
图-13
步骤二:使用eNSP平台绘制网络拓扑
1)启动eNSP模拟器
双击桌面上“eNSP”图标,打开eNSP窗口,如图-14所示。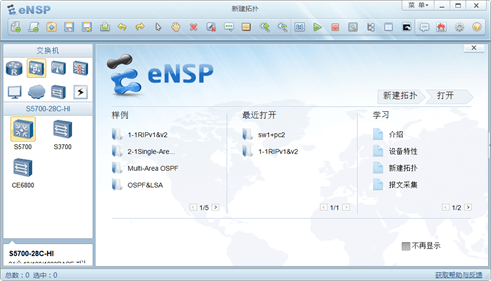
图-14
2)新建网络拓扑
从左侧找到S5700交换机、PC机、双绞线图标,通过拖拽和单击点选的方式绘制一个简单的网络突破图,如图-15所示。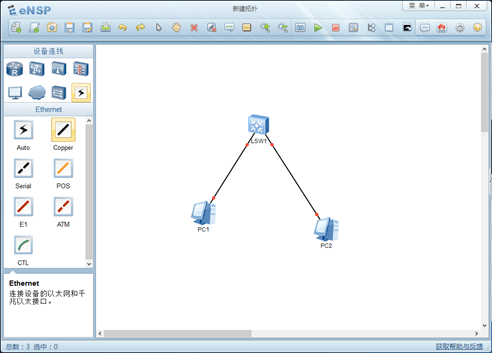
图-15
步骤三:启动网络拓扑中的设备
右击拓扑中的交换机,选择“启动”。
然后双击交换机图标,可以看到设备的命令行界面,确认可以成功启动,如图-16所示。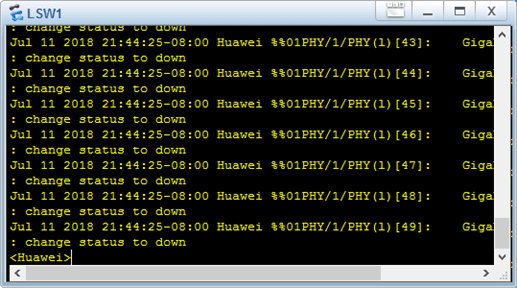
图-16
3 案例3:交换机组网
3.1 问题
本例要求组建两个独立的交换网络,相关说明如下。
首先在eNSP模拟平台中组建第1个S5700交换网络: 教学部网段 192.168.1.0/24
- 两台计算机pc1-1、pc1-2:192.168.1.1/24、192.168.1.2/24
- 确保从pc1-1能ping通pc1-2的IP地址
然后在上一个拓扑中增加第2个独立交换网络:
- 市场部网段 192.168.2.0/24
- 两台计算机pc2-1、pc2-2:192.168.2.1/24、192.168.2.2/24
- 确保从pc2-1能ping通pc2-2的IP地址
3.2 方案
3.3 步骤
实现此案例需要按照如下步骤进行。
步骤一:组建教学部网络
1)绘制网络拓扑,启动设备(LSW1、pc1-1、pc1-2),如图-18所示。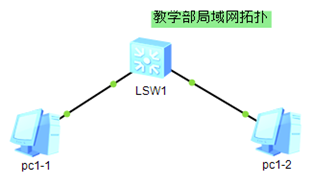
图-18
2)配置pc1-1,如图-19所示。
图-19
3)配置pc1-2,如图-20所示。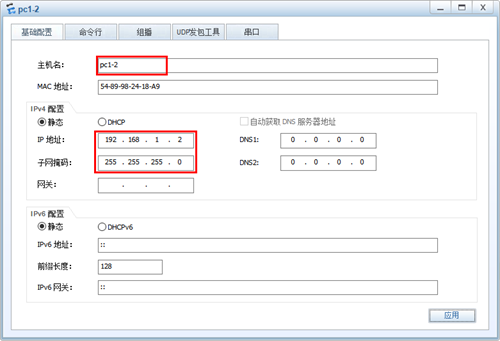
图-20
4)从pc1-1主机ping主机pc1-2,如图-21所示。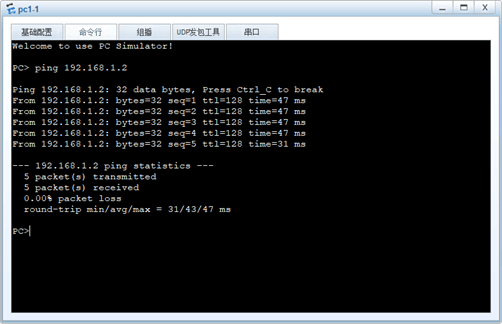
图-21
步骤二:组建市场部网络
1)绘制网络拓扑,启动设备(LSW2、pc2-1、pc2-2),如图-22所示。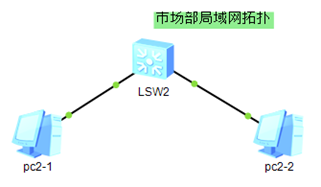
图-22
2)配置pc2-1,如图-23所示。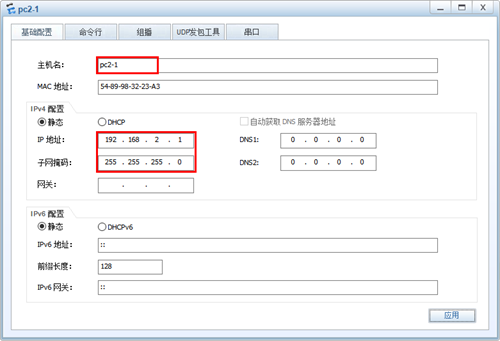
图-23
3)配置pc2-2,如图-24所示。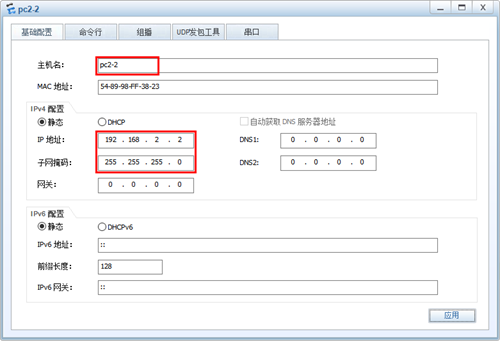
图-24
4)从pc2-1主机ping主机pc2-2,如图-25所示。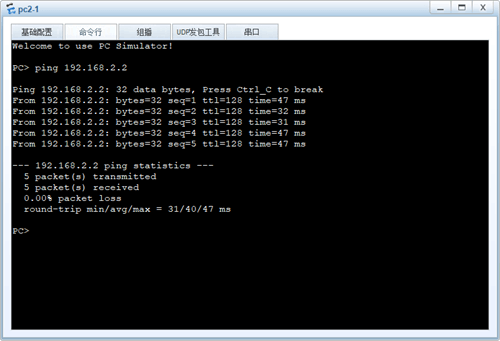
图-25
步骤三:保存网络拓扑文件
比如保存为NETBASE_DAY03.topo。
4 案例4:认识配置视图
4.1 问题
本例要求掌握华为交换机的配置视图,打开交换机lsw1配置终端,完成下列操作。
- 进入系统视图
- 进入接口g0/0/1的接口视图
- 返回系统视图、返回用户视图
- 重新进入接口g0/0/1的接口视图,快速返回用户视图
- 练习TAB补全、命令简写、?帮助的用法
4.2 方案
沿用前一章建立的教学部/市场部网络拓扑,如图-26所示,若当时未保存拓扑,也可以在eNSP平台中重新创建。
图-264.3 步骤
实现此案例需要按照如下步骤进行。
步骤一:进入配置终端及切换视图
1)进入系统视图
The device is running!
Enter system view, return user view with Ctrl+Z.
[Huawei] //系统视图
2)进入接口g0/0/1的接口视图
[Huawei] interface GigabitEthernet 0/0/1 //切进接口视图
[Huawei-GigabitEthernet0/0/1] //接口视图
3)返回系统视图、返回用户视图
[Huawei-GigabitEthernet0/0/1] quit
[Huawei] quit
4)重新进入接口g0/0/1的接口视图,快速返回用户视图
Enter system view, return user view with Ctrl+Z.
[Huawei]interface GigabitEthernet 0/0/1
[Huawei-GigabitEthernet0/0/1] //按Ctrl+Z快捷键
步骤二:命令行编辑技巧
1)练习TAB补全
2)命令简写
Enter system view, return user view with Ctrl+Z.
[Huawei]
[Huawei]int g0/0/1 //进接口模式的简写
[Huawei-GigabitEthernet0/0/1]
3)?帮助的用法
[Huawei-GigabitEthernet0/0/1]display ver? //在命令后加 ?会提示用法
version
[Huawei-GigabitEthernet0/0/1]display versio
[Huawei-GigabitEthernet0/0/1]display version ?
slot Slot
| Matching output
5 案例5:交换机基础配置
5.1 问题
本例要求掌握华为智能交换机的基础配置操作,相关说明如下。
- 将交换机lsw1的设备名设为 tedu-ntd-lsw1
- 禁用交换机上连接pc1-1的接口(比如g0/0/1),然后检查pc1-1是否还能ping通pc1-2
- 再启用交换机上连接pc1-1的接口(比如g0/0/1),然后检查pc1-1是否还能ping通pc1-2
- 检查、保存交换机配置
5.2 步骤
实现此案例需要按照如下步骤进行。
步骤一:将交换机lsw1的设备名设为 tedu-ntd-lsw1
为所有用户添加初始化命令。system-view
Enter system view, return user view with Ctrl+Z.
[Huawei] sysname tedu-ntd-lsw1 //将设备名设置为 tedu-ntd-lsw1
[tedu-ntd-lsw1]
步骤二:禁用/启用交换机上连接pc1-1的接口(比如g0/0/1)
1)禁用g0/0/1接口(连接pc1-1的接口)。
[tedu-ntd-lsw1]int g0/0/1 //进接口配置
[tedu-ntd-lsw1-GigabitEthernet0/0/1] shutdown //禁用接口
Jul 12 2018 13:31:05-08:00 lsw1 %%01PHY/1/PHY(l)[0]:
GigabitEthernet0/0/1: change status to down //此接口状态为down
2)从主机pc1-1测试ping主机pc1-2,已无法连通,如图-27所示。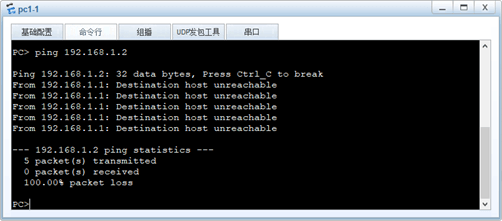
图-27
3)重新将连接pc1-1的g0/0/1接口启用。
[tedu-ntd-lsw1-GigabitEthernet0/0/1] undo shutdown
Jul 12 2018 13:31:31-08:00 lsw1 %%01PHY/1/PHY(l)[1]:
GigabitEthernet0/0/1: change status to up //此接口状态为up
4)再次从主机pc1-1测试ping主机pc1-2,已恢复连通,如图-28所示。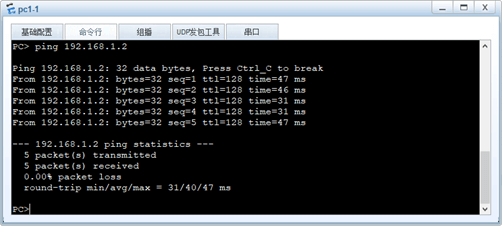
图-28
步骤三:检查、保存交换机配置
1)查看当前配置
#
sysname tedu-ntd-lsw1
#
cluster enable
ntdp enable
ndp enable
#
undo nap slave enable
#
drop illegal-mac alarm
#
diffserv domain default
#
drop-profile default
.. .. //按q可退出查看
2)保存当前配置
The current configuration will be written to the device.
Are you sure to continue?[Y/N]Y //输入Y确认
Now saving the current configuration to the slot 0.
Jul 25 2018 12:46:15-08:00 lsw1 %%01CFM/4/SAVE(l)[2]:The user chose Y when decid
ing whether to save the configuration to the device.
Save the configuration successfully.
6 案例6:实用配置技巧
6.1 问题
本例要求熟悉配置华为交换机的一些实用技巧,相关说明如下。
- 为交换机lsw1设置终端登录密码Taren1,退出终端重进以验证登录效果
- 将会话的闲置超时设为2880分钟
- 恢复出厂设置,重新进入后观察设备名变化
6.2 步骤
实现此案例需要按照如下步骤进行。
步骤一:为交换机lsw1设置终端登录密码Taren1
1)设置登录密码。system-view //进系统视图
[tedu-ntd-lsw1] user-interface console 0 //进终端配置
[tedu-ntd-lsw1-ui-console0] set authentication password cipher Taren1
//设置终端登录密码为 Taren1
[tedu-ntd-lsw1-ui-console0] authentication-mode password //启用密码认证
2)先从用户视图quit,然后重新登录测试。
Please Press ENTER.
Login authentication
Password: //再次进终端时,要求密码验证
步骤二:将会话的闲置超时设为2880分钟
[tedu-ntd-lsw1-ui-console0] idle-timeout 2880 //将闲置超时设为2880分钟
[tedu-ntd-lsw1-ui-console0]
步骤三:恢复交换机出厂设置
Warning: The action will delete the saved configuration in the device.
The configuration will be erased to reconfigure. Continue? [Y/N]:Y
//提示是否恢复选Y
Info: The system is now comparing the configuration, please wait.
Warning: All the configuration will be saved to the configuration file for the n
ext startup:, Continue?[Y/N]:N //提示是否保存选N
Info: If want to reboot with saving diagnostic information, input ‘N’ and then e
xecute ‘reboot save diagnostic-information’.
System will reboot! Continue?[Y/N]:Y //提示是否重启选Y
.. ..
7 案例7:辟邪剑谱
7.1 问题
本例要求熟悉操作华为交换机相关指令,相关说明如下。
- 完成命令至少敲五遍以上
- 在每一条命令后面天下命令中文注释
Change language mode, confirm? [Y/N] y
[Huawei]sys tedu-ntd-lsw1
[tedu-ntd-lsw1]inter g0/0/10
[tedu-ntd-lsw1-GigabitEthernet0/0/10]shut
[tedu-ntd-lsw1-GigabitEthernet0/0/10]undo shut
[tedu-ntd-lsw1-GigabitEthernet0/0/10]quit
[tedu-ntd-lsw1]dis cur
[tedu-ntd-lsw1]user-inter con 0
[tedu-ntd-lsw1-ui-console0]auth pass
[tedu-ntd-lsw1-ui-console0]set auth pass ci Taren1
[tedu-ntd-lsw1-ui-console0]return
是否继续?[Y/N]y
Please Press ENTER.
Login authentication
Password: //输入密码Taren1
[tedu-ntd-lsw1]user-inter co 0
[tedu-ntd-lsw1-ui-console0]idle-t 1440
[tedu-ntd-lsw1-ui-console0]return
The configuration will be erased to reconfigure. Continue? [Y/N]:y
ext startup:, Continue?[Y/N]:n
System will reboot! Continue?[Y/N]:y


