一、代码结构
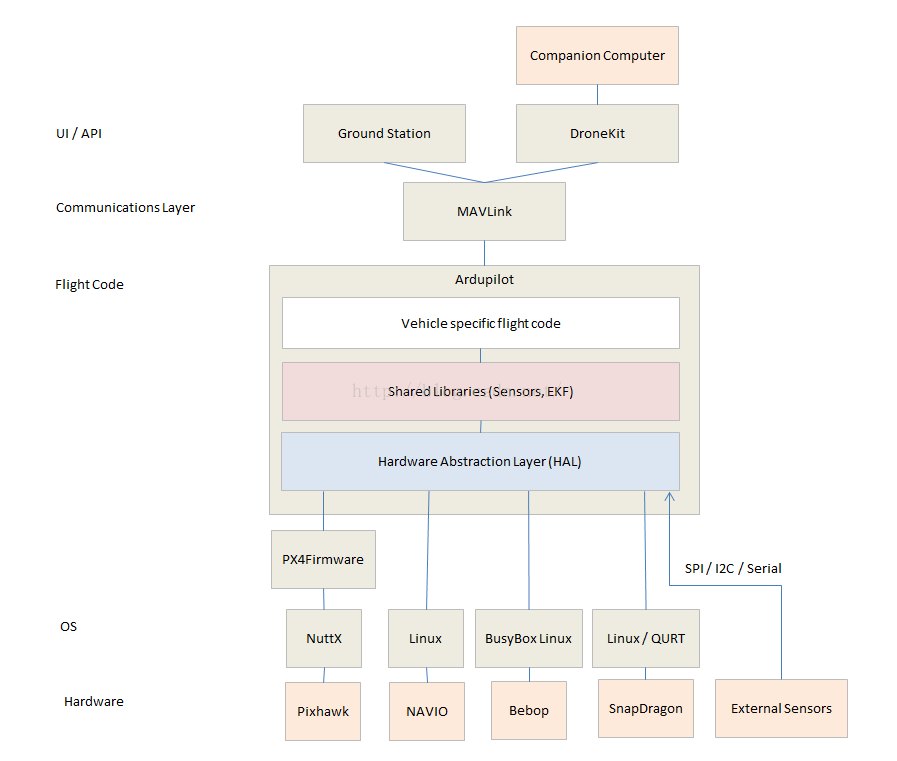
整体框架: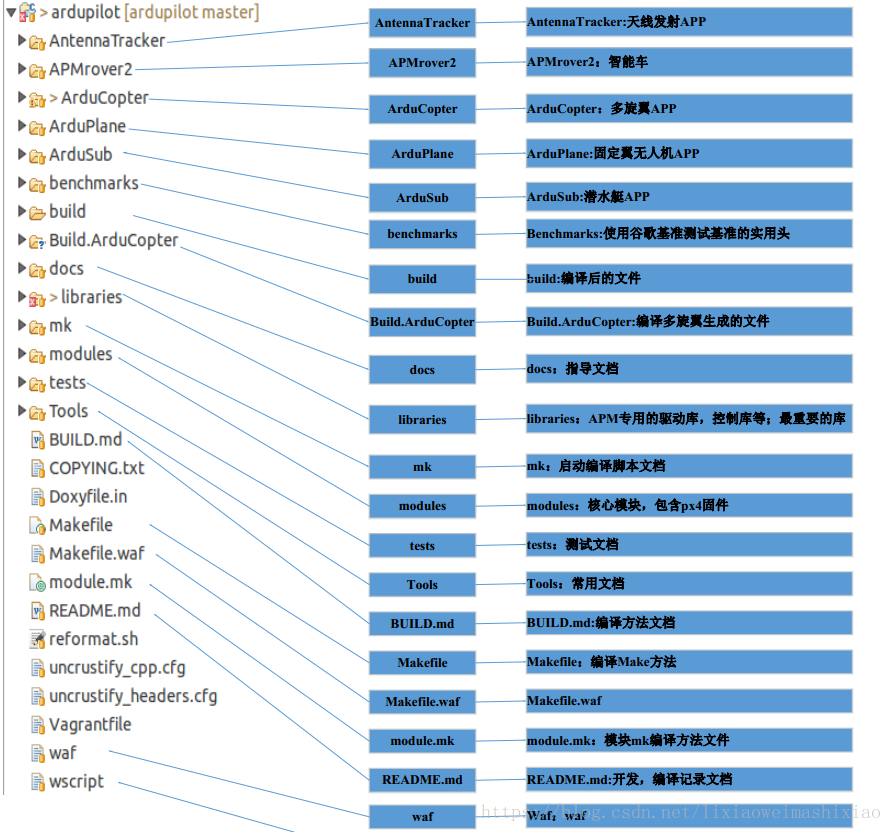
1.Vehicle specific flight code
包括不同航行器的代码:Plane、 Copter、APMrover2、AntennaTracker、Sub
2.Libraries目录中放的是不同航行器通用的设备/模块,包括:
(1)核心库
AP_AHRS:采用DCM(方向余弦矩阵方法)或EKF(扩展卡尔曼滤波方法)预估飞行器姿态。
AP_Common:所有执行文件(sketch格式,arduino IDE的文件)和其他库都需要的基础核心库。
AP_Math:包含了许多数学函数,特别对于矢量运算。
AC_PID:PID控制器库。
AP_InertialNav:扩展带有gps和气压计数据的惯性导航库。
AC_AttitudeControl:姿态控制相关库。
AP_WPNav:航点相关的导航库。
AP_Motors:多旋翼和传统直升机混合的电机库。
RC_Channel:更多的关于从APM_RC的PWM输入/输出数据转换到内部通用单位的库,比如角度。
AP_HAL,AP_HAL_AVR,AP_HAL_PX4:硬件抽象层库,提供一个飞控总的AP_HAL抽象,通过不同类型的飞控板去实现继承,这样就可以很好的兼容不同的板子,方便ardupilot可以支持不同的硬件。
AP_HAL_PX4:GPIO、I2C、UART、RCinput/output、scheduler、semaphores、storage。
(2)传感器相关库
AP_InertialSensor:读取陀螺仪和加速度计数据,并向主程序执行标准程序和提供标准单位数据(deg/s,m/s)。
AP_RangerFinder:声呐和红外测距传感器的交互库
AP_Baro:气压计相关库
AP_GPS:GPS相关库
AP_Compass:三轴罗盘相关库
AP_OpticalFlow:光流传感器相关库
(3)其他库
AP_Mount,AP_Camera, AP_Relay:相机安装控制库,相机快门控制库
AP_Mission: 从eeprom(电可擦只读存储器)存储/读取飞行指令相关库
AP_Buffer:惯性导航时所用到的一个简单的堆栈(FIFO,先进先出)缓冲区
AP_AccelCal、AP_Declination、AP_RCMapper、AP_RPM、AP_RSSI
AP_ADC:AD转换
APM_Control: pitch/roll/yaw controller
DataFlash:flash memory
GCS_Console/GCS_MAVLink:地面站通信、飞行日志子模块
在libraries目录下的各个设备中,有些会提供一个example目录,里边提供了一些针对该设备的测试文件,可以编译后单独测试该设备。同时也可以通过例程学习该设备相关函数和接口的使用方法。
3.其他的部分:external support code(也就是modules)、Tools
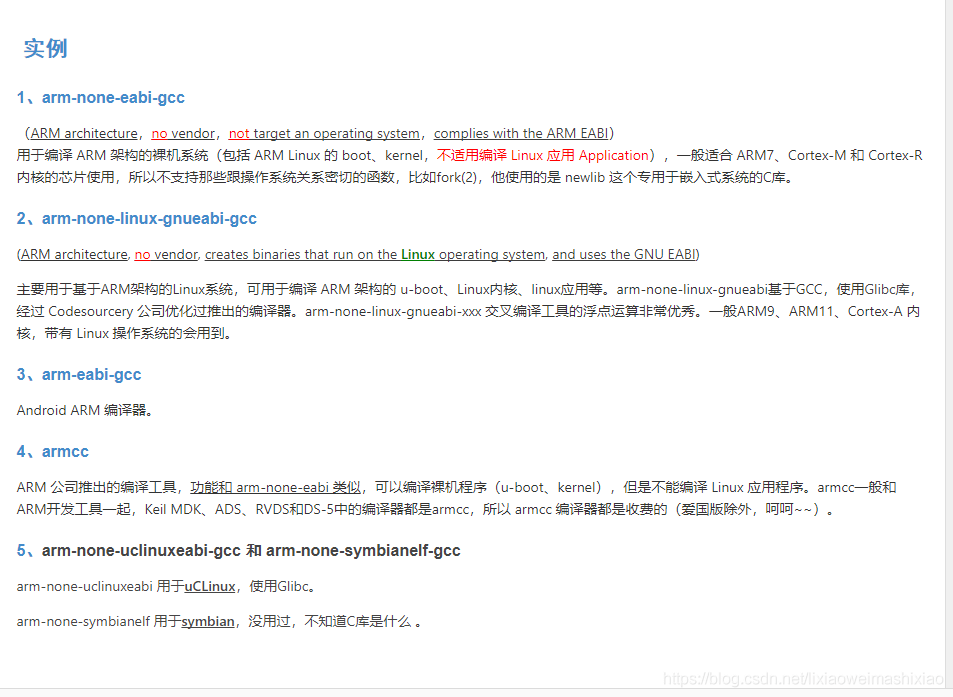
二、编译的背景知识(了解)
编译代码用的是gcc-arm-none-eabi-6-2017-q2-update-linux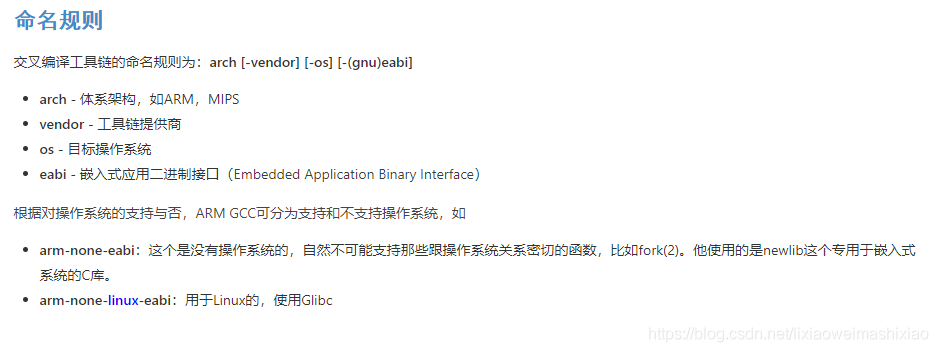
采用waf编译
切换到./ardupilot目录配置硬件信息:./waf configure --board=Pixhawk1编译源代码:./waf copter //以copter为例烧录源代码到板子中:./waf --targets bin/arducopter --upload
使用waf命令能够列出可以构建的例子
终端输入:./waf list | grep 'examples'
三、基础入门(学习库例程)
hal引用:
const AP_HAL::HAL& hal = AP_HAL::get_HAL(); //声明
每个例程如果想使用 AP_HAL 功能的文件都需要声明 HAL 引用。可以访问 AP_HAL: HAL 对象, 它提供对所有硬件特定功能的访问, 包括将消息打印到控制台、休眠和与 I2C 和 SPI 总线通信。
**
最常用的 hal 函数有:
hal.console->printf() 打印字符串
AP_HAL::millis()和AP_HAL::micros() 获得启动后的时间
hal.scheduler->delay()和hal.scheduler->delay_microseconds() 延迟一段时间
hal.gpio->pinMode(), hal.gpio->read() 和hal.gpio->write() 用于访问 GPIO 引脚
hal.i2c 用于访问 I2C
hal.spi用于访问 SPI
需要注意的是,例程中的setup()和loop() 只是复杂的板子程序的冰山一角。它会使 ArduPilot 看起来像是单线程, 但实际应用会有大量的实时线程启动。
四、主函数入口
AP_HAL_MAIN(); 这是一个 hal 宏, 它生成必要的代码来声明 c++ 主函数,以及 hal 的任何板级初始化代码。
在AP_HAL_Main.h 文件中,有如下代码:
#define AP_HAL_MAIN() \AP_HAL::HAL::FunCallbacks callbacks(setup, loop); \extern "C" { \int AP_MAIN(int argc, char* const argv[]); \int AP_MAIN(int argc, char* const argv[]) { \hal.run(argc, argv, &callbacks); \return 0; \} \}#define AP_HAL_MAIN_CALLBACKS(CALLBACKS) extern "C" { \int AP_MAIN(int argc, char* const argv[]); \int AP_MAIN(int argc, char* const argv[]) { \hal.run(argc, argv, CALLBACKS); \return 0; \} \}
而对于hal.run函数,我们会根据不同的飞控板层最终调用不同的设备run函数来实现。
下面以Chibios系统为例,直接定位AP_HAL_Chibios目录的HAL_ChibiOS_Class源文件即可找到相应的run()函数实现,其中会执行main_loop函数:
…………g_callbacks = callbacks; //函数定义传递//接管执行main------------Takeover mainmain_loop();
再来看main_loop函数:
static void main_loop(){daemon_task = chThdGetSelfX();/*switch to high priority for main loop*/chThdSetPriority(APM_MAIN_PRIORITY);#ifdef HAL_I2C_CLEAR_BUS// Clear all I2C Buses. This can be needed on some boards which// can get a stuck I2C peripheral on bootChibiOS::I2CBus::clear_all();#endifChibiOS::Shared_DMA::init();peripheral_power_enable();hal.uartA->begin(115200);#ifdef HAL_SPI_CHECK_CLOCK_FREQ// optional test of SPI clock frequenciesChibiOS::SPIDevice::test_clock_freq();#endifhal.uartB->begin(38400);hal.uartC->begin(57600);hal.analogin->init();hal.scheduler->init(); //初始化任务init线程/*run setup() at low priority to ensure CLI doesn't hang thesystem, and to allow initial sensor read loops to run*/hal_chibios_set_priority(APM_STARTUP_PRIORITY);if (stm32_was_watchdog_reset()) {// load saved watchdog datastm32_watchdog_load((uint32_t *)&utilInstance.persistent_data, (sizeof(utilInstance.persistent_data)+3)/4);last_persistent_data = utilInstance.persistent_data;}schedulerInstance.hal_initialized(); //系统初始化g_callbacks->setup(); //调用应用层的setup()函数#ifdef IOMCU_FWstm32_watchdog_init();#elif !defined(HAL_BOOTLOADER_BUILD)// setup watchdog to reset if main loop stopsif (AP_BoardConfig::watchdog_enabled()) {stm32_watchdog_init();}#ifndef HAL_NO_LOGGINGif (hal.util->was_watchdog_reset()) {AP::internalerror().error(AP_InternalError::error_t::watchdog_reset);const AP_HAL::Util::PersistentData &pd = last_persistent_data;AP::logger().WriteCritical("WDOG", "TimeUS,Task,IErr,IErrCnt,MavMsg,MavCmd,SemLine,FL,FT,FA,FP,ICSR", "QbIIHHHHHIBI",AP_HAL::micros64(),pd.scheduler_task,pd.internal_errors,pd.internal_error_count,pd.last_mavlink_msgid,pd.last_mavlink_cmd,pd.semaphore_line,pd.fault_line,pd.fault_type,pd.fault_addr,pd.fault_thd_prio,pd.fault_icsr);}#endif // HAL_NO_LOGGING#endif // IOMCU_FWschedulerInstance.watchdog_pat();hal.scheduler->system_initialized(); //系统初始化thread_running = true;chRegSetThreadName(SKETCHNAME);/*switch to high priority for main loop*/chThdSetPriority(APM_MAIN_PRIORITY);while (true) {g_callbacks->loop(); //调用应用层的loop线程/*give up 50 microseconds of time if the INS loop hasn'tcalled delay_microseconds_boost(), to ensure low prioritydrivers get a chance to run. Callingdelay_microseconds_boost() means we have already given uptime from the main loop, so we don't need to do it againhere*/#ifndef HAL_DISABLE_LOOP_DELAYif (!schedulerInstance.check_called_boost()) {hal.scheduler->delay_microseconds(50);}#endifschedulerInstance.watchdog_pat();}thread_running = false;}
在Rover.cpp的最后几行:
Rover rover;AP_HAL_MAIN_CALLBACKS(&rover);
因此对于我们用的rover而言,执行 g_callbacks->setup()会运行下面函数
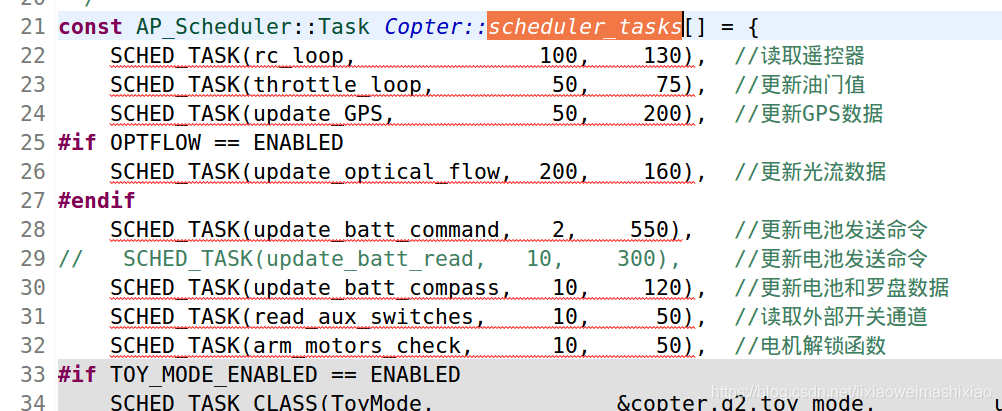
void Rover::setup(){// load the default values of variables listed in var_info[]AP_Param::setup_sketch_defaults();init_ardupilot(); //传感器初始化,注册//初始化整个主loop任务调度scheduler.init(&scheduler_tasks[0], ARRAY_SIZE(scheduler_tasks), MASK_LOG_PM);}
其中:scheduler_tasks[]数组就是我们的任务列表
执行 g_callbacks->loop()会运行下面函数
void Rover::loop(){scheduler.loop();G_Dt = scheduler.get_last_loop_time_s();}

若有收获,就点个赞吧
0 人点赞
