方法一 lightKG
lightKG简介
- lightKG是一个基于Pytorch和torchtext的知识图谱深度学习框架,涵盖知识图谱领域的一些简单算法,具有轻量、简单等特点,适合知识图谱领域的初学者。github地址
使用时,先从lightKG导入算法模型,创建对应的模型对象,然后调用模型对象的train方法训练模型,并保存训练好的模型;在测试时,先加载训练好的模型,然后进行测试,以x目录下的模型Y为例:
from lightkg.x import Y # 导入算法模型Ymodel = Y() # 创建模型对象Ymodel.train(...) # 训练模型和保存Ymodel.load(...) # 加载训练好的模型Ymodel.test(...) # 测试模型
方法概述:
TransE将关系看成实体间的转移,即:如果三元组(头实体,关系,尾实体)成立,头实体向量h与关系向量r的和与尾实体向量t相近,否则远离。![[9] 知识图谱嵌入实战代码 - 图1](/uploads/projects/armor-novr7@work/1c21f8d386d6ad8e7f1f2fb50d438912.png)
任务描述
- 知识图谱中的知识通常以(头实体,关系,尾实体)的三元组形式表达。
- 链接预测旨在给定三元组中的任意两个元素,预测第三个元素,即(?,关系,尾实体),(头实体,关系,?)和(头实体,?,尾实体),其中?表示待预测的元素,分别称为头实体预测,尾实体预测和关系预测。
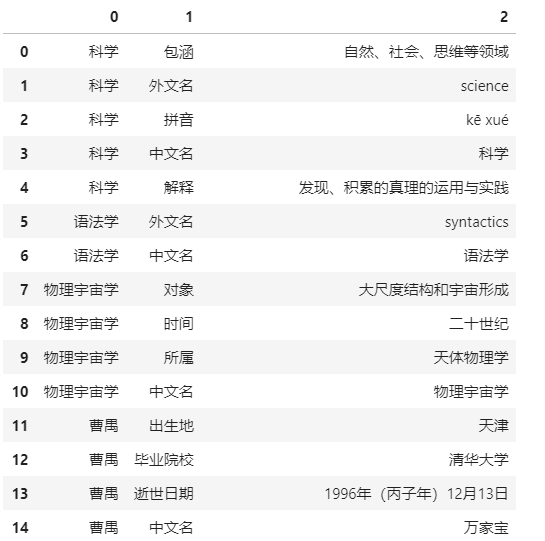
- 数据集:来自github的链接预测数据集,可以从这里下载。每行有三个字段,用“,”分隔,分别表示头实体,关系和尾实体,数据样例如下:
科学,包涵,自然、社会、思维等领域科学,外文名,science科学,拼音,kē xué科学,中文名,科学科学,解释,发现、积累的真理的运用与实践
所需依赖
测试环境 Python 3.6.8 Pytorch 1.4.0# 所需依赖---torchtext>=0.4.0tqdm>=4.28.1torch>=1.0.0pytorch_crf>=0.7.0scikit_learn>=0.20.2networkx>=2.2revtokjiebaregex---------------# 运行前需要按如下方式安装lightKG库!pip install -i https://pypi.douban.com/simple/ lightKG。
TransE
训练
基于上述转移假设,TransE设计三元组的得分函数为:![[9] 知识图谱嵌入实战代码 - 图2](/uploads/projects/armor-novr7@work/22adab3286cdc75cd9554f8d89c6dd8f.svg)
即用或
范数衡量距离(本教程采用
范数)。得分函数用于衡量三元组有效的可能性,得分越高,三元组越可能有效。因此,正例三元组的得分高,负例三元组的得分低。由于关系数量相对较少,负例只通过替换头实体或尾实体得到。
基于上述原则建模知识图谱中的正例三元组及其对应的负例三元组,类似支持向量机,最小化基于Margin的损失,使正例的得分比负例的得分至少高一个 Margin ,即:
%20%5Cin%20%5Cbigtriangleup%7D%5C%20%7B%5Csum%7B%5Cleft(h’%2Cr%2Ct’%20%5Cright)%20%5Cin%20%5Cbigtriangleup’%7D%7B%5Cmax%20%5Cleft(0%2C%20f%5Cleft(h%2C%20r%2C%20t%20%5Cright)%20%2B%20%5Cgamma-f%5Cleft(h’%2C%20r%2C%20t’%20%5Cright)%20%5Cright)%7D%7D%0A#card=math&code=L%3D%5Csum%7B%5Cleft%28h%2Cr%2Ct%20%5Cright%29%20%5Cin%20%5Cbigtriangleup%7D%5C%20%7B%5Csum_%7B%5Cleft%28h%27%2Cr%2Ct%27%20%5Cright%29%20%5Cin%20%5Cbigtriangleup%27%7D%7B%5Cmax%20%5Cleft%280%2C%20f%5Cleft%28h%2C%20r%2C%20t%20%5Cright%29%20%2B%20%5Cgamma-f%5Cleft%28h%27%2C%20r%2C%20t%27%20%5Cright%29%20%5Cright%29%7D%7D%0A&id=Nqm6u)
其中,为知识图谱中的正例三元组集合,
为基于
,通过替换其中正例三元组的头实体或尾实体得到的负例三元组集。最小化该损失得到实体和关系的向量表示。
# 查看数据集import pandas as pdtrain = pd.read_csv('datasets/train.sample.csv',header=None)train.head(20)
import osfrom lightkg.krl import KRLfrom lightkg.krl.config import DEFAULT_CONFIG# 修改epoch,默认1000DEFAULT_CONFIG['epoch']=10# 数据路径dataset_path = 'datasets/train.sample.csv'model_type = 'TransE'# 初始化实例krl = KRL()if not os.path.exists('./temp/models'):os.makedirs('./temp/models')# 训练krl.train(dataset_path,model_type=model_type,dev_path=dataset_path,save_path='./temp/models/LP_{}'.format(model_type))
预测
# 读取 模型krl.load(save_path='./temp/models/LP_{}'.format(model_type), model_type=model_type)krl.test(dataset_path)
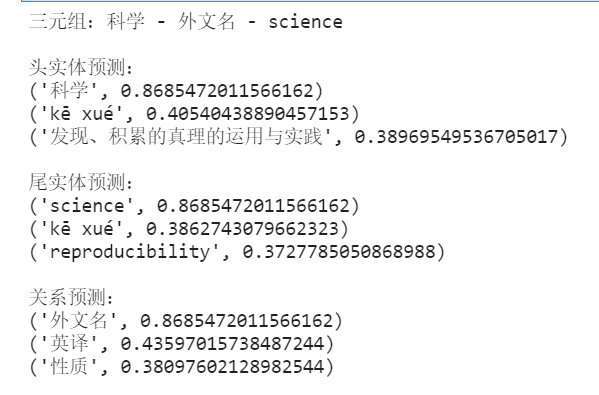
读取模型后调用对应的predict_head、predict_tail、predict_rel 即可预测头尾实体或关系。
# 打印函数def topk_print(l,name):print("{}预测:".format(name))for i in l:print(i)print()# 头实体预测head_pred = krl.predict_head(rel='外文名', tail='science', topk=3)# 尾实体预测tail_pred = krl.predict_tail(head='科学', rel='外文名', topk=3)# 关系预测relation_pred = krl.predict_rel(head='科学', tail='science', topk=3)print("三元组:科学 - 外文名 - science \n")topk_print(head_pred,"头实体")topk_print(tail_pred,"尾实体")topk_print(relation_pred,"关系")
方法二 AmpliGraph
ECAI 2020 给出很好的视频讲解和jupyter notebook指导
注意:ampligraph 需要tensorflow1.14.0及以上版本
ECAI_2020_KGE_Tutorial_Hands_on_Session.ipynb
方法三 dgl-ke (命令行训练)
dgl-ke是亚马逊出品的KGE工具,依赖dgl框架,dgl现已适配pytorch、mxnet、tensorflow深度学习框架,但目前dgl-ke只适配pytorch,且仅可在Ubuntu或maxOS系统上通过命令行执行,可以再colab训练,反正只是拿一个Embedding。
# 使用colab加载dgl-ke训练KGE# 使用命令行创建data文件夹,手动或者request获取文件# 参考https://github.com/MaastrichtU-IDS/KGRulEm/blob/7a696485f9506ba6af886b6cc86658a5fa6c696b/embeddings/Train_embeddings.ipynb!mkdir my_task# 处理自定义文件import osimport numpy as npimport pandas as pdtriples_path = "./data/freebase-237-merged-and-remapped.csv"df = pd.read_csv(triples_path, names=['sub', 'pred', 'obj'])triples = df.values.tolist()print(len(triples))# Please make sure the output directory exist.seed = np.arange(num_triples)np.random.seed(666)np.random.shuffle(seed)train_cnt = int(num_triples * 0.9)valid_cnt = int(num_triples * 0.05)train_set = seed[:train_cnt]train_set = train_set.tolist()valid_set = seed[train_cnt:train_cnt+valid_cnt].tolist()test_set = seed[train_cnt+valid_cnt:].tolist()with open("./data/FB15K237_train.tsv", 'w+') as f:for idx in train_set:f.writelines("{}\t{}\t{}\n".format(triples[idx][0], triples[idx][1], triples[idx][2]))with open("./data/FB15K237_valid.tsv", 'w+') as f:for idx in valid_set:f.writelines("{}\t{}\t{}\n".format(triples[idx][0], triples[idx][1], triples[idx][2]))with open("./data/FB15K237_test.tsv", 'w+') as f:for idx in test_set:f.writelines("{}\t{}\t{}\n".format(triples[idx][0], triples[idx][1], triples[idx][2]))# 使用命令行!DGLBACKEND=pytorch dglke_train --dataset FB15K237 --data_path ./data --data_files FB15K237_train.tsv FB15K237_valid.tsv FB15K237_test.tsv --format 'raw_udd_hrt' --model_name TransE_l2 --dataset FB15K237 --batch_size 1000 \--neg_sample_size 200 --hidden_dim 400 --gamma 19.9 --lr 0.25 --max_step 500 --log_interval 100 \--batch_size_eval 16 -adv --regularization_coef 1.00E-09 --test --num_thread 1 --num_proc 8
TransE源码剖析
TransE论文和KGE相关理论点击这里
17.[知识图谱嵌入]经典嵌入模型论文集合
算法主要流程: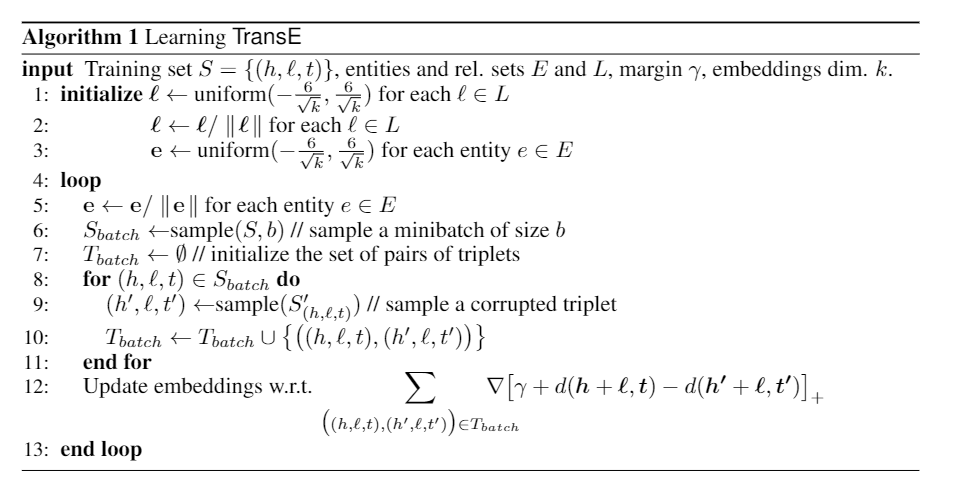
复现源码剖析:
超参数"""目标函数的常数——margin学习率——learningRate向量维度——dim k实体列表——entityList(读取文本文件,实体+id)关系列表——relationList(读取文本文件,关系 + id)三元关系列表——tripleList(读取文本文件,实体 + 实体 + 关系)损失值——loss距离公式——L1"""
初始化
# U分布初始化向量def init(dim):# uniform() 方法将随机生成下一个实数,它在[x, y]范围内。return uniform(-6/(dim**0.5), 6/(dim**0.5))# 归一化向量def norm(list):'''归一化:param 向量:return: 返回元素除以平方和后的数组'''var = linalg.norm(list)#x_norm=np.linalg.norm(x, ord=None, axis=None, keepdims=False)# 求范数 默认情况下,是求整体的矩阵元素平方和,再开根号。i = 0while i < len(list):list[i] = list[i]/var #list中每一元素/vari += 1return array(list)# 初始化向量def initialize(self):entityVectorList = {}relationVectorList = {}for entity in self.entityList: # 对entityList进行遍历n = 0entityVector = []while n < self.dim:ram = init(self.dim) #调用init函数,返回一个实数类似1.3266entityVector.append(ram) # 将ram 添加到实体向量中n += 1entityVector = norm(entityVector) #调用norm函数,单位化entityVectorList[entity] = entityVectorprint("entityVector初始化完成,数量是%d"%len(entityVectorList))for relation in self. relationList:n = 0relationVector = []while n < self.dim: # 循环dim次ram = init(self.dim) #调用init函数,返回一个实数类似1.3266relationVector.append(ram) # 将ram 添加到关系向量中n += 1relationVector = norm(relationVector) #归一化relationVectorList[relation] = relationVectorprint("relationVectorList初始化完成,数量是%d"%len(relationVectorList))# 初始化传入self.entityList = entityVectorListself.relationList = relationVectorList
随机采样三元组
sample函数中的size即为minibatch的大小
def getSample(self, size):#—随机选取部分三元关系,Sbatch# sample(序列a,n)# 功能:从序列a中随机抽取n个元素,并将n个元素生以list形式返回。return sample(self.tripleList, size)
负采样:固定关系随机替换
def getCorruptedTriplet(self, triplet):'''training triplets with either the head or tail replaced by a random entity (but not both at the same time)#随机替换三元组的实体,h、t中任意一个被替换,但不同时替换。:param triplet::return corruptedTriplet:'''i = uniform(-1, 1) #uniform(a, b)#随机生成a,b之间的数,左闭右开。if i < 0:#小于0,打坏三元组的第一项while True:entityTemp = sample(self.entityList.keys(), 1)[0] #从entityList.key()中sample一个元素,以列表行驶返回第一个元素if entityTemp != triplet[0]:breakcorruptedTriplet = (entityTemp, triplet[1], triplet[2])else:#大于等于0,打坏三元组的第二项while True:entityTemp = sample(self.entityList.keys(), 1)[0]if entityTemp != triplet[1]:breakcorruptedTriplet = (triplet[0], entityTemp, triplet[2])return corruptedTriplet
loss函数设计
# L1范数 L1范数是指向量中各个元素绝对值之和def distanceL1(h, t ,r):"""trans e:param h: head embendding:param t: tail:param r: relation:return: 返回绝对误差和"""s = h + r - tsum = fabs(s).sum() # fabs() 方法返回数字的绝对值,如math.fabs(-10) 返回10.0。return sum# L2范数L2范数是指向量各元素的平方和然后求平方根def distanceL2(h, t, r):"""trans r:param h::param t::param r::return: 返回误差平方和"""s = h + r - tsum = (s*s).sum()return sum# 迭代更新def update(self, Tbatch):copyEntityList = deepcopy(self.entityList) # 深拷贝 作为一个独立的存在 不会改变原来的值copyRelationList = deepcopy(self.relationList)# 遍历batch的三元组for tripletWithCorruptedTriplet in Tbatch:# [((h,t,r),(h',t',r)),(())]headEntityVector = copyEntityList[tripletWithCorruptedTriplet[0][0]]#tripletWithCorruptedTriplet是原三元组和打碎的三元组的元组tupletailEntityVector = copyEntityList[tripletWithCorruptedTriplet[0][1]]relationVector = copyRelationList[tripletWithCorruptedTriplet[0][2]]headEntityVectorWithCorruptedTriplet = copyEntityList[tripletWithCorruptedTriplet[1][0]]tailEntityVectorWithCorruptedTriplet = copyEntityList[tripletWithCorruptedTriplet[1][1]]headEntityVectorBeforeBatch = self.entityList[tripletWithCorruptedTriplet[0][0]]#tripletWithCorruptedTriplet是原三元组和打碎的三元组的元组tupletailEntityVectorBeforeBatch = self.entityList[tripletWithCorruptedTriplet[0][1]]relationVectorBeforeBatch = self.relationList[tripletWithCorruptedTriplet[0][2]]headEntityVectorWithCorruptedTripletBeforeBatch = self.entityList[tripletWithCorruptedTriplet[1][0]]tailEntityVectorWithCorruptedTripletBeforeBatch = self.entityList[tripletWithCorruptedTriplet[1][1]]if self.L1:# 计算正常情况下的误差distTriplet = distanceL1(headEntityVectorBeforeBatch, tailEntityVectorBeforeBatch, relationVectorBeforeBatch)# 计算负采样情况下的误差distCorruptedTriplet = distanceL1(headEntityVectorWithCorruptedTripletBeforeBatch, tailEntityVectorWithCorruptedTripletBeforeBatch , relationVectorBeforeBatch)else:distTriplet = distanceL2(headEntityVectorBeforeBatch, tailEntityVectorBeforeBatch, relationVectorBeforeBatch)distCorruptedTriplet = distanceL2(headEntityVectorWithCorruptedTripletBeforeBatch, tailEntityVectorWithCorruptedTripletBeforeBatch , relationVectorBeforeBatch)# margin loss = max(0, margin + pos - neg) 约束 + 正常(越小越好) - 负采样(越大越好)eg = self.margin + distTriplet - distCorruptedTripletif eg > 0: #[function]+ 是一个取正值的函数self.loss += egif self.L1:# tempos = 2 * lr * (t - h - r)tempPositive = 2 * self.learingRate * (tailEntityVectorBeforeBatch - headEntityVectorBeforeBatch - relationVectorBeforeBatch)tempNegtative = 2 * self.learingRate * (tailEntityVectorWithCorruptedTripletBeforeBatch - headEntityVectorWithCorruptedTripletBeforeBatch - relationVectorBeforeBatch)tempPositiveL1 = []tempNegtativeL1 = []for i in range(self.dim):#不知道有没有pythonic的写法(比如列表推倒或者numpy的函数)?if tempPositive[i] >= 0:tempPositiveL1.append(1)else:tempPositiveL1.append(-1)if tempNegtative[i] >= 0:tempNegtativeL1.append(1)else:tempNegtativeL1.append(-1)tempPositive = array(tempPositiveL1)tempNegtative = array(tempNegtativeL1)else:tempPositive = 2 * self.learingRate * (tailEntityVectorBeforeBatch - headEntityVectorBeforeBatch - relationVectorBeforeBatch)tempNegtative = 2 * self.learingRate * (tailEntityVectorWithCorruptedTripletBeforeBatch - headEntityVectorWithCorruptedTripletBeforeBatch - relationVectorBeforeBatch)headEntityVector = headEntityVector + tempPositivetailEntityVector = tailEntityVector - tempPositiverelationVector = relationVector + tempPositive - tempNegtativeheadEntityVectorWithCorruptedTriplet = headEntityVectorWithCorruptedTriplet - tempNegtativetailEntityVectorWithCorruptedTriplet = tailEntityVectorWithCorruptedTriplet + tempNegtative#只归一化这几个刚更新的向量,而不是按原论文那些一口气全更新了copyEntityList[tripletWithCorruptedTriplet[0][0]] = norm(headEntityVector)copyEntityList[tripletWithCorruptedTriplet[0][1]] = norm(tailEntityVector)copyRelationList[tripletWithCorruptedTriplet[0][2]] = norm(relationVector)copyEntityList[tripletWithCorruptedTriplet[1][0]] = norm(headEntityVectorWithCorruptedTriplet)copyEntityList[tripletWithCorruptedTriplet[1][1]] = norm(tailEntityVectorWithCorruptedTriplet)# 赋权更新self.entityList = copyEntityListself.relationList = copyRelationList
整体训练代码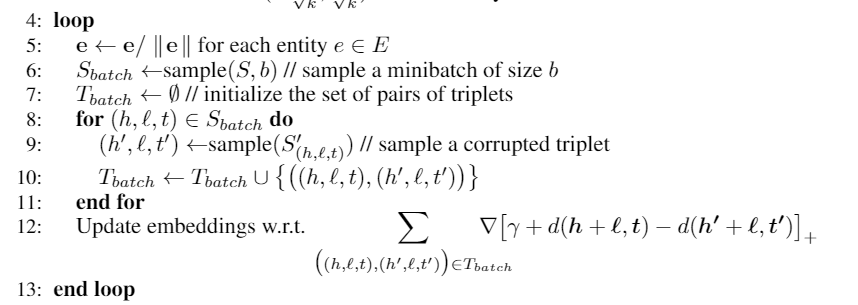
def transE(self, cI = 20):print("训练开始")for cycleIndex in range(cI):# 采样Sbatch = self.getSample(150) #随机选取150个元素Tbatch = [] # 初始空 元组对(原三元组,打碎的三元组)的列表 :{((h,r,t),(h',r,t'))}# 负采样for sbatch in Sbatch:tripletWithCorruptedTriplet = (sbatch, self.getCorruptedTriplet(sbatch)) #{((h,r,t),(h',r,t'))}if(tripletWithCorruptedTriplet not in Tbatch):Tbatch.append(tripletWithCorruptedTriplet)# 迭代更新self.update(Tbatch)# 打印输出if cycleIndex % 100 == 0:print("第%d次循环"%cycleIndex)print(self.loss)self.writeRelationVector(r".\data\FB15k\relationVector10.txt")self.writeEntilyVector(r".\data\FB15k\entityVector10.txt")self.loss = 0

若有收获,就点个赞吧
0 人点赞
