参考资料:https://mp.weixin.qq.com/s/Cb5ee9sN39aGOLSTifRJiA
这是一个对于机器学习新手非常友好的自动机器学习框架工具。本文中,小猴子将和大家一起了解 PyCaret 到底是什么,如何安装它,并深入研究使用 PyCaret 构建可解释的机器学习模型,包括集成模型。接下来和小猴子一起加速构建你的机器学习模型吧
AutoML系列往期文章:(点击查看👇)
一文彻底搞懂AutoML:Auto-Sklearn框架
一文彻底搞懂AutoML:H2O框架
不写代码也能玩AutoML:H2O Flow
一文彻底搞懂AutoML:TPOT框架
一文彻底搞懂AutoML:EvalML框架
使用 EvalML 完成 NLP 任务

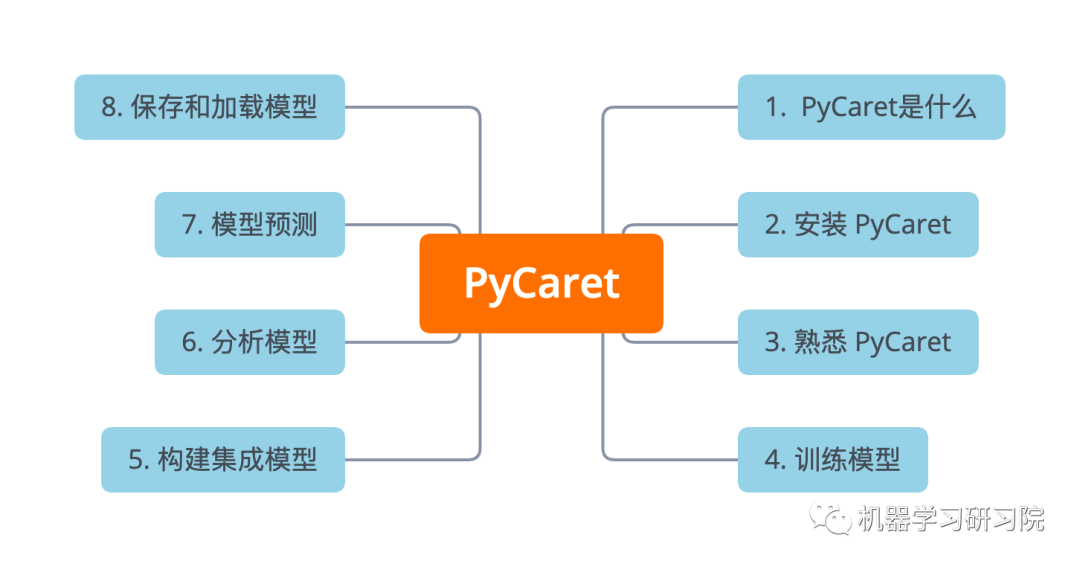
PyCaret 简介
PyCaret[1]是 Python 中的开源机器学习库,可帮助你从数据准备到模型部署。它易于使用,只需一行代码即可完成几乎所有数据科学项目任务。是众多自动机器学习成员中的一名大将!
使用 PyCaret 构建模型非常方便。以下是小猴子推荐大家使用的两个主要原因:
- PyCaret 是一个低代码库,可以提高工作效率。可以花更少的时间在编码上,可以做更多的实验。
- 它是一个易于使用的机器学习库,可帮助执行端到端机器学习实验,无论是计算缺失值、编码分类数据、实施特征工程、超参数调整还是构建集成模型,都可以非常方便的执行。
安装与警告
```python pip install pycaret检查版本
from pycaret.utils import version version()
‘2.3.10’
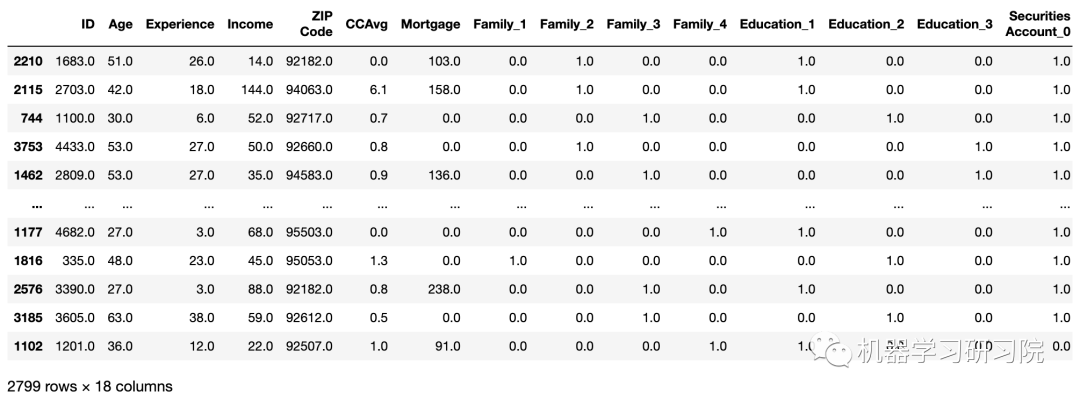
安装方法同一般Python 库,一键pip即可。但需要注意的是,'scikit-learn==0.23.2',如果版本不对,则会报错:<br />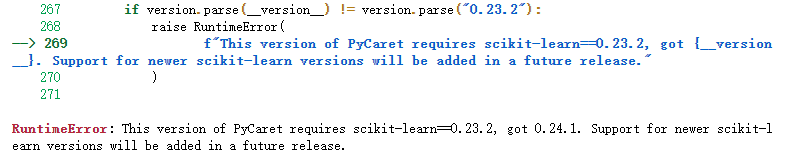<br />另外,有一些模块要求 scikit-learn >= 0.24 的,因此,模块间有所冲突,可以使用anaconda创建另一个虚拟环境,以防破坏原有环境。<br />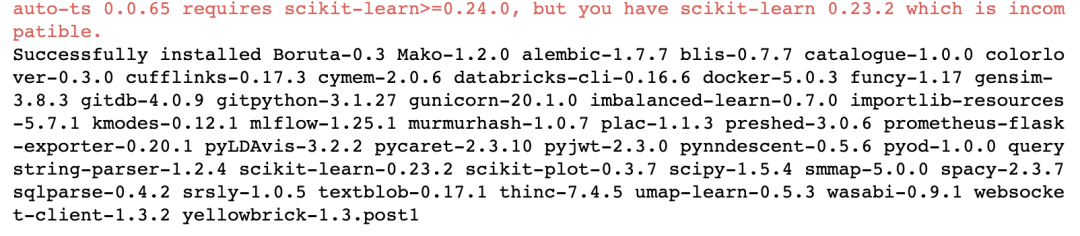<br />PyCaret 与 auto-ts 有冲突<a name="FENDx"></a>## 入门 PyCaret[Pycaret低代码实现回归和分类](https://www.yuque.com/seafyliang/tahcx7/oqmd31?view=doc_embed)在本文中,我们将解决一个分类问题。我们有一个银行数据集,其中包含客户年龄、经验、收入、教育程度以及他/她是否有信用卡等特征。该银行希望建立一个机器学习模型,帮助他们识别更有可能购买个人贷款的潜在客户。(其实,我们在之前的文章戳👉 [使用 LGBM 等模型预测信用卡潜在客户](https://mp.weixin.qq.com/s?__biz=MzkxODI5NjE1OQ==&mid=2247489199&idx=1&sn=c758ee51732b1d450930a482cf475472&scene=21#wechat_redirect)中,已经使用常规机器学习方法,实际完成过该项目,大家感兴趣的话可以对比学习)```python# importing pandas to read the CSV fileimport pandas as pd# read the datadata_classification = pd.read_csv('datasets/loan_train_data.csv')# view the top rows of the datadata_classification.head()

在PyCaret 中开始机器学习项目之前的第一步是设置环境。这只是一个两步过程:
① 导入模块:根据要解决的问题类型,首先需要导入模块。在 PyCaret 的第一个版本中,有 6 个不同的模块可用 —-> 回归、分类、聚类、自然语言处理 (NLP)、异常检测和关联挖掘规则。在本文中,我们将解决一个分类问题,因此我们将导入分类模块
② 初始化设置:在这一步中,PyCaret 执行一些基本的预处理任务,例如忽略 ID 和日期列、输入缺失值、编码分类变量以及将数据集拆分为训练测试拆分以进行其余建模步骤。
# import the classification modulefrom pycaret import classification# setup the environmentclassification_setup = classification.setup(data= data_classification, target='Personal Loan')
当你运行 setup 函数时,它会首先确认数据类型,然后如果你按下回车,它会为你创建环境让你继续。
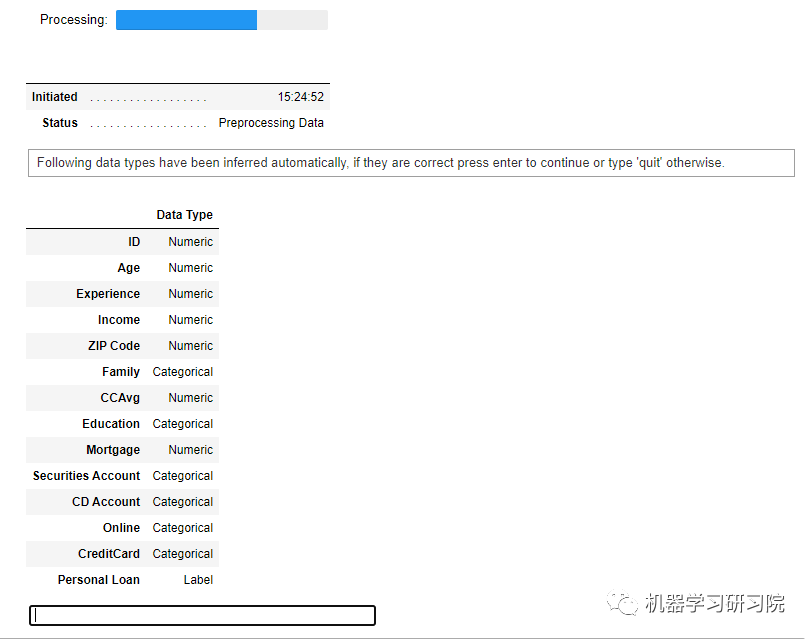
环境创建完成后,会列出分类函数所有参数的设置。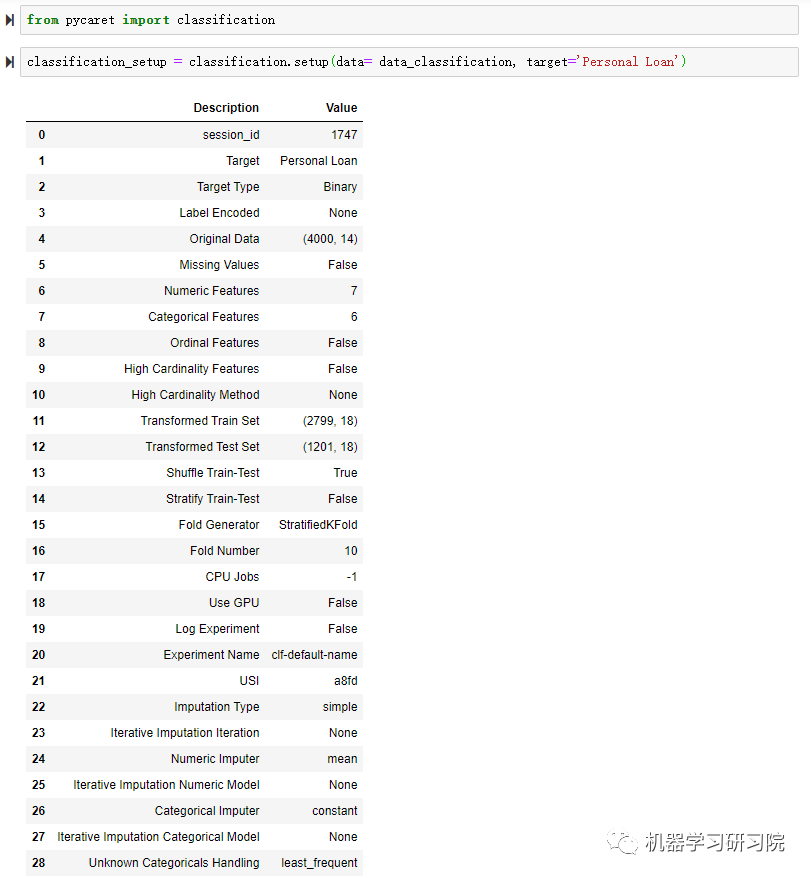
还可以设置更多的自定义参数
data_amend = exp_mclf101 = setup(data= data_classification,target='Personal Loan',train_size = 0.80,ignore_features = ["session_id",...],numeric_features =["Age",...],combine_rare_levels= False,rare_level_threshold=0.1,categorical_imputation = 'mode',imputation_type ='simple',feature_interaction = True,feature_ratio= True,interaction_threshold=0.01,session_id=123,fold_shuffle=True,use_gpu=True,fix_imbalance=True,remove_outliers=False,normalize = True,transformation = False,transformation_method='quantile',feature_selection= True,feature_selection_threshold = 0.8,feature_selection_method='boruta',remove_multicollinearity = True,multicollinearity_threshold=0.8normalize_method = 'robust')
使用 PyCaret 训练机器学习模型
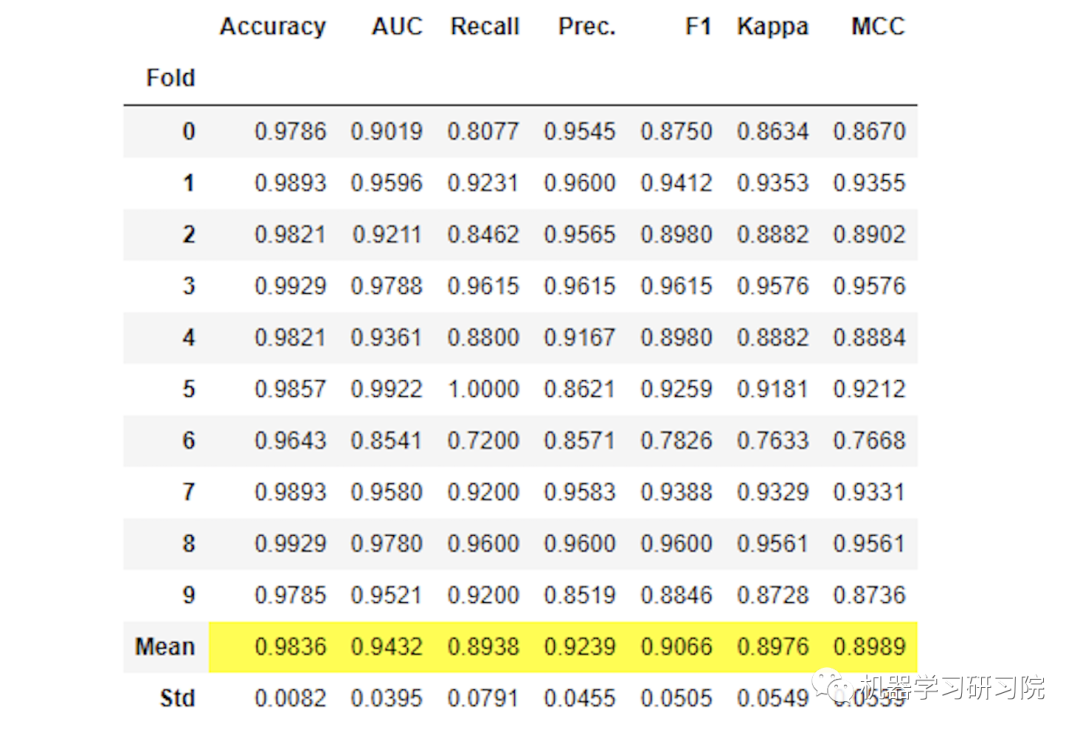
在 PyCaret 中训练模型非常简单。你只需要使用create_model函数,它只接受一个参数 —-> 模型缩写作为字符串。它将返回一个表格,其中包含用于分类模型的常用评估指标的 k 倍交叉验证分数。
以下是用于监督学习的评估指标:
- 分类:Accuracy、AUC、Recall、Prec.、F1、Kappa
- 回归:MAE、MSE、RMSE、R2、RMSLE、MAPE
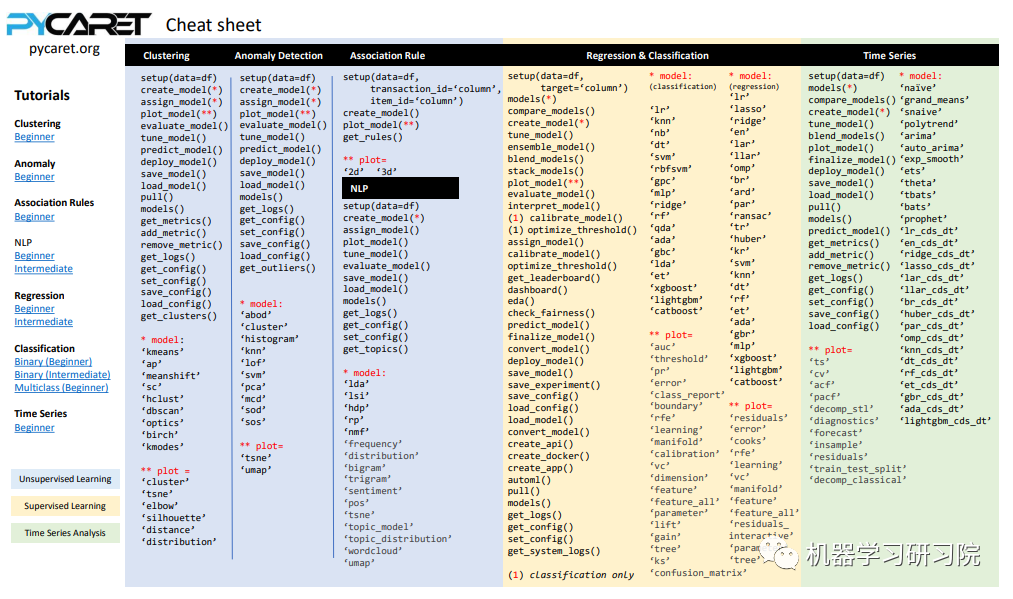
这里给出一个表格,里面包含了各类模型(聚类、分类、回归、异常检测及时间序列模型)模块所需要的模型缩写字符串,在后面用到时可以快速查找:
接下来简单列举两个例子:训练决策树模型及 XGBoost 模型。
训练决策树模型
首先训练一个决策树模型,须为其传递参数”dt “
# build the decision tree modelclassification_dt = classification.create_model('dt')
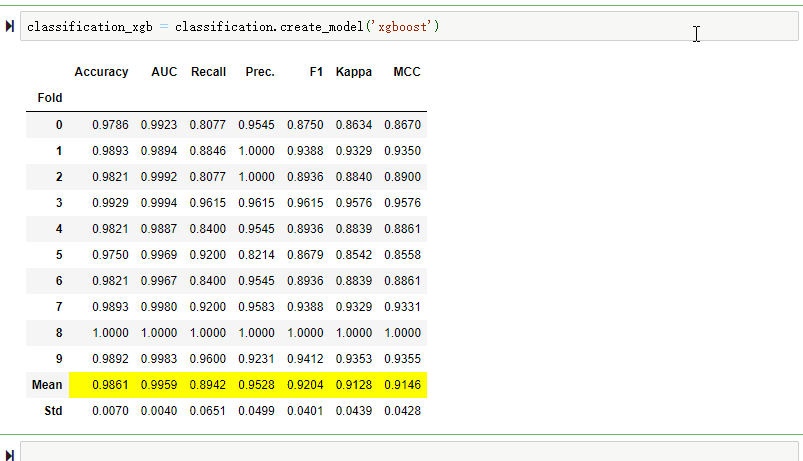
训练 XGBoost 模型
只需要传递字符串"xgboost":classification_xgb = classification.create_model('xgboost')
超参数调优
我们可以通过使用 tune_model 函数来调整机器学习模型的超参数,该函数接受一个参数——模型缩写字符串 (与在 create_model 函数中使用的相同)。
PyCaret 提供了很大的灵活性。例如,可以使用 tune_model 函数中的 fold 参数定义折叠次数。或者我们可以使用 n_iter 参数更改迭代次数。增加 n_iter 参数显然会增加训练时间,但会提供更好的性能。
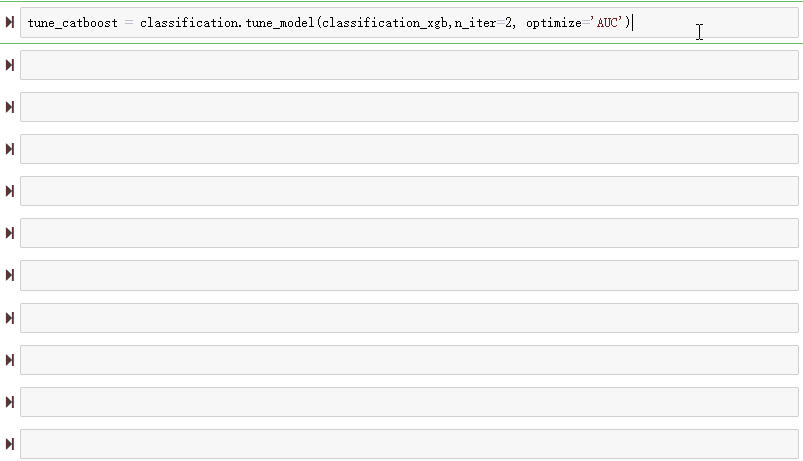
训练一个调整好的 CatBoost 模型:
# build and tune the xgboost modeltune_xgboost = classification.tune_model(classification_xgb,n_iter=50, optimize='AUC')

使用 PyCaret 构建集成模型
机器学习中的集成模型结合了来自多个模型的决策以提高整体性能。
在 PyCaret 中,我们只需一行代码就可以创建 bagging、boosting、blending 和 stacking 集成模型。
在这里训练一个提升集成模型。它还将返回一个表格,其中包含常见评估指标的 k折交叉验证分数:
# ensemble boostingboosting = classification.ensemble_model(classification_dt,method= 'Boosting')
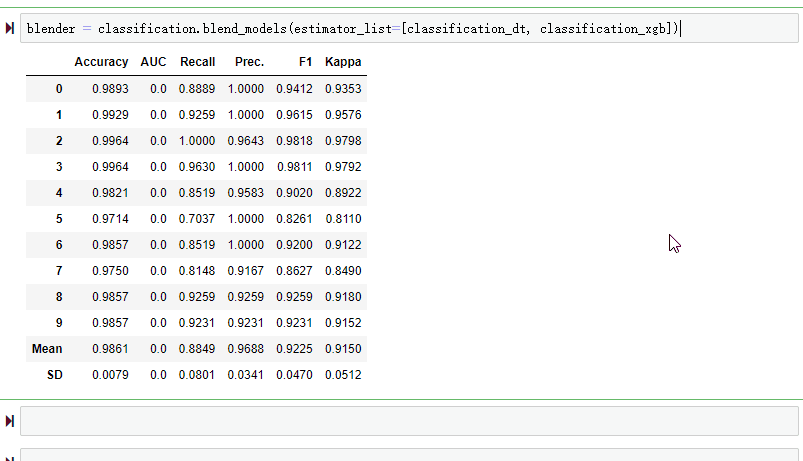
另一种非常著名的集成技术是混合。只需要传递在blend_models函数列表中创建的模型。
# Ensemble: blendingblender = classification.blend_models(estimator_list=[classification_dt,classification_xgb])
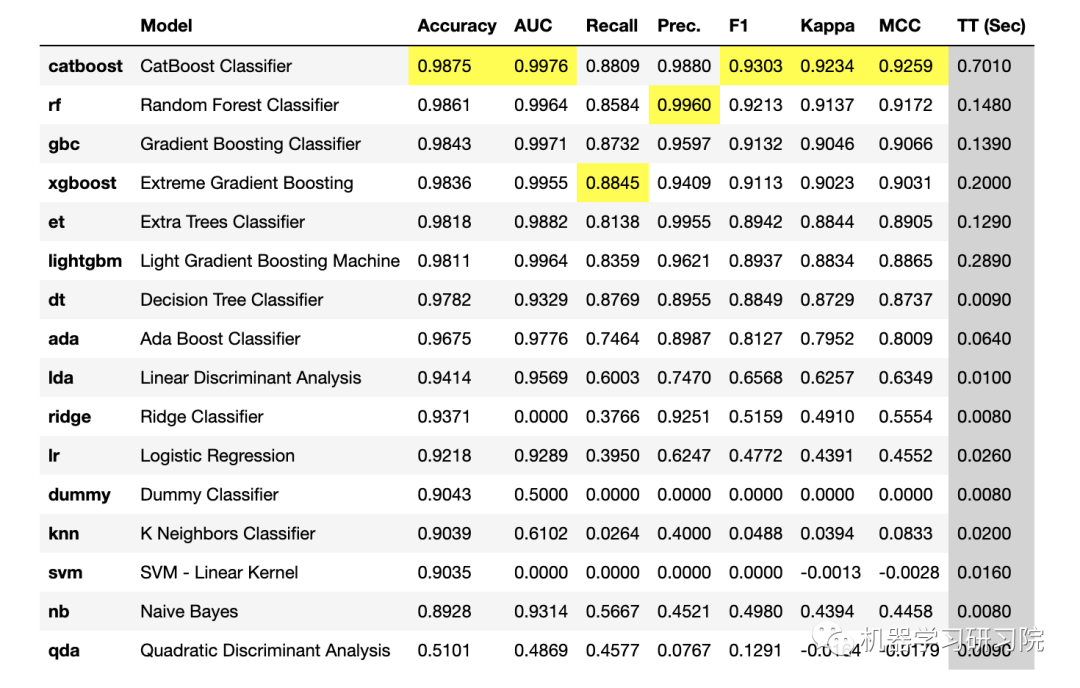
比较模型
这是 PyCaret 库的另一个有用功能。如果不想一一尝试不同的模型,可以使用比较模型功能,它会为导入的模块库中的所有可用模型训练和比较通用评估指标。
此功能仅在 pycaret.classification 和 pycaret.regression 模块中可用。
# compare performance of different classification modelsclassification.compare_models()

分析模型
在训练模型之后的下一步就是分析结果。从商业角度来看,这特别有用。在 PyCaret 中分析模型同样非常简单。只需一行代码就可以执行以下操作:
① 绘制模型结果: 在 PyCaret 中分析模型性能就像编写plot_model一样简单。可以绘制决策边界、精确召回曲线、验证曲线、残差图等。此外,对于聚类模型,可以绘制肘部图和轮廓图。对于文本数据,可以绘制词云、二元三元频率图等。
② 解释结果: 解释模型结果有助于通过分析重要特征来调试模型。这是工业级机器学习项目中的关键一步。在 PyCaret 中,我们只需一行代码就可以通过 SHAP 值和相关图来解释模型(这是一个相当大的主题)
绘制模型结果
可以通过提供模型对象作为参数和所需的绘图类型来绘制模型结果。
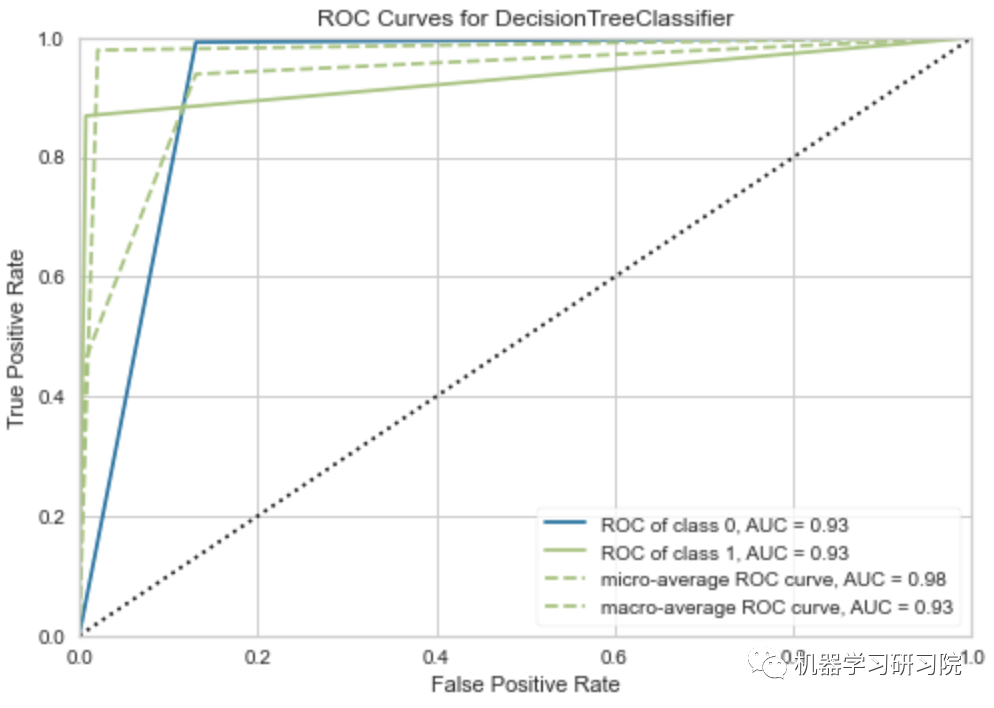
绘制 AUC-ROC 曲线和决策边界:
# AUC-ROC plotclassification.plot_model(classification_dt,plot = 'auc')
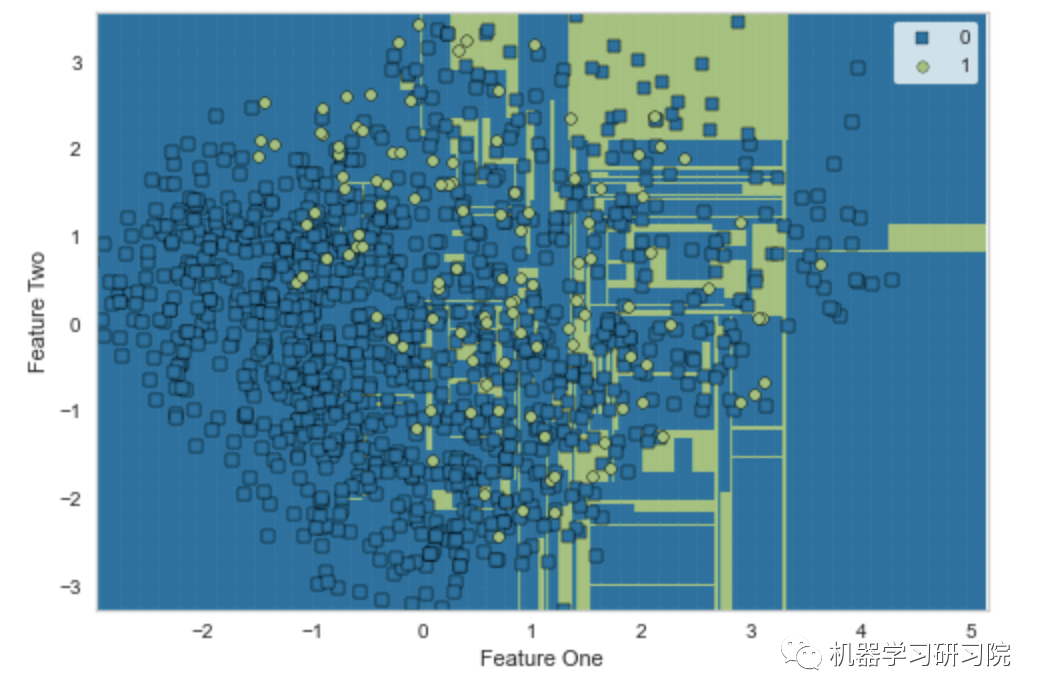
# Decision Boundaryclassification.plot_model(classification_dt,plot = 'boundary')
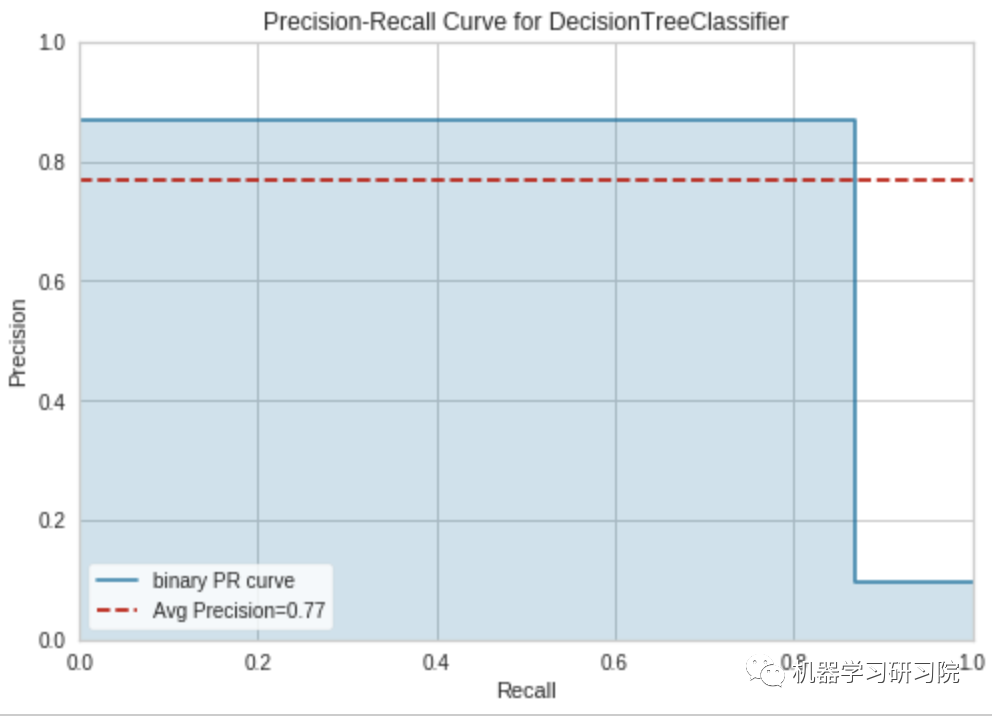
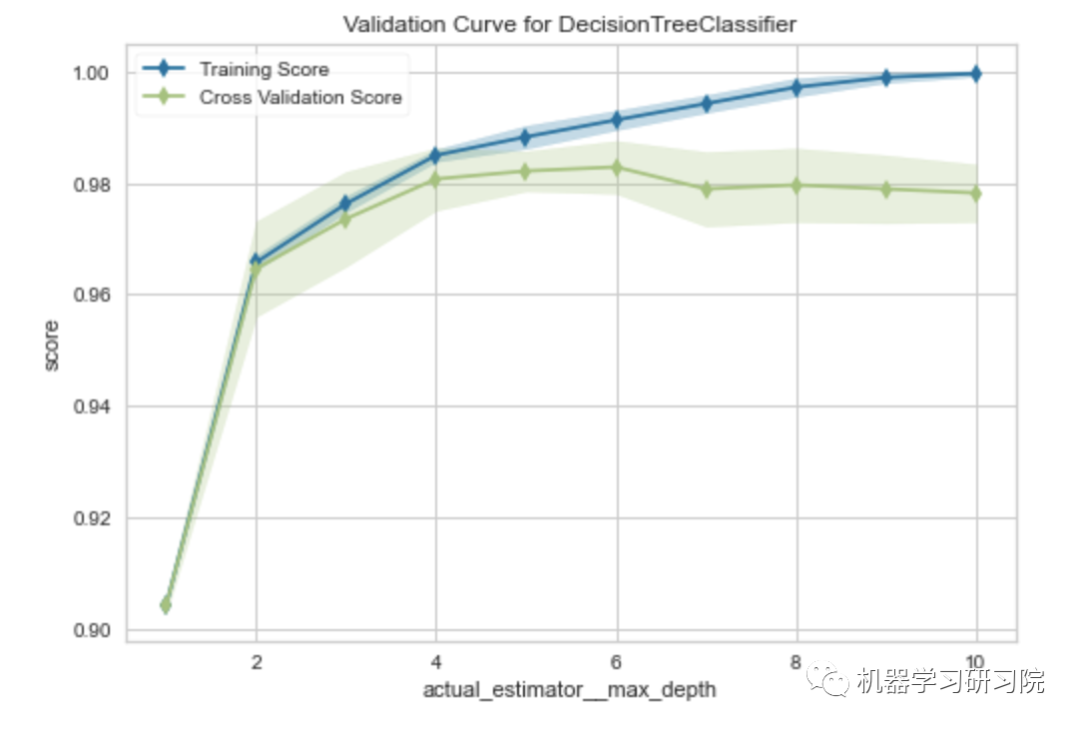
绘制训练模型的精确召回曲线和验证曲线:
# Precision Recall Curveclassification.plot_model(classification_dt,plot = 'pr')

# Validation Curveclassification.plot_model(classification_dt,plot = 'vc')

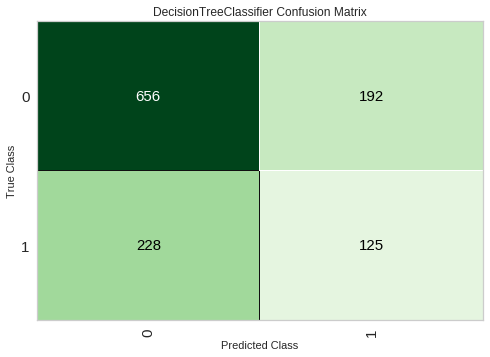
混淆矩阵
# Validation Curveclassification.plot_model(classification_dt,plot = 'confusion_matrix')
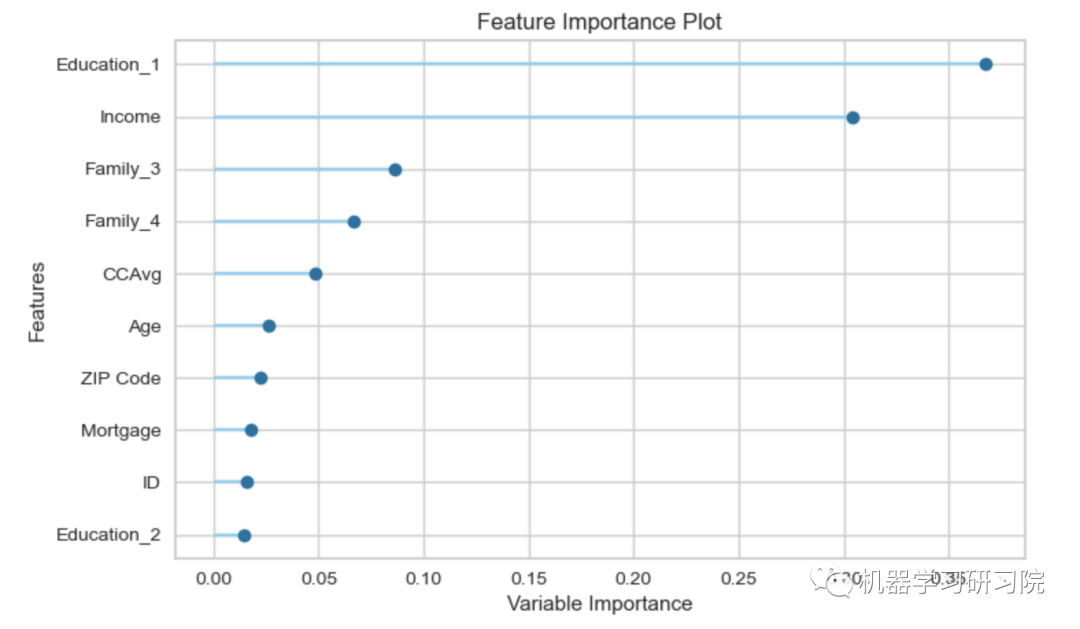
特征重要性top10
# Validation Curveclassification.plot_model(classification_dt,plot = 'feature')
更多评估模型可视化详细文档可参见:https://pycaret.gitbook.io/docs/get-started/functions/analyze#plot_model
评估模型
如果不想单独绘制所有这些可视化,那么 PyCaret 库还有另一个优秀的功能 —-> evaluate_model。在这个函数中,只需要传递模型对象,PyCaret 就会创建一个交互式窗口,让你以所有可能的方式查看和分析模型:
# evaluate modelclassification.evaluate_model(classification_dt)
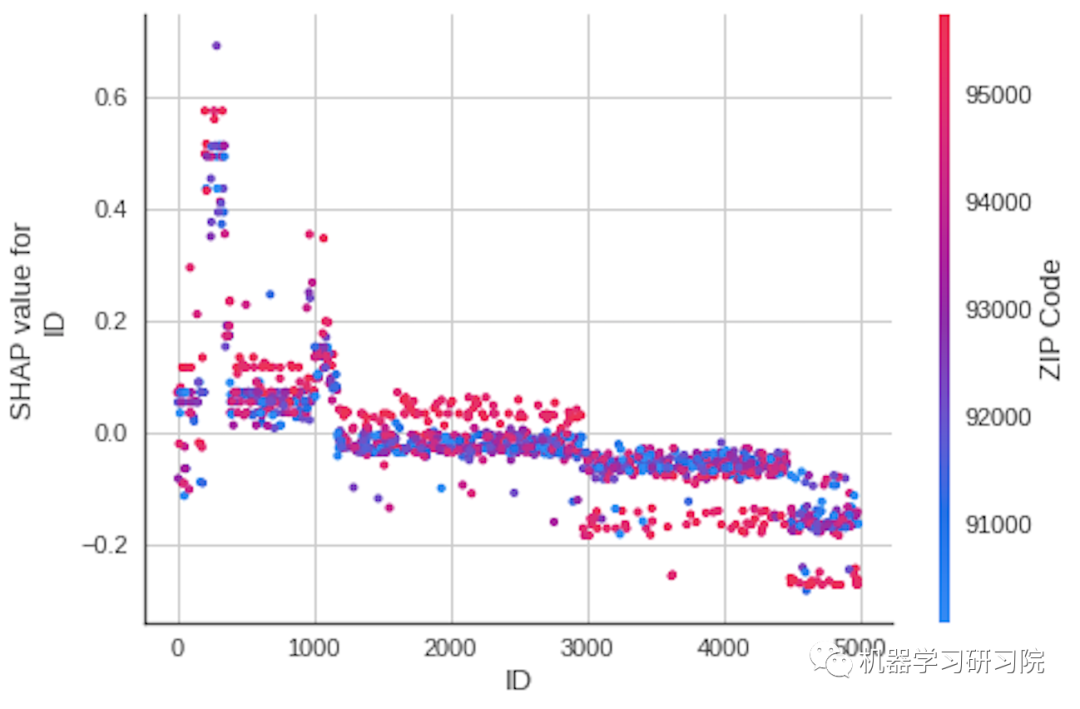
解释模型
在大多数机器学习项目中,解释复杂模型非常重要。它通过分析模型认为重要的内容来帮助调试模型。在PyCaret中,这一步就像编写 translate_model来获取 Shapley 值一样简单。
可以在此处阅读有关 Shapley 值的信息
# interpret_model: SHAPclassification.interpret_model(classification_xgb)


绘制相关图
# interpret model : Correlationclassification.interpret_model(classification_xgb,plot='correlation')
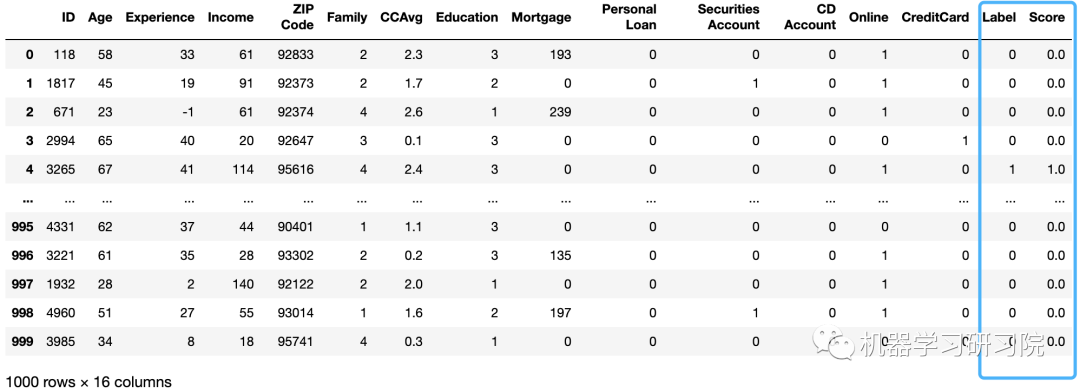
模型预测
最后,我们将对陌生数据进行预测。为此,我们只需要传递将用于预测的数据集的模型。注意的是,确保它与之前设置环境时提供的格式相同。PyCaret 构建了所有步骤的管道,并将预测数据传递到管道中并输出结果。
# read the test datatest_data_classification = pd.read_csv('datasets/loan_test_data.csv')# make predictionspredictions = classification.predict_model(classification_dt,data=test_data_classification)# view the predictionspredictions

保存和加载模型
一旦模型被构建和测试,可以使用 save_model 函数将它保存在 pickle 文件中。传递要保存的模型和文件名,就是这样:
# save the modelclassification.save_model(classification_dt, 'decision_tree_1')
Transformation Pipeline and Model Succesfully Saved
可以稍后加载这个模型并预测看不见的数据上的标签。
# load modeldt_model = classification.load_model(model_name='decision_tree_1')
Transformation Pipeline and Model Succesfully Loaded
PyCaret 中易被忽略的 5 件事
compare_models 做的比你想象的要多
PyCaret 1.0 版时,compare_models函数正在比较库中的所有模型以返回平均交叉验证的性能指标。基于此,使用create_model来训练性能最佳的模型并获得可用于预测的训练模型输出。
而后来在 2.0 版中,compare_models 根据 n_select 参数默认设置为 1返回最佳模型。
best_model = compare_models()print(best_model)
通过将n_select参数更改为 3,可以获得前 3 个模型的列表。例如
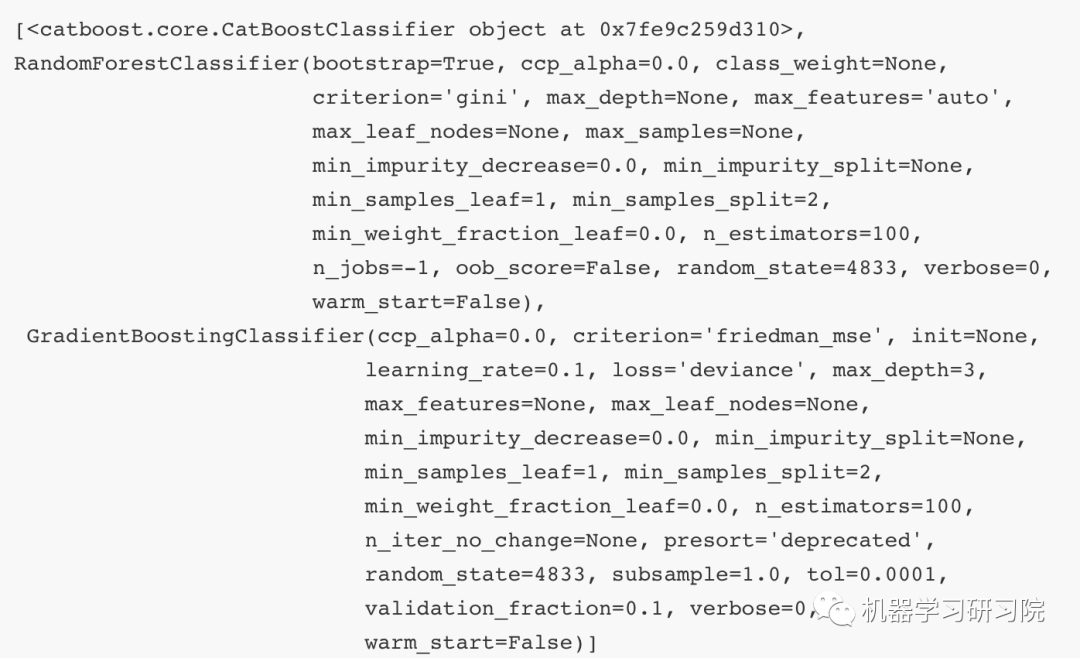
top3 = compare_models(n_select=3)print(top3)
返回的对象是经过训练的模型,不需要再次调用create_model来训练它们。可以使用这些模型来生成诊断图,甚至可以将它们用于预测。例如:
predict_model(top3[0], data=data)

不限于 scikit-learn 模型
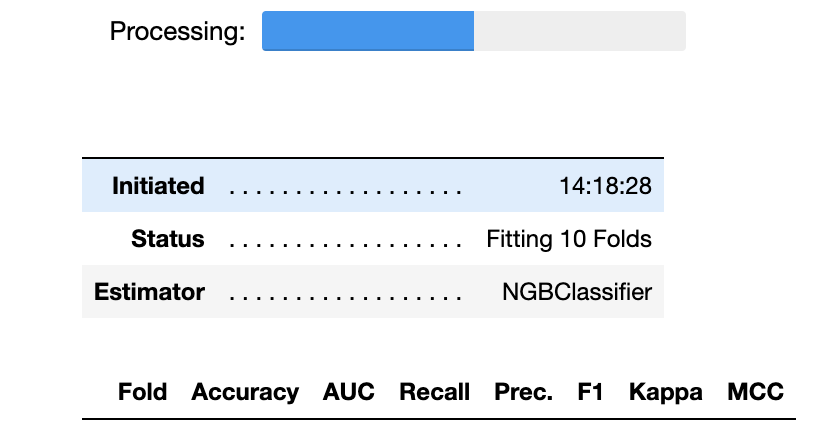
有不少用户没有意识到,PyCaret 不仅限于默认模型。除了模型库中可用模型的 ID 之外,create_model函数还接受未经训练的模型对象。只要你定义的对象与 scikit-learn fit/predict API 兼容,它就可以正常工作。例如,简单地导入未经训练的 NGBClassifier 来训练和评估来自 ngboost[2]库的 NGBClassifier。
注意⚠️,安装ngboost后会有一些不兼容,谨慎使用!
from ngboost import NGBClassifierngc = NGBClassifier()ngboost = create_model(ngc)print(ngboost)
也可以在compare_models的 include参数中传递未经训练的模型,它一样会正常工作。
best = compare_models(include=['lr', 'dt', 'knn', ngboost])
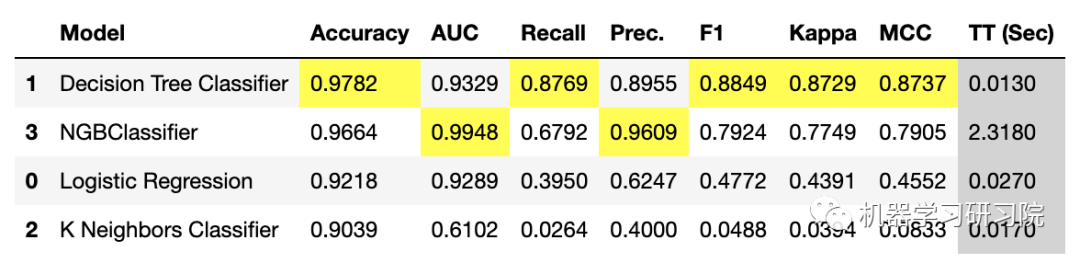

该函数 compare_models 中包含参数包括模型库中三个未训练模型的 ID,即逻辑回归、决策树和 KNN 以及 ngboost 库中的一个未训练对象。另外注意结果表中索引表示在 include 参数中输入的模型的位置。
易被忽略的pull() 函数
PyCaret 中的所有训练函数(create_model、tune_model、ensemble_model 等)都显示分数网格,但不返回分数网格。因此,你不能将分数网格存储在像 pandas.DataFrame 这样的对象中。但是,有一个名为pull的函数可以让你执行此操作。
dt = create_model('dt')dt_result = pull()type(dt_result)
pandas.core.frame.DataFrame
在使用predict_model函数时,也同样适用返回分数网格。
predictions = predict_model(dt)holdout_score = pull()type(holdout_score)


现在可以像 pandas.DataFrame 一样访问指标内容,从而可以以此做不少事。例如,可以创建一个循环来训练具有不同参数的模型,并使用以下简单代码创建一个比较表。
lr = [0.1, 0.2, 0.3, 0.4, 0.5, 0.6]AUC = []for i in lr:lightgbm = create_model('lightgbm', learning_rate=i)AUC.append(pull()['AUC']['Mean'])import pandas as pdpd.DataFrame(AUC, index=lr, columns=['AUC'])


PyCaret不是黑盒子
你以为PyCaret的预处理都在幕后进行,用户无法访问,也无法查看运行设置功能时发生的情况。其实不然!
PyCaret 中有两个函数get_config 和 set_config 允许你在后台访问和更改所有内容,从训练集到模型的随机状态。可以通过调用help(get_config)查看get_config函数的文档来帮助你了解可以访问哪些变量:
help(get_config)
Help on function get_config in module pycaret.classification:get_config(variable: str)This function retrieves the global variables created when initializing the``setup`` function. Following variables are accessible:- X: Transformed dataset (X)- y: Transformed dataset (y)- X_train: Transformed train dataset (X)- X_test: Transformed test/holdout dataset (X)- y_train: Transformed train dataset (y)- y_test: Transformed test/holdout dataset (y)- seed: random state set through session_id- prep_pipe: Transformation pipeline- fold_shuffle_param: shuffle parameter used in Kfolds- n_jobs_param: n_jobs parameter used in model training- html_param: html_param configured through setup- create_model_container: results grid storage container- master_model_container: model storage container- display_container: results display container- exp_name_log: Name of experiment- logging_param: log_experiment param- log_plots_param: log_plots param- USI: Unique session ID parameter- fix_imbalance_param: fix_imbalance param- fix_imbalance_method_param: fix_imbalance_method param- data_before_preprocess: data before preprocessing- target_param: name of target variable- gpu_param: use_gpu param configured through setup- fold_generator: CV splitter configured in fold_strategy- fold_param: fold params defined in the setup- fold_groups_param: fold groups defined in the setup- stratify_param: stratify parameter defined in the setupExample------->>> from pycaret.datasets import get_data>>> juice = get_data('juice')>>> from pycaret.classification import *>>> exp_name = setup(data = juice, target = 'Purchase')>>> X_train = get_config('X_train')Returns:Global variable
可以通过在get_config函数中调用这些变量来访问它。例如,要访问X_train转换后的数据集,可以这样编写:
get_config("X_train")
以使用set_config函数来更改环境变量。借助目前对pull、get_config和set_config函数的了解, 可以创建一些非常复杂的工作流。例如,可以对测试集重新采样 N 次 以评估平均性能指标,而不是仅仅依赖于一个测试集:
import numpy as npXtest = get_config('X_test')ytest = get_config('y_test')AUC = []for i in np.random.randint(0,1000,size=10):Xtest_sampled = Xtest.sample(n = 100, random_state = i)ytest_sampled = ytest[Xtest_sampled.index]set_config('X_test', Xtest_sampled)set_config('y_test', ytest_sampled)predict_model(dt);AUC.append(pull()['AUC'][0])print(AUC)print(np.array(AUC).mean())
[0.9944, 0.9944, 0.9944, 0.9944, 0.9944,
0.9944, 0.9944, 0.9944, 0.9944, 0.9944]
0.9944000000000001
记录实验日志
当使用get_logs函数时,PyCaret 的日志记录功能将生成一个漂亮、轻量级、易于理解的 Excel 电子表格。
# loading datasetfrom pycaret.datasets import get_datadata = get_data('juice')# initializing setupfrom pycaret.classification import *s = setup(data, target = 'Purchase', silent = True, log_experiment = True, experiment_name = 'juice1')# compare baseline modelsbest = compare_models()# generate logsget_logs()
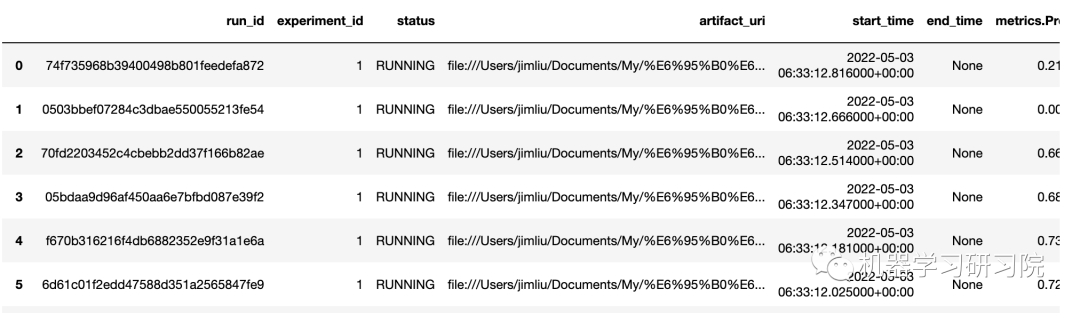
在这个非常简短的实验中,生成了超过 3,000 个元数据点(指标、超参数、运行时间等)。而我们并不可能手动跟踪这些数据。在 PyCaret 中,有一种简单的方法来跟踪这些元数据点。只需在函数setup中将参数log_experiment设置为 True 。
写在最后
它真的很容易使用。我个人发现 PyCaret 对于在时间紧迫的情况下快速生成结果非常有用。
练习在不同类型的数据集上使用它——你使用得越多,你就会真正掌握它的实用性!它甚至支持在云服务上进行模型部署,也只需一行代码。
参考资料
[1][2]
PyCaret: https://pycaret.org/
ngboost: https://github.com/stanfordmlgroup/ngboost

若有收获,就点个赞吧
0 人点赞
