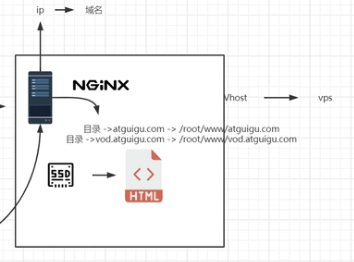
虚拟主机
域名、dns、 ip的关系
浏览器、nginx、http的关系
浏览器拿到请求以后,怎么向服务器发情请求?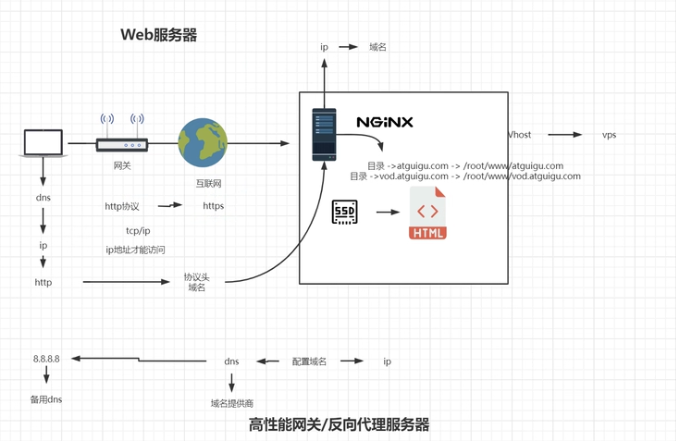
域名解析与泛域名解析实战
打开电脑的hosts文件,添加
10.211.55.5 xiumutest.com
打开终端,ping xiumutest.com 
已经配置成功了
阿里云域名解析 (需要买个域名)
这里是我在阿里云买的域名,如下做一个解析,就可以直接使用ngtest.xiumubai.com访问我们虚拟机的nginx网页。在浏览器输入http://ngtest.xiumubai.com 就可以看到我们启动的nginx页面了。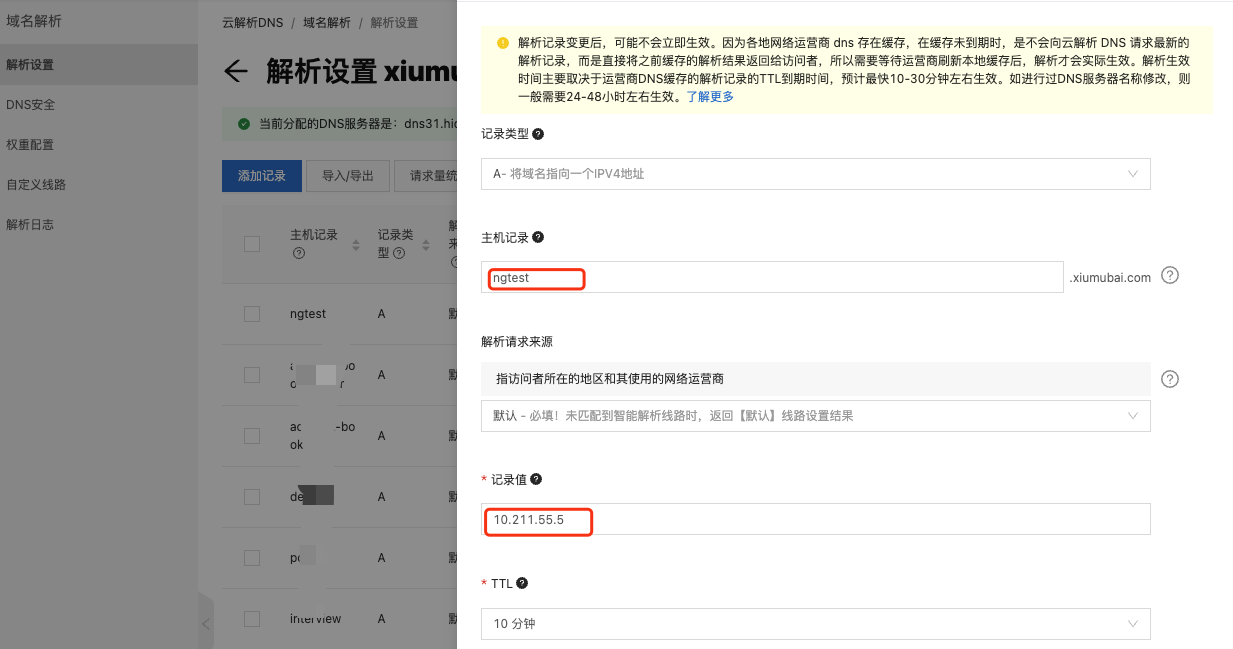
多端口多域名配置
1.在虚拟机根目录创建www文件
mkdir www
2.在www下面创建ng-test文件夹
mkdir ng-test
3.在ng-test下面分别创建foo和bar两个文件夹
mkdir www
4.在foo和bar分别添加index.html,内容如下
this a foo
this a bar
5.在nginx.confg配置文件中配置
#user nobody;worker_processes 1;events {worker_connections 1024;}http {include mime.types;default_type application/octet-stream;sendfile on;keepalive_timeout 65;server {listen 80;server_name localhost;location / {root /www/ng-test/bar/;index index.html index.htm;}error_page 500 502 503 504 /50x.html;location = /50x.html {root html;}}server {listen 88;server_name localhost;location / {root /www/ng-test/foo;index index.html index.htm;}error_page 500 502 503 504 /50x.html;location = /50x.html {root html;}}}
修改完了配置文件,记得重新加载一下nginx,使用systemctl reload nginx
现在我们使用http://ngtest.xiumubai.com和http://ngtest.xiumubai.com:88就能访问到foo和bar页面了。
server_name 匹配
server_name test.xiumubai.com test2.xiumubai.com; # 完整匹配server_name *.xiumubai.com; # 通配符匹配server_name www.xiumubai.*; # 通配符结束匹配server_name ~^[0-9]+\.xiumubai\.com$; # 正则匹配
多用户二级域名
*.xiumubai.com,
如上配置以后,我们就可以使用任意的xxx.xiumubai.com访问

若有收获,就点个赞吧
0 人点赞
