页面目录:src/pages/course/detail.vue
这个页面涉及的逻辑就比较复杂一点点了,具体可以参考需求文档中的课程详情
获取参数
因为这个页面是课程详情,所以需要在做跳转的时候把courseId带过来,这里我们在onLoad()当中获取到参数。
onLoad(option) {this.options = option;},
请求数据
定义data
data() {return {/** 章节列表 */chapterList: [],/** 课程详情-data */course: {},/** 课程详情-course */courseDetail: {},}}
这里我们需要调用两个接口,来渲染我们的页面,接口地址为:课程详情和评论列表
onShow() {this.getCourseDetail();this.getCommentList();},/*** @description: 获取评论列表* @return {*}*/async getCommentList() {try {const res = await userService.commentList({page: 1,limit: 10,courseId: this.options.id,});this.comment = res.data;this.getTopValue();} catch (e) {console.log("e", e);}},/*** @description: 获取课程详情* @return {*}*/async getCourseDetail() {try {const res = await courseService.courseDetail({id: this.options.id,// id: '1192252213659774977',});this.chapterList = res.data.chapterList;this.course = res.data;this.courseDetail = res.data.course;this.isCollect = res.data.isCollect;} catch (e) {console.log("e", e);}},
渲染基础信息
<view class="banner"><image :src="courseDetail.cover" /></view><view class="info bg_white"><view class="price"><h3><text>¥</text>{{ courseDetail.price || 0 }}</h3><view class="buy_count">已有{{ courseDetail.buyCount || 0 }}人购买</view></view><h3 class="name">{{ courseDetail.title || "" }}</h3><view class="tag_list"><view class="tag_item">{{ courseDetail.subjectLevelTwo || "" }}</view></view></view>

tab组件封装
**介绍、目录、评论**我们做成一个tab组件,在切换的时候,需要实现以下的功能:
- 对应目标区域会做锚点定位
- 如果滚动的是你,tab会做吸顶
- 切换元素样式改变
如下图:
<template><view class="tabs_bar" :style="{ background: background }"><viewv-for="item in tabList":key="item.index":class="['tabs_item', current == item.index ? 'active' : '']":data-current="item.index"@click="clickTab">{{ item.name }}</view></view></template><script>export default {name: 'v-tabs',props: {currentTab: {type: [String, Number],default: 0,},tabList: {type: Array,default: [],},background: {type: String,default: '#fff',},},data() {return {current: 0,};},mounted() {this.current = this.currentTab;},methods: {clickTab(e) {// console.log('e', e);if (this.current == e.target.dataset.current) {// 点击自身不做任何处理return false;} else {this.current = e.target.dataset.current;this.$emit('clickTab', this.current);}},},};</script><style scoped lang="scss">.tabs_bar {height: 40px;width: 100%;display: flex;justify-content: space-around;.tabs_item {position: relative;// width: 100%;text-align: center;color: #666c80;font-size: 12px;line-height: 34px;z-index: 1001;}.active {color: #3e414d;&::after {content: '';position: absolute;display: block;width: 20px;height: 3px;bottom: 3px;left: 50%;margin-left: -10px;background-color: #2080f7;border-radius: 6px;}}}</style>
吸顶组件封装
我们再封装一个吸顶组件,用来实现tab的吸顶功能
在封装之前,先分析一下吸顶的原理是什么?
- 首先设置吸顶元素停留的位置top值
- 当监听页面滚动的时候,比较scrollTop跟top值的大小
- 如果scrollTop>=top,则吸顶元素的定位修改成fixed
- 反之取消fixed定位的值
下面是具体的封装代码:
<template><view:class="{ sticky: fixedParams.isFixed }":id="sid":style="{ top: top, zIndex: zIndex }"><slot></slot></view></template><script>export default {name: 'v-sticky',props: {/** 距离顶部的距离 */top: {type: [String, Number],default: 0,},zIndex: {type: [String, Number],default: 999,},/** 默认id,不带# */sid: {type: String,default: '',},},data() {return {/** 吸顶元素属性 */fixedParams: {fixedH: 0, // 元素高度fixedTop: 0, // 元素距离顶部的距离isFixed: false, // 是否吸顶},};},mounted() {// 获取吸顶元素距离顶部的距离const _this = this;// console.log('id', this.sid);// 在组件中查找元素需要添加.in(this)this.$nextTick(() => {const query = uni.createSelectorQuery().in(this);query.select(`#${_this.sid}`).boundingClientRect((e) => {_this.fixedParams.fixedTop = e.top;_this.fixedParams.fixedH = e.height;}).exec();});/** 监听滚动事件 */uni.$on('onPageScroll', (e) => {if (this.fixedParams.fixedTop > e.scrollTop) {this.fixedParams.isFixed = false;} else {this.fixedParams.isFixed = true;}});},methods: {},};</script><style lang="scss" scoped>.sticky {width: 100%;position: fixed;top: 0px;z-index: 999;}</style>
注意<slot></slot>插槽的使用,就是为了在sticky里面嵌套tab
下面是具体的使用方式:
<view class="tab_wrapper bg_white"><v-sticky sid="tab"><v-tabs :tabList="tabList" @click-tab="clickTab"></v-tabs></v-sticky></view>
还需要事件监听的方式去监听页面滚动
onPageScroll(e) {uni.$emit("onPageScroll", e);},
现在我们已经实现了tab功能,而且能够吸顶,接下来当点击tab的是要滚动到对应内容区域,也就是类似锚点定位的功能了。
锚点定位
首先分析,当点击tab的时候如何跳转到对应的内容区域的?
举个例子:
<tab><tab1>1</tab1><tab1>1</tab1><tab1>1</tab1><tab><view><view>1</view><view>2</view><view>3</view></view>
当点击tab1,视图滚动到view1,点击tab2,视图滚动到view2…
所以,需要先获取每个view的距离顶部的top值,然后利用uni.pageScrollTop()滚动到对应top的位置
下面是具体代码的实现
首先当数据请求完毕以后,保存每个需要锚点定位的元素的top值
<template><view class="course_card'><view class="intro card" id="anchor0"></view><view class="intro card" id="anchor1"></view><view class="intro card" id="anchor2"></view></view></template><script>export default {data() {return {/** 锚点元素top值 */enchorParams: {enchorTop1: 0,enchorTop2: 0,enchorTop3: 0,},}},methods: {/*** @description: 获取评论列表* @return {*}*/async getCommentList() {try {const res = await userService.commentList({page: 1,limit: 10,courseId: this.options.id,});this.comment = res.data;this.getTopValue();} catch (e) {console.log("e", e);}},getTopValue() {const _this = this;// 提前保存锚点元素的top值this.$nextTick(() => {const query = uni.createSelectorQuery().in(_this);query.select("#anchor0").boundingClientRect((e) => {console.log("e1", e);this.enchorParams.enchorTop1 = e.top;}).select("#anchor1").boundingClientRect((e) => {console.log("e2", e);_this.enchorParams.enchorTop2 = e.top;}).select("#anchor2").boundingClientRect((e) => {console.log("e2", e);this.enchorParams.enchorTop3 = e.top;}).exec();});},}}</script>
点击tab的时候触发事件,滚动到对应的区域。
clickTab(index) {// 点击tab的时候触发const _this = this;let top = 0;if (index == 0) {top = this.enchorParams.enchorTop1;} else if (index == 1) {top = this.enchorParams.enchorTop2;} else {top = this.enchorParams.enchorTop3;}// 锚点定位,滚动到对应的位置uni.pageScrollTo({duration: 500,scrollTop: top - 58,});},
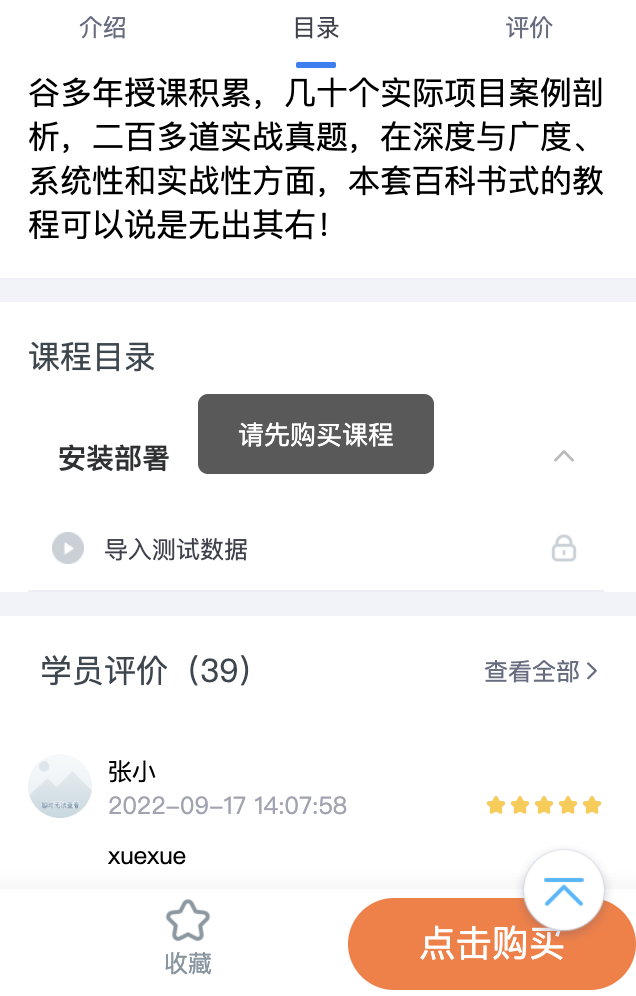
课程权限控制
当点击目录的时候,有两种情况
- 没有登陆的,点击弹出提示框,去登陆
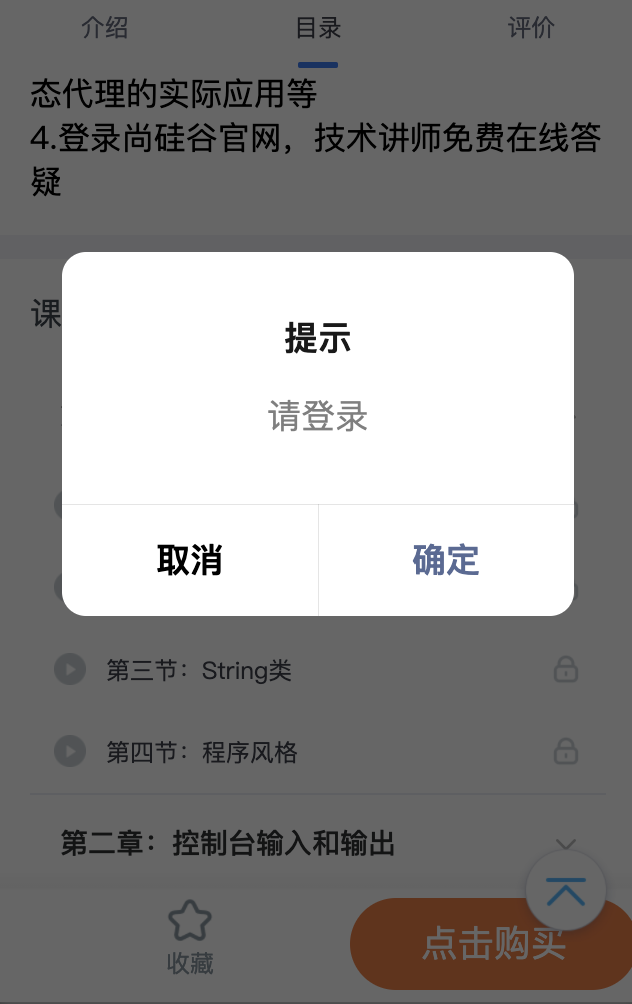
- 未购买课程,点击弹出提示框,去购买,目录显示锁定
登陆态检测
那么这个登陆权限控制是如何做的呢?其实只需要在store中定义一个方法,去检测登陆态,而不是在在页面逻辑中去做这件事情,下面是store中添加的方法:
goLogin(context, callBack) {if (!this.state.token) {uni.showModal({title: '提示',content: '请登录',success: function (res) {if (res.confirm) {uni.navigateTo({url: '/pages/login/index',});uni.clearStorageSync();} else if (res.cancel) {console.log('用户不想登陆');}},});} else {callBack();}
这里接受了两个参数,第一个就是store本身,必须传,第二个参数是一个callback,这个callback有什么妙用呢?
当我们检测到token没有,说明当前是未登陆状态,直接弹出提示框,让用户去登陆。如果是登陆了,就执行传递过来的callback,页面流程正常继续执行。下面的是页面如何使用goLogin的示例:
handleFavo() {this.$store.dispatch("goLogin", () => {// 如果是登陆,执行回调函数里面的逻辑if (!this.isCollect) {this.collectSave();} else {this.collectRemove();}});},
上面是一个点击收藏按钮的功能,点击收藏的时候,是需要用户登陆的,这时候就需要检测一下,直接使用上面的用法就能很快的实现。
同样的,点击购买的时候也需要检测登陆态
handleBuy() {this.$store.dispatch("goLogin", () => {// 点击购买// 判断是否登陆,是否已经购买,已经购买了,按钮显示去学习if (this.course.isBuy) {const videoSourceId = this.chapterList[0].children[0].videoSourceId;uni.navigateTo({url: `/pages/video/index?id=${this.options.id}&videoSourceId=${videoSourceId}`,});} else {uni.navigateTo({url: `/pages/order/index?courseId=${this.courseDetail.id}`,});}});},

若有收获,就点个赞吧
0 人点赞
