需求文档:https://www.yuque.com/xiumubai/fe/yk9lle
这一期我们就正式进入了页面开发的工作了,首先要解决的就是登陆页面
具体样式参考代码,就不列举了
登陆逻辑判断
当用户进入user页面的时候,在onShow中判断token是否为空,为空则跳转到登陆页面,否则就获取用户基础信息
onShow() {if (!this.$store.state.token) {uni.navigateTo({url: "/pages/login/index",});}this.user = this.$store.state.user;},
:::info TIps:这里解释一下为什么要用onShow而不是onLoad,因为当登陆完成以后使用uni.naviagateBack()返回user页面的,是需要刷新用户信息的,而onLoad不会重新执行。 :::
登陆逻辑
下面是关于登陆的逻辑,简单来说就是先拿到code去换token,拿到token以后,去请求用户信息接口,有两种情况,第一种,服务端没有没有用户信息,就需要从getUserPrifile()中获取用户基础信息,传给后端,让后端保存。第二种,服务端有用户信息,直接返回,登陆成功。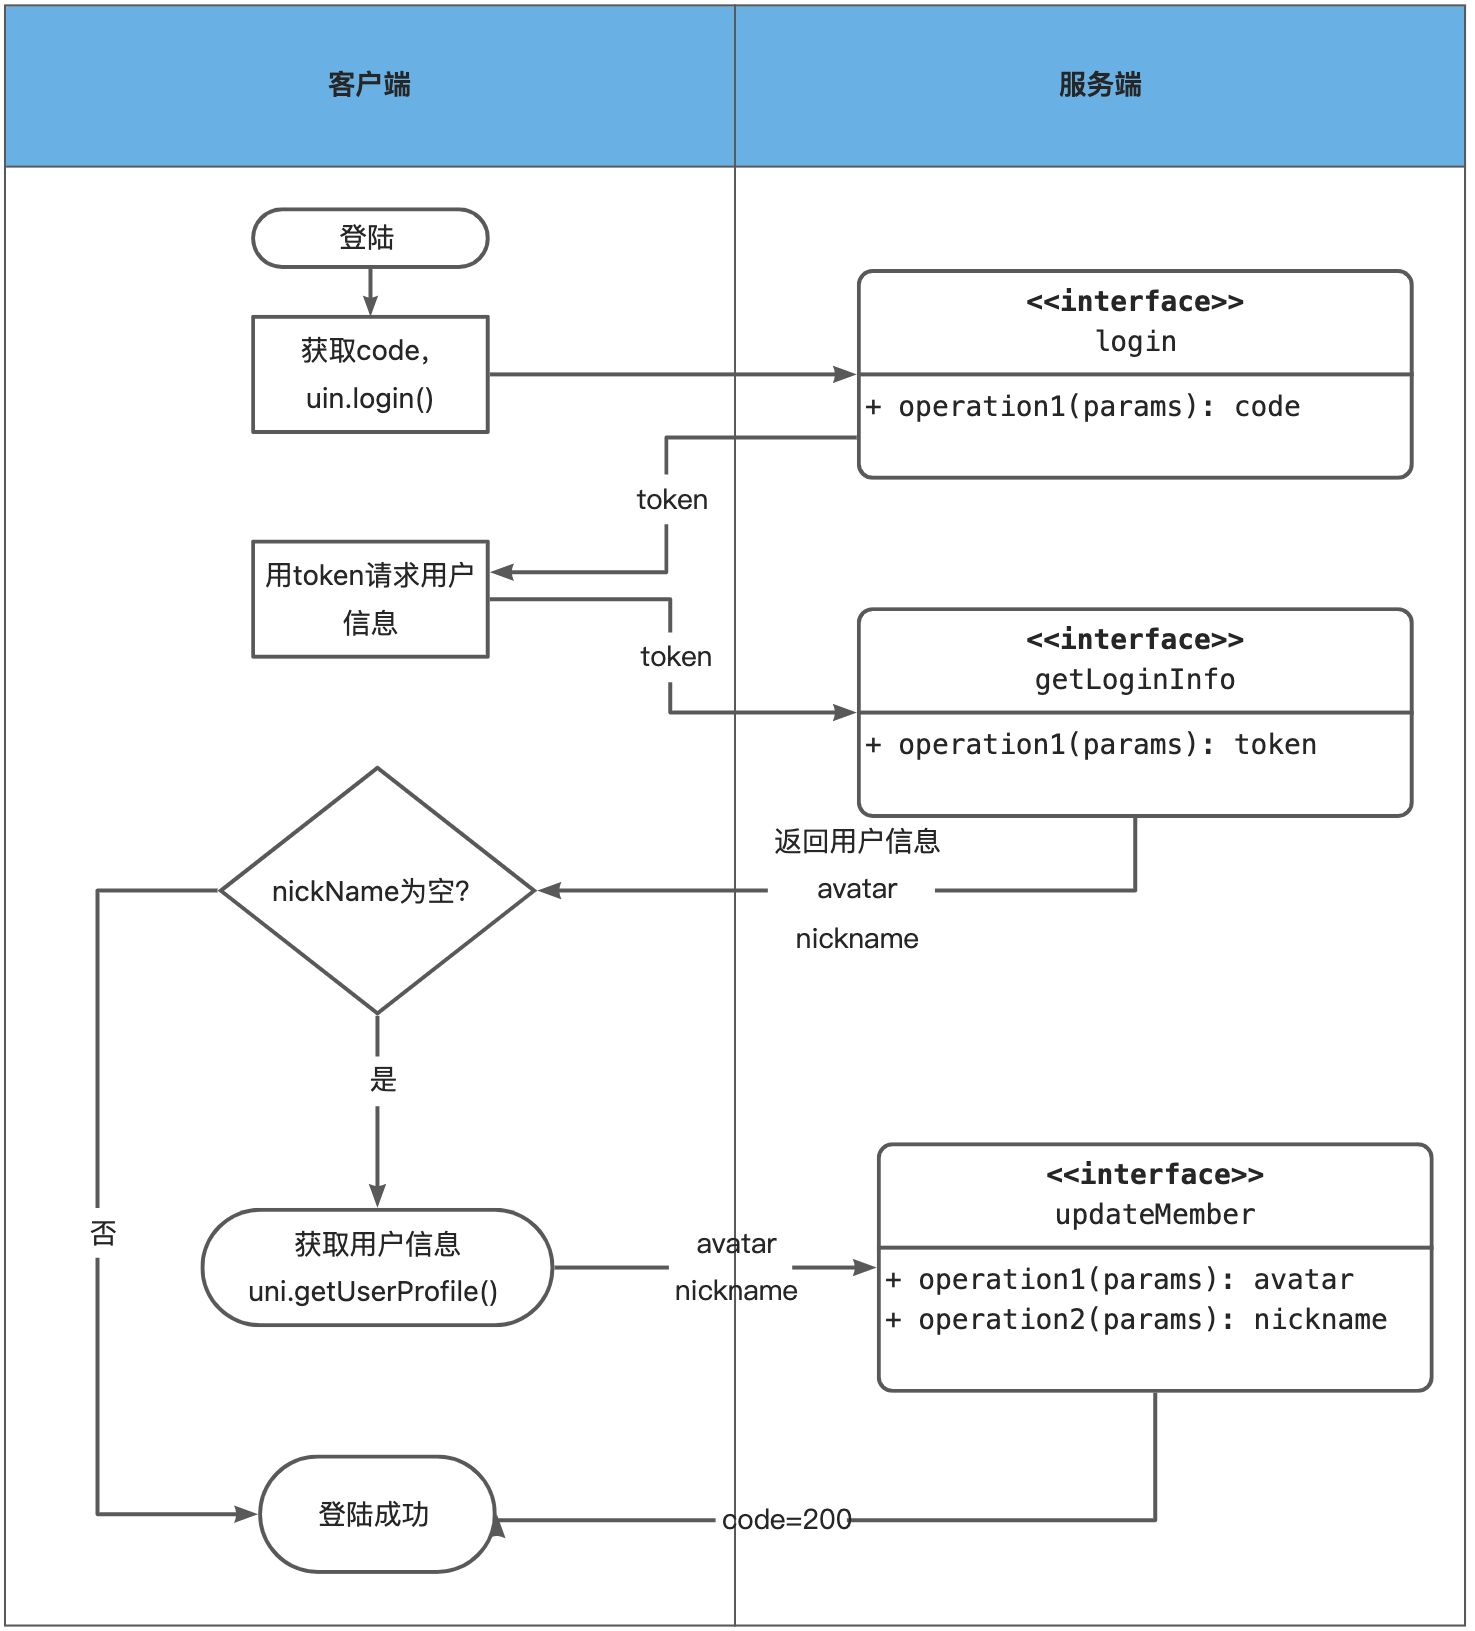
添加接口
接口文档参考:https://www.yuque.com/xiumubai/fe/yf8tf3
class User extends Service {*** @description: 小程序登陆接口* @param {*} options* @return {*}*/login(options = {}) {console.log(123);options.url = `/api/ucenter/webChat/callback?code=${options.code}`;return this.get(options);}/*** @description: 获取用户信息* @param {*} options* @return {*}*/getLoginInfo(options = {}) {options.url = `/api/ucenter/member/auth/getLoginInfo`;return this.get(options);}/*** @description: 更新用户信息* @param {*} options* @return {*}*/updateMember(options = {}) {options.url = `/api/ucenter/member/auth/updateMember`;return this.post(options);}}const userService = new User();export default userService;
调用微信登陆
先获取用户授权,就可以拿到用户基础信息(avatar,nickName),然后调用uni.login()获取code
/*** @description: 调用微信登陆* @returns {*}*/mpWeixinLogin() {const _this = this;try {// 先调用授权uni.getUserProfile({lang: "zh_CN",desc: "用于完善会员资料",success: async (res) => {console.log("userprofile", res);// 保存userinifo信息_this.userInfo = res.userInfo;// 授权成功uni.login({success(data) {// 获取到codeconst code = data.code;console.log("code", code);if (code) _this.login(code);},});},file: (err) => {console.log(err);},});} catch (e) {console.log(e);}},
获取token
拿到code后,请求login接口,返回token,存储到store当中
/*** @description: 请求登陆* @param {*} code* @returns {*}*/async login(code) {try {const res = await userService.login({code,});console.log("token", res.data.token);this.$store.dispatch("setToken", res.data.token);this.getUserInfo();} catch (e) {console.log(e);}},
获取用户信息
使用token去请求getLoginInfo()接口,拿到用户基础信息,如果用户名非空,登陆成功,返回上一页。反之更新用户信息。
async getUserInfo() {try {const res = await userService.getLoginInfo();console.log("userLogininfo", res);if (res.data.item) {this.$store.dispatch("setUser", {...res.data.item,});// 需要更新用户信息if (!res.data.item.nickname) {this.updateUserInfo();} else {this.jump();}}} catch (e) {console.log(e);}},
更新用户信息
如果服务端没有用户信息,请求updateMember()接口,更新用户信息,这里需要把用户的avatar和nickname传给服务端。
async updateUserInfo() {try {const res = await userService.updateMember({data: {avatar: this.userInfo.avatarUrl,nickname: this.userInfo.nickName,},});console.log("updateres", res);if (res.code == 200) {// 登陆成功,保存个人信息,返回个人页面this.$store.dispatch("setUser", {avatar: this.userInfo.avatarUrl,nickname: this.userInfo.nickName,});this.jump();}} catch (e) {console.log(e);}},
登陆成功
jump() {uni.showToast({title: "登陆成功",icon: "success",success: () => {uni.navigateBack();},});},
登陆成功以后,直接跳转到上一页 :::info Tips: 这里使用naviagateBackI()是因为有可能用户不是从user页面跳跳转过来的,也有可能是从别的页面跳转过来的,所以我们需要登陆成功以后返回原来的页面。TODO:判断当前操作是否需要登陆!!! :::

若有收获,就点个赞吧
0 人点赞
