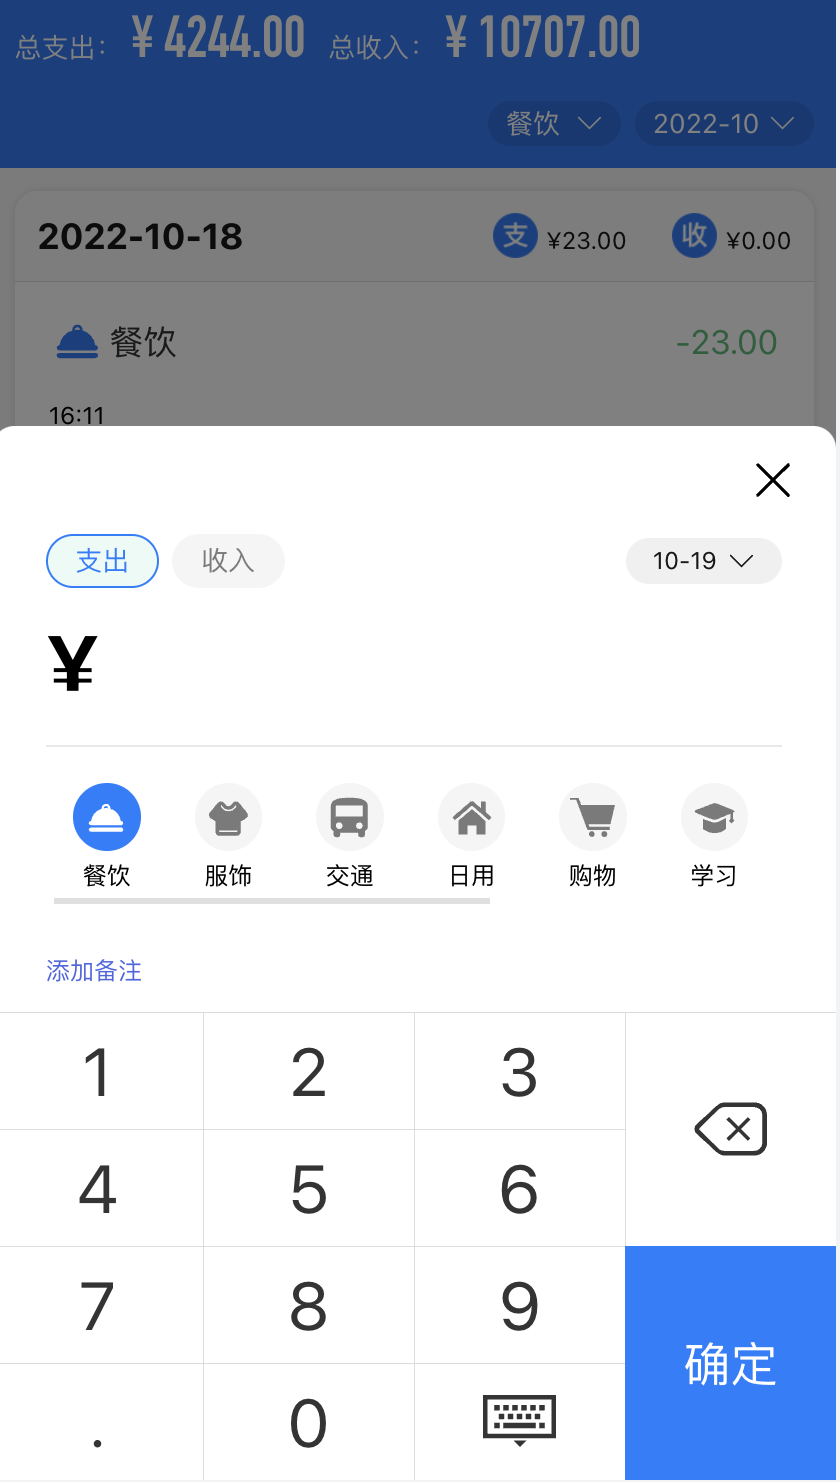
弹窗组件实现
先实现点击新增按钮,调出弹窗的功能。首先,在 Home/index.jsx 文件中添加 「新增按钮」,如下所示:
import CustomIcon from '@/components/CustomIcon'...const Home = () => {...const addToggle = () => {// do something}...return <div className={s.home}>...<div className={s.add} onClick={addToggle}><CustomIcon type='tianjia' /></div></div>}
样式中,注意给 border 设置的是 1PX,大写的单位,因为这样写的话,postcss-pxtorem 插件就不会将其转化为 rem 单位。
根据之前实现的弹窗组件,我们再实现一套类似的,在弹窗内控制弹窗组件的显示隐藏,在 components 下新建 PopupAddBill 文件夹,再新建 index.jsx 和 style.module.less,代码如下:
// PopupAddBill/index.jsximport React, { forwardRef, useEffect, useRef, useState } from 'react';import PropTypes from 'prop-types';import { Popup } from 'zarm';const PopupAddBill = forwardRef((props, ref) => {const [show, setShow] = useState(false) // 内部控制弹窗显示隐藏。// 通过 forwardRef 拿到外部传入的 ref,并添加属性,使得父组件可以通过 ref 控制子组件。if (ref) {ref.current = {show: () => {setShow(true);},close: () => {setShow(false);}}};return <Popupvisible={show}direction="bottom"onMaskClick={() => setShow(false)}destroy={false}mountContainer={() => document.body}><div style={{ height: 200, background: '#fff' }}>弹窗</div></Popup>})export default PopupAddBill
去 Home/index.jsx 中调用:
// Home/index.jsximport PopupAddBill from '@/components/PopupAddBill'const Home = () => {...const addRef = useRef(); // 添加账单 ref...// 添加账单弹窗const addToggle = () => {addRef.current && addRef.current.show()}return <div className={s.home}>...<PopupAddBill ref={addRef} /></div>}
账单类型和账单时间
我们先实现弹窗头部左侧的「支出」和「收入」账单类型切换功能,添加代码如下:
// components/PopupAddBill/index.jsx...import cx from 'classnames';import { Popup, Icon } from 'zarm';import s from './style.module.less';const PopupAddBill = forwardRef((props, ref) => {...const [payType, setPayType] = useState('expense'); // 支出或收入类型...// 切换收入还是支出const changeType = (type) => {setPayType(type);};return <Popupvisible={show}direction="bottom"onMaskClick={() => setShow(false)}destroy={false}mountContainer={() => document.body}><div className={s.addWrap}>{/* 右上角关闭弹窗 */}<header className={s.header}><span className={s.close} onClick={() => setShow(false)}><Icon type="wrong" /></span></header>{/* 「收入」和「支出」类型切换 */}<div className={s.filter}><div className={s.type}><span onClick={() => changeType('expense')} className={cx({ [s.expense]: true, [s.active]: payType == 'expense' })}>支出</span><span onClick={() => changeType('income')} className={cx({ [s.income]: true, [s.active]: payType == 'income' })}>收入</span></div></div></div></Popup>})export default PopupAddBill
我们定义 expense 为支出,income 为收入,代码中通过 payType 变量,来控制「收入」和「支出」按钮的切换。
接下来在类型边上添加时间筛选弹窗,此时你将体会到之前提取时间筛选组件是多么的明智。
import React, { forwardRef, useEffect, useRef, useState } from 'react';...import dayjs from 'dayjs';import PopupDate from '../PopupDate'...const PopupAddBill = forwardRef((props, ref) => {...const dateRef = useRef();const [date, setDate] = useState(new Date()); // 日期...// 日期选择回调const selectDate = (val) => {setDate(val);}return <Popupvisible={show}direction="bottom"onMaskClick={() => setShow(false)}destroy={false}mountContainer={() => document.body}><div className={s.addWrap}>{/* 「收入」和「支出」类型切换 */}<div className={s.filter}>...<divclassName={s.time}onClick={() => dateRef.current && dateRef.current.show()}>{dayjs(date).format('MM-DD')} <Icon className={s.arrow} type="arrow-bottom" /></div></div><PopupDate ref={dateRef} onSelect={selectDate} /></div></Popup>})export default PopupAddBill
我们引入了公共组件 PopupDate,传入 ref 控制弹窗的显示隐藏,传入 onSelect 获取日期组件选择后回调的值,并通过 setDate 重制 date,触发视图的更新,
我们通过上述代码,已经创造出了两个值,分别是「账单类型」和「账单日期」,还差「账单金额」 「账单种类」、「备注」。
账单金额
我们将金额动态化,引入 Zarm 为我们提供的模拟数字键盘组件 Keyboard,代码如下:
...// 监听输入框改变值const handleMoney = (value) => {value = String(value)// 点击是删除按钮时if (value == 'delete') {let _amount = amount.slice(0, amount.length - 1)setAmount(_amount)return}// 点击确认按钮时if (value == 'ok') {// 这里后续将处理添加账单逻辑return}// 当输入的值为 '.' 且 已经存在 '.',则不让其继续字符串相加。if (value == '.' && amount.includes('.')) return// 小数点后保留两位,当超过两位时,不让其字符串继续相加。if (value != '.' && amount.includes('.') && amount && amount.split('.')[1].length >= 2) return// amount += valuesetAmount(amount + value)}...<div className={s.money}><span className={s.sufix}>¥</span><span className={cx(s.amount, s.animation)}>{amount}</span></div><Keyboard type="price" onKeyClick={(value) => handleMoney(value)} />
账单种类
账单种类的作用是表示该笔账单的大致用途,我们通过接口从数据库回去账单种类列表,以横向滚动的形式,展示在金额的下面,接下来我们看具体的代码实现:
...import CustomIcon from '../CustomIcon';import { get, typeMap } from '@/utils';...const [currentType, setCurrentType] = useState({}); // 当前选中账单类型const [expense, setExpense] = useState([]); // 支出类型数组const [income, setIncome] = useState([]); // 收入类型数组useEffect(async () => {const { data: { list } } = await get('/api/type/list');const _expense = list.filter(i => i.type == 1); // 支出类型const _income = list.filter(i => i.type == 2); // 收入类型setExpense(_expense);setIncome(_income);setCurrentType(_expense[0]); // 新建账单,类型默认是支出类型数组的第一项}, [])...<div className={s.typeWarp}><div className={s.typeBody}>{/* 通过 payType 判断,是展示收入账单类型,还是支出账单类型 */}{(payType == 'expense' ? expense : income).map(item => <div onClick={() => setCurrentType(item)} key={item.id} className={s.typeItem}>{/* 收入和支出的字体颜色,以及背景颜色通过 payType 区分,并且设置高亮 */}<span className={cx({[s.iconfontWrap]: true, [s.expense]: payType == 'expense', [s.income]: payType == 'income', [s.active]: currentType.id == item.id})}><CustomIcon className={s.iconfont} type={typeMap[item.id].icon} /></span><span>{item.name}</span></div>)}</div></div>
注意,在 h5 界面实现横向滚动,和在网页端相比,多了如下属性:
* {touch-action: pan-x;}
CSS属性 touch-action 用于设置触摸屏用户如何操纵元素的区域(例如,浏览器内置的缩放功能)。
如果不设置它,只是通过 overflow-x: auto,无法实现 h5 端的横向滚动的,并且你要在一个 div 容器内设置全局 * 为 touch-action: pan-x;
备注弹窗
备注虽然不起眼,但是别小看它,它可以在账单类型不足以概括账单时,加以一定的文字描述。
我们直接将其放置于「账单种类」的下面,代码如下:
...import { Input } from 'zarm';...const [remark, setRemark] = useState(''); // 备注const [showRemark, setShowRemark] = useState(false); // 备注输入框展示控制...<div className={s.remark}>{showRemark ? <InputautoHeightshowLengthmaxLength={50}type="text"rows={3}value={remark}placeholder="请输入备注信息"onChange={(val) => setRemark(val)}onBlur={() => setShowRemark(false)}/> : <span onClick={() => setShowRemark(true)}>{remark || '添加备注'}</span>}</div>
CSS 样式部分
.remark {padding: 0 24px;padding-bottom: 12px;color: #4b67e2;:global {.za-input--textarea {border: 1px solid #e9e9e9;padding: 10px;}}}
:global 的使用之前已经有描述过,这里再提醒大家一句,目前项目使用的是 css module 的形式,所以样式名都会被打上 hash 值,我们需要修改没有打 hash 值的 zarm 内部样式,需要通过 :global 方法。
调用上传账单接口
此时我们集齐了五大参数:
- 账单类型:payType
- 账单金额:amount
- 账单日期:date
- 账单种类:currentType
- 备注:remark
我们给 Keyboard 的「确定」按钮回调添加方法:
import { Toast } from 'zarm';import { post } from '@/utils';// 监听输入框改变值const handleMoney = (value) => {value = String(value)// 点击是删除按钮时if (value == 'delete') {let _amount = amount.slice(0, amount.length - 1)setAmount(_amount)return}// 点击确认按钮时if (value == 'ok') {addBill()return}// 当输入的值为 '.' 且 已经存在 '.',则不让其继续字符串相加。if (value == '.' && amount.includes('.')) return// 小数点后保留两位,当超过两位时,不让其字符串继续相加。if (value != '.' && amount.includes('.') && amount && amount.split('.')[1].length >= 2) return// amount += valuesetAmount(amount + value)}// 添加账单const addBill = async () => {if (!amount) {Toast.show('请输入具体金额')return}const params = {amount: Number(amount).toFixed(2), // 账单金额小数点后保留两位type_id: currentType.id, // 账单种类idtype_name: currentType.name, // 账单种类名称date: dayjs(date).unix() * 1000, // 日期传时间戳pay_type: payType == 'expense' ? 1 : 2, // 账单类型传 1 或 2remark: remark || '' // 备注}const result = await post('/api/bill/add', params);// 重制数据setAmount('');setPayType('expense');setCurrentType(expense[0]);setDate(new Date());setRemark('');Toast.show('添加成功');setShow(false);if (props.onReload) props.onReload();}
onReload 方法为首页账单列表传进来的函数,当添加完账单的时候,执行 onReload 重新获取首页列表数据。
<PopupAddBill ref={addRef} onReload={refreshData} />
此时,我们的添加账单的功能已经全部实现。


