账单接口是我们本次实战项目的核心模块,用户可以通过账单模块记录自己日常消费和收入情况。本章节我们需要编写五个接口:
1、账单列表 2、添加账单 3、修改账单 4、删除账单 5、账单详情
这样一套增删改查操作下来,基本上可以用这套模式复制出另一套增删改查,所以业务基本上都是互通的,不同之处在于表与表之间能建立什么样的联系,同时也取决于需求方对业务的要求。
知识点
- 一套 CRUD。
- 多层级复杂数据结构的处理。
- egg-mysql 的使用。
新增账单接口
打开 /controller,在目录下新增 bill.js 脚本文件,添加一个 add 方法,代码如下:
'use strict';const moment = require('moment');const Controller = require('egg').Controller;class BillController extends Controller {async add() {const { ctx, app } = this;const { amount, type_id, type_name, date, pay_type, remark = '' } = ctx.request.body;// 判空处理if (!amount || !type_id || !type_name || !date || !pay_type) {ctx.body = {code: 400,msg: '参数错误',data: null,};}try {const token = ctx.request.header.authorization;const decode = await app.jwt.verify(token, app.config.jwt.secrit);if (!decode) return;const user_id = decode.id;await ctx.service.bill.add({amount,type_id,type_name,date,pay_type,remark,user_id,});ctx.body = {code: 200,msg: '请求成功',data: null,};} catch (e) {ctx.body = {code: 500,msg: '系统错误',data: null,};}}}module.exports = BillController;
新增账单接口唯一需要注意的是,往数据库里写数据的时候,需要带上用户 id,这样便于后续查找、修改、删除,能找到对应用户的账单信息。所以本章节的所有接口,都是需要经过鉴权中间件过滤的。必须要拿到当前用户的 token,才能拿到用户的 id 信息。
处理逻辑已经写完,我们需要把 service 服务也安排上,打开 service,在目录下新建 bill.js,添加代码如下:
'use strict';const Service = require('egg').Service;class BillService extends Service {async add(params) {const { app } = this;try {const result = await app.mysql.insert('bill', params);return result;} catch (e) {console.log(e);return null;}}}module.exports = BillService;
添加路由
/** 添加账单 */router.post('/api/bill/add', _jwt, controller.bill.add);
消费类型接口
添加账单列表的时候,会选择该笔账单的类型,如餐饮、购物、学习、奖金等等,这个账单类型就是我们我们之前定义的 type 表里获取的。于是我们在这里实现手动定义好这张表的初始数据,如下所示:
为了方便,我们在public下面新建一个type.json文件,具体的json结构如下:
{"code": 200,"msg": "请求成功","data": {"list": [{ "id": 1, "name": "餐饮", "type": "1", "user_id": 0 },{ "id": 2, "name": "服饰", "type": "1", "user_id": 0 },{ "id": 3, "name": "交通", "type": "1", "user_id": 0 },{ "id": 4, "name": "日用", "type": "1", "user_id": 0 },{ "id": 5, "name": "购物", "type": "1", "user_id": 0 },{ "id": 6, "name": "学习", "type": "1", "user_id": 0 },{ "id": 7, "name": "医疗", "type": "1", "user_id": 0 },{ "id": 8, "name": "旅行", "type": "1", "user_id": 0 },{ "id": 9, "name": "人情", "type": "1", "user_id": 0 },{ "id": 10, "name": "其他", "type": "1", "user_id": 0 },{ "id": 11, "name": "工资", "type": "2", "user_id": 0 },{ "id": 12, "name": "奖金", "type": "2", "user_id": 0 },{ "id": 13, "name": "转账", "type": "2", "user_id": 0 },{ "id": 14, "name": "理财", "type": "2", "user_id": 0 },{ "id": 15, "name": "退款", "type": "2", "user_id": 0 },{ "id": 16, "name": "其他", "type": "2", "user_id": 0 }]}}
我们还需要添加一个接口用来获取消费类型。
打开 /controller,在目录下新增 type.js 脚本文件,添加一个 list 方法,代码如下:
'use strict';const Controller = require('egg').Controller;class TypeController extends Controller {async list() {const { ctx, app } = this;const token = ctx.request.header.authorization;const decode = await app.jwt.verify(token, app.config.jwt.secret);if (!decode) return;const user_id = decode.id;const list = await ctx.service.type.list(user_id);ctx.body = {code: 200,msg: '请求成功',data: {list,},};}}module.exports = TypeController;
打开 service,在目录下新建 type.js,添加代码如下:
'use strict';const Service = require('egg').Service;class TypeService extends Service {// 获取标签列表async list(id) {const { app } = this;const QUERY_STR = 'id, name, type, user_id';const sql = `select ${QUERY_STR} from type where user_id = 0 or user_id = ${id}`;try {const result = await app.mysql.query(sql);return result;} catch (error) {console.log(error);return null;}}}module.exports = TypeService;
添加路由
/** 获取消费类型列表 */router.get('/api/type/list', _jwt, controller.type.list);
账单列表获取
账单列表的获取,我们可以先查看前端需要做成怎样的展示形式: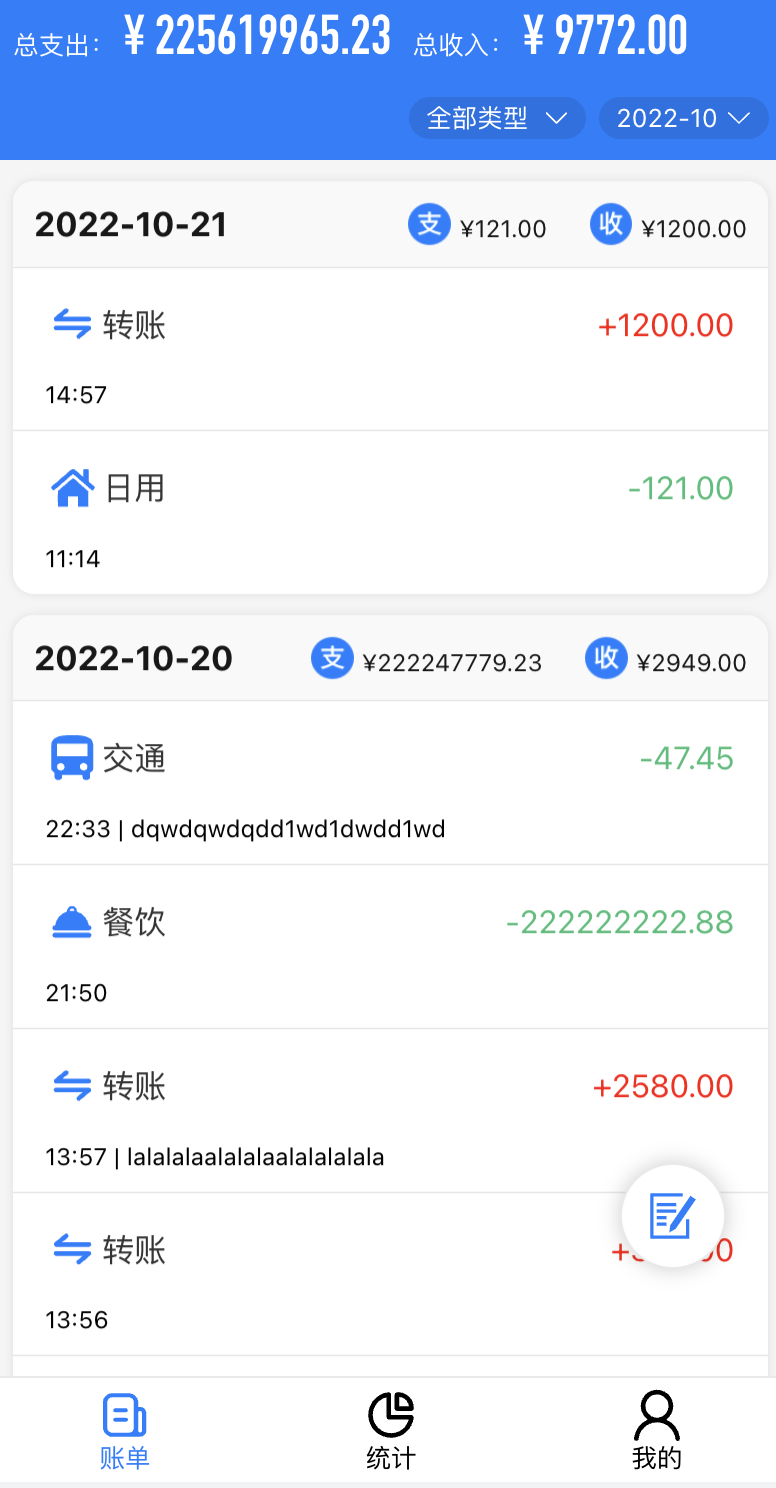
分析上图,账单是以时间作为维度,比如我在 2021 年 1 月 1 日记录了 2 条账单,在 2021 年 1 月 2 日记录了 1 条账,单我们返回的数据就是这样的:
[{date: '2022-10-10',bills: [{// bill 数据表中的每一项账单},{// bill 数据表中的每一项账单}]},{date: '2022-10-10',bills: [{// bill 数据表中的每一项账单},]}]
并且我们前端还需要做滚动加载更多,所以服务端是需要给分页的。于是就需要在获取 bill 表里的数据之后,进行一系列的操作,将数据整合成上述格式。
当然,获取的时间维度以月为单位,并且可以根据账单类型进行筛选。上图左上角有当月的总支出和总收入情况,我们也在列表数据中给出,因为它和账单数据是强相关的
打开 /controller/bill.js 添加一个 list 方法,来处理账单数据列表:
'use strict';const moment = require('moment');const Controller = require('egg').Controller;class BillController extends Controller {async list() {const { ctx, app } = this;const { date, page = 1, page_size = 5, type_id = 'all' } = ctx.query;try {// 通过 token 解析,拿到 user_idconst token = ctx.request.header.authorization;const decode = await app.jwt.verify(token, app.config.jwt.secret);if (!decode) return;const user_id = decode.id;// 1.该用户所有的账单数据const list = await ctx.service.bill.list(id, user_id);// 2.返回筛选条件下的数据const _list = list.filter(item => {if (type_id !== 'all') {// 根据类型和时间(当月)筛选数据return moment(Number(item.date)).format('YYYY-MM') === date.toString() && type_id.toString() === item.type_id;}// 返回当月所有的数据return moment(Number(item.date)).format('YYYY-MM') === date;});// 3.格式化数据,变成前端需要的格式const listMap = _list.reduce((curr, item) => {const date = moment(Number(item.date)).format('YYYY-MM-DD');// 日期相同的放到同一个数组bills中if (curr && curr.length && curr.findIndex(item => item.date === date) > -1) {const index = curr.findIndex(item => item.date === date);curr[index].bills.push(item);}// 如果是不同的日期,新建一个数组if (curr && curr.length && curr.findIndex(item => item.date === date) === -1) {curr.push({date,bills: [ item ],});}// 如果 curr 为空数组,则默认添加第一个账单项 itemif (!curr.length) {curr.push({date,bills: [ item ],});}return curr;}, []).sort((a, b) => moment(b.date) - moment(a.date));// 4.分页处理const pageListMap = listMap.slice((page - 1) * page_size, page * page_size);// 5.计算当月总收入和支出// 总支出const totalExpense = _list.reduce((curr, item) => {if (item.pay_type === 1) {curr += Number(item.amount);return curr;}return curr;}, 0);// 总支出const totalIncome = _list.reduce((curr, item) => {if (item.pay_type === 2) {curr += Number(item.amount);return curr;}return curr;}, 0);// 6.返回数据ctx.body = {coe: 200,msg: '请求成功',data: {totalExpense, // 当月支出totalIncome, // 当月收入totalPage: Math.ceil(listMap.length / page_size), // 总分页list: pageListMap || [], // 格式化后,并且经过分页处理的数据},};} catch (e) {console.log(e);ctx.body = {code: 500,msg: '系统错误',data: null,};}}}module.exports = BillController;
里面具体逻辑可以查看代码注释,主要的是对数据格式处理的操作比较多一些。
上述代码使用到了 service 服务 ctx.service.bill.list,所以后续我们需要在 /service/bill.js 下新建 list 方法,如下所示:
'use strict';const Service = require('egg').Service;class BillService extends Service {async list(id) {const { app } = this;const QUERY_STR = 'id, pay_type, amount, date, type_id, type_name, remark';// 从 bill 表中查询 user_id 等于当前用户 id 的账单数据,并且返回的属性是 id, pay_type, amount, date, type_id, type_name, remarkconst sql = `select ${QUERY_STR} from bill where user_id = ${id}`;try {const result = app.mysql.query(sql);return result;} catch (e) {console.log(e);return null;}}}module.exports = BillService;
这次我们利用执行 sql 语句的形式,从数据库中获取需要的数据,app.mysql.query 方法负责执行你的 sql 语句,上述 sql 语句,解释成中文就是,“从 bill 表中查询 user_id 等于当前用户 id 的账单数据,并且返回的属性是 id, pay_type, amount, date, type_id, type_name, remark”。
将接口抛出:
/** 账单列表 */router.get('/api/bill/list', _jwt, controller.bill.list);
账单详情接口
我们继续制作账单修改接口,修改接口和新增接口的区别在于,新增是在没有的情况下,编辑好参数,添加进数据库内部。而修改接口则是编辑现有的数据,根据当前账单的 id,更新数据。
所以这里我们需要实现两个接口:
1、获取账单详情接口
2、更新数据接口
我们先来完成获取账单详情接口,在 /controller/bill.js 添加 detail 方法,代码如下所示:
'use strict';const Controller = require('egg').Controller;class BillController extends Controller {async detail() {const { ctx, app } = this;const { id = '' } = ctx.query;const token = ctx.request.header.authorization;// 获取当前用户信息const decode = await app.jwt.verify(token, app.config.jwt.secret);if (!decode) return;const user_id = decode.id;if (!id) {ctx.body = {code: 500,msg: 'id不存在',data: null,};return;}try {// 从数据库中获取账单详情const result = await ctx.service.bill.detail(user_id);ctx.body = {code: 200,msg: '请求成功',data: result,};} catch {ctx.body = {code: 500,msg: '系统错误',data: null,};}}}module.exports = BillController;
在/service/bill.js 添加 ctx.service.bill.detail 方法,如下所示:
'use strict';const Service = require('egg').Service;class BillService extends Service {async detail(id) {const { app } = this;try {const result = await app.mysql.get('bill', { id });return result;} catch (e) {console.log(e);return null;}}}module.exports = BillService;
添加路由
/** 账单详情 */router.get('/api/bill/detail', _jwt, controller.bill.detail);
编辑账单接口
在 /controller/bill.js 添加 update 方法,如下所示:
'use strict';const moment = require('moment');const Controller = require('egg').Controller;class BillController extends Controller {async update() {const { ctx, app } = this;// 账单的相关参数,这里注意要把账单的 id 也传进来const { id, amount, type_id, type_name, date, pay_type, remark = '' } = ctx.request.body;const token = ctx.request.header.authorization;// 获取当前用户信息const decode = await app.jwt.verify(token, app.config.jwt.secret);if (!decode) return;const user_id = decode.id;// 判空处理if (!amount || !type_id || !type_name || !date || !pay_type) {ctx.body = {code: 400,msg: '参数错误',data: null,};}try {// 根据账单 id 和 user_id,修改账单数据await ctx.service.bill.update({id, // 账单 idamount, // 金额type_id, // 消费类型 idtype_name, // 消费类型名称date, // 日期pay_type, // 消费类型remark, // 备注user_id, // 用户 id});ctx.body = {code: 200,msg: '请求成功',data: null,};} catch {ctx.body = {code: 500,msg: '系统错误',data: null,};}}}module.exports = BillController;
ctx.service.bill.update 便是操作数据库修改当前账单 id 的方法,我们需要在 /service/bill.js 添加相应的方法,如下所示:
'use strict';const Service = require('egg').Service;class BillService extends Service {async update(params) {const { app } = this;try {const result = await app.mysql.update('bill', {...params,},{id: params.id,user_id: params.user_id,});return result;} catch (e) {console.log(e);return null;}}}module.exports = BillService;
添加路由
/** 修改账单 */router.post('/api/bill/update', _jwt, controller.bill.update);
账单删除接口
账单删除只需要获取到单笔账单的 id,通过 id 去删除数据库中对应的账单数据。我们打开 /controller/bill.js 添加 delete 方法,如下所示:
'use strict';const moment = require('moment');const Controller = require('egg').Controller;class BillController extends Controller {async delete() {const { ctx, app } = this;// 账单的相关参数,这里注意要把账单的 id 也传进来const { id } = ctx.request.body;const token = ctx.request.header.authorization;// 获取当前用户信息const decode = await app.jwt.verify(token, app.config.jwt.secret);if (!decode) return;const user_id = decode.id;if (!id) {ctx.body = {code: 400,msg: '参数错误',data: null,};}try {await ctx.service.bill.delete(id, user_id);ctx.body = {code: 200,msg: '请求成功',data: null,};} catch {ctx.body = {code: 500,msg: '系统错误',data: null,};}}}module.exports = BillController;
并且前往 /service/bill.js 添加 delete 服务,如下所示:
'use strict';const Service = require('egg').Service;class BillService extends Service {async delete(id, user_id) {const { app } = this;try {const result = await app.mysql.delete('bill', {id,user_id,});return result;} catch (e) {console.log(e);return null;}}}module.exports = BillService;
最后添加路由
// router.jsrouter.post('/api/bill/delete', _jwt, controller.bill.delete); // 删除账单
数据图表接口
我们在实现接口之前,先看看需要实现的需求:
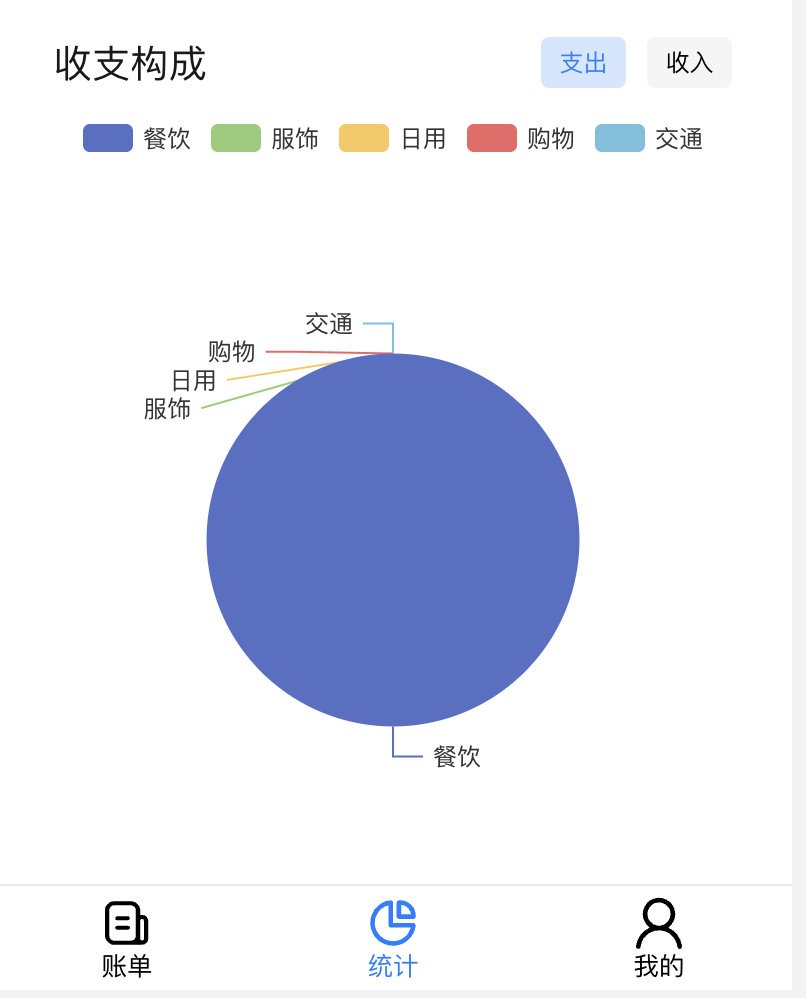
首先是头部的汇总数据,并且接口支持事件筛选,以 月 为单位。
其次是收支的构成图,对每一个类型的支出和收入进行累加,最后通过计算占比以此从大到小排布。如上图所示,当前月份的所有支出和收入,这个累加计算,我们在服务端完成。
最后我们引入 echarts ,完成一个饼图的简单排布,其实也就是上图收支比例图的一个变种。
我们最终要返回的数据机构如下:
{total_data: [{number: 137.84, // 支出或收入数量pay_type: 1, // 支出或消费类型值type_id: 1, // 消费类型idtype_name: "餐饮" // 消费类型名称}],total_expense: 3123.54, // 总消费total_income: 6555.80 // 总收入}
数据接口实现
经过上述分析,那我们就开始实现一下,我们将方法写在 /controller/bill.js 中,添加 data 方法,如下所示:
'use strict';const moment = require('moment');const Controller = require('egg').Controller;class BillController extends Controller {async data() {const { ctx, app } = this;// 账单的相关参数,这里注意要把账单的 id 也传进来const { date = '' } = ctx.query;const token = ctx.request.header.authorization;// 获取当前用户信息const decode = await app.jwt.verify(token, app.config.jwt.secret);if (!decode) return;const user_id = decode.id;if (!date) {ctx.body = {code: 400,msg: '参数错误',data: null,};return;}try {// 获取账单表中的账单数据const result = await ctx.service.bill.list(user_id);// 根据时间参数,筛选出当月所有的账单数据const start = moment(date).startOf('month').unix() * 1000; // 选择月份,月初时间const end = moment(date).endOf('month').unix() * 1000; // 选择月份,月末时间const _data = result.filter(item => (Number(item.date) > start && Number(item.date) < end));// 总支出const total_expense = _data.reduce((arr, cur) => {if (cur.pay_type === 1) {arr += Number(cur.amount);}return arr;}, 0);// 总收入const total_income = _data.reduce((arr, cur) => {if (cur.pay_type === 2) {arr += Number(cur.amount);}return arr;}, 0);// 获取收支构成let total_data = _data.reduce((arr, cur) => {const index = arr.findIndex(item => item.type_id === cur.type_id);if (index === -1) {arr.push({type_id: cur.type_id,type_name: cur.type_name,pay_type: cur.pay_type,number: Number(cur.amount),});}if (index > -1) {arr[index].number += Number(cur.amount);}return arr;}, []);total_data = total_data.map(item => {item.number = Number(Number(item.number).toFixed(2));return item;});ctx.body = {code: 200,msg: '请求成功',data: {total_expense: Number(total_expense).toFixed(2),total_income: Number(total_income).toFixed(2),total_data: total_data || [],},};} catch {ctx.body = {code: 500,msg: '系统错误',data: null,};}}}module.exports = BillController;
相关逻辑可以看注释,还是对一些数据格式的处理,搞清需要什么样的数据格式,就自然而然会了。
最后,添加一下路由:
/** 统计数据 */router.get('/api/bill/data', _jwt, controller.bill.data);

若有收获,就点个赞吧
0 人点赞
