核心概念还是没变
一些高级指引要需要重新学了
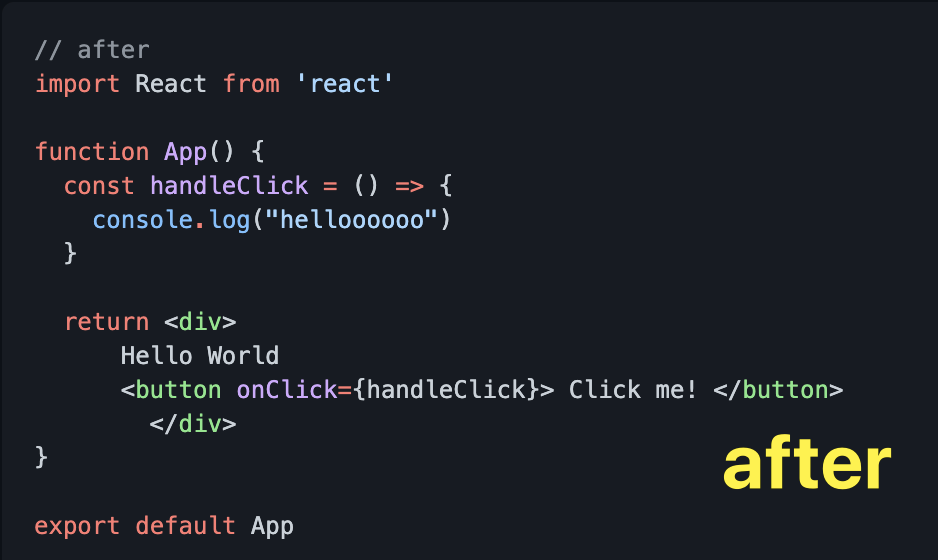
组件的按需加载Suspense&Lazy
在 Suspense 组件中渲染 lazy 组件,如此使得我们可以使用在等待加载 lazy 组件时做优雅降级(如 loading 指示器等)
React.lazy 接受一个函数,这个函数需要动态调用 import()。它必须返回一个 Promise,该 Promise 需要 resolve 一个 default export 的 React 组件。
# beforeimport OtherComponent from './OtherComponent';# afterconst OtherComponent = React.lazy(() => import('./OtherComponent'));# demo:局部按需加载import React, { Suspense } from 'react';import MyErrorBoundary from './MyErrorBoundary';const OtherComponent = React.lazy(() => import('./OtherComponent'));function MyComponent() {return (<div><MyErrorBoundary> # 异常捕获组件# Suspense包裹按需加载的组件,fallback用于优雅降级<Suspense fallback={<div>Loading...</div>}><section><OtherComponent /><AnotherComponent /></section></Suspense></MyErrorBoundary></div>);}# 基于路由的按需加载import React, { Suspense, lazy } from 'react';import { BrowserRouter as Router, Route, Switch } from 'react-router-dom';const Home = lazy(() => import('./routes/Home'));const About = lazy(() => import('./routes/About'));const App = () => (<Router><Suspense fallback={<div>Loading...</div>}><Switch><Route exact path="/" component={Home}/><Route path="/about" component={About}/></Switch></Suspense></Router>)
Context
Context 提供了一个无需为每层组件手动添加 props,就能在组件树间进行数据传递的方法。
什么样的数据适合放在 context树上?
如:地区偏好,UI 主题、当前认证的用户、首选语言
如何使用从上到下传递值
===1.全局变量创建===创建全局变量:#theme-context.jsexport const themes = {light: {background: '#eeeeee',},dark: {background: '#222222'},};# React.createContext创建全局变量export const ThemeContext = React.createContext(themes.dark // 默认值);===2.变量消费者 最细节的组件===#themed-button.js 使用全局变量的 最细枝末节的组件import {ThemeContext} from './theme-context';class ThemedButton extends React.Component {render() {let props = this.props;let theme = this.context;return (<button{...props}style={{backgroundColor: theme.background}}/>);}}# 将全局变量挂载在 组件的contextType属性,这样组件内部可以通过this.context读到全局变量ThemedButton.contextType = ThemeContext;export default ThemedButton;===3.变量消费者 的宿主 需要给末端组件提供宿主环境,即用provider包裹住变量使用者===#app.jsclass App extends React.Component {render() {return (<Page><ThemeContext.Provider value={this.state.theme}><ThemedButton onClick={props.changeTheme}>Change Theme</ThemedButton></ThemeContext.Provider><Section><ThemedButton /></Section></Page>);}
什么时候使用?
可以滥用吗?==> 请谨慎使用,因为这会使得组件的复用性变差。
其他方案:
如果你只是想避免层层传递一些属性,试试组件组合(component composition)
当 Provider 的 value 值发生变化时,它内部的所有消费组件都会重新渲染
Provider 及其内部 consumer 组件都不受制于 shouldComponentUpdate 函数
在很深的组件中更新context
解决方案:在变量的那一层,就定义修改变量的函数,并把这个函数传参给下面的用
HOOK
可以让我们在不编写class的情况下使用state及其他的React特性。使你在无需修改组件结构的情况下复用状态逻辑。
为什么要用?
提问:既然要使用state了,为啥还把组件设计为function组件 而不是class组件?
那我们思考一下 class组件有什么 不好的地方?
1. class组件状态管理逻辑复杂
React组件不能直接连接到store,在组件嵌套层级较深或者同级组件较多时,虽然可以使用render props、HOC等方案。但是组件间复用状态的处理比较困难。
所以相对来说复杂一点的项目就需要引用Redux或者Mobx做状态管理。
Hook则为React 提供了共享状态逻辑更好的原生途径。
2. class组件在生命周期里做状态逻辑处理容易导致副作用使得难以维护
例1:在componentDidMount或者componentDidUpdate中调用接口,获取数据,
会涉及鉴权、数据format等造成state频繁修改,页面有多次不必要的render。
例2:是生命周期使用了原生事件时。比如在componentDidMount设置了addEventListener,不会在组件卸载(unmount)的时候自动销毁,需要手动remove,增加了维护成本
Hook 并非强制按照生命周期划分,它可以使我们将组件中相互关联的部分拆分成更小的函数(比如设置订阅或请求数据),这样组件间功能更简洁,我们就使用更少的代码实现相同的功能,逻辑看起来也更清晰。
使用 Hook 其中一个目的就是要解决 class 中生命周期函数经常包含不相关的逻辑,但又把相关逻辑分离到了几个不同方法中的问题。Hook 允许我们按照代码的用途分离他们,** 而不是像生命周期函数那样。React 将按照 effect 声明的顺序依次调用组件中的每一个 effect。
3. class组件难以理解如this绑定
比如class中this的绑定
还有class组件预编译、压缩、热重载不稳定等等其他问题。。。
综上class组件的弊端,所以我们在引入hook后,可以在使用function组件的同时又可以使用更多的 React 特性。
如何使用:api们
Hook 就是 JavaScript 函数,使用限制:
- 只能在函数最外层调用 Hook。不要在循环、条件判断或者子函数中调用。
- 只能在 React 的函数组件中调用 Hook。不要在其他 JavaScript 函数中调用。
- 自定义HOOK里调用
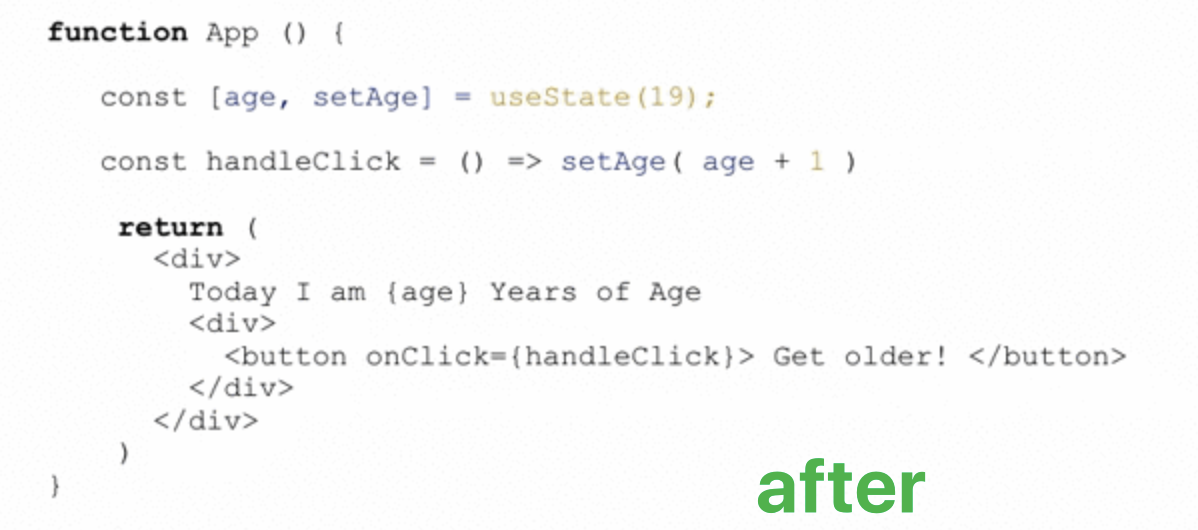
useState
可以充当constructor
# [变量,改变变量的方法] = useState(变量的初始值)const [value, setValue] = useState(defaultValue)setValue也只是接受一个新的值,直接覆盖原来的value
useState(唯一)参数是初始state,可以是数字、字符串或者object。
返回值是一个二项数组:当前状态value;一个更新state的函数setValue,它类似于class的this.setState,可以在合成或原生事件等其他地方调用这个函数。
useState给组件添加一些内部state,React会在重复render时保留这个state当前的value,并且提供最新的value给函数setValue。
可以在一个组件中多次使用。
当你多次调用 useState 的时候,React 将按照 effect 声明的顺序依次调用组件中的每一个 effect。
# demoimport React, { useState } from 'react';function Example() {// 声明一个叫 “count” 的 state 变量。const [count, setCount] = useState(0);return (<div><p>You clicked {count} times</p><button onClick={() => setCount(count + 1)}>Click me</button></div>);}
useEffect
# apiuseEffect(() => {// do sthreturn (() => {}); // 通过return一个函数指定如何清除副作用}, [dependencies]); # 配置项用于改变effect执行的时机dependencies:1.为空:效果不依赖任何东西,并且在第一个渲染之后仅运行一次2.有值数组:效果将被限制为仅在这些依赖项(useState里的变量)更改时才运行;3.省略,则效果将在每次render后运行;
什么是副作用?
=> 在 React 组件中执行数据获取、订阅或者手动修改过 DOM
useEffect是Effect Hook中的一种,给函数组件增加了操作副作用的能力。
对应:componentDidMount, componentDidUpdate, componentWillUnmount,相当于合并成了一个 API。
用途:执行数据获取、订阅或者修改DOM这些有副作用的操作。
如,下面这个组件在 React 更新 DOM 后会设置一个页面标题:
调用
useEffect就是在告诉 React 在完成对 DOM 的更改后运行你的“副作用”函数 补充:React 会在上一轮的render完成后(且浏览器绘制后),新的render执行前调用useEffect,执行effect —— 包括第一次渲染和每次更新
是不是相当于 vue的nextTick 插入到了当前eventloop的dom修改后(还是有点不一样,nextTick是绘制前但dom改变后)
# demoimport React, { useState, useEffect } from 'react';function Example() {const [count, setCount] = useState(0);# useEffect 相当于 componentDidMount 和 componentDidUpdate:useEffect(() => {// 使用浏览器的 API 更新页面标题document.title = `You clicked ${count} times`;});return (<div><p>You clicked {count} times</p><button onClick={() => setCount(count + 1)}>Click me</button></div>);}
这么一想,好像以前使用function组件的时候,只是木偶组件,如果有对用户操作做反应的handleCilck也只是做了一个调用props.click的方法。
如果用了hook,就可以在木偶组件里使用state和方法了,当然这只是浅显理解
由于副作用函数是在组件内声明的,所以它们可以访问到组件的 props 和 state;
默认情况下,React 会在每次渲染后调用副作用函数 —— 包括第一次渲染的时候(这么一看不就更像vue的nexttick了吗。。)
当副作用是一个监听器的时候,我们怎么手动清除副作用呢
==> 返回一个函数指定如何清除
useEffect(() => {// 订阅变化ChatAPI.subscribeToFriendStatus(props.friend.id, handleStatusChange);// React 会在组件销毁时取消对 ChatAPI 的订阅,然后在后续渲染时重新执行副作用函数return () => {ChatAPI.unsubscribeFromFriendStatus(props.friend.id, handleStatusChange);};});
使用hook的useEffect,是不是相当于不用纠结到底是在哪个生命周期里去写那些改变state的副作用函数了?
直接useEffect即可。
无需清除的副作用:
只想在 React 更新 DOM 之后运行一些额外的代码。比如发送网络请求,手动变更 DOM,记录日志
需要清除的:及时清除的重要性体现在 防止引起内存泄露
订阅外部数据源。
effect 的清除阶段在每次重新渲染时都会执行,而不是只在卸载组件的时候执行一次
==> 这个设计可以帮助我们创建 bug 更少的组件。
effect 中获取的 state 的值永远是最新的:
React会保存useEffect中的传参函数effect,当调用 useEffect 时,就是在告诉 React 在完成对 DOM 的更改,执行 DOM 更新后运行那个“副作用”函数effect。所以,在 effect 中获取的 state 的值永远是最新的(当前dom上显示的),而不用担心其过期的原因。每次我们重新渲染,也会生成新的 effect,替换掉之前的。
好处:
与 componentDidMount、componentDidUpdate 不同,使用 useEffect 调度的 effect 不会阻塞浏览器更新,这让你的应用看起来响应更快。
大多数情况下,effect 不需要同步地执行。在个别情况下(例如测量布局),可以用useLayoutEffect Hook,其 API 与 useEffect 相同。
useContext
useContext 让你不使用组件嵌套就可以订阅 React 的 Context。
使用规则限制
Hook 就是 JavaScript 函数,使用限制:
- 只能在函数最外层调用 Hook。不要在循环、条件判断或者子函数中调用。
react是依靠hook调用顺序来区分各个state的,所以不能产生不稳定的条件分支导致调用顺序不可控
如果我们想要有条件地执行一个 effect,可以将判断放到 Hook 的内部
- 只能在 React 的函数组件中调用 Hook。不要在其他 JavaScript 函数中调用。
- 自定义HOOK里调用
使用hook重构应用
文章链接:[译]React Hooks 实践:如何使用Hooks重构你的应用
没有state或生命周期的组件转换
就将函数代替class即可,this被取代,通过函数作用域来访问变量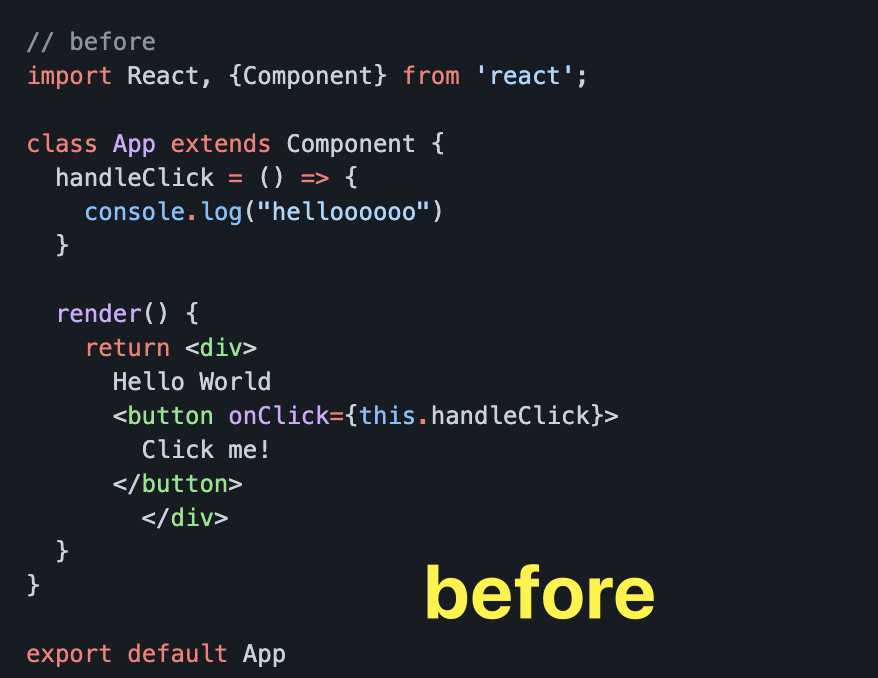
带有props并有默认值
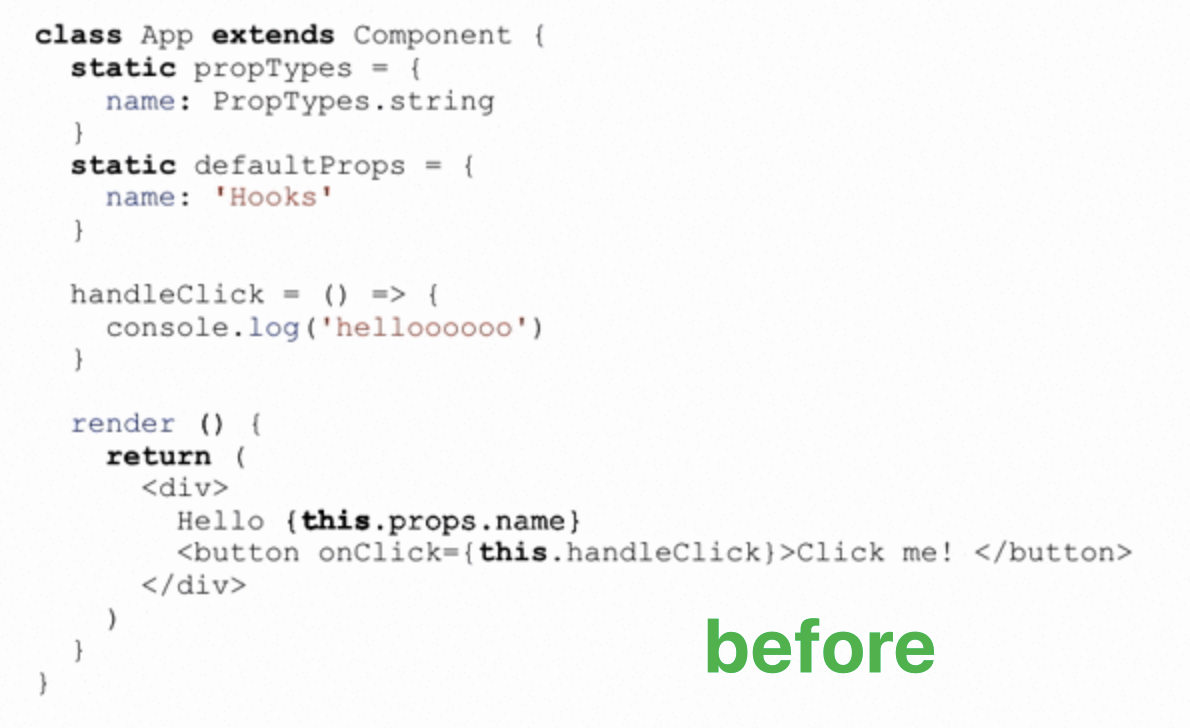
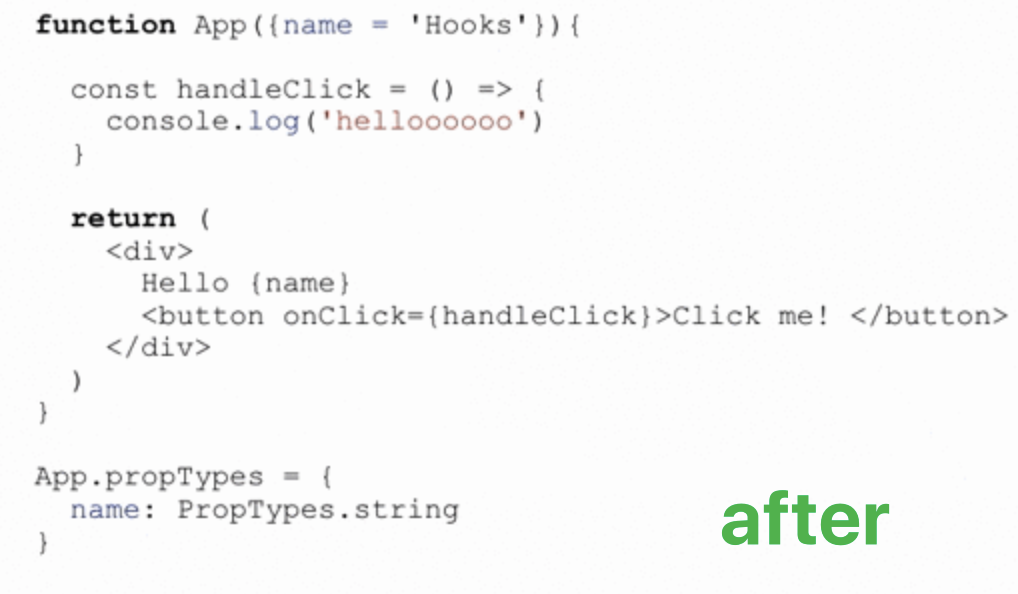
带有state
使用hook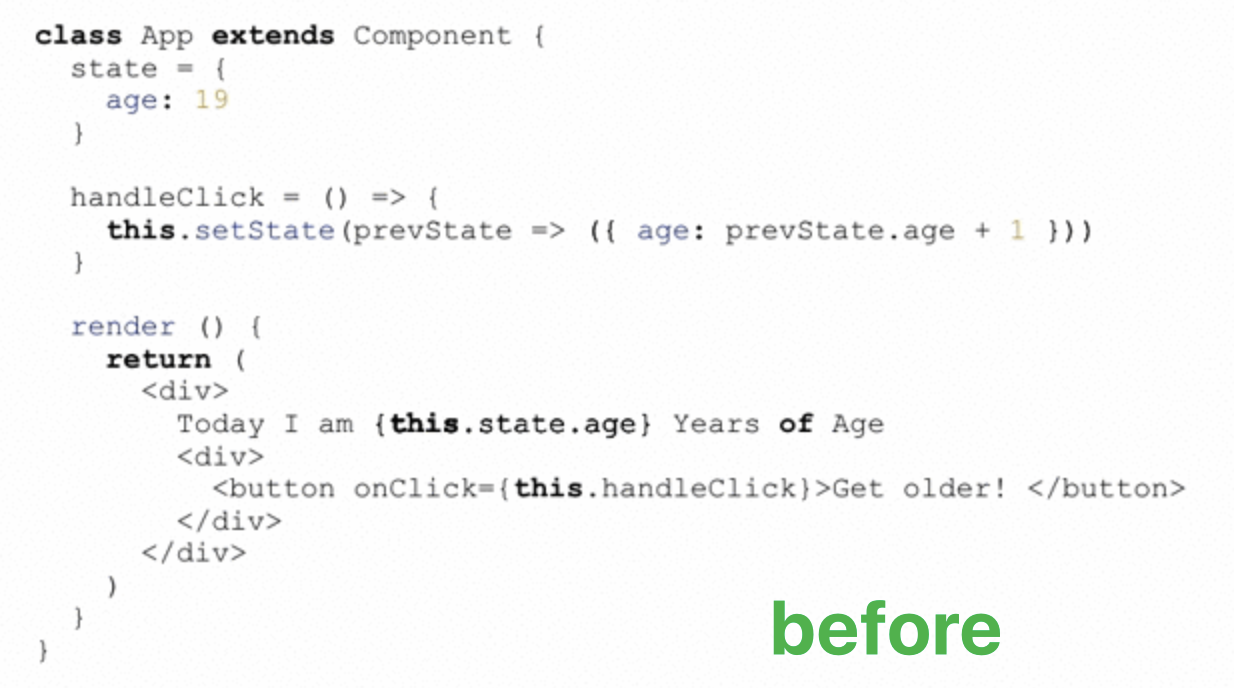
更多例子这里
好的实践
使用对象聚合useState
# badconst [searchKey,setSearchKey] = useState('');const [current,setCurrent] = useState(1)const [pageSize,setPageSize] = useState(10)# goodconst [searchParams,setSearchParams] = useState({searchKey: '',current:1,pageSize:10})
TS学习
快速入门文档:1.2W字 | 了不起的 TypeScript 入门教程
类型
# 数组 Arraylet list: number[] = [1, 2, 3];// ES5:var list = [1,2,3];let list: Array<number> = [1, 2, 3]; // Array<number>泛型语法// ES5:var list = [1,2,3];# 数组里有多种类型的 如[1, 'hello world', 22]# Tuple元组let tupleTypeTest: [string, boolean];tupleTypeTest = ["Semlinker", true];# 常量枚举enumenum Direction {NORTH = "NORTH",SOUTH = "SOUTH",EAST = "EAST",WEST = "WEST",}# void类型值只能为 undefined 或 null:用于函数没有返回值 就表示 return void类型function warnUser(): void {console.log("This is my warning message");}
any、unknown类型是兜底类型
尖括号orAs语法-断言
通过类型断言这种方式可以告诉编译器,“相信我,我知道自己在干什么”。类型断言好比其他语言里的类型转换,但是不进行特殊的数据检查和解构
let someValue: any = "this is a string";let strLength: number = (<string>someValue).length;orlet strLength: number = (someValue as string).length;
函数
# 参数类型及返回类型function createUserId(name: string, id: number): string {return name + id;}# 可选及默认参数function createUserId(name: string = "Semlinker",id: number,age?: number #可选): string {return name + id;}
类与接口
interface
**
interface Person {name: string;age: number;}let Semlinker: Person = {name: "Semlinker",age: 33,};
静态属性与方法:(相当于直接挂在类上,成员方法是挂在原型上的)
class Greeter {// 静态属性static cname: string = "Greeter";// 成员属性greeting: string;// 构造函数 - 执行初始化操作constructor(message: string) {this.greeting = message;}// 静态方法static getClassName() {return "Class name is Greeter";}// 成员方法greet() {return "Hello, " + this.greeting;}}let greeter = new Greeter("world");
私有变量
let passcode = "Hello TypeScript";class Employee {private _fullName: string;get fullName(): string {return this._fullName;}set fullName(newName: string) {if (passcode && passcode == "Hello TypeScript") {this._fullName = newName;} else {console.log("Error: Unauthorized update of employee!");}}}let employee = new Employee();employee.fullName = "Semlinker";if (employee.fullName) {console.log(employee.fullName);}
泛型
设计泛型的关键目的是在成员之间提供有意义的约束,这些成员可以是:类的实例成员、类的方法、函数参数和函数返回值。 泛型(Generics)是允许同一个函数接受不同类型参数的一种模板。相比于使用 any 类型,使用泛型来创建可复用的组件要更好,因为泛型会保留参数类型。
- T(Type):表示一个 TypeScript 类型
- K(Key):表示对象中的键类型
- V(Value):表示对象中的值类型
- E(Element):表示元素类型
class GenericNumber<T> {zeroValue: T;add: (x: T, y: T) => T;}#通过 extends 关键字添加泛型约束interface ILengthwise {length: number;}function loggingIdentity<T extends ILengthwise>(arg: T): T {console.log(arg.length);return arg;}#Partial<T> 的作用就是将某个类型里的属性全部变为可选项 ?。type Partial<T> = {[P in keyof T]?: T[P];};通过 keyof T 拿到 T 的所有属性名,然后使用 in 进行遍历,将值赋给 P,最后通过 T[P] 取得相应的属性值。中间的 ? 号,用于将所有属性变为可选interface Todo {title: string;description: string;}const todo1 = {title: "organize desk",description: "clear clutter",};function updateTodo(todo: Todo, fieldsToUpdate: Partial<Todo>) {return { ...todo, ...fieldsToUpdate };}const todo2 = updateTodo(todo1, {description: "throw out trash",});# todo2 是基于todo1,但是属性都是可选的了=>{title?: string | undefined;description?: string | undefined;}
装饰器
好的demo
不推荐函数参数超过3个
# badfunction getList(searchName:string,pageNum:number,pageSize:number,key1:string,key2:string){...}# good: 超过3个 使用对象来聚合。interface ISearchParams{searchName:string;pageNum:number;pageSize:number;key1:string;key2:string;}function getList(params:ISearchParams){}

若有收获,就点个赞吧
0 人点赞
