简介
SVG 是 Scalable Vector Graphics 的缩写,意为可缩放矢量图形。
概念
- SVG 是 Scalable Vector Graphics 的缩写 意为可缩放矢量图形
- SVG 是一个基于文本的开放网络标准,用来定义用于网络的矢量图形
- SVG 图像在放大或改变尺寸的情况下其图形质量不会有所损失,因此能够优雅而简洁地渲染不同大小的图形,并和 CSS,DOM,JavaScript 和 SMIL 等其他网络标准无缝衔接
- SVG 使用 XML 格式定义图形
- SVG 是万维网联盟的标准与诸如 DOM 和 XSL 之类的 W3C 标准是一个整体
优势
相对于其他格式的图像,SVG 的优势有很多:
- SVG 与 JPEG 和 GIF 图像比起来,尺寸更小,且可压缩性更强。
- SVG 图像中的文本是可选的,同时也是可搜索的,且可以与 JavaScript 技术一起运行
- SVG 可在图像质量不下降的情况下被放大和缩小
- SVG 可被非常多的工具读取和修改(比如文本编辑器)
- SVG 图像不依赖分辨率,可在任何的分辨率下被高质量地打印
- SVG 文件是纯粹的 XML
- SVG 是开放的标准
缺点
- SVG 复杂度越高渲染速度就会越慢(任何过度使用 DOM 的应用都不快)
- SVG 不适合游戏应用,只能结合 Canvas 来实现
- SVG 不能动态的修改动画内容
PS: 需要注意的是因为 XML 和 HTML 不同,XML 是区分大小写的,而 SVG 是使用 XML 格式来定义图形,所以在编写 SVG 的的时候元素和属性必须按标准格式书写。
语法
SVG 的语法如下:
<svg><circle cx="100" cy="100" r="50"/></svg>
如上面的语法所示,SVG 的绘制其实就是一个 SVG 标签,然后在标签内绘制你要绘制的内容,比如上面的语法是在 SVG 标签中绘制了一个圆形 (cx、cy 为圆的坐标,r 为圆的半径)。
代码如下:
<!DOCTYPE html><html lang="en"><head><meta charset="UTF-8"><meta http-equiv="X-UA-Compatible" content="IE=edge"><meta name="viewport" content="width=device-width, initial-scale=1.0"><title>SVG - 语法</title></head><body><svg><circle cx="100" cy="100" r="50"/></svg></body></html>
属性
SVG 的属性有哪些?
width、height
width、height 设置用来设置 SVG 的宽高。
举个例子看一下:设置 SVG 的宽高为 300 * 300
<!DOCTYPE html><html lang="en"><head><meta charset="UTF-8"><meta http-equiv="X-UA-Compatible" content="IE=edge"><meta name="viewport" content="width=device-width, initial-scale=1.0"><title>SVG - 属性</title></head><body><svg width="300" height="300"><circle cx="100" cy="100" r="100"/></svg></body></html>
注意:在不设置宽高的情况下,默认为 300 150,当内部元素大于 300 150 时,大于部分会被隐藏。
举个例子看一下:在坐标为(100, 100)的地方绘制一个半径为 100 的圆
<!DOCTYPE html><html lang="en"><head><meta charset="UTF-8"><meta http-equiv="X-UA-Compatible" content="IE=edge"><meta name="viewport" content="width=device-width, initial-scale=1.0"><title>SVG - 属性</title></head><body><svg><circle cx="100" cy="100" r="100"/></svg></body></html>
viewBox
viewBox 属性定义了 SVG 中可以显示的区域。
语法:viewBox="x y w h" x、y 为起始点,w、h 为显示区域的宽高。
看字面意思,我觉得你肯定是会理解错的,举个例子看一下:
下面我们将在一个尺寸为 300 * 300 的 SVG 中绘制一个坐标为(100, 100)半径为 100 的圆,同时我们加上 viewBox 属性为 “0 0 100 100”
<!DOCTYPE html><html lang="en"><head><meta charset="UTF-8"><meta http-equiv="X-UA-Compatible" content="IE=edge"><meta name="viewport" content="width=device-width, initial-scale=1.0"><title>SVG - 属性</title></head><body><svg width="300" height="300" viewBox="0 0 100 100"><circle cx="100" cy="100" r="100"/></svg></body></html>
效果如下:
如图 SVG 里面的圆只显示了一部份,原因是 viewBox 定义了一个:从(0, 0)点开始,宽高为 100 100 的显示区域。而这个 100 100 的显示区域会放到 300 * 300(svg 宽高) 的 SVG 中去显示,整体就放大了 3 倍。
version
version 属性用于指明 SVG 的版本,也就是指明 SVG 文档应该遵循的规范。version 属性纯粹就是一个说明,对渲染或处理没有任何影响。且目前只有 1.0 和 1.1 这两个版本。
示例:
<svg version="1.1">// ...</svg>
下面是来自维基百科的一些版本信息:
版本 1.x
- SVG 1.0 于 2001 年 9 月 4 日成为 W3C 推荐标准。
- SVG 1.1 于 2003 年 1 月 14 日成为 W3C 推荐标准。SVG 1.1 规范是模块化的,以便允许将子集定义为配置文件。除此之外,SVG 1.1 和 SVG 1.0 之间几乎没有区别。
- SVG Tiny 和 SVG Basic(移动 SVG 配置文件)于 2003 年 1 月 14 日成为 W3C 推荐标准。这些被描述为 SVG 1.1 的配置文件。
- SVG Tiny 1.2 于 2008 年 12 月 22 日成为 W3C 推荐标准。它最初是作为计划中的 SVG Full 1.2 的配置文件(后来被 SVG 2 放弃),但后来被重构为独立规范。它通常得不到很好的支持。
- SVG 1.1 第二版,包括所有勘误表和说明,但在 2011 年 8 月 16 日发布的原始 SVG 1.1 没有新功能。
- SVG Tiny 1.2 Portable/Secure,SVG Tiny 1.2 配置文件的更安全子集,于 2020 年 7 月 29 日作为 IETF 草案标准引入。也称为 SVG Tiny P/S。SVG Tiny 1.2 Portable/Secure 是 BIMI 草案标准的要求。
版本 2
SVG 2 删除或弃用了 SVG 1.1 的一些特性,并结合了 HTML5 和 Web 开放字体格式的新特性:
- 例如,SVG 2 删除了几个字体元素,例如 glyph 和 altGlyph(由 WOFF 字体格式替换)。
- 不推荐使用该 xml:space 属性以支持 CSS。
- 添加了 HTML5 功能,例如 translate 和 data-*属性。
- SVG Tiny 1.2 中的文本处理功能被注释为包含在内,但尚未在文本中正式化。其他一些 1.2 特性是精选的。但 SVG 2 通常不是 SVG tiny 1.2 的超集。
- SVG 2 于 2016 年 9 月 15 日进入候选推荐阶段,修订版于 2018 年 8 月 7 日和 2018 年 10 月 4 日发布。 最新草案于 2022 年 3 月 21 日发布。
xmlns 和 xmlns:xlink
上面我们说过 SVG 使用 XML 格式定义图形,SVG 文件是纯粹的 XML 文件。
在 XML 中,标签和属性属于命名空间,这是为了防止来自不同技术的标签和属性发生冲突。例如在 SVG 中存在 a 标签,在 HTML 中也存在 a 标签,那么怎么区分这个 a 标签属于哪一种技术,这就需要使用命名空间了。 加入命名空间以后我们就能知道哪一个是 svg:a,哪一个又是 html:a,这样我们就可以区分出不同的标签和属性。
xmlns 用于声明命名空间(namespace),在此声明之下的所有子标签都属于这个空间内。这里看起来是一个 url,但实际上仅仅是一个字符串,这样使用只是惯例。因此很多时候都会被称为”namespace url” 而不是”namespace name”。
当我们在 SVG 中加入 xmlns 时,因为它定义了默认命名空间,因此不需要前缀,我们直接在 SVG 标签中写一个 a 标签,a 标签和 UA 就知道它是 SVG 的 a 标签而不是 HTML 的 a 标签
xmlns:xlink 表示前缀为 xlink 的标签和属性,应该由理解该规范的 UA 使用 xlink 规范 来解释。
注解:UA 是 User Agent 的简称。User Agent 是 Http 协议中的一部分,属于头域的组成部分。通俗地讲 UA 是一种向访问网站提供你所使用的浏览器类型、操作系统、浏览器内核等信息的标识。通过这个标识,用户所访问的网站可以显示不同的排版,从而为用户提供更好的体验或者进行信息统计。
示例:
<svg xmlns="http://www.w3.org/2000/svg" xmlns:xlink="http://www.w3.org/1999/xlink">// ......</svg>
基本图形
基本图形其实就是我们插入到 SVG 标签中的元素,如上面示例中的圆形(circle)。
下面我们将依次介绍几个基本图形。
圆形(circle)
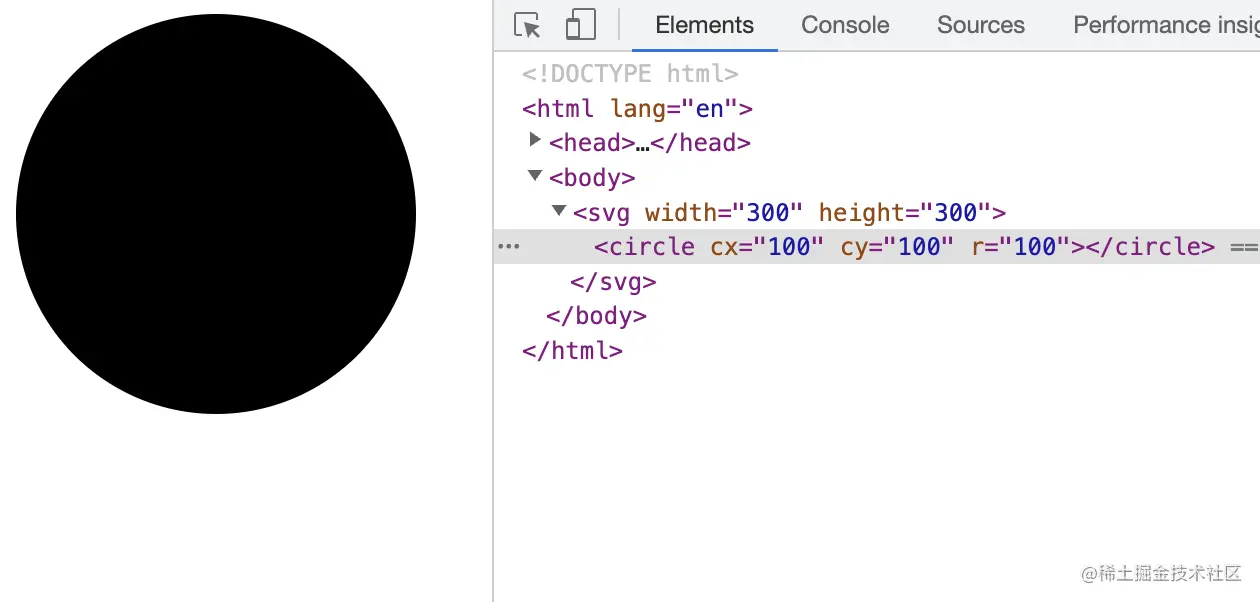
circle 标签能在屏幕上绘制一个圆形
语法:<circle cx="100" cy="100" r="100"/>
属性:cx、cy 为圆的坐标,r 为圆的半径
示例:
<!DOCTYPE html><html lang="en"><head><meta charset="UTF-8"><meta http-equiv="X-UA-Compatible" content="IE=edge"><meta name="viewport" content="width=device-width, initial-scale=1.0"><title>SVG - 基本图形</title></head><body><svg width="300" height="300"><circle cx="100" cy="100" r="100"/></svg></body></html>
效果:
矩形(rect)
rect 标签能在屏幕上绘制一个矩形
语法:<rect x="0" y="0" rx="5" ry="5" width="300" height="200"/>
属性:x、y 为矩形的起始点坐标,rx、ry 为圆角 x、y 轴方向的半径, width、height 为矩形的宽高
示例:
<!DOCTYPE html><html lang="en"><head><meta charset="UTF-8"><meta http-equiv="X-UA-Compatible" content="IE=edge"><meta name="viewport" content="width=device-width, initial-scale=1.0"><title>SVG - 基本图形</title></head><body><svg width="300" height="300"><rect x="0" y="0" rx="5" ry="5" width="300" height="200"/></svg></body></html>
效果:

椭圆(ellipse)
ellipse 标签比 circle 标签功能更强大,ellipse 标签也可以实现圆形的绘制,并且还可以分别缩放圆形的长轴半径和短轴半径,从而达到椭圆的效果。
语法:<ellipse cx="100" cy="100" rx="100" ry="50"/>
属性:cx、cy 为椭圆的坐标,rx 为椭圆的 x 轴半径、ry 为椭圆的 y 轴半径
示例:
<!DOCTYPE html><html lang="en"><head><meta charset="UTF-8"><meta http-equiv="X-UA-Compatible" content="IE=edge"><meta name="viewport" content="width=device-width, initial-scale=1.0"><title>SVG - 基本图形</title></head><body><svg width="300" height="300"><ellipse cx="100" cy="100" rx="100" ry="50"/></svg></body></html>
效果:

线条(line)
line 标签可以根据两点的坐标绘制一条直线
语法:<line x1="10" x2="50" y1="110" y2="150"/>
属性:x1、y1 为起点的坐标,x2、y2 为终点的坐标
示例:
<!DOCTYPE html><html lang="en"><head><meta charset="UTF-8"><meta http-equiv="X-UA-Compatible" content="IE=edge"><meta name="viewport" content="width=device-width, initial-scale=1.0"><title>SVG - 基本图形</title></head><body><svg width="300" height="300"><!-- 不设置样式属性 style 是看不出效果的 --><line x1="50" x2="50" y1="200" y2="50" style="stroke: #000000;"/></svg></body></html>
效果:

折线(polyline)
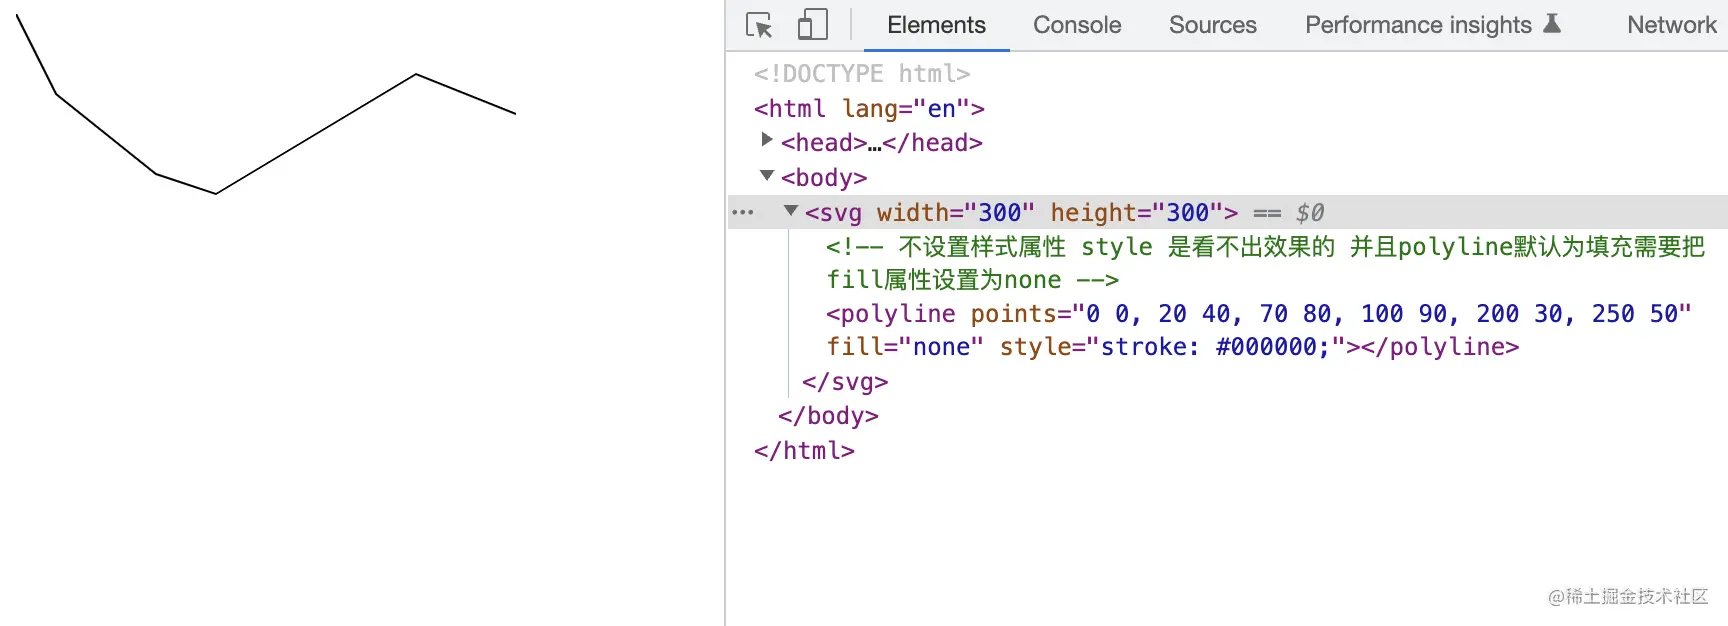
polyline 标签可以把很多个点链接在一起成为一条折线。
语法:<polyline points="0 0, 20 40, 70 80, 100 90, 200 30, 250 50" />
属性:points 为点集数列,其中每个点都必须包含 2 个数字,一个是 x 坐标,一个是 y 坐标。
示例:
<!DOCTYPE html><html lang="en"><head><meta charset="UTF-8"><meta http-equiv="X-UA-Compatible" content="IE=edge"><meta name="viewport" content="width=device-width, initial-scale=1.0"><title>SVG - 基本图形</title></head><body><svg width="300" height="300"><!-- 不设置样式属性style是看不出效果的 并且polyline默认为填充需要把fill属性设置为none --><polyline points="0 0, 20 40, 70 80, 100 90, 200 30, 250 50" fill="none" style="stroke: #000000;" /></svg></body></html>
效果:
多边形(polygon)
polygon 标签和 polyline 标签类似,都是由很多个点链接在一起的。但不同的是 polygon 路径中的最后一个点和第一个点是默认闭合的。
语法:<polygon points="0 0, 20 40, 70 80, 100 90, 200 30, 250 50" />
属性:points 为点集数列,其中每个点都必须包含 2 个数字,一个是 x 坐标,一个是 y 坐标。
示例:和折线(polyline)同样的数据
<!DOCTYPE html><html lang="en"><head><meta charset="UTF-8"><meta http-equiv="X-UA-Compatible" content="IE=edge"><meta name="viewport" content="width=device-width, initial-scale=1.0"><title>SVG - 基本图形</title></head><body><svg width="300" height="300"><!-- 不设置样式属性style是看不出效果的 并且polygon默认为填充需要把fill属性设置为none --><polygon points="0 0, 20 40, 70 80, 100 90, 200 30, 250 50" fill="none" style="stroke: #000000;" /></svg></body></html>
效果:

路径(path)
path 标签是所有图形中最复杂的,但他也是最强大的。在 SVG 中最常用的图形就是 path 标签,他可以绘制圆形、椭圆、矩形、线条、折线、多边形、贝塞尔曲线等。
语法:<path d="M50 50 H 200 V 200 H 50 L 50 50"/>
属性:d 为一个点集数列以及其它绘制路径的信息。
示例:
<!DOCTYPE html><html lang="en"><head><meta charset="UTF-8"><meta http-equiv="X-UA-Compatible" content="IE=edge"><meta name="viewport" content="width=device-width, initial-scale=1.0"><title>SVG - 基本图形</title></head><body><svg width="300" height="300"><path d="M50 50 H 200 V 200 H 50 L 50 50" fill="none" style="stroke: #000000;"/></svg></body></html>
效果:
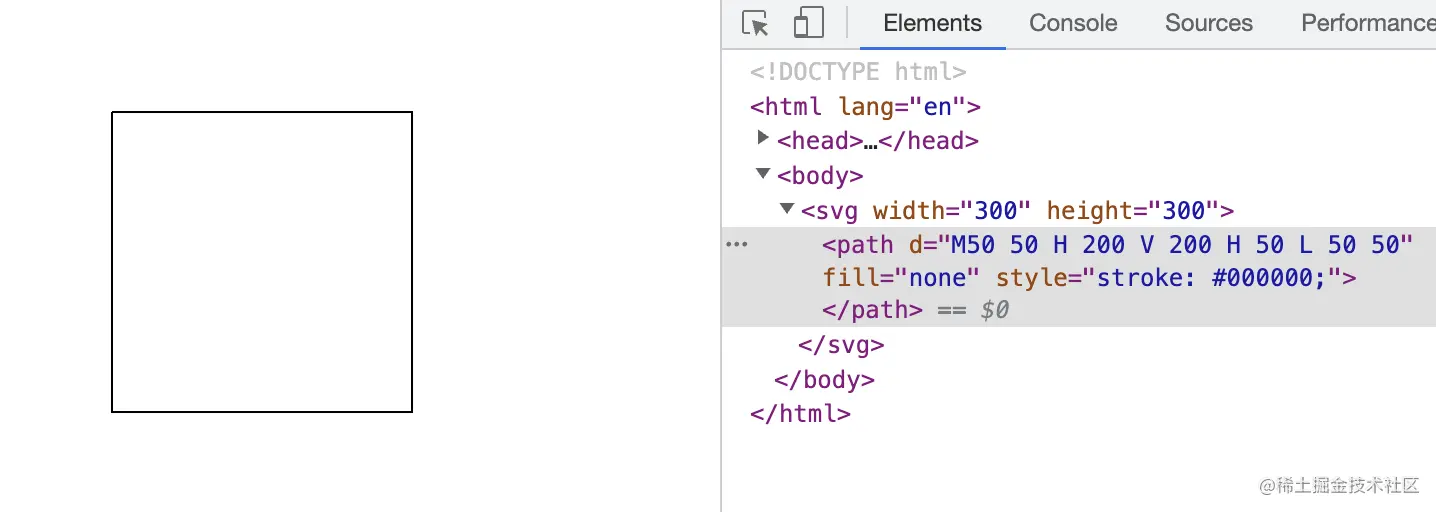
看着上面的例子是不是很懵 X?感觉就是一个简单的正方形但是怎么看都看不懂,什么 M、H、V 和 L,根本不知道是啥。
下面我们着重说一下路径(path),让我们从此能看懂 SVG。
路径(path)
上面对路径(path)的举例其实已经是一个很简单的例子了,但是呢我们还是发现我们看不懂,下面我们就看看路径(path)里的这个属性 d 究竟是什么玩意。
命令
path 标签的图形形状是通过属性 d 来定义的,属性 d 的值是以:命令 + 参数 的形式进行组合的,命令又是通过关键字来表示的。
那么究竟有哪些命令呢?我总结了一下概括为以下 10 个命令:
- M = Move to
- L = Line to
- H = Horizontal Line to
- V = Vertical Line to
- Q = Quadratic Bezier Curve to
- T = Smooth Quadratic Bezier Curve to
- C = Curve to
- S = Smooth Curve to
- A = Elliptical Arc
- Z = close path
下面我们将命令分为直线命令和曲线命令划分开,依次讲解其含义。
直线命令
直线命令的意思就是通过两个点画他们之间的直线。
注意:以下所有命令中 大写为绝对定位 小写为相对定位,后续的命令亦如此
M(Move to)
M 命令其实就是把画笔移动到某个点,就好像画笔提起来以后移动到一个新的位置准备开始绘制。但因为仅仅是移动画笔而没有绘制,所以 M 命令经常出现在路径的起始点,用来指明画笔应该从何处开始绘制。
每一段路径都必须以 M 命令开头,如果有多个 M 命令则表示新路径的开始。
语法:M x y 或者 m x y
参数:x、y 为坐标
因为 M 命令只是移动画笔而不画线,所以就先不给出示例,咱们结合下一个命令一起给示例。
L(Line to)
L 命令会绘制一点并且和之前的点(也就是 L 命令前面的点)连成一条直线。
语法:L x y 或者 l x y
参数:x、y 为坐标
示例:
<!DOCTYPE html><html lang="en"><head><meta charset="UTF-8"><meta http-equiv="X-UA-Compatible" content="IE=edge"><meta name="viewport" content="width=device-width, initial-scale=1.0"><title>SVG - path</title></head><body><svg width="300" height="300"><!-- 从起始点(50, 20)画一条到(250, 20)的直线 --><path d="M50 20 L250 20" style="stroke: #000000;"/><!-- 从起始点(50, 50)画一条到(250, 50)的直线 和 从起始点(50, 100)画一条到(250, 100)的直线 --><!-- M命令为多个时,后面的M命令为先线段的起始点 --><path d="M50 50 L250 50 M50 100 L250 100" style="stroke: #ff0000;"/><!-- 从起始点(50, 150)画一条到(250, 150)的直线 --><!-- M命令后面连续跟着多个坐标点,除了第一个坐标点,后面的全部默认为隐式的L命令 --><path d="M50 150 250 150" style="stroke: #00ff00;"/><!-- 从起始点(50, 200)画一条到(250, 200)又到(250,250)的折线 --><!-- 多个L命令连续可以省略后面的L命令 --><path d="M50 200 L250 200 250 250 " fill="none" style="stroke: #0000ff;"/></svg></body></html>
效果:

是不是觉得瞬间就明白了还觉得挺有意思?咱们继续看更有意思的。
H(Horizontal Line to)
H 命令可以从之前的点绘制一条水平的直线,H 命令可以等价于 y 值和之前点相同的 L 命令
语法:H x 或者 h x
参数:x 为 X 轴坐标
示例:
<!DOCTYPE html><html lang="en"><head><meta charset="UTF-8"><meta http-equiv="X-UA-Compatible" content="IE=edge"><meta name="viewport" content="width=device-width, initial-scale=1.0"><title>SVG - path</title></head><body><svg width="300" height="300"><!-- 从起始点(50, 20)画一条X轴为250的水平直线 --><path d="M50 20 H250" style="stroke: #000000;"/></svg></body></html>
效果为:

V(Vertical Line to)
V 命令可以从之前的点绘制一条垂直的直线,V 命令可以等价于 x 值和之前点相同的 L 命令
语法:V y 或者 v y
参数:y 为 Y 轴坐标
示例:
<!DOCTYPE html><html lang="en"><head><meta charset="UTF-8"><meta http-equiv="X-UA-Compatible" content="IE=edge"><meta name="viewport" content="width=device-width, initial-scale=1.0"><title>SVG - path</title></head><body><svg width="300" height="300"><!-- 从起始点(50, 20)画一条Y轴为250的垂直直线 --><path d="M50 20 V250" style="stroke: #000000;"/></svg></body></html>
效果:

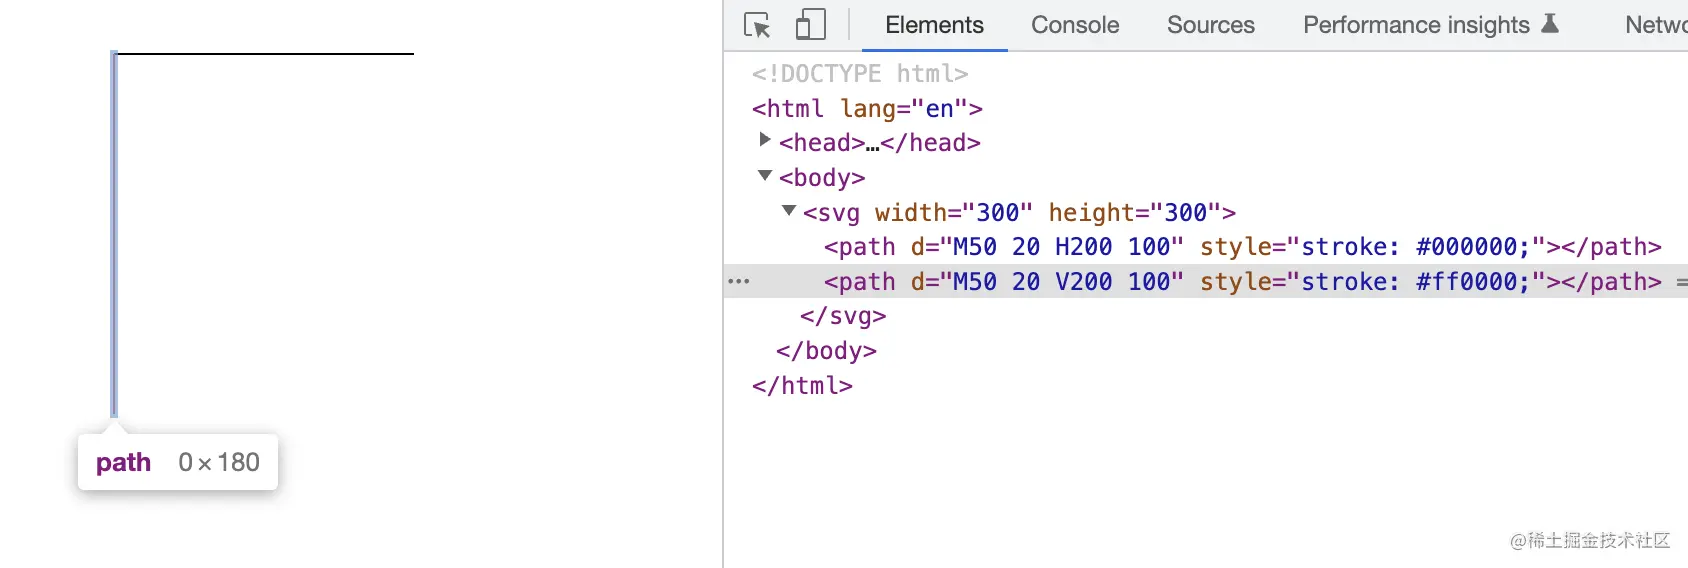
PS:注意连续的 H 命令和 V 命令取大值
示例:
<!DOCTYPE html><html lang="en"><head><meta charset="UTF-8"><meta http-equiv="X-UA-Compatible" content="IE=edge"><meta name="viewport" content="width=device-width, initial-scale=1.0"><title>SVG - path</title></head><body><svg width="300" height="300"><path d="M50 20 H200 100" style="stroke: #000000;"/><path d="M50 20 V200 100" style="stroke: #ff0000;"/></svg></body></html>
效果:
Z(Close path)
Z 命令是一个闭合命令,他会从当前点画一条直线到路径的起始点。
Z 命令因为没有参数所以 Z 和 z 效果一样,所以不区分大小写,
语法:Z 或者 z
参数:无
示例:
<!DOCTYPE html><html lang="en"><head><meta charset="UTF-8"><meta http-equiv="X-UA-Compatible" content="IE=edge"><meta name="viewport" content="width=device-width, initial-scale=1.0"><title>SVG - path</title></head><body><svg width="300" height="300"><path d="M50 20 H200 V200 Z" fill="none" style="stroke: #000000;"/></svg></body></html>
效果:

曲线命令
曲线命令顾名思义就是绘制平滑的曲线
Q(Quadratic Bezier Curve to)
Q 命令可以用来绘制一条二次贝塞尔曲线,二次贝塞尔曲线需要一个控制点,用来确定起点和终点的曲线斜率。
语法:Q x1 y1, x y 或者 q x1 y1, x y
参数:x、y 为终点位置,x1、y1 为控制点。
咦~ 有没有到发现,参数中只有终点没有起点?其实起点就是 M 命令
示例:
<!DOCTYPE html><html lang="en"><head><meta charset="UTF-8"><meta http-equiv="X-UA-Compatible" content="IE=edge"><meta name="viewport" content="width=device-width, initial-scale=1.0"><title>SVG - path</title></head><body><svg width="300px" height="300px"><path d="M50 100 Q 175 200 300 100" fill="none" style="stroke: #ff0000;"/></svg></body></html>
效果:

T(Smooth Quadratic Bezier Curve to)
T 命令时一个延长二次贝塞尔曲线的简化命令,T 命令可以通过前一个控制点推断出后一个控制点,这也就是为什么 T 命令只需要一个坐标的原因。
需要注意的是 T 命令的的前面必须有一个 Q 命令或者其他的 T 命令。如果 T 命令单独使用,那么控制点就会被认为和终点是同一个点,所以画出来的将是一条直线
语法:T x y 或者 t x y
参数:x、y 为终点位置。
示例:
<!DOCTYPE html><html lang="en"><head><meta charset="UTF-8"><meta http-equiv="X-UA-Compatible" content="IE=edge"><meta name="viewport" content="width=device-width, initial-scale=1.0"><title>SVG - path</title></head><body><svg width="600px" height="300px"><path d="M50 100 Q 175 200 300 100 T 600 100 " fill="none" style="stroke: #ff0000;"/></svg></body></html>
效果:

C(Curve to)
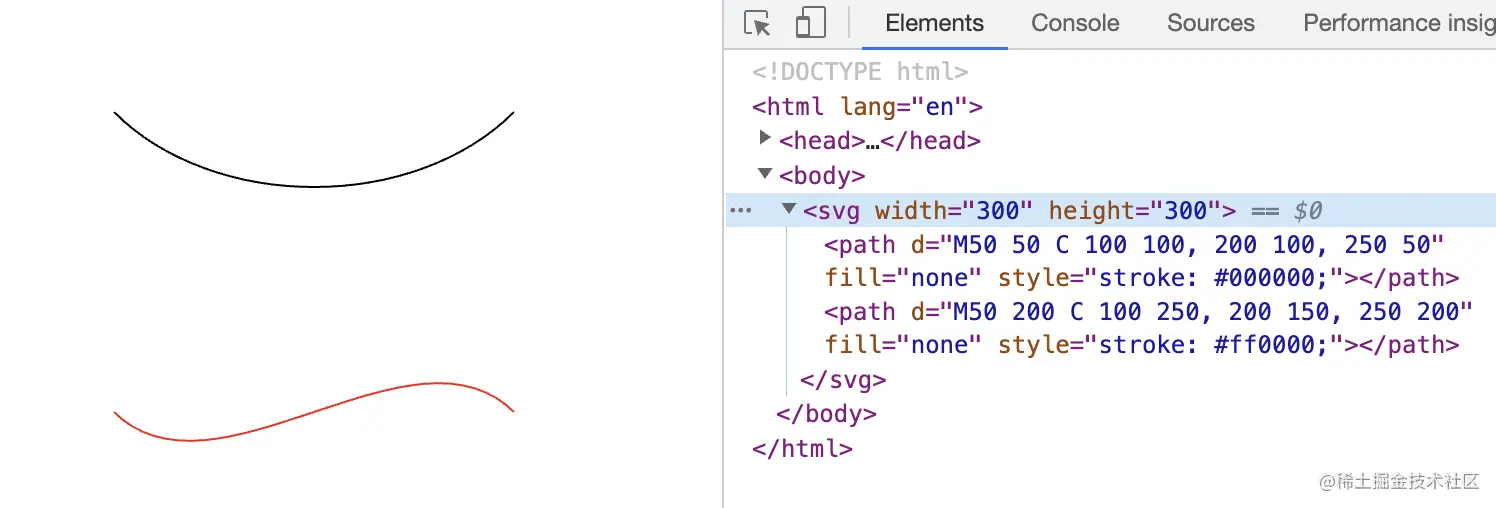
C 命令可用来绘制一条三次贝塞尔曲线,相对于二次贝塞尔曲线多了一个控制点。
语法:C x1 y1, x2 y2, x y 或者 c x1 y1, x2 y2, x y
参数:x、y 为终点位置,x1、y1 为曲线起始点的控制点,x2、y2 为曲线终止的控制点。
示例:
<!DOCTYPE html><html lang="en"><head><meta charset="UTF-8"><meta http-equiv="X-UA-Compatible" content="IE=edge"><meta name="viewport" content="width=device-width, initial-scale=1.0"><title>SVG - path</title></head><body><svg width="300" height="300"><path d="M50 50 C 100 100, 200 100, 250 50" fill="none" style="stroke: #000000;"/><path d="M50 200 C 100 250, 200 150, 250 200" fill="none" style="stroke: #ff0000;"/></svg></body></html>
效果:
S(Smooth Curve to)
三次贝塞尔曲线的 S 命令和二次贝塞尔曲线的 T 命令比较相似。S 命令也可以用来创建与前面一样的贝塞尔曲线,但如果 S 命令跟在一个 C 命令或者另一个 S 命令的后面,那么它的第一个控制点,就会被假设成前一个控制点的对称点。
如果 S 命令单独使用,前面没有 C 命令或者另一个 S 命令,那么它的两个控制点就会被假设为同一个点。
语法:S x2 y2, x y 或者 s x2 y2, x y
参数:x、y 为终点位置,x2、y2 为曲线终止的控制点。
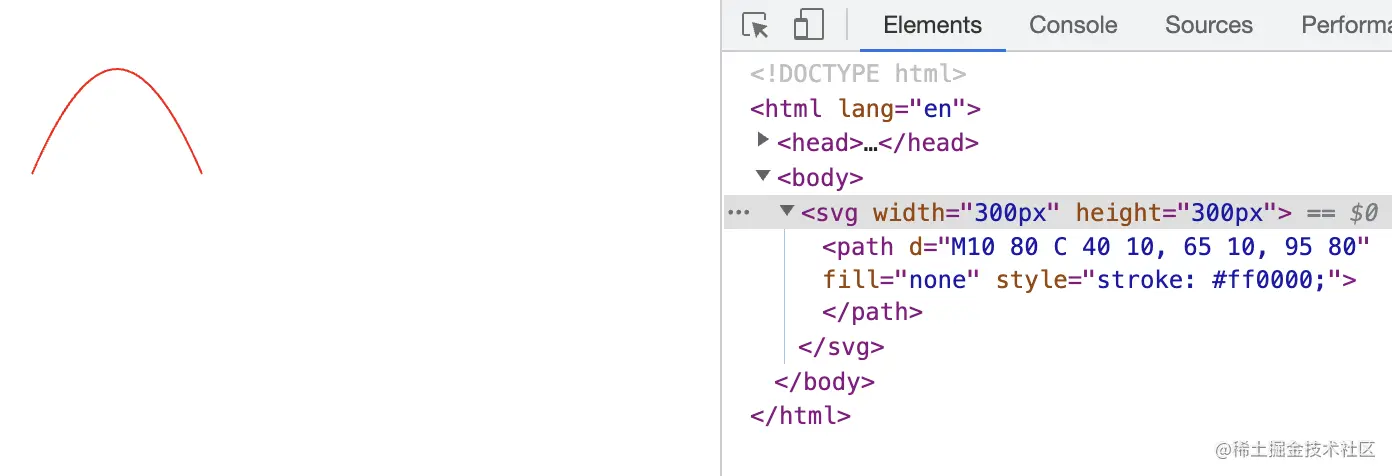
示例: 首先先画一段曲线
<!DOCTYPE html><html lang="en"><head><meta charset="UTF-8"><meta http-equiv="X-UA-Compatible" content="IE=edge"><meta name="viewport" content="width=device-width, initial-scale=1.0"><title>SVG - path</title></head><body><svg width="300px" height="300px"><path d="M10 100 C 40 10, 65 10, 95 100" fill="none" style="stroke: #ff0000;"/></svg></body></html>
效果如下:
然后我们再加一段 S 命令看看
<!DOCTYPE html><html lang="en"><head><meta charset="UTF-8"><meta http-equiv="X-UA-Compatible" content="IE=edge"><meta name="viewport" content="width=device-width, initial-scale=1.0"><title>SVG - path</title></head><body><svg width="300px" height="300px"><path d="M10 80 C 40 10, 65 10, 95 80 S 150 150, 180 80" fill="none" style="stroke: #ff0000;"/></svg></body></html>
效果为:

三次贝塞尔曲线相对于二次贝塞尔曲线拥有更大的自由度,但两种曲线能达到的效果是差不多的。最终选择使用哪种贝塞尔曲线,通常取决于需求,以及对曲线对称性的依赖程度。
A(Elliptical Arc)
A 命令用于画弧形,它可以截取圆或椭圆的弧形成的曲线
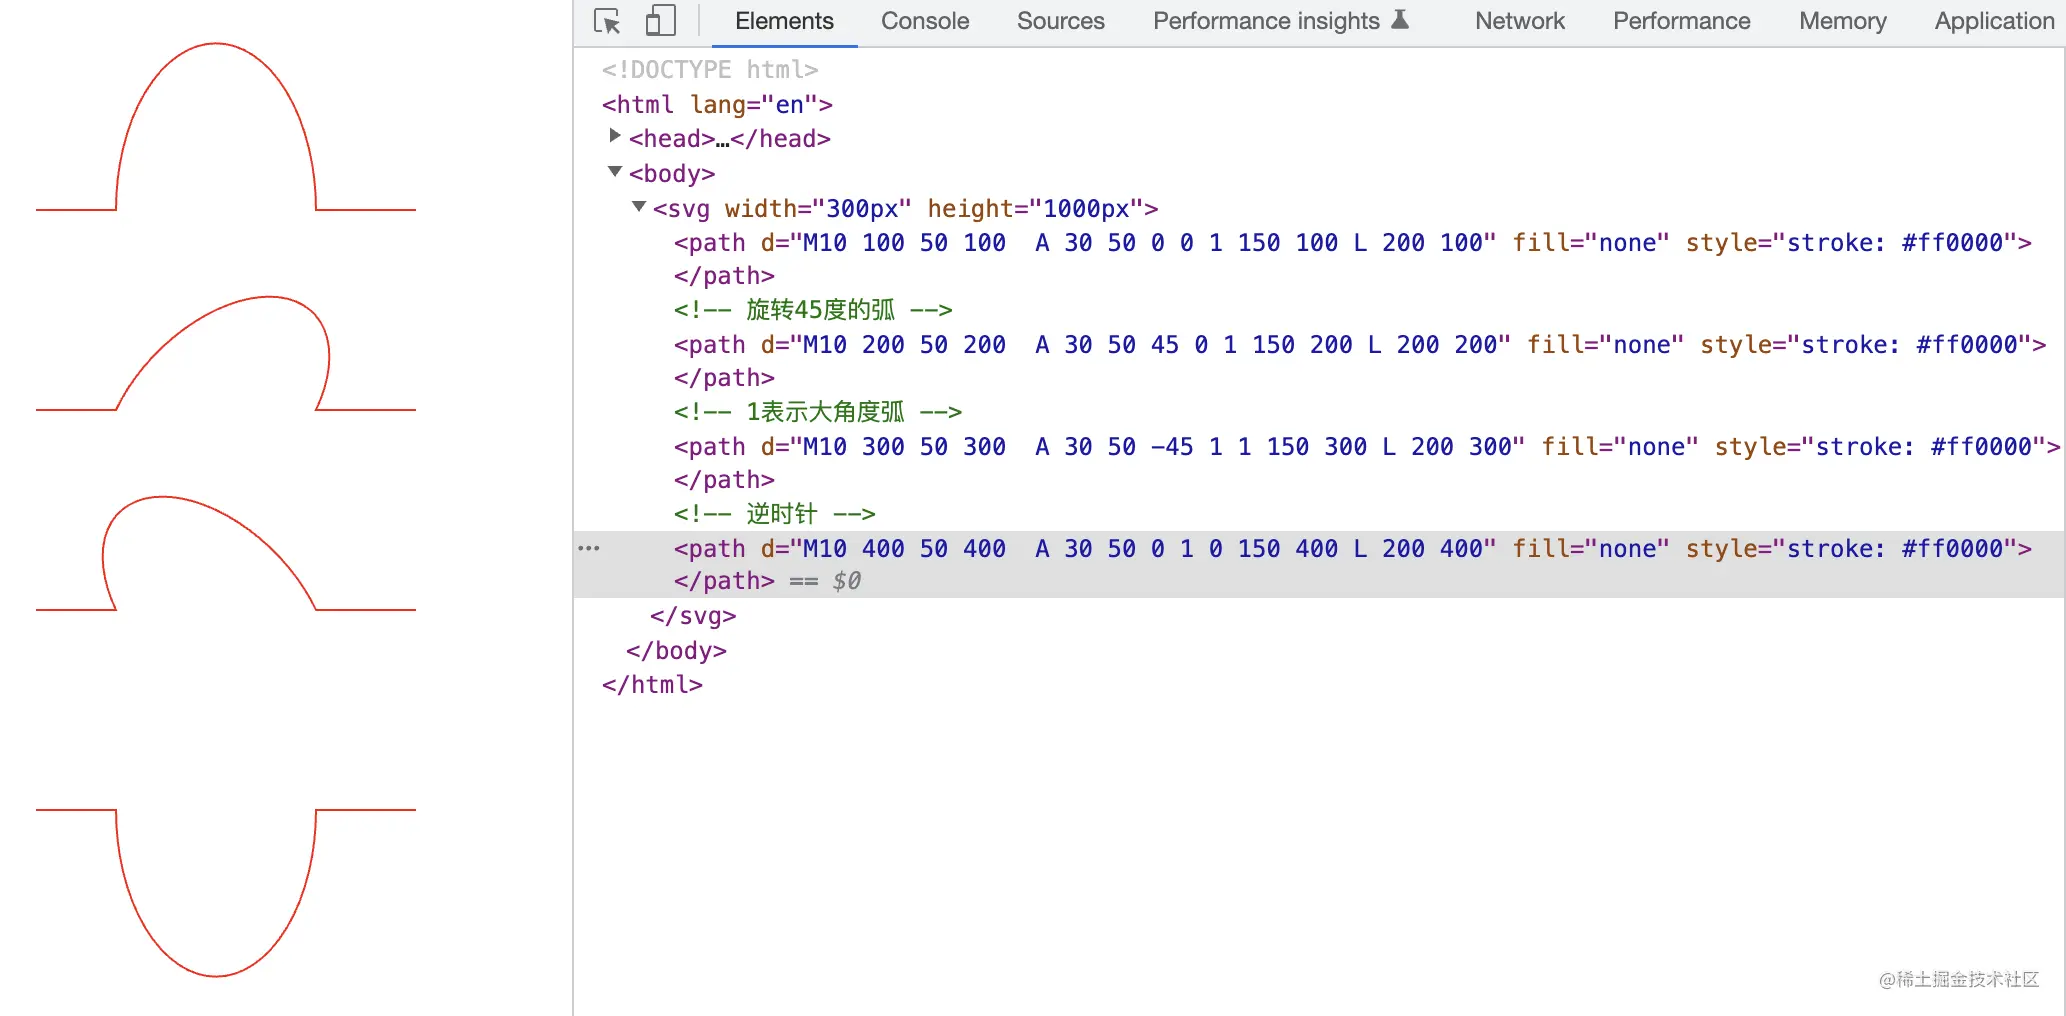
语法: A rx ry x-axis-rotation large-arc-flag sweep-flag x y 或者 a rx ry x-axis-rotation large-arc-flag sweep-flag x y
参数:
- rx、ry 分别为 X 轴的半径和 Y 轴的半径
- x-axis-rotation 为弧度在 X 轴的旋转角度
- large-arc-flag 决定弧线是大于还是小于 180 度,0 表示小角度弧,1 表示大角度弧
- sweep-flag 为弧的方向,0 表示从起点到终点沿逆时针画弧,1 表示从起点到终点沿顺时针画弧
- x、y 为弧形的终点
示例:
<!DOCTYPE html><html lang="en"><head><meta charset="UTF-8"><meta http-equiv="X-UA-Compatible" content="IE=edge"><meta name="viewport" content="width=device-width, initial-scale=1.0"><title>SVG - path</title></head><body><svg width="300px" height="1000px"><path d="M10 100 50 100 A 30 50 0 0 1 150 100 L 200 100" fill="none" style="stroke: #ff0000"/><!-- 旋转45度的弧(第三个参数) --><path d="M10 200 50 200 A 30 50 45 0 1 150 200 L 200 200" fill="none" style="stroke: #ff0000"/><!-- 1表示大角度弧(第四个参数) --><path d="M10 300 50 300 A 30 50 -45 1 1 150 300 L 200 300" fill="none" style="stroke: #ff0000"/><!-- 0逆时针(第五个参数) --><path d="M10 400 50 400 A 30 50 0 1 0 150 400 L 200 400" fill="none" style="stroke: #ff0000"/></svg></body></html>
效果为:
填充和轮廓
在上面的例子中我们经常用这样的属性:
fill="none" style="stroke: #ff0000"
我想大家看着肯定也会想这是啥玩意?其实这就是我们接下来要说的内容。
fill
fill 属性用于填充图形的颜色
语法:fill= "colour" 或者 style="fill: colour"
示例:
<!DOCTYPE html><html lang="en"><head><meta charset="UTF-8"><meta http-equiv="X-UA-Compatible" content="IE=edge"><meta name="viewport" content="width=device-width, initial-scale=1.0"><title>SVG - fill</title></head><body><svg><circle cx="80" cy="50" r="50" /><circle cx="200" cy="50" r="50" fill="#ff0000"/></svg></body></html>
效果:

从上面的示例中可以看出,在不设置 fill 属性的时候,其实默认是黑色的填充,这也就是为什么上面的很多例子我们设置了 fill='none' 其实就是去掉默认填充。
fill 属性其实还有一些延伸属性:
fill-opacity
fill-opacity 属性用于设置填充颜色的透明度
示例:
<!DOCTYPE html><html lang="en"><head><meta charset="UTF-8"><meta http-equiv="X-UA-Compatible" content="IE=edge"><meta name="viewport" content="width=device-width, initial-scale=1.0"><title>SVG - fill</title></head><body><svg width="400" height="400"><circle cx="80" cy="50" r="50" /><circle cx="200" cy="50" r="50" fill="#ff0000"/><circle cx="80" cy="130" r="50" fill="#00ff00"/><circle cx="200" cy="130" r="50" fill="#00ff00" fill-opacity="0.5"/></svg></body></html>
效果:

fill-rule
fill-rule 属性用来设置复杂形状的填充规则。它有两种填充方式:nonzero 和 evenodd。 该属性简单说就是判断某点属于该形状的 “内部” 还是“外部”。那么判断的规则是什么呢?
nonzero
nonzero 为默认值,规则为:要判断一个点是否在图形内,从该点作任意方向的一条射线,然后检测射线与图形路径的交点情况。从 0 开始计数,路径从左向右(顺时针)穿过射线则计数加 1,从右向左(逆时针)穿过射线则计数减 1。得出计数结果后,如果结果是 0,则认为点在图形外部,否则认为在内部。
是不是感觉还是有点懵?举个例子看一下。
示例:
<!DOCTYPE html><html lang="en"><head><meta charset="UTF-8"><meta http-equiv="X-UA-Compatible" content="IE=edge"><meta name="viewport" content="width=device-width, initial-scale=1.0"><title>SVG - fill</title></head><body><svg width="12cm" height="4cm" viewBox="0 0 1200 400"><defs><path id="Triangle" d="M 16,0 L -8,9 v-18 z" fill="#66ff66" stroke="none" /></defs><g fill-rule="nonzero" fill="#6666ff" stroke="#ff6666" stroke-width="3" ><path d="M 250,75 L 323,301 131,161 369,161 177,301 z" /><use xlink:href="#Triangle" transform="translate(306.21 249) rotate(72)" /><use xlink:href="#Triangle" transform="translate(175.16,193.2) rotate(216)" /><use xlink:href="#Triangle" transform="translate(314.26,161) rotate(0)" /><use xlink:href="#Triangle" transform="translate(221.16,268.8) rotate(144)" /><use xlink:href="#Triangle" transform="translate(233.21,126.98) rotate(288)" /><path d="M 600,81 A 107,107 0 0,1 600,295 A 107,107 0 0,1 600,81 zM 600,139 A 49,49 0 0,1 600,237 A 49,49 0 0,1 600,139 z" /><use xlink:href="#Triangle" transform="translate(600,188) rotate(0) translate(107,0) rotate(90)" overflow="visible" /><use xlink:href="#Triangle" transform="translate(600,188) rotate(120) translate(107,0) rotate(90)" overflow="visible" /><use xlink:href="#Triangle" transform="translate(600,188) rotate(240) translate(107,0) rotate(90)" overflow="visible" /><use xlink:href="#Triangle" transform="translate(600,188) rotate(60) translate(49,0) rotate(90)" overflow="visible" /><use xlink:href="#Triangle" transform="translate(600,188) rotate(180) translate(49,0) rotate(90)" overflow="visible" /><use xlink:href="#Triangle" transform="translate(600,188) rotate(300) translate(49,0) rotate(90)" overflow="visible" /><path d="M 950,81 A 107,107 0 0,1 950,295 A 107,107 0 0,1 950,81 zM 950,139 A 49,49 0 0,0 950,237 A 49,49 0 0,0 950,139 z" /><use xlink:href="#Triangle" transform="translate(950,188) rotate(0) translate(107,0) rotate(90)" overflow="visible" /><use xlink:href="#Triangle" transform="translate(950,188) rotate(120) translate(107,0) rotate(90)" overflow="visible" /><use xlink:href="#Triangle" transform="translate(950,188) rotate(240) translate(107,0) rotate(90)" overflow="visible" /><use xlink:href="#Triangle" transform="translate(950,188) rotate(60) translate(49,0) rotate(-90)" overflow="visible" /><use xlink:href="#Triangle" transform="translate(950,188) rotate(180) translate(49,0) rotate(-90)" overflow="visible" /><use xlink:href="#Triangle" transform="translate(950,188) rotate(300) translate(49,0) rotate(-90)" overflow="visible" /></g></svg></body></html>
PS:上面示例中的绿色三角形只是用来辅助理解的,可以忽略,咱们只需要了解规则是如何填充的就行。
效果图:

evenodd
规则为:要判断一个点是否在图形内,从该点作任意方向的一条射线,然后检测射线与图形路径的交点的数量。如果结果是奇数则认为点在内部,是偶数则认为点在外部。
直接看示例吧:
示例:
<!DOCTYPE html><html lang="en"><head><meta charset="UTF-8"><meta http-equiv="X-UA-Compatible" content="IE=edge"><meta name="viewport" content="width=device-width, initial-scale=1.0"><title>SVG - fill</title></head><body><svg width="12cm" height="4cm" viewBox="0 0 1200 400"><defs><path id="Triangle" d="M 16,0 L -8,9 v-18 z" fill="#66ff66" stroke="none" /></defs><g fill-rule="evenodd" fill="#6666ff" stroke="#ff6666" stroke-width="3" ><path d="M 250,75 L 323,301 131,161 369,161 177,301 z" /><use xlink:href="#Triangle" transform="translate(306.21 249) rotate(72)" overflow="visible" /><use xlink:href="#Triangle" transform="translate(175.16,193.2) rotate(216)" overflow="visible" /><use xlink:href="#Triangle" transform="translate(314.26,161) rotate(0)" overflow="visible" /><use xlink:href="#Triangle" transform="translate(221.16,268.8) rotate(144)" overflow="visible" /><use xlink:href="#Triangle" transform="translate(233.21,126.98) rotate(288)" overflow="visible" /><path d="M 600,81 A 107,107 0 0,1 600,295 A 107,107 0 0,1 600,81 zM 600,139 A 49,49 0 0,1 600,237 A 49,49 0 0,1 600,139 z" /><use xlink:href="#Triangle" transform="translate(600,188) rotate(0) translate(107,0) rotate(90)" overflow="visible" /><use xlink:href="#Triangle" transform="translate(600,188) rotate(120) translate(107,0) rotate(90)" overflow="visible" /><use xlink:href="#Triangle" transform="translate(600,188) rotate(240) translate(107,0) rotate(90)" overflow="visible" /><use xlink:href="#Triangle" transform="translate(600,188) rotate(60) translate(49,0) rotate(90)" overflow="visible" /><use xlink:href="#Triangle" transform="translate(600,188) rotate(180) translate(49,0) rotate(90)" overflow="visible" /><use xlink:href="#Triangle" transform="translate(600,188) rotate(300) translate(49,0) rotate(90)" overflow="visible" /><path d="M 950,81 A 107,107 0 0,1 950,295 A 107,107 0 0,1 950,81 zM 950,139 A 49,49 0 0,0 950,237 A 49,49 0 0,0 950,139 z" /><use xlink:href="#Triangle" transform="translate(950,188) rotate(0) translate(107,0) rotate(90)" overflow="visible" /><use xlink:href="#Triangle" transform="translate(950,188) rotate(120) translate(107,0) rotate(90)" overflow="visible" /><use xlink:href="#Triangle" transform="translate(950,188) rotate(240) translate(107,0) rotate(90)" overflow="visible" /><use xlink:href="#Triangle" transform="translate(950,188) rotate(60) translate(49,0) rotate(-90)" overflow="visible" /><use xlink:href="#Triangle" transform="translate(950,188) rotate(180) translate(49,0) rotate(-90)" overflow="visible" /><use xlink:href="#Triangle" transform="translate(950,188) rotate(300) translate(49,0) rotate(-90)" overflow="visible" /></g></svg></body></html>
PS:上面示例中的绿色三角形只是用来辅助理解的,可以忽略,咱们只需要了解规则是如何填充的就行。
效果为:

stroke
stroke 属性用来定义线条、文本或元素轮廓的颜色。
语法:stroke="colour" 或者 style="stroke: colour"
示例:
<!DOCTYPE html><html lang="en"><head><meta charset="UTF-8"><meta http-equiv="X-UA-Compatible" content="IE=edge"><meta name="viewport" content="width=device-width, initial-scale=1.0"><title>SVG - stroke</title></head><body><svg><circle cx="80" cy="50" r="50" /><circle cx="200" cy="50" r="50" stroke="#ff6666"/></svg></body></html>
效果:

stroke 属性也有一些延伸属性,下面依次介绍一下。
stroke-width
stroke-width 属性定义了轮廓的宽度
示例:
<!DOCTYPE html><html lang="en"><head><meta charset="UTF-8"><meta http-equiv="X-UA-Compatible" content="IE=edge"><meta name="viewport" content="width=device-width, initial-scale=1.0"><title>SVG - stroke</title></head><body><svg width="300" height="300"><circle cx="80" cy="50" r="50" /><circle cx="200" cy="50" r="50" stroke="#ff6666" /><circle cx="80" cy="200" r="50" stroke="#ff6666" stroke-width="5" /><circle cx="200" cy="200" r="50" stroke="#ff6666" stroke-width="10"/></svg></body></html>
效果:

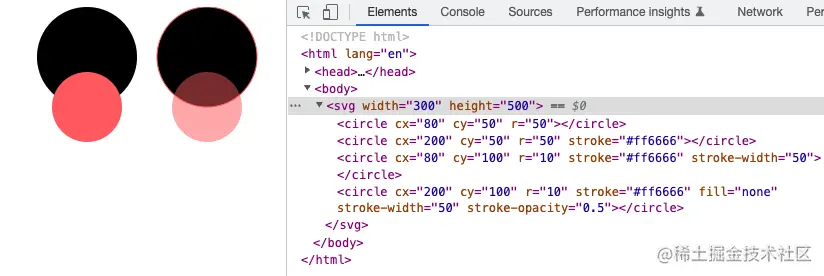
stroke-opacity
stroke-opacity 属性用于设置轮廓的透明度
示例:
<!DOCTYPE html><html lang="en"><head><meta charset="UTF-8"><meta http-equiv="X-UA-Compatible" content="IE=edge"><meta name="viewport" content="width=device-width, initial-scale=1.0"><title>SVG - stroke</title></head><body><svg width="300" height="500"><circle cx="80" cy="50" r="50" /><circle cx="200" cy="50" r="50" stroke="#ff6666" /><circle cx="80" cy="100" r="10" stroke="#ff6666" stroke-width="50" /><circle cx="200" cy="100" r="10" stroke="#ff6666" fill="none" stroke-width="50" stroke-opacity="0.5"/></svg></body></html>
效果:
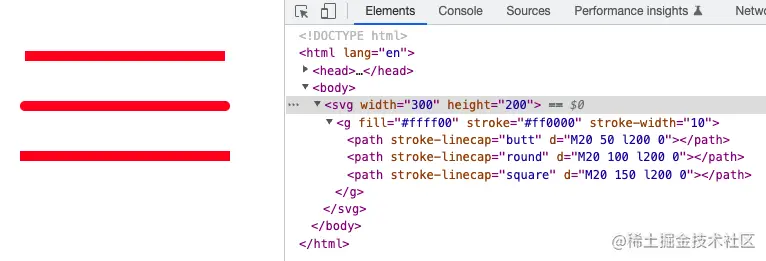
stroke-linecap
stroke-linecap 属性定义了轮廓终点的形状,该属性有三个值:
- butt:默认值,以直边结束线段
- round:以圆角结束线段,圆角的半径由 stroke-width(轮廓宽度)控制的
- square:也是以直边结束线段,但和 butt 不同的是会在结束位置多出一段由 stroke-width(轮廓宽度)大小控制的长度。
示例:
<!DOCTYPE html><html lang="en"><head><meta charset="UTF-8"><meta http-equiv="X-UA-Compatible" content="IE=edge"><meta name="viewport" content="width=device-width, initial-scale=1.0"><title>SVG - stroke</title></head><body><svg width="300" height="200"><g fill="#ffff00" stroke="#ff0000" stroke-width="10"><path stroke-linecap="butt" d="M20 50 l200 0" /><path stroke-linecap="round" d="M20 100 l200 0" /><path stroke-linecap="square" d="M20 150 l200 0" /></g></svg></body></html>
效果:
stroke-linejoin
stroke-linejoin 属性定义了轮廓连接处的样式。样式有三种类型:
- miter:默认值,表示用方形画笔在连接处形成尖角
- round:用圆角连接,实现平滑效果
- bevel:连接处会形成一个斜面
示例:
<!DOCTYPE html><html lang="en"><head><meta charset="UTF-8"><meta http-equiv="X-UA-Compatible" content="IE=edge"><meta name="viewport" content="width=device-width, initial-scale=1.0"><title>SVG - stroke</title></head><body><svg width="160" height="280"><g fill="none" stroke="#ff0000" stroke-width="20"><path d="M40 60 80 20 120 60" stroke-linecap="butt" stroke-linejoin="miter" /><path d="M40 140 80 100 120 140" stroke-linecap="round" stroke-linejoin="round" /><path d="M40 220 80 180 120 220" stroke-linecap="square" stroke-linejoin="bevel" /></g></svg></body></html>
效果:

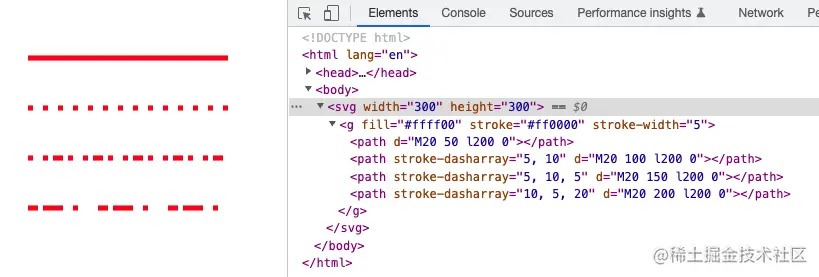
stroke-dasharray
stroke-dasharray 属性可以定义轮廓为虚线
语法:stroke-dasharray="xxx"
参数:xxx 为一列数字字符串,对应的是:线段 空格 线段 空格……
示例:
<!DOCTYPE html><html lang="en"><head><meta charset="UTF-8"><meta http-equiv="X-UA-Compatible" content="IE=edge"><meta name="viewport" content="width=device-width, initial-scale=1.0"><title>SVG - stroke</title></head><body><svg width="300" height="300"><g fill="#ffff00" stroke="#ff0000" stroke-width="5"><path d="M20 50 l200 0" /><path stroke-dasharray="5, 10" d="M20 100 l200 0" /><path stroke-dasharray="5, 10, 5" d="M20 150 l200 0" /><path stroke-dasharray="10, 5, 20" d="M20 200 l200 0" /></g></svg></body></html>
效果:
stroke-dashoffset
stroke-dashoffset 属性用于指定路径开始的距离。值可为正值、负值、百分比。
示例:
<!DOCTYPE html><html lang="en"><head><meta charset="UTF-8"><meta http-equiv="X-UA-Compatible" content="IE=edge"><meta name="viewport" content="width=device-width, initial-scale=1.0"><title>SVG - stroke</title></head><body><svg width="300" height="300"><g fill="#ffff00" stroke="#ff0000" stroke-width="5" stroke-dasharray="20"><path d="M50 50 l200 0" /><path d="M50 100 l200 0" stroke-dashoffset="10" /><path d="M50 150 l200 0" stroke-dashoffset="1%" /><path d="M50 200 l200 0" stroke-dashoffset="-10" /></g></svg></body></html>
效果:

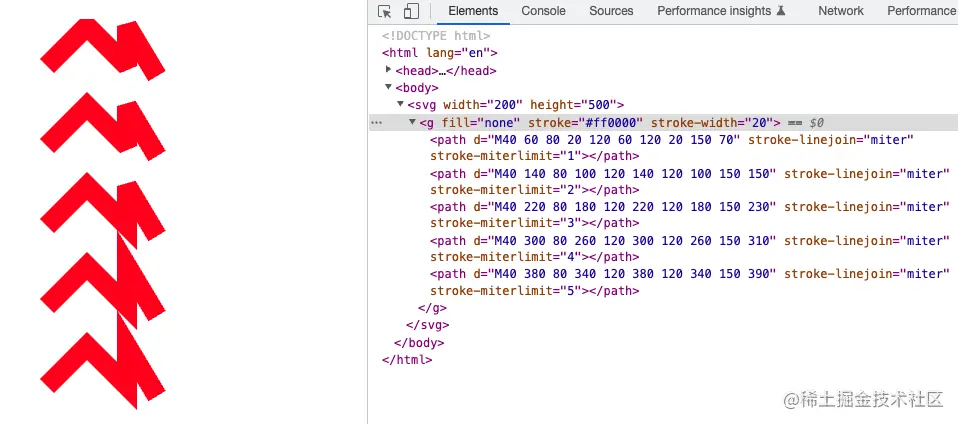
stroke-miterlimit
如果两条线交汇在一起形成一个尖角,而且属性 stroke-linejoin 指定了 miter,斜接有可能扩展到远远超过路径轮廓线的线宽。属性 stroke-miterlimit 对斜接长度和stroke-width的比率强加了一个极限。当极限到达时,交汇处由斜接变成倒角。
示例:
<!DOCTYPE html><html lang="en"><head><meta charset="UTF-8"><meta http-equiv="X-UA-Compatible" content="IE=edge"><meta name="viewport" content="width=device-width, initial-scale=1.0"><title>SVG - stroke</title></head><body><svg width="200" height="500"><g fill="none" stroke="#ff0000" stroke-width="20"><path d="M40 60 80 20 120 60 120 20 150 70" stroke-linejoin="miter" stroke-miterlimit="1" /><path d="M40 140 80 100 120 140 120 100 150 150" stroke-linejoin="miter" stroke-miterlimit="2" /><path d="M40 220 80 180 120 220 120 180 150 230" stroke-linejoin="miter" stroke-miterlimit="3" /><path d="M40 300 80 260 120 300 120 260 150 310" stroke-linejoin="miter" stroke-miterlimit="4" /><path d="M40 380 80 340 120 380 120 340 150 390" stroke-linejoin="miter" stroke-miterlimit="5" /></g></svg></body></html>
效果为:
文字
SVG 中我们不仅可以绘制各种图形,我们还可也以绘制文字。
text
通过 text 标签我们可以在 SVG 中添加文字,
示例:
<!DOCTYPE html><html lang="en"><head><meta charset="UTF-8"><meta http-equiv="X-UA-Compatible" content="IE=edge"><meta name="viewport" content="width=device-width, initial-scale=1.0"><title>SVG - 文字</title></head><body><svg width="300" height="300"><text x="50" y="50">Hello Svg !</text></svg></body></html>
效果为:

从上面的实例我们可以看到,text 标签有一些自己的属性,下面我们细说一下 text 标签的属性。
x 和 y
x 和 y 属性决定了文字的绘制起点。如上面的例子我们就是从坐标(50,50)的位置开始绘制的文字。
但需要注意的是 x 和 y 的值可以是一个数列。如果设置为了一个数列则会应用到每一个字符上
示例:
<!DOCTYPE html><html lang="en"><head><meta charset="UTF-8"><meta http-equiv="X-UA-Compatible" content="IE=edge"><meta name="viewport" content="width=device-width, initial-scale=1.0"><title>SVG - 文字</title></head><body><svg width="300" height="300"><textx="30 60 90 120 150 180 210 240 270"y="60 90 120 150 180 150 120 90 60"fill="#f00"stroke="#0f0"font-size="50"font-weight="bold" >Hello Svg !</text></svg></body></html>
效果为:

dx 和 dy
dx 和 dy 属性与 x 和 y 属性不同的是,x 和 y 属性是绝对的坐标,而 dx 和 dy 属性是相对于当前位置的偏移量。
参数也可以是一个数列。如果设置为了一个数列则会应用到每一个字符上
示例:
<!DOCTYPE html><html lang="en"><head><meta charset="UTF-8"><meta http-equiv="X-UA-Compatible" content="IE=edge"><meta name="viewport" content="width=device-width, initial-scale=1.0"><title>SVG - 文字</title></head><body><svg width="500" height="500"><textdx="50 10 10 10 10 10 10 10 10"dy="50 20 -20 20 -20 20 -20 20 -20"fill="#f00"stroke="#0f0"font-size="50"font-weight="bold" >Hello Svg !</text></svg></body></html>
效果为:

rotate
rotate 属性可以把文字旋转一个角度。
示例:
<!DOCTYPE html><html lang="en"><head><meta charset="UTF-8"><meta http-equiv="X-UA-Compatible" content="IE=edge"><meta name="viewport" content="width=device-width, initial-scale=1.0"><title>SVG - 文字</title></head><body><svg width="500" height="500"><textx="50"y="50"rotate="10"fill="#f00"stroke="#0f0"font-size="50"font-weight="bold" >Hello Svg !</text></svg></body></html>
效果为:

同样的参数也可以是一个数列。如果设置为了一个数列则会应用到每一个字符上
示例:
<!DOCTYPE html><html lang="en"><head><meta charset="UTF-8"><meta http-equiv="X-UA-Compatible" content="IE=edge"><meta name="viewport" content="width=device-width, initial-scale=1.0"><title>SVG - 文字</title></head><body><svg width="550" height="500"><textdx="50 20 20 20 20 20 20 20 20 20 20"y="50"rotate="0 20 40 60 80 100 120 140 160 180 200"fill="#f00"stroke="#0f0"font-size="50"font-weight="bold" >Hello Svg !</text></svg></body></html>
效果为:

textLength
textLength 属性给定了一个字符串的计算长度。在文字的长度和 textLength 属性给定的长度不一致的情况下渲染引擎会精细调整字型的位置。
示例:
<!DOCTYPE html><html lang="en"><head><meta charset="UTF-8"><meta http-equiv="X-UA-Compatible" content="IE=edge"><meta name="viewport" content="width=device-width, initial-scale=1.0"><title>SVG - 文字</title></head><body><svg width="550" height="500"><text x="50" y="50" textLength="150" fill="#f00" stroke="#0f0" font-size="50"font-weight="bold" >Hello Svg !</text><text x="50" y="100" textLength="500" fill="#f00" stroke="#0f0" font-size="50" font-weight="bold" >Hello Svg !</text></svg></body></html>
效果为:

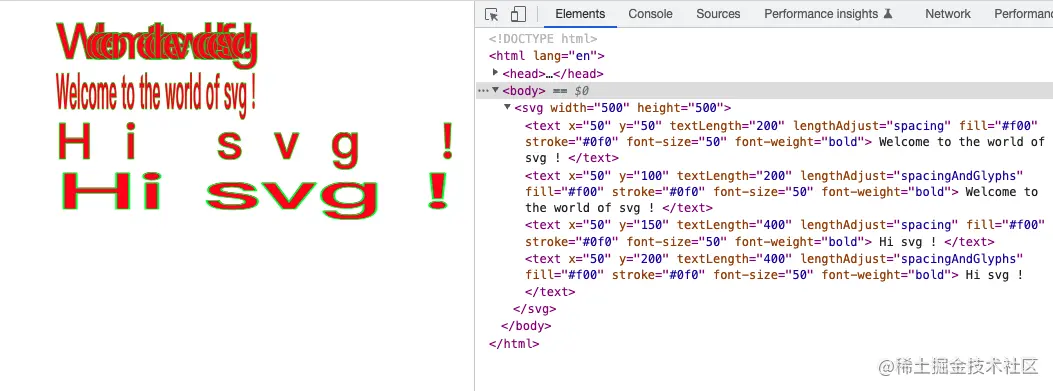
lengthAdjust
lengthadjust 属性可以控制文本以什么方式伸展到由textLength属性定义的长度。
- spacing:只拉伸或压缩间距(文字不变形)
- spacingAndGlyphs:同时拉伸或压缩间距和文字本身(文字变形)
示例:
<!DOCTYPE html><html lang="en"><head><meta charset="UTF-8"><meta http-equiv="X-UA-Compatible" content="IE=edge"><meta name="viewport" content="width=device-width, initial-scale=1.0"><title>SVG - 文字</title></head><body><svg width="500" height="500"><text x="50" y="50" textLength="200" lengthadjust="spacing" fill="#f00" stroke="#0f0" font-size="50" font-weight="bold" >Welcome to the world of svg !</text><text x="50" y="100" textLength="200" lengthadjust="spacingAndGlyphs" fill="#f00" stroke="#0f0" font-size="50" font-weight="bold" >Welcome to the world of svg !</text><text x="50" y="150" textLength="400" lengthadjust="spacing" fill="#f00" stroke="#0f0" font-size="50" font-weight="bold" >Hi svg !</text><text x="50" y="200" textLength="400" lengthadjust="spacingAndGlyphs" fill="#f00" stroke="#0f0" font-size="50" font-weight="bold" >Hi svg !</text></svg></body></html>
效果为:
fill 和 stroke
填充和轮廓也都可以应用于文字
示例:
<!DOCTYPE html><html lang="en"><head><meta charset="UTF-8"><meta http-equiv="X-UA-Compatible" content="IE=edge"><meta name="viewport" content="width=device-width, initial-scale=1.0"><title>SVG - 文字</title></head><body><svg width="300" height="300"><text x="50" y="50" fill="#f00" stroke="#0f0" font-weight="bold">Hello Svg !</text></svg></body></html>
效果为:

CSS 文字属性
一些 CSS 中的文字样式属性同样也可以应用于 SVG 的文字中。比如上面例子中我们用到的文字加粗:font-weight 还有很多属性同样也适用,例如:font-size、font-family、font-style、font-variant、font-stretch、font-size-adjust、kerning、letter-spacing、word-spacing、text-decoration 等。
示例:
<!DOCTYPE html><html lang="en"><head><meta charset="UTF-8"><meta http-equiv="X-UA-Compatible" content="IE=edge"><meta name="viewport" content="width=device-width, initial-scale=1.0"><title>SVG - 文字</title></head><body><svg width="400" height="300"><text x="50" y="50" fill="#f00" stroke="#0f0" font-weight="bold" font-size="50" font-family="arial">Hello Svg !</text></svg></body></html>
效果:

tspan
tspan 标签和 text 标签一样都可以用来添加文字,但不同的是 tspan 标签的作用为标记大块文本内的部分内容。比如一段文本其中某个字需要加粗或者颜色不一致,就可以用到 tspan 标签。
tspan 标签的属性和 text 标签一致,上面说道的 text 标签的属性在 tspan 标签中也适用。
需注意的是 tspan 标签必须是一个 text 元素的子元素或别的子元素 tspan 的子元素。
示例:
<!DOCTYPE html><html lang="en"><head><meta charset="UTF-8"><meta http-equiv="X-UA-Compatible" content="IE=edge"><meta name="viewport" content="width=device-width, initial-scale=1.0"><title>SVG - 文字</title></head><body><svg width="550" height="500"><text x="50" y="50" fill="#f00" stroke="#0f0" font-size="50" >Hello <tspan fill="#f0f" font-weight="bold"> 小 </tspan> Svg !</text></svg></body></html>
效果:
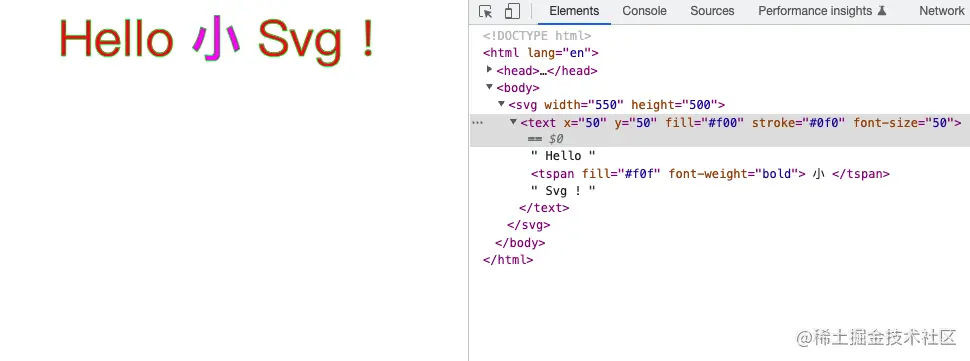
需要注意的是 tspan 标签的 x、y 和 dx、dy 会对标签后面的内容造成影响
示例:
<!DOCTYPE html><html lang="en"><head><meta charset="UTF-8"><meta http-equiv="X-UA-Compatible" content="IE=edge"><meta name="viewport" content="width=device-width, initial-scale=1.0"><title>SVG - 文字</title></head><body><svg width="550" height="500"><text x="50" y="50" fill="#f00" stroke="#0f0" font-size="50" >Hello <tspan x="150" dy="70" fill="#f0f" font-weight="bold"> 小 </tspan> Svg !</text></svg></body></html>
效果:

tref
tref 标签配合xlink:href属性能引用已经定义的文本,实现复制的效果。并且引用之后还可以单独定义他的样式。
但遗憾的是 tref 标签是 SVG 1.1 规范的内容,它已经从 SVG 2.0 规范中删除了。
因此此处咱们可以使用 use 标签来代替它,这里说明一下:
- defs 标签可以定义一些之后绘制中需要重复使用的图形元素,defs 是 definitions 的缩写 。
- use 标签可以在 SVG 文档内读取目标节点,并在别的地方复制使用。
示例:
<!DOCTYPE html><html lang="en"><head><meta charset="UTF-8"><meta http-equiv="X-UA-Compatible" content="IE=edge"><meta name="viewport" content="width=device-width, initial-scale=1.0"><title>SVG - 文字</title></head><body><svg width="500" height="500"><defs><text x="50" y="50" id="text" stroke="#000" font-size="30" >今天天气不错!</text></defs><!-- tref 已废弃 --><!-- <tref x="50" y="100" fill="#f00" xlink:href="#text" /> --><use x="50" y="100" fill="#f00" xlink:href="#text" /><use x="50" y="150" fill="#0f0" rotate="45" xlink:href="#text" /></svg></body></html>
效果:

textPath
textPath 标签可以利用它的 xlink:href 属性取得一个任意路径,并且可以让字符顺着路径渲染。
示例:
<!DOCTYPE html><html lang="en"><head><meta charset="UTF-8"><meta http-equiv="X-UA-Compatible" content="IE=edge"><meta name="viewport" content="width=device-width, initial-scale=1.0"><title>SVG - 文字</title></head><body><svg width="600" height="500"><path id="pathM" d="M 50 50 100 100 200 50 300 100" fill="none" /><path id="pathQ" d="M50 100 Q 175 200 300 100 T 600 100" fill="none" /><text><textPath xlink:href="#pathM"> Welcome to the world of SVG ! </textPath></text><text><textPath xlink:href="#pathQ"> Welcome to the world of SVG ! Welcome to the world of SVG ! </textPath></text></svg></body></html>
效果:

渐变
了解渐变的小伙伴都知道,渐变就是从一个颜色过渡到另一个颜色,且渐变都分为两种渐变:线性渐变和径向渐变
在 SVG 中渐变依旧如此。
但需要注意的是这里我们需要接触两个新的标签:
- defs 标签用来定义渐变
- stop 标签用来定义渐变的颜色坡度,具有三个属性:offset 定义渐变开始和结束的位置、stop-color(定义颜色)和 stop-opacity(定义透明度)
线性渐变
线性渐变(linearGradient)就是沿直线改变颜色。
语法:
<linearGradient x1="" y1="" x2="" y2=""><stop offset="0%"/>...<stop offset="20%"/>...<stop offset="100%"/></linearGradient>
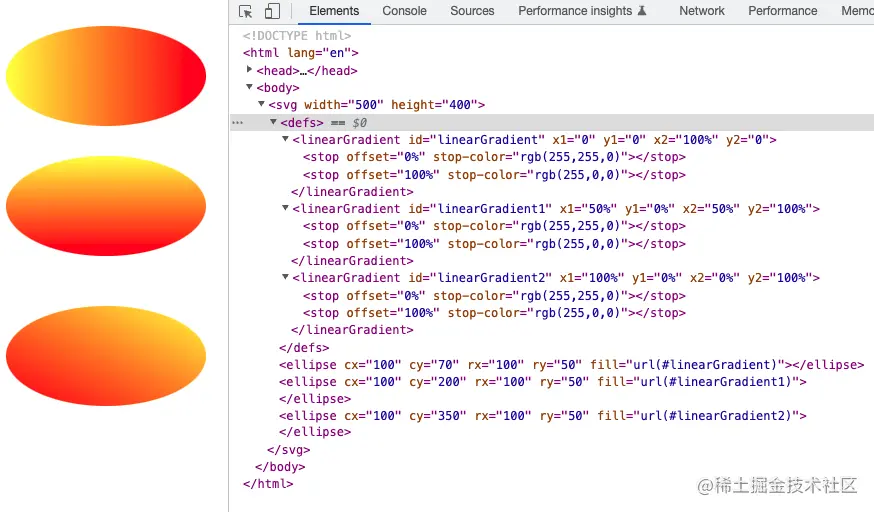
参数:x1、y1 定义线性渐变的起点, x2、y2 定义渐变的终点。
示例:
<!DOCTYPE html><html lang="en"><head><meta charset="UTF-8"><meta http-equiv="X-UA-Compatible" content="IE=edge"><meta name="viewport" content="width=device-width, initial-scale=1.0"><title>SVG - 渐变</title></head><body><svg width="500" height="300"><defs><linearGradient id="linearGradient" x1="0" y1="0" x2="100%" y2="0"><stop offset="0%" stop-color="rgb(255,255,0)" /><stop offset="100%" stop-color="rgb(255,0,0)" /></linearGradient></defs><ellipse cx="100" cy="70" rx="100" ry="50" fill="url(#linearGradient)" /></svg></body></html>
效果:
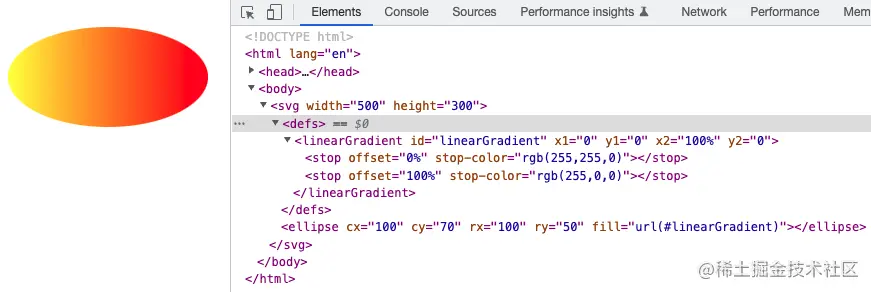
改变 x1、y1 和 x2、y2 的值可以定义不同方向上的渐变
示例:
<!DOCTYPE html><html lang="en"><head><meta charset="UTF-8"><meta http-equiv="X-UA-Compatible" content="IE=edge"><meta name="viewport" content="width=device-width, initial-scale=1.0"><title>SVG - 渐变</title></head><body><svg width="500" height="400"><defs><linearGradient id="linearGradient" x1="0" y1="0" x2="100%" y2="0"><stop offset="0%" stop-color="rgb(255,255,0)" /><stop offset="100%" stop-color="rgb(255,0,0)" /></linearGradient><linearGradient id="linearGradient1" x1="50%" y1="0%" x2="50%" y2="100%"><stop offset="0%" stop-color="rgb(255,255,0)" /><stop offset="100%" stop-color="rgb(255,0,0)" /></linearGradient><linearGradient id="linearGradient2" x1="100%" y1="0%" x2="0%" y2="100%"><stop offset="0%" stop-color="rgb(255,255,0)" /><stop offset="100%" stop-color="rgb(255,0,0)" /></linearGradient></defs><ellipse cx="100" cy="70" rx="100" ry="50" fill="url(#linearGradient)" /><ellipse cx="100" cy="200" rx="100" ry="50" fill="url(#linearGradient1)" /><ellipse cx="100" cy="350" rx="100" ry="50" fill="url(#linearGradient2)" /></svg></body></html>
效果:
径向渐变
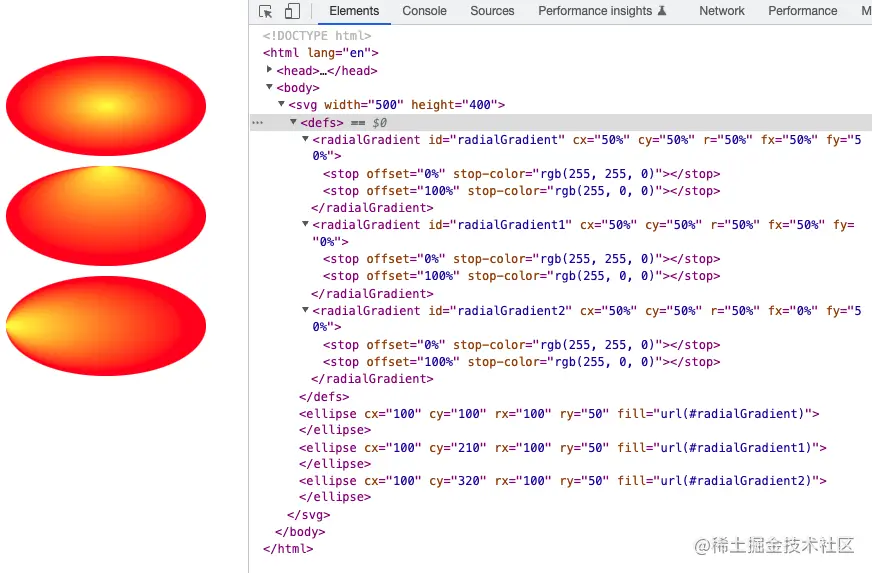
径向渐变(radialGradient)其实就是以一个点做放射性的渐变。
语法:
<radialGradient cx="" cy="" r="" fx="" fy=""><stop offset="0%"/>...<stop offset="20%"/>...<stop offset="100%"/></radialGradient>
参数: cx、cy、r 分别为圆的坐标和半径,也就是渐变的范围,fx、fy 定义渐变的中心点,也叫渐变的焦点。
示例:
<!DOCTYPE html><html lang="en"><head><meta charset="UTF-8"><meta http-equiv="X-UA-Compatible" content="IE=edge"><meta name="viewport" content="width=device-width, initial-scale=1.0"><title>SVG - 渐变</title></head><body><svg width="500" height="400"><defs><radialGradient id="radialGradient" cx="50%" cy="50%" r="50%" fx="50%" fy="50%"><stop offset="0%" stop-color="rgb(255, 255, 0)" /><stop offset="100%" stop-color="rgb(255, 0, 0)" /></radialGradient><radialGradient id="radialGradient1" cx="50%" cy="50%" r="50%" fx="50%" fy="0%"><stop offset="0%" stop-color="rgb(255, 255, 0)" /><stop offset="100%" stop-color="rgb(255, 0, 0)" /></radialGradient><radialGradient id="radialGradient2" cx="50%" cy="50%" r="50%" fx="0%" fy="50%"><stop offset="0%" stop-color="rgb(255, 255, 0)" /><stop offset="100%" stop-color="rgb(255, 0, 0)" /></radialGradient></defs><ellipse cx="100" cy="100" rx="100" ry="50" fill="url(#radialGradient)" /><ellipse cx="100" cy="210" rx="100" ry="50" fill="url(#radialGradient1)" /><ellipse cx="100" cy="320" rx="100" ry="50" fill="url(#radialGradient2)" /></svg></body></html>
效果:
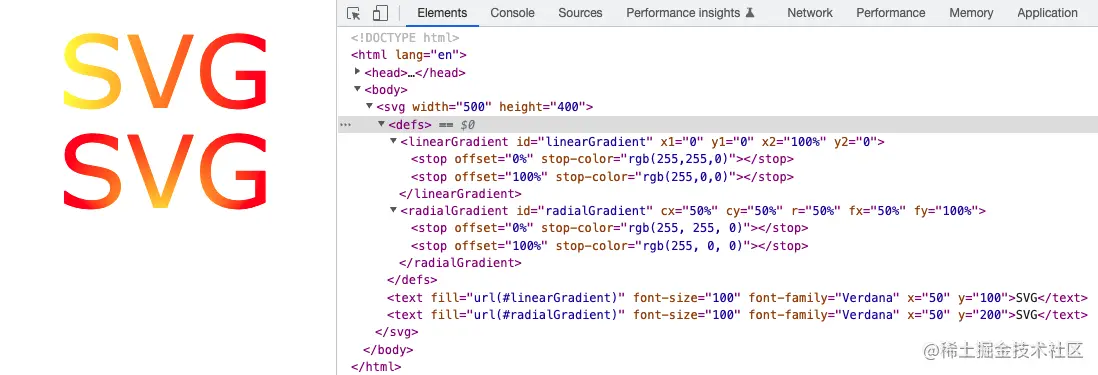
不管是线性渐变还是径向渐变,他们不仅可以用于图形还是用于文字
示例:
<!DOCTYPE html><html lang="en"><head><meta charset="UTF-8"><meta http-equiv="X-UA-Compatible" content="IE=edge"><meta name="viewport" content="width=device-width, initial-scale=1.0"><title>SVG - 渐变</title></head><body><svg width="500" height="400"><defs><linearGradient id="linearGradient" x1="0" y1="0" x2="100%" y2="0"><stop offset="0%" stop-color="rgb(255,255,0)" /><stop offset="100%" stop-color="rgb(255,0,0)" /></linearGradient><radialGradient id="radialGradient" cx="50%" cy="50%" r="50%" fx="50%" fy="100%"><stop offset="0%" stop-color="rgb(255, 255, 0)" /><stop offset="100%" stop-color="rgb(255, 0, 0)" /></radialGradient></defs><text fill="url(#linearGradient)" font-size="100" font-family="Verdana" x="50" y="100">SVG</text><text fill="url(#radialGradient)" font-size="100" font-family="Verdana" x="50" y="200">SVG</text></svg></body></html>
效果:
同样的渐变不仅可以用来填充(fill),还能用来绘制轮廓(stroke)
示例:
<!DOCTYPE html><html lang="en"><head><meta charset="UTF-8"><meta http-equiv="X-UA-Compatible" content="IE=edge"><meta name="viewport" content="width=device-width, initial-scale=1.0"><title>SVG - 渐变</title></head><body><svg width="500" height="400"><defs><linearGradient id="linearGradient" x1="0" y1="0" x2="100%" y2="0"><stop offset="0%" stop-color="rgb(255,255,0)" /><stop offset="100%" stop-color="rgb(255,0,0)" /></linearGradient><radialGradient id="radialGradient" cx="50%" cy="50%" r="50%" fx="50%" fy="100%"><stop offset="0%" stop-color="rgb(255, 255, 0)" /><stop offset="100%" stop-color="rgb(255, 0, 0)" /></radialGradient></defs><text stroke-width="5" stroke="url(#linearGradient)" fill="none" font-size="100" font-family="Verdana" x="50" y="100">SVG</text><text stroke-width="5" stroke="url(#radialGradient)" fill="none" font-size="100" font-family="Verdana" x="50" y="200">SVG</text></svg></body></html>
效果:

裁剪和蒙层
裁剪和蒙层是我们在之后的 SVG 应用中常用的功能之一。总而言之是一些特定场景必不可少的功能。
裁剪
裁剪的功能主要是使用clipPath标签定义一条裁剪路径,然后用来裁剪掉元素的部分内容。且任何透明度的效果都是无效的,它只能要么裁剪掉要么不裁剪。
示例:
<!DOCTYPE html><html lang="en"><head><meta charset="UTF-8"><meta http-equiv="X-UA-Compatible" content="IE=edge"><meta name="viewport" content="width=device-width, initial-scale=1.0"><title>SVG - 裁剪</title></head><body><svg width="300" height="300"><defs><clipPath id="clipPath"><path d="M10 50 A50 50 0 0 1 100 50 A50 50 0 0 1 190 50 Q210 100 100 200 Q-5 100 10 50 Z" /></clipPath></defs><rect x="0" y="0" width="200" height="200" fill="#f00" clip-path="url(#clipPath)" /></svg></body></html>
效果:

蒙层
蒙层的功能主要实现标签就是mask标签,他的功能和名字正好相反,他不是用来遮住元素的部分内容,而是用来显示元素中mask标签遮住的内容。 他和clipPath标签不同的是他允许使用透明度(透明度为 0 则无蒙层效果)和灰度值遮罩计算得的软边缘
示例:
<!DOCTYPE html><html lang="en"><head><meta charset="UTF-8"><meta http-equiv="X-UA-Compatible" content="IE=edge"><meta name="viewport" content="width=device-width, initial-scale=1.0"><title>SVG - 裁剪</title></head><body><svg width="300" height="300"><defs><mask id="Mask"><path d="M10 50 A50 50 0 0 1 100 50 A50 50 0 0 1 190 50 Q210 100 100 200 Q-5 100 10 50 Z" fill="#fff" fill-opacity="0.5" /></mask></defs><rect x="0" y="0" width="200" height="200" fill="#f00" mask="url(#Mask)" /></svg></body></html>
效果:

动画
盼星星盼月亮终于盼到了我们最期待的 SVG 动画的章节了。因为文章分为两部分发布的,上周末只发布了一些基础的东西,所以就有小伙伴在评论里催动画方面的知识点,这周末咱们就一起来看看。
基础动画
在做动画之前呢咱们需要先了解一下动画的基础知识。咱们再学习 CSS 的时候其实都有学过,大概就是平移、缩放、旋转等一些 transform 属性的一些方法。下面我们依次说一下,就算是做动画之前的一个小复习吧。
translate(平移)
translate() 方法主要的功能就是用来平移的,把元素从一个地点平移到另一个地点。
语法:transform="translate(x, y)"
参数:x 为 X 轴上的平移距离,y 为 Y 轴上的平移距离,
示例:
<!DOCTYPE html><html lang="en"><head><meta charset="UTF-8"><meta http-equiv="X-UA-Compatible" content="IE=edge"><meta name="viewport" content="width=device-width, initial-scale=1.0"><title>SVG - 动画</title></head><body><svg width="500" height="500"><rect x="0" y="0" width="100" height="50" fill="#ff770f"/><rect x="0" y="0" width="100" height="50" fill="#ff770f" transform="translate(100, 50)"/><rect x="0" y="0" width="100" height="50" fill="#ff770f" transform="translate(200, 100)"/></svg></body></html>
效果:

scale(缩放)
scale() 方法可以用来缩放元素,通过缩放来控制元素的大小。
语法:transform="scale(x, y)"
参数:x 为 X 轴上的缩放大小,y 为 Y 轴上的缩放大小,当两个值一样时,写一个值就可以。
示例:
<!DOCTYPE html><html lang="en"><head><meta charset="UTF-8"><meta http-equiv="X-UA-Compatible" content="IE=edge"><meta name="viewport" content="width=device-width, initial-scale=1.0"><title>SVG - 动画</title></head><body><svg width="500" height="500"><rect x="0" y="0" width="100" height="100" fill="#ff770f"/><rect x="0" y="200" width="100" height="100" fill="#7e9178" transform="scale(0.5)"/><rect x="0" y="100" width="100" height="100" fill="#183c78" transform="scale(1.5)"/><rect x="200" y="100" width="100" height="100" fill="#cccccc" transform="scale(1, 0.5)"/></svg></body></html>
效果:

rotate(旋转)
rotate() 方法可以用来做元素的旋转功能,把元素从一个地点平移到另一个地点。
语法:transform="rotate(deg)"
参数:deg 为旋转的角度,45 度就写 45 度。
示例:
<!DOCTYPE html><html lang="en"><head><meta charset="UTF-8"><meta http-equiv="X-UA-Compatible" content="IE=edge"><meta name="viewport" content="width=device-width, initial-scale=1.0"><title>SVG - 动画</title></head><body><svg width="500" height="500"><rect x="200" y="0" width="100" height="100" fill="#ff770f"/><rect x="200" y="0" width="100" height="100" fill="#cccccc" transform="rotate(20)"/><rect x="200" y="0" width="100" height="100" fill="#7e9178" transform="rotate(40)"/><rect x="200" y="0" width="100" height="100" fill="#183c78" transform="rotate(60)"/></svg></body></html>
效果:

是不是觉得效果和我们想想中的不一样?我就只想旋转,为什么感觉还发生了位移呢?
其实这是因为元素的旋转中心点是(0, 0)。如果我们想要只是选中而不位移,那么就需要把旋转的中心点设置在元素的中心点。
以上面的例子为例,元素的 x 坐标为 200,本身宽度为 100,则 x 轴元素的中心点就为 250,y 轴元素的坐标为 0,高度为 100,则 y 轴元素的中心点为 50。因此元素的中心点就为(250, 50)。
transform-origin
上面我们已经得到了元素的中心点,那么如何设置元素的中心点呢?
我们需要通过transform-origin属性来设置元素的中心点。直接看例子:
<!DOCTYPE html><html lang="en"><head><meta charset="UTF-8"><meta http-equiv="X-UA-Compatible" content="IE=edge"><meta name="viewport" content="width=device-width, initial-scale=1.0"><title>SVG - 动画</title></head><body><svg width="500" height="500"><rect x="200" y="0" width="100" height="100" fill="#ff770f"/><rect x="200" y="0" width="100" height="100" fill="#cccccc" transform-origin="250 50" transform="rotate(20)"/><rect x="200" y="0" width="100" height="100" fill="#7e9178" transform-origin="250 50" transform="rotate(40)"/><rect x="200" y="0" width="100" height="100" fill="#183c78" transform-origin="250 50" transform="rotate(60)"/></svg></body></html>
效果:

skew(倾斜)
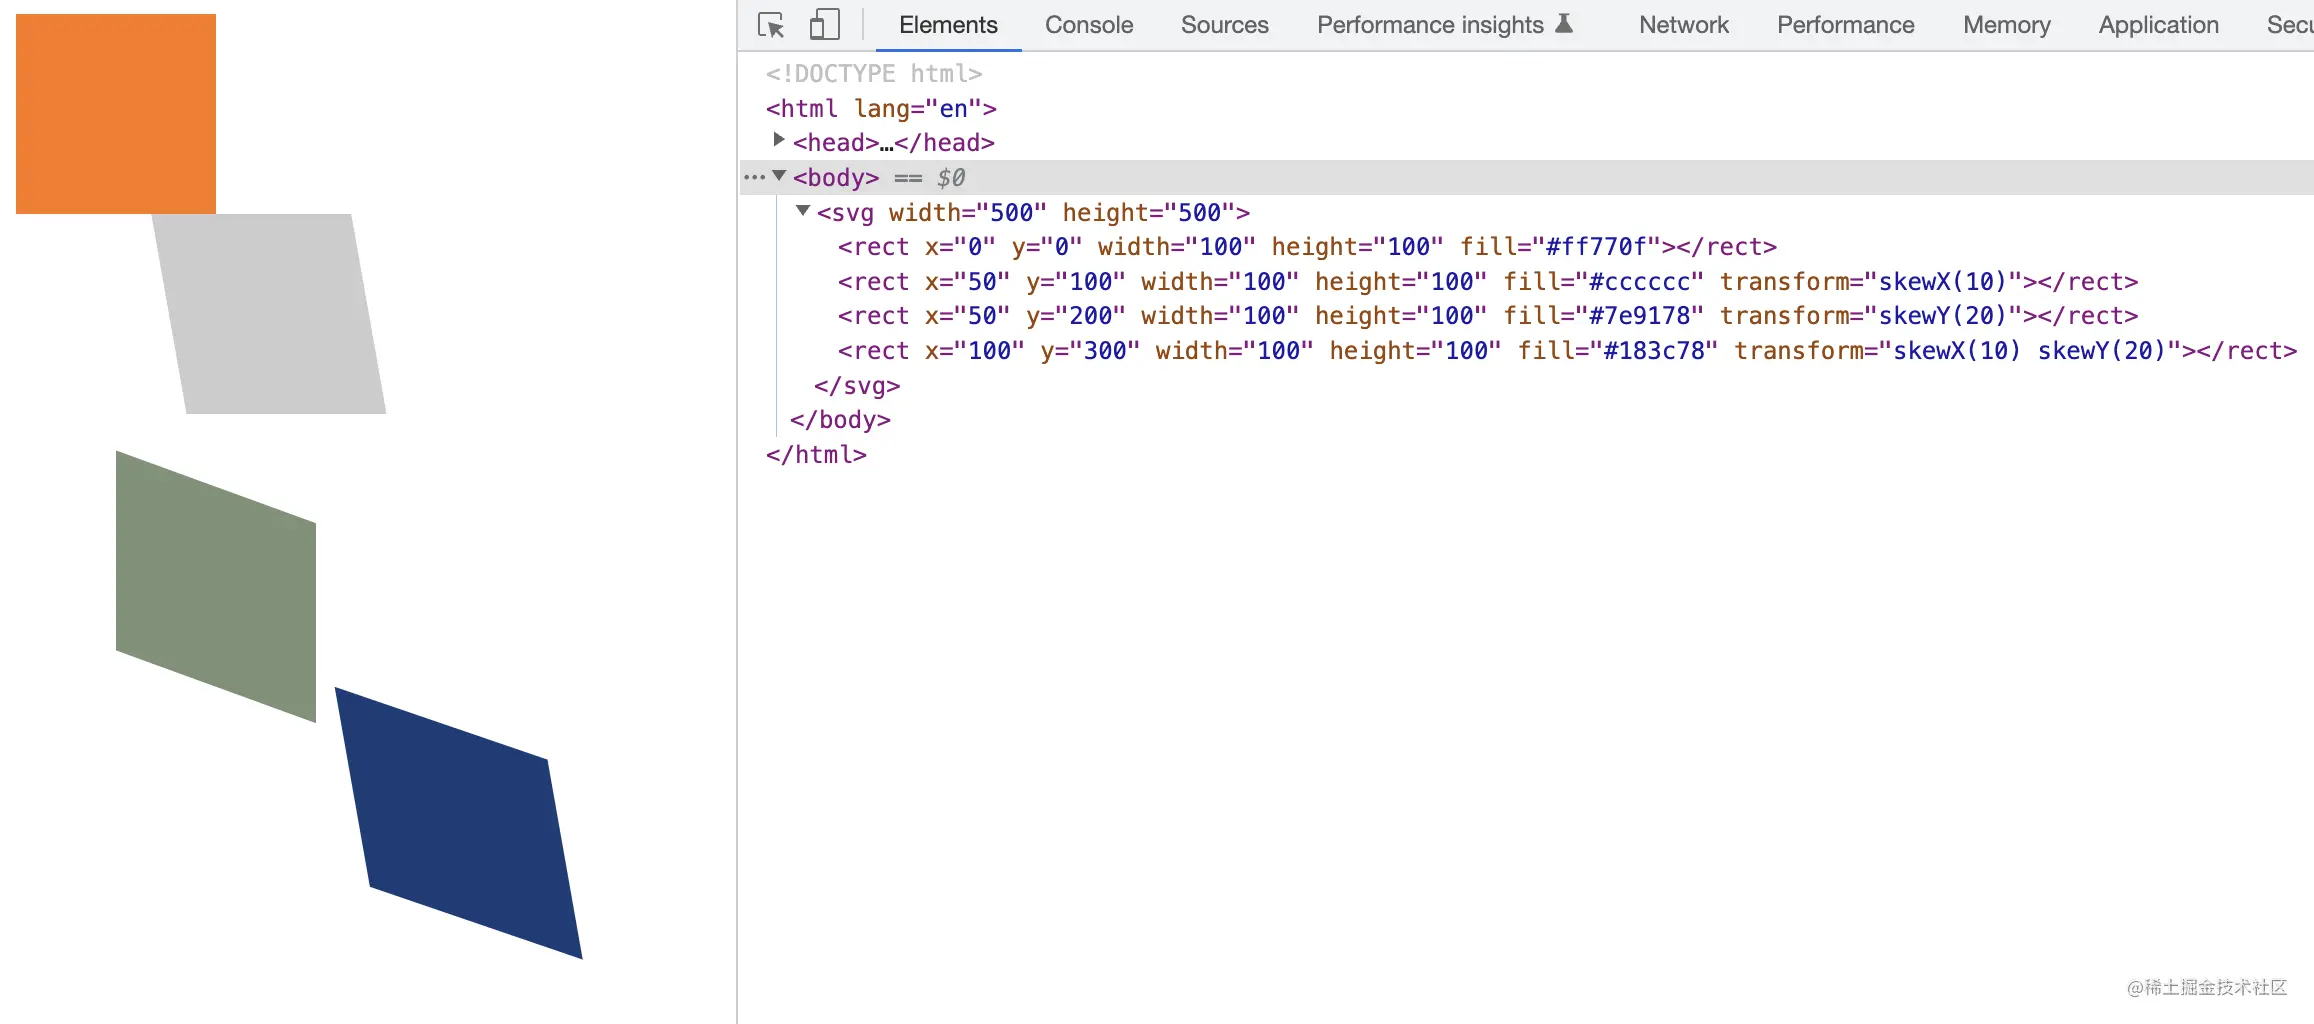
skew() 方法可用来实现元素的倾斜,可根据参数去分别做 X 轴和 Y 轴的倾斜度。
语法:transform="skewX(x) skewY(y)"
参数:x 为 X 轴上的倾斜度,y 为 Y 轴上的倾斜度。
在 SVG 中 skew 属性需要分开设置,x 轴设置为 skewX,y 轴设置为 skewY,不能合并起来用,写成 skew(x, y) 是不生效的。
示例:
<!DOCTYPE html><html lang="en"><head><meta charset="UTF-8"><meta http-equiv="X-UA-Compatible" content="IE=edge"><meta name="viewport" content="width=device-width, initial-scale=1.0"><title>SVG - 动画</title></head><body><svg width="500" height="500"><rect x="0" y="0" width="100" height="100" fill="#ff770f"/><rect x="50" y="100" width="100" height="100" fill="#cccccc" transform="skewX(10)"/><rect x="50" y="200" width="100" height="100" fill="#7e9178" transform="skewY(20)"/><rect x="100" y="300" width="100" height="100" fill="#183c78" transform="skewX(10) skewY(20)"/></svg></body></html>
效果:
JS 动画
在文章最开始的时候我们就说过:SVG 不能动态的修改动画内容。
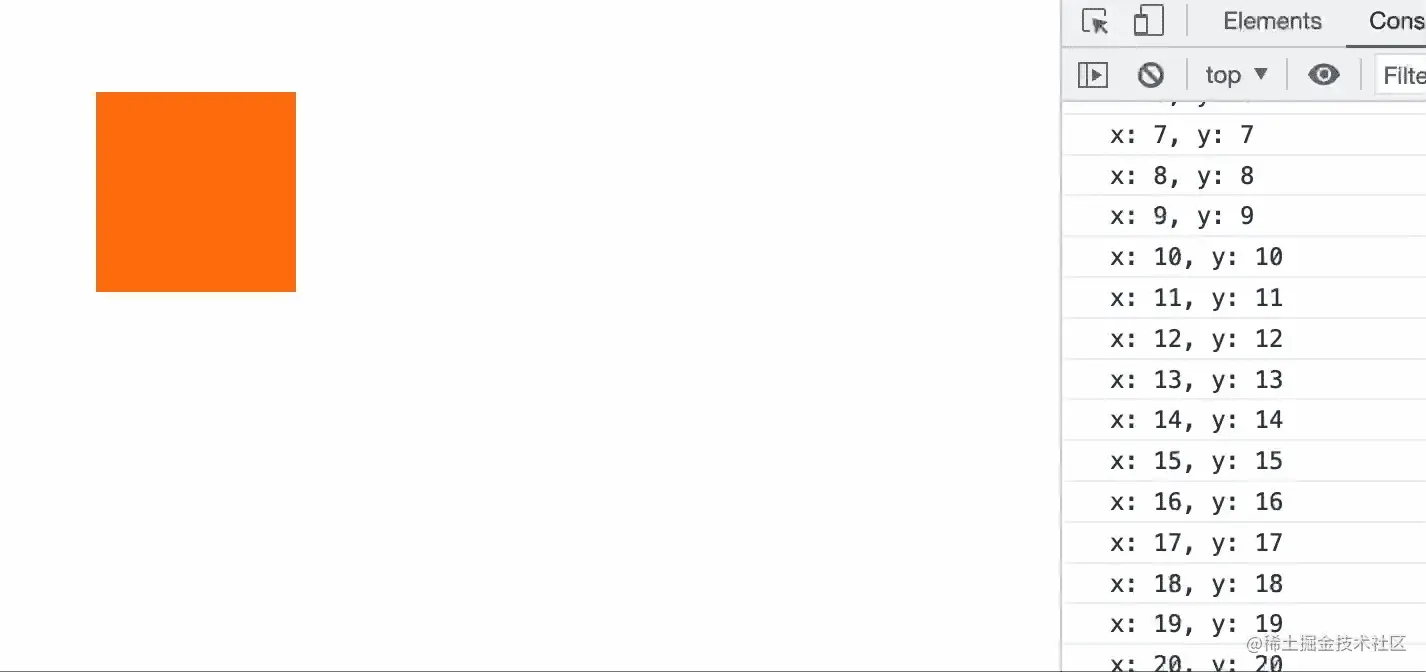
所以 CSS3 的过渡属性就不好使了,那么想实现动画就只能使用 js 的定时器(setInterval)来实现。
举个例子:
<!DOCTYPE html><html lang="en"><head><meta charset="UTF-8"><meta http-equiv="X-UA-Compatible" content="IE=edge"><meta name="viewport" content="width=device-width, initial-scale=1.0"><title>SVG - 动画</title></head><body><svg width="500" height="500"><rect id="svg" x="0" y="0" width="100" height="100" fill="#ff770f"/></svg><script>const svgEl = document.getElementById('svg')let x=0, y=0, add=truesetInterval(()=>{x+=1if(y<150 && add){y+=1} else {add=falsey-=1}console.log(`x: ${x}, y: ${y}`)svgEl.setAttribute('transform', `translate(${x}, ${y})`)}, 10)</script></body></html>
效果:
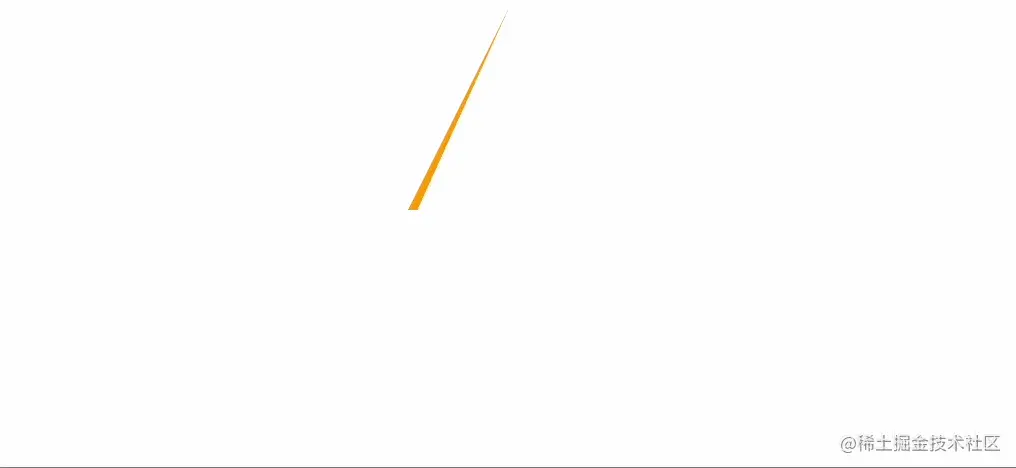
那么 SVG 最拿得出手的线条动画又如何用 js 来实现呢?比如我们需要变换图形:
示例:
<!DOCTYPE html><html lang="en"><head><meta charset="UTF-8"><meta http-equiv="X-UA-Compatible" content="IE=edge"><meta name="viewport" content="width=device-width, initial-scale=1.0"><title>SVG - 动画</title></head><body><svg width="500" height="500" fill="orange"><path id="svgPath" /></svg><script>const svgPath = document.getElementById('svgPath')let x=250, x1=250, y=100setInterval(()=>{if(x<350) {x+=0.1} else {x1=300if(y<200)y+=0.1}svgPath.setAttribute('d', `M 250 100 300 0 ${x} 100 ${x1} ${y} z`)}, 0)</script></body></html>
效果:
是不是越来越有 SVG 的样了?
但不幸的是,用 js 操作真的是很费劲。加入我们这个不是直线变三角再变菱形,而是正方形变十边形再变圆形最后变五角星。你想想这个计算是不是很头大?那有没有什么简单的方法呢?
这个问题我们先留着,接下来我们看看 CSS3 配合 SVG 做动画会怎么。
CSS 动画
下面我们就结合 CSS 来尝试做一下 svg 的线条动画。这里我们需要用上三个属性:分别是 stroke、stroke-dasharray、stroke-dashoffset。
首先咱们先看一下如何把线条动起来。
示例:
<!DOCTYPE html><html lang="en"><head><meta charset="UTF-8"><meta http-equiv="X-UA-Compatible" content="IE=edge"><meta name="viewport" content="width=device-width, initial-scale=1.0"><title>SVG - 动画</title><style>svg {display: block;margin: 50px auto;}#line {stroke-dasharray: 500;stroke-dashoffset: 500;animation: animation 2s linear infinite;}@keyframes animation {to {stroke-dashoffset: 0;}}</style></head><body><svg width="500" height="500" xmlns="http://www.w3.org/2000/svg" version="1.1"><line id="line" x1="0" x2="500" y1="0" y2="0" stroke="orange" stroke-width="10" /></svg></body></html>
效果:

那么咱们就按照这个逻辑搞一个按钮的线条动画吧。
示例:
<!DOCTYPE html><html lang="en"><head><meta charset="UTF-8"><meta http-equiv="X-UA-Compatible" content="IE=edge"><meta name="viewport" content="width=device-width, initial-scale=1.0"><title>SVG - 动画</title><style>body {background: #000000;margin-top: 100px;}.svg-wrapper {height: 60px;margin: 0 auto;position: relative;top: 50%;transform: translateY(-50%);width: 320px;}.rect {fill: transparent;stroke-dasharray: 200 540;stroke-dashoffset: -445;stroke-width: 8px;}@keyframes draw {0% {stroke-dasharray: 200 540;stroke-dashoffset: -445;stroke-width: 8px;}100% {stroke-dasharray: 760;stroke-dashoffset: 0;stroke-width: 2px;}}.svg-wrapper:hover .rect {-webkit-animation: 0.5s draw linear forwards;animation: 0.5s draw linear forwards;}</style></head><body><div class="svg-wrapper"><svg height="60" width="320" xmlns="http://www.w3.org/2000/svg"><text x="80" y="40" class="text" font-size="30" fill="#fff">Hello SVG</text><rect class="rect" height="60" width="320" stroke="#fff" /></svg></div></svg></body></html>
效果:

我们可以把填充和轮廓弄一些填充,效果就更好看了
示例:
<!DOCTYPE html><html lang="en"><head><meta charset="UTF-8"><meta http-equiv="X-UA-Compatible" content="IE=edge"><meta name="viewport" content="width=device-width, initial-scale=1.0"><title>SVG - 动画</title><style>body {background: #000000;margin-top: 100px;}.svg-wrapper {height: 60px;margin: 0 auto;position: relative;top: 50%;transform: translateY(-50%);width: 320px;}.rect {fill: transparent;stroke-dasharray: 200 540;stroke-dashoffset: -445;stroke-width: 8px;}@keyframes draw {0% {stroke-dasharray: 200 540;stroke-dashoffset: -445;stroke-width: 8px;}100% {stroke-dasharray: 760;stroke-dashoffset: 0;stroke-width: 2px;}}.svg-wrapper:hover .rect {-webkit-animation: 0.5s draw linear forwards;animation: 0.5s draw linear forwards;}</style></head><body><div class="svg-wrapper"><svg height="60" width="320" xmlns="http://www.w3.org/2000/svg"><defs><linearGradient id="linearGradient" x1="0" y1="0" x2="100%" y2="0"><stop offset="0%" stop-color="rgb(255,255,0)" /><stop offset="100%" stop-color="rgb(255,0,0)" /></linearGradient></defs><text x="80" y="40" class="text" font-size="30" fill="url(#linearGradient)">Hello SVG</text><rect class="rect" height="60" width="320" stroke="url(#linearGradient)" /></svg></div></svg></body></html>
效果:

到此我们就看完了 SVG 分别用 js 和 css 来实现动画的方法。那是不是觉得都比较繁琐呢?首先想绘制一个复杂的 SVG 就很复杂,其次用 js 去变化坐标也很复杂,用 css 去做动画简单点,但实现的动画也相对简单。
那么有没有什么 “捷径” 可以走呢?那回答肯定是:必须有啊!
GreenSock
GreenSock 动画平台 (GSAP) 是一个业界知名的工具套件,用于 超过 1100 万个网站,其中包括超过 50% 的 获奖网站 ! 您可以使用 GSAP 在任何框架中为 JavaScript 可以触及的几乎所有内容制作动画。 无论您是想要为 UI、SVG、Three.js 还是 React 组件制作动画,GSAP 都能满足您的需求。核心库 包含创建超快速、跨浏览器友好动画所需的一切。这就是我们将在本文中逐步介绍的内容。
除了核心,还有各种插件。您无需学习它们即可开始,但它们可以帮助解决特定的动画挑战,例如 基于滚动的动画、 可拖动 交互、变形等。

本文以 SVG 为主,所以不做太多 GSAP 的概述,我们直接说一下如何把 GSAP 应用到 SVG 动画中把。
引入
// 引入 CND 地址<script src="https://cdn.jsdelivr.net/npm/gsap"></script>
补间类型
下面介绍一下 GSAP 的使用和常用方法。
先举个例子看一下。
示例:
<!DOCTYPE html><html lang="en"><head><meta charset="UTF-8"><meta http-equiv="X-UA-Compatible" content="IE=edge"><meta name="viewport" content="width=device-width, initial-scale=1.0"><title>SVG - 动画</title><script src="https://cdn.jsdelivr.net/npm/gsap"></script></head><body><div id="svg-wrapper"><svg width="500" height="500" xmlns="http://www.w3.org/2000/svg"><rect id="rect" width="50" height="50" fill="orange"></rect></svg></div><script>gsap.to('#rect', {x: 300, // transform: translateX(300px)duration: 2 // 动画执行时间2S})</script></svg></body></html>
效果:

如上面的例子可以看出,我们只需要一个 .to() 方法就可以实现我们想要的动画。而像 .to()方法这样的补间类型还有三个:
补间有四种类型:
- gsap.to():这是最常见的补间类型。 .to() 补间将从元素的当前状态开始 “到” 补间中定义的值。
- gsap.from():和 .to() 正好相反,.from() 补间中定义的值 为动画开始的状态。
- gsap.fromTo():定义了起始值和结束值。
- gsap.set():立即设置属性(无动画)。
接下来我们将应用这几个补间类型实现一些酷炫点的动画。
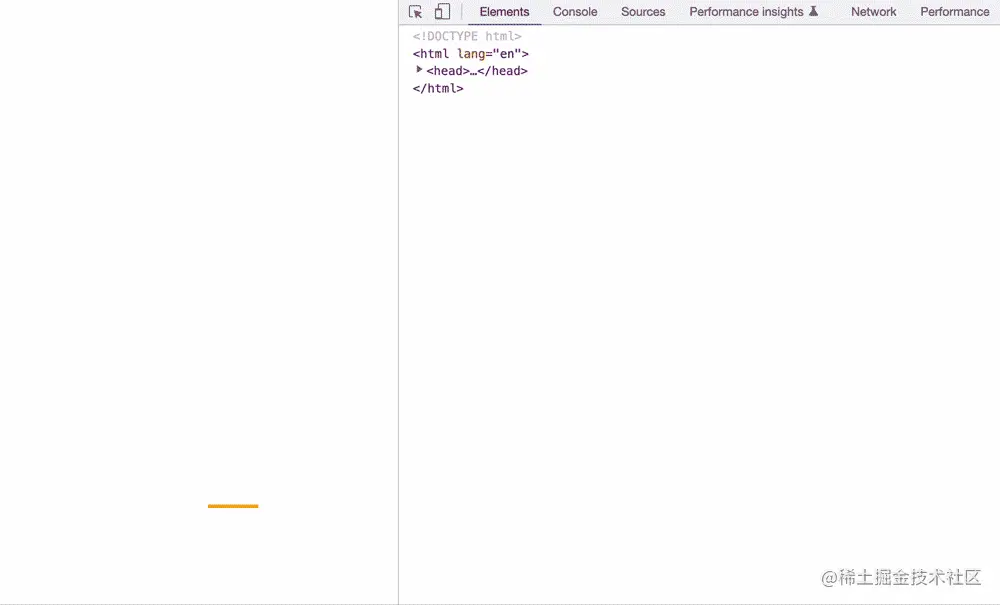
案例 1:下拉松开以后的回弹动效
<!DOCTYPE html><html lang="en"><head><meta charset="UTF-8"><meta http-equiv="X-UA-Compatible" content="IE=edge"><meta name="viewport" content="width=device-width, initial-scale=1.0"><title>SVG - 动画</title><script src="https://cdn.jsdelivr.net/npm/gsap"></script></head><body><div id="svg-wrapper"><svg width="500" height="500" xmlns="http://www.w3.org/2000/svg"><rect id="rect" x="200" y="500" width="50" height="50" fill="orange"></rect></svg></div><script>gsap.to('#rect', {y: -400, // transform: translateY(-400px)duration: 5, // 动画执行时间2Sease: "elastic.out(1, 0.3)", // 动画轨迹})</script></svg></body></html>
效果:
案例 2:小球物理落地动画
<!DOCTYPE html><html lang="en"><head><meta charset="UTF-8"><meta http-equiv="X-UA-Compatible" content="IE=edge"><meta name="viewport" content="width=device-width, initial-scale=1.0"><title>SVG - 动画</title><script src="https://cdn.jsdelivr.net/npm/gsap"></script></head><body><div id="svg-wrapper"><svg width="500" height="500" xmlns="http://www.w3.org/2000/svg"><circle id="circle" cx="100" cy="50" r="50" fill="orange" /></svg></div><script>gsap.to('#circle', {y: 400, // transform: translateY(400px)duration: 2, // 动画执行时间2Sease: "bounce.out", // 动画轨迹})</script></svg></body></html>
效果:

工具和插件
以前咱们是看不懂 SVG 里面的哪些标签和 path 路径,那么现在能看懂是不是又觉得写不出一个好看的 SVG 呢?
其实这是正常的,都啥时代了,能用工具的绝不自己动手,下面咱们就说一下,如何应用工具和插件,写一个酷炫的 SVG 动画。
工具
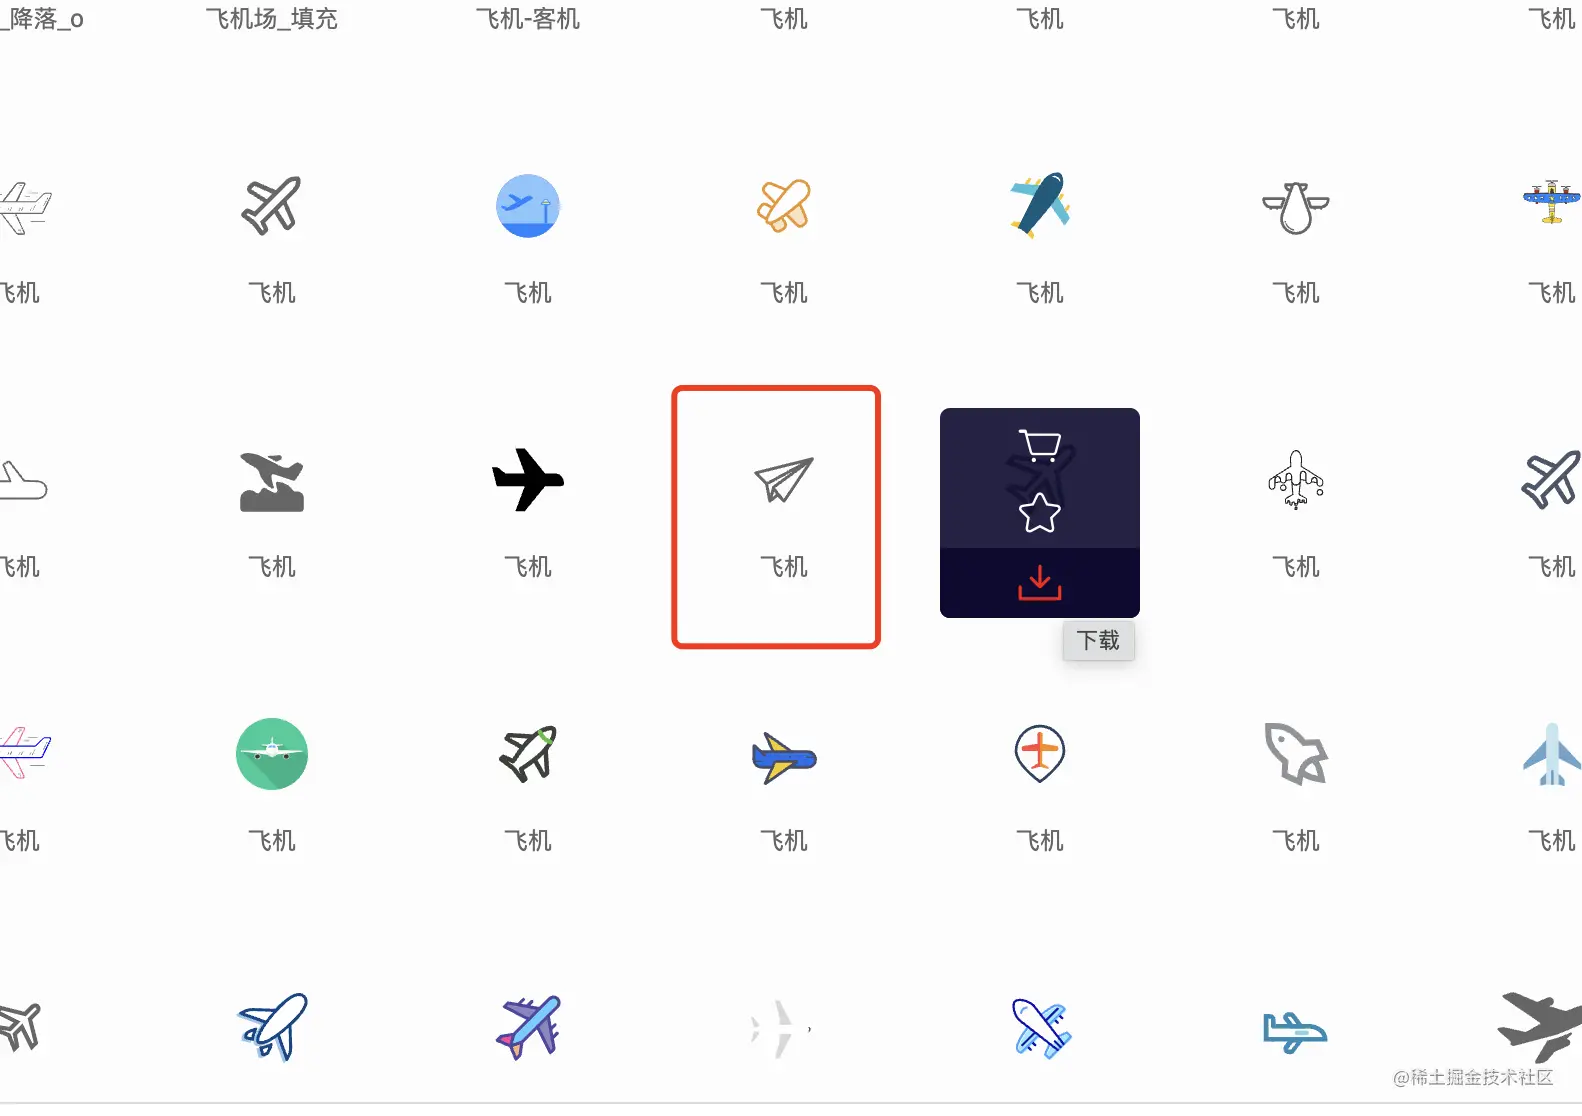
能生成 SVG 路径的工具还是比较多的啊,比如你想要现成的 SVG 图标,咱们可以直接上 iconfont 下载就完事了【大体的流程就是:进入 iconfont 网站 -> 找到你想要的图标 -> 鼠标滑到图标上点击下载 -> 然后选择 SVG 下载】。
一些复杂的 svg 路径呢我们可以用 Sketch 或者 AI 之类的工具生成,比如说下面我们要做一个飞机划过的动画:
首先 我们在 iconfont 中找一个飞机的图标,如图:
然后我们把下载下来的 svg 图片添加到我们的案例中:
<svg t="1659235898344" class="icon" viewBox="0 0 1024 1024" version="1.1" xmlns="http://www.w3.org/2000/svg" p-id="3908" xmlns:xlink="http://www.w3.org/1999/xlink" width="16" height="16"><defs><style type="text/css">@font-face { font-family: feedback-iconfont; src: url("//at.alicdn.com/t/font_1031158_u69w8yhxdu.woff2?t=1630033759944") format("woff2"), url("//at.alicdn.com/t/font_1031158_u69w8yhxdu.woff?t=1630033759944") format("woff"), url("//at.alicdn.com/t/font_1031158_u69w8yhxdu.ttf?t=1630033759944") format("truetype"); }</style></defs><path d="M1009.19461 5.118447a32.054274 32.054274 0 0 0-35.125341 0.255922l-959.708789 639.805859a31.830341 31.830341 0 0 0-14.043738 29.942914 31.830341 31.830341 0 0 0 19.929952 26.360002l250.292052 100.161607 117.692288 205.953506a31.990293 31.990293 0 0 0 27.415681 16.123108H415.998608c11.228593 0 21.657428-5.950194 27.415681-15.547283l66.443839-110.782384 310.14589 124.026365a31.734371 31.734371 0 0 0 27.543642-1.855437c8.445437-4.734563 14.23568-13.05204 15.867185-22.617137l159.951465-959.708788A32.054274 32.054274 0 0 0 1009.19461 5.118447zM100.446359 664.662317L841.821398 170.3803 302.784962 747.389214c-2.847136-1.695486-5.374369-3.934806-8.509418-5.182427l-193.829185-77.54447z m225.627536 105.216073l-0.223932-0.319903L931.842082 120.955298 415.230841 925.895049l-89.156946-156.016659z m480.750122 177.322194l-273.229092-109.278841a63.564712 63.564712 0 0 0-19.929952-3.806845L934.401305 181.896806l-127.577288 765.303778z" fill="#333333" p-id="3909"></path></svg>
上面这个就是小飞机的 svg 文件,添加到项目中就是这样

然后咱们再用 Sketch 弄一个飞机飞行轨迹的路径:
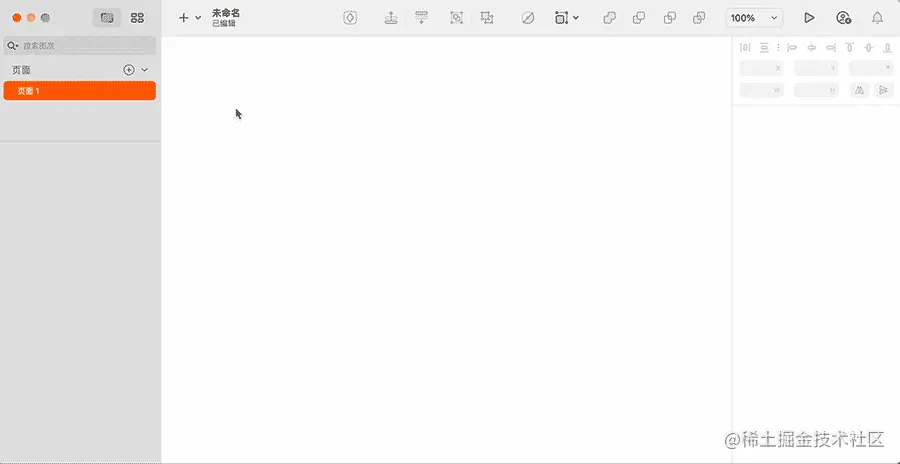
飞机和运动轨迹的 svg 都加入项目中以后,我们还需借助一个 GSAP 的插件(MotionPathPlugin)来实现这个功能。
示例:
<!DOCTYPE html><html lang="en"><head><meta charset="UTF-8"><meta http-equiv="X-UA-Compatible" content="IE=edge"><meta name="viewport" content="width=device-width, initial-scale=1.0"><title>SVG - 动画</title><script src="https://cdn.jsdelivr.net/npm/gsap"></script><script src="https://unpkg.com/gsap@3.10.4/dist/MotionPathPlugin.min.js"></script><style>body {width: 100vw;height: 100vh;display: flex;justify-content: center;align-items: center;}</style></head><body><!-- 飞机 --><svg id="airplane" width="16" height="16" class="icon" viewBox="0 0 1024 1024" version="1.1" xmlns="http://www.w3.org/2000/svg" p-id="3908" xmlns:xlink="http://www.w3.org/1999/xlink"><defs><style type="text/css">@font-face { font-family: feedback-iconfont; src: url("//at.alicdn.com/t/font_1031158_u69w8yhxdu.woff2?t=1630033759944") format("woff2"), url("//at.alicdn.com/t/font_1031158_u69w8yhxdu.woff?t=1630033759944") format("woff"), url("//at.alicdn.com/t/font_1031158_u69w8yhxdu.ttf?t=1630033759944") format("truetype"); }</style></defs><path d="M1009.19461 5.118447a32.054274 32.054274 0 0 0-35.125341 0.255922l-959.708789 639.805859a31.830341 31.830341 0 0 0-14.043738 29.942914 31.830341 31.830341 0 0 0 19.929952 26.360002l250.292052 100.161607 117.692288 205.953506a31.990293 31.990293 0 0 0 27.415681 16.123108H415.998608c11.228593 0 21.657428-5.950194 27.415681-15.547283l66.443839-110.782384 310.14589 124.026365a31.734371 31.734371 0 0 0 27.543642-1.855437c8.445437-4.734563 14.23568-13.05204 15.867185-22.617137l159.951465-959.708788A32.054274 32.054274 0 0 0 1009.19461 5.118447zM100.446359 664.662317L841.821398 170.3803 302.784962 747.389214c-2.847136-1.695486-5.374369-3.934806-8.509418-5.182427l-193.829185-77.54447z m225.627536 105.216073l-0.223932-0.319903L931.842082 120.955298 415.230841 925.895049l-89.156946-156.016659z m480.750122 177.322194l-273.229092-109.278841a63.564712 63.564712 0 0 0-19.929952-3.806845L934.401305 181.896806l-127.577288 765.303778z" fill="#333333" p-id="3909"></path></svg><!-- 运行的轨迹 --><svg width="481px" height="474px" viewBox="0 0 481 474" version="1.1" xmlns="http://www.w3.org/2000/svg" xmlns:xlink="http://www.w3.org/1999/xlink"><g id="页面-1" stroke="none" stroke-width="1" fill="none" fill-rule="evenodd"><path id="airplane-path" d="M0.650866946,473.296875 C9.94351815,378.307292 64.0286458,312.061198 162.90625,274.558594 C205.039435,258.578189 296.032367,243.501651 389.742188,185.972656 C427.061784,163.061943 457.245378,101.237724 480.292969,0.5" stroke="#979797"></path></g></svg><script>// 使用 MotionPathPlugin 插件gsap.registerPlugin(MotionPathPlugin);gsap.to("#airplane", { // 要运动的元素duration: 3, // 时间repeat: -1, // 循环(1、2、3、4 为循环次数,-1为无限循环)ease: Linear.easeNone, // 运动曲线motionPath:{path: "#airplane-path", // 运动的轨迹align: "#airplane-path",autoRotate: 45, // 飞机运动旋转角度 (true为自动调整角度)alignOrigin: [1, 1] // 飞机的运动原点}});</script></body></html>
效果:
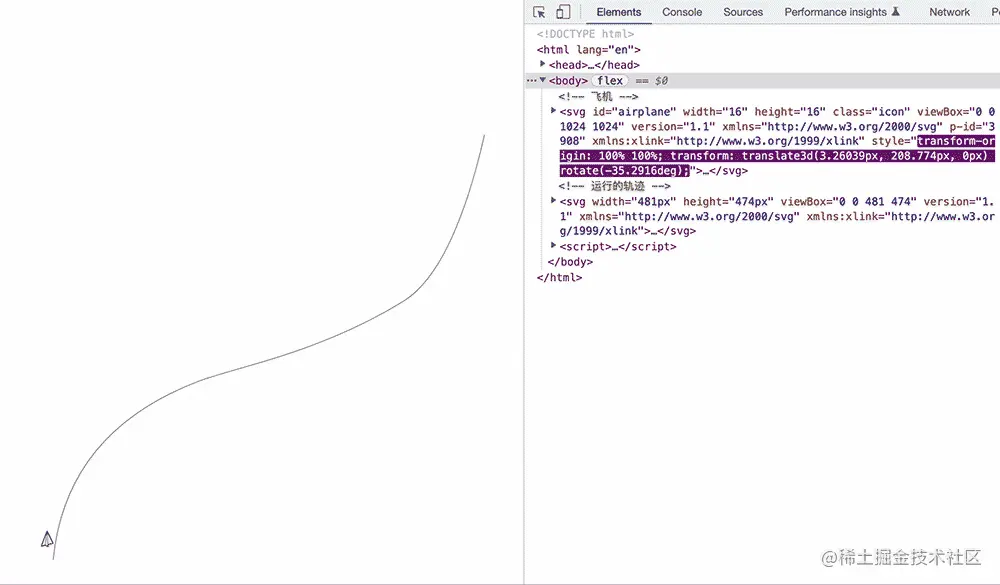
我们把运动轨迹隐藏看一下效果会发现更好。
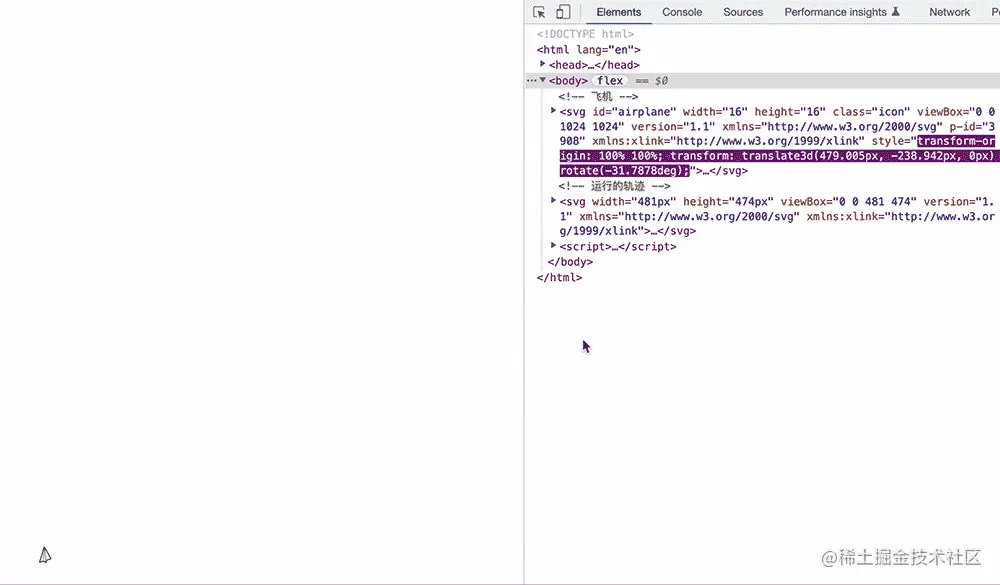
接下来我们做一个图形变换的例子。同样的用 Sketch 创建几个图形的路径:

按照上面的操作创建了三角形、矩形、五角星和,然后再在 iconfont 中找了一只猫和一只狗。下面我们就看一下他们之间的图形变换动画。
首先说一下我们需要用到的一个 GSAP 的方法:timeline(),其次还用到了另一个 GSAP 的插件:MorphSVGPlugin3
和名字一样,它是用来创建一条时间线的。
直接上示例:
<!DOCTYPE html><html lang="en"><head><meta charset="UTF-8"><meta http-equiv="X-UA-Compatible" content="IE=edge"><meta name="viewport" content="width=device-width, initial-scale=1.0"><title>SVG - 动画</title><script src="https://cdnjs.cloudflare.com/ajax/libs/gsap/3.2.6/gsap.min.js"></script><script src="https://s3-us-west-2.amazonaws.com/s.cdpn.io/16327/MorphSVGPlugin3.min.js"></script></head><body><svg width="400" height="400" viewBox="0 0 1200 1200" version="1.1" xmlns="http://www.w3.org/2000/svg" xmlns:xlink="http://www.w3.org/1999/xlink"><!-- 三角形 --><path id="triangle" d="M183,10 L356,363 L10,263 L183,10 Z" fill="#000000"></path><!-- 正方形 --><rect id="rect" fill="#D8D8D8" fill-opacity="0" x="0.5" y="0.5" width="422" height="422"></rect><!-- 五角星 --><path id="pentagram" d="M240.5,1.21504532 L314.363147,164.807166 L479.631495,191.057113 L360.039041,318.48039 L388.260044,498.335188 L240.5,413.423321 L92.7399555,498.335188 L120.960959,318.48039 L1.36850495,191.057113 L166.636853,164.807166 L240.5,1.21504532 Z" fill-opacity="0"></path><!-- 圆 --><circle id="circle" fill-opacity="0" cx="500" cy="500" r="400"></circle><!-- 猫 --><path id="cat" d="M 356.26 462.39 s 177.03 1.66 245.84 9.43 c 0 0 62.15 7.77 89.9 3.33 c 0 0 37.58 -18.84 58.82 -26.08 c 10.32 -3.52 17.98 -10.02 29.41 -32.19 c 3.42 -6.64 8.88 -13.32 25.53 -15.54 c 0 0 3.88 23.31 0 35.52 c 0 0 58.83 44.4 44.95 73.25 c 0 0 -9.85 16.28 -19.42 16.65 c -9.43 0.36 -33.85 -3.33 -37.74 0 c 0 0 -38.17 23.09 -42.18 56.61 c -2.27 19.02 -7.95 62.93 1.66 76.58 c 21.37 30.36 118.76 103.78 89.9 118.2 c 0 0 -8.88 4.99 -23.86 -6.66 c 0 0 -41.07 -44.4 -68.26 -54.39 c 0 0 -62.71 -36.07 -73.81 -54.94 c 0 0 -45.51 9.99 -36.07 105.44 c 0 0 8.26 14.74 14.98 19.42 c 4.74 3.3 18.59 21.18 -9.43 21.09 c 0 0 -33.3 3.88 -38.29 -39.96 c 0 0 -3.99 -90.46 -3.66 -118.76 l -161.72 -0.55 l -46.62 53.28 s -14.8 30.48 14.43 53.83 c 2.62 2.1 7.34 7.33 10.54 8.32 c 8.46 2.62 33.3 -2.22 28.86 20.53 c 0 0 -5.51 17.77 -38.85 6.1 c -21.87 -7.65 -44.4 -26.08 -68.26 -62.71 c 0 0 -11.1 -14.98 0 -36.63 c 0 0 11.1 -43.84 -7.21 -41.07 c 0 0 -36.07 38.85 -82.13 38.29 c 0 0 -49.95 -0.55 -51.06 78.25 c 0 0 22.75 23.86 -9.43 24.97 c 0 0 -24.97 2.22 -21.64 -33.85 c 0 0 3.33 -33.85 17.76 -81.02 c 0 0 3.88 -18.31 22.75 -29.97 c 0 0 32.74 -16.01 39.4 -42.41 c 0 0 8.88 -65.81 40.51 -101.32 c 0 0 7.21 -25.53 -8.88 -59.93 c 0 0 -31.08 -54.94 -36.63 -118.2 c 0 0 -1.66 -32.74 -45.51 -82.69 c 0 0 -19.15 -33.85 11.65 -25.53 c 0 0 68.26 37.46 79.08 109.88 c 0.04 0.02 23.63 115.18 64.69 135.43 Z" fill-opacity="0"/><!-- 狗子 --><path id="dog" d="M345.711616 469.227l-16.837632 70.654c74.320896-1.946 106.039296-19.359 218.017792-108.401 111.990784-89.029 98.112512-241.945 98.112512-241.945 34.69312-8.709 56.495104-33.879 56.495104-33.879-86.228992-88.063-133.791744 0-133.791744 0l-19.821568 0c-54.509568-29.995-152.619008-13.548-152.619008-13.548-14.86848-86.131-111.665152-17.414-111.665152-17.414 3.309568 29.69 42.957824 24.515 42.962944 24.515 0.013312 0.022 0.034816 0.048 0.048128 0.07-5.976064 77.29-32.164864 114.866-57.283584 133.093-28.628992-2.867-48.479232-5.737-48.479232-5.737-13.213696-45.49-42.615808-39.684-42.615808-39.684-47.565824 3.869-49.549312 128.722 0 186.791C227.782656 481.809 345.711616 469.227 345.711616 469.227zM445.309952 248.08c0.735232-15.481 7.862272-22.595 16.843776-25.447 0.982016 0.581 1.947648 1.154 2.876416 1.716 11.459584 6.939 10.838016 34.543 10.838016 34.543-1.748992 7.785-8.511488 13.662-18.762752 18.026C449.52576 272.741 444.548096 264.179 445.309952 248.08zM349.677568 235.985c13.874176-8.226 26.264576-7.26 26.264576 28.063 0 12.1-9.653248 19.43-22.344704 23.838-1.514496-0.035-3.028992-0.074-4.544512-0.118C343.319552 271.478 338.968576 242.34 349.677568 235.985zM316.6464 487.299l-67.38432-5.169c0 0-23.785472 33.556-25.116672 54.203-1.318912 20.635-11.886592 72.257 42.28608 54.196C320.60416 572.455 316.6464 487.299 316.6464 487.299zM592.812032 413.742c0 0-73.996288 99.359-210.098176 143.238 0 0-62.1056 141.939-76.63616 180.658-14.539776 38.707-39.643136 103.236-13.212672 125.169 26.420224 21.938 101.655552-98.072 128.790528-167.757l15.39584 10.33c0 0-59.61728 101.933-50.371584 140.648 9.245696 38.716 46.532608 74.253 96.448512-56.772 21.1456-55.485 21.1456-55.485 21.1456-55.485s9.2416 68.381 73.991168 100.638c0 0 26.433536-134.187 130.817024-98.052 0 0-107.031552-0.004-101.738496 105.804 0 0-89.851904 16.845-89.851904 39.388 0 22.55 5.27872 51.308 265.601024 17.389 79.280128-10.319 40.950784-149.674 13.206528-193.551C768.545792 661.503 612.630528 500.203 592.812032 413.742zM904.648704 596.98c-29.079552 30.975-113.63328 69.683-113.63328 69.683 26.806272 10.535 34.354176 65.81 34.354176 65.81 13.81376 3.146 22.460416 0 22.460416 0C929.76128 695.05 904.648704 596.98 904.648704 596.98z" fill-opacity="0"/></svg><script>// 创建时间线let tl = gsap.timeline({repeat: -1,repeatDelay: 0.2,yoyo: true, // 动画回放defaults: {duration: 2}})// 图形变化过程tl.to("#triangle", { morphSVG: "#rect" }, "+=1").to("#triangle", { morphSVG: "#pentagram" }, "+=1").to("#triangle", { morphSVG: "#circle" }, "+=1").to("#triangle", { morphSVG: "#cat" }, "+=1").to("#triangle", { morphSVG: "#dog" }, "+=1").timeScale(2);</script></body></html>
效果为:
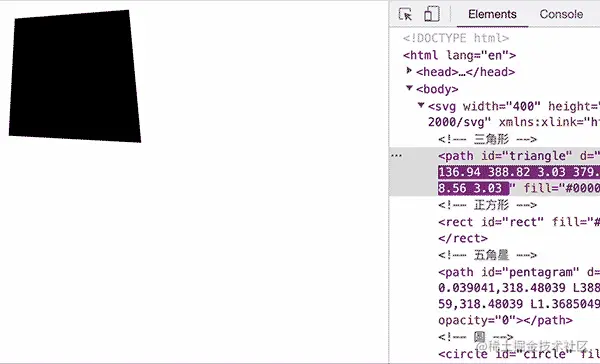
最后咱们看一个文字描边动画,今天天气不错,但我只能在家码字。所以就来一个 “今天天气不错!” 吧。
首先文字的轮廓咱们需要借助 AI 软件来创建,不然自己写我是写不出来。
上教程:

gif 太快还不清楚,需要的可以看视频:今天天气不错创建轮廓
拿到轮廓以后就开始写动画了。
<!DOCTYPE html><html lang="en"><head><meta charset="UTF-8"><meta http-equiv="X-UA-Compatible" content="IE=edge"><meta name="viewport" content="width=device-width, initial-scale=1.0"><title>SVG - 动画</title><script src="https://cdnjs.cloudflare.com/ajax/libs/gsap/3.2.6/gsap.min.js"></script><script src="https://s3-us-west-2.amazonaws.com/s.cdpn.io/16327/DrawSVGPlugin3.min.js"></script></head><body><svg xmlns="http://www.w3.org/2000/svg" viewBox="0 0 700 200"><g fill="none" stroke="#000000" stroke-width="1" ><path id="a" d="M88.43,81.14a6,6,0,0,1-.35,1.7,1.77,1.77,0,0,1-1.25.9,11.38,11.38,0,0,1-3,.3c-1.36,0-3.28,0-5.75-.1-1.4-.07-2.55-.15-3.45-.25a11.92,11.92,0,0,1-2.4-.5,7.45,7.45,0,0,1-2.05-1.1,20.74,20.74,0,0,1-2.2-2q-2.59-2.61-4.65-4.9c-1.36-1.54-2.7-3.15-4-4.85s-2.65-3.59-4.05-5.65-3-4.54-4.8-7.4A13.29,13.29,0,0,0,47,53.94a28.48,28.48,0,0,0-4.75-2.75,20.75,20.75,0,0,0-4.9-1.6,9,9,0,0,0-3.9-.05q-1.29,2-2.4,3.65c-.73,1.1-1.67,2.51-2.8,4.25a8.52,8.52,0,0,0,1.55.55l1.9.45q1,.2,1.8.3a3.48,3.48,0,0,0,1.15,0q1.5-.3,2.4-.45a6.53,6.53,0,0,1,1.6-.1,8.28,8.28,0,0,1,1.35.2c.44.1,1,.25,1.65.45a14,14,0,0,1,5.25,2.9,7.13,7.13,0,0,1,1.95,4.9,2.05,2.05,0,0,1-1,1.9,4.33,4.33,0,0,1-3.2.5,16.88,16.88,0,0,0-7.05.9q-4.35,1.29-10.65,3.8-3.7,1.4-4.45,1.2c-.5-.14.09-.84,1.75-2.1,1.07-.8,2-1.52,2.8-2.15s1.5-1.24,2.1-1.8l1.65-1.55c.5-.47,1-1,1.55-1.5a23.19,23.19,0,0,0-2-3.9,15.42,15.42,0,0,0-2.9-3.4q-2,3.6-3.55,6.25c-1,1.76-2,3.35-3,4.75a34.92,34.92,0,0,1-3,3.8,43.57,43.57,0,0,1-3.55,3.45C13,78,11.46,79.2,9.73,80.54S6,83.4,3.63,85.14a3.86,3.86,0,0,1-2.75,1.1c-.7-.14-1-.77-.85-1.9a9.39,9.39,0,0,1,1.35-4.25c.7-1,1.39-1.39,2.05-1,.14.06.77-.44,1.9-1.5s2.45-2.45,3.95-4.15,3-3.57,4.6-5.6a51.54,51.54,0,0,0,3.95-5.85q1.8-3.11,3.75-6.3t4.25-6.75q2.3-3.55,5.05-7.4c1.83-2.57,3.89-5.35,6.15-8.35a2.93,2.93,0,0,0,.5-1.5c0-.47-.4-1.1-1.2-1.9-.47-.47-.47-.84,0-1.1s1.53-.24,3.2.1a9,9,0,0,1,4.55,2.2,4.88,4.88,0,0,1,1.65,3.6,4.3,4.3,0,0,1-.45,2.1,6.45,6.45,0,0,1-1.85,1.8,22.38,22.38,0,0,0-5,4.7,25.26,25.26,0,0,1,8,2.9,35.58,35.58,0,0,1,8.75,7.1q5.81,6,10.2,9.9a61.11,61.11,0,0,0,8.3,6.3q5.5,3.3,8.55,5.15a40.07,40.07,0,0,1,4.45,3,5,5,0,0,1,1.65,1.9A4.09,4.09,0,0,1,88.43,81.14Zm-71.5,3.2c.34-1.87.78-2.92,1.35-3.15s.92,0,1,.85a1.34,1.34,0,0,0,.7.85,3.61,3.61,0,0,0,2.1.15A43.12,43.12,0,0,0,27.58,82c2-.5,3.8-1,5.5-1.6s3.13-1.09,4.3-1.55a10.39,10.39,0,0,0,1.95-.9c1.2-1.2,2.13-2.09,2.8-2.65a3.71,3.71,0,0,1,2.5-.85,9.2,9.2,0,0,1,3.1.65,14.58,14.58,0,0,1,3.5,1.85,7.76,7.76,0,0,1,3,3.35,2.36,2.36,0,0,1-.3,2.75,4.83,4.83,0,0,0-1.1,1.65q-.6,1.25-1.2,2.7c-.4,1-.77,1.88-1.1,2.75s-.57,1.46-.7,1.8c-.4,1.4-.91,3-1.55,4.65s-1.32,3.36-2.05,5a45,45,0,0,1-2.35,4.55,10.84,10.84,0,0,1-2.55,3.1c-1.06.8-1.93,1-2.6.65S37.5,108.24,37,106a15.86,15.86,0,0,1-.55-3.4,3.34,3.34,0,0,1,1.15-1.9,10.93,10.93,0,0,0,2.2-3.25,33.08,33.08,0,0,0,1.9-4.8A43.06,43.06,0,0,0,43,87.79a14.14,14.14,0,0,0,.35-3.55,39.18,39.18,0,0,1-6,2.75q-3.39,1.24-6.5,2.15t-5.45,1.35a11.85,11.85,0,0,1-2.85.35,12,12,0,0,1-3.4-1,4.81,4.81,0,0,1-1.75-1.5,3.86,3.86,0,0,1-.6-1.85A9.54,9.54,0,0,1,16.93,84.34Z"/><path id="b" d="M186.63,106.44c.47.73.64,1.28.5,1.65s-.67.71-1.6,1a20.29,20.29,0,0,1-5.15,1,57.12,57.12,0,0,1-7.85-.2,17.79,17.79,0,0,1-4.85-1.15,22.08,22.08,0,0,1-5.15-3,45.53,45.53,0,0,1-5.7-5.3,88.32,88.32,0,0,1-6.4-7.95,48,48,0,0,0-3.6-4.4,17.28,17.28,0,0,0-3.4-2.85,19.05,19.05,0,0,0-3.9-1.9,50.51,50.51,0,0,0-4.9-1.45,53,53,0,0,0-.95,5.6q-.35,3-.45,5.8a10.79,10.79,0,0,1-1.8,5.7,13.74,13.74,0,0,1-5.4,4.5,26.14,26.14,0,0,1-10,3.15,16.93,16.93,0,0,1-7.25-1c-1-.4-1.47-.89-1.4-1.45s.7-.89,1.9-1a16.73,16.73,0,0,0,6.55-2.15,24.23,24.23,0,0,0,6.85-5.65,22,22,0,0,0,3-5.25,41.94,41.94,0,0,0,2.1-7.55,14.56,14.56,0,0,1-4.5,1.1,20.24,20.24,0,0,1-4.5-.1,11.75,11.75,0,0,1-3.6-1,3.13,3.13,0,0,1-1.8-1.85q-.9-3.51.2-5.5c.54-.94,1.08-1.37,1.65-1.3s.75.43.55,1.1a.37.37,0,0,0,.3.5,5.11,5.11,0,0,0,2-.45c1-.37,2.52-1,4.45-1.9s4.57-2.22,7.9-4a19.37,19.37,0,0,0,.65-3,20.06,20.06,0,0,0,.25-3c-1.87,1.46-3.15,2-3.85,1.6s-.71-1.07,0-2c.53-.74,1.2-1.6,2-2.6s1.64-2,2.5-3c-.33-1.34-.36-2.12-.1-2.35s.9-.09,1.9.45q.41-.51.75-.9c.23-.27.48-.54.75-.8a6.61,6.61,0,0,1-2.2-.8,17.69,17.69,0,0,1-2.6-1.75,24.91,24.91,0,0,1-2.5-2.35,14.9,14.9,0,0,1-1.9-2.5c-1.26-2.4-.8-3.5,1.4-3.3a11.9,11.9,0,0,0,4-.4,24.92,24.92,0,0,0,5.35-2q5.8-2.8,6-4.2c0-.27.25-.49.75-.65a5.54,5.54,0,0,1,2-.2,13.77,13.77,0,0,1,2.85.45,19.63,19.63,0,0,1,3.4,1.2A9.06,9.06,0,0,1,155,39.49a5.14,5.14,0,0,1,1.25,2.5,3.13,3.13,0,0,1-.45,2.25,3.47,3.47,0,0,1-2.05,1.4,20.76,20.76,0,0,0-2.6,1.65q-2.1,1.44-4.8,3.5t-5.4,4.2c-1.8,1.43-3.26,2.65-4.4,3.65a16.1,16.1,0,0,1,1.9,3,10.42,10.42,0,0,1,1,3c.87-.4,2-.94,3.5-1.6s3-1.39,4.55-2.15,3.05-1.52,4.45-2.25,2.5-1.34,3.3-1.8a5.62,5.62,0,0,1,4.25-.2,12.86,12.86,0,0,1,5.25,3c1,.86,1.38,1.71,1.15,2.55s-1.25,1.51-3,2.05a54.57,54.57,0,0,0-5.4,2q-3.3,1.35-6.75,3t-6.6,3.3a56.69,56.69,0,0,0-5,2.85,33.81,33.81,0,0,1,4.25,2.45q2.35,1.55,4.5,3.2c1.44,1.1,2.75,2.16,4,3.2a28.28,28.28,0,0,1,2.6,2.45,19.4,19.4,0,0,0,2.45,2.4q1.56,1.29,3.3,2.55c1.17.83,2.34,1.58,3.5,2.25a18.14,18.14,0,0,0,2.95,1.4q5.51,1.89,9,3.35a50.61,50.61,0,0,1,5.7,2.7,14.45,14.45,0,0,1,3.35,2.45A12.81,12.81,0,0,1,186.63,106.44Z"/><path id="c" d="M286.63,106.44c.47.73.64,1.28.5,1.65s-.67.71-1.6,1a20.29,20.29,0,0,1-5.15,1,57.12,57.12,0,0,1-7.85-.2,17.79,17.79,0,0,1-4.85-1.15,22.08,22.08,0,0,1-5.15-3,45.53,45.53,0,0,1-5.7-5.3,88.32,88.32,0,0,1-6.4-7.95,48,48,0,0,0-3.6-4.4,17.28,17.28,0,0,0-3.4-2.85,19.05,19.05,0,0,0-3.9-1.9,50.51,50.51,0,0,0-4.9-1.45,53,53,0,0,0-.95,5.6q-.35,3-.45,5.8a10.79,10.79,0,0,1-1.8,5.7,13.74,13.74,0,0,1-5.4,4.5,26.14,26.14,0,0,1-9.95,3.15,16.93,16.93,0,0,1-7.25-1c-1-.4-1.47-.89-1.4-1.45s.7-.89,1.9-1a16.73,16.73,0,0,0,6.55-2.15,24.23,24.23,0,0,0,6.85-5.65,22,22,0,0,0,3-5.25,41.94,41.94,0,0,0,2.1-7.55,14.56,14.56,0,0,1-4.5,1.1,20.24,20.24,0,0,1-4.5-.1,11.75,11.75,0,0,1-3.6-1,3.13,3.13,0,0,1-1.8-1.85q-.9-3.51.2-5.5c.54-.94,1.08-1.37,1.65-1.3s.75.43.55,1.1a.37.37,0,0,0,.3.5,5.11,5.11,0,0,0,2-.45c1-.37,2.52-1,4.45-1.9s4.57-2.22,7.9-4a19.37,19.37,0,0,0,.65-3,20.06,20.06,0,0,0,.25-3c-1.87,1.46-3.15,2-3.85,1.6s-.71-1.07,0-2c.53-.74,1.2-1.6,2-2.6s1.64-2,2.5-3c-.33-1.34-.36-2.12-.1-2.35s.9-.09,1.9.45q.41-.51.75-.9c.23-.27.48-.54.75-.8a6.61,6.61,0,0,1-2.2-.8,17.69,17.69,0,0,1-2.6-1.75,24.91,24.91,0,0,1-2.5-2.35,14.9,14.9,0,0,1-1.9-2.5c-1.26-2.4-.8-3.5,1.4-3.3a11.9,11.9,0,0,0,4-.4,24.92,24.92,0,0,0,5.35-2q5.8-2.8,6-4.2c0-.27.25-.49.75-.65a5.54,5.54,0,0,1,2-.2,13.77,13.77,0,0,1,2.85.45,19.63,19.63,0,0,1,3.4,1.2A9.06,9.06,0,0,1,255,39.49a5.14,5.14,0,0,1,1.25,2.5,3.13,3.13,0,0,1-.45,2.25,3.47,3.47,0,0,1-2.05,1.4,20.76,20.76,0,0,0-2.6,1.65q-2.1,1.44-4.8,3.5t-5.4,4.2c-1.8,1.43-3.26,2.65-4.4,3.65a16.1,16.1,0,0,1,1.9,3,10.42,10.42,0,0,1,1,3c.87-.4,2-.94,3.5-1.6s3-1.39,4.55-2.15,3.05-1.52,4.45-2.25,2.5-1.34,3.3-1.8a5.62,5.62,0,0,1,4.25-.2,12.86,12.86,0,0,1,5.25,3c1,.86,1.38,1.71,1.15,2.55s-1.25,1.51-3.05,2.05a54.57,54.57,0,0,0-5.4,2q-3.3,1.35-6.75,3t-6.6,3.3a56.69,56.69,0,0,0-5,2.85,33.81,33.81,0,0,1,4.25,2.45q2.35,1.55,4.5,3.2c1.44,1.1,2.75,2.16,4,3.2a28.28,28.28,0,0,1,2.6,2.45,19.4,19.4,0,0,0,2.45,2.4q1.56,1.29,3.3,2.55c1.17.83,2.34,1.58,3.5,2.25a18.14,18.14,0,0,0,2.95,1.4q5.5,1.89,9,3.35a50.61,50.61,0,0,1,5.7,2.7,14.45,14.45,0,0,1,3.35,2.45A12.81,12.81,0,0,1,286.63,106.44Z"/><path id="d" d="M383.33,111.74a11.24,11.24,0,0,1-5.15,2.5,26.23,26.23,0,0,1-7.35.6,45.94,45.94,0,0,1-9.25-1.3,30,30,0,0,1-7.9-3.2,21.38,21.38,0,0,1-5.95-5.15,18.59,18.59,0,0,1-3.4-7.15,34.73,34.73,0,0,1-.6-5.85,60.81,60.81,0,0,1,.3-7.55q.41-4.11,1.2-8.5a63.75,63.75,0,0,1,2.2-8.6c-2.07.8-4.4,1.76-7,2.9s-5.16,2.28-7.7,3.45-4.9,2.28-7.1,3.35-4,1.93-5.3,2.6A34.42,34.42,0,0,1,315,82.19a9.33,9.33,0,0,1-3.65.35,6,6,0,0,1-2.55-.65,5.42,5.42,0,0,1-1.5-1.25,3,3,0,0,1-.65-1.5,3.31,3.31,0,0,1,.1-1.4,10.43,10.43,0,0,1,1.95-4c.64-.6,1.72-.8,3.25-.6a12.06,12.06,0,0,0,2.9-.25,27.67,27.67,0,0,0,4.85-1.45,56.52,56.52,0,0,0,6.5-3.1,65.63,65.63,0,0,0,7.75-5.1q-4.8.9-7.9,1.35a18.29,18.29,0,0,1-4.85.2,2.86,2.86,0,0,1-2.3-1.3,5.14,5.14,0,0,1-.25-3.05c.14-1,.27-1.79.4-2.35a4.61,4.61,0,0,1,.5-1.35,1.59,1.59,0,0,1,.8-.7,8.93,8.93,0,0,1,1.3-.4l2.7-.9c1.2-.4,2.44-.89,3.7-1.45s2.4-1.14,3.4-1.7a6.46,6.46,0,0,0,2-1.55,112.5,112.5,0,0,1-13.25,2.6c-3.43.4-5.38.06-5.85-1a17.66,17.66,0,0,1-.7-3.85,27.77,27.77,0,0,1,0-4.65,4.56,4.56,0,0,1,.5-2.1,2.27,2.27,0,0,1,1.6-.8,6,6,0,0,0,1.5-.45,8.87,8.87,0,0,0,1.85-1.2,29.4,29.4,0,0,0,2.45-2.3q1.41-1.45,3.3-3.75a7.9,7.9,0,0,0,2-3.35,3.73,3.73,0,0,0-.7-2.65c-.47-.74-.55-1.29-.25-1.65a1.13,1.13,0,0,1,1.35-.25l3.85,1.2a13,13,0,0,1,2.85,1.2A7.36,7.36,0,0,1,336,28.79a12.62,12.62,0,0,1,1.65,2.85,4.09,4.09,0,0,1-.2,3.75q-1,1.65-5,3.75c.93-.2,2-.42,3.2-.65l3.7-.75c1.27-.27,2.5-.57,3.7-.9a21.12,21.12,0,0,0,3.1-1.1,10.35,10.35,0,0,1,5.1-1.2,11.62,11.62,0,0,1,4.5,1.6q2.81,1.7,2.9,3.3c.07,1.06-.56,1.86-1.9,2.4-.8.33-2.1.91-3.9,1.75s-3.72,1.75-5.75,2.75-4,2-5.85,3.15a25.11,25.11,0,0,0-4.1,2.85q3.11-.81,5.25-1.2a20.46,20.46,0,0,1,3.7-.4,6.62,6.62,0,0,1,2.6.45,6.23,6.23,0,0,1,1.95,1.35,4,4,0,0,1,.9,1.45c.13.43-.25,1-1.15,1.8a41.91,41.91,0,0,1-4.6,3.15q-3.25,2-9.25,5.4a24.34,24.34,0,0,0,4.9-1,19.59,19.59,0,0,0,4.5-2,11.15,11.15,0,0,1,3.5-1.6,5.34,5.34,0,0,1,2.9.5q2.51,1.09,4.7,2.3a8.79,8.79,0,0,1,3.1,2.5,4.09,4.09,0,0,1,.95,1.85c0,.43-.31.91-1.05,1.45A25,25,0,0,0,352.88,78a31.76,31.76,0,0,0-2.35,12.45q0,6.8,3.9,11t11.7,5.1c2.53.33,4.1.33,4.7,0s.8-1,.6-1.9a19,19,0,0,0-1-3.15,36.11,36.11,0,0,0-1.65-3.55c-.63-1.2-1.31-2.39-2-3.55a36.07,36.07,0,0,0-2.1-3c-.53-.67-.61-1.17-.25-1.5s.85-.17,1.45.5q2,2.4,4.25,5t4.5,4.95c1.5,1.6,2.95,3.06,4.35,4.4s2.6,2.43,3.6,3.3,1.75,1.63,1.85,2.1S384.13,111.07,383.33,111.74Z"/><path id="e" d="M479.43,90a3.45,3.45,0,0,1-1.35,3.1,2.78,2.78,0,0,1-2.65.4L471.38,92c-1.43-.54-2.85-1.05-4.25-1.55s-2.7-.95-3.9-1.35-2.2-.7-3-.9c-1.87-.54-3.7-1.1-5.5-1.7a42.57,42.57,0,0,1-4.4-1.7,27.55,27.55,0,0,0-4.5-2,9.34,9.34,0,0,0-3.6-.25q-.19,2.29-.3,5.1c-.07,1.86-.13,3.73-.2,5.6s-.1,3.56-.1,5.1v3.5a9.67,9.67,0,0,1-1.6,5.75c-1.06,1.5-2.17,2.25-3.3,2.25-.53,0-1.26-.5-2.2-1.5a22.6,22.6,0,0,1-2.7-3.65,21.15,21.15,0,0,1-2.05-4.55,7.44,7.44,0,0,1-.25-4.2q.6-2.5,1.1-5.75c.34-2.17.6-4.3.8-6.4s.32-4.07.35-5.9a20.53,20.53,0,0,0-.25-4.25q-6.79,7.2-10.85,11.25T414.23,91a16.83,16.83,0,0,1-3.6,2.55,6,6,0,0,1-2.3.5,2.22,2.22,0,0,1-1.05-.3,3.46,3.46,0,0,1-1-.85,4.79,4.79,0,0,1-.7-1.15,1.66,1.66,0,0,1-.05-1.2,20.89,20.89,0,0,0,.85-3.5,41.06,41.06,0,0,0,.45-5.4c0-.6.17-.89.5-.85s.67.41,1,1.15c.74,1.4,1.37,2.11,1.9,2.15s1.3-.52,2.3-1.65c.6-.6,1.37-1.44,2.3-2.5s2-2.29,3.1-3.65,2.35-2.85,3.65-4.45,2.58-3.27,3.85-5a8,8,0,0,0-4.45-1,10,10,0,0,0-5.15,1.8c-1,.66-1.76.88-2.3.65s-.6-.72-.2-1.45a18.41,18.41,0,0,1,3.5-4.5,10.4,10.4,0,0,1,3.95-2.25,15.19,15.19,0,0,1,4.8-.6,48.89,48.89,0,0,1,6.15.55c.47-.6,1.12-1.47,1.95-2.6s1.73-2.37,2.7-3.7,1.89-2.65,2.75-4,1.6-2.39,2.2-3.25a31.45,31.45,0,0,1-8,4.9,17.68,17.68,0,0,1-6.1,1.5,7.49,7.49,0,0,1-2.35-.35,6.54,6.54,0,0,1-2.3-1.55,22.67,22.67,0,0,1-2.8-3.5c-1-1.54-2.31-3.6-3.85-6.2-.53-.94-.66-1.55-.4-1.85s1.1-.05,2.5.75a5.62,5.62,0,0,0,2.85.7,19.66,19.66,0,0,0,4.65-.8q3-.81,7.7-2.55t12.1-4.65a11,11,0,0,1,7.05-.45q3.25.94,5.95,5.45a7.61,7.61,0,0,1,1.45,4.75c-.17,1.3-1.18,2.55-3,3.75a34,34,0,0,0-4.05,3,19.44,19.44,0,0,0-2.95,3.1q-2,2.9-4.85,6.45t-5.75,6.65a43.48,43.48,0,0,1,1.75,5.8,38,38,0,0,1,.95,5.8,71.38,71.38,0,0,1,9.65-.2q5.65.19,15.15,1a12.28,12.28,0,0,1,3.7.75,8.15,8.15,0,0,1,2.4,1.55A35.69,35.69,0,0,1,478,85.79,7.22,7.22,0,0,1,479.43,90Z"/><path id="f" d="M582.53,66.14a2.75,2.75,0,0,1,.75,1.7,2.09,2.09,0,0,1-.6,1.6,4,4,0,0,1-2.2,1,13.55,13.55,0,0,1-4.05,0,74.9,74.9,0,0,0-12.5-.35,68.58,68.58,0,0,0-12.1,1.85c-.86.2-1.6,1-2.2,2.35a13.29,13.29,0,0,0-.7,5.85,6.59,6.59,0,0,0,1.75-.6q1.05-.51,2.25-1.2c.8-.47,1.57-1,2.3-1.5a8.69,8.69,0,0,0,1.8-1.7,7.73,7.73,0,0,1,5.2-2.85,7.64,7.64,0,0,1,5.7,2.15,22.25,22.25,0,0,1,2,1.85,4.85,4.85,0,0,1,1,1.5,5.1,5.1,0,0,1,.35,1.65c0,.6.05,1.36.05,2.3-.06,1.46-.1,3.65-.1,6.55s0,5.95.1,9.15a29.39,29.39,0,0,1-1.15,8.75,25.38,25.38,0,0,1-4,8.25c-.8.93-1.58,1.3-2.35,1.1a2.75,2.75,0,0,1-1.75-1.9,50,50,0,0,0-2.25-5.3,17.37,17.37,0,0,0-2.25-3.6,20.46,20.46,0,0,1-3.5,1.2,16.66,16.66,0,0,0-3.4,1.2c.14,1.6-.06,2.51-.6,2.75s-1.7-.59-3.5-2.45a13.74,13.74,0,0,1-2-2.8,11.52,11.52,0,0,1-1.1-3.65,44.81,44.81,0,0,1-.4-5.8q0-3.56.15-9.45a28.86,28.86,0,0,1,.9-7.15,12.77,12.77,0,0,1,3.2-5.25,24,24,0,0,0-3.35.9,33.69,33.69,0,0,0-3.45,1.4,27.93,27.93,0,0,0-3.2,1.75,18.15,18.15,0,0,0-2.6,2,4.17,4.17,0,0,1-1.8,3q2.5-.3.3,3.9a23.53,23.53,0,0,0-1.7,4q-.79,2.4-1.55,5.05t-1.3,5.25c-.36,1.73-.65,3.26-.85,4.6-.33,2.33-.83,3.6-1.5,3.8s-1.87-.37-3.6-1.7a30.36,30.36,0,0,1-2.85-2.65,8.59,8.59,0,0,1-1.65-2.7,13.8,13.8,0,0,1-.75-4q-.15-2.5-.15-6.7c-1,.46-1.93.93-2.8,1.4s-1.6.9-2.2,1.3c-1.26.73-2.25.65-3-.25A8.42,8.42,0,0,1,508,89c-.13-1.87.07-3.14.6-3.8a6.81,6.81,0,0,1,3.1-1.8,10.32,10.32,0,0,0,2.7-1.35,16.93,16.93,0,0,0,2.6-2.2,11.29,11.29,0,0,0,2-2.75,6.66,6.66,0,0,0,.75-3q-2.81,1.59-4.3,1.25c-1-.24-1.66-1.32-2-3.25a6.32,6.32,0,0,1,4-7.8,14.18,14.18,0,0,0,4.5-2.55,25.54,25.54,0,0,0,4.1-4.15,27,27,0,0,1-2.65.7,10.75,10.75,0,0,1-2,.2,7.2,7.2,0,0,1-1.7-.2c-.53-.14-1.13-.3-1.8-.5q-4.39,6.19-7.15,10t-4.8,6.3c-1.37,1.7-2.68,3.2-4,4.5s-2.8,2.81-4.6,4.55c-1.4,1.46-2.66,1.9-3.8,1.3a2.85,2.85,0,0,1-1.4-1.65,3.24,3.24,0,0,1,.1-2.35,6.64,6.64,0,0,1,1.75-2.8c.7-.6,1.22-.84,1.55-.7s1.15-.12,2.05-1a30.83,30.83,0,0,0,3.95-5.35q2.7-4.41,5.15-8.2c1.63-2.54,3.29-5,5-7.5s3.35-4.94,5-7.4l5.45-7.9a6.51,6.51,0,0,0,1.5-3.35,1.43,1.43,0,0,0-1.1-1.55c-.47-.14-.7-.39-.7-.75s.37-.65,1.1-.85a11.52,11.52,0,0,1,4.4-.3,4.9,4.9,0,0,1,2.85,1,4.67,4.67,0,0,1,1.6,2.25,5.81,5.81,0,0,1,.2,2.85,5.46,5.46,0,0,1-1.45,2.8l-2.15,2.5c-.63.73-1.25,1.43-1.85,2.1s-1.18,1.35-1.75,2-1.18,1.48-1.85,2.35a48.91,48.91,0,0,0,5-1.9,17.67,17.67,0,0,0,3.45-1.9,6.27,6.27,0,0,1,3.6-1.6,5.92,5.92,0,0,1,3.5.6,3.77,3.77,0,0,1,1.85,3.5,5.22,5.22,0,0,1-2.55,4.1c-1.2.93-2.23,1.75-3.1,2.45s-1.58,1.3-2.15,1.8a12.12,12.12,0,0,0-1.3,1.3,2.45,2.45,0,0,0-.55,1.15,4.25,4.25,0,0,1,2.75.5,5,5,0,0,1,1.95,1.85,4.14,4.14,0,0,1,.6,2.55,3.88,3.88,0,0,1-1.4,2.6,16,16,0,0,0-1.6,1.85c-.46.63-.9,1.28-1.3,2a13,13,0,0,0,2.9.3c1.6-.67,3.44-1.34,5.5-2s4.27-1.34,6.6-2a9,9,0,0,1-1.2-3,13.07,13.07,0,0,1-3.25-1.5,21.32,21.32,0,0,1-2.75-2.1c-.93-.8-1.31-1.57-1.15-2.3s.92-1.27,2.25-1.6a8.6,8.6,0,0,0,1.2-.25,5.43,5.43,0,0,0,1.1-.5,12.89,12.89,0,0,0,1.3-.9c.47-.37,1.07-.89,1.8-1.55a6.13,6.13,0,0,0,0-3.55,8.15,8.15,0,0,0-1.85-3.15,2.48,2.48,0,0,1-.3-3.5q.9-1.3,3.3-.6a26.85,26.85,0,0,1,2.75,1.1,5,5,0,0,1,1.7,1.25,4.57,4.57,0,0,1,.95,2c.2.8.4,1.86.6,3.2a22.7,22.7,0,0,1,3.55-1.2c1.3-.34,2.62-.64,4-.9a38,38,0,0,0,1.5-8.4c.07-2.14-.06-3.47-.4-4a4.73,4.73,0,0,1-.75-2.45,2.61,2.61,0,0,1,.6-1.65,1.94,1.94,0,0,1,1.5-.6,4.29,4.29,0,0,1,2,.6,13.48,13.48,0,0,1,3.35,2.6,6,6,0,0,1,1.45,3,11,11,0,0,1-.15,4c-.3,1.5-.75,3.31-1.35,5.45a8.76,8.76,0,0,1,4.35.65,3.49,3.49,0,0,1,1.65,2.75,6.48,6.48,0,0,1,.1,1.95,1.72,1.72,0,0,1-1,1.25,8.4,8.4,0,0,1-2.8.75c-1.26.16-3,.31-5.2.45q-1.89,3.2-2.9,5.3a25.06,25.06,0,0,0-1.6,4.4,45.56,45.56,0,0,1,5.45-.9,31.44,31.44,0,0,1,5.65-.1,17,17,0,0,0,3.25-.1,6.94,6.94,0,0,0,1.85-.5,3.53,3.53,0,0,1,2,.3A8.29,8.29,0,0,1,582.53,66.14Zm-51.1,16.3a13.72,13.72,0,0,0-2.6.8,8.35,8.35,0,0,0-2.5,1.5,35.73,35.73,0,0,0-1.65,4.2,28.75,28.75,0,0,0-.8,3.25,16.09,16.09,0,0,0-.25,2.6c0,.76,0,1.51.1,2.25a47.14,47.14,0,0,0,3.6-6.1Q529.32,87,531.43,82.44Zm32,17.8c.14-1.2.22-2.54.25-4s.05-2.95.05-4.45,0-3-.1-4.4-.13-2.65-.2-3.65c-.13-1.34-.48-2.07-1-2.2a4.11,4.11,0,0,0-2.35.4,12.66,12.66,0,0,1-5.55,1.25,9.33,9.33,0,0,1-3.45-.75,2.55,2.55,0,0,0-2.1.1c0,.53,0,1.35,0,2.45s0,2,0,2.55c.47,0,1,0,1.75-.1s1.42-.17,2.15-.3,1.42-.29,2-.45a8.6,8.6,0,0,0,1.35-.45,4.74,4.74,0,0,1,3.65-.75,3.71,3.71,0,0,1,2.35,2.45,2.55,2.55,0,0,1-.1,2.55,5.4,5.4,0,0,1-2.2,1.45l-2.7.9-3,1c-1,.33-2,.61-2.85.85a16.67,16.67,0,0,1-2.35.45,10.21,10.21,0,0,0,.15,2.75,2.12,2.12,0,0,0,1.15,1.65,7.69,7.69,0,0,0,2.65.2,15.83,15.83,0,0,0,2.55-.3,8.28,8.28,0,0,1,3.35-.25,4.69,4.69,0,0,1,2.05,1.35,3,3,0,0,0,1.65.3C563.05,100.77,563.36,100.57,563.43,100.24Zm-5.7-43.6a2.57,2.57,0,0,0-2.75-1,4.28,4.28,0,0,0-2.45,1.6,15.7,15.7,0,0,0-.95,3.95,16.31,16.31,0,0,0,.25,4,1.33,1.33,0,0,0,.8-.3,6.55,6.55,0,0,0,1.1-1.2,20.9,20.9,0,0,0,1.65-2.6Q556.34,59.43,557.73,56.64Z"/><path id="g" d="M607,89.44a14.37,14.37,0,0,1-2.2,7.4c-1.47,2.46-2.86,3.7-4.2,3.7a4.33,4.33,0,0,1-3.35-1.5q-1.35-1.5-1.35-5a17.66,17.66,0,0,1,1.8-7.4q1.8-4,3.7-4a4.05,4.05,0,0,1,2,.55,6.06,6.06,0,0,1,1.8,1.5,7.62,7.62,0,0,1,1.3,2.2A6.85,6.85,0,0,1,607,89.44Zm21.3-59.9a7.65,7.65,0,0,1,2.2-.3q4.41,0,7.6,4.4l-15.3,22.7q-3.71,5.49-6.8,10.3t-5.7,9.1c.67.06,1,.4,1,1a4.58,4.58,0,0,1-1.4,2.5,3.5,3.5,0,0,1-2.5,1.6q-1.09,0-3-2.1a6.61,6.61,0,0,1-1.8-4Q602.63,72,628.33,29.54Z"/></g></svg><script>// 创建时间线let tl = gsap.timeline({ repeat: -1 })// 获取所有的path(也就是字)var letters = document.querySelectorAll("path")for(var i = 0; i<letters.length; i++) {tl.fromTo(letters[i],{ drawSVG: "0%" },{ duration: 1, drawSVG: "100%", stagger: 1 },)}</script></body></html>
效果:

到此咱们 SVG 的基础内容就打算完成了。
感兴趣的兄弟们记得三连哦~ 非常感谢!
我正在参与掘金技术社区创作者签约计划招募活动,点击链接报名投稿。
分类:
标签:
文章被收录于专栏:

Canvas
Canvas 由浅入深
关注专栏
多内容聚合浏览、多引擎快捷搜索、多工具便捷提效、多模式随心畅享,你想要的,这里都有!
评论

表情
图片
Ctrl + Enter 发表评论
热门评论
删除
全栈 @ 字节跳动 1 月前
字数太多页面都卡了,整的我都以为我电脑卡了
展开
收起
5
5
删除
1 月前
兄弟没看到你的评论我也以为我电脑卡了
展开
收起
1
回复
删除
1 月前
大佬,麻烦优化一下你的文章,你文章卡死我了
展开
收起
1
回复
查看更多回复
删除
UI @ 昆明的这个小公司 1 月前
真的是好文,通俗易懂,已收藏
展开
收起
3
3
删除
[ndz
VIP.4 融会贯通
](/user/976022056736765)
(作者) 1 月前
感谢兄弟们的支持 小老弟感激不尽
展开
收起
点赞
回复
删除
[ndz
VIP.4 融会贯通
](/user/976022056736765)
(作者) 1 月前
已经写完了,欢迎继续阅读
展开
收起
点赞
回复
查看更多回复
删除
前端开发 @ 深信服 1 月前
线条那里写错了 应该是 x2 y2 写成 y3 了
展开
收起
点赞
3
删除
[ndz
VIP.4 融会贯通
](/user/976022056736765)
(作者) 1 月前
感谢指出问题,也感谢阅读
展开
收起
点赞
回复
删除
回复
1 月前
好文!
展开
收起
“
感谢指出问题,也感谢阅读
”
点赞
回复
查看更多回复
删除
[记癫 
VIP.4 融会贯通
](/user/1679709497983495)
前端 1 月前
写的太棒了 学完 收藏!
展开
收起
点赞
3
删除
[ndz
VIP.4 融会贯通
](/user/976022056736765)
(作者) 1 月前
感谢兄弟们支持
展开
收起
点赞
回复
删除
[ndz
VIP.4 融会贯通
](/user/976022056736765)
(作者) 1 月前
已经写完了,欢迎继续阅读
展开
收起
点赞
回复
查看更多回复
删除
小小前端 @ 说了你知道么? 1 月前
正好最近在学,复习一遍又加深了记忆,总结的真好。
展开
收起
1
2
删除
[ndz
VIP.4 融会贯通
](/user/976022056736765)
(作者) 1 月前
多谢老妹支持
展开
收起
点赞
回复
删除
[ndz
VIP.4 融会贯通
](/user/976022056736765)
(作者) 1 月前
已经写完了,欢迎继续阅读
展开
收起
点赞
回复
全部评论 111
最新
最热
删除
前端开发 @ 广州 xxx 4 天前
卧槽牛逼
展开
收起
点赞
回复
删除
🛠️打杂 19 天前
写得太好了
展开
收起
点赞
1
删除
[ndz
VIP.4 融会贯通
](/user/976022056736765)
(作者) 19 天前
大佬这说得我内心一阵激荡
展开
收起
点赞
回复
删除
IT 工程师 19 天前
进收藏夹 吃灰
我这张图不知道有人会发现不
展开
收起
点赞
回复
删除
FE @ 广州 20 天前
收藏 = 学会
展开
收起
点赞
1
删除
[ndz
VIP.4 融会贯通
](/user/976022056736765)
(作者) 20 天前
必须的
展开
收起
点赞
回复
删除
web 前端 @ 努力中 24 天前
梦中情章
展开
收起
点赞
1
删除
[ndz
VIP.4 融会贯通
](/user/976022056736765)
(作者) 23 天前
铁子给的评价太高了
展开
收起
点赞
回复
删除
1 月前
大佬 可以出系列视频教程了
展开
收起
点赞
1
删除
[ndz
VIP.4 融会贯通
](/user/976022056736765)
(作者) 23 天前
普通话讲的我媳妇听着都费劲 不敢出视频
展开
收起
点赞
回复
删除
1 月前
太牛了 写的真好
展开
收起
点赞
1
删除
[ndz
VIP.4 融会贯通
](/user/976022056736765)
(作者) 23 天前
感谢铁子们支持
展开
收起
点赞
回复
删除
全栈工程师 1 月前
封面图卡得不能动了
展开
收起
点赞
1
删除
[ndz
VIP.4 融会贯通
](/user/976022056736765)
(作者) 1 月前
改天做一个好点的效果换掉它
展开
收起
点赞
回复
删除
前端 1 月前
好文 值得收藏 赞
展开
收起
点赞
回复
删除
前端开发 @ 深信服 1 月前
线条那里写错了 应该是 x2 y2 写成 y3 了
展开
收起
点赞
3
删除
[ndz
VIP.4 融会贯通
](/user/976022056736765)
(作者) 1 月前
感谢指出问题,也感谢阅读
展开
收起
点赞
回复
删除
回复
1 月前
好文!
展开
收起
“
感谢指出问题,也感谢阅读
”
点赞
回复
查看更多回复
删除
[优弧 
VIP.3 渐入佳境
](/user/852876722177533)
管理员 | 运营负责人 @ 掘金 1 月前
这篇文章可以授权掘金官方账号发布吗?
展开
收起
点赞
1
删除
[ndz
VIP.4 融会贯通
](/user/976022056736765)
(作者) 1 月前
必须可以的啊
展开
收起
点赞
回复
删除
1 月前
超过一万字的都是好文,看不完也收藏求个心理安慰
展开
收起
点赞
2
删除
[ndz
VIP.4 融会贯通
](/user/976022056736765)
(作者) 1 月前
哈哈 兄弟妙人啊
展开
收起
点赞
回复
删除
[ndz
VIP.4 融会贯通
](/user/976022056736765)
(作者) 1 月前
已经写完了,欢迎继续阅读
展开
收起
点赞
回复
删除
前端小菜比 @ 山卡拉旮旯 1 月前
吃灰去吧
展开
收起
点赞
2
删除
[ndz
VIP.4 融会贯通
](/user/976022056736765)
(作者) 1 月前
收藏以后比较容易找到
展开
收起
点赞
回复
删除
[ndz
VIP.4 融会贯通
](/user/976022056736765)
(作者) 1 月前
已经写完了,欢迎继续阅读
展开
收起
点赞
回复
删除
1 月前

展开
收起
点赞
2
删除
[ndz
VIP.4 融会贯通
](/user/976022056736765)
(作者) 1 月前

展开
收起
点赞
回复
删除
[ndz
VIP.4 融会贯通
](/user/976022056736765)
(作者) 1 月前
已经写完了,欢迎继续阅读
展开
收起
点赞
回复
删除
[记癫 
VIP.4 融会贯通
](/user/1679709497983495)
前端 1 月前
写的太棒了 学完 收藏!
展开
收起
点赞
3
删除
[ndz
VIP.4 融会贯通
](/user/976022056736765)
(作者) 1 月前
感谢兄弟们支持
展开
收起
点赞
回复
删除
[ndz
VIP.4 融会贯通
](/user/976022056736765)
(作者) 1 月前
已经写完了,欢迎继续阅读
展开
收起
点赞
回复
查看更多回复
删除
小小前端 @ 王者荣耀 1 月前
没文化的我只能说:卧槽 牛逼啊
展开
收起
点赞
2
删除
[ndz
VIP.4 融会贯通
](/user/976022056736765)
(作者) 1 月前
卧槽 感谢啊
展开
收起
点赞
回复
删除
[ndz
VIP.4 融会贯通
](/user/976022056736765)
(作者) 1 月前
已经写完了,欢迎继续阅读
展开
收起
点赞
回复
删除
Java 1 月前
支持
展开
收起
点赞
2
删除
[ndz
VIP.4 融会贯通
](/user/976022056736765)
(作者) 1 月前
感谢支持
展开
收起
点赞
回复
删除
[ndz
VIP.4 融会贯通
](/user/976022056736765)
(作者) 1 月前
已经写完了,欢迎继续阅读
展开
收起
点赞
回复
删除
1 月前
想看动画的部分啊
展开
收起
点赞
2
删除
[ndz
VIP.4 融会贯通
](/user/976022056736765)
(作者) 1 月前
这周末给兄弟们安排上
展开
收起
点赞
回复
删除
[ndz
VIP.4 融会贯通
](/user/976022056736765)
(作者) 1 月前
已经写完了,欢迎继续阅读
展开
收起
点赞
回复
删除
前端开发 1 月前
强烈支持
展开
收起
点赞
2
删除
[ndz
VIP.4 融会贯通
](/user/976022056736765)
(作者) 1 月前
有多墙裂?
展开
收起
点赞
回复
删除
[ndz
VIP.4 融会贯通
](/user/976022056736765)
(作者) 1 月前
已经写完了,欢迎继续阅读
展开
收起
点赞
回复
删除
前端工程师 @ 腾讯 1 月前
支持老哥
展开
收起
点赞
2
删除
[ndz
VIP.4 融会贯通
](/user/976022056736765)
(作者) 1 月前
感谢感谢

展开
收起
点赞
回复
删除
[ndz
VIP.4 融会贯通
](/user/976022056736765)
(作者) 1 月前
已经写完了,欢迎继续阅读
展开
收起
点赞
回复
查看全部 111 条回复
208
111
收藏
相关推荐
前端开发陈龙威
1 月前
前端 SVG
你一个前端,svg 图片改色都不会?都给我卷起来
周六来公司写点东西,刚好有个 icon 颜色不对,ui 又不在公司,那么就只能自己动手丰衣足食了。 呜呜呜,好想住公司,都不用上下班了。 当 ui 给你了 svg 图片,且是单色的,又只有你用 svg 填充色用的 fi
- 1.6w
- 120
- 39

西炒蛋
19 天前
前端 JavaScript SVG
如何将 DOM 生成为图片?速度打败 html2canvas、dom-to-image
市面上的截图插件 html2canvas、dom-to-image 都是通过内联样式的方式解决此问题。 条件允许的情况下,可以提前准备好样式内容,嵌入 svg,移除这一环节,提升截图效率。
- 5180
- 59
- 13

ndz
2 月前
前端 Canvas
案例 + 图解带你一文读懂 Canvas🔥🔥(2W + 字)
Canvas 在刚推出时主打的优势就是更快的渲染速度,刷新了人们对 Web 页面元素绘制速度的印象,但 Canvas 的优势却不仅限于此。
- 3.1w
- 723
- 206

胡哥有话说
3 月前
前端 SVG
都 2022 年了,一个还不知道 Lottie 动画的前端已经 OUT 啦!
为什么会有 Lottie 动画呢?在前端程序员根据 UI 视觉稿实现页面效果时一直存在这样的一种 “矛盾” - 动画效果更完美与工期成本的矛盾。
- 4.5w
- 640
- 109

德育处主任
2 月前
前端 SVG
SVG 从入门到后悔,怎么不早点学起来(图解版)
✨ 别只是懂 Vue 和 React 了,原生的东西也赶紧学起来吧。SVG 在前端的地位越来越高,它能轻轻松松做出 CSS 难以做到的特效 ✨
- 1.7w
- 505
- 60

三月暖阳
7 月前
ECharts
ECharts 案例大全(最新版),含各种案例,实例。
ECharts 案例大全整理;ECharts 生态社区原 Make A Pie 网站各种案例大全的搬运工;ECharts 各种案例,实例参照。
- 3.5w
- 569
- 75
答神
1 年前
前端 TypeScript
一文读懂 TS 的 (.d.ts) 文件
随着前端技术的不断发展,TypeScript(简称: TS) 已经在逐步取代 JavaScript(简称: JS), 尤其在以 Vue3 使用 TS 重构后,TS 更是成为前端框架编写的主力语言。
- 2.1w
- 105
- 8

chokcoco
11 月前
前端 CSS SVG
CSS 奇技淫巧 | 妙用 drop-shadow 实现线条光影效果
本文将介绍一种利用 CSS 滤镜 filter 的 drop-shadow(),实现对 HTML 元素及 SVG 元素的部分添加阴影效果,以实现一种酷炫的光影效果,用于各种不同的场景之中。
- 8251
- 210
- 24

归子莫
10 月前
前端 SVG
【SVG】为了前端页面的美丽,我选择学习 SVG
【SVG】为了前端页面的美丽,我选择学习 SVG 博客说明 说明 SVG 在之前自学的过程中,其实一直都是很高深的样子不敢触碰,但是想要理解终究都会走到这一步的。再怎么看起来难的技术都是由简
- 1.4w
- 160
- 24
慕雪
2 年前
React.js
一文带你看懂 UmiJS (3.x 版本)
Umi 是蚂蚁金服的底层前端框架,我用这个框架也有一段时间了,但是网上 umi 相关的文章甚少呀,特别对于是 3.x 版本,本文就来简单介绍一下 umi 框架。 从 3.0 版本开始它们的 slogan 就改成了插件化的企业级前端应用框架,插件这个概念让整个 umi 框架的扩展性大大提高,插件让框架支持…
- 1.8w
- 81
- 12
chokcoco
8 月前
前端 CSS SVG
Amazing!!CSS 也能实现烟雾效果?
最近利用 CSS 实现了一些看似超出 CSS 能力的效果: 巧用渐变实现高级感拉满的背景光动画 Amazing!!CSS 也能实现极光? 本文继续此系列,本文主要想探讨一下,使用 CSS 能否比较好的
- 1.5w
- 327
- 24

泱泱
4 年前
CSS SVG 动效
不炫技,SVG+CSS3 旋转动画属性就能实现的梦幻效果
CSS3 的动画相关的基础的属性基本都涉猎过了,个人认为,其中最复杂的是 d:path() 路径变形动画,超过 3D,而位移、轨迹、旋转、缩放、斜切什么的,相对简单一些,但作为非动画设计师而言,灵活的掌握这些基本的动画加以无穷无尽的变换,就已经能做出很多华丽丽的效果了,这篇呢,源于做一…
- 1.3w
- 477
- 43
溯朝
4 年前
前端 SVG 数据可视化
svg、canvas、css3d 实现数据可视化(伪 3D 效果)
这次项目用到了一些自定义的数据可视化组件,我把我做的部分抽出来几个典型做个汇总。 有些图片(例如下面这个 jpg 动图)太大,进行了一定程度的压缩,有点模糊(^_^)。 改进版:大小和亮暗用 gap 控制,近大远小,近亮远暗。 这篇文章画的是 angle 一个纬度,只要再增加另外一个纬度 r…
- 1.3w
- 231
- 21

chokcoco
7 月前
前端 CSS SVG
巧用 CSS 实现动态线条 Loading 动画
有群友问我,使用 CSS 如何实现如下 Loading 效果: 这是一个非常有意思的问题。 我们知道,使用 CSS,我们可以非常轻松的实现这样一个动画效果: 动画如下: 与要求的线条 loading
- 5826
- 119
- 11

yeyan1996
2 年前
JavaScript
字节跳动面试官:请你实现一个大文件上传和断点续传
这段时间面试官都挺忙的,频频出现在博客文章标题,虽然我不是特别想蹭热度,但是实在想不到好的标题了 -。-,蹭蹭就蹭蹭 :)
- 24.7w
- 5457
- 573
泱泱
4 年前
前端 SVG 动效
SVG+CSS3 仿作了 2018 草莓音乐节的宣传视频动画
这是从 2018“草莓音乐节” 的宣传视频得到的灵感,海报的主题是错位拼贴分割重组,对我这种设计渣渣而言,看中的是其平面化,也就是说,用 SVG+CSS3 动画完全可以玩转。因为只涉及一些基础元素的位移、缩放构成的转场效果,相对来说比较简单,但创意很开脑洞。因为宣传视频比较长,所以把它…
- 6394
- 158
- 31
FESKY
3 年前
CSS 前端 SVG
幻术,一行代码实现镂空效果
学习之前可以先看看酷炫的动画效果,想想怎么实现。 从最近在做的需求说起,一个优惠券样式,过设计稿的时候认为没什么大不了的,满口答应了。真正开始开发的时候遇到问题,主要是镂空效果实现方式上比较费劲。要求是背景可配,并且票身可以配背景图,然后镂空是真镂空。 设想并尝试了很多种方案,…
- 2.7w
- 762
- 93

chokcoco
6 月前
前端 CSS SVG
巧用 CSS 实现炫彩三角边框动画
最近有个小伙伴问我,在某个网站看到一个使用 SVG 实现的炫彩三角边框动画,问能否使用 CSS 实现: 很有意思的一个动画效果,立马让我想起了我在 CSS 奇思妙想边框动画 一文中介绍的边框动画,非常
- 5684
- 92
- 8

苏英伟
4 年前
CSS 前端 SVG
CSS 实现空心三角指示箭头
web 开发中,三角形的日常应用,以三角形指示箭头最为常见,其用 CSS 来实现非常简单,熟悉了之后相比于引入 SVG 或是背景图片会是更好更灵活的选择。 而三角箭头一般而言,又分为两种,一种是视觉上没有边框的,我们叫做实心三角形;还有一种是视觉上有边框的,而三角箭头刨去边框的部分又要与…
- 1.1w
- 106
- 11
神三元
2 年前
JavaScript 前端
(建议收藏) 原生 JS 灵魂之问, 请问你能接得住几个?(上)
笔者最近在对原生 JS 的知识做系统梳理,因为我觉得 JS 作为前端工程师的根本技术,学再多遍都不为过。打算来做一个系列,一共分三次发,以一系列的问题为驱动,当然也会有追问和扩展,内容系统且完整,对初中级选手会有很好的提升,高级选手也会得到复习和巩固。敬请大家关注! 2. 说出下面运行的…
- 15.6w
- 3368
- 234
[ndz 
VIP.4 融会贯通
](/user/976022056736765)
全栈 @ 站酷

2021 年度人气作者 No.81
获得点赞 4,718
文章被阅读 209,508
[

下载稀土掘金 APP
一个帮助开发者成长的社区
](/app)

相关文章
[
老板让你做性能优化,第一步你应该做什么?🔥🔥
212 点赞
·
106 评论
](/post/7121323745980973070 “老板让你做性能优化,第一步你应该做什么?🔥🔥”)[
案例 + 图解带你一文读懂 Canvas🔥🔥(2W + 字)
723 点赞
·
206 评论
](/post/7119495608938790942 “案例 + 图解带你一文读懂 Canvas🔥🔥(2W + 字)”)[
SVG 从入门到后悔,怎么不早点学起来(图解版)
505 点赞
·
60 评论
](/post/7118985770408345630 “SVG 从入门到后悔,怎么不早点学起来(图解版)”)[
Webpack V5 + React 脚手架的配置 🔥🔥
181 点赞
·
9 评论
](/post/7080874840202313742 “Webpack V5 + React 脚手架的配置 🔥🔥”)[
云函数定时触发掘金社区:自动签到 、自动免费抽奖 🔥🔥
325 点赞
·
119 评论
](/post/7041495891388743716 “云函数定时触发掘金社区:自动签到 、自动免费抽奖 🔥🔥”)
目录
下一篇
案例 + 图解带你一文读懂 Canvas🔥🔥(2W + 字)
收藏成功!
已添加到「」, 点击更改
- 微信
微信扫码分享 - 新浪微博
沉浸阅读

选择你感兴趣的技术方向
后端
前端
Android
iOS
人工智能
开发工具
代码人生
阅读
跳过
上一步
至少选择 1 个分类


