不同打包工具对比
- grunt:基于任务配置实现,配置规则复杂
gulp:基于node的stream流,通过配置pipe任务
const gulp = require("gulp");const babel = require("gulp-babel");function defaultTask(callback){gulp.src("src/app.js").pipe(babel({presets: ["@babel/preset-env"]})).pipe(gulp.dest("dist"))callback();}export.default = defaultTask;
webpack:模块化打包,将各种类型的资源进行打包处理。
rollup:ES6模块化打包,一般多用于打包js类库。默认支持treeShaking
import resolve from "rollup-plugin-node-resolve";import babel from "roll-plugin-babel";export default {input: "src/app.js",output: {file: "dist/bundle.js",format: "cjs", //commonjsexports: "default"},plugins:[resolve(),babel({presets: ["@babel/preset-env"],exclude: "node_modules/**"})]}
parcel:零配置启动项目,可以以html文件作为入口。因为是0配置,所以不灵活。
Loader和Plugin的不同
loader模块加载器:处理不同类型的工具,有了loader就可以处理css、img、tiff、map4等各种资源
plugin插件:在编译过程的不同时机执行不同任务,类似生命周期处理任务。Plugin是用于扩展webpack功能的手段。
webpack的构建流程
初始化参数:
- 开始编译:
- 编译模块:
- 完成模块编译:
- 输出结果:
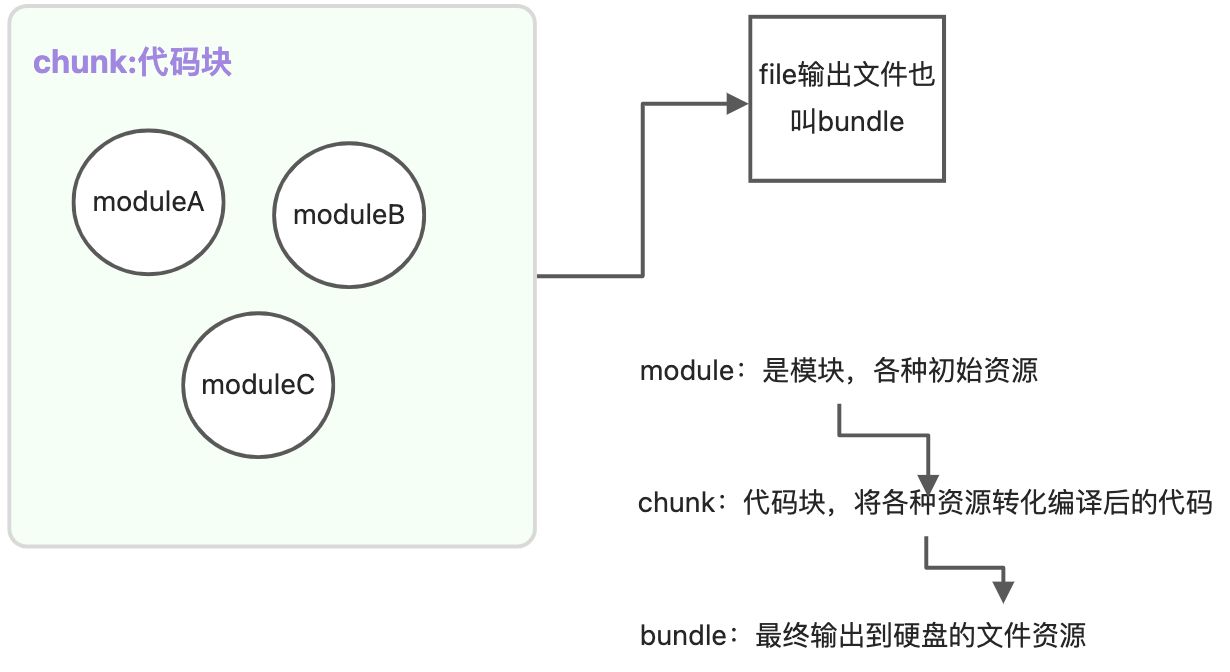
module\chunk\bundle区别
- module:js的模块化,所以webpack支持commonjs/es6模块规范,可以通过import导入的代码
- chunk:chunk是webpack根据功能拆分处理的
- 根据入口entry
- 通过import()动态引入
- 通过splitChunks拆分出来的代码
- bundle:bundle是webpack打包后的文件,一般和chunk是一对一的,bundle是对chunk进行编译压缩打包处理后,写入到硬盘上的文件
代码分割splitChunks
hash的种类
- hash:整个项目的hash值,根据每次编译内容计算获得,每次编译后都会生成新的hash。
- chunkhash:根据chunk生成hash值,来源于同一个chunk,则hash值是一样的。同一个chunk内任何一个文件发生改变,则chunkhash就会发生改变。
- contenthash:根据内容值计算hash和改变hash,只有内容变化,才会更新contenthash
hash > chunkhash > contenthash ,影响程度越来越小
hash < chunkhash < contenthash, 稳定性越来越高
优化打包,提速打包时间
1分析打包时间
使用speedMeasureWebpackPlugin进行时间分析
cosnt smw = require("speedMeasureWebpackPlugin");module.export = smw.wrap({// 默认的webpack配置})
2缩小范围
extensions:设置后可以省略导入文件扩展名,会依次自动匹配
resolve: {extensions: [".js", ".jsx", ".json", ".css"]}
alias:配置别名加快webpack的查找模块速度
resolve: {alias: {"jquery": path.resolve(__dirname, "node_modules/jquery/dist/index.js")}}
modules:对于声明的依赖名模块,webpack会类似node进行路径搜索。
resolve: {modules: ["node_modules"]}
mainFields:默认是package.json文件按照文件中的main字段的文件名查找文件,也可自定义配置
resolve:{// 配置的target为web或target是webworker,mainField默认值是mainFields: ["browser", "module", "main"],// target为其他时,mainFields默认值mainFields: ["module", "main"]}
mainFiles:当目录没有package.json时,默认使用目录下的index.js,这个也是可以配置
resolve: {mainFiles: ["index"]//也可设置其他文件}
resolveLoader:用于配置解析loader时的resolve配置
//默认配置module.exports = {resolveLoader: {modules: [ "node_modules" ],extensions: [".js", ".json"],mainFields: ["loader", "main"]}}
3noParse
配置不需要解析依赖的第三方大型类库,以提高整体构建速度
module.exports = {module: {noParse: /jquery|lodash/}}
4IgnorePlugin
用于忽略某些特定的模块,让webpack不把这些模块打包进去 ```typescript import moment from “moment”; console.log(moment); //默认会有多语言包,很大
// 进行webpack配置,在 plugins中添加 new webpack.IgnorePlugin(/^.\/locale/, /moment$/)
<a name="j2eRT"></a>### 5日志优化使用插件[friendly-errors-webpack-plugin](https://www.npmjs.com/package/friendly-errors-webpack-plugin), 可以设置输出日志的级别。<br />success成功时输出日志提示,warning警告日志提示,error错误日志提示。```typescriptmodule.exports = {stats: "errors-only",plugins: [new FriendlyErrorsWebpackPlugin()]}
6利用缓存
webpack开启缓存的办法:
- babel-loader开启缓存
- 使用cache-loader
- 使用hard-source-webpack-plugin
babel-loader
Babel在转化js文件过程中消耗性能高,可以将babel-loader执行结果换成起来,重新打包时使用缓存/ ```typescript module.exports = { module: { rules:[{
}] } }test: /\.js$/,exclude: /node_modules/,use: [{loader: "babel-loader",options: {cacheDirectory: true}}]
<a name="qqflZ"></a>#### cache-loader- 在一些性能开销大的loader之前添加cache-loader,将结果缓存到硬盘- 存取也需要性能开销,所以只在性能开销大的loader中设置cache-loader```typescriptmodule.exports = {module: {rules:[{test: /\.js$/,exclude: /node_modules/,use: ["cache-loader",{loader: "babel-loader",options: {cacheDirectory: true}}]}]}}
hard-source-webpack-plugin
- 为模块提供中间缓存,缓存默认路径为
node_module/.cache/hard-source - 配置hard-source-webpack-plugin后首次不会有时间变化,但是第二次后会有显著提升。
- webpack5默认内置了hard-source-webpack-plugin
const HardSourceWebpackPlugin = require("hard-source-webpack-plugin");module.exports = {plugins: [new HardSourceWebpackPlugin()]}
oneOf:匹配rules时只匹配一个即退出
默认情况下,每个文件对于rules中的所有规则都会遍历一遍,使用oneOf可以解决该问题。module.exports = {module: {rules: [{text: /\.js$/,exclude: /node_modules/,enforce: 'pre',loader: "eslint-loader",options: {fix: true}},{oneOf:[// 这里配置的loader之后匹配一个就退出]}]}}
7多进程处理
thread-loader多进程打包处理
把thread-loader放到其他loader之前,那么被它装饰的其他loader会有一个单独的worker进程运行。 ```typescript module.exports = { module: { rules: [
] }{text: /\.js$/,exclude: /node_modules/,include: path.resolve(__dirname, "/src"),use: [{loader: "thread-loader", // 给babel-loader开启多进程options: { workers : 3 }},{loader: "babel-loader",options: {presets: ["@babel/preset-env", "@babel/preset-react"]}}]}
}
<a name="koOUa"></a>#### ParallelUglifyPlugin处理多个js都需要压缩,可以开启一个子进程。```typescriptconst path = require('path');const DefinePlugin = require('webpack/lib/DefinePlugin');const ParallelUglifyPlugin = require('webpack-parallel-uglify-plugin');module.exports = {plugins: [// 使用 ParallelUglifyPlugin 并行压缩输出的 JS 代码new ParallelUglifyPlugin({// 传递给 UglifyJS 的参数uglifyJS: {output: {// 最紧凑的输出beautify: false,// 删除所有的注释comments: false,},compress: {// 在UglifyJs删除没有用到的代码时不输出警告warnings: false,// 删除所有的 `console` 语句,可以兼容ie浏览器drop_console: true,// 内嵌定义了但是只用到一次的变量collapse_vars: true,// 提取出出现多次但是没有定义成变量去引用的静态值reduce_vars: true,}},}),],};
8DLL动态链接库
动态链接库 项目中使用了react和react-dom库,打包之后文件会非常大。DllPlugin可以先把react和react-dom单独抽离出来。
新建一个专门打包链接库的配置文件,webpack.config.dll.js
let webpack = require('webpack');let path = require('path');module.exports = {mode: 'development',entry: {react: ['react', 'react-dom'],},output: {filename: '_dll_[name].js',path: path.resolve(__dirname, 'dist'),library: '_dll_[name]',// libraryTarget: 'var'},plugins: [new webpack.DllPlugin({name: '_dll_[name]',path: path.resolve(__dirname, 'dist', 'manifest.json'),}),],};
执行npx webpack —config webpack.config.dll.js。打包出来_dll_react.js和manifest.json
- 在html模版中引入_dll_react.js静态文件,可以使用插件add-asset-html-webpack-plugin给html模板添加静态文件
- 给标准webpack配置文件添加插件,使用并引入manifest.json文件
plugins: [new webpack.DllReferencePlugin({manifest: path.resolve(__dirname, 'dist', 'manifest.json'),})]
loader的分类
- preLoader:前置
- normalLoader:普通默认loader
- inlineLoader:内联loader
- postLoader:后置loader
preLoader-》normalLoader-〉inlineLoader-》postLoader
打包后生成的文件
webpack打包后生成bundle.js,删除注释后。文件可直接引入html中使用
(function(modules) {function __webpack_require__(moduleId) {let module = {i: moduleId,exports: {},};modules[moduleId].call(module.exports, module, module.exports, __webpack_require__);return module.exports;}return __webpack_require__('./src/index.js');})({'./src/title.js': function(module, exports, __webpack_require__) {module.exports = 'title';},'./src/index.js': function(module, exports, __webpack_require__) {let title = __webpack_require__('./src/title.js');console.log(title);},});
treeShaking实现原理
基于esModule规范,将未使用到的模块不加载。使用插件进行处理,将默认的一个ImportDeclaration转化为多个importDefaultSpecifier。
const babel = require('@babel/core');const types = require('babel-types');const visitor = {ImportDeclaration: {enter(path, state = { opts }) {const specifiers = path.node.specifiers;const source = path.node.source;if (state.opts.library == source.value && !types.isImportDefaultSpecifier(specifiers[0])){const declarations = specifiers.map((specifier, index) => {return types.ImportDeclaration([types.importDefaultSpecifier(specifier.local)],types.stringLiteral(`${source.value}/${specifier.local.name}`));});path.replaceWithMultiple(declarations);}}}}module.export = function (babel){return { visitor }}
通过对specifiers的处理,将ImportDeclaration转为多个importDefaultSpecifier。
hmr热更新实现原理
hash
websocket,客户端和服务端通信
jsonp请求更新后的代码


