前置1:数据响应式核心
为什么要做响应式?
https://www.bilibili.com/video/BV1d4411v7UX 第1-5节响应式原理;
响应式解决开发中的什么问题?
在开发中,如果需要实现一个计算的功能 b = a * 10,b的结果依赖着a的变化,当a为1,b为10。然后修改a的值,此时b并不会发生数据变化。
let a = 1;let b = a * 10; // b:10a = 2; // a:2b; //b的值依旧为10;
响应式数据就是实现一个函数,当a变化,b的值会自动变化,类型excel的表格中的函数,B1 = A1 * 10;通过函数计算就可以实时更新B1表格的值。
劫持对象的getter/setter方法
// 用来判断参数是对象function isObject (obj) {return typeof obj === 'object'&& !Array.isArray(obj)&& obj !== null&& obj !== undefined}function convert (obj) {// 如果传入的参数不是对象,直接抛出类型错误if (!isObject(obj)) {throw new TypeError()}// Object.keys 将对象的key取出,转为数组形式Object.keys(obj).forEach(key => {let rawVale = obj[key]; //初始化定义对象属性的原始值Object.defineProperty(obj, key, {get () {console.log(`getting key "${key}": ${rawVale}`);return rawVale; // 此处必须使用外层定义的rawVale,如果不定义原始值,直接获取值obj[key],则会出现死循环(一直getter下去)。},set (value) {console.log(`setting key "${key}" to: ${rawVale}`);rawVale = value;}})})}let o = {foo: 1};convert(o);console.log(o.foo)o.foo = 99;console.log(o.foo);
Dep的依赖depend和通知notify
// 创建Dep类class Dep {constructor() {// 创建观察者对象this.subscribers = new Set()}// 收集依赖depend() {if (activeUpdate) {this.subscribers.add(activeUpdate)}}// 触发更新notify() {this.subscribers.forEach(subscriber => subscriber())}}// 定义全局中正在更新的函数activeUpdatelet activeUpdatefunction effectUpdate(update) {function wrappedUpdate() {// wrappedUpdate赋值给activeUpdate,可以把函数添加到观察者的队列中activeUpdate = wrappedUpdateupdate()activeUpdate = null}wrappedUpdate()}let dep = new Dep();effectUpdate(() => {dep.depend()console.log('update');})// 调用notify时,会触发收集的activeUpdate函数dep.notify();
结合对象的getter/setter及Dep类,实现mini版响应式
function isObject (obj) {return typeof obj === 'object'&& !Array.isArray(obj)&& obj !== null&& obj !== undefined}function observe (obj) {if (!isObject(obj)) {throw new TypeError()}Object.keys(obj).forEach(key => {let internalValue = obj[key]let dep = new Dep()Object.defineProperty(obj, key, {get () {dep.depend()return internalValue},set (newValue) {const isChanged = internalValue !== newValueif (isChanged) {internalValue = newValuedep.notify()}}})})}class Dep {constructor () {this.subscribers = new Set()}depend () {if (activeUpdate) {// register the current active update as a subscriberthis.subscribers.add(activeUpdate)}}notify () {// run all subscriber functionsthis.subscribers.forEach(subscriber => subscriber())}}let activeUpdatefunction autorun (update) {function wrappedUpdate () {activeUpdate = wrappedUpdateupdate()activeUpdate = null}wrappedUpdate()}let state = {count : 0,name: 'raw'}observe(state);// F1,该函数内部收集了两个属性的依赖,当两个属性都发生改变,此函数会执行两次,第一次更新count,第二次更新nameautorun(()=>{// 触发getter方法console.log('-----------');console.log(state.count)console.log(state.name)})// F2,只收集了name的依赖autorun(()=>{console.log('///////////');console.log(state.name)})// 触发setter方法中的dep.notify(),会将所有的依赖项进行更新state.count = 90;state.name = 'change';
vue2使用defineProperty实现响应式
只处理一个属性
let data = {msg: "hello world"};let vm = {}// 数据劫持,给vm的msg设置成get/set方法,在设置属性或获取属性时可以加入一些操作Object.defineProperty(vm, "msg",{enumerable: true,configurable: true,get(){return data.msg},set(newVal){data.msg = newVal}})console.log(vm.msg)vm.msg = "change"
经过数据转化getter/setter,访问数据和设置数据可以加入特殊操作,把data的msg属性,代理到了vm对象上。
处理多个属性时
当data数据有多个属性成员时,需要遍历操作。可以把上面转化响应式的方法封装成函数。
let data = {msg: "hello world",count: 0,};let vm = {}function proxyData(data) {Object.keys(data).forEach(item=>{// 定义响应式对象,必须有一个中介对象vm,否则会进入死循环Object.defineProperty(vm, item, {enumerable: true,configurable: true,get(){return data[item];},set(newVal){if(newVal === data[item] ) return;data[item] = newVal;// 数据值变化,更新dom的值document.querySelector("#app").textContent = data[item];}})})}proxyData(data);vm.msg = "change msg"
⚠️注意:在设置getter的返回值时,这个数据不能是Object.defineProperty定义的对象,即不能和第一个参数对象相同,否则会进入死递归循环。
vue3使用Proxy实现响应式
Proxy是把data对象整体设置为响应式,不用对data成员进行遍历,性能很大提升
- reactive使用的proxy原理
- ref使用的defineProperty,这也是ref可以给基本类型做响应式数据的原理。但是ref必要加.value
```javascript
// 数据响应式,在vue3中使用proxy对象,代理整个data对象,不需要递归
let data = {
msg: “hello”,
count:0
}
let vm = new Proxy(data, {
get(target, key) {
}, set(target, key, value) {return target[key];
} })if(value === target[key]) return;target[key] = value;
vm.msg = “update”; console.log(vm.msg);
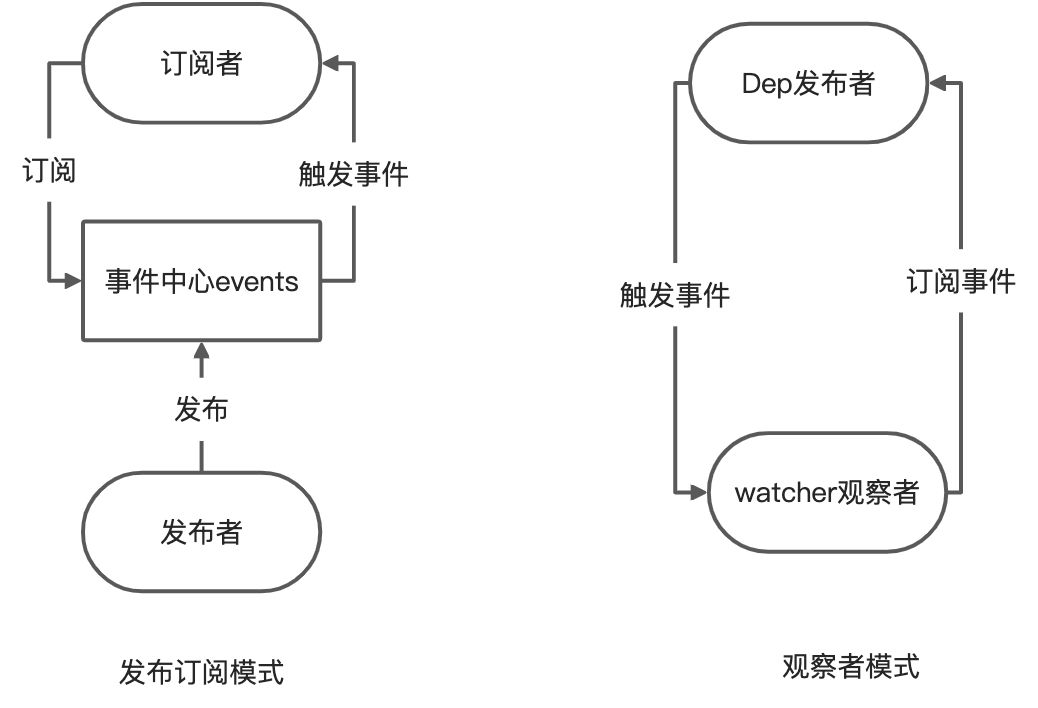
Proxy代理的是data对象本身,而不是data属性成员。<a name="yDtCg"></a># 前置2:发布订阅和观察者模式<a name="ySSIN"></a>## 发布订阅模式vue的$emit,以及EventBus事件处理,都是发布订阅模式。发布订阅包含发布者/订阅者/事件处理中心。```javascript// events = { "update":[f1,f2], "change":[m1,m2]}class EventBus{constructor(){// 观察者和发布者,建立关系的事件中心this.events = Object.create(null);}// 观察者$on(eventType, handler){this.events[eventType] = this.events[eventType] || [];// 添加观察者this.events[eventType].push(handler);}// 发布事件,通知所有观察者$emit(eventType){this.events[eventType].forEach(event=>{event()})}}let bus = new EventBus();bus.$on("haha",()=>{console.log("haha111");})bus.$on("haha",()=>{console.log("haha222");})bus.$emit("haha")
观察者模式
vue的响应式数据采用的观察者模式,包含发布者/观察者。
// 观察者模式// 没有事件处理中心// 观察者watcher,包含update方法// 发布者dep,包含addDep和notify方法class Dep {constructor(){this.deps = [];}addDep(dep){if(dep.update){this.deps.push(dep)}}notify(){this.deps.forEach(dep => dep.update())}}// 观察者class Watcher{update(){console.log("watch update");}}let w1 = new Watcher();let w2 = new Watcher();let dep = new Dep();dep.addDep(w1)dep.addDep(w2)dep.notify();
发布订阅模式和观察者模式区别
mini版vue2实现框架
vue2的核心模块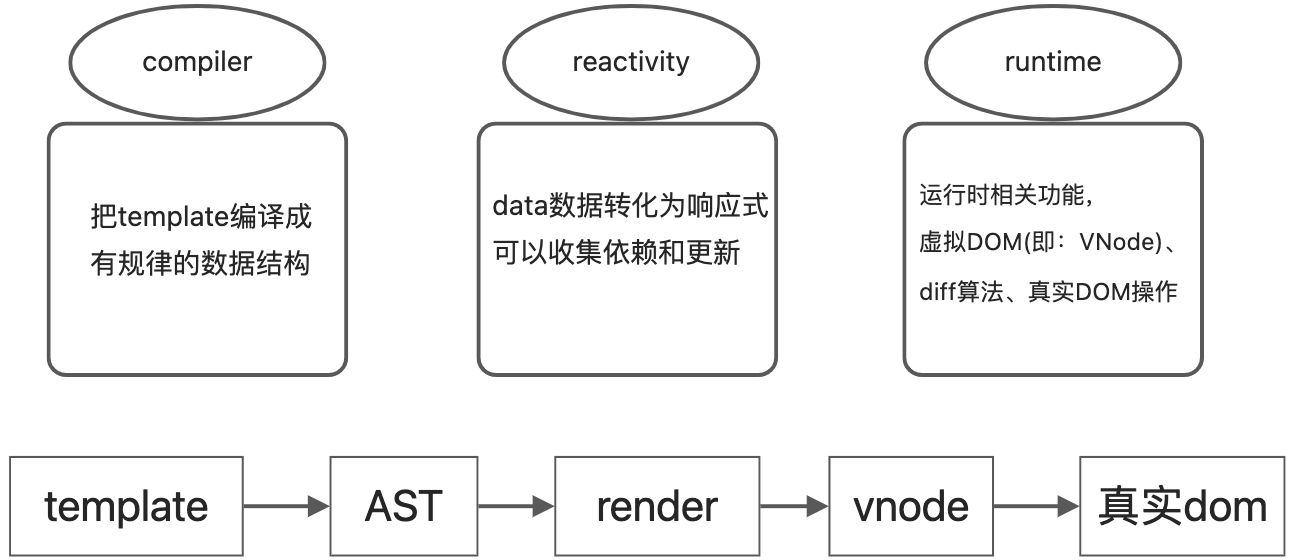
Vue提供的render函数来实现vnode,也就是h函数,可以转换成VNode的函数
render(){let { h } = Vue;return h('div',{ title : this.title , message : 'you' },[h('input',{ value : this.title , onInput : (ev)=>{ this.title = ev.target.value } }),h('button',{ onClick : this.inc },'点击')])}
AST和VNode的区别
AST和VNode的职责是不同的,不能进行等价划分;
- 即AST是compiler中把模板编译成有规律的数据结构,方便转换成render函数所存在的;
- VNode是优化DOM操作的,减少频繁DOM操作的,提升DOM性能的。可以进行dom diff
转化过程 template > ast > render function > 执行 render function > VNode
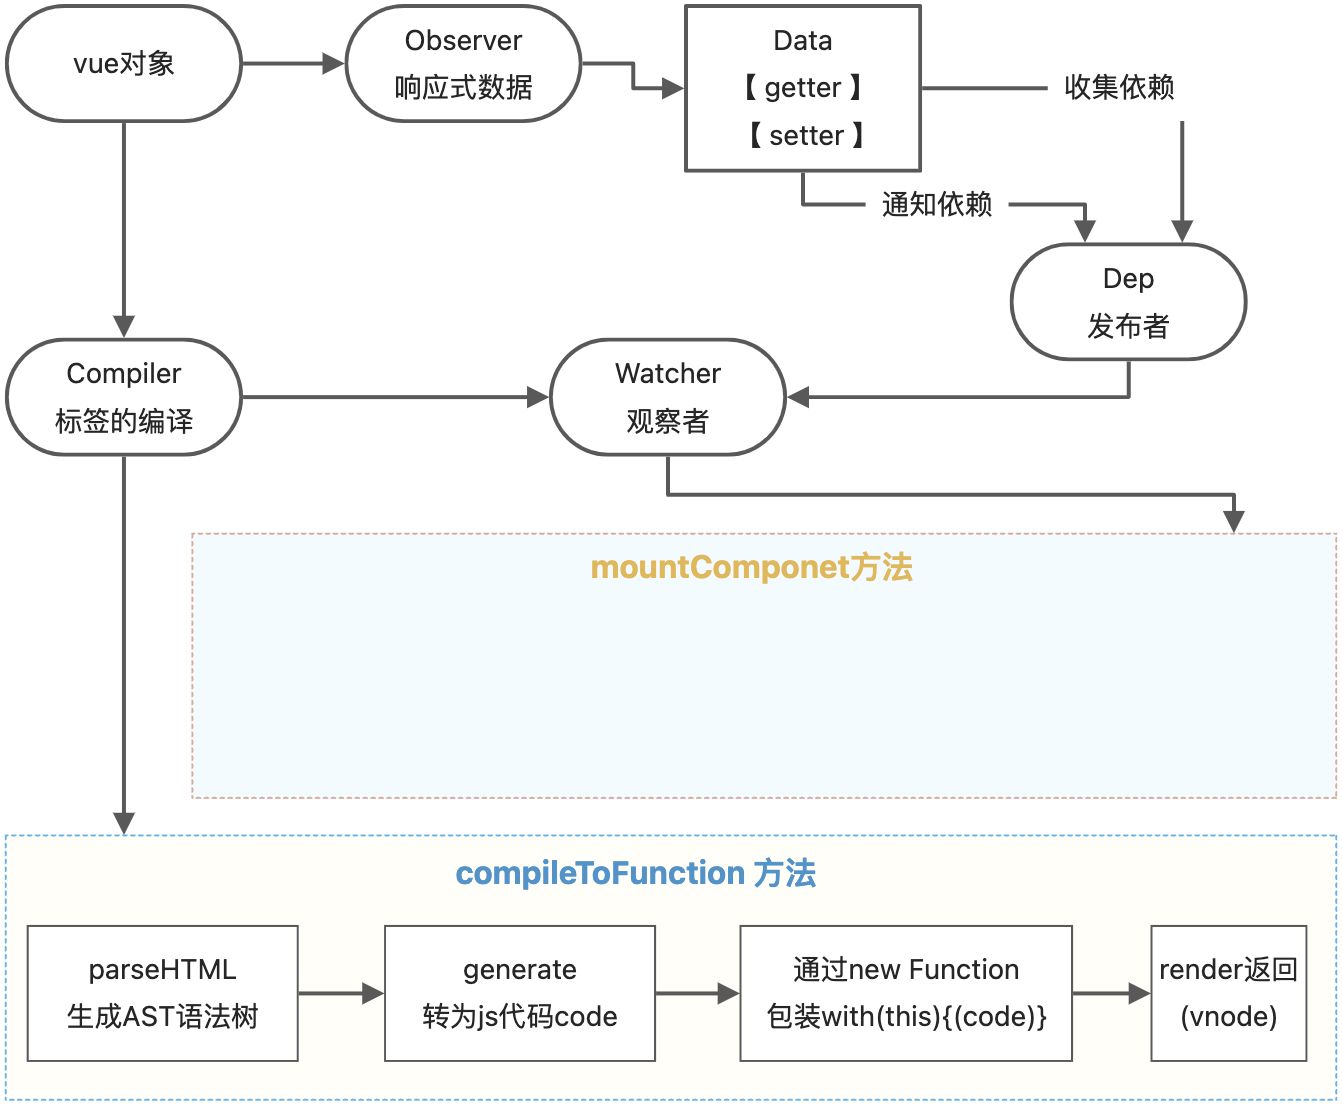
vue的实现主要包括五个功能类:
- Vue:把data中的成员注入到vue实例,并同时转为getter/setter
- Observer:能够对数据对象的所有属性进行监听,有变化立刻通知Dep类
- Compiler:解析编译特殊标签,如:指令/差值表达式
- Dep:设置发布者,Dep类在数据转为响应式数据时调用,并在getter方法内实现收集依赖。Dep类有addSub和notify方法。
- Watcher:data成员的每个响应式数据,都是一个watcher对象,在Watcher类内部通过设置Dep.target=this, 将watcher实例和Dep类关联起来。 watcher类有update方法更新视图。
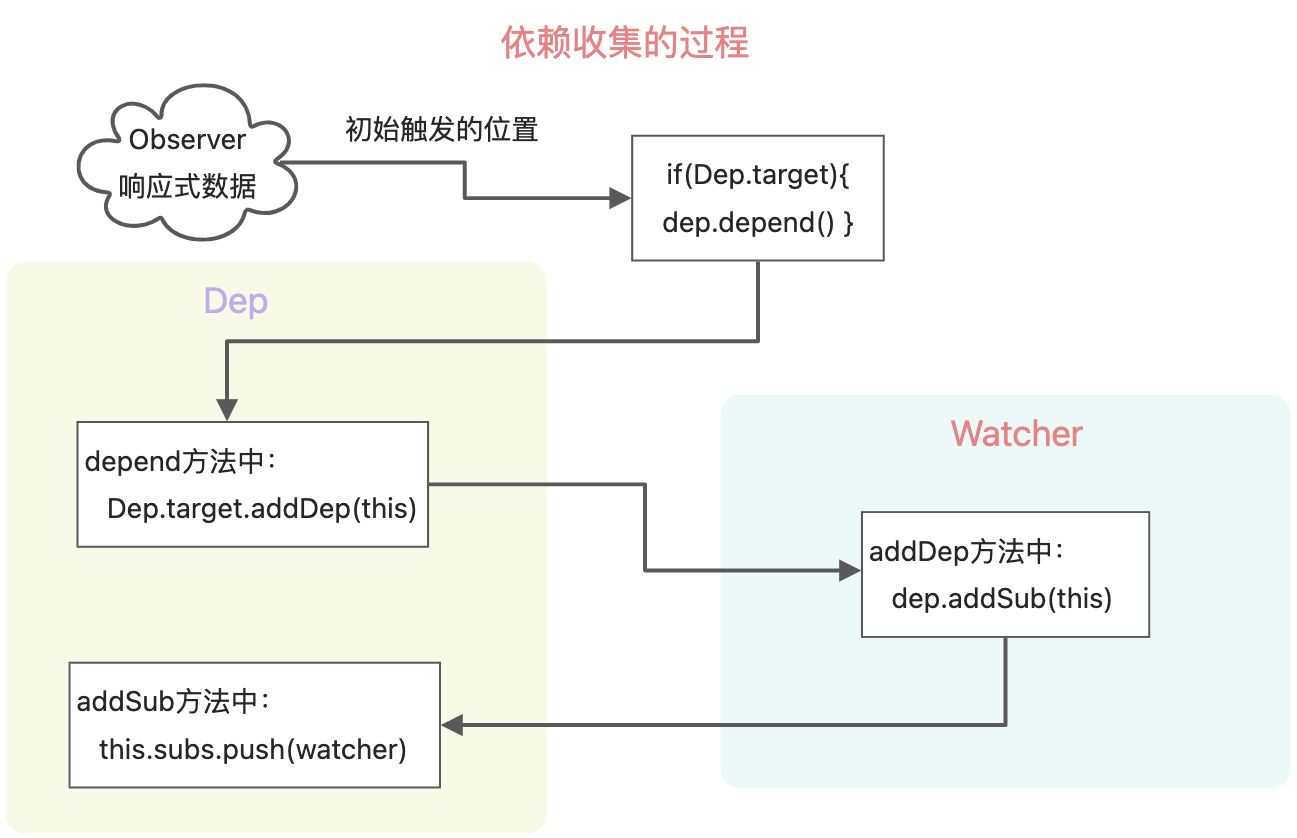
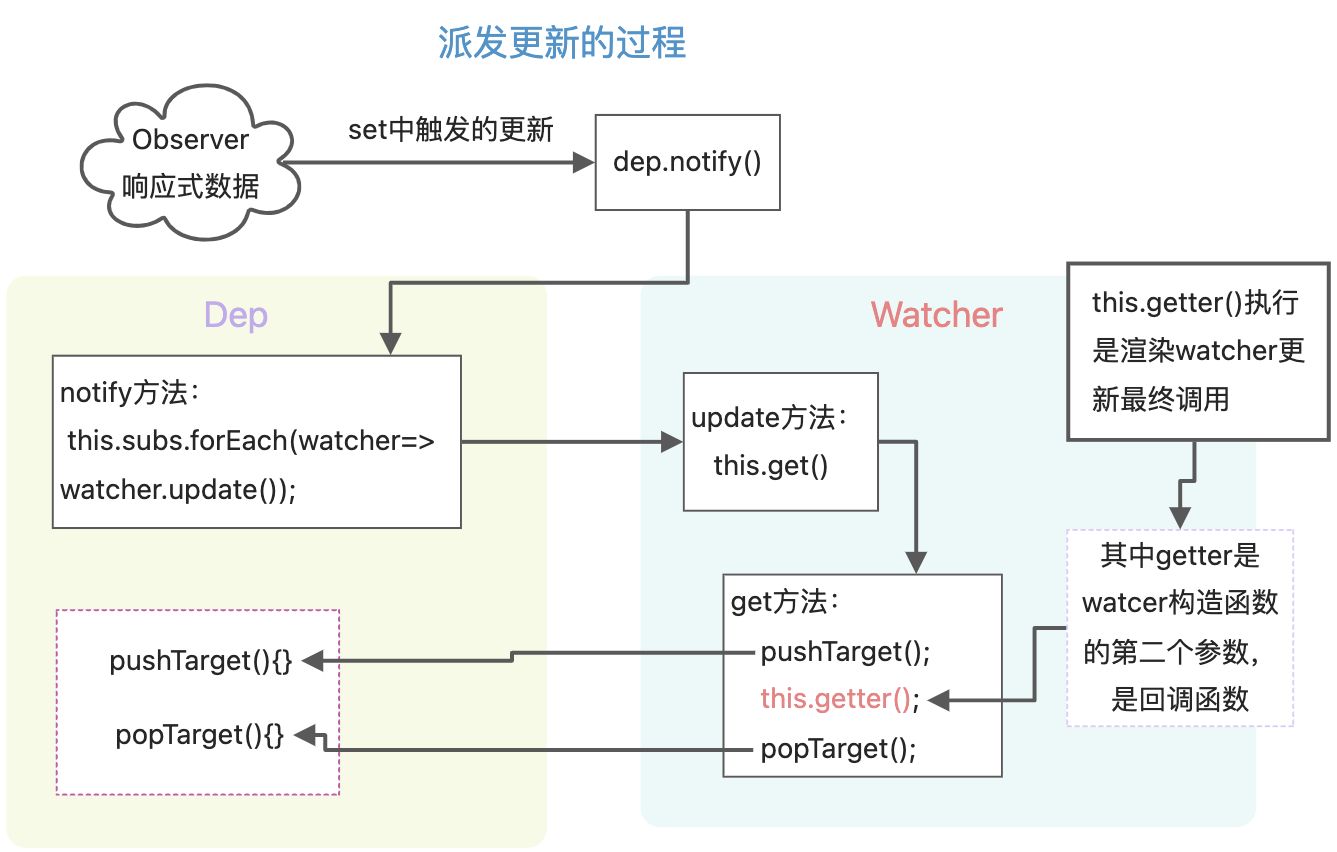
vue2依赖收集和派发更新
Watch和Dep的关系。Watcher内 部收集有Dep,Dep内也收集有Watcher,是多对多的关系。class Watcher{constructor(vm, exprOrFn, callback, options){this.deps = []; //watcher中存放着depthis.depsId = new Set(); //为了避免dep重复,设置为Set数据结构this.getter = expOrFn; //内部传递过来的回调函数,放在getter属性上。在get方法里执行}get() {pushTarget(this); // 把当前的watcher存起来let value = this.getter.call(this.vm); //渲染watcher执行popTarget(); //移除watcherreturn value;}//【4444444】// 通过Dep.target.addDep(this)走到这里addDep(dep){let id = dep.id;if(!this.depsId.has(id)){this.depsId.add(id);this.deps.push(dep); //在watcher中存放dep的动作// 下面这句,又回到Dep类的addSub方法中,作用是给dep添加watcherdep.addSub(this);}}update(){this.get();}}
let id = 0;class Dep{constructor(){this.id = id++;this.subs = []; //dep中存放watcher}depend(){// 【3333333】if(Dep.target){ //如果类中存在 Dep.target,说明存在watcher】// 这一句的调用,说明是watcher的addDep方法,进入到Watcher中Dep.target.addDep(this);// 让watcher,去存放dep,this表示当前dep}}// 【这里是触发更新的过程】notify(){this.subs.forEach(watcher=>watcher.update());}// 【5555555】// addSub是往subs数组中添加watcheraddSub(watcher){this.subs.push(watcher); //dep存放watcher的动作}}let stack = [];export function pushTarget(watcher){// 【1111111】Dep.target = watcher; // 通过给Dep类设置target属性,并赋值为watcherstack.push(watcher);}export function popTarget(){stack.pop();Dep.target = stack[stack.length-1];}export default Dep;
响应式数据定义时
let dep = new Dep();Object.defineProperty(data, key, {get() {// 【222222】if(Dep.target){ // 如果取值时有watcherdep.depend(); // 让watcher保存dep,并且让dep 保存watcher}return value},set(newValue) {if (newValue == value) return;observe(newValue);value = newValue;dep.notify(); // 通知渲染watcher去更新}});
图解分析依赖收集和派发更新的过程
watch的实现
watch是依赖watcher实现的,通过传入参数user,将渲染watcher设置为用户watcher。渲染的是用户传递的回调函数。
改写watcher,第5行,获取到是用户watcher。第30行,执行用户传入的回调函数
class Watcher {constructor(vm, exprOrFn, callback, options) {// ...// 通过options读取到user属性this.user = !! options.userif(typeof exprOrFn === 'function'){this.getter = exprOrFn;}else{this.getter = function (){ // 将表达式转换成函数let path = exprOrFn.split('.');let obj = vm;for(let i = 0; i < path.length;i++){obj = obj[path[i]];}return obj;}}this.value = this.get(); // 将初始值记录到value属性上}get() {pushTarget(this); // 把用户定义的watcher存起来const value = this.getter.call(this.vm); // 执行函数 (依赖收集)popTarget(); // 移除watcherreturn value;}run(){let value = this.get(); // 获取新值let oldValue = this.value; // 获取老值this.value = value;if(this.user){ // 如果是用户watcher 则调用用户传入的callbackthis.callback.call(this.vm,value,oldValue)}}}
computed的实现
computed计算属性的实现也是依赖watcher,通过传入的lazy属性和dirty属性。computed是懒执行的,初次加载并不会执行。
- lazy属性用来判断是computed的watcher
- dirty属性用来设置computed的更新时间,
- 如果dirty是true则更新,说明依赖的属性发生了变化
- 如果是false,则直接读取缓存,不在进行计算。
computed比watch,有缓存功能。watch可以检测到每次值的变化,能够获取到旧值和新值。
function initComputed(vm, computed) {// 存放计算属性的watcherconst watchers = vm._computedWatchers = {};for (const key in computed) {const userDef = computed[key];// 获取get方法const getter = typeof userDef === 'function' ? userDef : userDef.get;// 通过传入{lazy: true}属性,创建计算属性watcherwatchers[key] = new Watcher(vm, userDef, () => {}, { lazy: true });defineComputed(vm, key, userDef)}}
class Watcher {constructor(vm, exprOrFn, callback, options) {this.vm = vm;this.dirty = this.lazy// ...this.value = this.lazy ? undefined : this.get(); // 调用get方法 会让渲染watcher执行}}
计算属性需要保存一个dirty属性,用来实现缓存功能
function defineComputed(target, key, userDef) {if (typeof userDef === 'function') {sharedPropertyDefinition.get = createComputedGetter(key)} else {sharedPropertyDefinition.get = createComputedGetter(userDef.get);sharedPropertyDefinition.set = userDef.set;}// 使用defineProperty定义Object.defineProperty(target, key, sharedPropertyDefinition)}function createComputedGetter(key) {return function computedGetter() {const watcher = this._computedWatchers[key];if (watcher) {if (watcher.dirty) { // 如果dirty为truewatcher.evaluate();// 计算出新值,并将dirty 更新为false}if (Dep.target) { // 计算属性在模板中使用 则存在Dep.targetwatcher.depend()}// 如果依赖的值不发生变化,则返回上次计算的结果return watcher.value}}}
修改watcher中的方法evaluate和update
evaluate() {this.value = this.get()this.dirty = false}update() {if (this.lazy) {this.dirty = true;} else {queueWatcher(this);}}
Vue类
功能
- 负责接收初始化的参数options
- 把data中属性成员注入到vue实例,转化成getter/setter
- 调用observer监听data中所有属性变化
-
结构
代码
vue.js,创建Vue类 ```javascript class Vue{ constructor(options){
// 设置this.$options,保存选项options的数据this.$options = options;this.$data = options.data;this.$el = typeof options.el === 'string' ? document.querySelector(options.el) :options.el// 把data中的数转化成getter和setter,注入vue实例中this._proxyData(this.$data);// 调用observer对象,监听数据变化new Observer(this.$data);// 调用compiler对象,解析指令和差值表达式new Compiler(this)
} // 让Vue实例代理data的属性,经过该操作,vue实例对就可以直接访问data中的属性 _proxyData(data){
// 遍历data中所有属性Object.keys(data).forEach((key)=>{// 要代理的对象是this即vue实例,把data中的属性都代理到vue实例上Object.defineProperty(this, key, {enumerable:true,configurable: true,get(){console.log("proxy");return data[key];},set(newVal){if(newVal === data[key]) return;data[key] = newVal;}})})
} }

<a name="prf2n"></a>## Observer类<a name="apeOb"></a>### 功能1. 把data中属性成员转化成getter/setter响应式数据2. data中的属性的值也是对象,递归把该属性的value也转换成响应式数据3. 数据变化发送通知<a name="mz1DT"></a>### 结构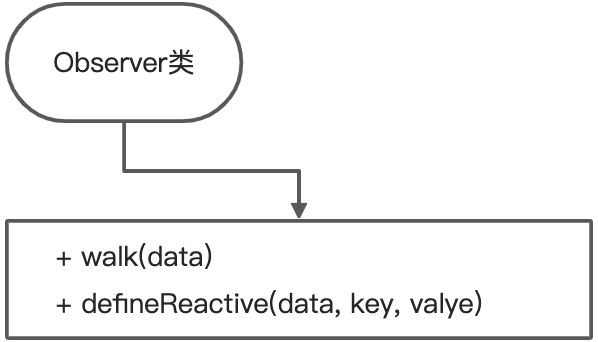<a name="P3LWT"></a>### 代码```javascript// 响应式对象,可以随时观察data属性数据的变化class Observer{constructor(data){// 将data转为响应式this.walk(data);}walk(data){// 判断data是否存在,判断data的类型为对象if(!data || typeof data !== 'object') return;Object.keys(data).forEach(key=>{this.defineReactive(data, key);})}defineReactive(obj, key){let _self = this;// 创建Dep实例对象,建立依赖对象(发布者)let dep = new Dep()// 创建临时中间变量value,可以在getter的return中使用let value = obj[key];// ⭐️如果data下属性的数据仍是对象,需要把对象下的属性继续执行响应式this.walk(value)// 和_proxy方法很大的区别是第一个参数,_proxy第一个参数是vue实例,该处的第一个参数是data对象Object.defineProperty(obj, key, {enumerable: true,configurable: true,get(){console.log("observer");// 收集依赖,Dep.target是watcher的实例对象Dep.target && dep.addSub(Dep.target)// 此处return的结果不能是obj[key],因为第一个参数对象是objreturn value;},set(newValue){if(newValue === value) return;value = newValue;// ⭐️给data的属性赋值为一个对象,需要将该对象转为响应式,如果赋值的是基本类型,则不是响应式_self.walk(newValue)// 监听数据的变化,发送通知dep.notify()}})}}
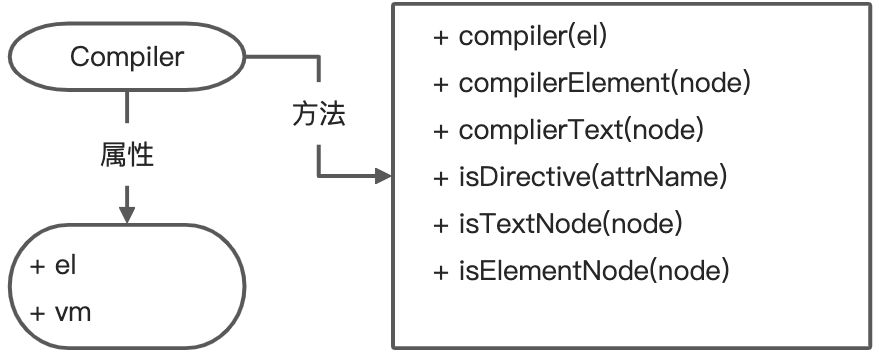
Compiler类
功能:
- 编译模板,解析指令/差值表达式
- 页面的首次渲染
-
结构
代码
```javascript // 编译特殊语法 class Compiler{ constructor(vm){
this.vm = vm;this.el = vm.$el;// 创建实例对象后,立即编译模板this.compile(this.el)
} // 编译模版,处理文本节点和元素节点 compile(el){
let childNode = el.childNodes;Array.from(childNode).forEach(item =>{// 处理文本节点if(this.isTextNode(item)){this.compileText(item);}// 处理元素节点else if(this.isElementNode(item)){this.compileElement(item);}// 判断item是否有子节点,如果有子节点,递归调用compileif(item.childNodes && item.childNodes.length>0){this.compile(item)}})
} // 编译元素节点,处理指令 compileElement(node){
// 获取属性节点// console.log(node.attributes);// 遍历所有的属性节点Array.from(node.attributes).forEach((item)=>{/*解析v-text="msg"attrName : v-textkey : msg*/// 判断属性是否是指令let attrName = item.name;let keyVal = item.value;if(this.isDirective(attrName)){// 将指令v-去掉,v-text转为text,v-model转为modelattrName = attrName.substr(2)this.update(node, keyVal, attrName)}})
}
/ 适配器设计模式 / update(node, key, attrName){ let updateFn = this[attrName + ‘Updater’] updateFn && updateFn.call(this, node, this.vm[key], key) }
// 处理v-text指令textUpdater(node, value, key){node.textContent = value/* ⭐️指令v-text创建watcher对象,当数据改变更新视图 */new Watcher(this.vm, key, (newValue)=>{node.textContent = newValue})}// 处理v-model指令modelUpdater(node, value, key){node.value = value/* ⭐️指令v-model创建watcher对象,当数据改变更新视图 */new Watcher(this.vm, key, (newValue)=>{node.value = newValue})// 改变输入框的值,视图发生变化,双向绑定node.addEventListener("input", ()=>{this.vm[key] = node.value})}// 编译文本节点,处理差值表达式{{ msg }}compileText(node){// console.dir(node,"compileText");// ⭐️使用正则表达式处理差值表达式,差值表达式可能有多个括号,并且要把中间的值提取出来let reg = /\{\{(.+?)\}\}/// 获取文本节点内容let value = node.textContent;if(reg.test(value)){// 获取差值表达式中的值let key = RegExp.$1.trim();// 替换差值表达式的值node.textContent = value.replace(reg, this.vm[key]);/* ⭐️差值表达式创建watcher对象,当数据改变更新视图 */new Watcher(this.vm, key, (newValue)=>{node.textContent = newValue;})}}// 判断是否是指令isDirective(attrName){// 属性以v-开头则为指令return attrName.startsWith("v-")}// 判断节点是否是文本isTextNode(node){return node.nodeType === 3;}// 判断节点是否是元素节点isElementNode(node){return node.nodeType === 1;}
}
<a name="f5Dz7"></a>## Dep类<a name="Y8ypa"></a>### 功能- 收集依赖,添加观察者watcher- 通知所有观察者<a name="ZWMf3"></a>### 结构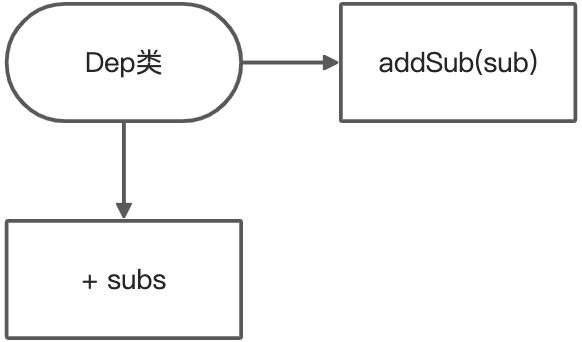<a name="CXk2V"></a>### 代码```javascriptclass Dep{constructor(){this.subs=[]}//添加观察者addSub(sub){if(sub&&sub.update){this.subs.push(sub)}}// 给每个观察者发送通知notify(){this.subs.forEach(sub=>sub.update())}}
Watcher类
功能

代码
// 监测数据变化,并更新视图,在compiler中调用class Watcher{constructor(vm, key, cb){this.vm = vm;// data中属性名this.key = key;// 由于更新视图的形式不同,可以传递cb回调函数处理不同的方法,cb负责更新视图:// 如:差值表达式更新的是textContent,v-model指令需要更新input元素的valuethis.cb = cb;/* ⭐️⭐️⭐️watcher和dep建立关系把watcher对象记录到Dep类的静态属性target上*/Dep.target = this;// 通过访问vm中的属性,就会触发get方法,在get方法中调用addSub,下面的vm[key]正好执行this.oldValue = vm[key];// 调用过addSub,把watcher添加到dep的sub之后,需要将watcher置空,以便下次使用Dep.target = null;}// 当数据发生变化时,更新视图update(){let newVal = this.vm[this.key]if(newVal === this.oldValue) return;this.cb(newVal)}}
测试文件index.html
<!DOCTYPE html><html lang="en"><head><meta charset="UTF-8"><meta http-equiv="X-UA-Compatible" content="IE=edge"><meta name="viewport" content="width=device-width, initial-scale=1.0"><title>vue-mini demo</title></head><body><div id="app"><h1>差值表达式</h1><h3>{{msg}}</h3><h3>{{count}}</h3><h1>v-text</h1><div v-text="msg"></div><h1>v-model</h1><input type="text" v-model="msg"><br/><input type="text" v-model="count"></div><script src="./js/dep.js"></script><script src="./js/watcher.js"></script><script src="./js/compiler.js"></script><script src="./js/observer.js"></script><script src="./js/vue.js"></script><script>let app = new Vue({el:"#app",data: {msg:"vue mini",count:123,person: {name:"John",age:10}}});// app.msg = {// text:"msg"// }// console.log(app.$data.msg,"msg");</script></body></html>
数据双向绑定
在compiler类中,处理v-model指令时,设置事件处理方法
// 改变输入框的值,视图发生变化,双向绑定node.addEventListener("input", ()=>{this.vm[key] = node.value})
锤子分析vue源码
锤子科技前端工程师:分析vue源码
https://www.zhihu.com/people/zhaoliangliang/posts?page=3

若有收获,就点个赞吧
0 人点赞
