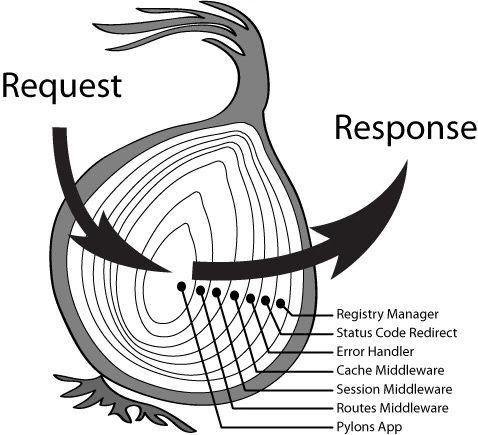
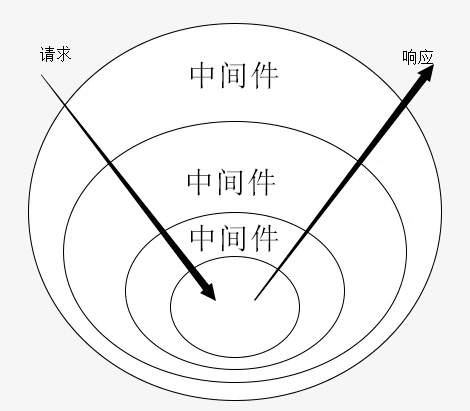
执行过程,洋葱模型
const Koa = require('koa');const app = new Koa();app.use(async (ctx, next) => {console.log(1);await next()console.log(2);})app.use(async (ctx, next) => {console.log(3);await next()console.log(4);ctx.body = "hello koa2!!!"})app.use(ctx => {console.log(5);ctx.body = "hello koa3"})app.listen(3000)
打印结果 1 ,3, 5, 4, 2

路由中间件
根据url匹配处理
处理不同的url
通过不同的url路径,跳转不同的页面
app.use(async (ctx, next) => {if(ctx.url === '/'){ctx.body = "主页"}else if(ctx.url === "/users"){ctx.body = "用户列表"}else{ctx.status = 404;}})
处理不同的http请求方式
if(ctx.url === "/users"){if(ctx.method === "GET"){ctx.body = "用户列表"}else if(ctx.method === "POST"){ctx.body = "创建用户"}else{// 不允许操作ctx.status = 405;}}
解析url上的参数
使用url.match()
if(ctx.url.match(/\/users\/\w+/)){const userId = ctx.url.match(/\/users\/(\w+)/)[1];ctx.body = `用户${userId}`}
通过koa-router中间件
const Router = require('koa-router')const router = new Router()router.get('/',(ctx) =>{ctx.body = "这是主页"})router.get('/users', (ctx) =>{ctx.body = "用户列表"})// 不同的http请求方法router.post('/users', (ctx) =>{ctx.body = "创建用户"})// 获取url路径上的参数router.get('/users/:id', (ctx) =>{ctx.body = `这是用户${ctx.params.id}`})app.use(router.routes())
路由添加前缀prefix
// 添加前缀,可以分层级管理路由const userRouter = new Router({prefix: "/users"})userRouter.get('/', (ctx) =>{ctx.body = "用户列表"})// 不同的http请求方法userRouter.post('/', (ctx) =>{ctx.body = "创建用户"})// 获取url路径上的参数userRouter.get('/:id', (ctx) =>{ctx.body = `这是用户${ctx.params.id}`})app.use(userRouter.routes())
使用koa-bodyparser解析body内容
const bodyparser = require("koa-bodyparser");// 注册到koa实例app上app.use(bodyparser());
重构路由结构
把home和users抽离为单独路由
home.js代码
const Router = require("koa-router");const router = new Router()router.get('/', (ctx)=>{ctx.body = "这里是主页"})module.exports = router;
users.js文件
const Router = require("koa-router");const router = new Router({prefix:"/users"})router.get('/', (ctx) =>{ctx.body = "用户列表"})// 不同的http请求方法router.post('/', (ctx) =>{ctx.body = "创建用户"})// 获取url路径上的参数router.get('/:id', (ctx) =>{ctx.body = `这是用户${ctx.params.id}`})module.exports = router;
index文件收集所有路由文件统一处理
使用到node的fs模块,同步读取目录下的所有文件。将所有文件统一做处理导出。
const fs = require('fs');const allRoutes = (app)=>{fs.readdirSync(__dirname).forEach(file=>{if(!file.includes("index")){const route = require(`./${file}`)app.use(route.routes()).use(route.allowedMethods())}})}module.exports = allRoutes;
然后在入口文件引入routes目录下的index文件
const routes = require("./routes")routes(app);
控制器control
处理经过路由之后进入的页面,处理不同的业务逻辑。由于业务逻辑比较复杂,实际项目开发中,会把控制器单独抽离出来。
创建controllers目录
home控制器
class HomeCtrl{index(ctx){ctx.body = "这是首页page"}}module.exports = new HomeCtrl();
user控制器
class UsersCtrl{findUser(ctx){ctx.body = "用户列表"}findUserById(ctx){ctx.body = `这是用户${ctx.params.id}`}createUser(ctx){ctx.body = "创建用户"}}module.exports = new UsersCtrl();
错误处理
koa内部处理
- 404,客户端请求路径错误
- 412,获取特定数据不存在,即:先决条件失败412Precondition Failed
500,服务器内部错误,运行时错误(不是语法错误)。
findUserById(ctx){if(ctx.params.id >100){ctx.throw(412, "先决条件失败,查询数据不存在。")}ctx.body = `这是用户${ctx.params.id}`}
编写中间件处理错误
由于koa内部处理错误返回的数据不是json格式,需要通过中间件处理。
app.use(async (ctx,next) => {try {await next();}catch (err){ctx.status = err.status || err.statusCode ||500;ctx.body = {message: err.message};}})
错误处理第三方中间件
koa-json-error : 处理报错信息为json,生产环境设置取消stack的打印
-
用户认证JWT
JWT介绍
JSON WEB TOKEN的简写,定义了将各方之间的信息作为json对象进行安全传输,该信息可以验证和信任,信息都是经过数字签名的。
JWT的构成:头部header、有效载荷payload、签名signature。
红色为header,紫色为payload,青色为signature
https://www.jianshu.com/p/576dbf44b2aejwt的头部header承载两部分信息
声明类型,这里是jwt
- 声明加密的算法 通常直接使用 HMAC SHA256
完整的头部就像下面这样的JSON:
{'typ': 'JWT','alg': 'HS256'}
将头部进行base64加密,构成了第一部分header
eyJ0eXAiOiJKV1QiLCJhbGciOiJIUzI1NiJ9
payload载荷
载荷就是存放有效信息的地方。有效信息包含三个部分
- 标准中注册的声明
- 公共的声明
- 私有的声明
定义一个payload:
{"sub": "1234567890","name": "John Doe","admin": true}
然后将其进行base64加密,得到Jwt的第二部分。
eyJzdWIiOiIxMjM0NTY3ODkwIiwibmFtZSI6IkpvaG4gRG9lIiwiYWRtaW4iOnRydWV9
signature算法
jwt的第三部分是一个签证信息,这个签证信息由三部分组成:
- header (base64后的)
- payload (base64后的)
- secret
这个部分需要base64加密后的header和base64加密后的payload使用.连接组成的字符串,然后通过header中声明的加密方式进行加盐secret组合加密,然后就构成了jwt的第三部分。
var signature = HMACSHA256( base64UrlEncode(header) + '.' + base64UrlEncode(payload), 'secret');
将这三部分用 . 连接成一个完整的字符串,构成了最终的jwt:
eyJhbGciOiJIUzI1NiIsInR5cCI6IkpXVCJ9.eyJzdWIiOiIxMjM0NTY3ODkwIiwibmFtZSI6IkpvaG4gRG9lIiwiYWRtaW4iOnRydWV9.TJVA95OrM7E2cBab30RMHrHDcEfxjoYZgeFONFh7HgQ
注意:secret是保存在服务器端的,jwt的签发生成也是在服务器端的,secret就是用来进行jwt的签发和jwt的验证,所以,它就是你服务端的私钥,在任何场景都不应该流露出去。一旦客户端得知这个secret, 那就意味着客户端是可以自我签发jwt。
node中使用JWT
- 安装jsonwebtoken
- 签名
- 验证
const jwt =require("jsonwebtoken")const token = jwt.sign({name:"sam"}, "secret")jwt.verify(token, "secret")
用jwt实现用户注册和登录
1:当用户登录时,生产token信息,并返回给前端
// index首页,使用koa-parameter对客户端输入的数据进行校验const parameter = require('koa-parameter');parameter(app);
const jsonwebtoken = require("jsonwebtoken");async login(ctx){// ctx.request.body name和password必须填写,parameter对参数进行的校验ctx.verifyParams({name: {type: "string", required: true},password: {type: "string", required: true}})// 查询输入的用户是否存在const user = await User.findOne(ctx.request.body);if(!user) {ctx.throw(401, '用户名或密码有误');}//解析出用户名和_id信息const {_id, name} = user;// 设置jsonwebtoken,使用sign签名,第一个参数要校验的数据,第二个secret密码,第三有效时长const token = jsonwebtoken.sign({_id, name}, "secret_zidingyi_y8e42938", {expiresIn:"1d"});// 将生成后的token返回前端,前端以后进行接口请求时,需要携带此信息。ctx.body = {token}}
2:编写一个认证的中间件
认证的作用,用户进行相关操作时进行的身份认证,看当前作用的身份是否正确,是否能调用当前接口。
通常需要对用户的更新进行认证操作,如果登录的身份和更新的身份不一致,则不能进行更新操作。// 自定义认证中间件const auth = async (ctx, next) =>{const {authorization = ""} = ctx.request.header;const token = authorization.replace("Bearer ", "")try{const user = jsonwebtoken.verify(token, "secret_zidingyi_y8e42938");// 将用户信息存储ctx.state.user = user;}catch(err){ctx.throw(401, err.message)}await next();}
// 更新用户信息,新进行认证操作,成功后在进行更新操作router.put('/:id', auth, userCtrl.updateUser)
3:授权中间件,判断登录用户的权限
上述第二步中,如果登录的认证可以通过,如果需要更新其他用户的数据,就需要权限设置,如果登录用户是管理员,权限比较大,就可以更新别的用户信息,此时用到认证后的授权操作。
示例演示,仅设置最简单的权限,通过判断登录id和token的id是否一致。// 授权,设置权限// 检查是否有操作数据的权限const checkOwner=async (ctx, next)=>{if(ctx.params.id !== ctx.state.user._id){ctx.throw(403, '没有权限')}await next();}
使用koa-jwt
上面使用了自定义的中间件,也可以使用现成的中间件完成上述过程。 ```javascript const jwt = require(“koa-jwt”);
// 设置jwt的认证,koa-jwt可以简化代码 const jwtAuth = jwt({secret:”secret_zidingyi_y8e42938”}) // 更新用户信息,先进行认证,在进行授权 router.put(‘/:id’, jwtAuth, checkOwner, userCtrl.updateUser)
<a name="HJE83"></a>## 图片上传及设置静态路径<a name="FSVPb"></a>### koa-body中间件设置上传koa-body可以解析上传的文件,也可以解析form及json格式。```javascriptconst koaBody = require('koa-body')// 使用koa-body替换bodyParser,koa-body可以解析文件格式app.use(koaBody({multipart: true,formidable:{uploadDir: path.join(__dirname, "/public/uploads"), //设置上传路径keepExtensions: true, // 保留扩展名}}))
koa-static设置静态目录
可以将目录设置为通过路径就能访问的静态目录
// 设置静态目录z中间件const koaStatic = require('koa-static');// 设置静态目录app.use(koaStatic(path.join(__dirname, '/public')))
修改上传接口返回的路径
upload(ctx){const file = ctx.request.files.file;const basename = path.basename(file.path)ctx.body = {url: `${ctx.origin}/uploads/${basename}`}}
使用mongoose连接数据库
使用mongoose的connect连接数据库
const mongoose = require('mongoose')const connectionPath="mongodb://test:123456@0.0.0.0:27017/test"mongoose.connect(connectionPath, { useNewUrlParser: true, useUnifiedTopology: true}, () =>{console.log('connect success')})mongoose.connection.on('error',(err)=>{console.error("link error",err)})
定义schema
定义user的模型model
const userSchema = new Schema({"__v": {type: Number,// select:false,查询的时候可以不显示字段select: false},"name": {type: String,required: true},"password": {type: String,required: true,select: false},"gender": {type: String,// 可以枚举的类型enum: ['male', 'female'],// 默认的类型default: 'male',// 必填项required: true},// 兴趣爱好,是个字符串类型的数组"hobbies": {type: [{type: String,select: false}]},"employments": {// 工作信息,是个包含多个信息对象的数组列表,包含公司/职业type: [{company: {type: String},job: {type: String}}],select: false},// 粉丝列表following:{// 引用,设置关联到用户,使用了mongoose的数据类型,schema.Types.ObjectId// ref,设置关联,在控制器中,可以使用populate()查询完整对象type: [{ type: Schema.Types.ObjectId, ref: "User"}],select: false}})
控制器
// 查询关注者列表async followingList(ctx) {//使用populate方法,需要在定义schema时设置ref关联对象。如果不设置populate,查询处理的只是idconst user = await User.findById(ctx.params.id).select("+following").populate("following")if(!user){ctx.throw(404)}else{ctx.body = user.following;}}

