动画基本结构
在Flutter中我们可以通过多种方式来实现动画,下面通过一个图片逐渐放大示例的不同实现来演示Flutter中动画的不同实现方式的区别
基础版本
下面我们演示一下最基础的动画实现方式:
import 'package:flutter/material.dart';void main() => runApp(new MyApp());class MyApp extends StatelessWidget {@overrideWidget build(BuildContext context) {return MaterialApp(debugShowCheckedModeBanner: true,title: '基础版本',theme: ThemeData(primarySwatch: Colors.blue,),home: Scaffold(appBar: AppBar(title: Text("基础版本")),body: ScaleAnimationRoute(),));}}class ScaleAnimationRoute extends StatefulWidget {@override_ScaleAnimationRouteState createState() => new _ScaleAnimationRouteState();}//需要继承TickerProvider,如果有多个AnimationController,则应该使用TickerProviderStateMixin。class _ScaleAnimationRouteState extends State<ScaleAnimationRoute>with SingleTickerProviderStateMixin {AnimationController _controller;Animation<double> _animation;@overrideinitState() {super.initState();_controller = new AnimationController(duration: const Duration(seconds: 3), vsync: this);_animation = new CurvedAnimation(parent: _controller, curve: Curves.easeOut);//图片宽高从0变到300_animation = new Tween(begin: 300.0, end: 3.0).animate(_animation)..addListener(() {setState(() => {});});//启动动画(正向执行)_controller.forward();}@overrideWidget build(BuildContext context) {return new Center(child: Image.asset("images/avatar.jpg",width: _animation.value, height: _animation.value),);}@overridevoid dispose() {//路由销毁时需要释放动画资源_controller.dispose();super.dispose();}}
上面代码中addListener()函数调用了setState(),所以每次动画生成一个新的数字时,当前帧被标记为脏(dirty),这会导致widget的build()方法再次被调用,而在build()中,改变Image的宽高,因为它的高度和宽度现在使用的是animation.value ,所以就会逐渐放大。值得注意的是动画完成时要释放控制器(调用dispose()方法)以防止内存泄漏。
上面的例子中并没有指定Curve,所以放大的过程是线性的(匀速),下面我们指定一个Curve,来实现一个类似于弹簧效果的动画过程,我们只需要将initState中的代码改为下面这样即可:
@overrideinitState() {super.initState();_controller = new AnimationController(duration: const Duration(seconds: 3), vsync: this);_animation = new CurvedAnimation(parent: _controller, curve: Curves.easeOut);//图片宽高从0变到300_animation = new Tween(begin: 300.0, end: 3.0).animate(_animation)..addListener(() {setState(() => {});});//启动动画(正向执行)_controller.forward();}
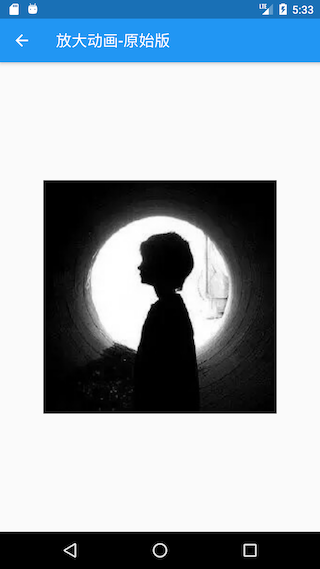
上面代码执行后截取了其中的两帧,效果如图9-1、9-2所示: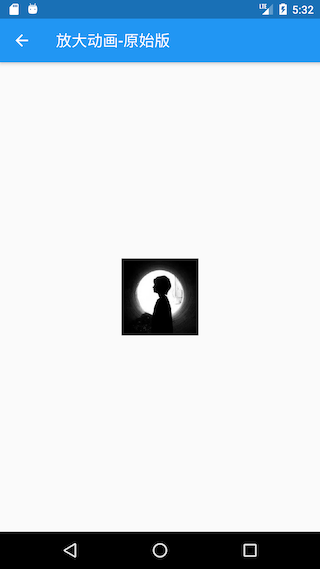
使用AnimatedWidget简化版
细心的读者可能已经发现上面示例中通过addListener()和setState()来更新UI这一步其实是通用的,如果每个动画中都加这么一句是比较繁琐的。AnimatedWidget类封装了调用setState()的细节,并允许我们将widget分离出来,重构后的代码如下:
import 'package:flutter/material.dart';void main() => runApp(new MyApp());class MyApp extends StatelessWidget {@overrideWidget build(BuildContext context) {return MaterialApp(debugShowCheckedModeBanner: true,title: '使用AnimatedWidget简化版',theme: ThemeData(primarySwatch: Colors.blue,),home: Scaffold(appBar: AppBar(title: Text("使用AnimatedWidget简化版")),body: ScaleAnimationRoute1(),));}}class AnimatedImageTest extends AnimatedWidget {final Animation<double> animation;// AnimatedImageTest({Key key, Animation<double> animation})// : super(key: key, listenable: animation);AnimatedImageTest({Key key, this.animation}): super(key: key, listenable: animation);Widget build(BuildContext context) {// final Animation<double> animation = animation;return new Center(child: Image.asset("images/avatar.jpg",width: animation.value, height: animation.value),);}}class ScaleAnimationRoute1 extends StatefulWidget {@override_ScaleAnimationRouteState createState() => new _ScaleAnimationRouteState();}class _ScaleAnimationRouteState extends State<ScaleAnimationRoute1>with SingleTickerProviderStateMixin {Animation<double> animation;AnimationController controller;initState() {super.initState();controller = new AnimationController(duration: const Duration(seconds: 3), vsync: this);//图片宽高从0变到300animation = CurvedAnimation(parent: controller, curve: Curves.bounceInOut);animation = new Tween(begin: 0.0, end: 300.0).animate(animation);//启动动画controller.forward();}@overrideWidget build(BuildContext context) {return AnimatedImageTest(animation: animation,);}dispose() {//路由销毁时需要释放动画资源controller.dispose();super.dispose();}}
用AnimatedBuilder重构版
用AnimatedWidget可以从动画中分离出widget,而动画的渲染过程(即设置宽高)仍然在AnimatedWidget中
假设如果我们再添加一个widget透明度变化的动画,那么我们需要再实现一个AnimatedWidget,这样不是很优雅,如果我们能把渲染过程也抽象出来,那就会好很多,而AnimatedBuilder正是将渲染逻辑分离出来, 上面的build方法中的代码可以改为:
import 'package:flutter/material.dart';void main() => runApp(new MyApp());class MyApp extends StatelessWidget {@overrideWidget build(BuildContext context) {return MaterialApp(debugShowCheckedModeBanner: true,title: '使用AnimatedWidget简化版',theme: ThemeData(primarySwatch: Colors.blue,),home: Scaffold(appBar: AppBar(title: Text("使用AnimatedWidget简化版")),body: ScaleAnimationRoute1(),));}}class AnimatedImageTest extends AnimatedWidget {final Animation<double> animation;// AnimatedImageTest({Key key, Animation<double> animation})// : super(key: key, listenable: animation);AnimatedImageTest({Key key, this.animation}): super(key: key, listenable: animation);Widget build(BuildContext context) {// final Animation<double> animation = animation;return new Center(child: Image.asset("images/avatar.jpg",width: animation.value, height: animation.value),);}}class ScaleAnimationRoute1 extends StatefulWidget {@override_ScaleAnimationRouteState createState() => new _ScaleAnimationRouteState();}class _ScaleAnimationRouteState extends State<ScaleAnimationRoute1>with SingleTickerProviderStateMixin {Animation<double> animation;AnimationController controller;initState() {super.initState();controller = new AnimationController(duration: const Duration(seconds: 3), vsync: this);//图片宽高从0变到300animation = CurvedAnimation(parent: controller, curve: Curves.bounceInOut);animation = new Tween(begin: 0.0, end: 300.0).animate(animation);//启动动画controller.forward();}@overrideWidget build(BuildContext context) {// return AnimatedImageTest( animation: animation, );return AnimatedBuilder(animation: animation,child: Image.asset("images/avatar.jpg"),builder: (BuildContext ctx, Widget child) {return new Center(child: Container(height: animation.value,width: animation.value,child: child,),);},);}dispose() {//路由销毁时需要释放动画资源controller.dispose();super.dispose();}}
上面的代码中有一个迷惑的问题是,child看起来像被指定了两次。但实际发生的事情是:将外部引用child传递给AnimatedBuilder后,AnimatedBuilder再将其传递给匿名构造器, 然后将该对象用作其子对象。最终的结果是AnimatedBuilder返回的对象插入到widget树中。
对AnimatedBuilder进一步封装
也许你会说这和我们刚开始的示例差不了多少,其实它会带来三个好处:
- 不用显式的去添加帧监听器,然后再调用setState()了,这个好处和AnimatedWidget是一样的。
- 动画构建的范围缩小了
- 如果没有builder,setState()将会在父组件上下文中调用,这将会导致父组件的build方法重新调用
- 而有了builder之后,只会导致动画widget自身的build重新调用,避免不必要的rebuild。
- 通过AnimatedBuilder可以封装常见的过渡效果来复用动画。下面我们通过封装一个GrowTransition来说明,它可以对子widget实现放大动画:
这样,最初的示例就可以改为: ```dart import ‘package:flutter/material.dart’;class GrowTransition extends StatelessWidget {GrowTransition({this.child, this.animation});final Widget child;final Animation<double> animation;Widget build(BuildContext context) {return new Center(child: new AnimatedBuilder(animation: animation,builder: (BuildContext context, Widget child) {return new Container(height: animation.value,width: animation.value,child: child);},child: child),);}}
void main() => runApp(new MyApp());
class MyApp extends StatelessWidget { @override Widget build(BuildContext context) { return MaterialApp( debugShowCheckedModeBanner: true, title: ‘使用AnimatedWidget简化版’, theme: ThemeData( primarySwatch: Colors.blue, ), home: Scaffold( appBar: AppBar(title: Text(“使用AnimatedWidget简化版”)), body: ScaleAnimationRoute1(), )); } }
class AnimatedImageTest extends AnimatedWidget {
final Animation
// AnimatedImageTest({Key key, Animation
class ScaleAnimationRoute1 extends StatefulWidget { @override _ScaleAnimationRouteState createState() => new _ScaleAnimationRouteState(); }
class _ScaleAnimationRouteState extends State
@override initState() { super.initState(); controller = new AnimationController( duration: const Duration(seconds: 3), vsync: this); //图片宽高从0变到300 animation = CurvedAnimation(parent: controller, curve: Curves.bounceInOut); animation = new Tween(begin: 0.0, end: 300.0).animate(animation); //启动动画 controller.forward(); }
@override Widget build(BuildContext context) { // return AnimatedImageTest( animation: animation, ); return GrowTransition( child: Image.asset(“images/avatar.jpg”), animation: animation, ); }
dispose() { //路由销毁时需要释放动画资源 controller.dispose(); super.dispose(); } }
class GrowTransition extends StatelessWidget {
GrowTransition({this.child, this.animation});
final Widget child;
final Animation
Flutter中正是通过这种方式封装了很多动画,如:- FadeTransition- ScaleTransition- SizeTransition等很多时候都可以复用这些预置的过渡类。<a name="EQjdf"></a>##<a name="AboV8"></a>##<a name="CNPji"></a>## 动画状态监听上面说过,我们可以通过Animation的addStatusListener()方法来添加动画状态改变监听器。Flutter中,有四种动画状态,在AnimationStatus枚举类中定义,下面我们逐个说明:| 枚举值 | 含义 || --- | --- || dismissed | 动画在起始点停止 || forward | 动画正在正向执行 || reverse | 动画正在反向执行 || completed | 动画在终点停止 |示例:我们将上面图片放大的示例改为先放大再缩小再放大……这样的循环动画。要实现这种效果,我们只需要监听动画状态的改变即可,即:在动画正向执行结束时反转动画,在动画反向执行结束时再正向执行动画。代码如下:```dart@overrideinitState() {super.initState();controller = new AnimationController(duration: const Duration(seconds: 3), vsync: this);//图片宽高从0变到300animation = CurvedAnimation(parent: controller, curve: Curves.bounceInOut);animation = new Tween(begin: 0.0, end: 300.0).animate(animation);//启动动画controller.forward();animation.addStatusListener((status) {if (status == AnimationStatus.completed) {//动画执行结束时反向执行动画controller.reverse();} else if (status == AnimationStatus.dismissed) {//动画恢复到初始状态时执行动画(正向)controller.forward();}});//启动动画(正向)controller.forward();}

若有收获,就点个赞吧
0 人点赞
