- IT大厨 - PowerShell : 如何设置输出颜色,Format-Color让黑乎乎的窗口丰富起来">IT大厨 - PowerShell : 如何设置输出颜色,Format-Color让黑乎乎的窗口丰富起来
- 缘起-对Shell的向往
- Windows下的PowerShell
- 使用Write-Host 改变输出颜色
- ANSI Color
- 什么是SGR?
- SGR
- 如何使用SGR 输出样式
- 下划线
- ColorTool简介
- 使用PowerShell Cmdlet简化样式设置
- 格式化表格输出
- 总结
- 相关参考
- EmacsWiki: ansi-color.el">EmacsWiki: ansi-color.el
- ANSI color codes">ANSI color codes
- What are ANSI Color Codes?">What are ANSI Color Codes?
- Using ANSI Escape Sequences in PowerShell :: duffney.io">Using ANSI Escape Sequences in PowerShell :: duffney.io
- Use ANSI colors in the terminal - Windows CMD - SS64.com">Use ANSI colors in the terminal - Windows CMD - SS64.com
- about ANSI terminals - PowerShell | Microsoft Docs">about ANSI terminals - PowerShell | Microsoft Docs
- Everything you never wanted to know about ANSI escape codes">Everything you never wanted to know about ANSI escape codes
- Select Graphic Rendition (ANSI)">Select Graphic Rendition (ANSI)
IT大厨 - PowerShell : 如何设置输出颜色,Format-Color让黑乎乎的窗口丰富起来
缘起-对Shell的向往
本人工作以来浸淫Windows多年,虽偶有接触Linux但是大多都是用来学习些东西,加上它炫酷的Shell界面(装X神器)。所以一直对Linux的Shell界面有种莫名的向往。最留恋的莫过于下面的开机画面了: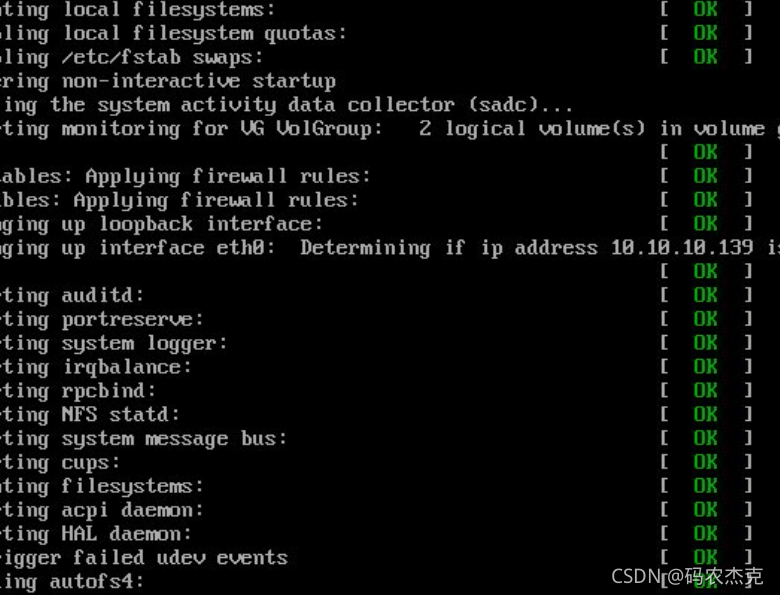
启动过程中的各种检查日志输出,加上那不一样的绿色状态。就一直觉得很帅。
所以在自己工作中凡事遇到Shell/CMD的地方也总想像它一样在黑黑的屏幕上来点色彩,就像星空中的点点繁星。
Windows下的PowerShell
平时PowerShell用的最多,那么PowerShell是否也有类似的功能呢?其实是有的。
比如: Write-Host这个命令本身就可以设置输出的文字字体颜色和背景颜色。
Write-Host[[-Object] <Object>][-NoNewline] #不换行[-Separator <Object>] #分隔符 当输入多个字符串的时候可以使用这个选项[-ForegroundColor <ConsoleColor>] #字体颜色[-BackgroundColor <ConsoleColor>] #字体背景色[<CommonParameters>]
使用Write-Host 改变输出颜色
在PowerShell中要实现这样的功能可以用下面的几行代码来实现:
$message = "Checking CPU..." #要输出的消息Write-Host $message.PadRight(50), "[ " -NoNewline #输出前半截,不换行Write-Host "OK" -ForegroundColor:Green -NoNewline #输出状态,并设置格式Write-Host " ]" #输出最后的括号并换行
效果如下:
当然如果每次要输出的时候都这么输肯定会很痛苦,而且要修改输出格式的时候是很不方便的。
那怎么办呢?可以考虑把上面的代码写成一个方法(function)这样每次需要输出类似的代码的时候就调用这个方法就可以了。
方法如下,当然这个里面加入了一些对参数的处理,核心的思想还是上面的三行代码:
function Format-Status {param ($Message,$Status,[System.ConsoleColor]$ForegroundColor,$BackgroundColor,[int]$Pading = 80)Write-Host $message.PadRight($Pading), "[ " -NoNewlineif ($ForegroundColor -and $BackgroundColor) {Write-Host $Status -ForegroundColor:$ForegroundColor -NoNewline -BackgroundColor:$BackgroundColor}elseif ($ForegroundColor) {Write-Host $Status -ForegroundColor:$ForegroundColor -NoNewline}elseif ($BackgroundColor) {Write-Host $Status -NoNewline -BackgroundColor:$BackgroundColor}else {Write-Host $Status -NoNewline}Write-Host " ]"}
在控制台里面运行上面的方法之后就可以调用了: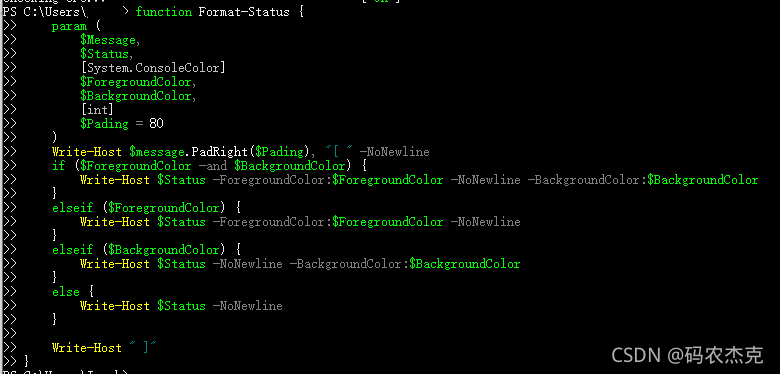
现在,输出同样的内容只需要调一行代码了:
Format-Status -Message $message -Status "OK" -ForegroundColor:Green
故事到这里似乎也就结束了。——非也非也
PowerShell不仅可以顺序执行命令,也可以异步执行。比如Start-Job和各种带-AsJob的命令都能异步执行:
Start-Job[-Name <String>][-ScriptBlock] <ScriptBlock>[-Credential <PSCredential>][-Authentication <AuthenticationMechanism>][[-InitializationScript] <ScriptBlock>][-WorkingDirectory <String>][-RunAs32][-PSVersion <Version>][-InputObject <PSObject>][-ArgumentList <Object[]>][<CommonParameters>]
带-AsJob参数的命令:
Invoke-Command[[-Session] <PSSession[]>][-ThrottleLimit <Int32>][-AsJob] #输入这个参数会让该命令以job的方式执行,所以主线程里不会等待执行结束[-HideComputerName][-JobName <String>][-FilePath] <String>[-RemoteDebug][-InputObject <PSObject>][-ArgumentList <Object[]>][<CommonParameters>]
那这个又和刚才我们写好的方法有什么关系呢?
我们先对Format-Status稍加修改来模拟真实的执行环境:
function Format-Status {param ($Message,$Status,[System.ConsoleColor]$ForegroundColor,$BackgroundColor,[int]$Pading = 80)Write-Host $message.PadRight($Pading) -NoNewlineStart-Sleep -Milliseconds 100 #在脚本真正执行的时候有时候可能会有延迟Write-Host "[ " -NoNewlineif ($ForegroundColor -and $BackgroundColor) {Write-Host $Status -ForegroundColor:$ForegroundColor -NoNewline -BackgroundColor:$BackgroundColor}elseif ($ForegroundColor) {Write-Host $Status -ForegroundColor:$ForegroundColor -NoNewline}elseif ($BackgroundColor) {Write-Host $Status -NoNewline -BackgroundColor:$BackgroundColor}else {Write-Host $Status -NoNewline}Write-Host " ]"}
然后我们再起三个job来模拟真实环境下的多任务执行:
# 0..2 相当于生成一个 @(0,1,2)的数组,这个有点类似于JavaScript的ES6语法$Jobs = (0..2 | % {Start-Job -ScriptBlock {#为了简单起见,把Format-Status放到Job里面#因为每一个Job相当于我们的多线程里面的一个线程#它有它自己执行的上下文function Format-Status {param ($Message,$Status,[System.ConsoleColor]$ForegroundColor,$BackgroundColor,[int]$Pading = 80)Write-Host $message.PadRight($Pading) -NoNewlineStart-Sleep -Milliseconds 100Write-Host "[ " -NoNewlineif ($ForegroundColor -and $BackgroundColor) {Write-Host $Status -ForegroundColor:$ForegroundColor -NoNewline -BackgroundColor:$BackgroundColor}elseif ($ForegroundColor) {Write-Host $Status -ForegroundColor:$ForegroundColor -NoNewline}elseif ($BackgroundColor) {Write-Host $Status -NoNewline -BackgroundColor:$BackgroundColor}else {Write-Host $Status -NoNewline}Write-Host " ]"}#Job里面循环21遍模拟实际执行工程中的内容0..20 | % {#耗时操作Start-Sleep -Seconds ( Get-Random -Minimum 0 -Maximum 3)$msg = @("CPU checking ... ""Memory checking ...""Disk checking ...""Network checking ...""BIOS checking ...""Loading boot image ...")$message = $msg[(Get-Random -Minimum 0 -Maximum ($msg.Count - 1))]#执行结束输出结果Format-Status -Message "[$_] $message" -Status "OK" -ForegroundColor:Green}}})$Jobs | Receive-Job -Wait -AutoRemoveJob #阻塞主线程,接收执行结果,自动销毁job
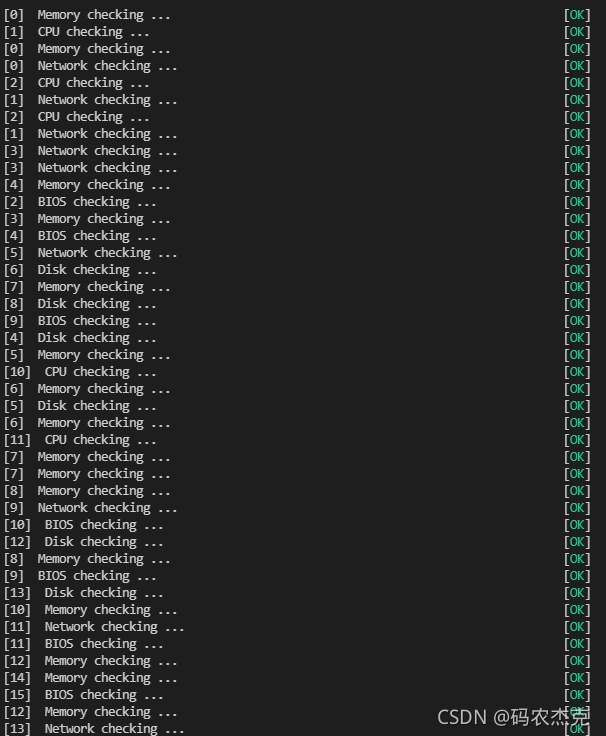
我们来看下模拟执行的效果:
一开始还OK,但是慢慢的出现了串行:
为什么呢?因为我们的Format-Status里Write-Host使用了-NoNewline参数,而我们又在前后Write-Host之间设置了延迟,导致线程A刚刚输出不换行的内容之后,线程B又输出了自己的内容就直接接在了线程A输出的内容之后—导致串行。
我想说这并不是我故意这么设置导致输出这样的结果,而是在实际的开发/工作过程中遇到的真实案例。尤其是使用PowerShell执行远程命令并且是以job的形式执行的时候。
那既然如此还有没有更愉快的方法,让PowerShell输出的内容既炫又不会有刚才那样的问题?
答案坑定还是有的,要不我为啥要写这篇blog,O(∩_∩)O哈哈~
ANSI Color
好好的为啥提到ANSI Color?那到底什么又是ANSI Color?
不知道大家有没有注意到我们的PowerShell也好,CMD也好还是Linux也罢都能显示颜色,但是能显示的颜色都只有几种。拿PowerShell或者Windows下面的控制台程序为例:
- Black
- Blue
- Green
- Cyan
- Red
- Magenta
- Yellow
- White
当然还有个中间灰 Gray,以及与之对应的还有稍微暗一点的Dark系列:
- DarkBlue
- DarkGreen
- DarkGray
- DarkCyan
- DarkRed
- DarkMagenta
- DarkYellow
PowerShell中的默认颜色
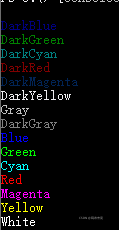
但是无外乎都是这几种颜色。那么问题来了,谁规定的控制台就这几种颜色呢?在网上一顿研究之后最终目标指向了ANSI Color。那什么是ANSI Color?
ANSI Color是由美国标准化组织ANSI制定的一系列安全色(ANSI Z535.1-2011),用于安全标识中。比如最常见的就是在消防安全中的各种颜色。终于知道原来各个场所中的各种标识的颜色并不是随便标的,而是有其标准的。下面是其每一种颜色以及其具体的意义: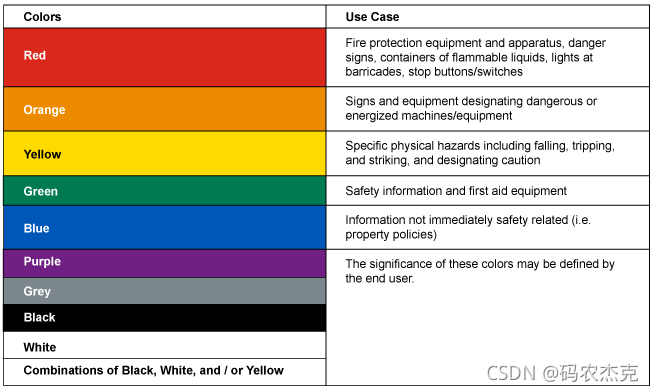
哈哈,看了这个是不是对各种标识的颜色有个感性的认识了。计算机最早有显示器的时候也是几乎黑乎乎的一个屏幕,只有文字,能给文字加上颜色就很炫酷了。当然这些文字颜色应该也遵循这样的标准并延续至今(这只是个人猜测,没有考证)。还记得最早老师教各种DOS程序的时候输出的颜色就很有限,那个时候就觉得能输出几种不同的颜色就很激动了。
当然随着计算机软件和硬件的发展,这几种颜色已经远远不能适应大家的需求了。尤其是像Windows这样的图形计算机系统出现以后。但是控制台程序里面还是延续了这几种默认的颜色。不过控制台实际支持的颜色已经不止这几种了。什么是SGR?
在探讨这个问题之前,大家先思考一下下面的问题。
如果有用过Linux下的vi或者vim工具的大牛应该知晓它们的强大。虽然他们只是款控制台的编辑工具,但是其提供的编辑功能是非常丰富和强大的,尤其是它还是在shell里面工作。这对作为服务器使用没有图形界面的Linux的来说无疑是非常实用的。
那么vi / vim如此强大的功能是如何实现的呢?ANSI 转义序列(ANSI Escape Codes)
我们先来看下面这张表,这是从别的网站复制过来的:
| name | signature | description | |
|---|---|---|---|
| A | Cursor Up | (n=1) | 将光标向上移动n |
| B | Cursor Down | (n=1) | 将光标向下移动n |
| C | Cursor Forward | (n=1) | 将光标向前移动n |
| D | Cursor Back | (n=1) | 将光标向后移动n |
| E | Cursor Next Line | (n=1) | 将光标向下移动到第n行的开头 |
| F | Cursor Previous Line | (n=1) | 将光标移动到第n行的开头 |
| G | Cursor Horizontal Absolute | (n=1) | 将光标移动到当前行中的n列 |
| H | Cursor Position | (n=1, m=1) | 将光标移动到n行m列,从左上角开始计数 |
| J | Erase in Display | (n=0) | 清除屏幕的一部分。0、1、2和3具有各种特定功能 |
| K | Erase in Line | (n=0) | 清除部分线路。0、1和2具有各种特定功能 |
| S | Scroll Up | (n=1) | 将窗口向上滚动n行 |
| T | Scroll Down | (n=1) | 将窗口向下滚动n行 |
| s | Save Cursor Position | () | 保存当前光标位置以与u一起使用 |
我们的计算机前辈们早就为我们考虑到了这样的问题。那就是ANSI转义序列(ANSI Escape Codes),具体是那些前辈做出来的暂时不去考究了,原始的定义文档也没有时间去挖掘。
ANSI转义序列总是以 ASCII码27(ASCII码的前33个字符都是控制字符。第28(ASCII是以0开始的)位字符正好对应键盘上的ESC)开始然后跟着一个’[‘,然后是上表中各个控制字符的参数,接下来是具体的function名称。概括起来如下:
<ESC><[>[[p1;]..[pn;]]<Function Name>
比如在PowerShell中 “`e[A” 表示光标向上移动一行。
从另一个角度来讲可以按照下面的方式去解读转义控制序列:
- $esc[ : 告诉终端接下来调用控制方法
- p1;…pn; : 控制方法的参数(1,2, … n)
- m : 控制方法,加上参数相当于m(1,2,3…n)
比如: $esc[1A 相当于告诉终端调用方法A(1),即光标上移一行。
对于这个ASCII码27的表示方式各个系统终端各有不同,比如:\x1b 或者 \e 或者 \033。
在Windows PowerShell下可以使用 e (注意早期版本并不支持e)或者 $esc=([char]27) 的方式来表示ESC的转义。
我们可以具体看一下举例(Windows PowerShell),为了方便先声一个变量来保存ESC字符:
$esc=([char]27)
| code | Description |
|---|---|
| “$esc[3B” | 光标向下移动3行 |
| “$esc[3S” | 窗口内容向上滚动3行 |
| “$esc[31mHello$esc[0m” | 输出红色的Hello然后重置所有设置 如果不加后面的 $esc[0m 就会变成下面这样,会影响到后续的输出 |
那么看到这里应该能够猜到本章一开始提出的为什么,vi / vim在shell下都能如此强大了。虽然具体是不是这么实现的我没有去深入探讨过,但是我猜测跟这个东西有很大的关系。
我们看到转义序列表里面最后一行是SGR,这才是本文的重点。
SGR
我们看到SGR也是ANSI众多转义序列当中的一个。其它的function要么是用来控制光标,要么是用来控制窗口,而这个(SGR)就是用来设置输出文本的样式的。而他的function name是’m’。所以对应的设置颜色的语法如下:
<ESC><[>[[p1;]...[pn;]]m
SGR每个参数值对应的意义如下(手动翻译,如果有不准确的请不吝赐教):
| value | name / description |
|---|---|
| 0 | 重置关闭所有设置: $esc[0m |
| 1 | 加粗/高亮: $esc[1m |
| 2 | 变浅 |
| 3 | 斜体: $esc[3m |
| 4,24 | 4设置下划线, 24关闭下划线设置 $esc[4m |
| 5 | 慢慢地闪烁 |
| 6 | 快速闪烁 |
| 7,27 | 7设置反显;27关闭反显 |
| 30–37 | 设置字体颜色 |
| 38;5;n | 设置字体颜色为256色中的一个(n) 256-colour palette (例如 $esc[38;5;34m) |
| 38;2;r;g;b | 设置字体颜色为RGB颜色值 (例如 $esc[38;2;255;255;0m) |
| 40–47 | 设置字体背景色 |
| 48;5;n | 设置字体背景颜色为256色中的一个n |
| 48;2;r;g;b | 设置字体颜背景色为RGB颜色值 |
| 90–97 | 设置字体高亮颜色值,与0-7所表示的颜色值对应 |
| 100–107 | 设置字体背景高亮颜色值,与0-7所表示的颜色值对应 |
详细参数请参考:Select Graphic Rendition (ANSI)
当然并不是上面所有的参数在所有终端中都支持,在下面的例子中就能看出,同样是在Windows下运行,但是不同的控制台对这些参数的支持情况是不一样的。
尝试一下在PowerShell中输入一下以下内容看会发生什么:
$esc=([char]27)write-host "$esc[31m$('H')$esc[32me$esc[33ml$esc[34ml$esc[36mo$esc[0m"write-host "$esc[38;2;255;255;0mH$esc[0;1;3;35me$esc[95ml$esc[42ml$esc[0;41mo$esc[0m"
输出结果如下:
或者:
为什么会这样呢?是因为不同的终端对转义序列的支持情况不一样。第一个输出是在VSCode的集成PowerShell窗口中的输出结果。第二个是在Windows10下的PowerShell 7中的输出结果。
如何使用SGR 输出样式
那么接下看看我们究竟如何使用SGR来格式化我们的颜色输出呢?在使用SGR之前我们首先要搞清楚我们的字体样式都有哪些,然后再去找对应的参数。
比如:是否设置前景色(使用何种方式设置前景色)?是否设置背景色以及使用何种方式设置背景色?是否加粗?,是否是斜体?,是否有下划线?等等
然后最重要的是,设置完之后一定要重置($esc[0m)所有属性,要不然会影响到后续输出的样式。 更多关于SGR的信息请参考(Select Graphic Rendition (ANSI))
粗体
$text = 'Hello World';Write-Host "`e[1m$text`e[0m";
斜体
$text = 'Hello World';Write-Host "`e[3m$text";
斜体+粗体
$text = 'Hello World';Write-Host "`e[1;3m$text`e[0m";
下划线
$text = 'Hello World';Write-Host "`e[4m$text`e[0m";
下划线+粗体
$text = 'Hello World';Write-Host "`e[1;4m$text`e[0m";
下划线+粗体+斜体
$text = 'Hello World';Write-Host "`e[1;3;4m$text`e[0m";
使用7色设置字体颜色
$text = 'Hello World';30..37 | %{Write-Host "`e[1;3;4;$($_)m$text`e[0m";}$text = 'Hello World';30..37 | %{Write-Host "`e[$($_)m$text`e[0m";}
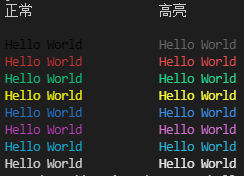
使用高亮7色设置字体颜色
$text = 'Hello World';Write-Host "正常".PadRight(19),"高亮"Write-Host0..7 | %{Write-Host "`e[$($_+30)m$text`e[0m".PadRight(30),"`e[$($_+90)m$text`e[0m";}
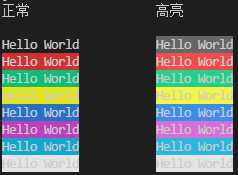
使用高亮7色设置背景色
$text = 'Hello World';Write-Host "正常".PadRight(19),"高亮"Write-Host0..7 | %{Write-Host "`e[$($_+40)m$text`e[0m".PadRight(30),"`e[$($_+100)m$text`e[0m";}
使用7色设置背景色
$text = 'Hello World';40..47 | %{Write-Host "`e[$($_)m$text`e[0m";}
使用7色同时设置前景色和背景色
$text = 'Hello World';30..37 | %{$forColor=$_40..47 | %{Write-Host "`e[$forColor;$($_)m$text `e[0m" -NoNewline;}Write-Host}
使用7色同时设置前景色和背景色(下划线+粗体+斜体)
$text = 'Hello World';30..37 | %{$forColor=$_40..47 | %{Write-Host "`e[1;3;4;$forColor;$($_)m$text `e[0m" -NoNewline;}Write-Host}
使用256色设置前景/背景色
foreach ($fgbg in 38, 48) {# foreground/background switchforeach ($color in 0..255) {# color range#Display the colors$field = "$color".PadLeft(4) # pad the chart boxes with spacesWrite-Host -NoNewLine "$esc[$fgbg;5;${color}m$field $esc[0m"#Display 8 colors per lineif ( (($color + 1) % 8) -eq 0 ) { Write-Host }}Write-Host}
使用RGB设置前景和背景色
foreach ($fgbg in 38, 48) {# foreground/background switchforeach ($color in 0..255) {# color range#Display the colors$field = "$color".PadLeft(4) # pad the chart boxes with spacesWrite-Host -NoNewLine "$esc[$fgbg;2;${color};150;50m$field $esc[0m"#Display 8 colors per lineif ( (($color + 1) % 40) -eq 0 ) { Write-Host }}Write-Host}

以上是SGR的基本使用示例希望对大家有所帮助,下面要介绍一个非常实用的工具用来在控制台获取或者设置颜色主题。
ColorTool简介
虽然上一节中介绍了很丰富的设置背景色和前景色的方法,但是我们在实际使用中可能也就使用默认的那几种颜色。或者说如果我们希望设置一个主题来快速的改变我们控制台的样式该怎么做呢?ColorTool或许是一个不错的选择。
使用ColorTool可以快速的设置我们控制台样式,或者查询当前样式设置,可以让我们在编写相关的脚本的时候更省心。
语法
下载之后运行下面的命令:
.\ColorTool.exe
帮助信息如下:
Usage:colortool.exe [options] <schemename>ColorTool is a utility for helping to set the color palette of the Windows Console.By default, applies the colors in the specified .itermcolors, .json or .ini file to the current console window.This does NOT save the properties automatically. For that, you'll need to open the properties sheet and hit "Ok".Included should be a `schemes/` directory with a selection of schemes of both formats for examples.Feel free to add your own preferred scheme to that directory.Arguments:<schemename>: The name of a color scheme. ct will try to first load it as an .ini file color schemeIf that fails, it will look for it as a .json file color schemeIf that fails, it will look for it as an .itermcolors file color scheme.Options:-?, --help : Display this help message-c, --current : Print the color table for the currently applied scheme-q, --quiet : Don't print the color table after applying-e, --errors : Report scheme parsing errors on the console-d, --defaults : Apply the scheme to only the defaults in the registry-b, --both : Apply the scheme to both the current console and the defaults.-x, --xterm : Set the colors using VT sequences. Used for setting the colors in WSL.Only works in Windows versions >= 17048.-s, --schemes : Displays all available schemes-l, --location : Displays the full path to the schemes directory-v, --version : Display the version number-o, --output <filename> : output the current color table to an file (in .ini format)Available importers:INI File Parserconcfg ParseriTerm Parser
查看当前设置
.\ColorTool.exe -c
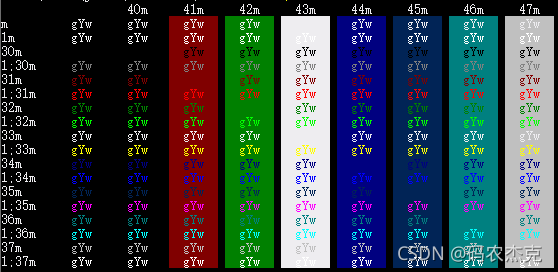
通过上面的表格就可以快速的查询各种样式的转义序列值以及显示效果。
获取主题列表
.\ColorTool.exe -s
改变当前主题
.\ColorTool.exe -x OneHalfDark.itermcolors
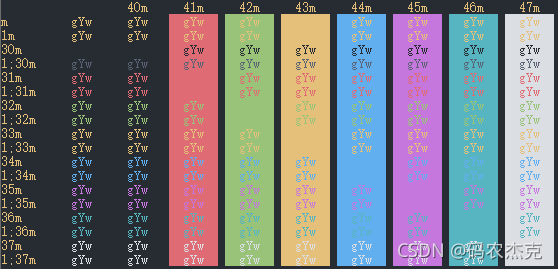
可以看到同样的SGR参数,对应的输出完全改变。比如我们之前的例子: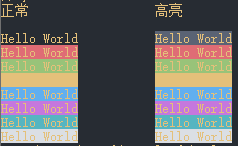
使用PowerShell Cmdlet简化样式设置
根据平时的使用习惯和场景,写了一个简单的方法来帮助设置字体样式。仅供参考,代码如下。把下面的代码保存成Format-Color.psm1:
function Format-Color {[CmdletBinding()]param ([Parameter(ValueFromPipeline, ParameterSetName = "Formatter")][Alias("m")]$Message,[Parameter(ParameterSetName = "Formatter")][Alias("f")][ArgumentCompleter({ param ($commandName,$parameterName,$wordToComplete,$commandAst,$fakeBoundParameters )@("Black""DarkRed""DarkGreen""DarkYellow""DarkBlue""DarkMagenta""DarkCyan""Gray""DarkGray""Red""Green""Yello""Blue""Magenta""Cyan""White") | ? { $_ -like "$wordToComplete*" } | % { $_ } })]$ForegroundColor,[Parameter(ParameterSetName = "Formatter")][Alias("b")][ArgumentCompleter({param ($commandName,$parameterName,$wordToComplete,$commandAst,$fakeBoundParameters )@("Black""DarkRed""DarkGreen""DarkYellow""DarkBlue""DarkMagenta""DarkCyan""Gray""DarkGray""Red""Green""Yello""Blue""Magenta""Cyan""White") | ? { $_ -like "$wordToComplete*" } | % { $_ }})]$BackgroundColor,[Parameter(ParameterSetName = "ShowColorTable")][switch]$ShowColorTable)begin {#Refer: https://duffney.io/usingansiescapesequencespowershell/function Get-ColorTable {$esc = $([char]27)Write-Host "`n$esc[1;4m256-Color Foreground & Background Charts$esc[0m"foreach ($fgbg in 38, 48) {# foreground/background switchforeach ($color in 0..255) {# color range#Display the colors$field = "$color".PadLeft(4) # pad the chart boxes with spacesWrite-Host -NoNewLine "$esc[$fgbg;5;${color}m$field $esc[0m"#Display 8 colors per lineif ( (($color + 1) % 8) -eq 0 ) { Write-Host }}Write-Host}}function ParseColor {param ($Value)if ($Value) {if ($Value -is [string]) {if ($colorMapping.ContainsKey($Value)) {Write-Output $colorMapping[$Value]}}elseif ($Value -is [int]) {# Write-Output $Valuessif (($Value -le 255 -and $Value -ge 0)) {Write-Output $Value}else {throw "The color value should beteen 0 and 255, but the input value is $Value. Please check and retry again."}}}}#Refer: https://ss64.com/nt/syntax-ansi.html#:~:text=How-to%3A%20Use%20ANSI%20colors%20in%20the%20terminal%20,%20%206%20%2018%20more%20rows%20$colorMapping = @{"Black" = 30"DarkRed" = 31"DarkGreen" = 32"DarkYellow" = 33"DarkBlue" = 34"DarkMagenta" = 35"DarkCyan" = 36"Gray" = 37"DarkGray" = 90"Red" = 91"Green" = 92"Yello" = 93"Blue" = 94"Magenta" = 95"Cyan" = 96"White" = 97}$esc = $([char]27)$backgroudSwitch = 48$foregroundSwitch = 38$ansiParam = @()if ($null -ne $PSBoundParameters["ForegroundColor"]) {if ($ForegroundColor -is [string]) {$ansiParam += "5;$(ParseColor $ForegroundColor)".Trim()}else {$ansiParam += "$foregroundSwitch;5;$(ParseColor $ForegroundColor)".Trim()}}if ($null -ne $PSBoundParameters["BackgroundColor"]) {if ($BackgroundColor -is [string]) {$ansiParam += "5;$((ParseColor $BackgroundColor)+10)".Trim()}else {$ansiParam += "$backgroudSwitch;5;$(ParseColor $BackgroundColor)".Trim()}}}process {$current = $_if ($PSCmdlet.ParameterSetName -eq "ShowColorTable") {Get-ColorTable}else {if ([string]::IsNullOrEmpty($current)) {$current = $Message}if ($ansiParam.Count -gt 0) {Write-Output "$esc[$($ansiParam -join ";")m$current$($esc)[0m"}else {Write-Output $current}}}}Export-ModuleMember -Function Format-Color
使用方法
导入模块文件
Import-Module .\Format-Color.psm1 -Global -Function * -Force
调用Format-Color方法
"hello world" | Format-Color -ForegroundColor:RedFormat-Color -Message "hello world" -ForegroundColor:Red
使用举例
输出日志
再回头去看一下如何解决我们多任务下面输出混乱的问题呢?
PowerShell本身是处理管道对象,而不只是字符串。开篇章节中的例子实际上是调用Receive-Job来接收多任务的输出,而使用Write-Host的-NoNewLine 参数的方式来控制输出格式,实际上是吧结果拆分成了几个对象往管道输出,这就会导致在多任务下面有的先进有的后进。在实际运行的时候,看起来就像混乱了一样。
那么为了避免这个问题,正确的做法应该是让每一条日志当成一个整体来输出(调用一次Write-Host),那么Receive-Job接收到的就是一条完整的日志,自然也就不会存错乱的问题。
为了验证我的想法把之前的例子重新改一下再试试。
$Jobs = (0..2 | % {Start-Job -ScriptBlock {#为了简单起见,把Format-Status放到Job里面#因为每一个Job相当于我们的多线程里面的一个线程#它有它自己执行的上下文function Format-Color {[CmdletBinding()]param ([Parameter(ValueFromPipeline, ParameterSetName = "Formatter")][Alias("m")]$Message,[Parameter(ParameterSetName = "Formatter")][Alias("f")][ArgumentCompleter({ param ($commandName,$parameterName,$wordToComplete,$commandAst,$fakeBoundParameters )@("Black""DarkRed""DarkGreen""DarkYellow""DarkBlue""DarkMagenta""DarkCyan""Gray""DarkGray""Red""Green""Yello""Blue""Magenta""Cyan""White") | ? { $_ -like "$wordToComplete*" } | % { $_ } })]$ForegroundColor,[Parameter(ParameterSetName = "Formatter")][Alias("b")][ArgumentCompleter({param ($commandName,$parameterName,$wordToComplete,$commandAst,$fakeBoundParameters )@("Black""DarkRed""DarkGreen""DarkYellow""DarkBlue""DarkMagenta""DarkCyan""Gray""DarkGray""Red""Green""Yello""Blue""Magenta""Cyan""White") | ? { $_ -like "$wordToComplete*" } | % { $_ }})]$BackgroundColor,[Parameter(ParameterSetName = "ShowColorTable")][switch]$ShowColorTable)begin {#Refer: https://duffney.io/usingansiescapesequencespowershell/function Get-ColorTable {$esc = $([char]27)Write-Host "`n$esc[1;4m256-Color Foreground & Background Charts$esc[0m"foreach ($fgbg in 38, 48) {# foreground/background switchforeach ($color in 0..255) {# color range#Display the colors$field = "$color".PadLeft(4) # pad the chart boxes with spacesWrite-Host -NoNewLine "$esc[$fgbg;5;${color}m$field $esc[0m"#Display 8 colors per lineif ( (($color + 1) % 8) -eq 0 ) { Write-Host }}Write-Host}}function ParseColor {param ($Value)if ($Value) {if ($Value -is [string]) {if ($colorMapping.ContainsKey($Value)) {Write-Output $colorMapping[$Value]}}elseif ($Value -is [int]) {# Write-Output $Valuessif (($Value -le 255 -and $Value -ge 0)) {Write-Output $Value}else {throw "The color value should beteen 0 and 255, but the input value is $Value. Please check and retry again."}}}}#Refer: https://ss64.com/nt/syntax-ansi.html#:~:text=How-to%3A%20Use%20ANSI%20colors%20in%20the%20terminal%20,%20%206%20%2018%20more%20rows%20$colorMapping = @{"Black" = 30"DarkRed" = 31"DarkGreen" = 32"DarkYellow" = 33"DarkBlue" = 34"DarkMagenta" = 35"DarkCyan" = 36"Gray" = 37"DarkGray" = 90"Red" = 91"Green" = 92"Yello" = 93"Blue" = 94"Magenta" = 95"Cyan" = 96"White" = 97}$esc = $([char]27)$backgroudSwitch = 48$foregroundSwitch = 38$ansiParam = @()if ($null -ne $PSBoundParameters["ForegroundColor"]) {if ($ForegroundColor -is [string]) {$ansiParam += "5;$(ParseColor $ForegroundColor)".Trim()}else {$ansiParam += "$foregroundSwitch;5;$(ParseColor $ForegroundColor)".Trim()}}if ($null -ne $PSBoundParameters["BackgroundColor"]) {if ($BackgroundColor -is [string]) {$ansiParam += "5;$((ParseColor $BackgroundColor)+10)".Trim()}else {$ansiParam += "$backgroudSwitch;5;$(ParseColor $BackgroundColor)".Trim()}}}process {$current = $_if ($PSCmdlet.ParameterSetName -eq "ShowColorTable") {Get-ColorTable}else {if ([string]::IsNullOrEmpty($current)) {$current = $Message}if ($ansiParam.Count -gt 0) {Write-Output "$esc[$($ansiParam -join ";")m$current$($esc)[0m"}else {Write-Output $current}}}}function Format-Status {param ($Message,$Status,$ForegroundColor,$BackgroundColor,[int]$Pading = 80)Write-Host "$($message.PadRight($Pading))[$(Format-Color -Message $Status -ForegroundColor:$ForegroundColor -BackgroundColor:$BackgroundColor)]"}#Job里面循环21遍模拟实际执行工程中的内容0..20 | % {#耗时操作Start-Sleep -Seconds ( Get-Random -Minimum 0 -Maximum 3)$msg = @("CPU checking ... ""Memory checking ...""Disk checking ...""Network checking ...""BIOS checking ...""Loading boot image ...")$message = $msg[(Get-Random -Minimum 0 -Maximum ($msg.Count - 1))]#执行结束输出结果Format-Status -Message "[$_] $message" -Status "OK" -ForegroundColor Green}}})$Jobs | Receive-Job -Wait -AutoRemoveJob #阻塞主线程,接收执行结果,自动销毁job
格式化表格输出
这是一个非常有用的工具,尤其是在查询各种状态,需要区分显示的时候:
Get-Process | select Id,Handles,@{ n="CPU"; e= {if ($_.CPU -lt 20) {"$(Format-Color -Message "$($_.CPU)" -ForegroundColor:Green )"}elseif ($_.CPU -lt 50 -and $_.CPU -ge 20) {"$(Format-Color -Message "$($_.CPU)" -ForegroundColor:Yello )"}else {"$(Format-Color -Message "$($_.CPU)" -ForegroundColor:Red )"}}},Name | Format-Table
查询CPU状态,并对CPU这一属性进行高亮显示: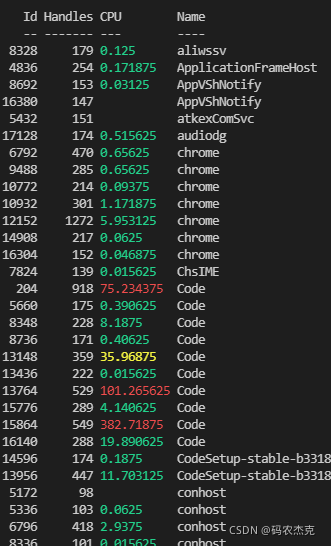
格式化显示某一个单独的属性时也可以设置颜色:
Get-Process | select Id,Handles,@{ n="CPU"; e= {if ($_.CPU -lt 20) {"$(Format-Color -Message "$($_.CPU)" -ForegroundColor:Green )"}elseif ($_.CPU -lt 50 -and $_.CPU -ge 20) {"$(Format-Color -Message "$($_.CPU)" -ForegroundColor:Yello )"}else {"$(Format-Color -Message "$($_.CPU)" -ForegroundColor:Red )"}}},Name | select -First 1 | fl
总结
前前后后拖了差不多两周终于把这个总结写完了。不想当什么肝帝肝颤什么的,只求自己能够日益精进,同时能把自己的所想所感分享出来供大家参考。
在脚本这种设置颜色,往小了说可以说是一个可有可无的功能,往大了说这也是牵涉到很多计算机相关的历史。总的来说以后即使写脚本也能写的炫酷一点,这大概就是程序员的快乐吧。


