实例 56
题目
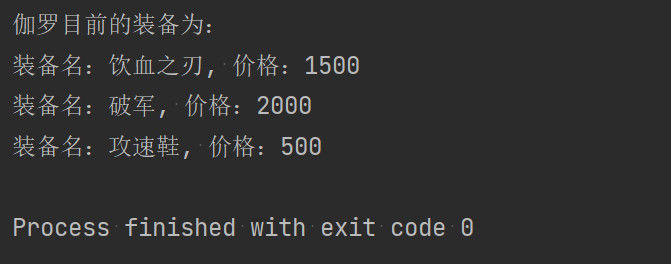
设计一个装备类 Equipment,该类有两个属性,一个是名字 name,类型为字符串类型,另一个是价格 price,类型为 int。然后实例化 3 件具体装备并打印其名字和价格。
分析
主要考察类的创建以及如何实例化一个对象,并且伴随有重写 toString() 方法。
实现
/*** Created with IntelliJ IDEA.** @author : 村雨* @version : 1.0* @project : Java 编程实例* @package : PACKAGE_NAME* @className : Example56* @createTime : 2021/7/3 22:23* @email : 747731461@qq.com* @公众号 : 村雨遥* @website : https://cunyu1943.github.io* @description :*/public class Example56 {public static void main(String[] args) {Equipment equipment1 = new Equipment("饮血之刃", 1500);Equipment equipment2 = new Equipment("破军", 2000);Equipment equipment3 = new Equipment("攻速鞋", 500);System.out.println("伽罗目前的装备为:");System.out.println(equipment1.toString());System.out.println(equipment2.toString());System.out.println(equipment3.toString());}}class Equipment {private String name;private int price;public Equipment() {}public Equipment(String name, int price) {this.name = name;this.price = price;}@Overridepublic String toString() {return "装备名:" + name + ", 价格:" + price;}}
结果

实例 57
题目
现在王者荣耀很火,相信大部分人也玩过,那我们就来定义一个英雄类,用来作为王者荣耀里的各英雄的父类。一般来讲,一个英雄有名字、血量、蓝量、初始移动速度、攻击值……,我们需要做的,就是将这些作为类的属性尽可能地添加到类中。
分析
主要考察如何定义类,以及如何添加类中的属性,而且如何选择属性的数据类型。
实现
/*** Created with IntelliJ IDEA.** @author : 村雨* @version : 1.0* @project : Java 编程实例* @package : PACKAGE_NAME* @className : Example57* @createTime : 2021/7/4 8:40* @email : 747731461@qq.com* @公众号 : 村雨遥* @website : https://cunyu1943.github.io* @description :*/public class Example57 {public static void main(String[] args) {Hero hero = new Hero("虞姬", 3000, 1000, 50, 800, 0, 0, 0);System.out.println("英雄信息如下");System.out.println(hero.toString());}}class Hero {private String name;private float hp;private float mp;private int initSpeed;private int attack;private int killed;private int beKilled;private int assist;public Hero() {}public Hero(String name, float hp, float mp, int initSpeed, int attack, int killed, int beKilled, int assist) {this.name = name;this.hp = hp;this.mp = mp;this.initSpeed = initSpeed;this.attack = attack;this.killed = killed;this.beKilled = beKilled;this.assist = assist;}@Overridepublic String toString() {final StringBuffer sb = new StringBuffer();sb.append("名字 = '").append(name).append('\'');sb.append(", 血量 = ").append(hp);sb.append(", 蓝量 = ").append(mp);sb.append(", 初始速度 = ").append(initSpeed);sb.append(", 攻击值 = ").append(attack);sb.append(", 击杀数 = ").append(killed);sb.append(", 被击杀数 = ").append(beKilled);sb.append(", 助攻数 = ").append(assist);return sb.toString();}}
结果

实例 58
题目
既然王者荣耀中的英雄有很多属性,而且也有很多装备,我们买了装备之后就会给我们的英雄加血量、加攻击值或则加移动速度之类。我们就来定义几个方法,用于购买装备后给我们的英雄增加属性值。
分析
主要考察如何给我们的类定义方法。
实现
/*** Created with IntelliJ IDEA.** @author : 村雨* @version : 1.0* @project : Java 编程实例* @package : PACKAGE_NAME* @className : Example58* @createTime : 2021/7/4 8:58* @email : 747731461@qq.com* @公众号 : 村雨遥* @website : https://cunyu1943.github.io* @description :*/public class Example58 {public static void main(String[] args) {Hero hero = new Hero("虞姬", 3000, 1000, 50, 800, 0, 0, 0);System.out.println("英雄初始信息如下");System.out.println(hero.toString());hero.addAttack(1000);hero.addSpeed(100);hero.addKilled(5);System.out.println("英雄增加属性后信息如下");System.out.println(hero.toString());}}class Hero {private String name;private float hp;private float mp;private int initSpeed;private int attack;private int killed;private int beKilled;private int assist;public Hero() {}public Hero(String name, float hp, float mp, int initSpeed, int attack, int killed, int beKilled, int assist) {this.name = name;this.hp = hp;this.mp = mp;this.initSpeed = initSpeed;this.attack = attack;this.killed = killed;this.beKilled = beKilled;this.assist = assist;}public void addSpeed(int add) {System.out.println("购买了鞋子");this.initSpeed += add;}public void addAttack(int add) {System.out.println("购买了攻击装");this.attack += add;}public void addKilled(int add) {System.out.println("你击杀了一名敌人");this.killed += add;}@Overridepublic String toString() {final StringBuffer sb = new StringBuffer();sb.append("名字 = '").append(name).append('\'');sb.append(", 血量 = ").append(hp);sb.append(", 蓝量 = ").append(mp);sb.append(", 初始速度 = ").append(initSpeed);sb.append(", 攻击值 = ").append(attack);sb.append(", 击杀数 = ").append(killed);sb.append(", 被击杀数 = ").append(beKilled);sb.append(", 助攻数 = ").append(assist);return sb.toString();}}
结果

实例 59
题目
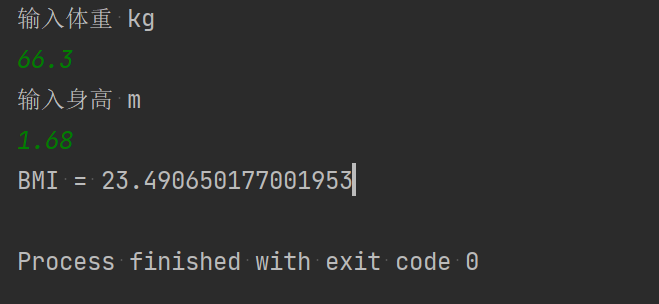
设计一个方法,用于计算你的 BMI 值是多少,其中 BMI = 体重(kg)/ 身高(m) * 身高(m)
分析
输入体重和身高,然后调用方法计算 BMI 即可。
实现
import java.util.Scanner;/*** Created with IntelliJ IDEA.** @author : 村雨* @version : 1.0* @project : Java 编程实例* @package : PACKAGE_NAME* @className : Example59* @createTime : 2021/7/4 9:46* @email : 747731461@qq.com* @公众号 : 村雨遥* @website : https://cunyu1943.github.io* @description :*/public class Example59 {public static void main(String[] args) {Scanner scanner = new Scanner(System.in);System.out.println("输入体重 kg");float weight = scanner.nextFloat();System.out.println("输入身高 m");float height = scanner.nextFloat();System.out.println("BMI = " + calcBMI(height, weight));}public static double calcBMI(float height, float weight) {return weight / height / height;}}
结果

实例 60
题目
通过输入的月份,判断该月处于哪一个季节。
分析
主要考察 switch 多分支的判断,而且要注意,要结束一个分支的判断时,需要有 break。要注意 switch 自从 JDK 1.7 及之后是支持 String 类型的。当然也可以使用 if 进行判断。
实现
import java.util.Scanner;/*** Created with IntelliJ IDEA.** @author : 村雨* @version : 1.0* @project : Java 编程实例* @package : PACKAGE_NAME* @className : Example60* @createTime : 2021/7/4 10:00* @email : 747731461@qq.com* @公众号 : 村雨遥* @website : https://cunyu1943.github.io* @description :*/public class Example60 {public static void main(String[] args) {Scanner scanner = new Scanner(System.in);System.out.println("输入月份");int month = scanner.nextInt();switch (month) {case 3:case 4:case 5:System.out.println(month + " 月是春季");break;case 6:case 7:case 8:System.out.println(month + " 月是夏季");break;case 9:case 10:case 11:System.out.println(month + " 月是秋季");break;case 12:case 1:case 2:System.out.println(month + " 月是冬季");break;default:break;}}}
结果


