背景
前几天,在不同的 CentOS 7 服务器上尝试部署同一个发行版本的 Galaxy 生物信息分析平台(Galaxy Project:云计算背景下诞生的一个生物信息学可视化分析开源项目)的时候,发现在执行 sh run.sh 部署时,出现了由于网络限制导致的 requirements.txt 包安装 ReadTimeoutError。
galaxy@ecs-steven 08:58:14 /data/galaxy-dist/galaxy$ sh run.shFound conda at: /data/galaxy-dist/anaconda2/bin/condaFound Conda, virtualenv will not be used.To use a virtualenv instead, create one with a non-Conda Python 2.7 at .venvActivating Conda environment: _galaxy_18.05Looking in indexes: https://wheels.galaxyproject.org/simple, https://pypi.python.org/simpleCollecting amqp==2.2.2 (from -r requirements.txt (line 1))......Collecting bx-python==0.8.1 (from -r requirements.txt (line 14))Downloading https://wheels.galaxyproject.org/packages/bx_python-0.8.1-cp27-cp27mu-manylinux1_x86_64.whl (3.2MB)50% |████████████████▎ | 1.6MB 4.1kB/s eta 0:06:15Exception:Traceback (most recent call last):File "/data/galaxy-dist/anaconda2/envs/_galaxy_18.05/lib/python2.7/site-packages/pip/_internal/cli/base_command.py", line 143, in mainstatus = self.run(options, args)......File "/data/galaxy-dist/anaconda2/envs/_galaxy_18.05/lib/python2.7/site-packages/pip/_vendor/urllib3/response.py", line 345, in _error_catcherraise ReadTimeoutError(self._pool, None, 'Read timed out.')ReadTimeoutError: HTTPSConnectionPool(host='wheels.galaxyproject.org', port=443): Read timed out.
原因在于:
第一,Galaxy 的初始化部署,其中有一步就是通过 pip 去在线下载位于 https://wheels.galaxyproject.org/simple 和 https://pypi.python.org/simple 这两个 PyPI 库的 requirements.txt 包,并执行安装。
第二,由于这两个 pypi 库位于国外,国内服务器想要下载里面的包可能会出现网络超时。
从 https://wheels.galaxyproject.org/ 的首页介绍,可以知道这是 Galaxy 基于 pypiserver-1.2.1 搭建的一个 PyPI 源(This instance is running version 1.2.1 of the pypiserver software.)。为了解决文章开头的 ReadTimeoutError,我们借着这个机会来学习一下如何使用 pypiserver 快速搭建一个属于自己的离线 PyPI 仓库(本文章使用 pip==18.1)。
PyPI 私有源
PyPI (Python Package Index,https://pypi.org/) 是 Python 官方的第三方库的仓库,所有人都可以下载第三方库或上传自己开发的库到 PyPI。
通常我们使用 pip 安装 Python 包,默认就是从 https://pypi.python.org/pypi (https://pypi.org/) 上安装。当然,我们也可以通过配置 pip.conf 或者使用命令行从指定的 PyPI 源安装。
# 从阿里云的 PyPI 源安装pip install --index-url https://mirrors.aliyun.com/pypi/simple/ PACKAGE-NAME# 替换默认 pip 源为阿里云mkdir ~/.piptee ~/.pip/pip.conf <<-'EOF'[global]index-url = https://mirrors.aliyun.com/pypi/simple/[install]trusted-host= mirrors.aliyun.comEOF
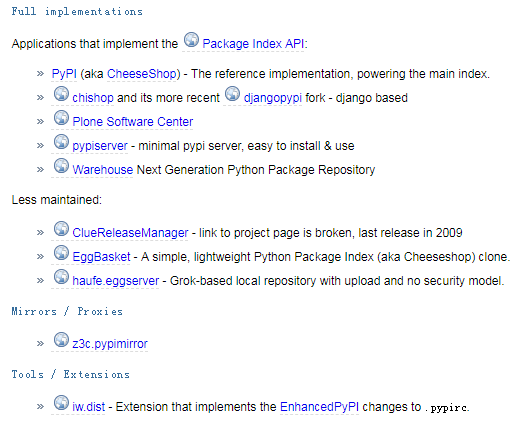
这里需要提到的是,有些是公司内部的项目,不方便放到外网上去,这个时候我们就要搭建自己的内网 PyPI 源服务器,需要安全并且拥有同样的舒适体验。关于 PyPI 私有源的实现,Python 官方的 PyPiImplementations 说明中列出了几个比较成熟的实现方案: ##
##
这里选择 pypiserver,除了 Galaxy 的原因外,最重要的是因为它最小而且使用简单。
pypiserver 简介
pypiserver is a minimal PyPI compatible server for pip or easy_install. It is based on bottle and serves packages from regular directories. Wheels, bdists, eggs and accompanying PGP-signatures can be uploaded either with pip, setuptools, twine, pypi-uploader, or simply copied with scp.
pypiserver 服务端配置
pypiserver > 1.2.x works with Python 2.7 and 3.4+ or pypy. Older Python versions may still work, but they are not tested. For legacy Python versions, use pypiserver-1.1.x series.
也就是说,pypiserver 1.2.x 以上版本要求 Python 2.7 或 3.4+,低版本的 Python 请使用 pypiserver-1.1.x。
# 替换默认 pip 源为阿里云$ mkdir ~/.pip$ tee ~/.pip/pip.conf <<-'EOF'[global]index-url = https://mirrors.aliyun.com/pypi/simple/[install]trusted-host= mirrors.aliyun.comEOF# 直接在线安装 pypiserver$ pip install pypiserver# 离线安装 pypiserver$ wget https://files.pythonhosted.org/packages/ec/f6/593ff8da4862f73c55027c32ac6f73ea09eabb546e7ebec82f83cc034fcb/pypiserver-1.2.4-py2.py3-none-any.whl$ cp pypiserver-1.2.4-py2.py3-none-any.whl /tmp/pypiserver/$ pip install /tmp/pypiserver/pypiserver-1.2.4-py2.py3-none-any.whl# 创建 pypiserver 离线包的保存路径$ mkdir ~/packages# 以 mako 包为例,下载该包并拷贝至 ~/packages$ cd ~/packages$ pip download -d /home/shenweiyan/packages mako# 启动 pypiserver 服务$ pypi-server -p 8080 ~/packages &
pypiserver 客户端配置
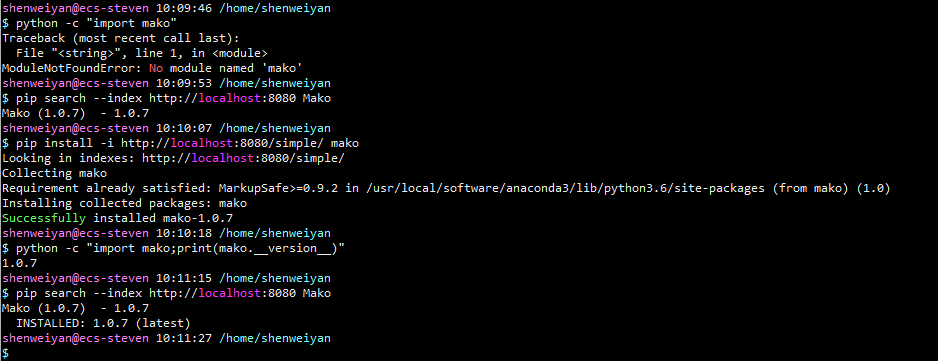
$ python -c "import mako"Traceback (most recent call last):File "<string>", line 1, in <module>ModuleNotFoundError: No module named 'mako'# 从本地镜像搜索包$ pip search --index http://localhost:8080 MakoMako (1.0.7) - 1.0.7# 从指定的本地镜像安装包pip install -i http://localhost:8080/simple/ mako

pypiserver 客户端推荐的个人配置:
tee ~/.pip/pip.conf <<-'EOF'[global]index-url = http://120.77.xx.xx/simpleextra-index-url = https://mirrors.aliyun.com/pypi/simple/[install]trusted-host = 120.77.xx.xxEOF
requirements.txt 离线 PyPI 仓库
一般 Python 项目使用 pip 安装的包,都可以通过 pip freeze >requirements.txt 导出环境中已有的模块。搭建 requirements.txt 离线 PyPI 仓库,我们首先需要把 requirements.txt 所有的模块安装包下载到本地。
$ pip download -d /home/shenweiyan/packages -r /home/shenweiyan/galaxy/requirements.txt --index-url https://mirrors.aliyun.com/pypi/simple --extra-index-url https://wheels.galaxyproject.org/simpleLooking in indexes: https://mirrors.aliyun.com/pypi/simple, https://wheels.galaxyproject.org/simpleCollecting amqp==2.2.2 (from -r //home/shenweiyan/galaxy/requirements.txt (line 1))Downloading https://mirrors.aliyun.com/pypi/packages/88/4a/8c45a882d842678963516ebd9cf584a4ded51af719234c3b696c2e884c60/amqp-2.2.2-py2.py3-none-any.whl (48kB)100% |████████████████████████████████| 51kB 779kB/sSaved ./amqp-2.2.2-py2.py3-none-any.whl......Collecting wrapt==1.10.11 (from -r /home/shenweiyan/galaxy/requirements.txt (line 134))Downloading https://wheels.galaxyproject.org/packages/wrapt-1.10.11-cp27-cp27mu-manylinux1_x86_64.whl (64kB)100% |████████████████████████████████| 71kB 321kB/sSaved /home/galaxy/packages/wrapt-1.10.11-cp27-cp27mu-manylinux1_x86_64.whlSuccessfully downloaded amqp appdirs asn1crypto babel bagit bcrypt bdbag beaker bioblend bleach boltons boto bunch bx-python bz2file certifi ...... wcwidth webencodings webob whoosh wrapt
我们把 /home/shenweiyan/packages 整个目录拷贝到目标服务器(可连网但速度极慢,目标路径:/data/galaxy-dist/packages),搭建并启动 pypiserver,然后从本地离线 PyPI 仓库安装 requirements 软件:
# 登陆目标服务器,离线安装 pypiserver# 启动 pypiserver$ cd /data/galaxy-dist/packages$ pypi-server -p 8080 /data/galaxy-dist/packages &# 安装 requirements 软件$ conda activate galaxy$ pip install --index-url http://localhost:8080/simple/ --extra-index-url https://mirrors.aliyun.com/pypi/simple/ -r requirements.txtLooking in indexes: http://localhost:8080/simple/, https://mirrors.aliyun.com/pypi/simple/Requirement already satisfied: amqp==2.2.2 in ./galaxy-dist/anaconda2/envs/galaxy/lib/python2.7/site-packages (from -r /data/galaxy-dist/galaxy/requirements.txt (line 1)) (2.2.2)Requirement already satisfied: appdirs==1.4.3 in ./galaxy-dist/anaconda2/envs/galaxy/lib/python2.7/site-packages (from -r /data/galaxy-dist/galaxy/requirements.txt (line 2)) (1.4.3)......Collecting bdbag==1.2.4 (from -r /data/galaxy-dist/galaxy/requirements.txt (line 7))Downloading http://localhost:8080/packages/bdbag-1.2.4-py2-none-any.whl (42kB)100% |████████████████████████████████| 51kB 52.0MB/sCollecting beaker==1.9.1 (from -r /data/galaxy-dist/galaxy/requirements.txt (line 8))Downloading http://localhost:8080/packages/Beaker-1.9.1.tar.gz (40kB)100% |████████████████████████████████| 40kB 49.4MB/s......Successfully installed bdbag-1.2.4 beaker-1.9.1 ...... warlock-1.2.0 webob-1.4.2
到这里,基于 pypiserver 的离线本地 PyPI 仓库基本搭建与使用实践就已经介绍完毕了。对于一个完整的 Python 项目,如果需要从连网的开发服务器迁移至内网(无法使用外网,或者部分资源位于墙外,墙内下载速度差)的部署服务器,pypiserver 可能是一个不错的解决方案。
- 对于 conda 依赖的 Python 项目,国内推荐使用清华大学的镜像。
- 对于 PyPI 源,国内推荐使用阿里云或者清华大学的 PyPI 镜像。
- 对于特定项目的第三方 PyPI 源,可考虑 pypiserver 实现离线本地化。
pypiserver 的一些高级用法,如基于 systemd 和 supervisor 的自动化启动管理;基于 Docker 技术的部署与使用;基于 Nginx 反向代理的 pypiserver 运行等等,我们后面有时间再进行介绍。有需要的童鞋也可参考 pypiserver 的 GitHub 说明文档:https://github.com/pypiserver/pypiserver。
参考资料
- 如何搭建自己的pypi私有源服务器,阿里云教程中心
- 使用 pypiserver 快速搭建内网离线 pypi 仓库实践,HelloDog 博客
- pypi 镜像使用帮助,清华大学开源软件镜像站
- wiki:PyPiImplementations,wiki.python.org
- https://github.com/pypiserver/pypiserver,GitHub

