1.Nacos简介
1.1定义
1.2作用
- 下载jar包,直接运行
-
2.2下载jar包运行的步骤
jar包的下载、解压(https://github.com/alibaba/nacos/releases/tag/1.2.1)
- 推荐使用1.2.1,打开链接,下载即可
- 解压
运行nacos server
.\startup.cmd -m standalone
2.3下载源码打包运行的步骤
找到你想要下载的版本

- 下载完成后使用IDEA打开
-
2.4Nacos服务器简单使用
nacos服务器为我们提供了一个可视化的管理界面,非常的友好,默认的地址(http://localhost:8848/nacos),默认的用户名:nacos,密码:nacos

3.Nacos的服务注册与服务调用
3.1服务注册
nacos作为一个服务注册中心来使用时的步骤如下:
pom文件
①如果父工程没有继承com.alibaba.cloud,每个微服务的pom中应该加入
<dependency><groupId>com.alibaba.cloud</groupId><artifactId>spring-cloud-starter-alibaba-nacos-discovery</artifactId><version>2.1.0.RELEASE</version></dependency>
②若父工程继承了com.alibaba.cloud,即父工程的pom文件如下
<dependencyManagement><dependencies><dependency><groupId>com.alibaba.cloud</groupId><artifactId>spring-cloud-alibaba-dependencies</artifactId><version>2.1.0.RELEASE</version><type>pom</type><scope>import</scope></dependency></dependencies></dependencyManagement>
那么子工程不需要写版本
<dependency><groupId>com.alibaba.cloud</groupId><artifactId>spring-cloud-starter-alibaba-nacos-discovery</artifactId></dependency>
配置文件
server:port: 8081spring:application:name: nacos-service1cloud:nacos:discovery:server-addr: 127.0.0.1:8848managetment:endpoints:web:exposure:include: "*"
注:这块有个坑,如果你把最后一行
"*"的双引号取出,会报错
一定要看看技术官方文档 :
注解 ```java import org.springframework.boot.SpringApplication; import org.springframework.boot.autoconfigure.SpringBootApplication; import org.springframework.cloud.client.discovery.EnableDiscoveryClient;
@SpringBootApplication @EnableDiscoveryClient public class NacosService1Application {
public static void main(String[] args) {SpringApplication.run(NacosService1Application.class, args);}
}
4. 结果查看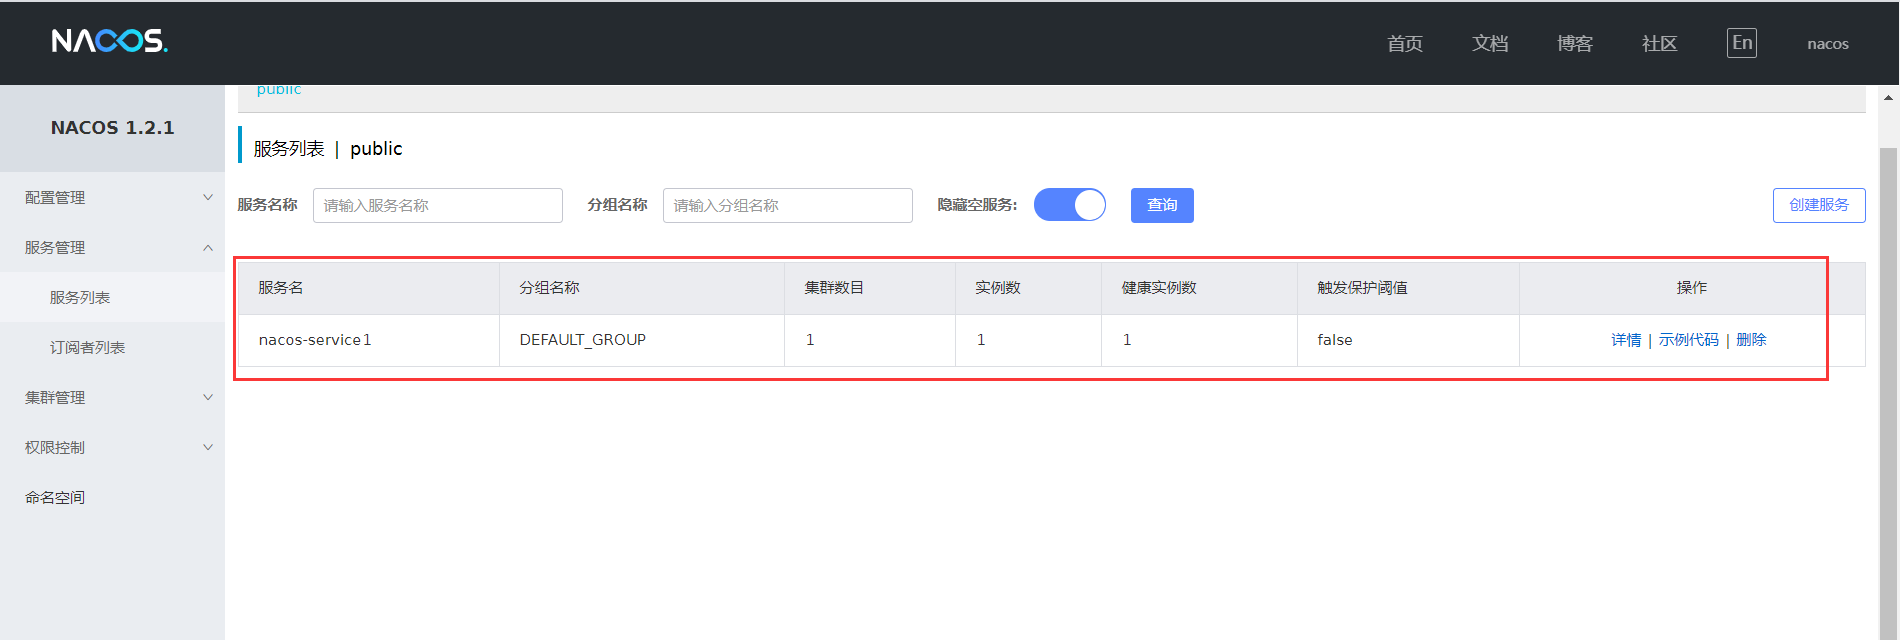5. 小结比Eureka简单的多。<a name="gXYsB"></a>## 3.2服务的调用服务的注册不是目的,我们最终的目的是能够实现微服务之间的调用。在官方文档中有这么一句话> > 翻译就是:nacos的发现服务集成了nettflix ribbon组件,我们可以通过restTemplate或者openFeign的方式去调用。下面就演示服务调用服务的2种方式<a name="edMd1"></a>### 3.2.1通过RestTemplate的方式1. 环境描述1. 服务提供者就是我们上面的 nacos-service12. 服务消费者我们新建模块 nacos-consumer13. 服务提供者提供一个 `sayHello` 接口4. 通过浏览器调用nacos-consmer1的`callSayHello`接口,让后通过`callSayHello` 去调用nacos-service1`的sayHello` 接口,并将返回值打印到浏览器中2. 搭建步骤①nacos-service1编写`sayHello `接口```java@RestControllerpublic class TestCallController {@RequestMapping("sayHello")public String sayHello(){return "Hello Yunrun";}}
②新建nacos-consumer1模块,并且将其注册到nacos server,具体步骤同3.1,端口改成8082即可
③使用restTemplate的方式掉用服务,具体步骤,在nacos中服务注册信息的实例代码中有,这点nacos做的十分到位,如下图: 具体代码:
具体代码:
a.声明bean
@LoadBalanced@Beanpublic RestTemplate restTemplate(){return new RestTemplate();}
b.callSayHello代码
@RestControllerpublic class TestCallServiceController {@Autowiredprivate RestTemplate restTemplate;@RequestMapping("callSayHello")public String callSayHello(){return restTemplate.getForObject("http://nacos-service1/sayHello", String.class);}}
④结果,浏览器访问 localhost:8082/callSayHello
3.2.2 通过OpenFeign调用
通过OpenFeign调用,原来使用Eureka注册中心怎么用,现在一样。
- 环境描述:
- nacos-service1不用改动,只需要再提供一个 nacos-service1-api的Feign的调用类即可
- nacos-cosumer2和当前项目的消费者一样,注入服务,调用方法即可
- 具体步骤
①nacos-service1 什么都不用动
②nacos-cosumer2 的pom文件
<dependency><groupId>org.springframework.boot</groupId><artifactId>spring-boot-starter-web</artifactId></dependency><dependency><groupId>org.springframework.cloud</groupId><artifactId>spring-cloud-starter-openfeign</artifactId></dependency><dependency><groupId>com.alibaba.cloud</groupId><artifactId>spring-cloud-starter-alibaba-nacos-discovery</artifactId></dependency>
③nacos-consumer2编写一个Fegin接口类
@FeignClient(name="nacos-service1")public interface NacosService1Feign {@RequestMapping("sayHello")String sayHello();}
④nacos-consumer2的主类
@SpringBootApplication@EnableDiscoveryClient@EnableFeignClientspublic class NacosCosumer2Application {public static void main(String[] args) {SpringApplication.run(NacosCosumer2Application.class, args);}}
⑤nacos-comsumer2的配置文件(换个端口和服务名)
server:port: 8083spring:application:name: nacos-consumer2cloud:nacos:discovery:server-addr: 127.0.0.1:8848managetment:endpoints:web:exposure:include: "*"
⑥最后一个主类的注解
@SpringBootApplication@EnableDiscoveryClient@EnableFeignClientspublic class NacosCosumer2Application {public static void main(String[] args) {SpringApplication.run(NacosCosumer2Application.class, args);}}
⑦Controller接口 callSayHelloByFeign
@RestControllerpublic class TestByFeignController {@Autowiredprivate NacosService1Feign nacosService1Feign;@RequestMapping("callSayHello2")public String callSayHello2(){return nacosService1Feign.sayHello();}}
⑧浏览器访问 localhost:8083/callSayHelloByFeign
4.Nacos作为注册中心小结
- 以上演示了nacos作为服务注册中心的服务 call 服务 ,可以发现,与原来相比就是pom文件的改变和配置文件的不同。
GateWay的改动也是仅仅需要引入nacos的依赖和在配置中心配置即可
5.Nacos配置中心
5.1简单的demo
引入依赖(与发现者的配置类似,父工程引入后可以省略版本)
<dependency><groupId>com.alibaba.cloud</groupId><artifactId>spring-cloud-starter-alibaba-nacos-config</artifactId></dependency>
配置文件(在bootstrap.yml中配置) ```xml spring: application: name: nacos-config cloud: nacos: config:
server-addr: 127.0.0.1:8848
3. nacos配置文件准备①配置的具体内容<br />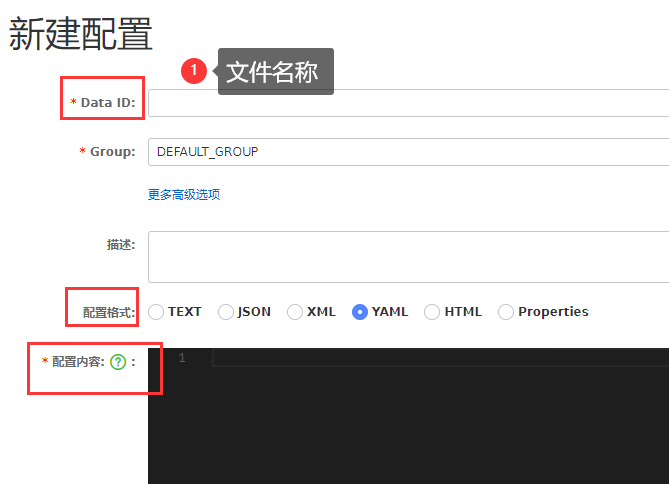<br />②文件的名称、DataID 是很有讲究的,举例如下:```xmlspring.application.name=nacos-configspring.profiles.active=devspring.cloud.nacos.config.file-extension=yaml #默认properties
如上的配置,服务只会找 nacos-config-dev.yaml的DataID。
③ 在只配置了一个spring.application.name默认只会找nacos-config.properties配置文件。
- `file-extension`:默认是`properties`- `spring.profiles.active`:没有就不用
举例:在只配置了spring.application.name=nacos-config时,如下的配置文件是不可能被寻找到的。
④将配置文件的dataId改为properties,格式也得是properties。就可以成功
4.名词解释
①namespace:通过spring.cloud.nacos.config.namespace 指定
②group:通过spring.cloud.nacos.config.group指定
③补充说明:默认的namespace是 public 默认组是default_group
④namespace group dataId 的关系如下

5.小结
①nacos作为配置中心,服务会自动根据服务相关信息去找nacos中的配置文件
②由于是配置文件的获取,关于有关获取配置文件的配置信息放在 bootstrap.properties的配置文件中
③yml文件和properties文件要用相应的格式书写配置
④项目自动寻找到的配置文件会自动刷新,也可以通过spring.cloud.nacos.config.refresh-enabled=false去关闭
5.2自定义寻找配置文件
自定义配置文件由两种:
ext-config方式:指定不同组中的配置shared-dataids方式:指定同一组中的配置- 通过
ext-config配置项spring.cloud.nacos.config.ext-config[n].data-id. 指定文件名spring.cloud.nacos.config.ext-config[n].group. 指定所在组,未指定的话默认 DEFAULT_GROUP- 配置这个
spring.cloud.nacos.config.ext-config[n].refresh来指定该条是否动态刷新
- 通过
# config external configuration# 1. Data Id is in the default group of DEFAULT_GROUP, and dynamic refresh of configurations is not supported.spring.cloud.nacos.config.ext-config[0].data-id=ext-config-common01.properties# 2. Data Id is not in the default group, and dynamic refresh of configurations is not supported.spring.cloud.nacos.config.ext-config[1].data-id=ext-config-common02.propertiesspring.cloud.nacos.config.ext-config[1].group=GLOBALE_GROUP# 3. Data Id is not in the default group and dynamic referesh of configurations is supported.spring.cloud.nacos.config.ext-config[2].data-id=ext-config-common03.propertiesspring.cloud.nacos.config.ext-config[2].group=REFRESH_GROUPspring.cloud.nacos.config.ext-config[2].refresh=true
- 通过
shared-dataids配置项
①文件后缀只能是 properties、yaml、yml
②若所配置的文件在同组,可以使用下面的一个配置方式
#指定组spring.cloud.nacos.config.group=DEVELOP_GROUP#指定哪些配置文件spring.cloud.nacos.config.shared-dataids=bootstrap-common.properties,all-common.properties#指定哪些配置文件可以动态刷新spring.cloud.nacos.config.refreshable-dataids=bootstrap-common.properties
5.3Nacos作为配置中心小结
- 需要掌握namespace、group、dataId的含义和关系
- 配置中心所学习重点就是如何配置和如何寻找

若有收获,就点个赞吧
0 人点赞
