1.简介
现在微服务的流行,一个稳定的服务调用越发重要,sentinel使用流量作为突破点,对为服务进行监控、熔断和负载保护
- 下载软件包
命令启动(若8080被占用可以使用 其他端口 替换)
java -Dserver.port=8080 -Dcsp.sentinel.dashboard.server=localhost:8080 -Dproject.name=sentinel-dashboard -jar sentinel-dashboard.jar
3.控制台访问:http://localhost:8089
4.登录名和密码都是 : sentinel2.2微服务的搭建
pom
<dependency><groupId>com.alibaba.cloud</groupId><artifactId>spring-cloud-starter-alibaba-sentinel</artifactId></dependency>
编写一个Controller
@RestControllerpublic class SentinalController {@RequestMapping("sayHello")public String sayHello(){return "hello World";}}
配置文件(因为我控制台用 8089端口启动的)
spring:cloud:sentinel:transport:port: 8719dashboard: localhost:8089
8719端口解释:在使用sentinel时,每个整合了sentinel的微服务需要和sentinel控制中心通信,于是需要再次启动一个HTTP服务器来和控制中心通信,获取流量控制的配置信息,于是8719就是指名这个http服务器的端口,若端口被占用,会自增
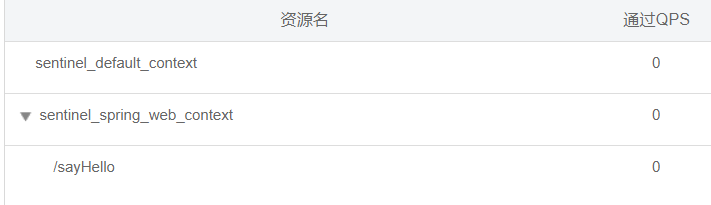
2.3查看控制台
服务中的资源(接口)被调用过一次后,才会被触发监控
- 对于一些@RequestMapping之类的接口,http服务提供了限流埋点
但是对于一些普通的方法,比如:
@RestControllerpublic class SentinalController {@RequestMapping("sayHello")public String sayHello(){cleanMySelf();return "hello World";}public String cleanMySelf(){return "cleanMySelf";}}
在sayHello前要cleanMySelf(),这个方法不能被控制,在控制台上只有sayHello
4.解决上述 第3点的策略就是在方法上 添加 @SenttinalResource(后面咱们单独一章讲)@RestControllerpublic class SentinalController {@RequestMapping("sayHello")public String sayHello(){cleanMySelf();return "hello World";}@SentinelResource("cleanMySelf")public String cleanMySelf(){return "cleanMySelf";}}
这里发现,还是不行,这个错误要保留一下,因为他底层使用AOP方式实现,所以改动一些将cleanMySelf移入Service层
5.代码如下:@Servicepublic class SentinelService {@SentinelResource("cleanMySelf")public String cleanMySelf(){return "cleanMySelf";}}
@RestControllerpublic class SentinalController {@Autowiredprivate SentinelService sentinelService;@RequestMapping("sayHello")public String sayHello(){sentinelService.cleanMySelf();return "hello World";}}
3.规则配置
规则配置的话,可以使用控制台,也可以使用代码的方式。我这里只整理控制台的形式

可以看到有流控、降级、热点和授权四个按钮,咱们就讲讲如何配置这4个3.1流控的配置
名词解释
- QPS:query per second(每秒请求数)
- 基础配置
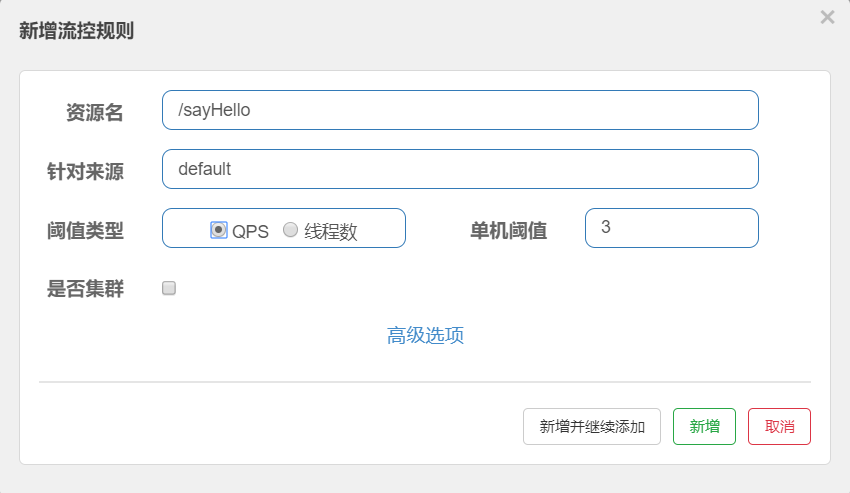
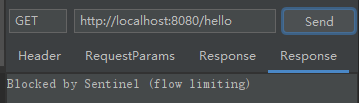
- QPS、单机阈值3:每秒的请求超过3次就返回错误提示,(线程数一样)
b.点击集群后,可以设置均摊的阈值或总体阈值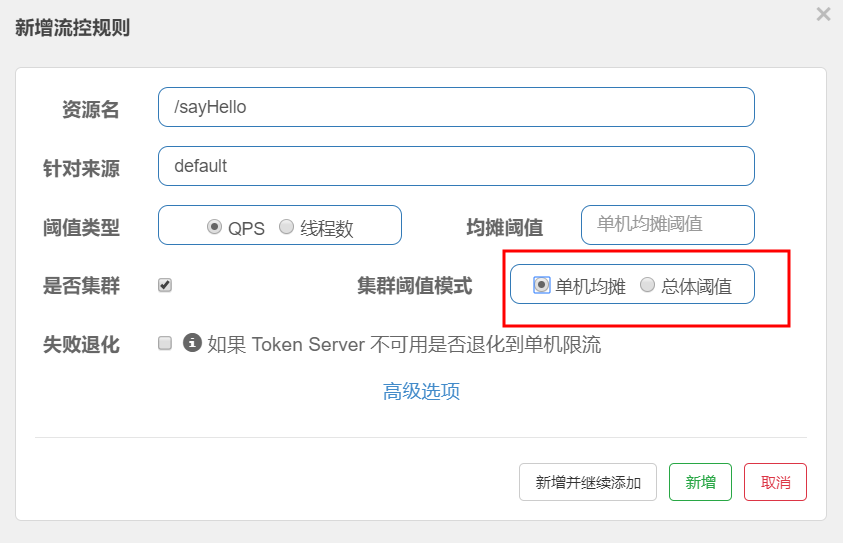
- 高级选项中的配置
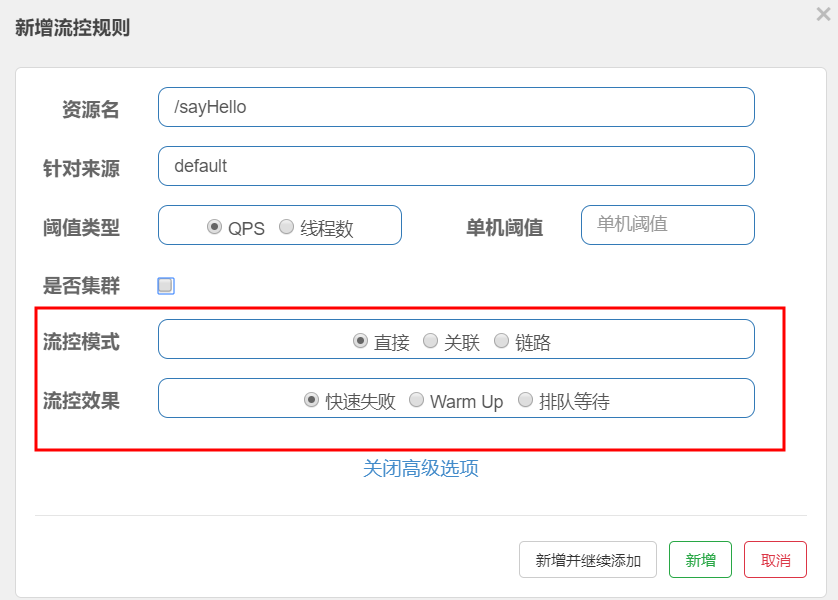
4.流控模式
这里先解释一个来源的概念:就是我这个服务的调用者。
- 直接模式:当针对来源直接的调用,才记录到QPS中
- 关联:需要指明sentinel中的另一资源名称,也就是说我两者的QPS之和不能超过这个阈值
- 链路:资源C可能,资源A要用,资源B要用,可以只对资源A使用它的量限制,
5.流控效果
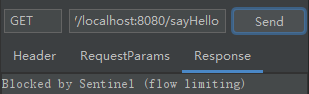
- 快速失败:达到流控条件后,立刻返回 flow control
- warm up :我设置了一个阈值,但是刚开始,我的QPS阈值小于这个值,经过一段时间后才真正成为这个阈值
排队等待:当达到阈值后,又进来的请求不立即返回失败,而是在队列等待指定时间
3.2降级配置
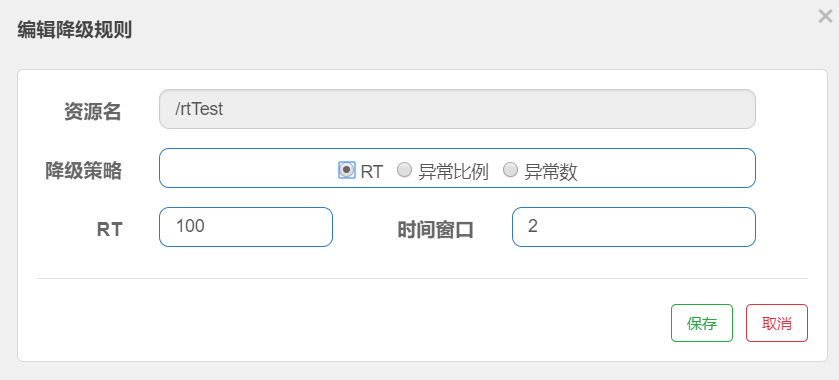
1.RT:1s中5次以上的请求,求平均响应时间,若大于100ms,则熔断2s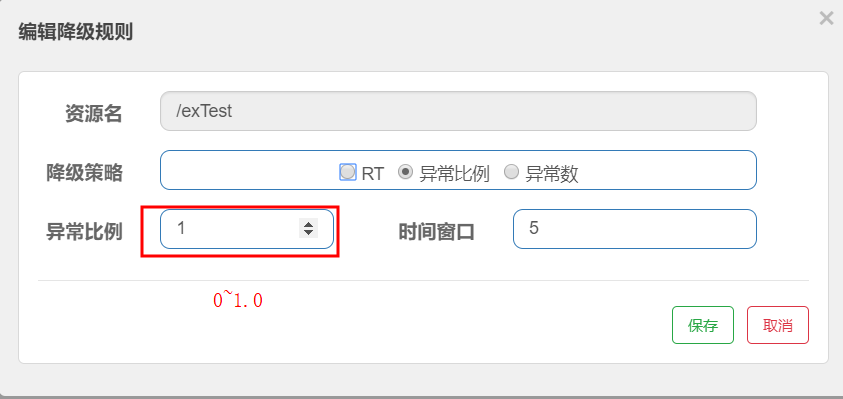
2.异常比例:1s中5次以上请求,异常比例超过 1=100%,就在5s能返回降级
3.异常数:1分钟内请求的异常数超过阈值,降级 指定时间3.3热点参数限流

就是对资源中的某个参数请求,进行限制
- 对这个参数的具体某些值也可以特定限制
- 踩坑:首先这样的资源必须加@SentinelResources注解
一定要在下图的资源上设置,不要再/*上面设置
4.当达到限制条件时,返回的是错误页面,需要在注解上添加 fallback方法(后面再说)
3.4授权

4.对OpenFeign的支持
- 就是将histrix的换成 sentinel
配置如下:
feign:sentinel:enabled: true
5.对GateWay的支持
pom
<dependency><groupId>org.springframework.cloud</groupId><artifactId>spring-cloud-starter-gateway</artifactId></dependency><dependency><groupId>com.alibaba.cloud</groupId><artifactId>spring-cloud-starter-alibaba-nacos-discovery</artifactId></dependency><dependency><groupId>com.alibaba.cloud</groupId><artifactId>spring-cloud-starter-alibaba-sentinel</artifactId></dependency><dependency><groupId>com.alibaba.cloud</groupId><artifactId>spring-cloud-alibaba-sentinel-gateway</artifactId></dependency>
配置文件 ```yaml server: port: 10000 spring: application: name: cloud-gateway cloud: nacos: discovery:
server-addr: 127.0.0.1:8848
gateway: routes:
- id: hello-service
uri: lb://hello-service
predicates:
- Path=/hello-service/** filters:
- StripPrefix=1 discovery: locator: lower-case-service-id: true enabled: true sentinel: transport: dashboard: localhost:8089 scg: fallback: mode: response response-body: fallBackHello response-status: 444
3. 流控配置- RouteID ,就是配置中的 -id :hello-service ,就是这个服务的所有接口都流控- API分组,就是进行请求地址的正则匹配,进行流控4. 2022.4.4号小坑记录- spring-boot:2.2.9.RELEASE- spring-cloud:Hoxton.SR3- spring-cloud-alibaba:2.2.1.RELEASE> 问题:网关流控无效> 结果:与sentinel的控制台无关1.8.3。要指定好版本```powershell<dependency><groupId>org.springframework.cloud</groupId><artifactId>spring-cloud-starter-gateway</artifactId><version>2.2.0.RELEASE</version></dependency><dependency><groupId>com.alibaba.cloud</groupId><artifactId>spring-cloud-starter-alibaba-sentinel</artifactId><version>2.2.0.RELEASE</version></dependency><dependency><groupId>com.alibaba.cloud</groupId><artifactId>spring-cloud-alibaba-sentinel-gateway</artifactId><version>2.2.1.RELEASE</version></dependency>
配制实例
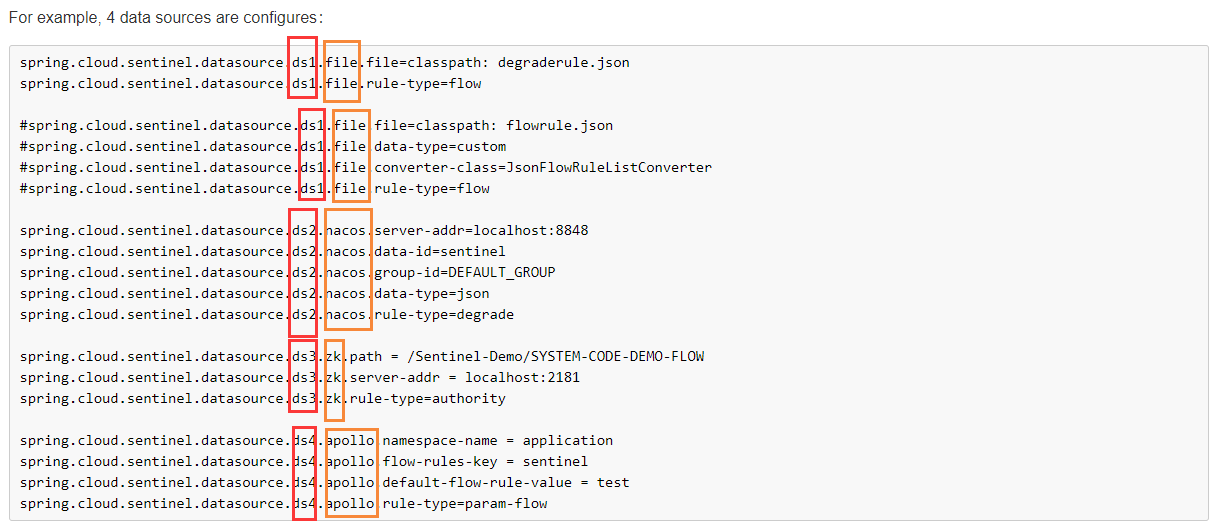
解释
①需要为你的数据源取一个响亮的名字9(ds1/ds2/…..只要你喜欢,随便你定义)
②配置所在的位置:file、nacos、zookeeper、appollo(这个必须一定的)
- 每一个数据源所需要配置3个配置项
①data-type:数据类型(json、xml、custom自定义)
②converter-class:将数据类型转化的转化器(默认就是 xml、json,或者你自己定义一个)
③rule-type:(flow,degrade,authority,system, param-flow, gw-flow, gw-api-group)
④建议使用json(默认的转换器、默认的数据类型)
- 定义流控、降级等规则的方式
- 通过写代码的形式定义(不灵活、换个规则就得重写代码)
- 通过控制台配置、直观、明了但是不可持久,于是需要一个存储数据的地方
- 从数据源中如何获取
- 数据源推送给客户端:nacos redis zk等
- 客户端主动去要:文件
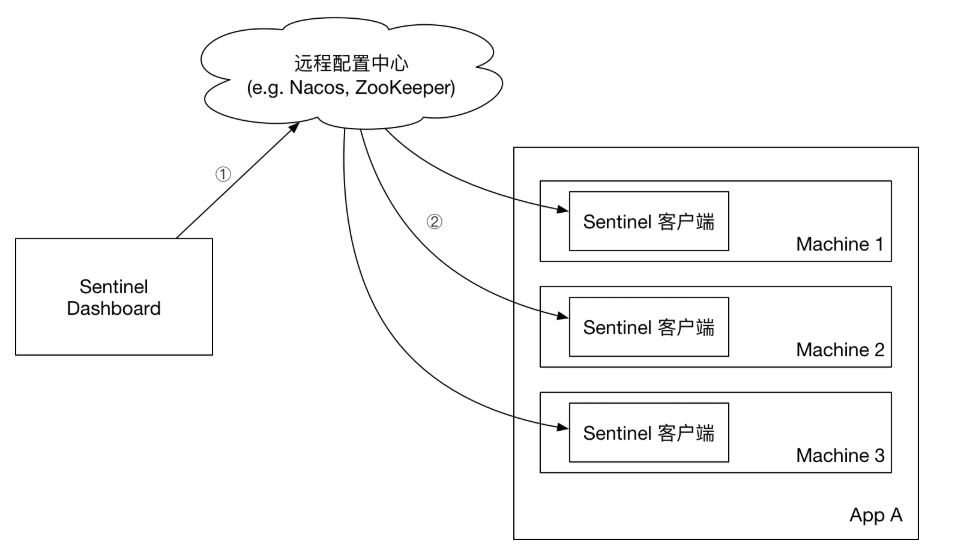
- 演示一把从 nacos 中配置规则
- push模式的原理图
- 配置实例(springcloudalibaba 的 example中有例子怎么配,各种配置文件怎么写,去看)
①pom文件
<dependency><groupId>com.alibaba.cloud</groupId><artifactId>spring-cloud-starter-alibaba-sentinel</artifactId></dependency><dependency><groupId>com.alibaba.cloud</groupId><artifactId>spring-cloud-alibaba-sentinel-datasource</artifactId></dependency><dependency><groupId>com.alibaba.csp</groupId><artifactId>sentinel-datasource-nacos</artifactId></dependency>
②配置
spring:cloud:sentinel:transport:port: 8719dashboard: localhost:8089datasource:ds1:nacos:server-addr: localhost:8848data-id: sentinelgroup-id: DEFAULT_GROUPdata-type: jsonrule-type: flow
2022/4/4号吐槽
定义资源名称使用
- 指定流控的规则(默认的流控规则太丑)
- 总体自定义流控规则
```java
public class CustomUrlBlockHandler implements UrlBlockHandler {
@Override
public void blocked(HttpServletRequest httpServletRequest, HttpServletResponse httpServletResponse, BlockException e) throws IOException {
} }httpServletResponse.setStatus(436);httpServletResponse.setCharacterEncoding("UTF-8");httpServletResponse.getWriter().println("流控限制");
@Configuration public class MyConfig { @Bean public WebCallbackManager webCallbackManager(){ WebCallbackManager.setUrlBlockHandler(new CustomUrlBlockHandler()); return new WebCallbackManager(); } }
4. 通过注解指定(blockHandler)blockHandlerClass:指定的产生的处理方法`blockHandler`在那个类<br />blockHandler:指定具体那个方法<br />注意点:<br />①若只使用blockHandler,方法必须和流控资源在同一类,参数、返回值一致,并且在最后参数添加BlockException<br />②若使用class+handler的方式,还需要 方法为static5. fallBack、fallBackClass同上面用法一样,但是不同的是,这个方法是针对所有抛出来的异常```java@RequestMapping("testFallBack")@SentinelResource(value="testFallBack",fallback = "doFallBack")public String testFallBack(){int a=1/0;return "hello";}public String doFallBack(Throwable throwable){System.out.println(throwable.getStackTrace());return throwable.getMessage();}
6.defaultFallback:就是没指定fallback的情况下走它
7.exceptionToIgnore:翻译一下。

若有收获,就点个赞吧
0 人点赞
