1.模式简介与选择
1.1模式简介

1.2模式选择
通过对各种模式的理解和部分模式尝试使用。我认为AT模式比较合适
理由:
①当前项目使用的是Mysql数据库,支持事务,符合AT模式的使用前提
②AT模式不需要手动编写提交或回滚代码,原代码不用做改动
③AT模式的学习资源和介绍丰富:
SpringCloudAlibaba提供的Seata使用示例是AT模式的
Seata官方快速启动也是针对AT模式,并且对AT模式的相关介绍高于其他各个模式
网上的博客较其他的模式要多
2.数据库的修改
2.1Seata数据库创建
2.1.1测试库和开发库
测试库和开发库都在 10.11.0.215的Mysql中因此,此Mysql上创建 test_seata和seata两个数据库,并且两个库分别创建3个相同的表
参考:https://github.com/seata/seata/blob/develop/script/server/db/mysql.sql
-- -------------------------------- The script used when storeMode is 'db' ---------------------------------- the table to store GlobalSession dataCREATE TABLE IF NOT EXISTS `global_table`(`xid` VARCHAR(128) NOT NULL,`transaction_id` BIGINT,`status` TINYINT NOT NULL,`application_id` VARCHAR(32),`transaction_service_group` VARCHAR(32),`transaction_name` VARCHAR(128),`timeout` INT,`begin_time` BIGINT,`application_data` VARCHAR(2000),`gmt_create` DATETIME,`gmt_modified` DATETIME,PRIMARY KEY (`xid`),KEY `idx_gmt_modified_status` (`gmt_modified`, `status`),KEY `idx_transaction_id` (`transaction_id`)) ENGINE = InnoDBDEFAULT CHARSET = utf8;-- the table to store BranchSession dataCREATE TABLE IF NOT EXISTS `branch_table`(`branch_id` BIGINT NOT NULL,`xid` VARCHAR(128) NOT NULL,`transaction_id` BIGINT,`resource_group_id` VARCHAR(32),`resource_id` VARCHAR(256),`branch_type` VARCHAR(8),`status` TINYINT,`client_id` VARCHAR(64),`application_data` VARCHAR(2000),`gmt_create` DATETIME(6),`gmt_modified` DATETIME(6),PRIMARY KEY (`branch_id`),KEY `idx_xid` (`xid`)) ENGINE = InnoDBDEFAULT CHARSET = utf8;-- the table to store lock dataCREATE TABLE IF NOT EXISTS `lock_table`(`row_key` VARCHAR(128) NOT NULL,`xid` VARCHAR(96),`transaction_id` BIGINT,`branch_id` BIGINT NOT NULL,`resource_id` VARCHAR(256),`table_name` VARCHAR(32),`pk` VARCHAR(36),`gmt_create` DATETIME,`gmt_modified` DATETIME,PRIMARY KEY (`row_key`),KEY `idx_branch_id` (`branch_id`)) ENGINE = InnoDBDEFAULT CHARSET = utf8;
2.1.2生产库
生产库的话应该是创建一个 seata数据库即可,sql语句 同上。
2.2undo_log表的创建
在用到的数据库中创建undo_log表即可
参考:https://github.com/seata/seata/blob/develop/script/client/at/db/mysql.sql
-- for AT mode you must to init this sql for you business database. the seata server not need it.CREATE TABLE IF NOT EXISTS `undo_log`(`branch_id` BIGINT(20) NOT NULL COMMENT 'branch transaction id',`xid` VARCHAR(100) NOT NULL COMMENT 'global transaction id',`context` VARCHAR(128) NOT NULL COMMENT 'undo_log context,such as serialization',`rollback_info` LONGBLOB NOT NULL COMMENT 'rollback info',`log_status` INT(11) NOT NULL COMMENT '0:normal status,1:defense status',`log_created` DATETIME(6) NOT NULL COMMENT 'create datetime',`log_modified` DATETIME(6) NOT NULL COMMENT 'modify datetime',UNIQUE KEY `ux_undo_log` (`xid`, `branch_id`)) ENGINE = InnoDBAUTO_INCREMENT = 1DEFAULT CHARSET = utf8 COMMENT ='AT transaction mode undo table';
3.Seata-Server的部署
3.1开发环境的Seata-Server的部署
1.开发环境的Seata-Server采用的方式与开发环境nacos的使用方式相同,开发人员启动自己的Seata-Server
2.Seata-Sever配置好打包到项目中即可
3.Seata-Server中的文件配置(register.conf)
#注册在本地registry {# file 、nacos 、eureka、redis、zk、consul、etcd3、sofatype = "nacos"nacos {application = "seata-server"serverAddr = "127.0.0.1:8848"group = "SEATA_GROUP"namespace = ""cluster = "default"username = "nacos"password = "nacos"}}#去220找配置config {# file、nacos 、apollo、zk、consul、etcd3type = "nacos"nacos {application = "seata-server"serverAddr = "10.11.0.220:8855"group = "SEATA_GROUP"namespace = "dev-seata空间的id"cluster = "default"username = "appconnect"password = "appconnect"}}
3.2测试环境的Seata-Sever部署
1.测试环境的Seata-Server采用的方式与测试环境nacos的使用方式也相同。
2.当前测试环境nacos也是重新启动一份的,所以seata-server在测试环境中也启动一份即可
3.配置文件(register.conf)
registry {# file 、nacos 、eureka、redis、zk、consul、etcd3、sofatype = "nacos"nacos {application = "seata-server"serverAddr = "127.0.0.1:8848"group = "SEATA_GROUP"namespace = ""cluster = "default"username = "nacos"password = "nacos"}}config {# file、nacos 、apollo、zk、consul、etcd3type = "nacos"nacos {application = "seata-server"serverAddr = "10.11.0.220:8855"group = "SEATA_GROUP"namespace = "test-seata空间的id"cluster = "default"username = "appconnect"password = "appconnect"}}
3.3生产环境的Seata-Sever部署
1.生产环境的Seata-Server采取高可用的配置方式;
2.具体操作:在不同的生产服务器上启动多个Seata-Server即可,数量不限
3.配置文件(register.conf)
registry {# file 、nacos 、eureka、redis、zk、consul、etcd3、sofatype = "nacos"nacos {application = "seata-server"serverAddr = "10.11.0.220:8855"group = "SEATA_GROUP"namespace = "生产服务注册空间id"cluster = "default"username = "appconnect"password = "appconnect"}}config {# file、nacos 、apollo、zk、consul、etcd3type = "nacos"nacos {application = "seata-server"serverAddr = "10.11.0.220:8855"group = "SEATA_GROUP"namespace = "pro-seata空间的id"cluster = "default"username = "appconnect"password = "appconnect"}}
4.Nacos关于Seata-Server的配置
4.1命名空间的创建
1.分别创建三个命名空间
①dev-seata:存放开发环境的seata配置
②test-seata:存放测试环境的seata配置
③pro-seata:存放生产环境的seata配置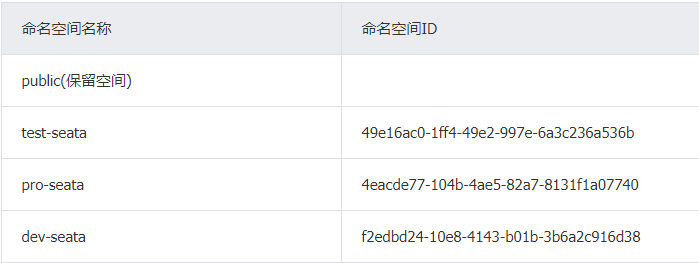
4.2各个配置空间的配置初始化
参考:https://github.com/seata/seata/tree/develop/script/config-center
先准备好以下2个文件config.txt和nacos-config.sh
1.准备config.txt
transport.type=TCPtransport.server=NIOtransport.heartbeat=truetransport.enableClientBatchSendRequest=falsetransport.threadFactory.bossThreadPrefix=NettyBosstransport.threadFactory.workerThreadPrefix=NettyServerNIOWorkertransport.threadFactory.serverExecutorThreadPrefix=NettyServerBizHandlertransport.threadFactory.shareBossWorker=falsetransport.threadFactory.clientSelectorThreadPrefix=NettyClientSelectortransport.threadFactory.clientSelectorThreadSize=1transport.threadFactory.clientWorkerThreadPrefix=NettyClientWorkerThreadtransport.threadFactory.bossThreadSize=1transport.threadFactory.workerThreadSize=defaulttransport.shutdown.wait=3service.vgroupMapping.my_test_tx_group=defaultservice.enableDegrade=falseservice.disableGlobalTransaction=falseclient.rm.asyncCommitBufferLimit=10000client.rm.lock.retryInterval=10client.rm.lock.retryTimes=30client.rm.lock.retryPolicyBranchRollbackOnConflict=trueclient.rm.reportRetryCount=5client.rm.tableMetaCheckEnable=falseclient.rm.sqlParserType=druidclient.rm.reportSuccessEnable=falseclient.rm.sagaBranchRegisterEnable=falseclient.tm.commitRetryCount=5client.tm.rollbackRetryCount=5client.tm.defaultGlobalTransactionTimeout=60000client.tm.degradeCheck=falseclient.tm.degradeCheckAllowTimes=10client.tm.degradeCheckPeriod=2000store.mode=dbstore.db.datasource=druidstore.db.dbType=mysqlstore.db.driverClassName=com.mysql.jdbc.Driverstore.db.url=jdbc:mysql://127.0.0.1:3306/seata?useUnicode=truestore.db.user=usernamestore.db.password=passwordstore.db.minConn=5store.db.maxConn=30store.db.globalTable=global_tablestore.db.branchTable=branch_tablestore.db.queryLimit=100store.db.lockTable=lock_tablestore.db.maxWait=5000server.recovery.committingRetryPeriod=1000server.recovery.asynCommittingRetryPeriod=1000server.recovery.rollbackingRetryPeriod=1000server.recovery.timeoutRetryPeriod=1000server.maxCommitRetryTimeout=-1server.maxRollbackRetryTimeout=-1server.rollbackRetryTimeoutUnlockEnable=falseclient.undo.dataValidation=trueclient.undo.logSerialization=jacksonclient.undo.onlyCareUpdateColumns=trueserver.undo.logSaveDays=7server.undo.logDeletePeriod=86400000client.undo.logTable=undo_logclient.log.exceptionRate=100transport.serialization=seatatransport.compressor=nonemetrics.enabled=falsemetrics.registryType=compactmetrics.exporterList=prometheusmetrics.exporterPrometheusPort=9898
2.准备nacos-config.sh
#!/usr/bin/env bash# Copyright 1999-2019 Seata.io Group.## Licensed under the Apache License, Version 2.0 (the "License");# you may not use this file except in compliance with the License.# You may obtain a copy of the License at、## http://www.apache.org/licenses/LICENSE-2.0## Unless required by applicable law or agreed to in writing, software# distributed under the License is distributed on an "AS IS" BASIS,# WITHOUT WARRANTIES OR CONDITIONS OF ANY KIND, either express or implied.# See the License for the specific language governing permissions and# limitations under the License.while getopts ":h:p:g:t:u:w:" optdocase $opt inh)host=$OPTARG;;p)port=$OPTARG;;g)group=$OPTARG;;t)tenant=$OPTARG;;u)username=$OPTARG;;w)password=$OPTARG;;?)echo " USAGE OPTION: $0 [-h host] [-p port] [-g group] [-t tenant] [-u username] [-w password] "exit 1;;esacdoneif [[ -z ${host} ]]; thenhost=localhostfiif [[ -z ${port} ]]; thenport=8848fiif [[ -z ${group} ]]; thengroup="SEATA_GROUP"fiif [[ -z ${tenant} ]]; thentenant=""fiif [[ -z ${username} ]]; thenusername=""fiif [[ -z ${password} ]]; thenpassword=""finacosAddr=$host:$portcontentType="content-type:application/json;charset=UTF-8"echo "set nacosAddr=$nacosAddr"echo "set group=$group"failCount=0tempLog=$(mktemp -u)function addConfig() {curl -X POST -H "${contentType}" "http://$nacosAddr/nacos/v1/cs/configs?dataId=$1&group=$group&content=$2&tenant=$tenant&username=$username&password=$password" >"${tempLog}" 2>/dev/nullif [[ -z $(cat "${tempLog}") ]]; thenecho " Please check the cluster status. "exit 1fiif [[ $(cat "${tempLog}") =~ "true" ]]; thenecho "Set $1=$2 successfully "elseecho "Set $1=$2 failure "(( failCount++ ))fi}count=0for line in $(cat "./config.txt" | sed s/[[:space:]]//g); do(( count++ ))key=${line%%=*}value=${line#*=}addConfig "${key}" "${value}"doneecho "========================================================================="echo " Complete initialization parameters, total-count:$count , failure-count:$failCount "echo "========================================================================="if [[ ${failCount} -eq 0 ]]; thenecho " Init nacos config finished, please start seata-server. "elseecho " init nacos config fail. "fi
4.2.1开发环境pro-seata命名空间的seata配置信息初始化
1.将config.txt中数据库配置修改
service.vgroupMapping.yurun_dev_tx_group=defaultstore.db.url=jdbc:mysql://10.11.0.215:3306/seata?useUnicode=true
2.执行命令
sh nacos-config.sh -h localhost -p 8848 -g SEATA_GROUP -t (dev-seata命空间id) -u (nacos登录名) -w (nacos登录密码)实例:sh nacos-config.sh -h localhost -p 8848 -g SEATA_GROUP -t f2edbd24-10e8-4143-b01b-3b6a2c916d38 -u nacos -w nacos
4.2.2测试环境test-seata命名空间的seata配置信息初始化
1.将config.txt中的数据库配置修改
service.vgroupMapping.yurun_test_tx_group=defaultstore.db.url=jdbc:mysql://10.11.0.215:3306/test_seata?useUnicode=true
2.执行命令
sh nacos-config.sh -h localhost -p 8848 -g SEATA_GROUP -t (dev-seata命空间id) -u (nacos登录名) -w (nacos登录密码)实例:sh nacos-config.sh -h localhost -p 8848 -g SEATA_GROUP -t 49e16ac0-1ff4-49e2-997e-6a3c236a536b -u nacos -w nacos
4.2.3生产环境pro-seata命名空间的seata配置信息初始化
1.将config.txt中的数据库配置修改
service.vgroupMapping.yurun_pro_tx_group=defaultstore.db.url=jdbc:mysql://生产库ip:3306/seata?useUnicode=true
2.执行命令
sh nacos-config.sh -h localhost -p 8848 -g SEATA_GROUP -t (dev-seata命空间id) -u (nacos登录名) -w (nacos登录密码)实例:sh nacos-config.sh -h localhost -p 8848 -g SEATA_GROUP -t 4eacde77-104b-4ae5-82a7-8131f1a07740 -u nacos -w nacos
5.各个微服务的seata相关的配置
5.1pom文件
分布式事务的参与者需要引入seata
<!--seata--><dependency><groupId>io.seata</groupId><artifactId>seata-spring-boot-starter</artifactId><version>1.3.0</version></dependency><dependency><groupId>com.alibaba.cloud</groupId><artifactId>spring-cloud-starter-alibaba-seata</artifactId><exclusions><exclusion><groupId>io.seata</groupId><artifactId>seata-spring-boot-starter</artifactId></exclusion></exclusions></dependency>
5.2开发环境关于seata的nacos配置文件(seata-client.yaml)
seata:tx-service-group: yurun_dev_tx_groupregistry:type: nacosnacos:server-addr: localhost:8848username: nacospassword: nacosconfig:type: nacosnacos:username: appconnectpassword: appconnectnamespace: dev-seata命名空间idserverAddr: 10.11.0.220:8855
5.3测试环境关于seata的nacos配置文件(seata-client.yaml)
seata:tx-service-group: yurun_test_tx_groupregistry:type: nacosnacos:server-addr: localhost:8848username: nacospassword: nacosconfig:type: nacosnacos:username: appconnectpassword: appconnectnamespace: test-seata命名空间idserverAddr: 10.11.0.220:8855
5.4生产环境关于seata的nacos配置文件(seata-client.yaml)
seata:tx-service-group: yurun_pro_tx_groupregistry:type: nacosnacos:server-addr: 10.11.0.220:8855username: appconnectpassword: appconnectnamespace: 生产的服务注册命名空间idconfig:type: nacosnacos:username: appconnectpassword: appconnectnamespace: pro-seata命名空间idserverAddr: 10.11.0.220:8855
5.5总结
对于seata-client.yaml分别在10.11.0.220的nacos中不同命名空间放置即可,在每个需要分布式事务的bootstrap.yml中的nacos配置文件中添加即可: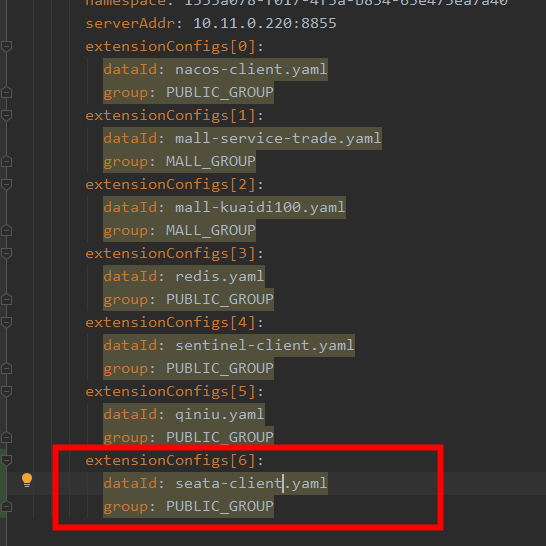
6.使用
在需要分布式事务的方法上添加@GlobalTransactional
但是对于我们电商现在的中台,只有controller层,异常不给抛出,Controller方法加注解也没用,所以对代码改造是:
在中台添加一个Service层,在service层方法上添加注解即可实现分布式事务

若有收获,就点个赞吧
0 人点赞
