项目简介
pig项目是目前(2021-10-30)的gitee上排名第一的开源项目。Pig使用的也是Spring Security Oauth2这一套框架。所以,今天就来好好整理一下整体的一个写法。
https://gitee.com/log4j/pig.git
登录演示
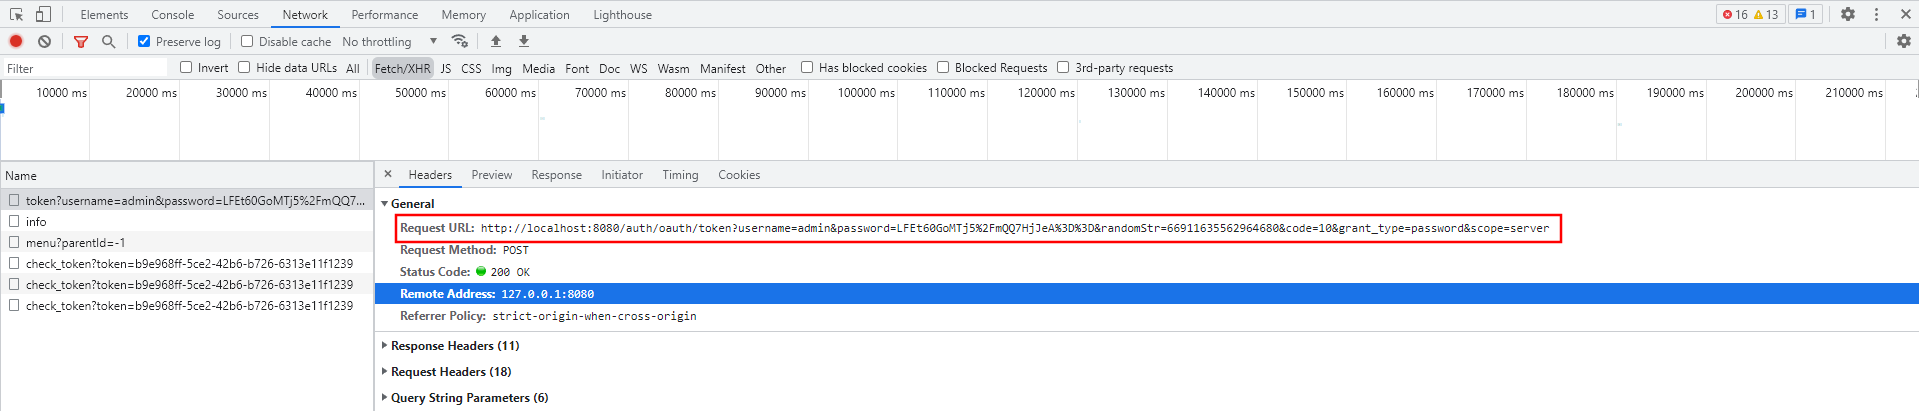
- 登录地址使用的是框架(Spring Security Oauth2)提供的token发布接口
- 使用的是password授权类型
项目使用的是password授权方式,那么必定需要
AuthenticationManager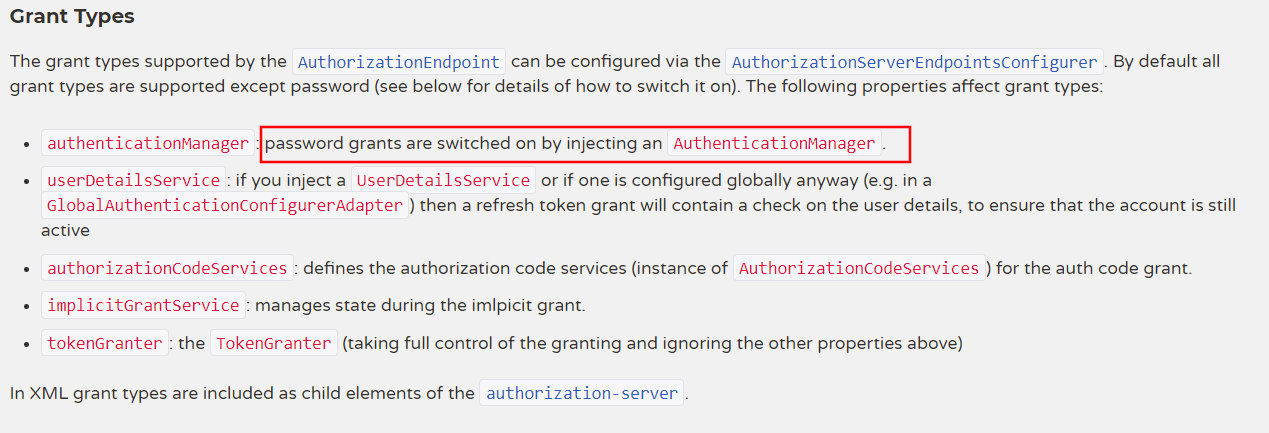
Oauth2必须有客户端信息,具体存放位置是哪里?
- Token的存放方式?Redis?Jwt?
- 如何自定义授权方式
- SpringSecurity配置类的作用?怎么配置?
问题1
- 项目使用的是password授权方式,那么必定需要
AuthenticationManager从哪里来
答:AuthenticationManager一定是有SpringSecurity配置类中@Bean注册到容器中。自然需要有SpringSecurity的相关配置
问题2
- Oauth2必须有客户端信息,具体存放位置是哪里?
答:作者重写了SpringSecurityOauth2提供的JdbcClientService。使用自己的表存储查询客户端信息
@Configuration@RequiredArgsConstructor@EnableAuthorizationServerpublic class AuthorizationServerConfig extends AuthorizationServerConfigurerAdapter {private final DataSource dataSource;private final UserDetailsService userDetailsService;private final AuthenticationManager authenticationManager;private final TokenStore redisTokenStore;@Override@SneakyThrowspublic void configure(ClientDetailsServiceConfigurer clients) {clients.withClientDetails(pigClientDetailsService());}@Beanpublic ClientDetailsService pigClientDetailsService() {PigClientDetailsService clientDetailsService = new PigClientDetailsService(dataSource);clientDetailsService.setSelectClientDetailsSql(SecurityConstants.DEFAULT_SELECT_STATEMENT);clientDetailsService.setFindClientDetailsSql(SecurityConstants.DEFAULT_FIND_STATEMENT);return clientDetailsService;}}

问题3
- Token的存放方式
答:作者将Token选择存放在Redis中
/*** @author lengleng* @date 2019/2/1 认证服务器配置*/@Configuration@RequiredArgsConstructor@EnableAuthorizationServerpublic class AuthorizationServerConfig extends AuthorizationServerConfigurerAdapter {private final DataSource dataSource;private final UserDetailsService userDetailsService;private final AuthenticationManager authenticationManager;private final TokenStore redisTokenStore;/*令牌增强器的作用就是调用oauth/token后返回的字段的增加{"access_token": "b9e968ff-5ce2-42b6-b726-6313e11f1239","token_type": "bearer","refresh_token": "dd5f65df-8792-47d3-a10e-2985481d7b2b","expires_in": 43199,"scope": "server","license": "made by pig" (这行就是添加的)}*/@Beanpublic TokenEnhancer tokenEnhancer() {return (accessToken, authentication) -> {final Map<String, Object> additionalInfo = new HashMap<>(4);additionalInfo.put(SecurityConstants.DETAILS_LICENSE, SecurityConstants.PROJECT_LICENSE);((DefaultOAuth2AccessToken) accessToken).setAdditionalInformation(additionalInfo);return accessToken;};}/*1.这块原来不是这样的,最近正版又被改了。2.自定义了TokenService3.自定义了TokenStore4.但是最终还是Redis存储5.太厉害了,改这一套要看好多源码的。*/@Beanpublic PigCustomTokenServices tokenServices() {PigCustomTokenServices tokenServices = new PigCustomTokenServices();tokenServices.setTokenStore(redisTokenStore);tokenServices.setSupportRefreshToken(true);tokenServices.setReuseRefreshToken(false);tokenServices.setClientDetailsService(pigClientDetailsService());tokenServices.setTokenEnhancer(tokenEnhancer());addUserDetailsService(tokenServices, userDetailsService);return tokenServices;}/*这行我不太了解。但是目的就是把 userDetailService放入 tokenService中*/private void addUserDetailsService(PigCustomTokenServices tokenServices, UserDetailsService userDetailsService) {if (userDetailsService != null) {PreAuthenticatedAuthenticationProvider provider = new PreAuthenticatedAuthenticationProvider();provider.setPreAuthenticatedUserDetailsService(new UserDetailsByNameServiceWrapper<>(userDetailsService));tokenServices.setAuthenticationManager(new ProviderManager(Collections.singletonList(provider)));}}}
问题5
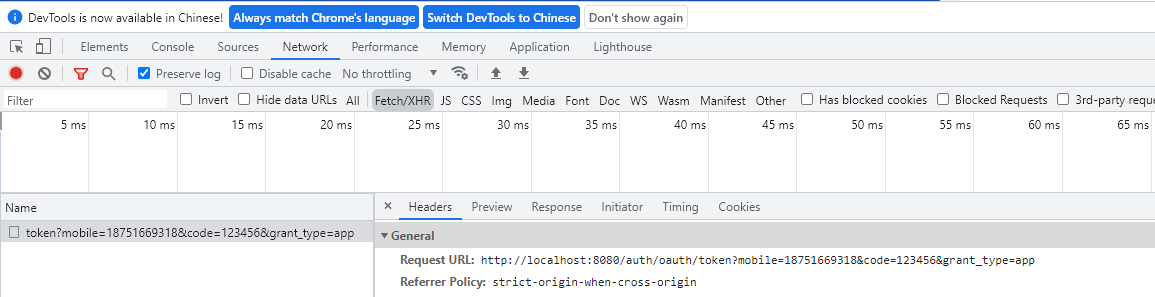
如何自定义授权方式
答:pig团队自定义了一种授权类型并配置到框架中
/*** @author lengleng* @date 2019/2/1 认证服务器配置*/@Configuration@RequiredArgsConstructor@EnableAuthorizationServerpublic class AuthorizationServerConfig extends AuthorizationServerConfigurerAdapter {private final DataSource dataSource;private final UserDetailsService userDetailsService;private final AuthenticationManager authenticationManager;private final TokenStore redisTokenStore;@Overridepublic void configure(AuthorizationServerEndpointsConfigurer endpoints) {endpoints.allowedTokenEndpointRequestMethods(HttpMethod.GET, HttpMethod.POST).tokenServices(tokenServices()).tokenStore(redisTokenStore).tokenEnhancer(tokenEnhancer()).userDetailsService(userDetailsService).authenticationManager(authenticationManager).reuseRefreshTokens(false).pathMapping("/oauth/confirm_access", "/token/confirm_access").exceptionTranslator(new PigWebResponseExceptionTranslator());setTokenGranter(endpoints);}private void setTokenGranter(AuthorizationServerEndpointsConfigurer endpoints) {// 获取默认授权类型TokenGranter tokenGranter = endpoints.getTokenGranter();ArrayList<TokenGranter> tokenGranters = new ArrayList<>(Arrays.asList(tokenGranter));ResourceOwnerCustomeAppTokenGranter resourceOwnerCustomeAppTokenGranter = new ResourceOwnerCustomeAppTokenGranter(authenticationManager, endpoints.getTokenServices(), endpoints.getClientDetailsService(),endpoints.getOAuth2RequestFactory());tokenGranters.add(resourceOwnerCustomeAppTokenGranter);CompositeTokenGranter compositeTokenGranter = new CompositeTokenGranter(tokenGranters);endpoints.tokenGranter(compositeTokenGranter);}}
问题5
- SpringSecurity配置类的作用?怎么配置?
答:这边SpringSecurity配置类的出现是为了配置:
AuthenticationManagerPasswordEncoder- 放行 oauth2 相关端口
- 其他系统oauth2认证的登录页面和退出处理定义 ```java
@Primary @Order(90) @Configuration @AllArgsConstructor public class WebSecurityConfigurer extends WebSecurityConfigurerAdapter {
/*UserDetail在 common-security中定义并注册好了*/private final UserDetailsService userDetailsService;@Override@SneakyThrowsprotected void configure(HttpSecurity http) {http.authenticationProvider(phoneAuthenticationProvider()).formLogin().loginPage("/token/login")//定义Oauth2登录页面.loginProcessingUrl("/token/form").failureHandler(authenticationFailureHandler()).and().logout()//退出登录处理.logoutSuccessHandler(logoutSuccessHandler()).deleteCookies("JSESSIONID").invalidateHttpSession(true)//放行 oauth接口 和 健康监控接口.and().authorizeRequests().antMatchers("/token/**", "/actuator/**", "/mobile/**").permitAll().anyRequest().authenticated().and().csrf().disable();}/*** 不要直接使用@Bean注入 会导致默认的提供者无法注入(DaoAuthenticationProvider)* 自定义的一个认证提供者*/private CustomAppAuthenticationProvider phoneAuthenticationProvider() {CustomAppAuthenticationProvider phoneAuthenticationProvider = new CustomAppAuthenticationProvider();phoneAuthenticationProvider.setUserDetailsService(userDetailsService);return phoneAuthenticationProvider;}@Overridepublic void configure(WebSecurity web) {web.ignoring().antMatchers("/css/**");}@Bean@Override@SneakyThrowspublic AuthenticationManager authenticationManagerBean() {return super.authenticationManagerBean();}@Beanpublic AuthenticationFailureHandler authenticationFailureHandler() {return new FormAuthenticationFailureHandler();}/*** 支持SSO 退出* @return LogoutSuccessHandler*/@Beanpublic LogoutSuccessHandler logoutSuccessHandler() {return new SsoLogoutSuccessHandler();}/*** https://spring.io/blog/2017/11/01/spring-security-5-0-0-rc1-released#password-storage-updated* Encoded password does not look like BCrypt* @return PasswordEncoder*/@Beanpublic PasswordEncoder passwordEncoder() {return PasswordEncoderFactories.createDelegatingPasswordEncoder();}
}
<a name="ceIgE"></a># 退出登录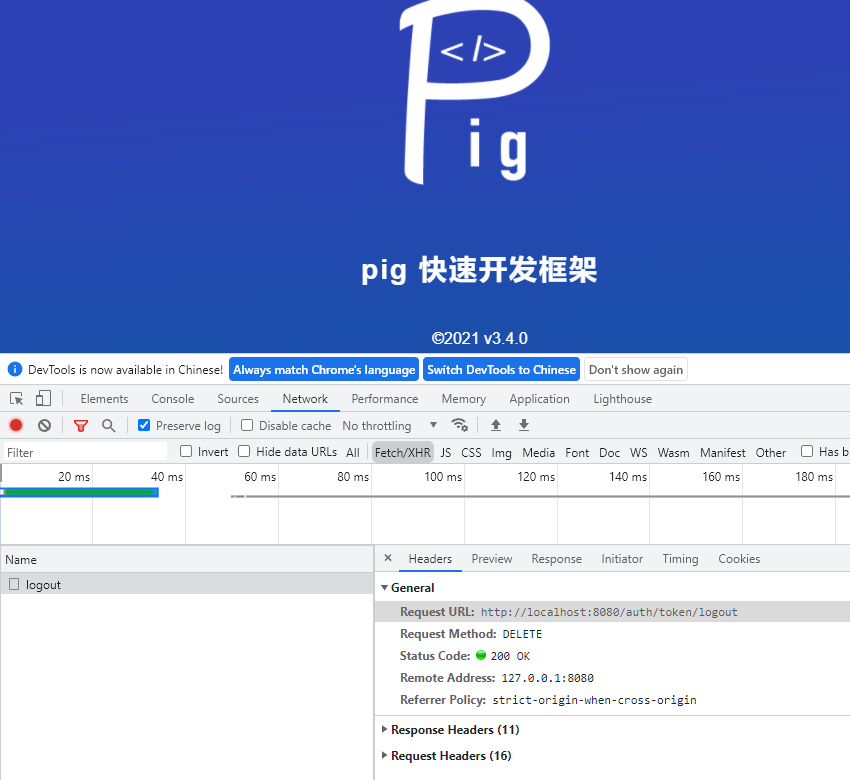- 退出登录调用的是自定义的一个接口- 成功后,会发送SpringEvent事件。然后Common中定义了处理逻辑(记日志)<a name="v55XX"></a># Security-Common包解读- util:主要是token从header中解析和用户信息获取工具类- handler:主要定义了一些Spring Event处理器(登录成功、失败)- exception:自定义异常包- service:特定的UserDetailService<a name="dh0mr"></a>## Service包下内容Pig项目用户登录使用password方式进行授权。用户登录时会使用SpringSecurity校验用户的账号和密码。校验逻辑通过自定义UserDetailService来实现。<a name="O5gC9"></a>### PigClientDetailsService自定义OauthClientService这个就是自定义的一个ClientService。<a name="AqHnF"></a>### SpringSecurity用户实体类UserDetailService需要返回一个UserDetail对象。Pig项目自定义了自己的`PigUser`类(继承User类)来实现UserDetail的实现。```java/*** @author lengleng* @date 2019/2/1 扩展用户信息*/public class PigUser extends User {/*** 用户ID*/@Getterprivate final Integer id;/*** 部门ID*/@Getterprivate final Integer deptId;/*** Construct the <code>User</code> with the details required by* {@link DaoAuthenticationProvider}.* @param id 用户ID* @param deptId 部门ID* @param username the username presented to the* <code>DaoAuthenticationProvider</code>* @param password the password that should be presented to the* <code>DaoAuthenticationProvider</code>* @param enabled set to <code>true</code> if the user is enabled* @param accountNonExpired set to <code>true</code> if the account has not expired* @param credentialsNonExpired set to <code>true</code> if the credentials have not* expired* @param accountNonLocked set to <code>true</code> if the account is not locked* @param authorities the authorities that should be granted to the caller if they* presented the correct username and password and the user is enabled. Not null.* @throws IllegalArgumentException if a <code>null</code> value was passed either as* a parameter or as an element in the <code>GrantedAuthority</code> collection*/public PigUser(Integer id, Integer deptId, String username, String password, boolean enabled,boolean accountNonExpired, boolean credentialsNonExpired, boolean accountNonLocked,Collection<? extends GrantedAuthority> authorities) {super(username, password, enabled, accountNonExpired, credentialsNonExpired, accountNonLocked, authorities);this.id = id;this.deptId = deptId;}}
PigUserDetailsServiceImpl用户登录逻辑类
这个类完成具体的登录逻辑,具体流程是:
- 先从cache中拿去PigUser,若有直接返回
- 调用system服务,去查询用户信息
- 封装PigUser信息(之后SpringSecurityOauth2框架会自动的比较密码)
PigCustomTokenServices令牌服务
主要负责令牌的刷新创建。在之前还是没有这个类的。之前使用框架自带的DefaultTokenServices。grant包下内容
grant包下的所有内容都是为了平台能够完成手机号+验证码的登录方式做的功能。但是目前这个功能我还没还有实际使用上。还不太清楚其中某些类的用法。
fegin包下内容
外部直接调用服务,框架会校验token,但是服务之间调用的话 token是不会自己带着的。所有这个包下就是解决这个问题的。
annotation包下内容
注解包下主要有两个注解。@Inner的作用是做切面标识使用。标识某个接口是否为内部调用接口。
@Slf4j@Aspect@RequiredArgsConstructorpublic class PigSecurityInnerAspect implements Ordered {private final HttpServletRequest request;@SneakyThrows@Around("@within(inner) || @annotation(inner)")public Object around(ProceedingJoinPoint point, Inner inner) {// 实际注入的inner实体由表达式后一个注解决定,即是方法上的@Inner注解实体,若方法上无@Inner注解,则获取类上的if (inner == null) {Class<?> clazz = point.getTarget().getClass();inner = AnnotationUtils.findAnnotation(clazz, Inner.class);}String header = request.getHeader(SecurityConstants.FROM);//内部 true 且 但是来源不是内部if (inner.value() && !StrUtil.equals(SecurityConstants.FROM_IN, header)) {log.warn("访问接口 {} 没有权限", point.getSignature().getName());throw new AccessDeniedException("Access is denied");}return point.proceed();}@Overridepublic int getOrder() {return Ordered.HIGHEST_PRECEDENCE + 1;}}
- AnnotationUtils找类上的注解
- 默认标识接口,接口的调用者必须是通过fegin调用
- 如果想通过postman直接调用,则使用@Inner(false);
@EnablePigResourceServer这个注解值得学习一下。一般写Common包。通过这个注解开启一些功能。
@Documented@Inherited@EnableResourceServer@Target({ ElementType.TYPE })@Retention(RetentionPolicy.RUNTIME)@EnableGlobalMethodSecurity(prePostEnabled = true)@Import({ PigResourceServerAutoConfiguration.class, PigSecurityBeanDefinitionRegistrar.class,PigResourceServerTokenRelayAutoConfiguration.class, PigFeignClientConfiguration.class })public @interface EnablePigResourceServer {}
Component包下内容
PigResourceServerAutoConfiguration类
框架的ResourceServer的核心配置类。除了pig-auth外,其他的所有微服务都是一个资源服务器。
@EnableConfigurationProperties(PermitAllUrlProperties.class)public class PigResourceServerAutoConfiguration {/*定义权限校验Service*/@Bean("pms")public PermissionService permissionService() {return new PermissionService();}/*注册 无权限访问的处理类*/@Beanpublic PigAccessDeniedHandler pigAccessDeniedHandler(ObjectMapper objectMapper) {return new PigAccessDeniedHandler(objectMapper);}/*注册自己token提取器*/@Beanpublic PigBearerTokenExtractor pigBearerTokenExtractor(PermitAllUrlProperties urlProperties) {return new PigBearerTokenExtractor(urlProperties);}/*没有token时的处理器*/@Beanpublic ResourceAuthExceptionEntryPoint resourceAuthExceptionEntryPoint(ObjectMapper objectMapper) {return new ResourceAuthExceptionEntryPoint(objectMapper);}/*注册自己的ResourceServerTokenService 资源服务器token解析器这里之后就不照着 常规去再 配置 ResourceAdapter了。*/@Bean@Primarypublic ResourceServerTokenServices resourceServerTokenServices(TokenStore tokenStore,UserDetailsService userDetailsService) {return new PigLocalResourceServerTokenServices(tokenStore, userDetailsService);}}
PermissionService类
PigBearerTokenExtractor
需要过滤哪些加入白名单的接口,哪些接口是没token的。
PigLocalResourceServerTokenServices类
这个类直接不用调用 pig-auth去校验token了。直接使用TokenStore。从redis校验
/*** @author lengleng* @date 2020/9/29*/@RequiredArgsConstructorpublic class PigLocalResourceServerTokenServices implements ResourceServerTokenServices {private final TokenStore tokenStore;private final UserDetailsService userDetailsService;@Overridepublic OAuth2Authentication loadAuthentication(String accessToken)throws AuthenticationException, InvalidTokenException {OAuth2Authentication oAuth2Authentication = tokenStore.readAuthentication(accessToken);if (oAuth2Authentication == null) {return null;}OAuth2Request oAuth2Request = oAuth2Authentication.getOAuth2Request();if (!(oAuth2Authentication.getPrincipal() instanceof PigUser)) {return oAuth2Authentication;}// 根据 username 查询 spring cache 最新的值 并返回PigUser pigxUser = (PigUser) oAuth2Authentication.getPrincipal();UserDetails userDetails;try {userDetails = userDetailsService.loadUserByUsername(pigxUser.getUsername());}catch (UsernameNotFoundException notFoundException) {throw new UnauthorizedException(String.format("%s username not found", pigxUser.getUsername()),notFoundException);}Authentication userAuthentication = new UsernamePasswordAuthenticationToken(userDetails, "N/A",userDetails.getAuthorities());OAuth2Authentication authentication = new OAuth2Authentication(oAuth2Request, userAuthentication);authentication.setAuthenticated(true);return authentication;}@Overridepublic OAuth2AccessToken readAccessToken(String accessToken) {throw new UnsupportedOperationException("Not supported: read access token");}}
PigSecurityBeanDefinitionRegistrar类
@Slf4jpublic class PigSecurityBeanDefinitionRegistrar implements ImportBeanDefinitionRegistrar {/*** 根据注解值动态注入资源服务器的相关属性* @param metadata 注解信息* @param registry 注册器*/@Overridepublic void registerBeanDefinitions(AnnotationMetadata metadata, BeanDefinitionRegistry registry) {if (registry.isBeanNameInUse(SecurityConstants.RESOURCE_SERVER_CONFIGURER)) {log.warn("本地存在资源服务器配置,覆盖默认配置:" + SecurityConstants.RESOURCE_SERVER_CONFIGURER);return;}GenericBeanDefinition beanDefinition = new GenericBeanDefinition();beanDefinition.setBeanClass(PigResourceServerConfigurerAdapter.class);registry.registerBeanDefinition(SecurityConstants.RESOURCE_SERVER_CONFIGURER, beanDefinition);}}
这个写法告诉我们Common包和某些本地的bean 可能会冲突时。可以这样解决
PigResourceServerConfigurerAdapter资源服务器配置类
这里之前一般使用的RemoteTokenServices,现在改成本地校验token了。
@Slf4jpublic class PigResourceServerConfigurerAdapter extends ResourceServerConfigurerAdapter {/*** 资源服务器认证,处理异常自定义逻辑*/@Autowiredprotected ResourceAuthExceptionEntryPoint resourceAuthExceptionEntryPoint;/*可以不用注入了*/@Autowiredprotected RemoteTokenServices remoteTokenServices;/*** 无权访问时的处理逻辑*/@Autowiredprivate AccessDeniedHandler pigAccessDeniedHandler;@Autowiredprivate PermitAllUrlProperties permitAllUrl;@Autowiredprivate PigBearerTokenExtractor pigBearerTokenExtractor;@Autowiredprivate ResourceServerTokenServices resourceServerTokenServices;/*** 默认的配置,对外暴露* @param httpSecurity*/@Override@SneakyThrowspublic void configure(HttpSecurity httpSecurity) {// 允许使用iframe 嵌套,避免swagger-ui 不被加载的问题httpSecurity.headers().frameOptions().disable();ExpressionUrlAuthorizationConfigurer<HttpSecurity>.ExpressionInterceptUrlRegistry registry = httpSecurity.authorizeRequests();permitAllUrl.getUrls().forEach(url -> registry.antMatchers(url).permitAll());registry.anyRequest().authenticated().and().csrf().disable();}@Overridepublic void configure(ResourceServerSecurityConfigurer resources) {resources.authenticationEntryPoint(resourceAuthExceptionEntryPoint).tokenExtractor(pigBearerTokenExtractor).accessDeniedHandler(pigAccessDeniedHandler).tokenServices(resourceServerTokenServices);}}

若有收获,就点个赞吧
0 人点赞
