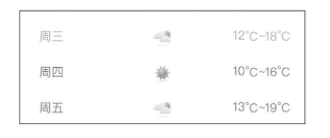
打开weather.js,修改weeks数据,添加天气状况数据,代码如下
Page({data:{city:"北京",area:"海淀",weather:"多云",temperature:"18℃",weeks:[{ week:"周三",temp:{highest:"18℃",lowest:"12℃"},weather:"多云"},{ week:"周四",temp:{highest:"16℃",lowest:"10℃"},weather:"晴"},{ week:"周五",temp:{highest:"19℃",lowest:"13℃"},weather:"多云"},]}})
修改weather.wxml页面,添加天气图标,代码如下。
<view class='icon'><image wx:if="{{w.weather=='晴'}}" src="/public/imgs/sun.png" mode='widthFix' style='width:50rpx'></image><image wx:else src="/public/imgs/cloud.png" mode='widthFix' style='width:50rpx'></image></view>
每个星期的天气图标有两张图片,通过wx:if判断天气是否是“晴”控制显示哪张图片
<view class='container'><image class='bg' mode='widthFix' src='/public/imgs/qntq-bg.png'></image><text class='weather'>{{weather}}</text><text class='city'>{{city}} {{area}}</text><text class='temperature'>{{temperature}}</text><view class='week-list'><view class='week-item' wx:for="{{weeks}}" wx:for-item="w" wx:key="index"><view class='week'>{{w.week}}</view><view class='icon'><image wx:if="{{w.weather == '晴'}}" src="/public/imgs/sun.png" mode='widthFix'style='width:50rpx'></image><image wx:else src="/public/imgs/cloud.png" mode='widthFix' style='width:50rpx'> </image></view><view class='temp'>{{w.temp.highest}}~{{w.temp.lowest}}C</view></view></view></view>


