本教程介绍了 Android 中的服务及其生命周期,并提供了有关如何创建服务的示例。
Android 服务与 Android 活动有很大不同。 这是 Android 应用程序开发的概念。 让我们讨论一下。
Android 服务
服务用于实现或执行在我们的应用中运行的后台操作。 它是一个应用程序组件,用于执行长时间运行的重要后台任务,例如播放音乐,下载文件或执行网络事务。 由于服务在后台运行,因此与活动不同,它没有任何用户界面。 它使我们能够在应用程序中启用多任务处理。 尽管应用程序已关闭或服务已完成工作或已明确停止,但服务仍在后台继续运行。 因此,它比不活动的应用程序具有更高的优先级。 您还可以将其设置为与正在运行的前台任务相同的优先级。 让我们讨论一下服务类型。
Android 服务的类型
Android 中提供三种不同类型的服务。
调度:在诸如jobScheduler之类的 API 中计划了一项服务,然后将其称为计划服务。 系统检查jobScheduler并在适当的时间执行服务。
启动:如果服务可以由应用程序组件启动,则将其称为已启动服务。 活动调用startService(0方法,然后在后台运行。 通常,此服务执行单个操作。
绑定:如果应用程序组件将服务绑定到bindService(),则称为绑定。 它具有一个客户端服务器接口,该接口允许组件与服务进行交互。
Android 服务的生命周期
Android 服务生命周期与 Android 活动完全不同。 如果使用startService()创建服务或使用bindService()创建服务,则其生命周期可能会有所不同。 下图显示了两个生命周期。
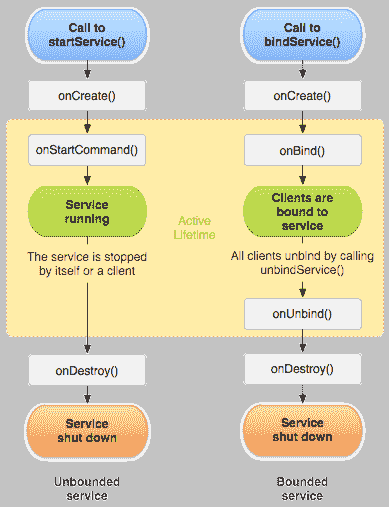
服务生命周期
让我们讨论服务生命周期的回调方法。 当使用startService()创建服务时,将调用OnStartCommand()方法。 执行此方法后,服务星将在后台运行。 如果使用此方法创建了服务,请通过调用stopSelf()或stopService()方法将其停止。 如果服务是有界的,则使用OnBound()方法。 其他组件使用此方法将自己与服务绑定。OnCreate()方法用于创建服务。OnDestroy()方法用于销毁服务。
Android 中的服务示例
这是 Android Studio 中的服务示例。 打开您的 IDE 并创建一个新项目。 创建活动并将其命名为actvity_main,这是activty_main.xml的代码
<?xml version="1.0" encoding="utf-8"?><RelativeLayout android:layout_width="368dp"android:layout_height="495dp"xmlns:tools="http://schemas.android.com/tools"tools:layout_editor_absoluteX="8dp"tools:layout_editor_absoluteY="8dp"xmlns:android="http://schemas.android.com/apk/res/android"><Buttonandroid:id="@+id/buttonStart"android:layout_width="wrap_content"android:layout_height="wrap_content"android:layout_alignParentTop="true"android:layout_centerHorizontal="true"android:layout_marginTop="122dp"android:text="Button"tools:text="Start Service" /><Buttonandroid:id="@+id/buttonStop"android:layout_width="wrap_content"android:layout_height="wrap_content"android:layout_alignLeft="@+id/buttonStart"android:layout_alignStart="@+id/buttonStart"android:layout_below="@+id/buttonStart"android:layout_marginTop="36dp"android:text="Button"tools:text="Stop Service" /><Buttonandroid:id="@+id/buttonNext"android:layout_width="wrap_content"android:layout_height="wrap_content"android:layout_marginTop="44dp"android:text="Button"tools:text="Next"android:layout_below="@+id/buttonStop"android:layout_centerHorizontal="true" /><TextViewandroid:id="@+id/textView"android:layout_width="wrap_content"android:layout_height="wrap_content"android:layout_alignParentTop="true"android:layout_centerHorizontal="true"android:layout_marginTop="47dp"android:text="TextView"android:textColorLink="@android:color/black"android:textSize="24sp"tools:text="javaTutorial.net" /></RelativeLayout>
这是MainActivity.java的代码
package com.example.admin.androidservice;import android.app.Activity;import android.content.Intent;import android.support.v7.app.AppCompatActivity;import android.os.Bundle;import android.view.View;import android.widget.Button;public class MainActivity extends Activity implements View.OnClickListener {Button buttonStart, buttonStop,buttonNext;@Overridepublic void onCreate(Bundle savedInstanceState) {super.onCreate(savedInstanceState);setContentView(R.layout.activity_main);buttonStart = (Button) findViewById(R.id.buttonStart);buttonStop = (Button) findViewById(R.id.buttonStop);buttonNext = (Button) findViewById(R.id.buttonNext);buttonStart.setOnClickListener(this);buttonStop.setOnClickListener(this);buttonNext.setOnClickListener(this);}public void onClick(View src) {switch (src.getId()) {case R.id.buttonStart:startService(new Intent(this, SecondActivity.class));break;case R.id.buttonStop:stopService(new Intent(this, SecondActivity.class));break;case R.id.buttonNext:Intent intent=new Intent(this,SecondActivity.class);startActivity(intent);break;}}}
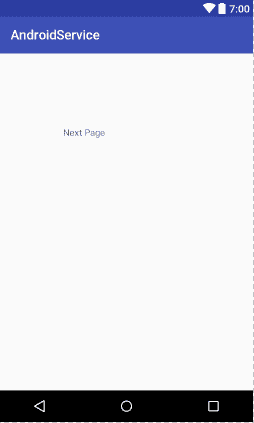
为另一个屏幕创建另一个活动,然后为其命名。 打开activity_second.xml并粘贴以下代码
<?xml version="1.0" encoding="utf-8"?><RelativeLayout android:layout_width="368dp"android:layout_height="495dp"xmlns:tools="http://schemas.android.com/tools"tools:layout_editor_absoluteX="8dp"tools:layout_editor_absoluteY="8dp"xmlns:android="http://schemas.android.com/apk/res/android"><TextViewandroid:id="@+id/textView1"android:layout_width="wrap_content"android:layout_height="wrap_content"android:layout_alignParentLeft="true"android:layout_alignParentTop="true"android:layout_marginLeft="96dp"android:layout_marginTop="112dp"android:text="Next Page" /></RelativeLayout>
这是secondActivity.java的代码
package com.example.admin.androidservice;import android.support.v7.app.AppCompatActivity;import android.os.Bundle;public class SecondActivity extends AppCompatActivity {@Overridepublic void onCreate(Bundle savedInstanceState) {super.onCreate(savedInstanceState);setContentView(R.layout.activity_second);}}
运行并测试它,这是此代码的输出
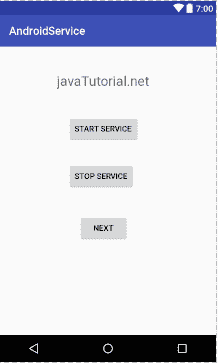
android 服务
服务
您可以从此链接下载代码。

若有收获,就点个赞吧
0 人点赞
