本教程将向您展示如何使用 Spring Framework 和 STS(Spring 工具套件)构建一个简单的 Web 应用程序。 这是一个入门指南,如果您是 Spring 或 STS 的新手,它将为您提供帮助。
注意:本教程要求使用 Eclipse IDE 安装和配置 Spring STS。 如果尚未完成此步骤,请先阅读在 Eclipse 中安装 Spring STS。
什么是 Spring Boot
本教程使用 Spring Boot 创建一个简单的 Web 应用程序,并在嵌入式 Tomcat 服务器上运行。
Spring Boot 是 Spring 的解决方案,用于创建易于构建和运行的独立应用程序。 它使用预配置的 Spring 平台和第三方库,因此您可以在数分钟内开始使用。 大多数 Spring Boot 应用程序只需要很少的 Spring 配置。 此特定示例完全不需要任何配置。
Spring Boot 的功能:
- 创建独立的 Spring 应用程序
- 直接嵌入 Tomcat 或 Jetty(无需部署 WAR 文件)
- 提供 POM 文件以简化您的 Maven 配置
- 尽可能自动配置 Spring
- 提供生产就绪的功能,例如指标,运行状况检查和外部配置
- 完全没有代码生成,也不需要 XML 配置
创建新的 Spring Starter 项目
**1. 启动 Eclipse 并转到“文件 -> 新建 -> 其他…”或按键盘上的Ctrl + N
在搜索字段中输入spring。 这将列出几个 Spring 选项。 我们需要本教程的一个是“Spring Starter Project”。 选择它并单击“下一步”确认
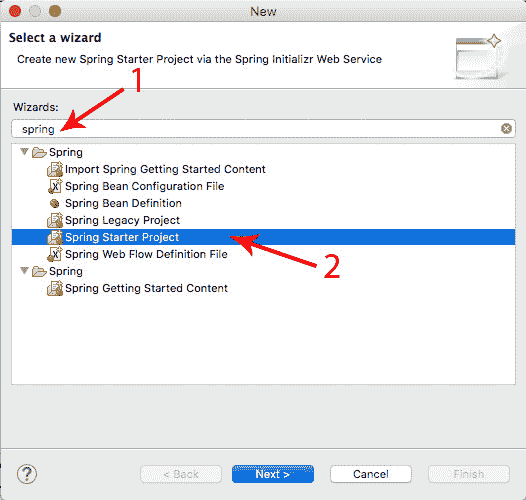
创建新的 Spring 入门项目
- 使用下面的屏幕快照中所示的设置。
为您的项目选择一个名称。 选择 Maven 作为构建工具,JAR 打包以及您的 Java 版本。
在“包”下,键入包名称。“Artifact”是您要构建的 JAR 文件的名称。 例如,如果您将springexample用作工件,则最终的 JAR 文件将称为springexample.jar
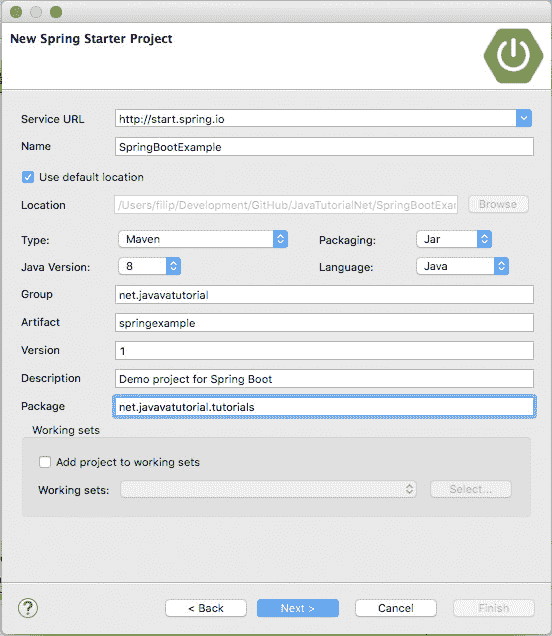
Spring Starter 项目设置
- 在“New Spring Starter 项目依赖项”窗口中,选择“Web”。
如果您在列表中找不到它,请使用搜索字段并在其中键入web
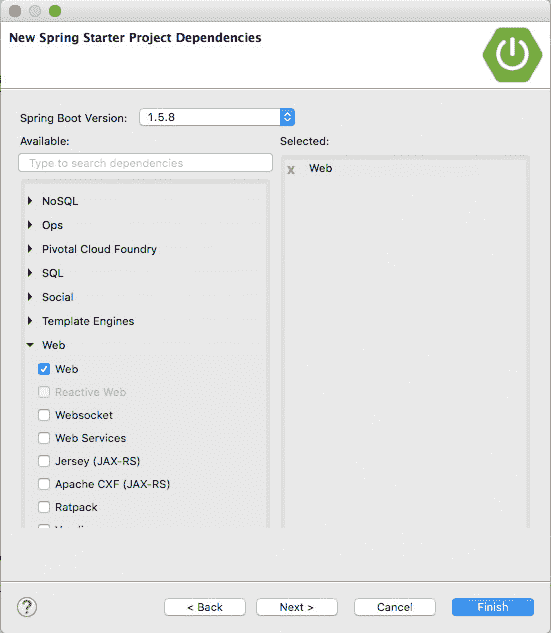
创建 Spring Web 项目
单击“完成”按钮确认。 STS 将为您创建项目并下载所有需要的依赖项。
4. 创建项目后,您将看到一个名为SpringBootExampleApplication.java的主要 Java 类,一个用于测试的 Java 类,空属性文件,一个 Maven POM 文件以及两个文件,可从命令行执行该应用程序 。 在下面的屏幕截图中,您将在左侧看到项目结构,在右侧看到主类的内容。
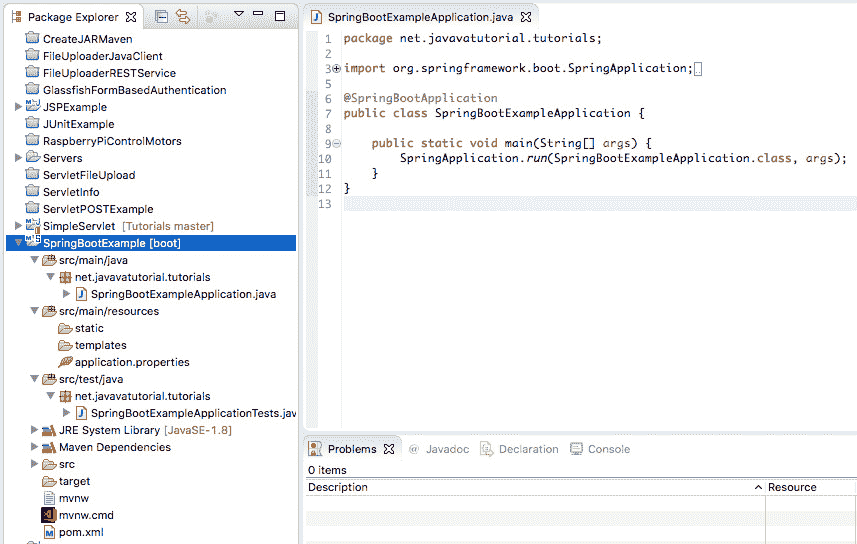
Spring Boot Web 项目结构
运行您的 Spring Boot 应用程序
右键单击您的项目,转到“运行方式”,然后选择“Spring Boot App”
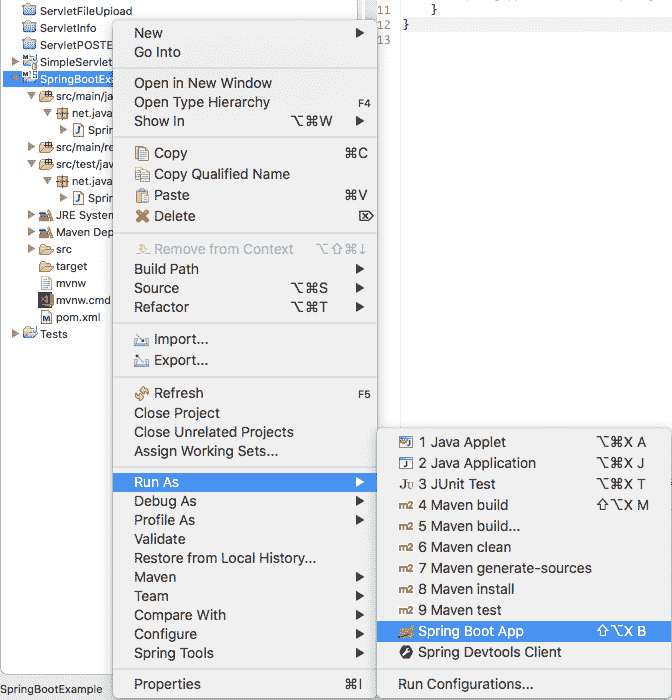
作为 Spring Boot 应用程序运行项目
这将引导嵌入式 Tomcat 服务器,部署您的应用程序并映射 URL。 在 Eclipse 控制台中,您将看到类似于以下内容的输出:
. ____ _ __ _ _/\\ / ___'_ __ _ _(_)_ __ __ _ \ \ \ \( ( )\___ | '_ | '_| | '_ \/ _` | \ \ \ \\\/ ___)| |_)| | | | | || (_| | ) ) ) )' |____| .__|_| |_|_| |_\__, | / / / /=========|_|==============|___/=/_/_/_/:: Spring Boot :: (v1.5.8.RELEASE)2017-11-28 11:15:29.068 INFO 3428 --- [ main] n.j.t.SpringBootExampleApplication : Starting SpringBootExampleApplication on Filips-MacBook-Air.local with PID 3428 (/Users/filip/Development/GitHub/JavaTutorialNet/SpringBootExample/target/classes started by filip in /Users/filip/Development/GitHub/JavaTutorialNet/SpringBootExample)2017-11-28 11:15:29.081 INFO 3428 --- [ main] n.j.t.SpringBootExampleApplication : No active profile set, falling back to default profiles: default2017-11-28 11:15:29.163 INFO 3428 --- [ main] ationConfigEmbeddedWebApplicationContext : Refreshing org.springframework.boot.context.embedded.AnnotationConfigEmbeddedWebApplicationContext@4461c7e3: startup date [Tue Nov 28 11:15:29 EET 2017]; root of context hierarchy2017-11-28 11:15:30.753 INFO 3428 --- [ main] s.b.c.e.t.TomcatEmbeddedServletContainer : Tomcat initialized with port(s): 8080 (http)2017-11-28 11:15:30.773 INFO 3428 --- [ main] o.apache.catalina.core.StandardService : Starting service [Tomcat]2017-11-28 11:15:30.775 INFO 3428 --- [ main] org.apache.catalina.core.StandardEngine : Starting Servlet Engine: Apache Tomcat/8.5.232017-11-28 11:15:30.949 INFO 3428 --- [ost-startStop-1] o.a.c.c.C.[Tomcat].[localhost].[/] : Initializing Spring embedded WebApplicationContext2017-11-28 11:15:30.949 INFO 3428 --- [ost-startStop-1] o.s.web.context.ContextLoader : Root WebApplicationContext: initialization completed in 1791 ms2017-11-28 11:15:31.201 INFO 3428 --- [ost-startStop-1] o.s.b.w.servlet.ServletRegistrationBean : Mapping servlet: 'dispatcherServlet' to [/]2017-11-28 11:15:31.206 INFO 3428 --- [ost-startStop-1] o.s.b.w.servlet.FilterRegistrationBean : Mapping filter: 'characterEncodingFilter' to: [/*]2017-11-28 11:15:31.207 INFO 3428 --- [ost-startStop-1] o.s.b.w.servlet.FilterRegistrationBean : Mapping filter: 'hiddenHttpMethodFilter' to: [/*]2017-11-28 11:15:31.208 INFO 3428 --- [ost-startStop-1] o.s.b.w.servlet.FilterRegistrationBean : Mapping filter: 'httpPutFormContentFilter' to: [/*]2017-11-28 11:15:31.208 INFO 3428 --- [ost-startStop-1] o.s.b.w.servlet.FilterRegistrationBean : Mapping filter: 'requestContextFilter' to: [/*]2017-11-28 11:15:31.684 INFO 3428 --- [ main] s.w.s.m.m.a.RequestMappingHandlerAdapter : Looking for @ControllerAdvice: org.springframework.boot.context.embedded.AnnotationConfigEmbeddedWebApplicationContext@4461c7e3: startup date [Tue Nov 28 11:15:29 EET 2017]; root of context hierarchy2017-11-28 11:15:31.777 INFO 3428 --- [ main] s.w.s.m.m.a.RequestMappingHandlerMapping : Mapped "{[/error]}" onto public org.springframework.http.ResponseEntity<java.util.Map<java.lang.String, java.lang.Object>> org.springframework.boot.autoconfigure.web.BasicErrorController.error(javax.servlet.http.HttpServletRequest)2017-11-28 11:15:31.779 INFO 3428 --- [ main] s.w.s.m.m.a.RequestMappingHandlerMapping : Mapped "{[/error],produces=[text/html]}" onto public org.springframework.web.servlet.ModelAndView org.springframework.boot.autoconfigure.web.BasicErrorController.errorHtml(javax.servlet.http.HttpServletRequest,javax.servlet.http.HttpServletResponse)2017-11-28 11:15:31.820 INFO 3428 --- [ main] o.s.w.s.handler.SimpleUrlHandlerMapping : Mapped URL path [/webjars/**] onto handler of type [class org.springframework.web.servlet.resource.ResourceHttpRequestHandler]2017-11-28 11:15:31.820 INFO 3428 --- [ main] o.s.w.s.handler.SimpleUrlHandlerMapping : Mapped URL path [/**] onto handler of type [class org.springframework.web.servlet.resource.ResourceHttpRequestHandler]2017-11-28 11:15:31.871 INFO 3428 --- [ main] o.s.w.s.handler.SimpleUrlHandlerMapping : Mapped URL path [/**/favicon.ico] onto handler of type [class org.springframework.web.servlet.resource.ResourceHttpRequestHandler]2017-11-28 11:15:32.144 INFO 3428 --- [ main] o.s.j.e.a.AnnotationMBeanExporter : Registering beans for JMX exposure on startup2017-11-28 11:15:32.254 INFO 3428 --- [ main] s.b.c.e.t.TomcatEmbeddedServletContainer : Tomcat started on port(s): 8080 (http)2017-11-28 11:15:32.271 INFO 3428 --- [ main] n.j.t.SpringBootExampleApplication : Started SpringBootExampleApplication in 13.607 seconds (JVM running for 19.742)
启动应用程序后,打开浏览器并转到http://localhost:8080
您将看到一个标签为“Whitelabel Error Page”的页面。 很好 不用担心 它指示服务器已启动,但是 URL /没有可用的映射。 我们将在下一步中解决此问题。

Spring WhiteLabel 错误页面
创建请求映射
现在,为了能够在http://localhost:8080下看到一些“有意义的”内容,我们需要更改出价SpringBootExampleApplication.java的代码。 首先使用@Controller注解对类进行注解。 其次,创建一个映射到 URL /的请求 - 这会将home()方法映射到该 URL。 换句话说,当浏览器向http://localhost:8080发出 GET 请求时,将通过此方法提供服务。 最后,为了能够将响应返回给浏览器,您需要使用@ResponseBody注释home()方法。 您将在下面找到所有更改:
package net.javavatutorial.tutorials;import org.springframework.boot.SpringApplication;import org.springframework.boot.autoconfigure.SpringBootApplication;import org.springframework.stereotype.Controller;import org.springframework.web.bind.annotation.RequestMapping;import org.springframework.web.bind.annotation.ResponseBody;@Controller@SpringBootApplicationpublic class SpringBootExampleApplication {@RequestMapping("/")@ResponseBodyString home() {return "Greetings from Java Tutorial Network";}public static void main(String[] args) {SpringApplication.run(SpringBootExampleApplication.class, args);}}
重新启动 Spring Boot App
在看到上一步中所做的更改之前,您需要重新部署已更改的应用程序。 为此,请使用以下屏幕截图中显示的“Spring 重新启动按钮”
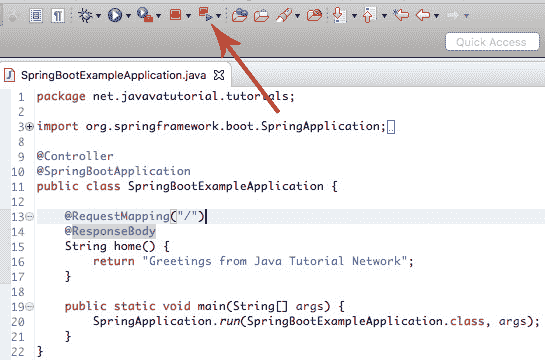
Spring 重新启动按钮
现在转到浏览器并刷新页面。 您应该在屏幕上看到我们的home()方法返回的字符串
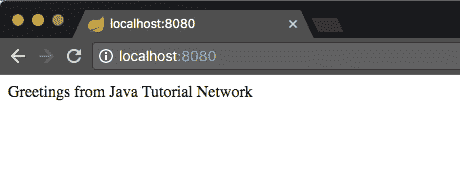
程序输出
该项目的完整源代码可以在我们的 GitHub 存储库中找到: https://github.com/JavaTutorialNetwork/Tutorials/tree/master/SpringBootExample

