接口文档:https://easydoc.net/doc/75716633/ZUqEdvA4/LnjzZHPj
一、分类维护

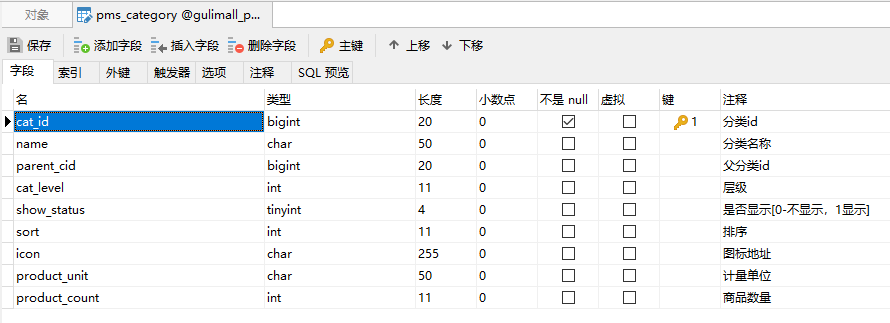
DROP TABLE IF EXISTS `pms_category`;CREATE TABLE `pms_category` (`cat_id` bigint(20) NOT NULL AUTO_INCREMENT COMMENT '分类id',`name` char(50) DEFAULT NULL COMMENT '分类名称',`parent_cid` bigint(20) DEFAULT NULL COMMENT '父分类id',`cat_level` int(11) DEFAULT NULL COMMENT '层级',`show_status` tinyint(4) DEFAULT NULL COMMENT '是否显示[0-不显示,1显示]',`sort` int(11) DEFAULT NULL COMMENT '排序',`icon` char(255) DEFAULT NULL COMMENT '图标地址',`product_unit` char(50) DEFAULT NULL COMMENT '计量单位',`product_count` int(11) DEFAULT NULL COMMENT '商品数量',PRIMARY KEY (`cat_id`)) ENGINE=InnoDB AUTO_INCREMENT=1433 DEFAULT CHARSET=utf8mb4 COMMENT='商品三级分类';
1、递归查询
1)CategoryEntity实体类
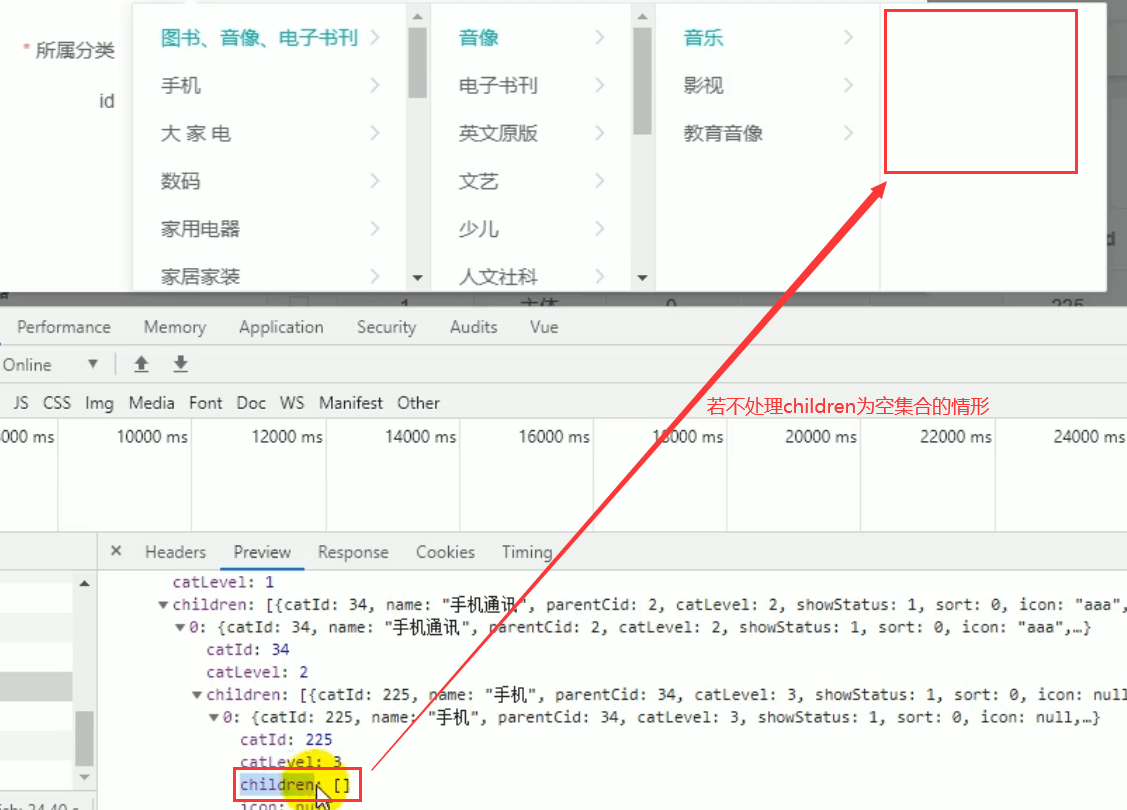
@Data@TableName("pms_category")public class CategoryEntity implements Serializable {private static final long serialVersionUID = 1L;/*** 分类id*/@TableIdprivate Long catId;/*** 分类名称*/private String name;/*** 父分类id*/private Long parentCid;/*** 层级*/private Integer catLevel;/*** 是否显示[0-不显示,1显示]* 若与配置文件yml默认规则不一致,可以手动设置显示:value = "1",不显示:delval = "0"*/@TableLogic(value = "1",delval = "0")private Integer showStatus;/*** 排序*/private Integer sort;/*** 图标地址*/private String icon;/*** 计量单位*/private String productUnit;/*** 商品数量*/private Integer productCount;/*** 子分类属性* @TableField(exist = false):表示在数据库中不存在* @JsonInclude(JsonInclude.Include.NON_EMPTY):表示这个数据不为空时才返回*/@JsonInclude(JsonInclude.Include.NON_EMPTY)@TableField(exist = false)private List<CategoryEntity> children;}
2)controller层
/*** 查出所有分类以及子分类,以树形结构组装起来*/@RequestMapping("/list/tree")public R list(){List<CategoryEntity> entities = categoryService.listWithTree();return R.ok().put("data", entities);}
3)service及实现类
public interface CategoryService extends IService<CategoryEntity> {List<CategoryEntity> listWithTree();}
/*** 查出所有分类以及子分类,以树形结构组装起来* @return*/@Overridepublic List<CategoryEntity> listWithTree() {// 1、查出所有分类List<CategoryEntity> entityList = baseMapper.selectList(null);// 2、组装成父子的树形结构// 2.1、找到所有的一级分类,filter筛选所有的一级分类,map设置一级分类的子菜单List<CategoryEntity> level1Menus = entityList.stream().filter(categoryEntity ->categoryEntity.getParentCid() == 0).map(menu -> {// 递归查找所有菜单的子菜单menu.setChildren(getChildrens(menu, entityList));return menu;}).sorted((menu1, menu2) -> {return (menu1.getSort() == null ? 0 : menu1.getSort()) - (menu2.getSort() == null ? 0 : menu2.getSort());}).collect(Collectors.toList());return level1Menus;}/*** 递归查找所有菜单的子菜单*/private List<CategoryEntity> getChildrens(CategoryEntity root, List<CategoryEntity> entityList){List<CategoryEntity> children = entityList.stream().filter(categoryEntity -> {// 1、过滤子菜单return categoryEntity.getParentCid() == root.getCatId();}).map(menu -> {// 2、设置子菜单menu.setChildren(getChildrens(menu, entityList));return menu;}).sorted((menu1, menu2) -> {// 3、菜单的排序// 防止sort为空时,报空指针异常return (menu1.getSort() == null ? 0 : menu1.getSort()) - (menu2.getSort() == null ? 0 : menu2.getSort());}).collect(Collectors.toList());return children;}
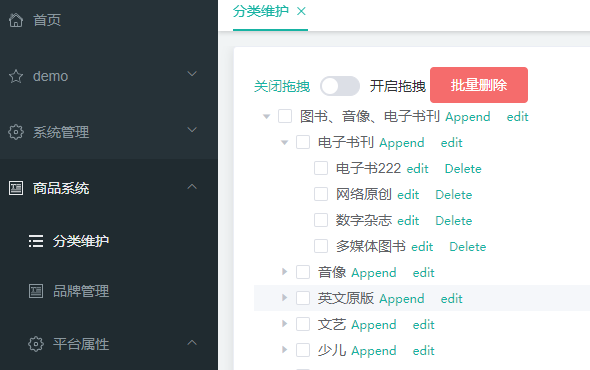
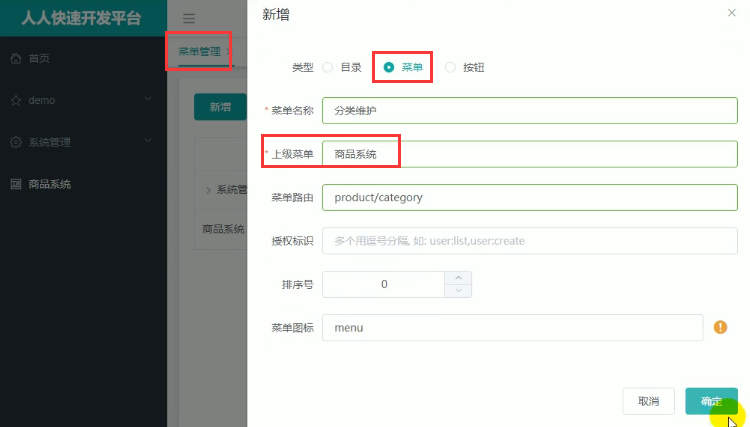
4)前端实现
2、配置网关路由与路径重写
前端请求:localhost:8080/renren-fast/product/category/list/tree,报错404找不到。此时访问登录页验证码不显示。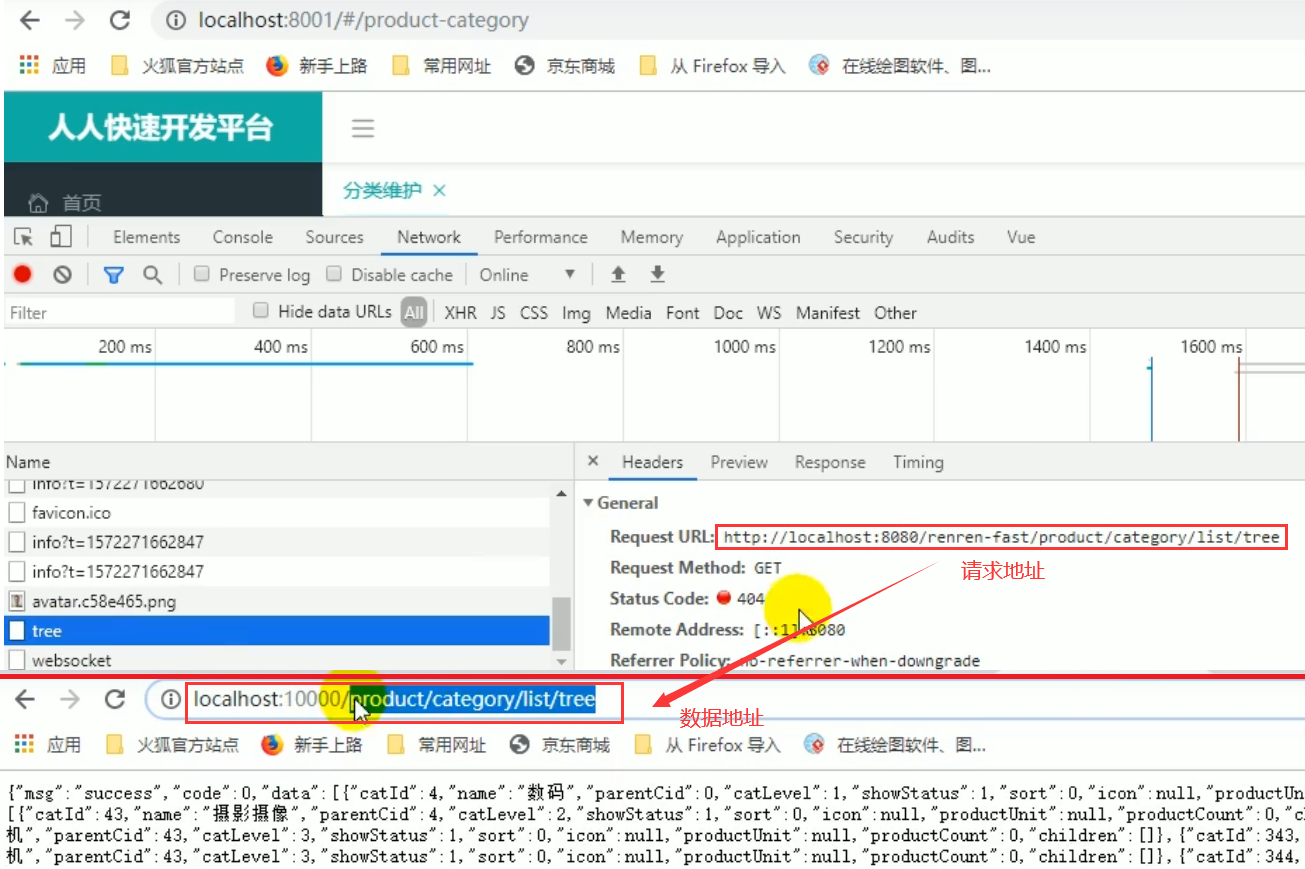
前端访问端口设置: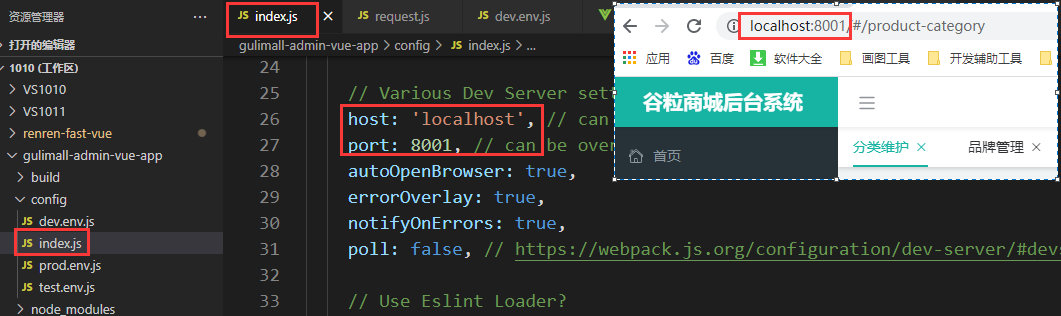
原因分析:前端请求8080端口,但数据在10000端口(商品服务)上
1)方法一:修改vue项目里的全局配置static/config/index.js,此时只能访问商品服务,若需要访问其他服务,需要再次修改端口号
window.SITE_CONFIG['baseUrl'] = 'http://localhost:10000';
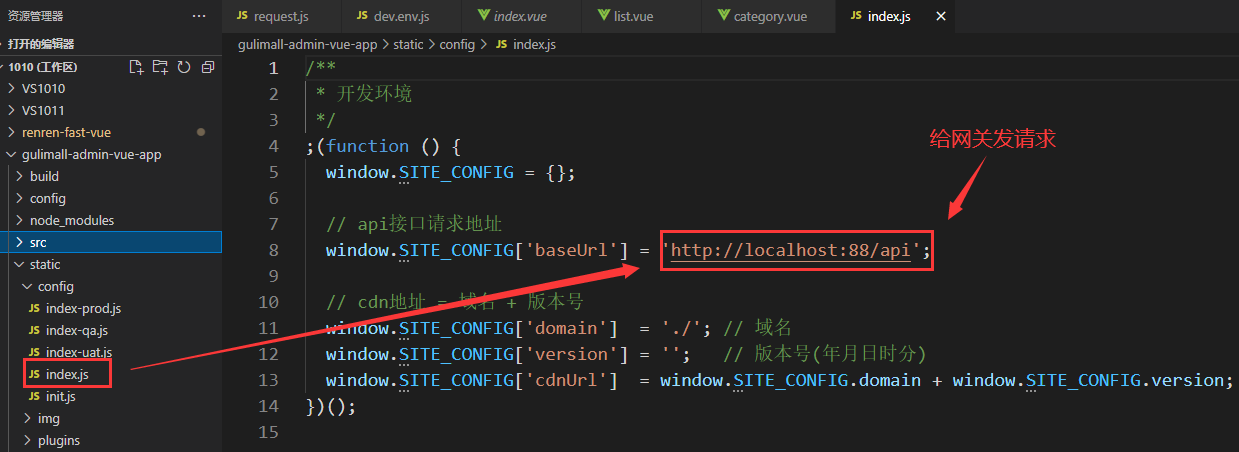
2)方法2:搭建网关,让网关路由到10000端口,即将前端所有请求都发送到网关,网关通过路径匹配,然后到nacos里找到管理后台的微服务,就可以找到对应的端口号,这样我们就无需管理端口,统一交给网关管理端口接口
修改vue项目里的全局配置static/config/index.js
// 意思是说本vue项目中要请求的资源url都发给88/api,那么我们就让网关端口为88,然后匹配到/api请求即可// 网关可以通过过滤器处理url后指定给某个微服务// renren-fast服务必须注册到了nacos中window.SITE_CONFIG['baseUrl'] = 'http://localhost:88/api';
# gateway微服务的配置spring.cloud.nacos.discovery.server-addr=127.0.0.1:8848spring.application.name=gulimall-gatewayserver.port=88
1)解决验证码不显示的问题:
让网关将所有请求发送到renren-fast服务,首先需要网关发现renren-fast服务,那么需要将renren-fast服务注册到nacos注册中心(gulimall-common有nacos依赖),这样所有请求经过网关88端口时,就会将请求转发到renren-fast的8080端口
<dependency><groupId>com.atguigu.gulimall</groupId><artifactId>gulimall-common</artifactId><version>0.0.1-SNAPSHOT</version></dependency>
spring:application:name: renren-fast #服务名称。把renren-fast服务注册到nacoscloud:nacos:discovery:server-addr: localhost:8848 #nacos地址
然后在fast启动类上加上注解@EnableDiscoveryClient,重启服务
@EnableDiscoveryClient // 开启服务注册发现功能@SpringBootApplicationpublic class RenrenApplication {public static void main(String[] args) {SpringApplication.run(RenrenApplication.class, args);}}
如果gson依赖报错,就导入google的gson依赖
<dependency><groupId>com.google.code.gson</groupId><artifactId>gson</artifactId><version>2.8.5</version></dependency>
然后在nacos的服务列表里看到了renren-fast
所有请求到达gateway服务,然后在配置文件application.yml中配置路由规则
spring:cloud:gateway:routes:# 路由地址存在先后顺序,需要把精确的uri放到前面,模糊的uri放到后面- id: test_routeuri: https://www.baidu.compredicates:- Query=url,baidu- id: admin_routeuri: lb://renren-fast # 负载均衡(lb)到指定的服务(renren-fast)predicates: # 路由规则- Path=/api/** # 默认前端项目发起的所有请求都路由到admin_route。即localhost:88/apifilters: # 路径重写,把/api/* 转换成 /renren-fast/*- RewritePath=/api/(?<segment>.*),/renren-fast/$\{segment}
2)网关路径重写
前端请求网关服务,路由到了renren-fast,然后去nacos里找renren-fast服务。
找到后拼接成了http://renren-fast:8080/api/captcha.jpg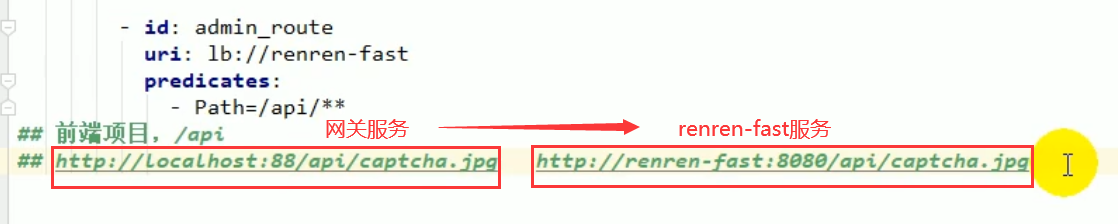
但是正确的是localhost:8080/renren-fast/captcha.jpg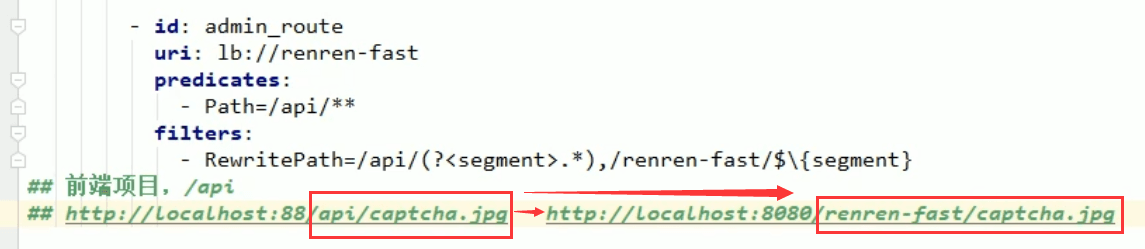
所以要利用网关带的路径重写,参考https://docs.spring.io/spring-cloud-gateway/docs/current/reference/html/#the-rewritepath-gatewayfilter-factory
在网关里把api换成renren-fast即可
- id: admin_routeuri: lb://renren-fastpredicates:- Path=/api/**filters: # 路径重写,把/api/* 转换成 /renren-fast/*- RewritePath=/api/(?<segment>.*),/renren-fast/$\{segment}
登录还是报错:出现了跨域的问题,就是说前端访问的是8001端口,却要跳转到网关的88端口,为了安全性,浏览器会拒绝跨域请求 
从8001访问88,引发CORS跨域请求,浏览器会拒绝跨域请求。具体来说当前页面是8001端口,但是要跳转88端口,这是不可以的(post请求json可以)
3、网关统一配置跨域
问题描述:已拦截跨源请求:同源策略禁止8001端口页面读取位于 http://localhost:88/api/sys/login 的远程资源。(原因:CORS 头缺少 ‘Access-Control-Allow-Origin’)。
问题分析:这是一种跨域问题。访问的域名或端口和原来请求的域名端口一旦不同,请求就会被限制
跨域:指的是浏览器不能执行其他网站的脚本。它是由浏览器的同源策略造成的,是浏览器对javascript施加的安全限制。
同源策略:是指协议,域名,端口都要相同,其中有一个不同都会产生跨域;
跨域流程:
这个跨域请求的实现是通过预检请求实现的,先发送一个OPSTIONS探路,收到响应允许跨域后再发送真实请求。
什么意思呢?跨域是要请求的、新的端口那个服务器限制的,不是浏览器限制的。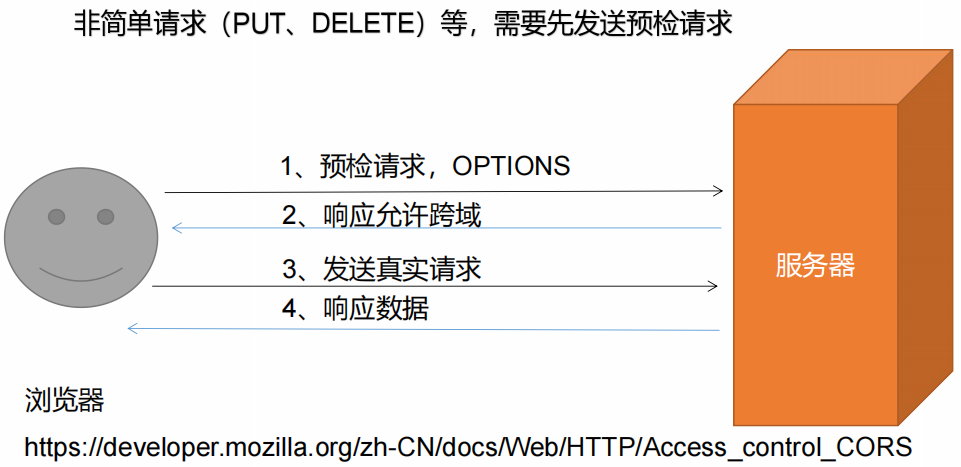
资料:https://developer.mozilla.org/zh-CN/docs/Web/HTTP/Access_control_CORS
解决跨域方式一:使用nginx部署为同一域
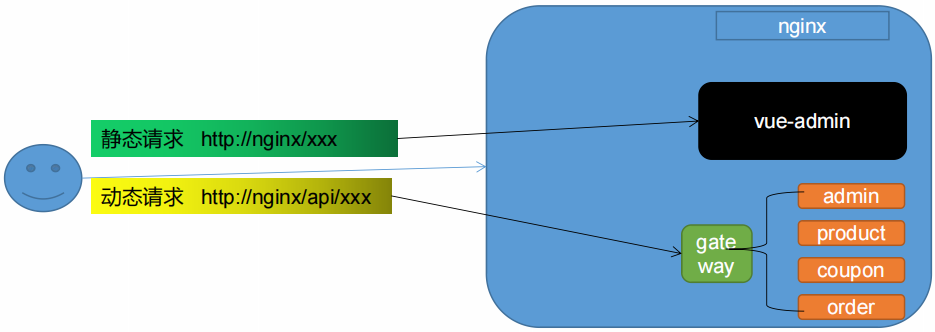
将前端项目和gateway服务都部署到nginx上。所有请求都先到nginx,静态请求都发送给前端项目,动态请求都发送给网关服务,网关在转发到对应的微服务。所以从头到尾都是访问的nginx地址。然后配置好反向代理,将前端和网关配置为同一个域即可
解决跨域方式二:配置当次请求允许跨域
浏览器会先发一个预检请求,去问服务器能不能跨域。让服务器告诉预检请求可以跨域即可。给预检请求一个响应。添加如下响应头:
• Access-Control-Allow-Origin:支持哪些来源的请求跨域• Access-Control-Allow-Methods:支持哪些方法跨域• Access-Control-Allow-Credentials:跨域请求默认不包含cookie,设置为true可以包含cookie• Access-Control-Expose-Headers:跨域请求暴露的字段• CORS请求时,XMLHttpRequest对象的getResponseHeader()方法只能拿到6个基本字段:Cache-Control、Content-Language、Content-Type、Expires、Last-Modified、Pragma。如果想拿到其他字段,就必须在Access-Control-Expose-Headers里面指定。• Access-Control-Max-Age:表明该响应的有效时间为多少秒。在有效时间内,浏览器无须为同一请求再次发起预检请求。请注意,浏览器自身维护了一个最大有效时间,如果该首部字段的值超过了最大有效时间,将不会生效。
参考:https://blog.csdn.net/qq_38128179/article/details/84956552
解决方法:在网关中定义GulimallCorsConfiguration类,该类用来做过滤所有请求,允许所有的请求跨域
@Configurationpublic class GulimallCorsConfiguration {@Bean // 加入到容器中public CorsWebFilter corsWebFilter(){// 跨域的配置信息UrlBasedCorsConfigurationSource source = new UrlBasedCorsConfigurationSource();// 配置跨域CorsConfiguration corsConfiguration = new CorsConfiguration();corsConfiguration.addAllowedHeader("*"); // 跨域请求暴露的字段corsConfiguration.addAllowedMethod("*"); // 支持哪些方法跨域corsConfiguration.addAllowedOrigin("*"); // 支持哪些来源的请求跨域corsConfiguration.setAllowCredentials(true); // 跨域请求默认不包含cookie,设置为true可以包含 cookie// 跨域配置,任何路径都要source.registerCorsConfiguration("/**",corsConfiguration);return new CorsWebFilter(source);}}
再次访问:http://localhost:8001/#/login,预检请求已成功返回跨域设置
但正式请求仍报错,提示不允许有多个 ‘Access-Control-Allow-Origin’。即不允许多次跨域
为了解决这个问题,需要修改renren-fast服务,注释掉“io.renren.config.CorsConfig”类。然后再次进行访问。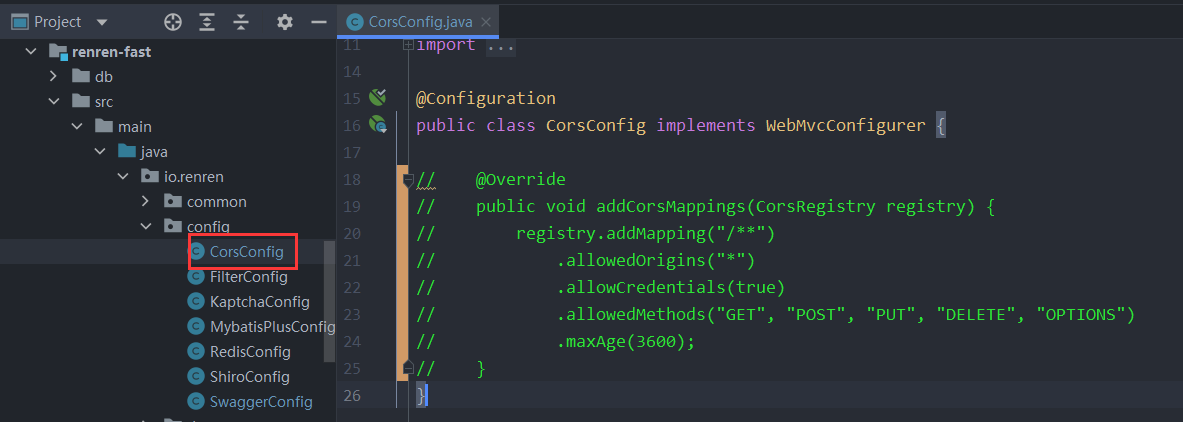
在显示商品系统/分类信息的时候,出现了404异常,请求的http://localhost:88/api/product/category/list/tree不存在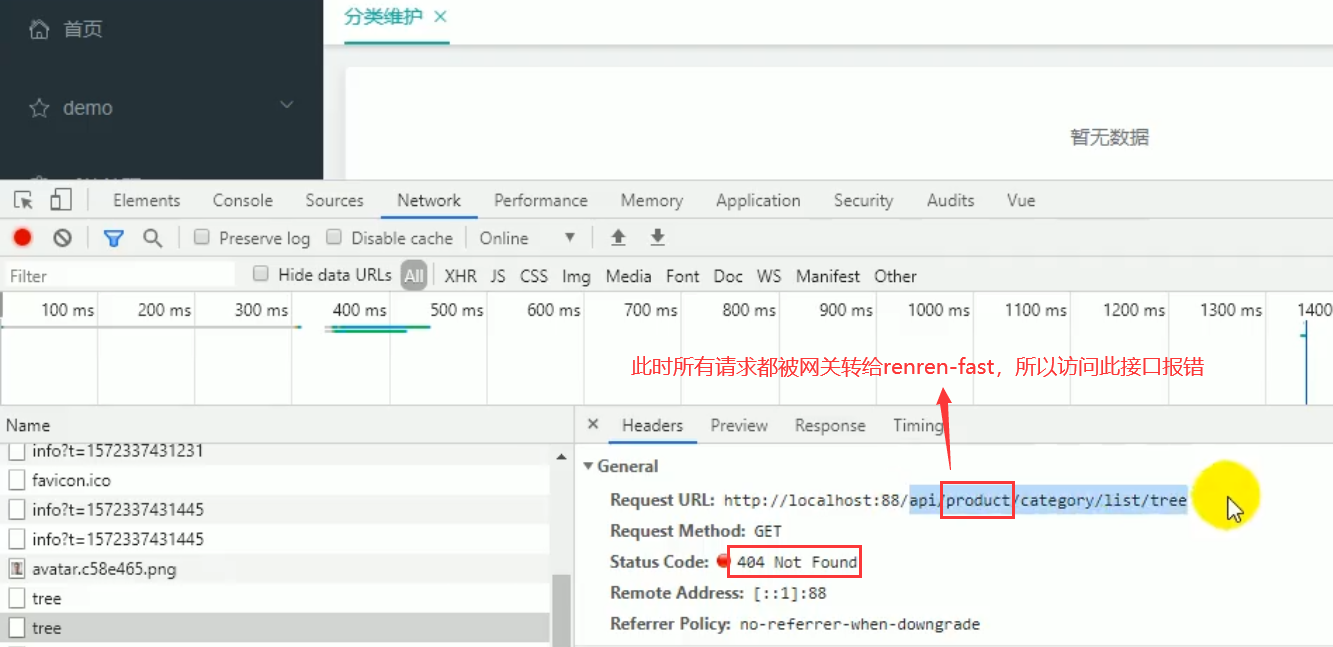
需要在网关配置product服务
在nacos中新建命名空间,用命名空间隔离项目(可以在其中新建gulimall-product.yml)
在product项目中新建bootstrap.properties
spring.application.name=gulimall-productspring.cloud.nacos.config.server-addr=127.0.0.1:8848spring.cloud.nacos.config.namespace=e6cd36a8-81a2-4df2-bfbc-f0524fa17664
将product服务注册到nacos中:在启动类上加上@EnableDiscoveryClient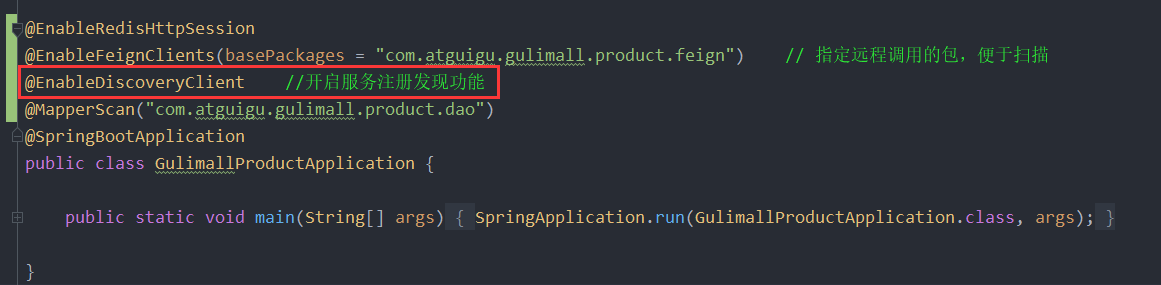
访问localhost:88/api/product/category/list/tree,报错:invalid token,非法令牌,后台管理系统中没有登录,所以没有带令牌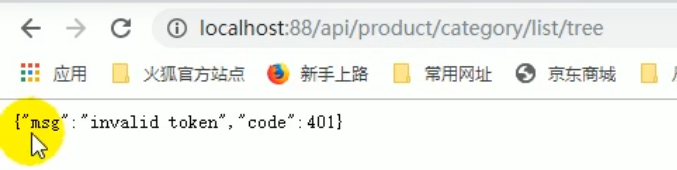
原因:先匹配的先路由,fast和product路由重叠,fast要求登录
修正:在路由规则的顺序上,将精确的路由规则放置到模糊的路由规则的前面,否则的话,精确的路由规则将不会被匹配到,类似于异常体系中try catch子句中异常的处理顺序。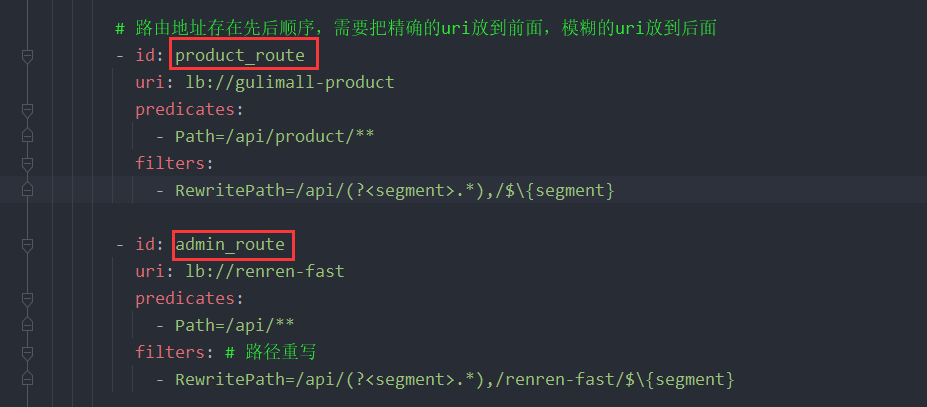
http://localhost:88/api/product/category/list/tree 正常
访问http://localhost:8001/#/product-category ,正常
原因是:先访问网关88,网关路径重写后访问nacos8848,nacos找到服务
4、逻辑删除
1)controller层
/*** 商品三级分类*/@RestController@RequestMapping("product/category")public class CategoryController {@Autowiredprivate CategoryService categoryService;/*** 删除* @RequestBody:获取请求体,必须发送POST请求* SpringMVC自动将请求体的数据(json),转为对应的对象*/@RequestMapping("/delete")// @RequiresPermissions("product:category:delete")public R delete(@RequestBody Long[] catIds){// categoryService.removeByIds(Arrays.asList(catIds));if(catIds == null || catIds.length == 0){return R.ok().put("message", "参数不能为空");}categoryService.removeMenuByIds(Arrays.asList(catIds));return R.ok();}}
2)service以及实现类
public interface CategoryService extends IService<CategoryEntity> {void removeMenuByIds(List<Long> asList);}
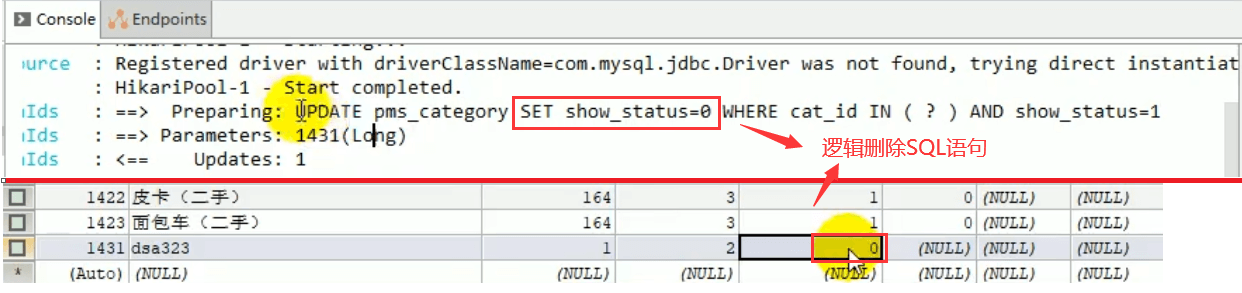
@Service("categoryService")public class CategoryServiceImpl extends ServiceImpl<CategoryDao, CategoryEntity> implements CategoryService {/*** 删除*/@Overridepublic void removeMenuByIds(List<Long> asList) {//TODO 1、检查当前删除的菜单,是否被别的地方引用baseMapper.deleteBatchIds(asList);}}
3)逻辑删除配置
配置全局的逻辑删除规则(可以省略)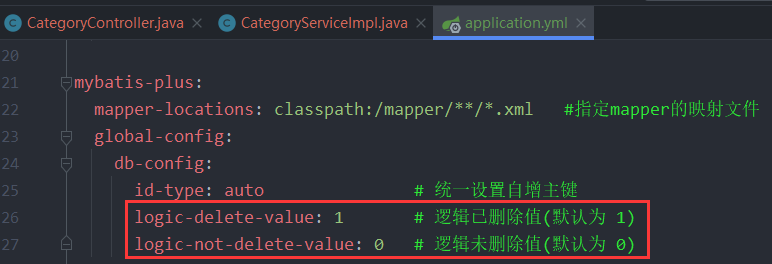
配置逻辑删除的组件Bean(mybatis3以上版本可以省略)
* 给Bean加上逻辑删除注解@TableLogic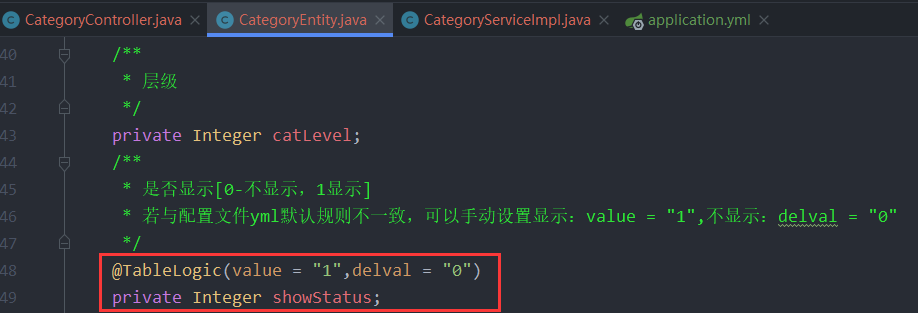
5、新增分类
/*** 商品三级分类*/@RestController@RequestMapping("product/category")public class CategoryController {@Autowiredprivate CategoryService categoryService;/*** 保存*/@RequestMapping("/save")//@RequiresPermissions("product:category:save")public R save(@RequestBody CategoryEntity category){categoryService.save(category);return R.ok();}}
6、修改分类
/*** 商品三级分类*/@RestController@RequestMapping("product/category")public class CategoryController {@Autowiredprivate CategoryService categoryService;/*** 修改*/@RequestMapping("/update")//@RequiresPermissions("product:category:update")public R update(@RequestBody CategoryEntity category){categoryService.update(category);return R.ok();}}
7、修改排序
/*** 商品三级分类*/@RestController@RequestMapping("product/category")public class CategoryController {@Autowiredprivate CategoryService categoryService;/*** 修改排序*/@RequestMapping("/update/sort")//@RequiresPermissions("product:category:update")public R updateSort(@RequestBody CategoryEntity[] category){categoryService.updateBatchById(Arrays.asList(category));return R.ok();}}
二、Object 划分
- PO(persistant object) 持久对象
PO 就是对应数据库中某个表中的一条记录,多个记录可以用 PO 的集合。 PO 中应该不包含任何对数据库的操作。 —比如:BrandEntity
- DO(Domain Object)领域对象
就是从现实世界中抽象出来的有形或无形的业务实体。
- TO(Transfer Object) ,数据传输对象
不同的应用程序之间传输的对象 — 微服务调用之间的数据
- DTO(Data Transfer Object)数据传输对象
这个概念来源于 J2EE 的设计模式,原来的目的是为了 EJB 的分布式应用提供粗粒度的数据实体,以减少分布式调用的次数,从而提高分布式调用的性能和降低网络负载,但在这里,泛指用于展示层与服务层之间的数据传输对象。
- VO(value object) 值对象
通常用于业务层之间的数据传递,和 PO 一样也是仅仅包含数据而已。但应是抽象出的业务对象 , 可以和表对应 , 也可以不 , 这根据业务的需要 。用 new 关键字创建,由GC 回收的。
View object:视图对象;
接受页面传递来的数据,封装对象
将业务处理完成的对象,封装成页面要用的数据
- BO(business object) 业务对象
从业务模型的角度看 , 见 UML 元件领域模型中的领域对象。封装业务逻辑的 java 对象 , 通过调用 DAO 方法 , 结合 PO,VO 进行业务操作。business object: 业务对象 主要作用是把业务逻辑封装为一个对象。这个对象可以包括一个或多个其它的对象。 比如一个简历,有教育经历、工作经历、社会关系等等。 我们可以把教育经历对应一个 PO ,工作经历对应一个 PO ,社会关系对应一个 PO 。 建立一个对应简历的 BO 对象处理简历,每个 BO 包含这些 PO 。 这样处理业务逻辑时,我们就可以针对 BO 去处理。
7. POJO(plain ordinary java object) 简单无规则 java 对象
传统意义的 java 对象。就是说在一些 Object/Relation Mapping 工具中,能够做到维护数据库表记录的 persisent object 完全是一个符合 Java Bean 规范的纯 Java 对象,没有增加别的属性和方法。我的理解就是最基本的 java Bean ,只有属性字段及 setter 和 getter方法!。
POJO 是 DO/DTO/BO/VO 的统称。
- DAO(data access object) 数据访问对象
是一个 sun 的一个标准 j2ee 设计模式, 这个模式中有个接口就是 DAO ,它负持久层的操作。为业务层提供接口。此对象用于访问数据库。通常和 PO 结合使用, DAO 中包含了各种数据库的操作方法。通过它的方法 , 结合 PO 对数据库进行相关的操作。夹在业务逻辑与数据库资源中间。配合 VO, 提供数据库的 CRUD 操作.
4、接口文档地址
https://easydoc.xyz/#/s/78237135

若有收获,就点个赞吧
0 人点赞
