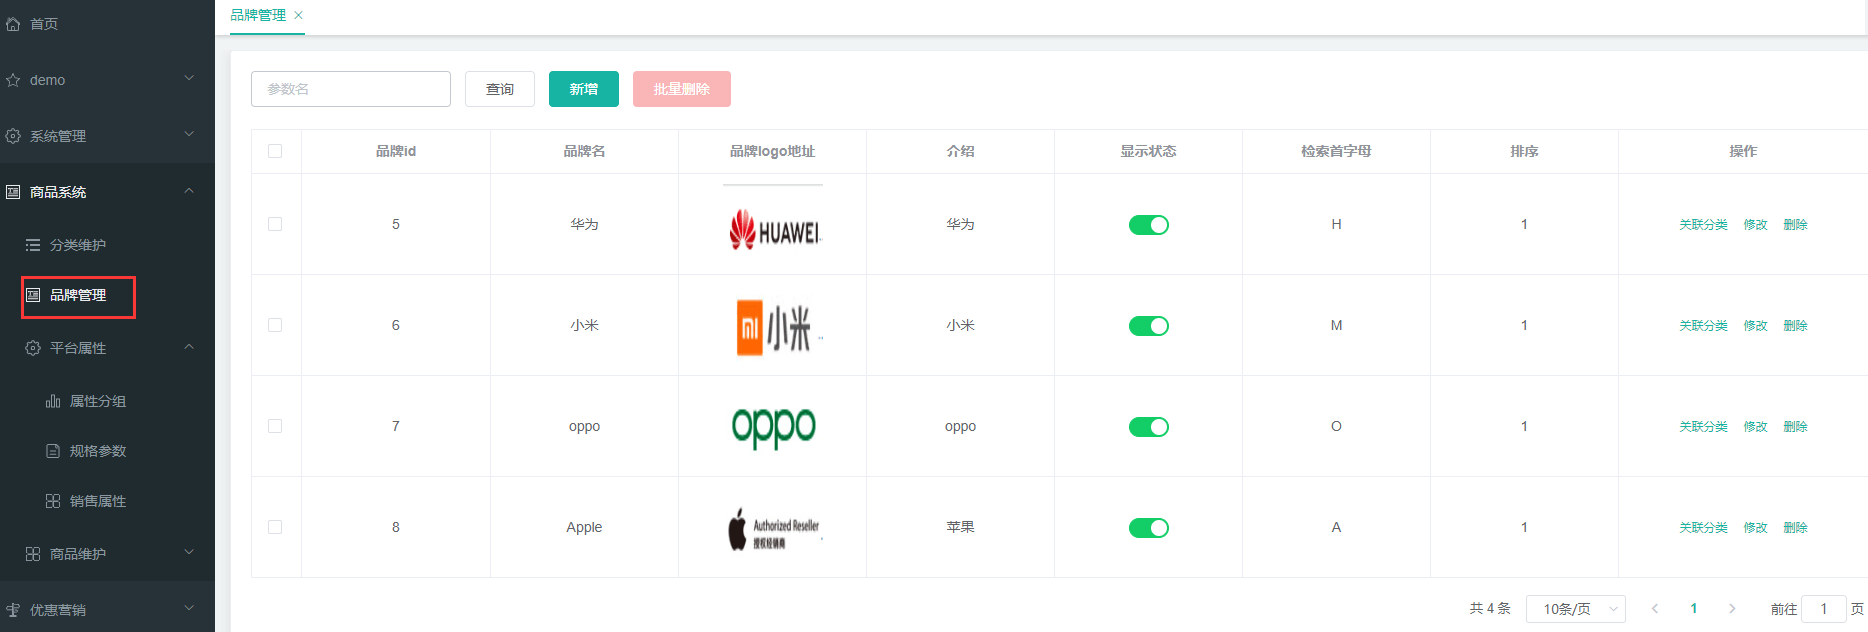
create table pms_brand (brand_id bigint not null auto_increment comment '品牌id',name char(50) comment '品牌名',logo varchar(2000) comment '品牌logo地址',descript longtext comment '介绍',show_status tinyint comment '显示状态[0-不显示;1-显示]',first_letter char(1) comment '检索首字母',sort int comment '排序',primary key (brand_id));alter table pms_brand comment '品牌';
1、文件存储
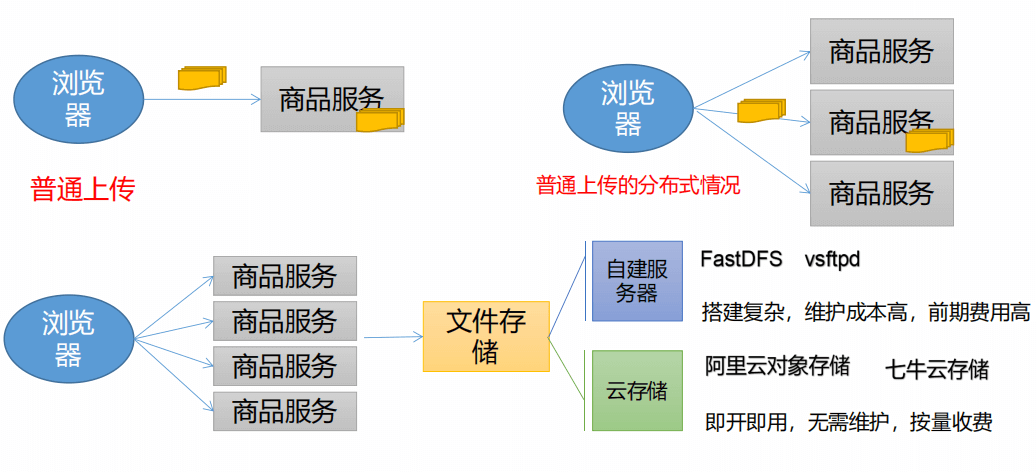
1)传统的文件存储
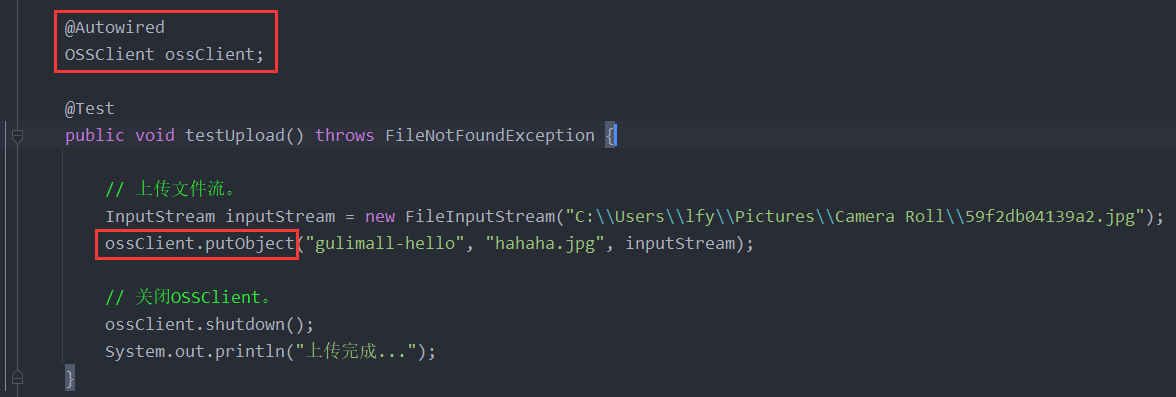
2)阿里云-普通上传方式
先把字节流给服务器,服务器转发给阿里云 <br />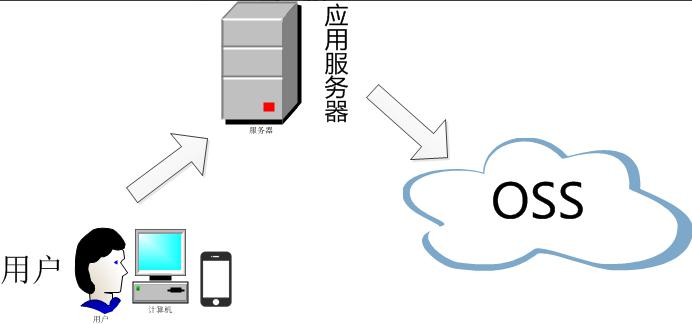<br />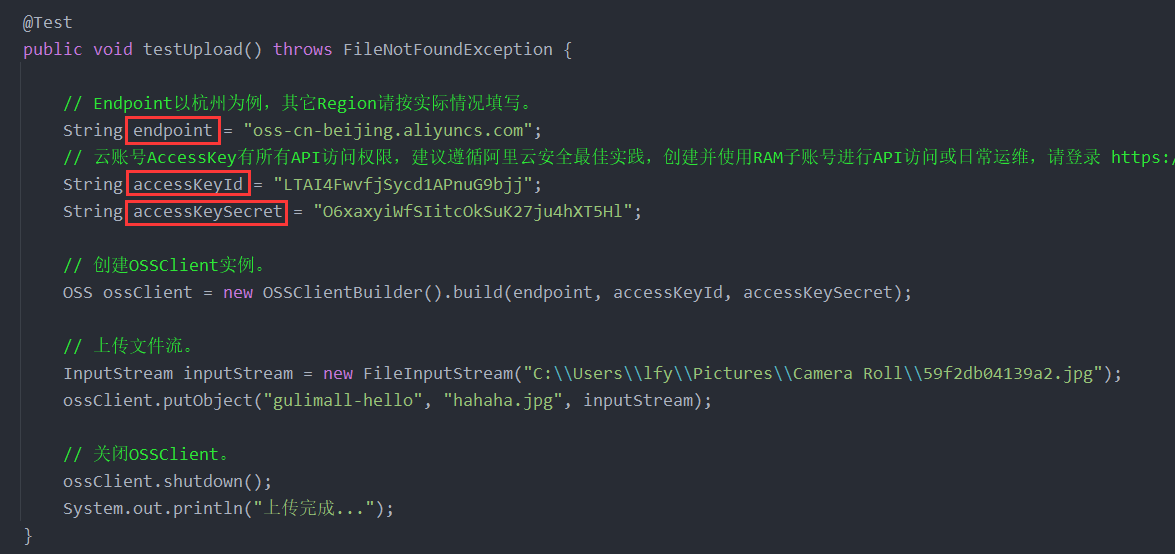<br />endpoint的取值:点击概览就可以看到你的endpoint信息,endpoint在这里就是上海等地区,如 oss-cn-qingdao.aliyuncs.com<br /> bucket域名:就是签名加上bucket,如gulimall-fermhan.oss-cn-qingdao.aliyuncs.com
accessKey的获取
accessKeyId和accessKeySecret需要创建一个RAM账号: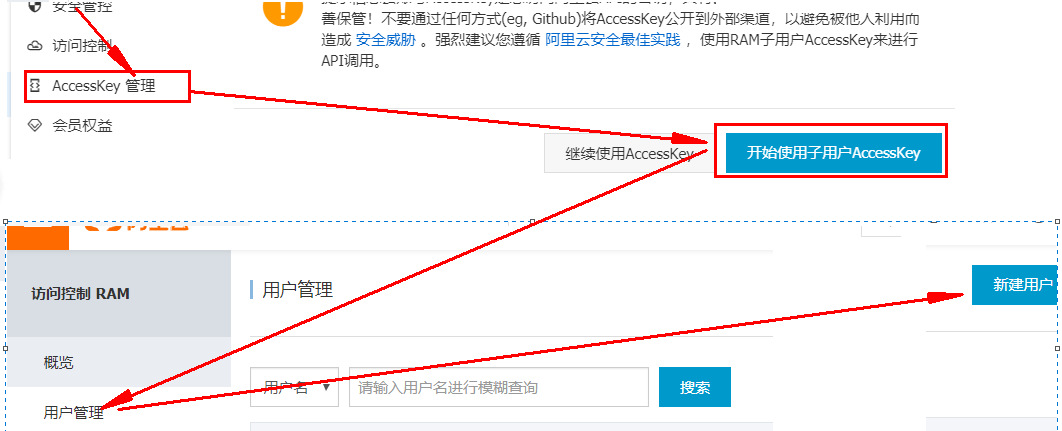
选上编程访问
创建用户完毕后,会得到一个“AccessKey ID”和“AccessKeySecret”,然后复制这两个值到代码的“AccessKey ID”和“AccessKeySecret”。
另外还需要添加访问控制权限: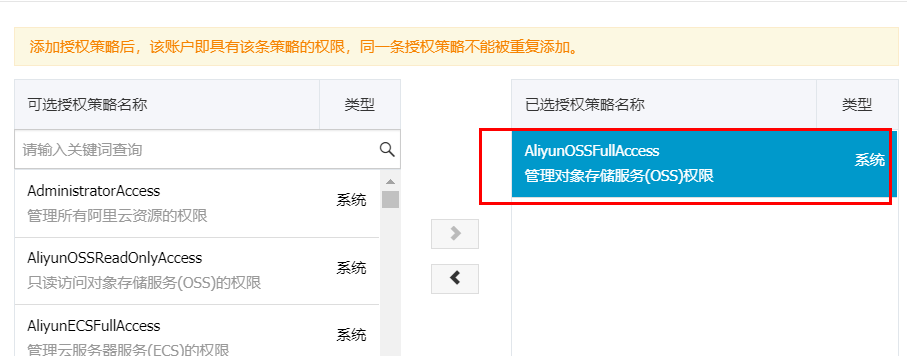
使用SpringCloud Alibaba来管理oss:
1)添加依赖
<dependency><groupId>com.alibaba.cloud</groupId><artifactId>spring-cloud-starter-alicloud-oss</artifactId></dependency>
2)配置key,secret和endpoint相关信息
spring:cloud:nacos:discovery:server-addr: 127.0.0.1:8848alicloud:access-key: LTAI4FwvfjSycd1APnuG9bjjsecret-key: O6xaxyiWfSIitcOkSuK27ju4hXT5Hloss:endpoint: oss-cn-beijing.aliyuncs.combucket: gulimall-hello
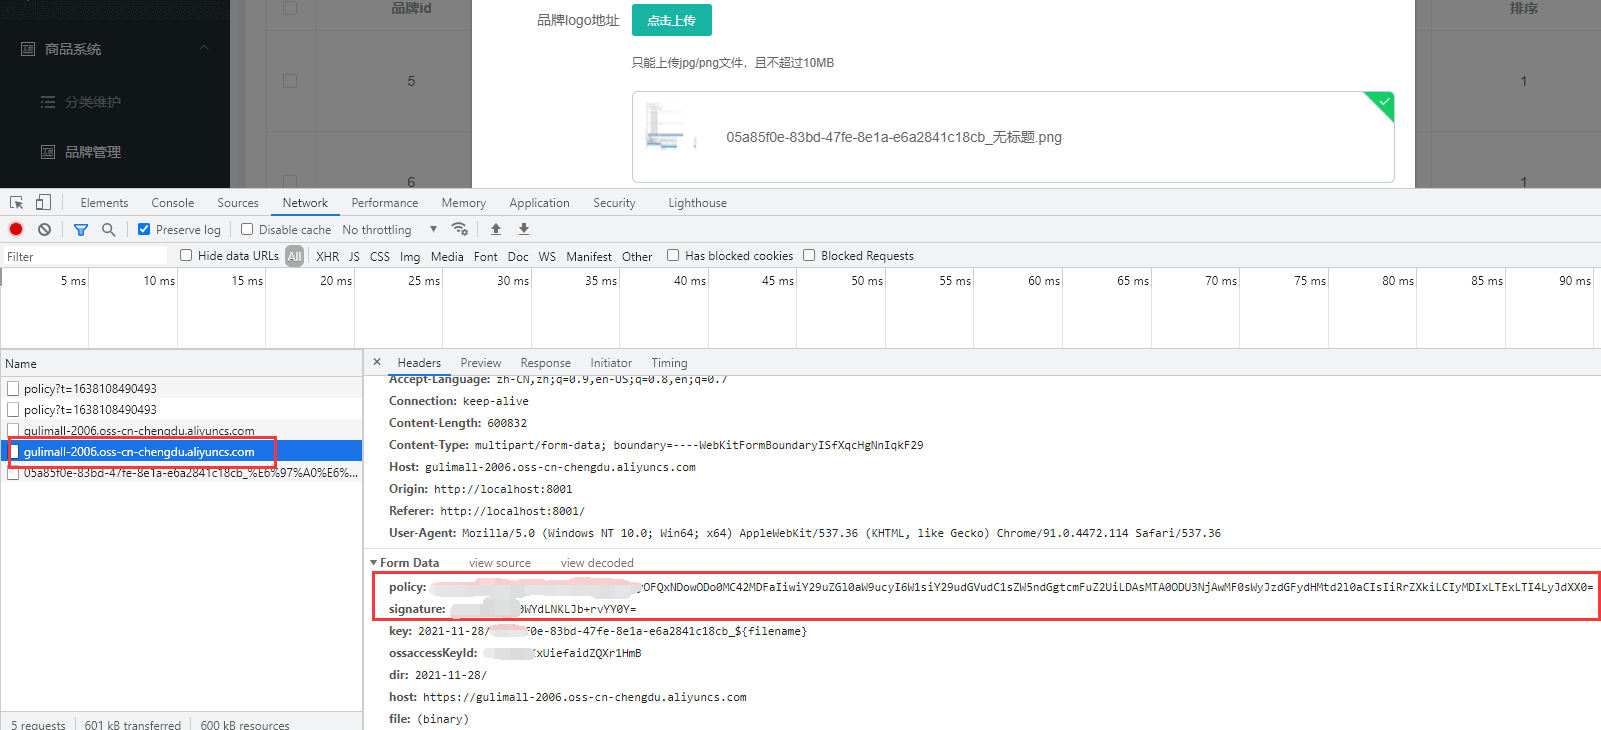
3)阿里云-服务端签名后直传
文件还需要传到java后端中转一下,没有必要,如何能直接传到oss就好了。所以考虑把AccessKeyID和AcessKeySecret给前端传过去,前端直接传到oss?
但是,采用JavaScript客户端直接签名(参见JavaScript客户端签名直传)时,AccessKeyID和AcessKeySecret会暴露在前端页面,因此存在严重的安全隐患。因此,ali-OSS提供了服务端签名后直传的方案。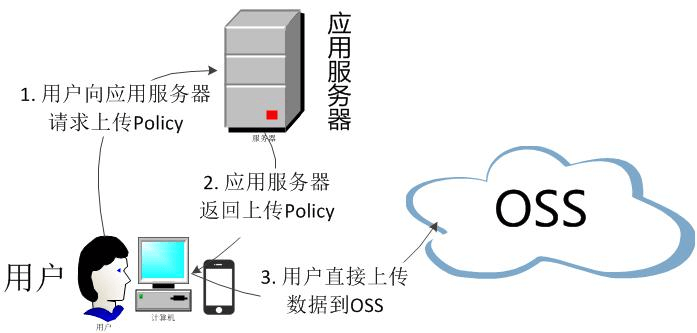
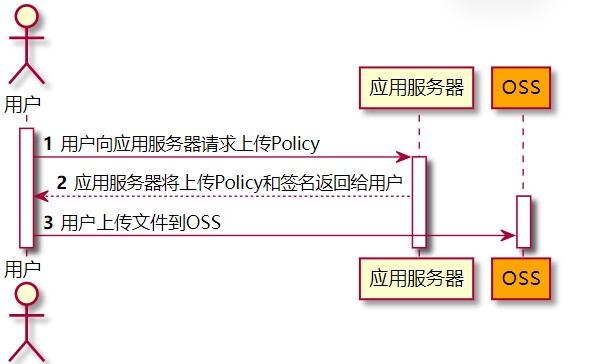
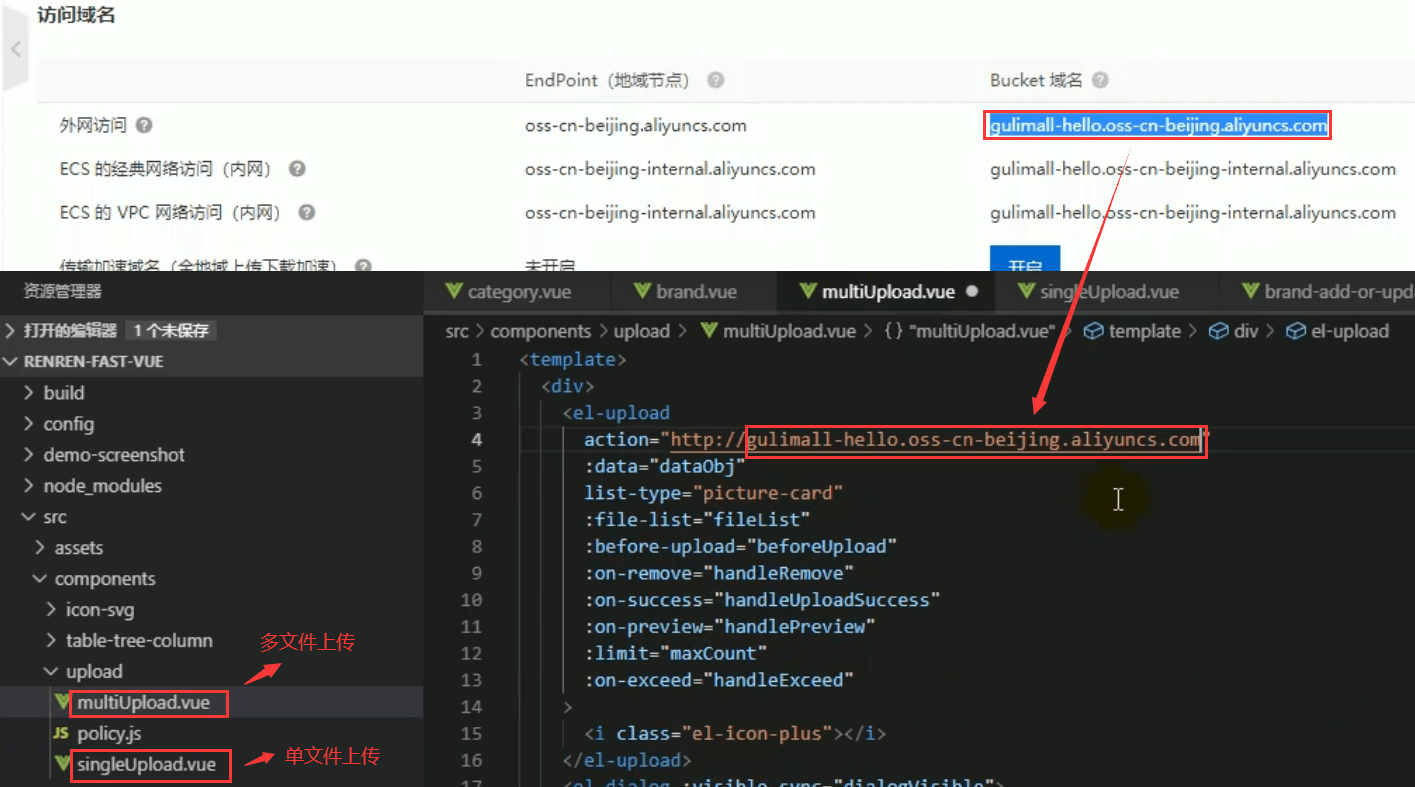
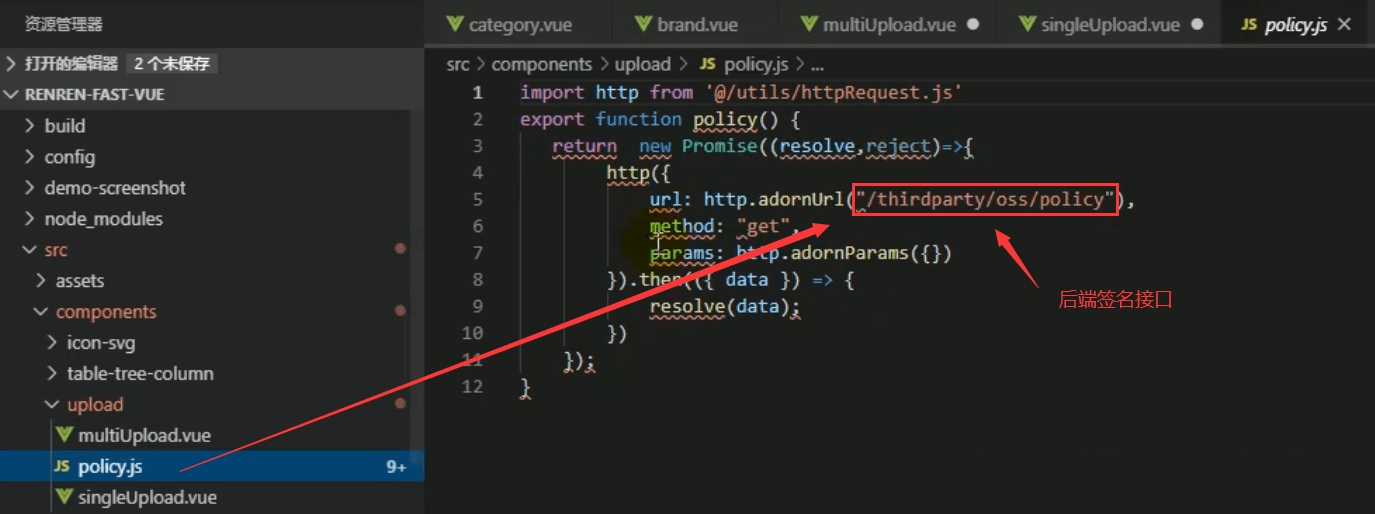
2、服务端签名整合测试
新建gulimall-third-party服务,添加依赖
<!-- 阿里云对象存储OSS --><dependency><groupId>com.alibaba.cloud</groupId><artifactId>spring-cloud-alicloud-oss</artifactId></dependency>
1)bootstrap.properties
spring.application.name=gulimall-third-partyspring.cloud.nacos.config.server-addr=127.0.0.1:8848spring.cloud.nacos.config.namespace=4252b29b-4d4a-4f17-91ce-a164163f288aspring.cloud.nacos.config.extension-configs[0].data-id=oss.ymlspring.cloud.nacos.config.extension-configs[0].group=DEFAULT_GROUPspring.cloud.nacos.config.extension-configs[0].refresh=true
2)application.yml
spring:cloud:nacos:discovery:server-addr: 127.0.0.1:8848alicloud:access-key: LTAI5tRK=424xr1mB12secret-key: SyfI5Zh3JwDgUzuIULoss:endpoint: oss-cn-chengdu.aliyuncs.combucket: gulimall-200615application:name: gulimall-third-partyserver:port: 30000
3)OssController
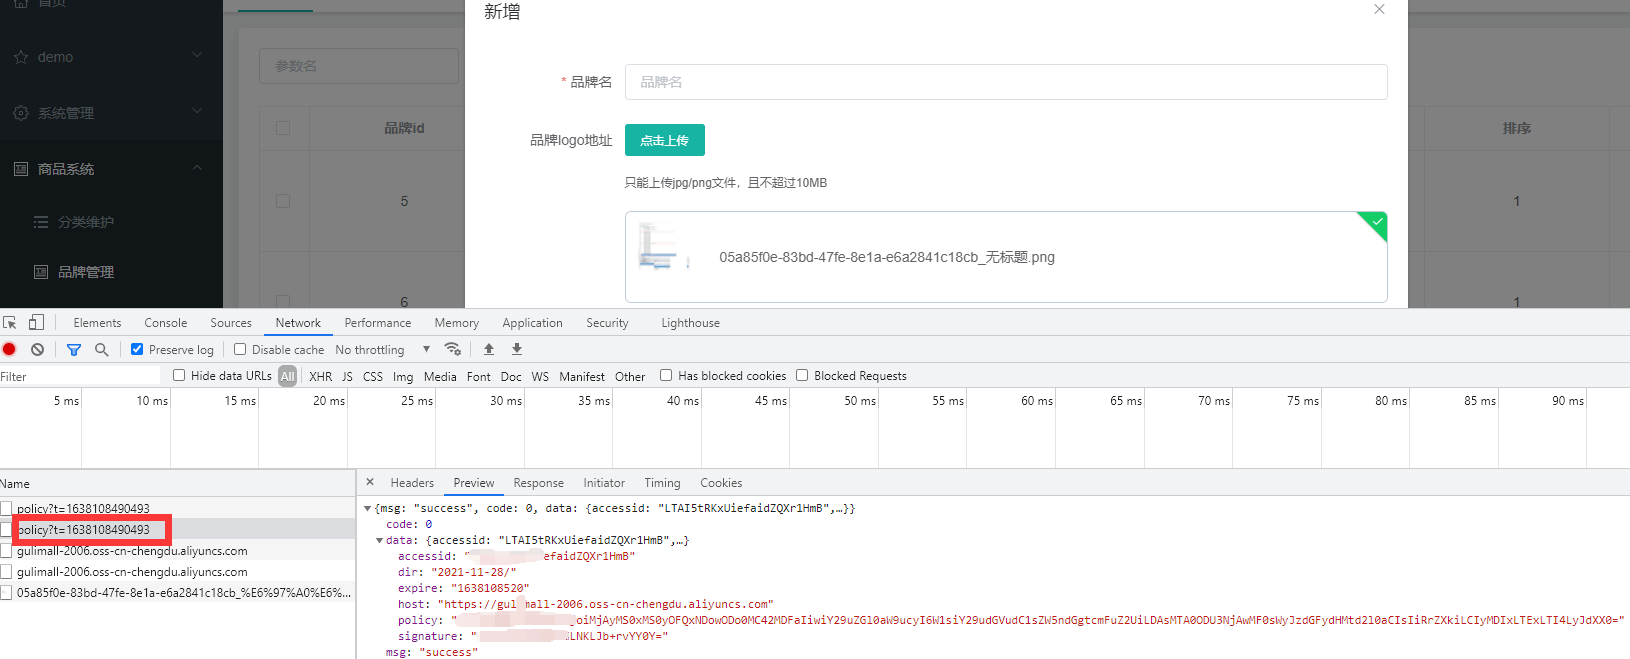
@RestControllerpublic class OssController {// 创建OSSClient实例@AutowiredOSS ossClient;@Value("${spring.cloud.alicloud.oss.endpoint}")private String endpoint;@Value("${spring.cloud.alicloud.oss.bucket}")private String bucket;@Value("${spring.cloud.alicloud.access-key}")private String accessId;@RequestMapping("/oss/policy")public R policy(){// host的格式为 bucketname.endpointString host = "https://" + bucket + "." + endpoint;// callbackUrl为上传回调服务器的URL,请将下面的IP和Port配置为您自己的真实信息。//String callbackUrl = "http://88.88.88.88:8888";String format = new SimpleDateFormat("yyyy-MM-dd").format(new Date());String dir = format + "/"; // 用户上传文件时指定的前缀。即文件夹Map<String, String> respMap = null;try {long expireTime = 30;long expireEndTime = System.currentTimeMillis() + expireTime * 1000;Date expiration = new Date(expireEndTime);// PostObject请求最大可支持的文件大小为5 GB,即CONTENT_LENGTH_RANGE为5*1024*1024*1024。PolicyConditions policyConds = new PolicyConditions();policyConds.addConditionItem(PolicyConditions.COND_CONTENT_LENGTH_RANGE, 0, 1048576000);policyConds.addConditionItem(MatchMode.StartWith, PolicyConditions.COND_KEY, dir);String postPolicy = ossClient.generatePostPolicy(expiration, policyConds);byte[] binaryData = postPolicy.getBytes("utf-8");String encodedPolicy = BinaryUtil.toBase64String(binaryData);String postSignature = ossClient.calculatePostSignature(postPolicy);respMap = new LinkedHashMap<String, String>();respMap.put("accessid", accessId);respMap.put("policy", encodedPolicy);respMap.put("signature", postSignature);respMap.put("dir", dir);respMap.put("host", host);respMap.put("expire", String.valueOf(expireEndTime / 1000));// respMap.put("expire", formatISO8601Date(expiration));} catch (Exception e) {// Assert.fail(e.getMessage());System.out.println(e.getMessage());} finally {ossClient.shutdown();}return R.ok().put("data",respMap);}}
4)测试
3、表单校验&自定义校验器
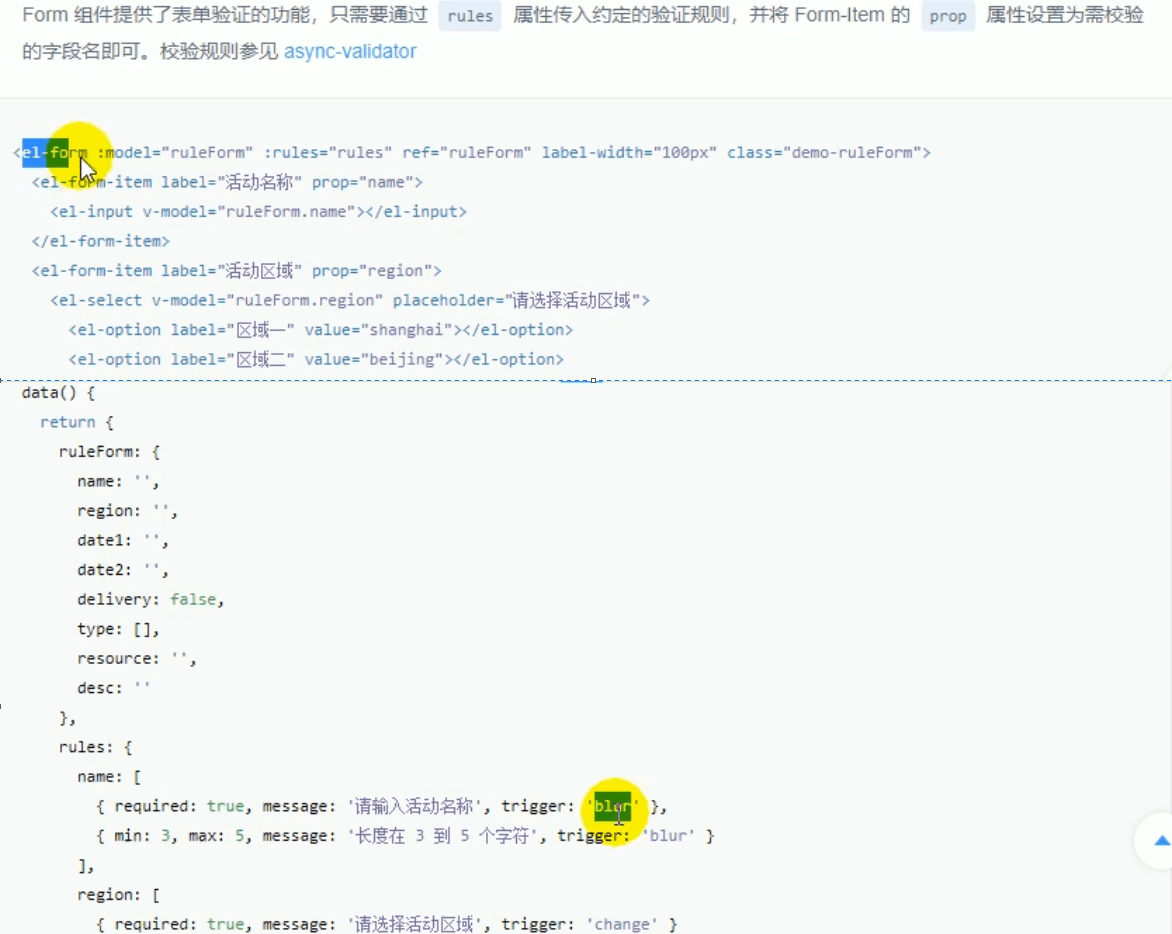
1)前端表单校验
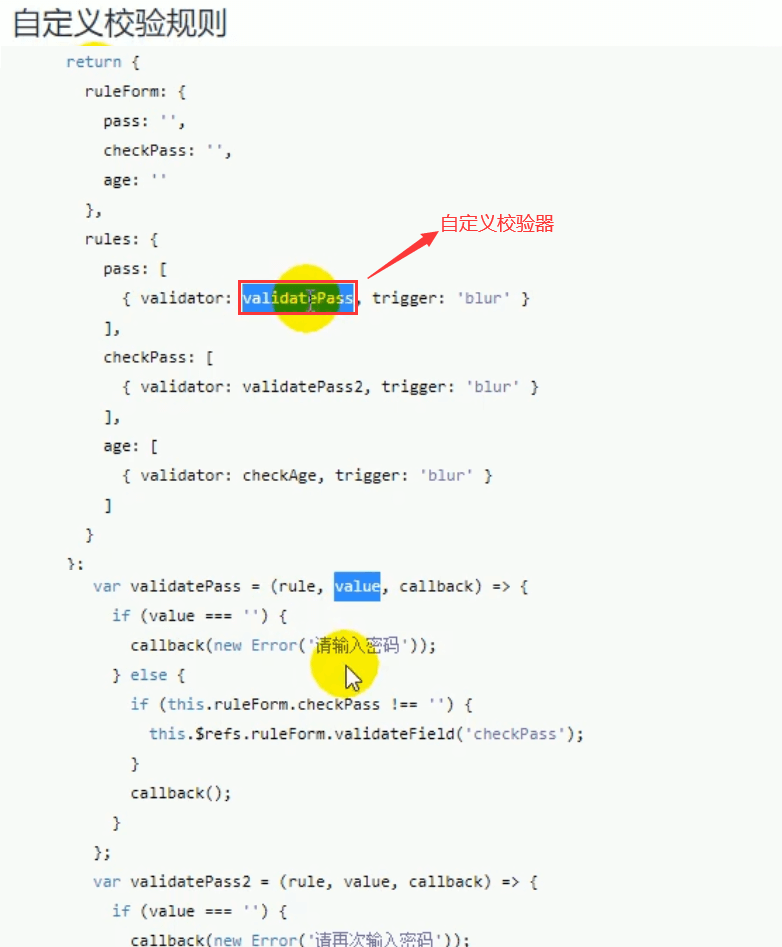
2)自定义校验器
/*** 集中处理所有controller抛过来的异常*/@Slf4j//@ResponseBody//@ControllerAdvice(basePackages = "com.atguigu.gulimall.product.app")@RestControllerAdvice(basePackages = "com.atguigu.gulimall.product.app")public class GulimallExceptionControllerAdvice {/*** 处理controller数据校验错误。精确处理异常* @param e* @return*/@ExceptionHandler(value= MethodArgumentNotValidException.class)public R handleVaildException(MethodArgumentNotValidException e){log.error("数据校验出现问题{},异常类型:{}",e.getMessage(),e.getClass());BindingResult bindingResult = e.getBindingResult();Map<String,String> errorMap = new HashMap<>();bindingResult.getFieldErrors().forEach((fieldError)->{// 获取到错误提示String message = fieldError.getDefaultMessage();// 获取错误属性的名字String field = fieldError.getField();errorMap.put(field,message);});return R.error(BizCodeEnume.VAILD_EXCEPTION.getCode(), BizCodeEnume.VAILD_EXCEPTION.getMsg()).put("data",errorMap);}/*** 处理自定义的异常* @param e* @return*/@ExceptionHandler(value = GuliException.class)public R GuliException(GuliException e){log.error("错误:", e);return R.error(e.getCode(), e.getMsg());}/*** 处理所有类型的异常* @param throwable* @return*/@ExceptionHandler(value = Throwable.class)public R handleException(Throwable throwable){log.error("错误:",throwable);return R.error(BizCodeEnume.UNKNOW_EXCEPTION.getCode(), BizCodeEnume.UNKNOW_EXCEPTION.getMsg());}}
3)错误码枚举类
package com.atguigu.common.exception;/**** 错误码和错误信息定义类* 1. 错误码定义规则为5为数字* 2. 前两位表示业务场景,最后三位表示错误码。例如:100001。10:通用 001:系统未知异常* 3. 维护错误码后需要维护错误描述,将他们定义为枚举形式* 错误码列表:* 10: 通用* 001:参数格式校验* 11: 商品* 12: 订单* 13: 购物车* 14: 物流*/public enum BizCodeEnume {UNKNOW_EXCEPTION(10000,"系统未知异常"),VAILD_EXCEPTION(10001,"参数格式校验失败"),PRODUCT_UP_EXCEPTION(11000,"商品上架异常"),SMS_CODE_EXCEPTION(10002,"发送验证码太频繁,请稍后再试"),TO_MANY_REQUEST(10003,"请求流量过大"),USER_EXIST_EXCEPTION(15001,"用户已存在"),PHONE_EXIST_EXCEPTION(15002,"手机号码已存在"),PHONE_NULL_EXCEPTION(15003,"未输入手机号码"),NO_STOCK_EXCEPTION(21000,"商品库存不足"),LOGINACCT_PASSWORD_INVAILD_EXCEPTION(15002,"账号或密码错误");private int code;private String msg;BizCodeEnume(int code, String msg){this.code = code;this.msg = msg;}public int getCode() {return code;}public String getMsg() {return msg;}}
4、JSR303数据校验
1)给Bean添加校验注解
给Bean添加校验注解:javax.validation.constraints,并定义自己的message提示
/*** 品牌*/@Data@TableName("pms_brand")public class BrandEntity implements Serializable {private static final long serialVersionUID = 1L;/*** 品牌id*/@NotNull(message = "修改必须指定品牌id",groups = {UpdateGroup.class})@Null(message = "新增不能指定id",groups = {AddGroup.class})@TableIdprivate Long brandId;/*** 品牌名*/@NotBlank(message = "品牌名必须提交",groups = {AddGroup.class,UpdateGroup.class})private String name;/*** 品牌logo地址*/@NotBlank(groups = {AddGroup.class})@URL(message = "logo必须是一个合法的url地址",groups={AddGroup.class,UpdateGroup.class})private String logo;/*** 介绍*/private String descript;/*** 显示状态[0-不显示;1-显示]*/// @Pattern()@NotNull(groups = {AddGroup.class, UpdateStatusGroup.class})@ListValue(vals={0,1},groups = {AddGroup.class, UpdateStatusGroup.class})private Integer showStatus;/*** 检索首字母*/@NotEmpty(groups={AddGroup.class})@Pattern(regexp="^[a-zA-Z]$",message = "检索首字母必须是一个字母",groups={AddGroup.class,UpdateGroup.class})private String firstLetter;/*** 排序*/@NotNull(groups={AddGroup.class})@Min(value = 0,message = "排序必须大于等于0",groups={AddGroup.class,UpdateGroup.class})private Integer sort;}
2)开启校验功能@Valid
效果:告诉springMVC这个参数需要校验。校验错误以后会有默认的响应;
/*** 保存*/@RequestMapping("/save")public R save(@Valid @RequestBody BrandEntity brand){brandService.save(brand);return R.ok();}
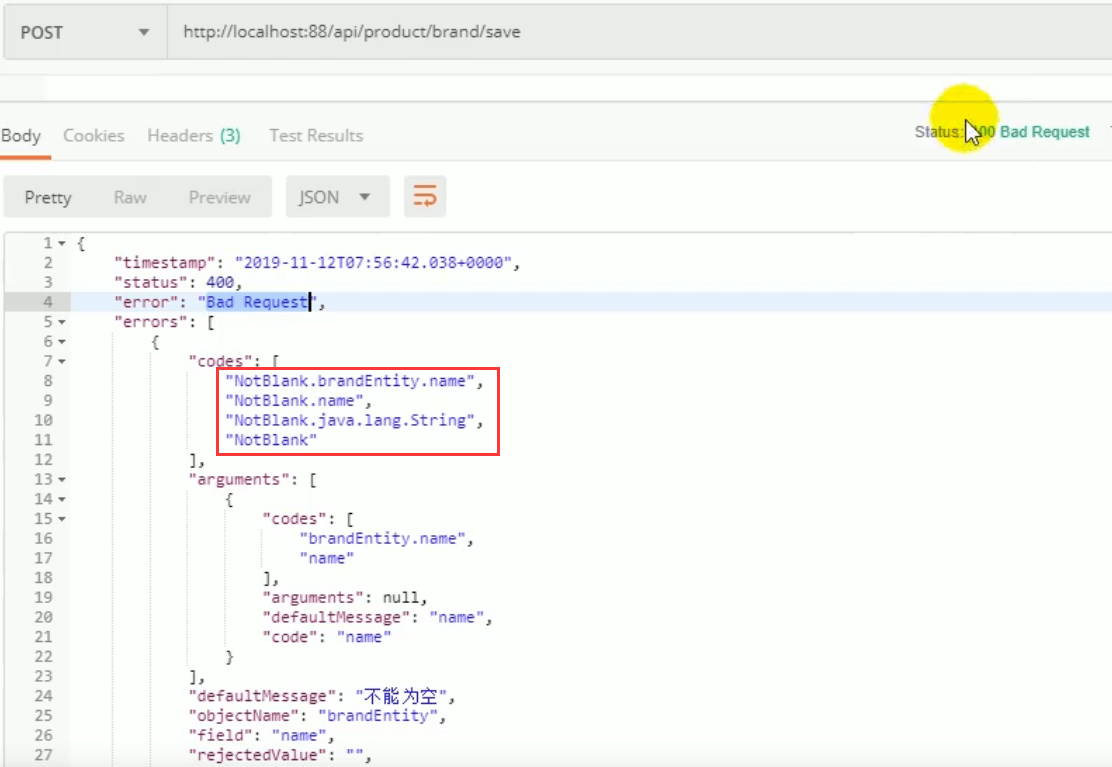
3)使用BindingResult
给校验的bean后紧跟一个BindingResult,就可以获取到校验的结果
/*** 保存*/@RequestMapping("/save")public R save(@Valid @RequestBody BrandEntity brand, BindingResult result){if(result.hasErrors()){HashMap<String, String> map = new HashMap<>();// 1、获取所有校验的错误结果result.getFieldErrors().forEach(fieldError -> {// 获取到错误提示String message = fieldError.getDefaultMessage();// 获取错误属性的名字String field = fieldError.getField();map.put(field,message);});return R.error(400, "参数不合法").put("data",map);}else {brandService.save(brand);return R.ok();}}
4)分组校验(多场景的复杂校验)
① 自定义分组接口
package com.atguigu.common.valid;public interface AddGroup {}
package com.atguigu.common.valid;public interface UpdateGroup {}
package com.atguigu.common.valid;public interface UpdateStatusGroup {}
② 校验注解加上校验场景
@NotBlank(message = “品牌名必须提交”,groups = {AddGroup.class,UpdateGroup.class}),给校验注解标注什么情况需要进行校验
@Data@TableName("pms_brand")public class BrandEntity implements Serializable {private static final long serialVersionUID = 1L;/*** 品牌id*/@NotNull(message = "修改必须指定品牌id",groups = {UpdateGroup.class})@Null(message = "新增不能指定id",groups = {AddGroup.class})@TableIdprivate Long brandId;/*** 品牌名*/@NotBlank(message = "品牌名必须提交",groups = {AddGroup.class,UpdateGroup.class})private String name;********}
③ controller上使用@Validated({UpdateGroup.class})
/*** 修改*/@RequestMapping("/update")public R update(@Validated({UpdateGroup.class}) @RequestBody BrandEntity brand){brandService.updateDetail(brand);return R.ok();}
注意:默认没有指定分组的校验注解@NotBlank,在分组校验情况@Validated({UpdateGroup.class})下不生效,只会在@Validated生效;所以使用@Validated时,所有属性均要使用groups指定分组才会起作用
5)自定义校验
① 编写自定义的校验注解ListValue
//ListValueConstraintValidator 校验器@Documented// 可以指定多个不同的校验器,适配不同类型的校验@Constraint(validatedBy = { ListValueConstraintValidator.class })@Target({ METHOD, FIELD, ANNOTATION_TYPE, CONSTRUCTOR, PARAMETER, TYPE_USE })@Retention(RUNTIME)public @interface ListValue {// 在配置文件ValidationMessages.properties中// 校验出错后,出错信息获取的位置String message() default "{com.atguigu.common.valid.ListValue.message}";// 支持分组校验的功能Class<?>[] groups() default { };// 支持自定义负载信息Class<? extends Payload>[] payload() default { };// 数组,需要用户自己指定int[] vals() default { };}
② 编写自定义的校验器 ConstraintValidator
public class ListValueConstraintValidatorimplements ConstraintValidator<ListValue,Integer> {//<校验注解, 校验值类型>// 存储所有可能的值private Set<Integer> set = new HashSet<>();// 初始化方法,可以获取注解上的内容并进行处理@Overridepublic void initialize(ListValue constraintAnnotation) {// 获取属性上的所有数据,这个vals就是ListValue里的vals,属性上的注解是@ListValue(vals={0,1})int[] vals = constraintAnnotation.vals();for (int val : vals) {set.add(val);}}/*** 判断是否校验成功* @param value 需要校验的值* @param context 整个上下文环境信息* @return 判断需要校验的值是否在属性上的所有枚举值*/@Overridepublic boolean isValid(Integer value, ConstraintValidatorContext context) {return set.contains(value);}}
③ 关联自定义的校验器和自定义的校验注解
@Constraint(validatedBy = { ListValueConstraintValidator.class })
//ListValueConstraintValidator 校验器@Documented// 可以指定多个不同的校验器,适配不同类型的校验@Constraint(validatedBy = { ListValueConstraintValidator.class })@Target({ METHOD, FIELD, ANNOTATION_TYPE, CONSTRUCTOR, PARAMETER, TYPE_USE })@Retention(RUNTIME)public @interface ListValue {// 在配置文件ValidationMessages.properties中// 校验出错后,出错信息获取的位置String message() default "{com.atguigu.common.valid.ListValue.message}";// 支持分组校验的功能Class<?>[] groups() default { };// 支持自定义负载信息Class<? extends Payload>[] payload() default { };// 数组,需要用户自己指定int[] vals() default { };}
④ 使用自定义校验注解
/*** 显示状态[0-不显示;1-显示]*/@NotNull(groups = {AddGroup.class, UpdateStatusGroup.class})@ListValue(vals={0,1}, groups = {AddGroup.class, UpdateStatusGroup.class})private Integer showStatus;
5、品牌与分类关联

create table pms_category_brand_relation (id bigint not null auto_increment,brand_id bigint comment '品牌id',catelog_id bigint comment '分类id',brand_name varchar(255),catelog_name varchar(255),primary key (id));alter table pms_category_brand_relation comment '品牌分类关联';
1)获取品牌关联的分类
/*** 获取当前品牌关联的所有分类列表*/@GetMapping("/catelog/list")public R catelogList(@RequestParam("brandId") Long branId){LambdaQueryWrapper<CategoryBrandRelationEntity> wrapper = new LambdaQueryWrapper<>();wrapper.eq(CategoryBrandRelationEntity::getBrandId,branId);List<CategoryBrandRelationEntity> list = categoryBrandRelationService.list(wrapper);return R.ok().put("data", list);}
2)新增品牌与分类关联
/*** 新增品牌与分类关联关系*/@RequestMapping("/save")//@RequiresPermissions("product:categorybrandrelation:save")public R save(@RequestBody CategoryBrandRelationEntity categoryBrandRelation){categoryBrandRelationService.saveDetail(categoryBrandRelation);return R.ok();}
/*** 新增品牌与分类关联关系* @param categoryBrandRelation*/@Overridepublic void saveDetail(CategoryBrandRelationEntity categoryBrandRelation) {Long brandId = categoryBrandRelation.getBrandId();Long catelogId = categoryBrandRelation.getCatelogId();BrandEntity brandEntity = brandDao.selectById(brandId);CategoryEntity categoryEntity = categoryDao.selectById(catelogId);categoryBrandRelation.setBrandName(brandEntity.getName());categoryBrandRelation.setCatelogName(categoryEntity.getName());this.save(categoryBrandRelation);}
3)级联更新
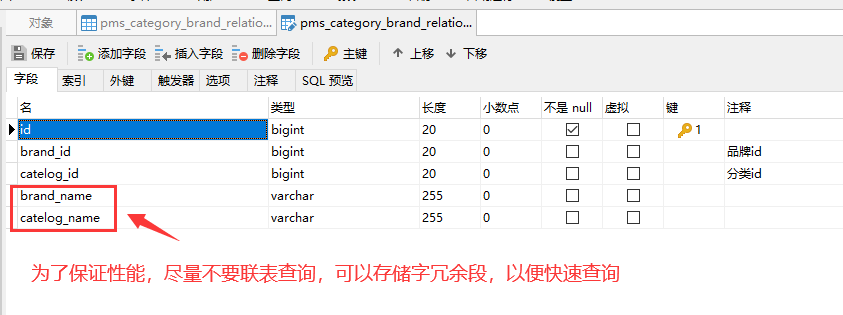
/*** BrandController:修改品牌*/@RequestMapping("/update")public R update(@Validated({UpdateGroup.class}) @RequestBody BrandEntity brand){brandService.updateDetail(brand);return R.ok();}/*** BrandServiceImpl:修改品牌*/@Transactional@Overridepublic void updateDetail(BrandEntity brand) {// 保证冗余字段的数据一致性// 1、首先更新自身表的数据this.updateById(brand);// 2、如果品牌名称不为空,更新关联表的数据if(!StringUtils.isEmpty(brand.getName())){categoryBrandRelationService.updateBrand(brand.getBrandId(),brand.getName());//TODO 更新其他关联表的数据}}/*** CategoryBrandRelationServiceImpl:更新关联表的品牌名称* @param brandId* @param name*/@Overridepublic void updateBrand(Long brandId, String name) {CategoryBrandRelationEntity entity = new CategoryBrandRelationEntity();entity.setBrandId(brandId);entity.setBrandName(name);LambdaQueryWrapper<CategoryBrandRelationEntity> wrapper = new LambdaQueryWrapper<>();wrapper.eq(CategoryBrandRelationEntity::getBrandId,brandId);this.update(entity,wrapper);}
/*** CategoryController:修改分类*/@RequestMapping("/update")public R update(@RequestBody CategoryEntity category){categoryService.updateCascade(category);return R.ok();}/*** CategoryServiceImpl:修改分类*/@Transactional@Overridepublic void updateCascade(CategoryEntity category) {this.updateById(category);// 更新关联表categoryBrandRelationService.updateCategory(category.getCatId(),category.getName());}/*** CategoryBrandRelationServiceImpl:修改分类*/@Transactional@Overridepublic void updateCategory(Long catId, String name) {CategoryBrandRelationEntity entity = new CategoryBrandRelationEntity();entity.setCatelogId(catId);entity.setCatelogName(name);LambdaQueryWrapper<CategoryBrandRelationEntity> wrapper = new LambdaQueryWrapper<>();wrapper.eq(CategoryBrandRelationEntity::getCatelogId,catId);this.baseMapper.update(entity,wrapper);// this.baseMapper.updateCategory(catId,name);}

