资料来源:https://www.bilibili.com/video/BV1KW411F7oX?p=1
一、Spring Boot与缓存
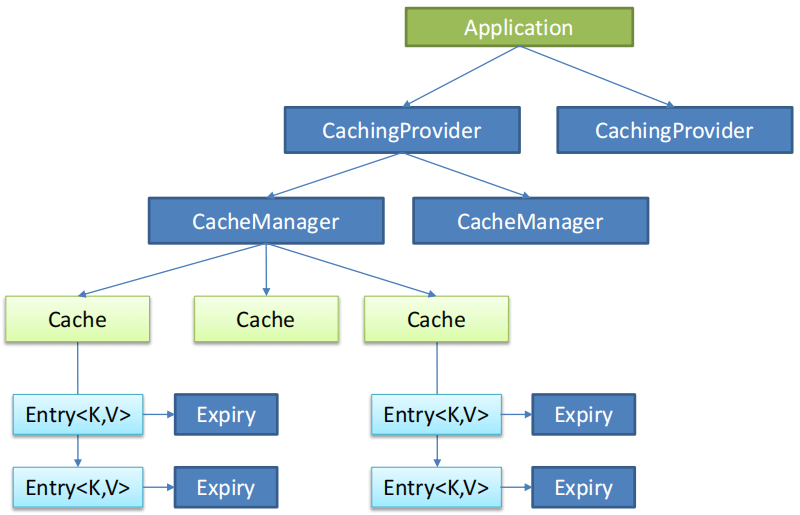
1、JSR107
Java Caching定义了5个核心接口,分别是CachingProvider, CacheManager, Cache, Entry 和 Expiry。
- CachingProvider定义了创建、配置、获取、管理和控制多个CacheManager。一个应用可以在运行期访问多个CachingProvider。 —- 缓存提供者
- CacheManager定义了创建、配置、获取、管理和控制多个唯一命名的Cache,这些Cache存在于CacheManager的上下文中。一个CacheManager仅被一个CachingProvider所拥有。 —- 缓存管理器
- Cache是一个类似Map的数据结构并临时存储以Key为索引的值。一个Cache仅被一个CacheManager所拥有。
- Entry是一个存储在Cache中的key-value对。
- Expiry每一个存储在Cache中的条目有一个定义的有效期。一旦超过这个时间,条目为过期的状态。一旦过期,条目将不可访问、更新和删除。缓存有效期可以通过ExpiryPolicy设置。
2、Spring缓存抽象
Spring从3.1开始定义了org.springframework.cache.Cache和org.springframework.cache.CacheManager接口来统一不同的缓存技术;并支持使用JCache(JSR-107)注解简化我们开发;
- Cache接口为缓存的组件规范定义,包含缓存的各种操作集合;
- Cache接口下Spring提供了各种xxxCache的实现;如RedisCache,EhCacheCache , ConcurrentMapCache等;
- 每次调用需要缓存功能的方法时,Spring会检查检查指定参数的指定的目标方法是否已经被调用过;如果有就直接从缓存中获取方法调用后的结果,如果没有就调用方法并缓存结果后返回给用户。下次调用直接从缓存中获取。
- 使用Spring缓存抽象时我们需要关注以下两点;
- 1、确定方法需要被缓存以及他们的缓存策略
- 2、从缓存中读取之前缓存存储的数据
3、缓存工作原理
将方法的运行结果进行缓存;以后再要相同的数据,直接从缓存中获取,不用调用方法;
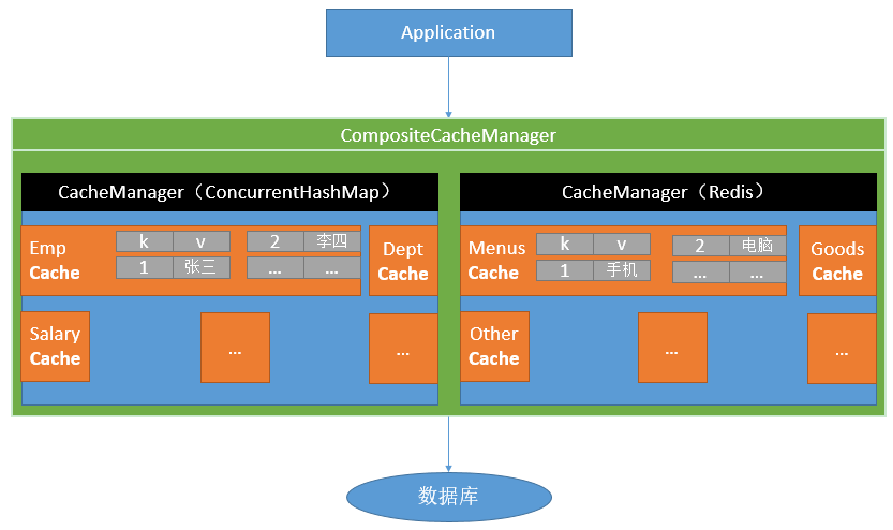
CacheManager管理多个Cache组件的,对缓存的真正CRUD操作在Cache组件中,每一个缓存组件有自己唯一一个名字;
默认使用的是ConcurrentMapCacheManager==ConcurrentMapCache;将数据保存在 ConcurrentMap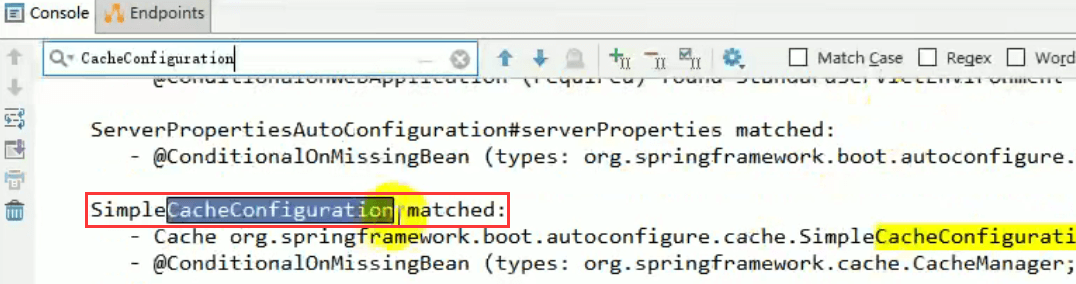
开发中使用缓存中间件;redis、memcached、ehcache;
原理:
1、自动配置类:CacheAutoConfiguration
2、缓存的配置类
org.springframework.boot.autoconfigure.cache.GenericCacheConfiguration
org.springframework.boot.autoconfigure.cache.JCacheCacheConfiguration
org.springframework.boot.autoconfigure.cache.EhCacheCacheConfiguration
org.springframework.boot.autoconfigure.cache.HazelcastCacheConfiguration
org.springframework.boot.autoconfigure.cache.InfinispanCacheConfiguration
org.springframework.boot.autoconfigure.cache.CouchbaseCacheConfiguration
org.springframework.boot.autoconfigure.cache.RedisCacheConfiguration
org.springframework.boot.autoconfigure.cache.CaffeineCacheConfiguration
org.springframework.boot.autoconfigure.cache.GuavaCacheConfiguration
org.springframework.boot.autoconfigure.cache.SimpleCacheConfiguration【默认】
org.springframework.boot.autoconfigure.cache.NoOpCacheConfiguration
3、哪个配置类默认生效:SimpleCacheConfiguration;
application.properties中配置debug=true,可查看以下数据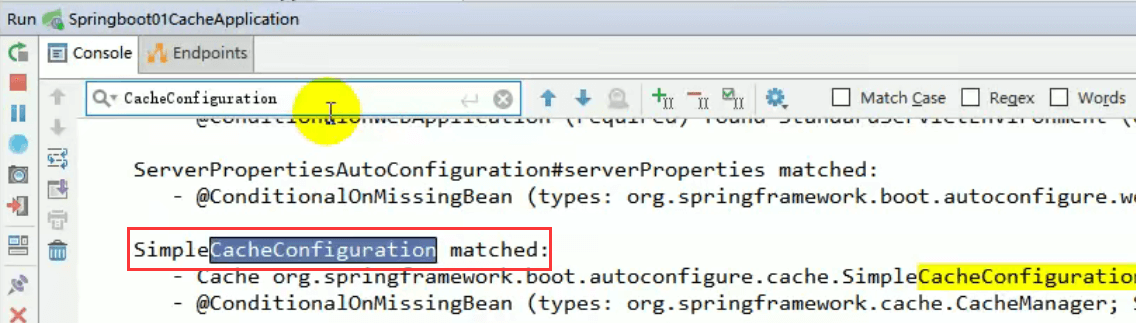
4、给容器中注册了一个CacheManager:ConcurrentMapCacheManager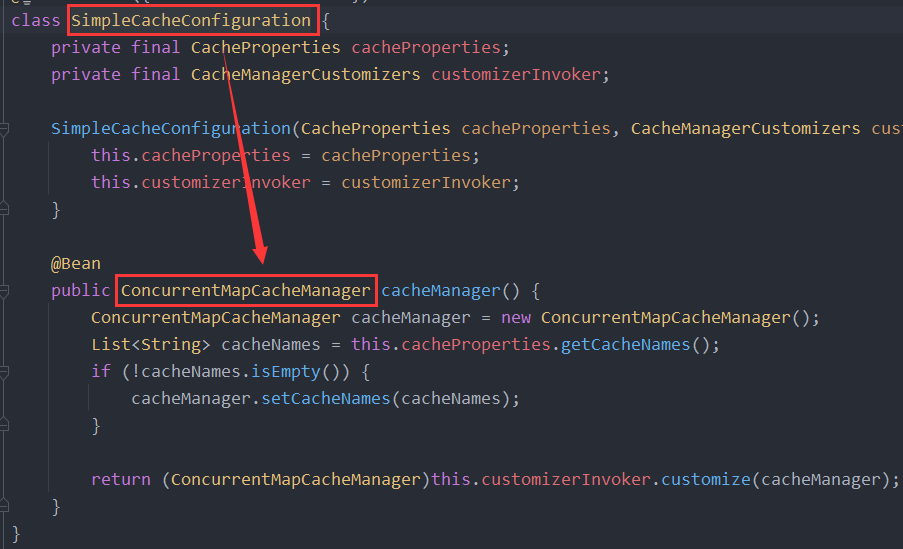
5、可以获取和创建ConcurrentMapCache类型的缓存组件;他的作用将数据保存在ConcurrentMap中
4、缓存注解
| Cache | 缓存接口,定义缓存操作。 实现有:RedisCache、EhCacheCache、ConcurrentMapCache等 |
|---|---|
| CacheManager | 缓存管理器,管理各种缓存(Cache)组件 |
| @Cacheable | 主要针对方法配置,能够根据方法的请求参数对其结果进行缓存 |
| @CacheEvict | 清空缓存 |
| @CachePut | 保证方法被调用,又希望结果被缓存 |
| @EnableCaching | 开启基于注解的缓存 |
| keyGenerator | 缓存数据时key生成策略 |
| serialize | 缓存数据时value序列化策略 |
4.1 @Cacheable
1、运行流程
第一步:service方法运行之前,先去查询Cache(缓存组件),按照cacheNames指定的名字获取缓存; (CacheManager先获取相应的缓存)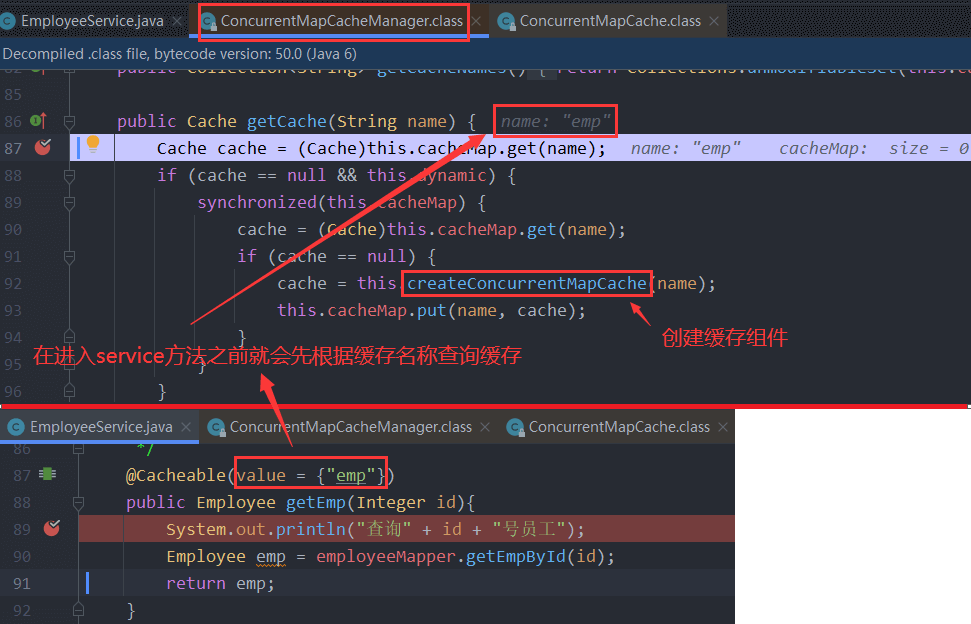
第一次获取缓存时,如果没有Cache组件会自动创建。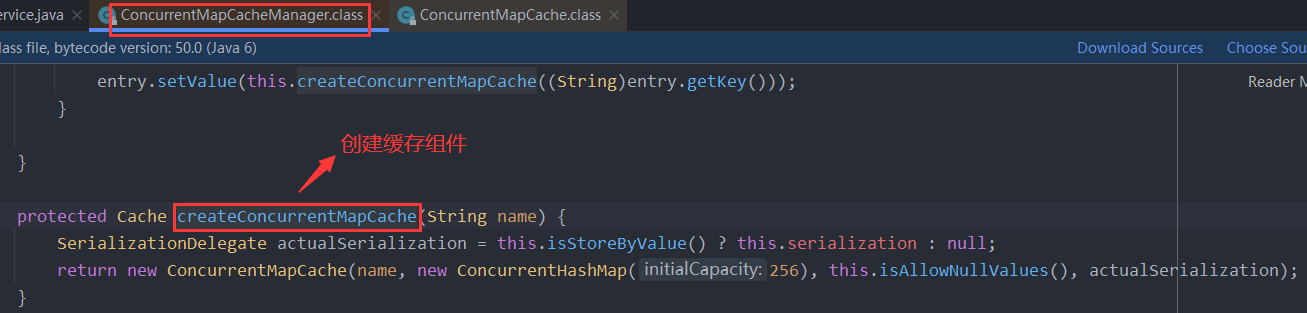
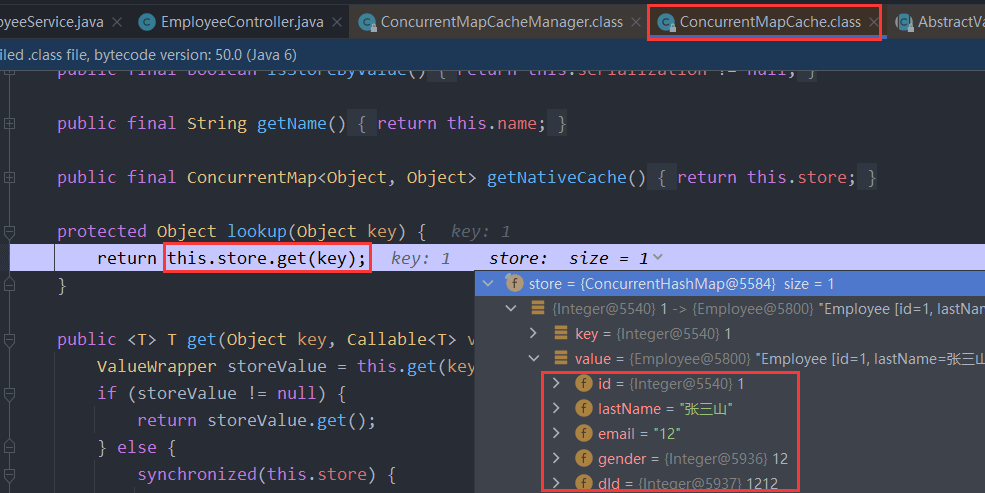
第二步:首先根据方法的参数按照某种策略生成key,然后根据key去Cache中查找缓存的内容。第一次查询无缓存,所以store为空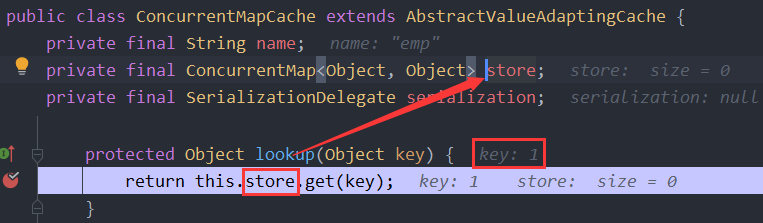
key是按照某种策略生成的;默认是使用keyGenerator生成的,默认使用SimpleKeyGenerator生成key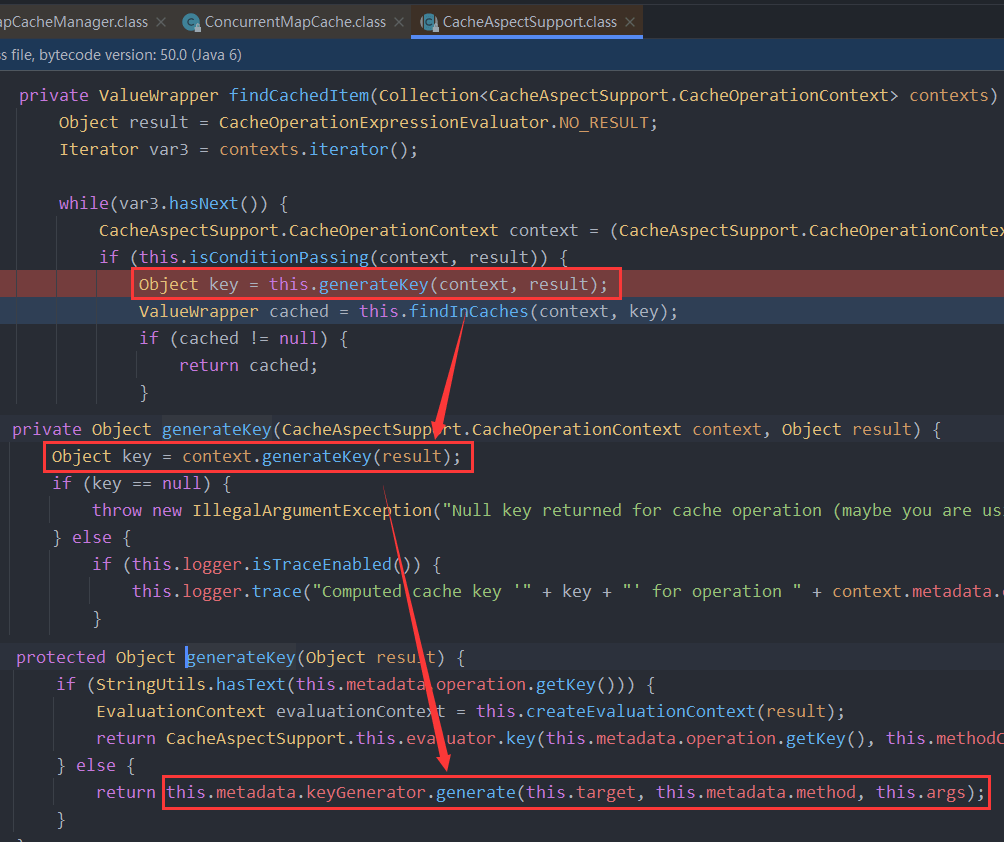
SimpleKeyGenerator生成key的默认策略;
如果没有参数;key = new SimpleKey();
如果有一个参数:key = 参数的值
如果有多个参数:key = new SimpleKey(params);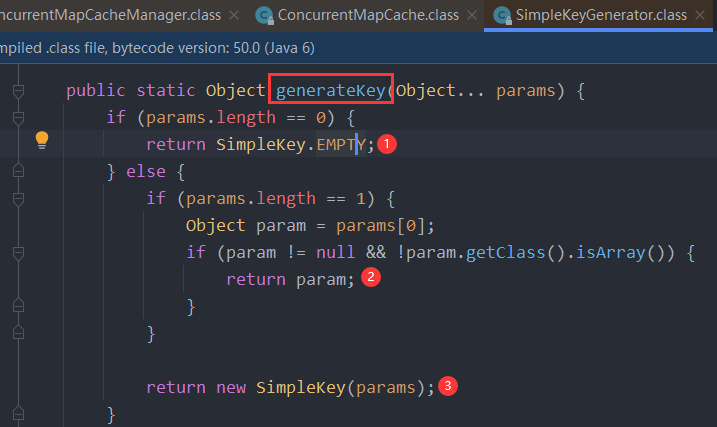
第三步:没有查到缓存就调用目标方法返回结果
第四步:将目标方法返回的结果,放进缓存中
@Cacheable标注的方法执行之前先来检查缓存中有没有这个数据,默认按照参数的值作为key去查询缓存
如果没有就运行方法并将结果放入缓存;以后再来调用就可以直接使用缓存中的数据;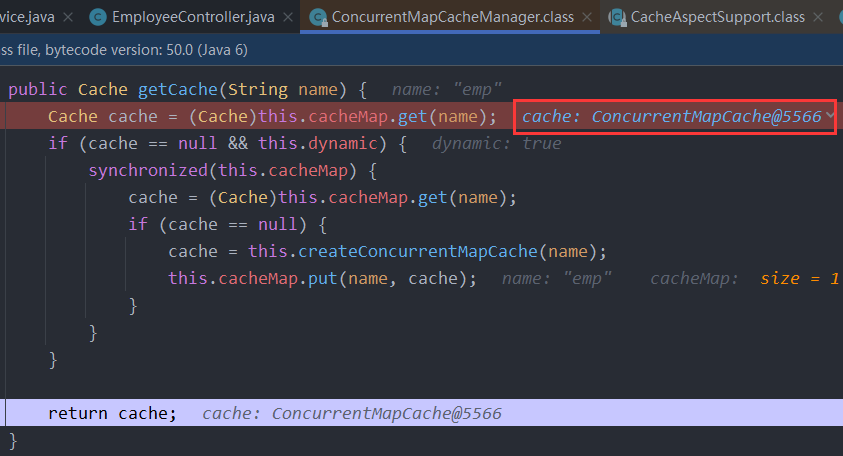
2、核心原理
1)使用CacheManager【ConcurrentMapCacheManager】按照名字得到Cache【ConcurrentMapCache】组件
2)key使用keyGenerator生成的,默认是SimpleKeyGenerator
3、几个属性
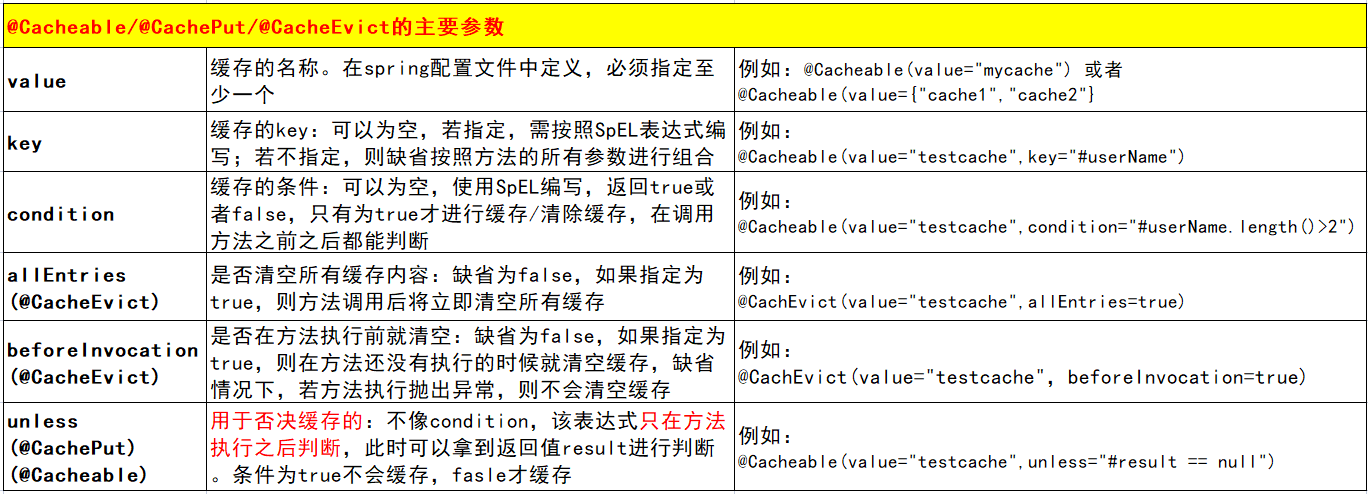
cacheNames/value:指定缓存组件的名字;将方法的返回结果放在哪个缓存中,是数组的方式,可以指定多个缓存;
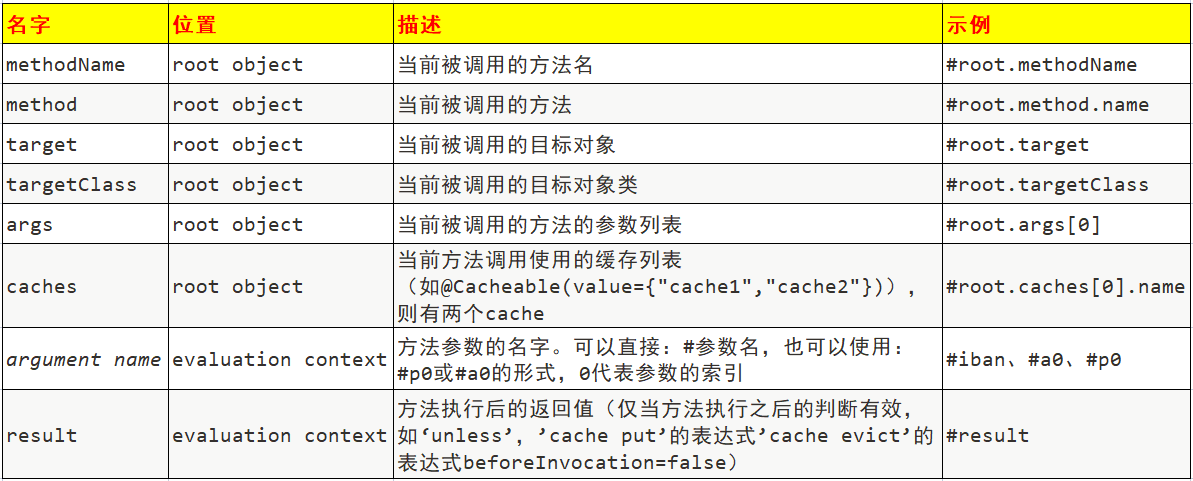
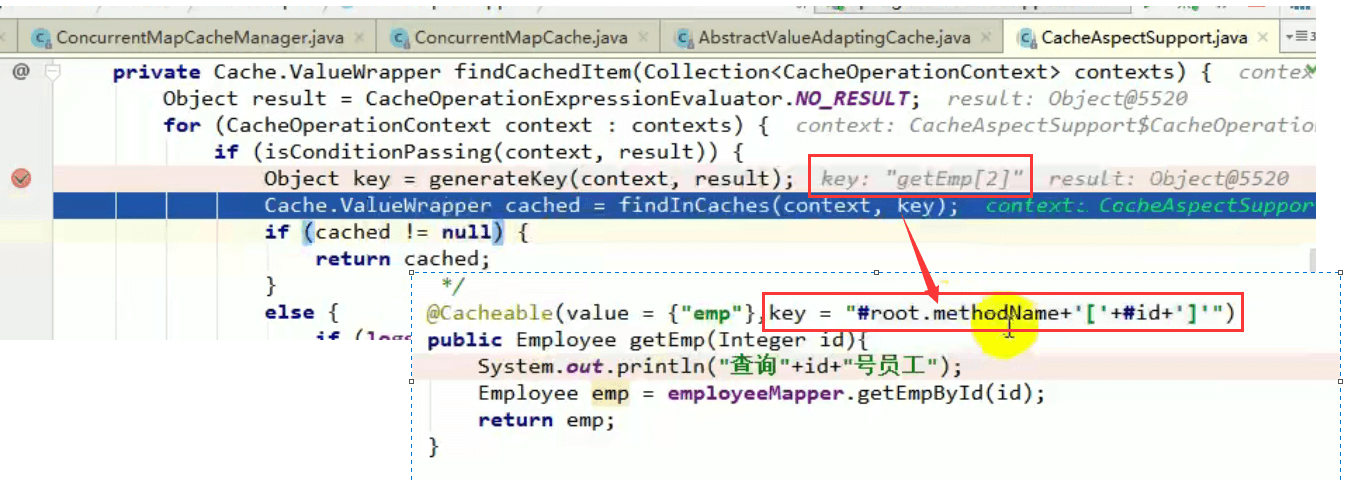
key:缓存数据使用的key;可以用它来指定。默认是使用方法参数的值 1 - 方法的返回值
编写SpEL:#id;参数id的值 #a0 #p0 #root.args[0]
getEmp[2]:key = “#root.methodName+’[‘+#id+’]’”
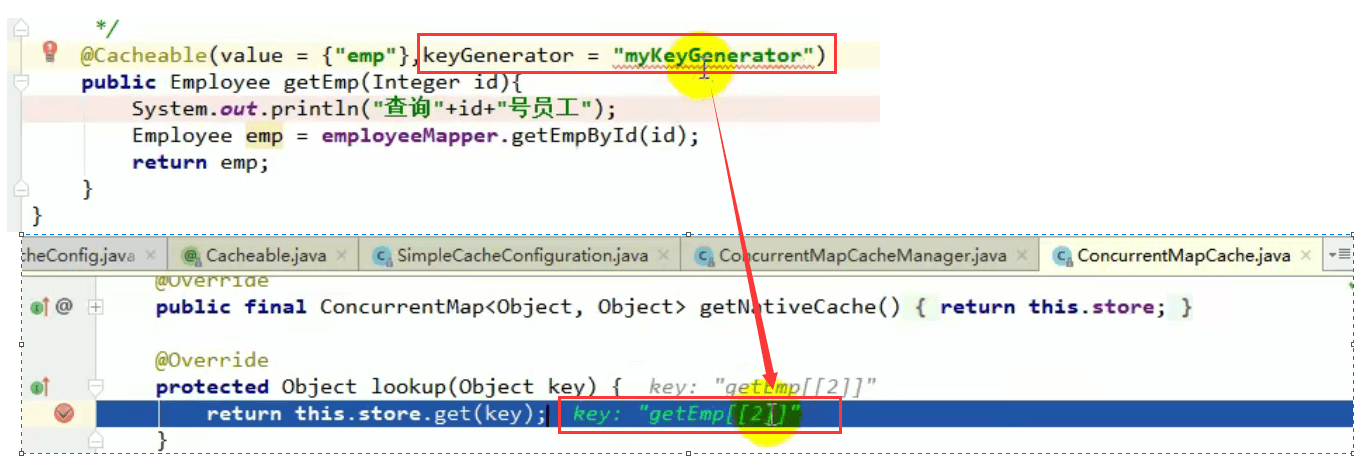
 keyGenerator:key的生成器;可以自己指定key的生成器的组件id
key/keyGenerator:二选一使用;
@Configurationpublic class MyCacheConfig {@Bean("myKeyGenerator")public KeyGenerator keyGenerator(){return new KeyGenerator(){@Overridepublic Object generate(Object target, Method method, Object... params) {return method.getName()+"["+ Arrays.asList(params).toString()+"]";}};}}
cacheManager:指定缓存管理器;或者cacheResolver指定获取解析器
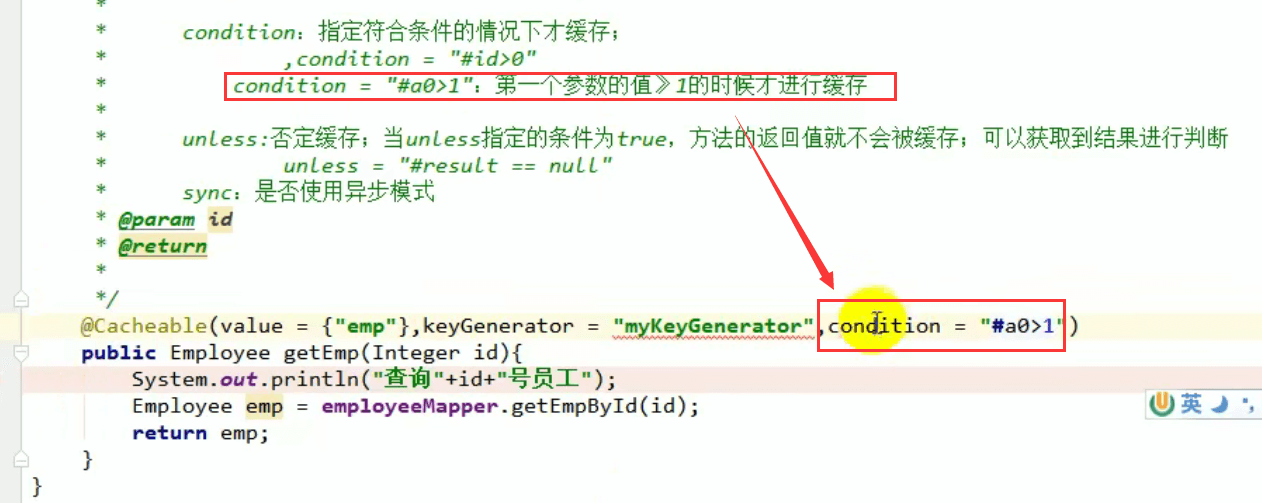
condition:指定符合条件的情况下才缓存;
condition = “#id>0”
condition = “#a0>1”:第一个参数的值 >1的时候才进行缓存
unless:否定缓存;当unless指定的条件为true,方法的返回值就不会被缓存;可以获取到结果进行判断
unless = “#result == null”
unless = “#a0==2”:如果第一个参数的值是2,结果不缓存;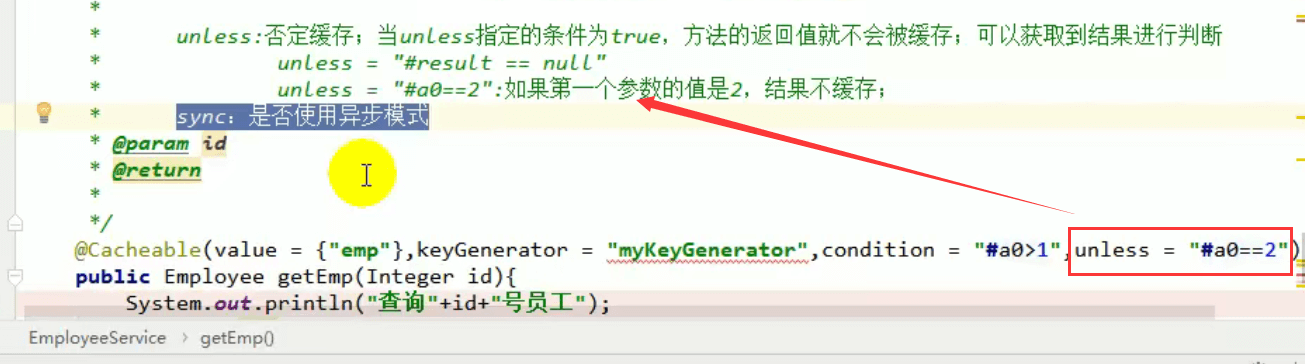
sync:是否使用异步模式,此时不支持unless
4.2 @CachePut
既调用方法,又更新缓存数据;同步更新缓存
修改了数据库的某个数据,同时更新缓存;
@Cacheable(value = {"emp"})public Employee getEmp(Integer id){System.out.println("查询" + id + "号员工");Employee emp = employeeMapper.getEmpById(id);return emp;}@CachePut(value = "emp")public Employee updateEmp(Employee employee){System.out.println("updateEmp:" + employee);employeeMapper.updateEmp(employee);return employee;}
运行时机:
1、先调用目标方法
2、将目标方法的结果缓存起来
注意:缓存更新的key与缓存查询的key必须一致
测试步骤:
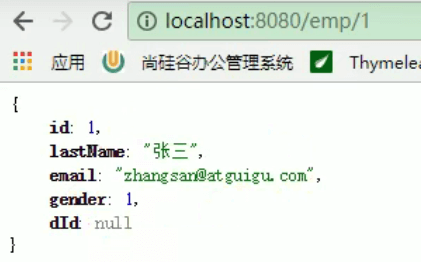
1、查询1号员工,查到的结果会放在缓存中;
此时的key:1 value:lastName:张三

2、以后查询还是之前的结果,直接查询缓存数据,不用查询数据库
3、更新1号员工【lastName:zhangsan;gender:0】
将方法的返回值也放进缓存了,此时的key:传入的employee对象 value:返回的employee对象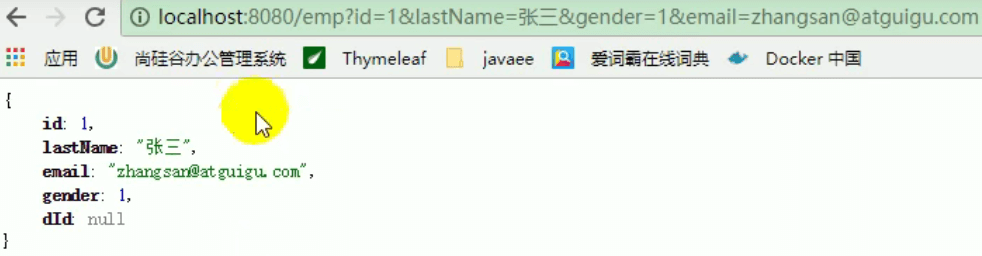
4、再次查询1号员工
1)没有更新先前的查询结果。原因是:1号员工没有在缓存中更新,先前缓存数据的key为1,更新操作后的缓存数据的key为employee对象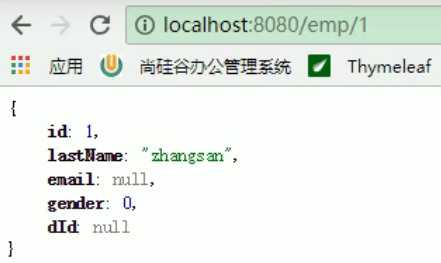
2)要想查询结果为更新后的数据:
@CachePut(value = "emp", key = "#result.id")public Employee updateEmp(Employee employee){System.out.println("updateEmp:" + employee);employeeMapper.updateEmp(employee);return employee;}
方式一:key = “#employee.id”:使用传入的参数的员工id
方式二:key = “#result.id”:使用返回后的id
注意:@Cacheable的key不能使用#result,原因是方法运行之前就要生成key。此时没有result
4.3 @CacheEvict
key:指定要清除的数据
allEntries = true:指定清除这个缓存中所有的数据
beforeInvocation = false:缓存的清除是否在方法之前执行
默认代表缓存清除操作是在方法执行之后执行,如果出现异常缓存就不会清除
beforeInvocation = true:
代表清除缓存操作是在方法运行之前执行,无论方法是否出现异常,缓存都清除
@CacheEvict(value="emp", key = "#id", beforeInvocation = true)public void deleteEmp(Integer id){System.out.println("deleteEmp:"+id);//employeeMapper.deleteEmpById(id);int i = 10/0;}
4.4 @Caching
定义复杂的缓存规则
@Caching(cacheable = { @Cacheable(value="emp", key = "#lastName") },put = { @CachePut(value="emp", key = "#result.id"),@CachePut(value="emp", key = "#result.email")})public Employee getEmpByLastName(String lastName){return employeeMapper.getEmpByLastName(lastName);}
5、缓存的使用
1、引入spring-boot-starter-cache模块
<dependency><groupId>org.springframework.boot</groupId><artifactId>spring-boot-starter-cache</artifactId></dependency>
2、@EnableCaching开启缓存
@SpringBootApplication@EnableCachingpublic class Springboot01CacheApplication {public static void main(String[] args) {SpringApplication.run(Springboot01CacheApplication.class, args);}}
3、使用缓存注解
@Cacheable(value = {"emp"}, condition = "#a0>1", unless = "#a0==2")public Employee getEmp(Integer id){System.out.println("查询" + id + "号员工");Employee emp = employeeMapper.getEmpById(id);return emp;}
4、切换为其他缓存
6、整合redis实现缓存
<dependency><groupId>org.springframework.boot</groupId><artifactId>spring-boot-starter-data-redis</artifactId></dependency>
引入spring-boot-starter-data-redisapplication.yml配置redis连接地址使用RestTemplate操作redisredisTemplate.opsForValue(); //操作字符串redisTemplate.opsForHash(); //操作hashredisTemplate.opsForList(); //操作listredisTemplate.opsForSet(); //操作setredisTemplate.opsForZSet(); //操作有序set配置缓存、CacheManagerCustomizers测试使用缓存、切换缓存、CompositeCacheManager
原理:CacheManager===Cache 缓存组件来实际给缓存中存取数据
1)引入redis的starter,容器中保存的是 RedisCacheManager(此时就作为默认缓存管理器);
2)RedisCacheManager 帮我们创建 RedisCache 来作为缓存组件;RedisCache通过操作redis缓存数据的
3)默认保存数据 k-v 都是Object;利用序列化保存;如何保存为json
1、引入了redis的starter,cacheManager变为 RedisCacheManager;
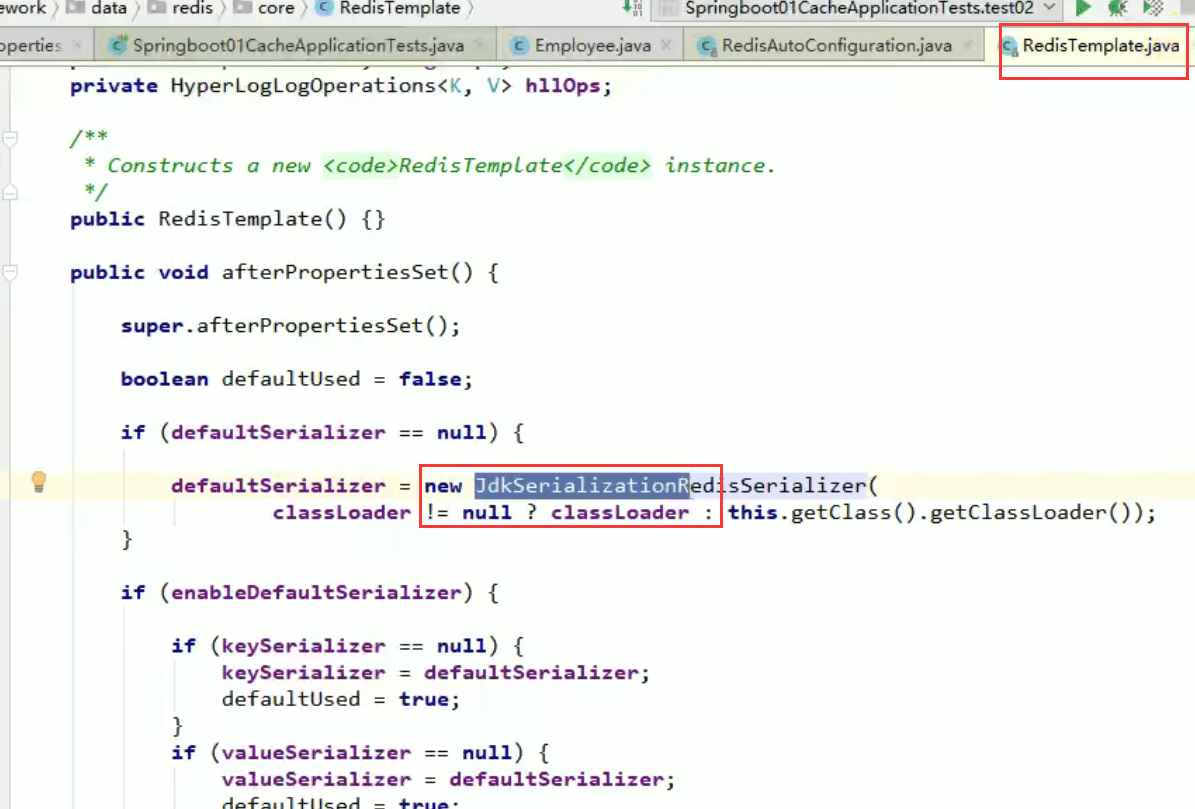
2、默认创建的 RedisCacheManager 操作redis的时候使用的是:RedisTemplate
3、RedisTemplate
4)自定义CacheManager
@RunWith(SpringRunner.class)@SpringBootTestpublic class Springboot01CacheApplicationTests {@AutowiredEmployeeMapper employeeMapper;@AutowiredStringRedisTemplate stringRedisTemplate; //操作k-v都是字符串的@AutowiredRedisTemplate redisTemplate; //k-v都是对象的@AutowiredRedisTemplate<Object, Employee> empRedisTemplate;/*** Redis常见的五大数据类型* String(字符串)、List(列表)、Set(集合)、Hash(散列)、ZSet(有序集合)* stringRedisTemplate.opsForValue()[String(字符串)]* stringRedisTemplate.opsForList()[List(列表)]* stringRedisTemplate.opsForSet()[Set(集合)]* stringRedisTemplate.opsForHash()[Hash(散列)]* stringRedisTemplate.opsForZSet()[ZSet(有序集合)]*/@Testpublic void test01(){// 给redis中保存数据stringRedisTemplate.opsForValue().append("msg","hello");String msg = stringRedisTemplate.opsForValue().get("msg");System.out.println(msg);stringRedisTemplate.opsForList().leftPush("mylist","1");stringRedisTemplate.opsForList().leftPush("mylist","2");}// 测试保存对象@Testpublic void test02(){Employee empById = employeeMapper.getEmpById(1);// 默认如果保存对象,使用jdk序列化机制,序列化后的数据保存到redis中redisTemplate.opsForValue().set("emp-01",empById);// 将数据以json的方式保存// 方式一:自己将对象转为json// 方式二:redisTemplate默认的序列化规则;改变默认的序列化规则;empRedisTemplate.opsForValue().set("emp-01",empById);}}
@Configurationpublic class MyRedisConfig {@Beanpublic RedisTemplate<Object, Employee> empRedisTemplate(RedisConnectionFactory redisConnectionFactory)throws UnknownHostException {RedisTemplate<Object, Employee> template = new RedisTemplate<Object, Employee>();template.setConnectionFactory(redisConnectionFactory);Jackson2JsonRedisSerializer<Employee> ser = new Jackson2JsonRedisSerializer<Employee>(Employee.class);template.setDefaultSerializer(ser);return template;}@Beanpublic RedisTemplate<Object, Department> deptRedisTemplate(RedisConnectionFactory redisConnectionFactory)throws UnknownHostException {RedisTemplate<Object, Department> template = new RedisTemplate<Object, Department>();template.setConnectionFactory(redisConnectionFactory);Jackson2JsonRedisSerializer<Department> ser = new Jackson2JsonRedisSerializer<Department>(Department.class);template.setDefaultSerializer(ser);return template;}// CacheManagerCustomizers可以来定制缓存的一些规则@Primary // 将某个缓存管理器作为默认的@Beanpublic RedisCacheManager employeeCacheManager(RedisTemplate<Object, Employee> empRedisTemplate){RedisCacheManager cacheManager = new RedisCacheManager(empRedisTemplate);// key多了一个前缀// 使用前缀,默认会将CacheName作为key的前缀cacheManager.setUsePrefix(true);return cacheManager;}@Beanpublic RedisCacheManager deptCacheManager(RedisTemplate<Object, Department> deptRedisTemplate){RedisCacheManager cacheManager = new RedisCacheManager(deptRedisTemplate);// key多了一个前缀// 使用前缀,默认会将CacheName作为key的前缀cacheManager.setUsePrefix(true);return cacheManager;}}
@Servicepublic class DeptService {@AutowiredDepartmentMapper departmentMapper;@Qualifier("deptCacheManager")@AutowiredRedisCacheManager deptCacheManager;/*** 缓存的数据能存入redis;* 第二次从缓存中查询就不能反序列化回来;* 存的是dept的json数据;CacheManager默认使用RedisTemplate<Object, Employee>操作Redis*/@Cacheable(cacheNames = "dept", cacheManager = "deptCacheManager")public Department getDeptById(Integer id){System.out.println("查询部门" + id);Department department = departmentMapper.getDeptById(id);return department;}// 使用缓存管理器得到缓存,进行api调用public Department getDeptById(Integer id){System.out.println("查询部门" + id);Department department = departmentMapper.getDeptById(id);//获取某个缓存Cache dept = deptCacheManager.getCache("dept");dept.put("dept:1",department);return department;}}
二、Spring Boot与消息
三、Spring Boot与检索
四、Spring Boot与任务
1、异步任务
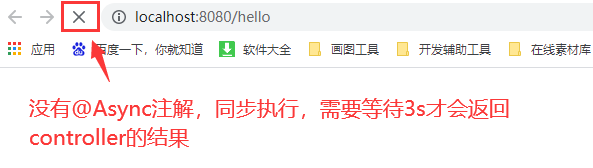
在Java应用中,绝大多数情况下都是通过同步的方式来实现交互处理的;但是在处理与第三方系统交互的时候,容易造成响应迟缓的情况,之前大部分都是使用多线程来完成此类任务,其实,在Spring 3.x之后,就已经内置了@Async来完美解决这个问题。
两个注解: @EnableAysnc、@Aysnc
@EnableAsync //开启异步注解功能@SpringBootApplicationpublic class Springboot04TaskApplication {public static void main(String[] args) {SpringApplication.run(Springboot04TaskApplication.class, args);}}
@RestControllerpublic class AsyncController {@AutowiredAsyncService asyncService;@GetMapping("/hello")public String hello(){asyncService.hello();return "success";}}@Servicepublic class AsyncService {// 告诉Spring这是一个异步方法,若是同步执行,controller会等待service方法执行完毕后才返回数据@Asyncpublic void hello(){try {Thread.sleep(3000);} catch (InterruptedException e) {e.printStackTrace();}System.out.println("处理数据中...");}}
2、定时任务
项目开发中经常需要执行一些定时任务,比如需要在每天凌晨时候,分析一次前一天的日志信息。Spring为我们提供了异步执行任务调度的方式,提供TaskExecutor 、TaskScheduler 接口。
两个注解:@EnableScheduling、@Scheduled
cron表达式: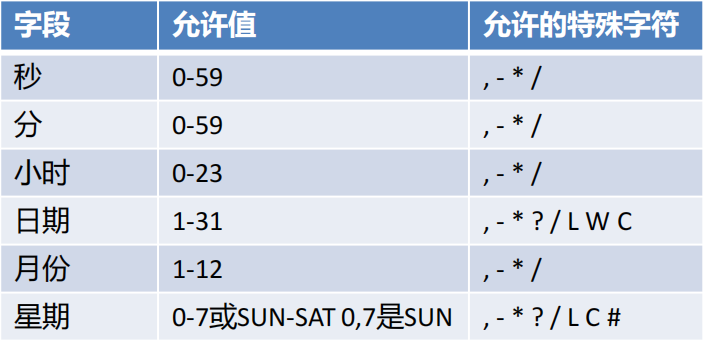

@EnableScheduling // 开启基于注解的定时任务@SpringBootApplicationpublic class Springboot04TaskApplication {public static void main(String[] args) {SpringApplication.run(Springboot04TaskApplication.class, args);}}
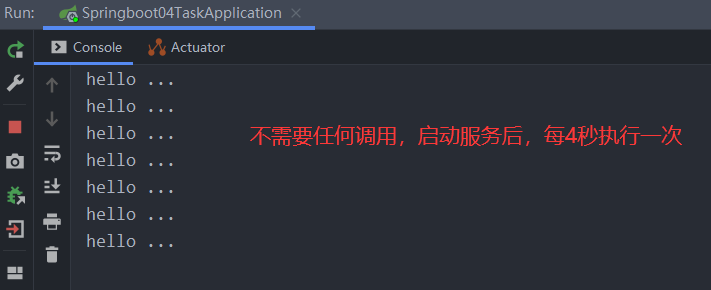
@Servicepublic class ScheduledService {/*** second(秒), minute(分), hour(时), day of month(日), month(月), day of week(周几).* 0 * * * * MON-FRI* 【0 0/5 14,18 * * ?】 每天14点整,和18点整,每隔5分钟执行一次* 【0 15 10 ? * 1-6】 每个月的周一至周六10:15分执行一次* 【0 0 2 ? * 6L】每个月的最后一个周六凌晨2点执行一次* 【0 0 2 LW * ?】每个月的最后一个工作日凌晨2点执行一次* 【0 0 2-4 ? * 1#1】每个月的第一个周一凌晨2点到4点期间,每个整点都执行一次;*/// @Scheduled(cron = "0 * * * * MON-SAT")// @Scheduled(cron = "0,1,2,3,4 * * * * MON-SAT") 周一到周六的每分钟的前四秒执行一次// @Scheduled(cron = "0-4 * * * * MON-SAT")@Scheduled(cron = "0/4 * * * * MON-SAT") // 每4秒执行一次public void hello(){System.out.println("hello ... ");}}
3、邮件任务
1)邮件发送需要引入spring-boot-starter-mail
<dependency><groupId>org.springframework.boot</groupId><artifactId>spring-boot-starter-mail</artifactId></dependency>
2)Spring Boot自动配置MailSenderAutoConfiguration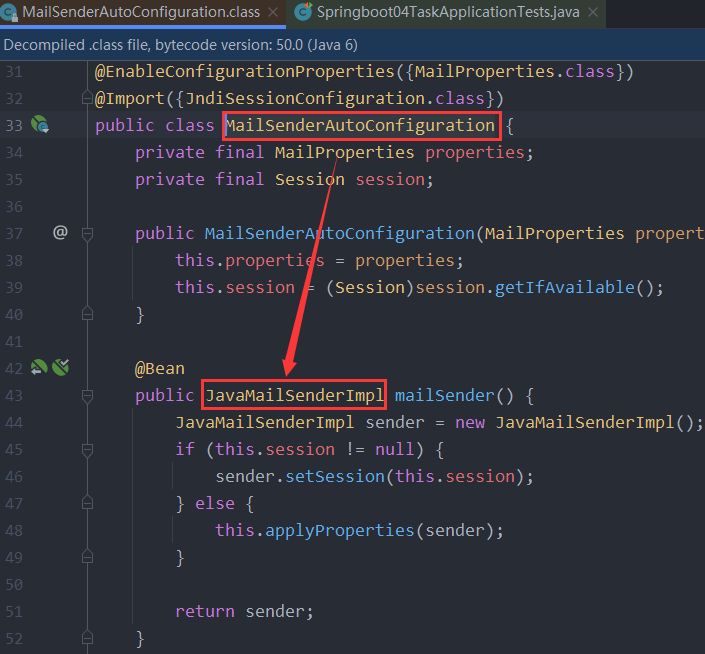
3)定义MailProperties内容,配置在application.yml中
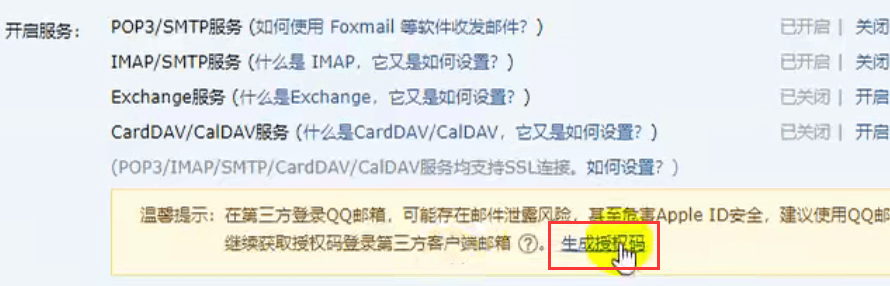
# 发件人邮箱用户名spring.mail.username=534096094@qq.com# 发件人邮箱授权码spring.mail.password=gtstkoszjelabijb# 发件人邮箱主机地址spring.mail.host=smtp.qq.com# 开启ssl,保证可靠连接,否则报错spring.mail.properties.mail.smtp.ssl.enable=true
4)自动装配JavaMailSender
@AutowiredJavaMailSenderImpl mailSender;
5)测试邮件发送
@RunWith(SpringRunner.class)@SpringBootTestpublic class Springboot04TaskApplicationTests {@AutowiredJavaMailSenderImpl mailSender;// 简单邮件发送@Testpublic void contextLoads() {SimpleMailMessage message = new SimpleMailMessage();// 邮件设置message.setSubject("通知-今晚开会");message.setText("今晚7:30开会");message.setTo("17512080612@163.com");message.setFrom("534096094@qq.com");mailSender.send(message);}@Testpublic void test02() throws Exception{// 1、创建一个复杂的消息邮件MimeMessage mimeMessage = mailSender.createMimeMessage();// 声明是否上传附件MimeMessageHelper helper = new MimeMessageHelper(mimeMessage, true);// 邮件设置helper.setSubject("通知-今晚开会");helper.setText("<b style='color:red'>今天 7:30 开会</b>", true);helper.setTo("17512080612@163.com");helper.setFrom("534096094@qq.com");// 上传文件helper.addAttachment("1.jpg",new File("D:\\\\1.jpg"));helper.addAttachment("2.jpg",new File("D:\\\\2.jpg"));mailSender.send(mimeMessage);}}
五、Spring Boot与安全
六、Spring Boot与分布式
七、Spring Boot与监控管理
八、Spring Boot与部署

若有收获,就点个赞吧
0 人点赞
