资料来源:https://www.bilibili.com/video/BV1hE411o7w7?p=144
一、设计模式-工厂模式
工厂模式是我们最常用的实例化对象模式了,它是用工厂中的方法代替new创建对象的一种设计模式
我们以Mybatis的SqlSession接口为例,它有一个实现类DefaultSqlSession,如果我们要创建该接口的实例对象:SqlSession sqlSession=new DefaultSqlSession();
可是,实际情况是,通常我们都要在创建SqlSession实例时做点初始化的工作,比如解析XML,封装连接数据库的信息等等。
在创建对象时,如果有一些不得不做的初始化操作时,我们首先到的是,可以使用构造函数,这样生成实例就写成:SqlSession sqlSession=new DefaultSqlSession(传入配置文件的路径)
但是,如果创建sqlSession实例时所做的初始化工作不是像赋值这样简单的事,可能是很长一段代码,如果也写入构造函数中,那你的代码很难看了(就需要Refactor重构)。
为什么说代码很难看,初学者可能没有这种感觉,我们分析如下,初始化工作如果是很长一段代码,说明要做的工作很多,将很多工作装入一个方法中,相当于将很多鸡蛋放在一个篮子里,是很危险的,这也是有悖于Java面向对象的原则,面向对象的封装(Encapsulation)和分派(Delegation)告诉我们,尽量将长的代码分派“切割”成每段,将每段再“封装”起来(减少段和段之间耦合联系性),这样,就会将风险分散,以后如果需要修改,只要更改每段,不会再发生牵一动百的事情。
所以,Mybatis框架在使用时为我们提供了SqlSessionFactory工厂类,通过方法获取到SqlSession对象。同时方法有很多重载,用于实现不同的需求。这个方法就是openSession(),它支持传入Connection参数来保证连接的一致性;支持传入true|false来保证事务的提交时机等等。
二、IOC和DI
1、IOC-Inversion of Control
它的含义为:**控制反转**。它不是一个技术,而是一种思想。其作用是用于削减代码间的耦合。它的实现思想就是**利用了工厂设计模式,把创建对象代码从具体类中剥离出去,交由工厂来完成,从而降低代码间的依赖关系**
耦合有如下分类:
(1)内容耦合。当一个模块直接修改或操作另一个模块的数据时,或一个模块不通过正常入口而转入另一个模块时,这样的耦合被称为内容耦合。内容耦合是最高程度的耦合,应该避免使用之。
(2)公共耦合。两个或两个以上的模块共同引用一个全局数据项,这种耦合被称为公共耦合。在具有大量公共耦合的结构中,确定究竟是哪个模块给全局变量赋了一个特定的值是十分困难的。
(3)外部耦合。一组模块都访问同一全局简单变量而不是同一全局数据结构,而且不是通过参数表传递该全局变量的信息,则称之为外部耦合。
(4)控制耦合。一个模块通过接口向另一个模块传递一个控制信号,接受信号的模块根据信号值而进行适当的动作,这种耦合被称为控制耦合。
(5)标记耦合。若一个模块A通过接口向两个模块B和C传递一个公共参数,那么称模块B和C之间存在一个标记耦合。
(6)数据耦合。模块之间通过参数来传递数据,那么被称为数据耦合。数据耦合是最低的一种耦合形式,系统中一般都存在这种类型的耦合(不需要解耦的部分),因为为了完成一些有意义的功能,往往需要将某些模块的输出数据作为另一些模块的输入数据。
(7)非直接耦合。两个模块之间没有直接关系,它们之间的联系完全是通过主模块的控制和调用来实现
为什么要解耦:
耦合是影响软件复杂程度和设计质量的一个重要因素,在设计上我们应采用以下原则:如果模块间必须存在耦合,就尽量使用数据耦合,少用控制耦合,限制公共耦合的范围,尽量避免使用内容耦合。
2、DI-Dependency Injection
它的全称是依赖注入。**是spring框架核心ioc的具体实现**。<br /> 举例说明:我们的程序在编写时,通过控制反转,把对象的创建交给了spring,但是代码中不可能出现没有依赖的情况。**ioc解耦只是降低他们的依赖关系,但不会消除**。例如:我们的业务层仍会调用持久层的方法。那这种业务层和持久层的依赖关系,在使用spring之后,就让spring来维护了。<br /> 简单的说,就是坐等框架把持久层对象传入业务层,而不用我们自己去获取。
三、Spring注解驱动开发入门
1、写在最前
spring在2.5版本引入了注解配置的支持,同时从Spring 3版本开始,Spring JavaConfig项目提供的许多特性成为核心Spring框架的一部分。因此可以使用Java而不是XML文件来定义应用程序类外部的bean。在这里面官方文档为我们提供了四个基本注解@Configuration,@Bean,@Import,@DependsOn
2、注解驱动入门案例介绍
1. 需求:实现保存一条数据到数据库。2. 表结构:create table account(id int primary key auto_increment,name varchar(50),money double(7,2));3. 要求:使用spring框架中的JdbcTemplate和DriverManagerDataSource使用纯注解配置spring的ioc
3、案例实现
3.1、导入坐标
<dependencies><dependency><groupId>org.springframework</groupId><artifactId>spring-context</artifactId><version>5.1.6.RELEASE</version></dependency><dependency><groupId>org.springframework</groupId><artifactId>spring-jdbc</artifactId><version>5.1.6.RELEASE</version></dependency><dependency><groupId>mysql</groupId><artifactId>mysql-connector-java</artifactId><version>5.1.45</version></dependency></dependencies>
3.2、编写配置类
/*** spring的配置类,相当于applicationContext.xml的作用*/@Import(JdbcConfig.class) // 建立JdbcConfig与主配置文件SpringConfiguration的关联@PropertySource(value="classpath:jdbc.properties") // 读取配置文件内容,也可以放到JdbcConfig上@Configuration // spring的配置类,相当于applicationContext.xml的作用//@Componentpublic class SpringConfiguration {}
/*** 和Jdbc操作相关的配置类*/// 读取配置文件内容,也可以放到SpringConfiguration配置类上// @PropertySource(value="classpath:jdbc.properties")public class JdbcConfig {@Value("${jdbc.driver}")private String driver;@Value("${jdbc.url}")private String url;@Value("${jdbc.username}")private String username;@Value("${jdbc.password}")private String password;/*** 创建JdbcTemplate对象,并且存入Ioc容器* @return*/@Bean("jdbcTemplate") // @Bean:把当前对象的返回值存入Ioc容器,指定bean的ID为jdbcTemplate,若不指定则默认为方法名// @Autowired:自动按照类型注入,会从ioc容器中找到跟DataSource参数类型相匹配的对象。此处可以不用标注@Autowired,会自动在容器中注入public JdbcTemplate createJdbcTemplate(@Autowired DataSource dataSource){return new JdbcTemplate(dataSource);}/*** 创建数据源,并存入ioc容器* @return*/@Beanpublic DataSource createDataSource(){// 1.创建Spring的内置数据源对象DriverManagerDataSource dataSource = new DriverManagerDataSource();// 2.给数据源提供必要的参数dataSource.setDriverClassName(driver);dataSource.setUrl(url);dataSource.setUsername(username);dataSource.setPassword(password);// 3.返回return dataSource;}}
3.3、编写配置文件
jdbc.driver=com.mysql.jdbc.Driverjdbc.url=jdbc:mysql://localhost:3306/spring_day01jdbc.username=rootjdbc.password=1234
3.4、编写测试类
/*** 测试spring注解驱动开发的入门案例*/public class SpringAnnotationTest {public static void main(String[] args) {// 1.创建容器(基于注解的创建方式)// AnnotationConfigApplicationContext ac = new AnnotationConfigApplicationContext(SpringConfiguration.class);// 首先扫描config包下存在@Configuration注解的类AnnotationConfigApplicationContext ac = new AnnotationConfigApplicationContext("config");// 2.根据bean的Id获取对象JdbcTemplate jdbcTemplate = ac.getBean("jdbcTemplate", JdbcTemplate.class);// 3.执行操作jdbcTemplate.update("insert into account(name, money) values(?, ?)","zzz",54321);}}
四、IOC的常用注解分析
1、用于注解驱动的注解
1.1、@Configuration
1.1.1、源码
@Target(ElementType.TYPE)@Retention(RetentionPolicy.RUNTIME)@Documented@Component // 将Configuration修饰的对象存在IOC容器public @interface Configuration {@AliasFor(annotation = Component.class)String value() default ""; // 支持设置Bean的ID}
1.1.2、说明
1、作用:
它是在spring3.0版本之后加入的。此注解是spring支持注解驱动开发的一个标志。表明当前类是spring的一个配置类,作用是替代spring的applicationContext.xml。但其本质就是@Component注解,被此注解修饰的类,也会被存入spring的IOC容器。
2、属性:
value:用于存入spring的Ioc容器中Bean的id。
3、使用场景:
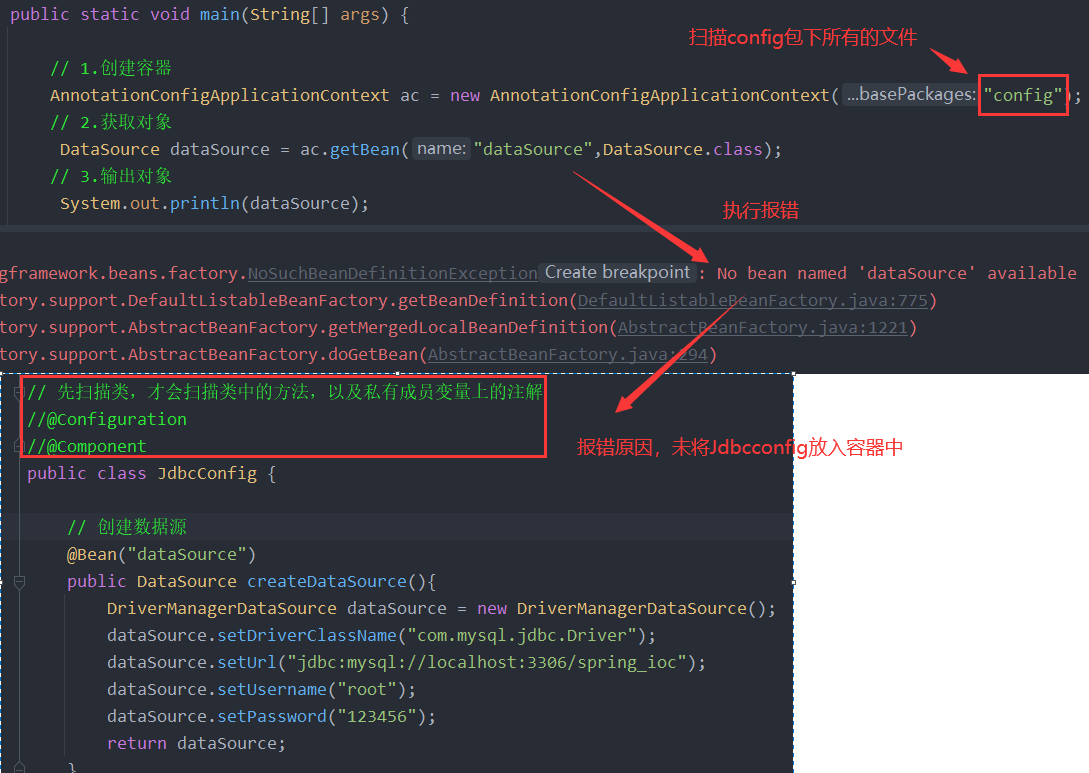
在注解驱动开发时,用于编写配置的类,通常可以使用此注解。一般情况下,我们的配置也会分为主从配置,@Configuration一般出现在主配置类上。例如,入门案例中的SpringConfiguration类上。值得注意的是,如果我们在注解驱动开发时,构建ioc容器使用的是传入字节码的构造函数,此注解可以省略。但是如果传入的是一个包,此注解则不能省略。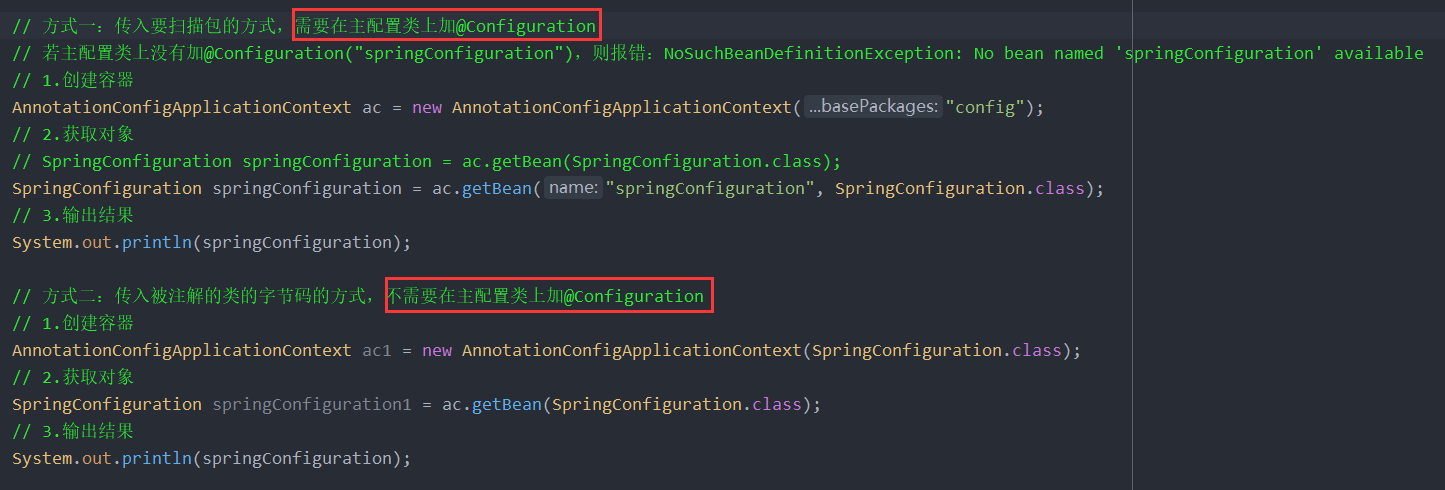
// 方式一:传入要扫描包的方式,需要在主配置类上加@Configuration// 若主配置类上没有加@Configuration("springConfiguration"),则报错:NoSuchBeanDefinitionException: No bean named 'springConfiguration' available// 1.创建容器AnnotationConfigApplicationContext ac = new AnnotationConfigApplicationContext("config");// 2.获取对象// SpringConfiguration springConfiguration = ac.getBean(SpringConfiguration.class);SpringConfiguration springConfiguration = ac.getBean("springConfiguration", SpringConfiguration.class);// 3.输出结果System.out.println(springConfiguration); // config.SpringConfiguration$$EnhancerBySpringCGLIB$$55ee2d39@3439f68d// 方式二:传入被注解的类的字节码的方式,不需要在主配置类上加@Configuration// 1.创建容器AnnotationConfigApplicationContext ac1 = new AnnotationConfigApplicationContext(SpringConfiguration.class);// 2.获取对象SpringConfiguration springConfiguration1 = ac1.getBean(SpringConfiguration.class);// 3.输出结果System.out.println(springConfiguration1); // config.SpringConfiguration$$EnhancerBySpringCGLIB$$55ee2d39@74294adb
1.1.3、示例
在注解驱动的入门案例中,由于没有了applicationContext.xml,就没法在xml中配置spring创建容器要扫描的包了。那么,我们自己写的一些类,通过注解配置到ioc容器中也无法实现了。此时就可以使用此注解来代替spring的配置文件。
/*** spring的配置类* 用于替代xml配置*/@Configuration@Import(JdbcConfig.class)@PropertySource("classpath:jdbc.properties")public class SpringConfiguration {}
1.2、@ComponentScan
1.2.1、源码
@Retention(RetentionPolicy.RUNTIME)@Target(ElementType.TYPE)@Documented@Repeatable(ComponentScans.class)public @interface ComponentScan {@AliasFor("basePackages")String[] value() default {};@AliasFor("value")String[] basePackages() default {};Class<?>[] basePackageClasses() default {};Class<? extends BeanNameGenerator> nameGenerator() default BeanNameGenerator.class;Class<? extends ScopeMetadataResolver> scopeResolver() default AnnotationScopeMetadataResolver.class;ScopedProxyMode scopedProxy() default ScopedProxyMode.DEFAULT;String resourcePattern() default ClassPathScanningCandidateComponentProvider.DEFAULT_RESOURCE_PATTERN;boolean useDefaultFilters() default true;Filter[] includeFilters() default {};Filter[] excludeFilters() default {};boolean lazyInit() default false;@Retention(RetentionPolicy.RUNTIME)@Target({})@interface Filter {FilterType type() default FilterType.ANNOTATION;@AliasFor("classes")Class<?>[] value() default {};@AliasFor("value")Class<?>[] classes() default {};String[] pattern() default {};}}
1.2.2、说明
1、作用:
用于指定创建容器时要扫描的包。该注解在指定扫描的位置时,可以指定包名,也可以指定扫描的类。同时支持定义扫描规则,例如包含哪些或者排除哪些。同时,它还支持自定义Bean的命名规则
2、属性:
1)value:
用于指定要扫描的包。当指定了包的名称之后,spring会扫描指定的包及其子包下的所有类。
2)basePackages:
它和value作用是一样的。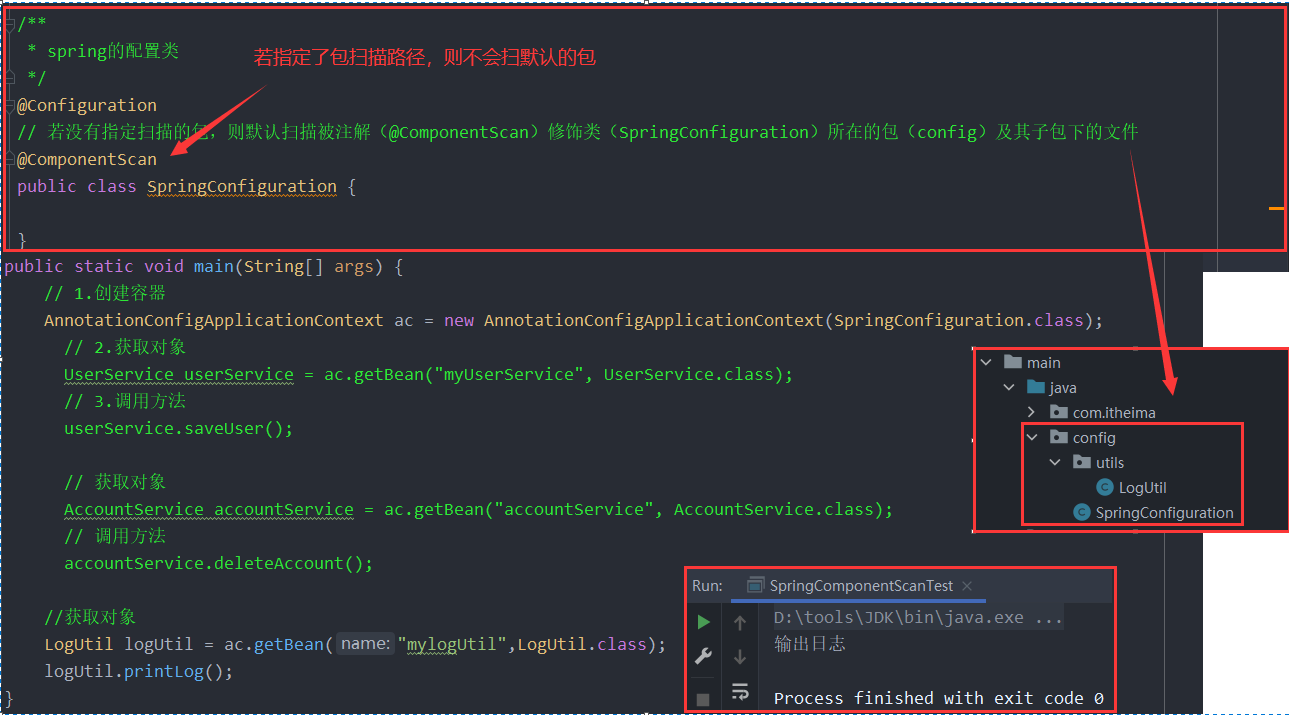
3)basePackageClasses
指定具体要扫描的类的字节码。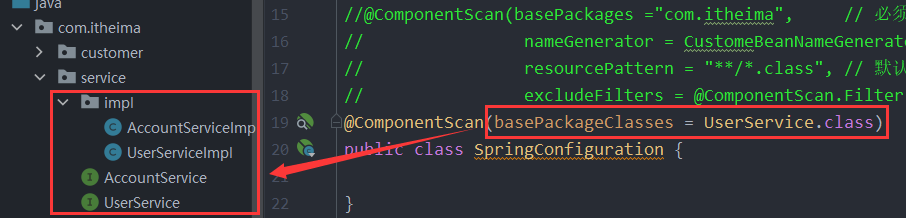
4)nameGenrator:
指定扫描bean对象存入容器时的命名规则。详情请参考第五章第4小节的BeanNameGenerator及其实现类。
/*** 自定义BeanName生成规则*/public class CustomeBeanNameGenerator implements BeanNameGenerator {@Overridepublic String generateBeanName(BeanDefinition definition, BeanDefinitionRegistry registry) {//定义Bean的名称String beanName = null;//1.判断当前bean的定义信息是否是注解的if(definition instanceof AnnotatedBeanDefinition){//2.把definition转成注解的bean定义信息AnnotatedBeanDefinition annotatedBeanDefinition = (AnnotatedBeanDefinition)definition;//2.获取注解Bean定义的元信息AnnotationMetadata annotationMetadata = annotatedBeanDefinition.getMetadata();//3.获取定义信息中的所有注解Set<String> types = annotationMetadata.getAnnotationTypes();//4.遍历types集合for(String type : types){//5.得到注解的属性AnnotationAttributes attributes = AnnotationAttributes.fromMap(annotationMetadata.getAnnotationAttributes(type, false));//6.判断attributes是否为null,同时必须是@Component及其衍生注解if (attributes != null && isStereotypeWithNameValue(type, annotationMetadata.getMetaAnnotationTypes(type), attributes)) {//7.获取value属性的值Object value = attributes.get("value");//8.判断value属性是否为String类型if (value instanceof String) {String strVal = (String) value;//9.判断value属性是否有值if (StringUtils.hasLength(strVal)) {if (beanName != null && !strVal.equals(beanName)) {throw new IllegalStateException("Stereotype annotations suggest inconsistent " +"component names: '" + beanName + "' versus '" + strVal + "'");}beanName = strVal;}}}}}return beanName != null ? "my"+beanName : "my"+buildDefaultBeanName(definition);}private static final String COMPONENT_ANNOTATION_CLASSNAME = "org.springframework.stereotype.Component";private boolean isStereotypeWithNameValue(String annotationType,Set<String> metaAnnotationTypes, @Nullable Map<String, Object> attributes) {boolean isStereotype = annotationType.equals(COMPONENT_ANNOTATION_CLASSNAME) ||metaAnnotationTypes.contains(COMPONENT_ANNOTATION_CLASSNAME) ||annotationType.equals("javax.annotation.ManagedBean") ||annotationType.equals("javax.inject.Named");return (isStereotype && attributes != null && attributes.containsKey("value"));}private String buildDefaultBeanName(BeanDefinition definition) {String beanClassName = definition.getBeanClassName();Assert.state(beanClassName != null, "No bean class name set");String shortClassName = ClassUtils.getShortName(beanClassName);return Introspector.decapitalize(shortClassName);}}
5)scopeResolver:(基本不用)<br /> 用于处理并转换检测到的Bean的作用范围。<br /> 6)soperdProxy:(基本不用)<br /> 用于指定bean生成时的代理方式。默认是Default,则不使用代理。详情请参考第五章第5小节ScopedProxyMode枚举。<br /> 7)resourcePattern:<br /> 用于指定符合组件检测条件的类文件,默认是包扫描下的 **/*.class<br /><br /> 8)useDefaultFilters:<br /> 是否对带有@Component @Repository @Service @Controller注解的类开启检测,默认是开启的。<br /> 9)includeFilters:<br /> 自定义组件扫描的过滤规则,用以扫描组件。不会排除其他的,比如设置了包含service,不会排除controller<br /> FilterType有5种类型:<br /> ANNOTATION:注解类型,默认<br /> ASSIGNABLE_TYPE:指定固定类<br /> ASPECTJ:ASPECTJ类型<br /> REGEX:正则表达式<br /> CUSTOM:自定义类型<br /> 详细用法请参考第五章第6小节自定义组件扫描过滤规则<br /> 10)excludeFilters:<br /> 自定义组件扫描的排除规则。<br /> 11)lazyInit:<br /> 组件扫描时是否采用懒加载 ,默认不开启。<br />3、使用场景:<br /> 在注解驱动开发时,我们自己编写的类都使用注解的方式进行配置,要想让spring添加到ioc容器中,就需要使用此注解来实现组件的扫描。<br />4、细节:<br /> 在spring4.3版本之后还加入了一个@ComponentScans的注解,该注解就是支持配置多个@ComponentScan。
1.2.3、示例(P12-P17)
在入门案例中,如果我们加入了dao或者记录日志的工具类,这些使用了@Component或其衍生注解配置的bean,要想让他们进入ioc容器,就少不了使用@ComponentScan
@Repository("accountDao")public class AccountDaoImpl implements AccountDao{//持久层开发(此处没有考虑mybatis代理dao方式或者其他持久层技术,因为不希望和其他框架技术关联)}/*** spring的配置类* 用于替代xml配置*/@Configuration@Import(JdbcConfig.class)@PropertySource("classpath:jdbc.properties")@ComponentScan("com.itheima")public class SpringConfiguration {}
1.3、@Bean
1.3.1、源码
@Target({ElementType.METHOD, ElementType.ANNOTATION_TYPE})@Retention(RetentionPolicy.RUNTIME)@Documentedpublic @interface Bean {@AliasFor("name")String[] value() default {};@AliasFor("value")String[] name() default {};@DeprecatedAutowire autowire() default Autowire.NO;boolean autowireCandidate() default true;String initMethod() default "";String destroyMethod() default AbstractBeanDefinition.INFER_METHOD;}
1.3.2、说明
1、作用:
它写在方法上,表示把当前方法的返回值存入spring的ioc容器。
同时还可以出现在注解上,作为元注解来使用。
// 自定义Bean注解@Retention(RetentionPolicy.RUNTIME)@Target({ElementType.METHOD})@Bean(name = "abcd") // 初始化bean的标识public @interface MyBean {}
2、属性:
1)name:
用于指定存入spring容器中bean的标识。支持指定多个标识。当不指定该属性时,默认值是当前方法的名称
2)value:
此属性是在4.3.3版本之后加入的。它和name属性的作用是一样的。
3)autowireCandidate:
用于指定是否支持自动按类型注入到其他bean中。只影响@Autowired注解的使用。不影响@Resource注解注入。默认值为true,意为允许使用自动按类型注入。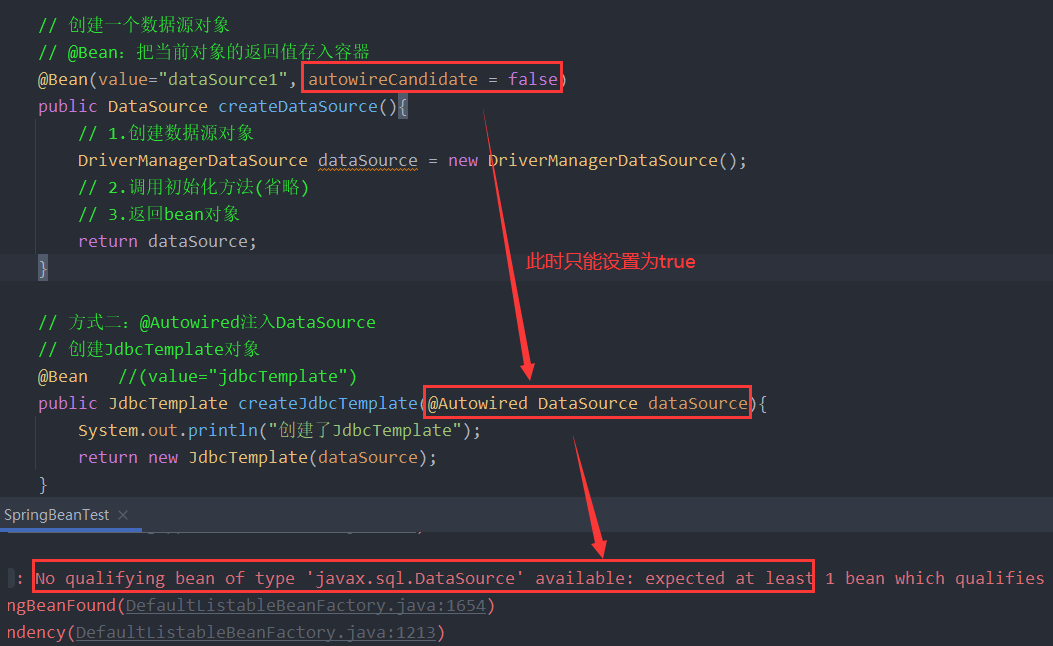
4)initMethod:
用于指定初始化方法(通常使用编程的方式进行初始化,所以不用initMethod)
5)destroyMethod:
用于指定销毁方法(通常没使用)
3、使用场景:
通常情况下,在基于注解的配置中,我们用于把一个类存入spring的ioc容器中,首先考虑的是使用@Component以及他的衍生注解。但是如果遇到要存入容器的Bean对象不是我们写的类,此时无法在类上添加@Component注解,这时就需要此注解了。
4、示例:
例如,在我们配置JdbcTemplate使用Spring内置数据源DriverManagerDataSource时,数据源类是spring-jdbc这个jar包中类,此时我们无法编辑,在上面加注解,此时就可以使用@Bean注解配置。
总结:@Component只适用于我们新建的类,@Bean适用于第三方提供的类
5、@Bean写到注解上,自定义注解,也会存到IOC容器中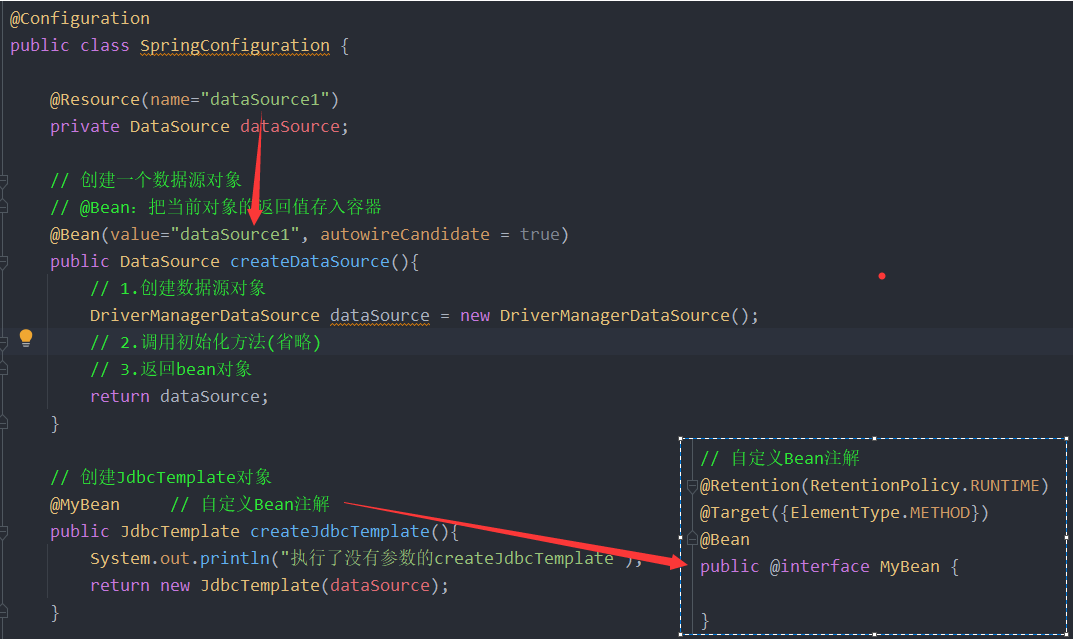
6、使用细节
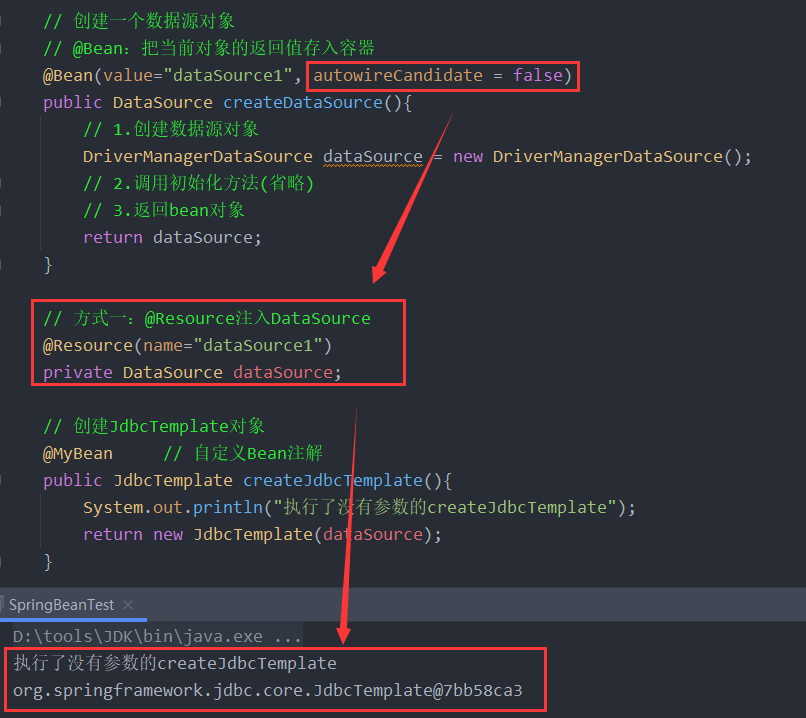
当@Bean没有指定value或name时,仍然会存入IOC容器,在存入容器的时候是使用方法名称作为Bean的标识。若出现方法重载,则按照定义的顺序,只会将最后一个@Bean放入IOC容器创建对象。若返回值是void,执行会报错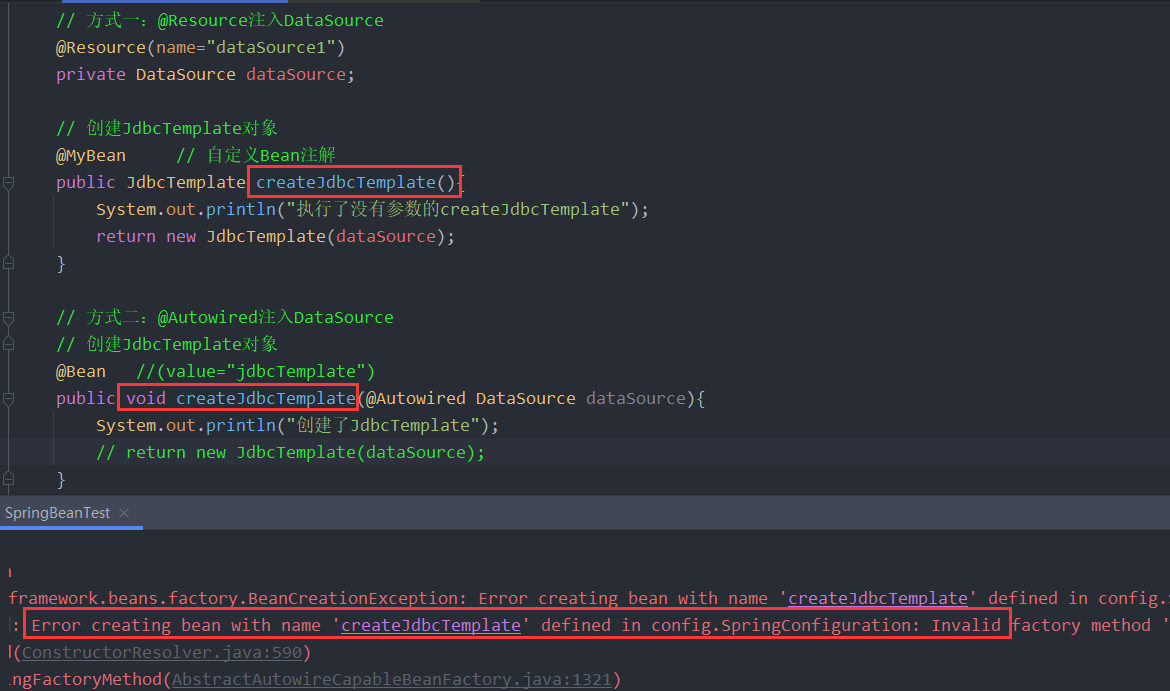

1.3.3、示例代码
@Configurationpublic class SpringConfiguration {// 创建一个数据源对象// @Bean:把当前对象的返回值存入容器@Bean(value="dataSource1", autowireCandidate = false)public DataSource createDataSource(){// 1.创建数据源对象DriverManagerDataSource dataSource = new DriverManagerDataSource();// 2.调用初始化方法(省略)// 3.返回bean对象return dataSource;}// 方式一:@Resource注入DataSource,针对autowireCandidate = false,不受影响@Resource(name="dataSource1")private DataSource dataSource;// 创建JdbcTemplate对象@MyBean // 自定义Bean注解public JdbcTemplate createJdbcTemplate(){System.out.println("执行了没有参数的createJdbcTemplate");return new JdbcTemplate(dataSource);}// 方式二:@Autowired注入DataSource,若autowireCandidate = false,则报错// 创建JdbcTemplate对象@Bean //(value="jdbcTemplate")public JdbcTemplate createJdbcTemplate(@Autowired DataSource dataSource){System.out.println("创建了JdbcTemplate");return new JdbcTemplate(dataSource);}}
1.4、@Import
1.4.1、源码
@Target(ElementType.TYPE)@Retention(RetentionPolicy.RUNTIME)@Documentedpublic @interface Import {Class<?>[] value();}
1.4.2、说明
1、作用:
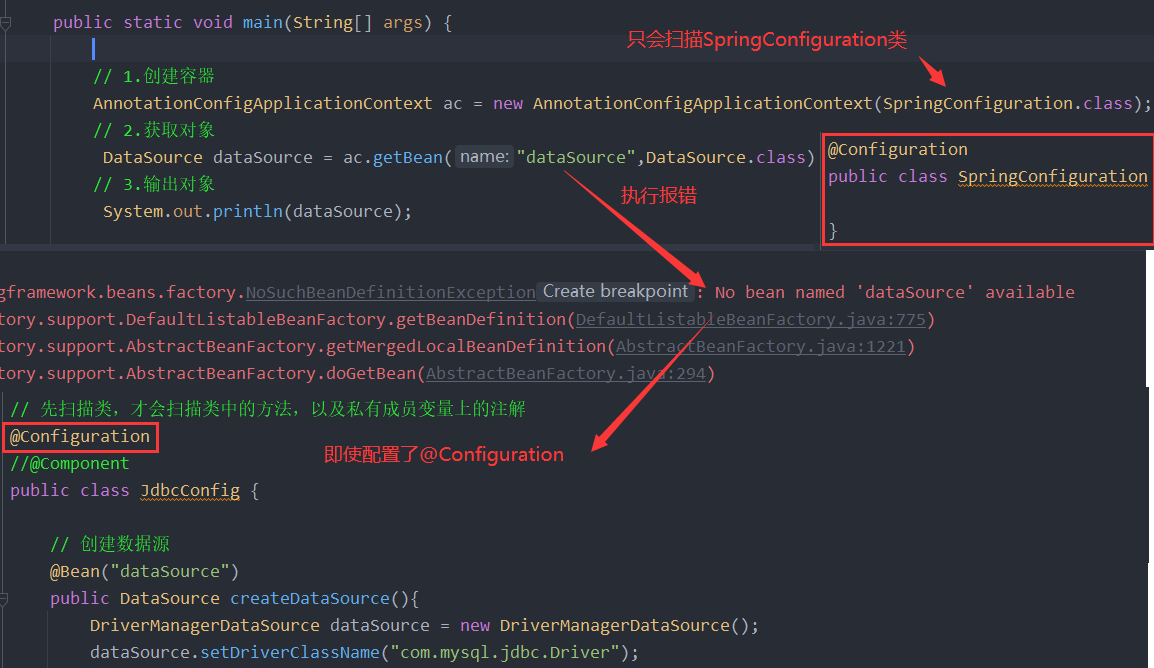
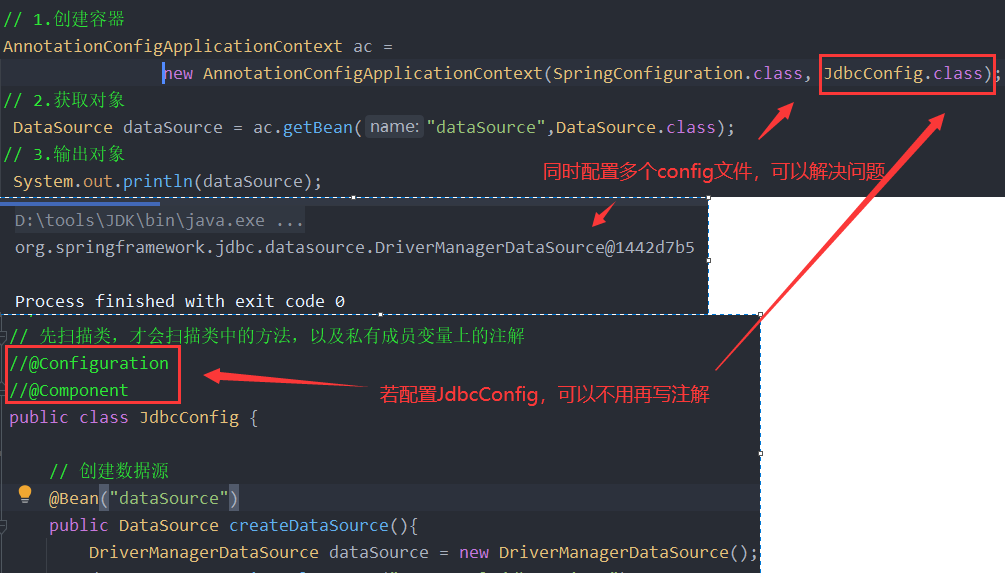
该注解是写在类上的,通常都是和注解驱动的配置类一起使用的。其作用是引入其他的配置类。使用了此注解之后,可以使我们的注解驱动开发和早期xml配置一样,分别配置不同的内容,使配置更加清晰。同时指定了此注解之后,被引入的类上可以不再使用@Configuration、@Component等注解。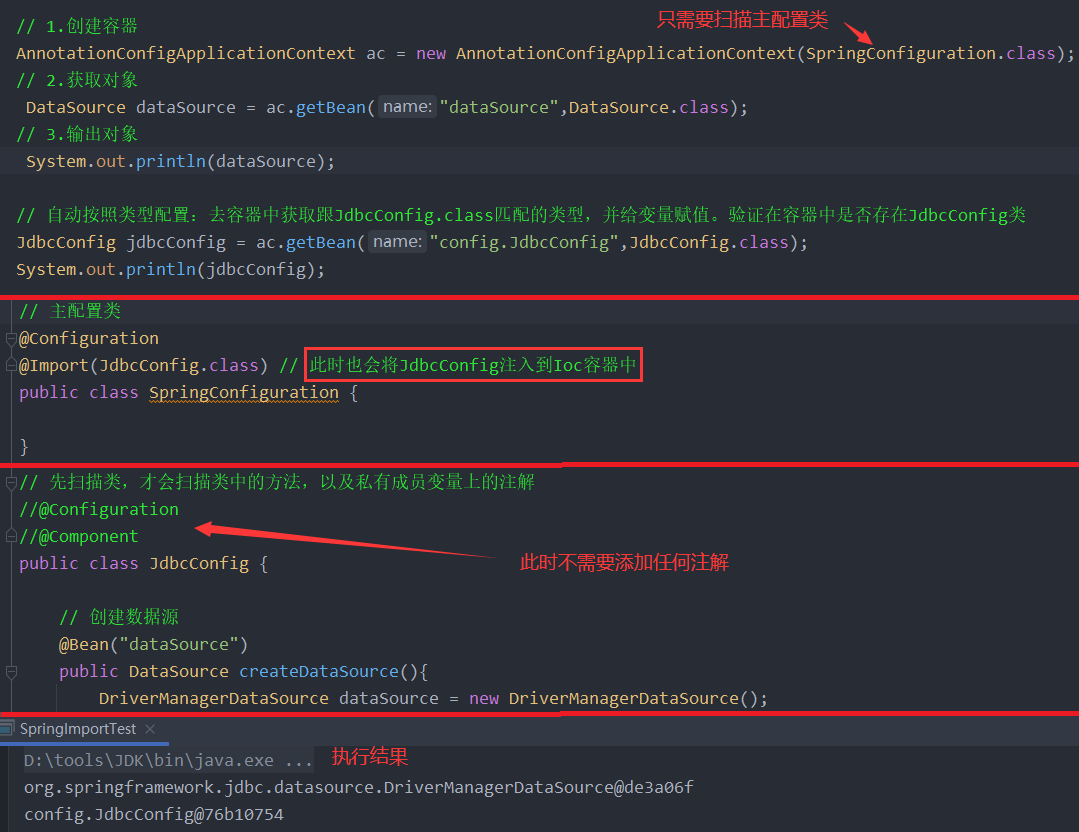
2、属性:
value:
用于指定其他配置类的字节码。它支持指定多个配置类。
关于ImportSelector和ImportBeanDefinitionRegistrar请参考第五章第7小节@Import注解的高级分析
3、使用场景:
当我们在使用注解驱动开发时,由于配置项过多,如果都写在一个类里面,配置结构和内容将杂乱不堪,此时使用此注解可以把配置项进行分门别类进行配置。
4、使用细节
Bean的唯一标识是类的全限定类名。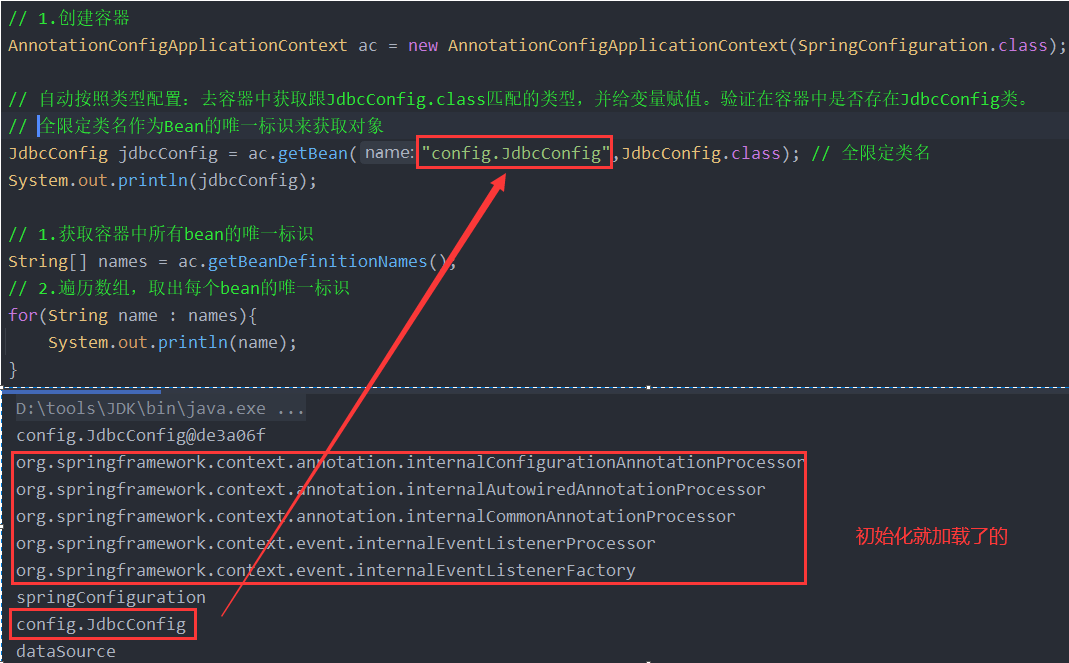
1.4.3、示例(P24-P28)
在入门案例中,我们使用了SpringConfiguration做为主配置类,而连接数据库相关的配置被分配到了JdbcConfig配置类中,此时使用在SpringConfiguration类上使用@Import注解把JdbcConfig导入进来就可以了。
/*** spring的配置类* 用于替代xml配置*/@Configuration@Import(JdbcConfig.class)@PropertySource("classpath:jdbc.properties")@ComponentScan("com.itheima")public class SpringConfiguration {}
// 连接数据库的配置public class JdbcConfig {@Value("${jdbc.driver}")private String driver;@Value("${jdbc.url}")private String url;@Value("${jdbc.username}")private String username;@Value("${jdbc.password}")private String password;@Bean("jdbcTemplate")public JdbcTemplate createJdbcTemplate(DataSource dataSource){return new JdbcTemplate(dataSource);}@Bean("dataSource")public DataSource createDataSource(){DriverManagerDataSource dataSource = new DriverManagerDataSource();dataSource.setDriverClassName(driver);dataSource.setUrl(url);dataSource.setUsername(username);dataSource.setPassword(password);return dataSource;}}
1.5、@PropertySource
1.5.1、源码
@Retention(RetentionPolicy.RUNTIME)@Documented@Repeatable(PropertySources.class)public @interface PropertySource {String name() default "";String[] value();boolean ignoreResourceNotFound() default false;String encoding() default "";Class<? extends PropertySourceFactory> factory() default PropertySourceFactory.class;}
1.5.2、说明
1、作用:
用于指定读取资源文件的位置。注意,它不仅支持properties,也支持xml文件,并且通过YAML解析器,配合自定义PropertySourceFactory实现解析yml配置文件(详情请参考第五章第8小节自定义PropertySourceFactory实现YAML文件解析)。
2、属性:
1)name:
指定资源的名称。如果没有指定,将根据基础资源描述生成。
2)value:
指定资源的位置。可以是类路径,也可以是文件路径。
3)ignoreResourceNotFound:
指定是否忽略资源文件有没有,默认是false,也就是说当资源文件不存在时spring启动将会报错。
4)encoding:
指定解析资源文件使用的字符集。当有中文的时候,需要指定中文的字符集。
5)factory: P31(执行过程分析)
指定读取对应资源文件的工厂类,默认的是PropertySourceFactory。
3、使用场景:
我们实际开发中,使用注解驱动后,xml配置文件就没有了,此时一些配置如果直接写在类中,会造成和java源码的紧密耦合,修改起来不方法。此时一些配置可以使用properties或者yml来配置就变得很灵活方便。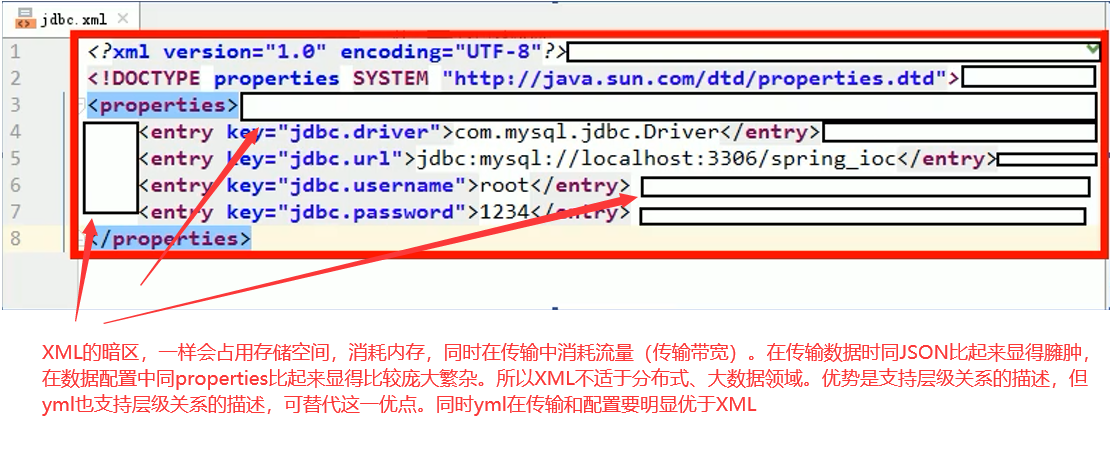
1.5.3、示例(P31-P34)
在入门案例中,我们连接数据库的信息如果直接写到JdbcConfig类中,当需要修改时,就面临修改源码的问题,此时使用@PropertySource和SpringEL表达式,就可以把配置放到properties文件中了。
// jdbc.propertiesjdbc.driver=com.mysql.jdbc.Driverjdbc.url=jdbc:mysql://localhost:3306/spring_iocjdbc.username=rootjdbc.password=1234
// spring的主配置类,用于替代xml配置@Configuration@Import(JdbcConfig.class)@PropertySource("classpath:jdbc.xml") // 用于指定配置文件的位置//@PropertySource("classpath:jdbc.properties")//@PropertySource("file:///I:/spring_ioc/spring_annotation_demo/anno08_propertysource/src/main/resources/jdbc.properties") //基于文件协议的方式public class SpringConfiguration {// 针对Spring4.3版本之前的properties文件解析器,需要注册资源文件解析器的bean到ioc容器中// 在4.3版本之后使用PropertySourceFactory接口的唯一实现类:DefaultPropertySourceFactory(已自动注册)//@Bean//public static PropertySourcesPlaceholderConfigurer createPropertySourcesPlaceholderConfigurer(){//return new PropertySourcesPlaceholderConfigurer();//}}
// JDBC的配置类public class JdbcConfig {// 需要在主配置文件中指定资源配置文件的路径,否则根据${jdbc.driver}找不到任何内容@Value("${jdbc.driver}")private String driver;@Value("${jdbc.url}")private String url;@Value("${jdbc.username}")private String username;@Value("${jdbc.password}")private String password;@Bean(name="dataSource")public DataSource createDataSource(){System.out.println("驱动类是:" + driver);//1.创建Spring内置数据源DriverManagerDataSource dataSource = new DriverManagerDataSource();//2.给数据源填充属性dataSource.setDriverClassName(driver);dataSource.setUrl(url);dataSource.setUsername(username);dataSource.setPassword(password);//3.返回return dataSource;}}
//1.创建容器AnnotationConfigApplicationContext ac = new AnnotationConfigApplicationContext("config");//2.获取对象DataSource dataSource = ac.getBean("dataSource",DataSource.class);//3.获取连接Connection connection = dataSource.getConnection();System.out.println("连接成功.....");connection.close();
2、注解驱动开发之注入时机和设定注入条件的注解
2.1、@DependsOn
2.1.1、源码
@Target({ElementType.TYPE, ElementType.METHOD})@Retention(RetentionPolicy.RUNTIME)@Documentedpublic @interface DependsOn {String[] value() default {};}
2.1.2、说明
1、作用:
用于指定在创建某个类时,其依赖的bean对象先创建。spring中没有特定bean的加载顺序,使用此注解则可指定bean的加载顺序。(在基于注解配置中,是按照类中方法的书写顺序决定的。默认情况下在扫描包config时,会按照包名、类名按序逐个扫描里面的类,注入容器中创建对象)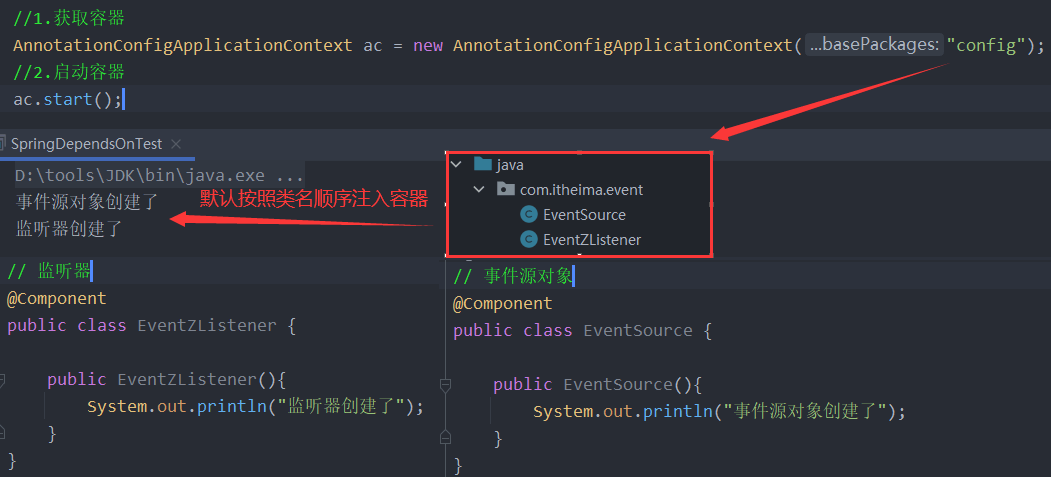
2、属性:
value: 用于指定bean的唯一标识。被指定的bean会在当前bean创建之前加载。
3、使用场景:
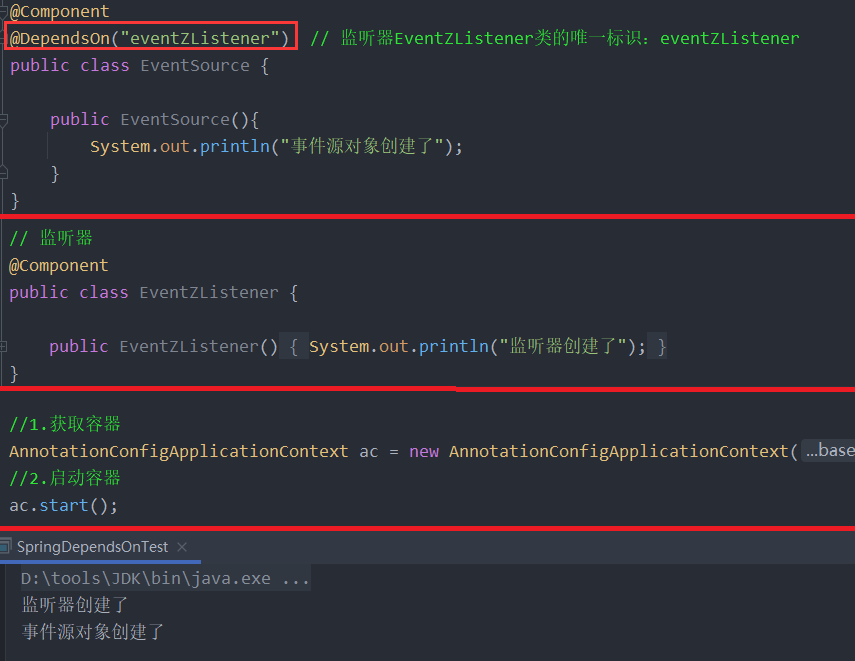
在观察者模式中,分为事件,事件源和监听器。一般情况下,我们的监听器负责监听事件源,当事件源触发了事件之后,监听器就要捕获,并且做出相应的处理。以此为前提,我们肯定希望监听器的创建时间在事件源之前,此时就可以使用此注解。
2.1.3、示例
package com.itheima.event;// 监听器@Componentpublic class EventZListener {public EventZListener(){System.out.println("监听器创建了");}}
package com.itheima.event;// 事件源对象@Component@DependsOn("eventZListener") // 监听器EventZListener类的唯一标识:eventZListener(被@Component修饰后的结果)public class EventSource {public EventSource(){System.out.println("事件源对象创建了");}}
package config;@Configuration@ComponentScan("com.itheima") // 扫描com.itheima包下所有的文件,注入容器public class SpringConfiguration {}
public class SpringDependsOnTest {public static void main(String[] args) {//1.获取容器AnnotationConfigApplicationContext ac = new AnnotationConfigApplicationContext("config");//2.启动容器ac.start();}}执行结果:监听器创建了事件源对象创建了
2.2、@Lazy
2.2.1、源码
@Target({ElementType.TYPE, ElementType.METHOD, ElementType.CONSTRUCTOR, ElementType.PARAMETER, ElementType.FIELD})@Retention(RetentionPolicy.RUNTIME)@Documentedpublic @interface Lazy {boolean value() default true;}
2.2.2、说明
1、作用:
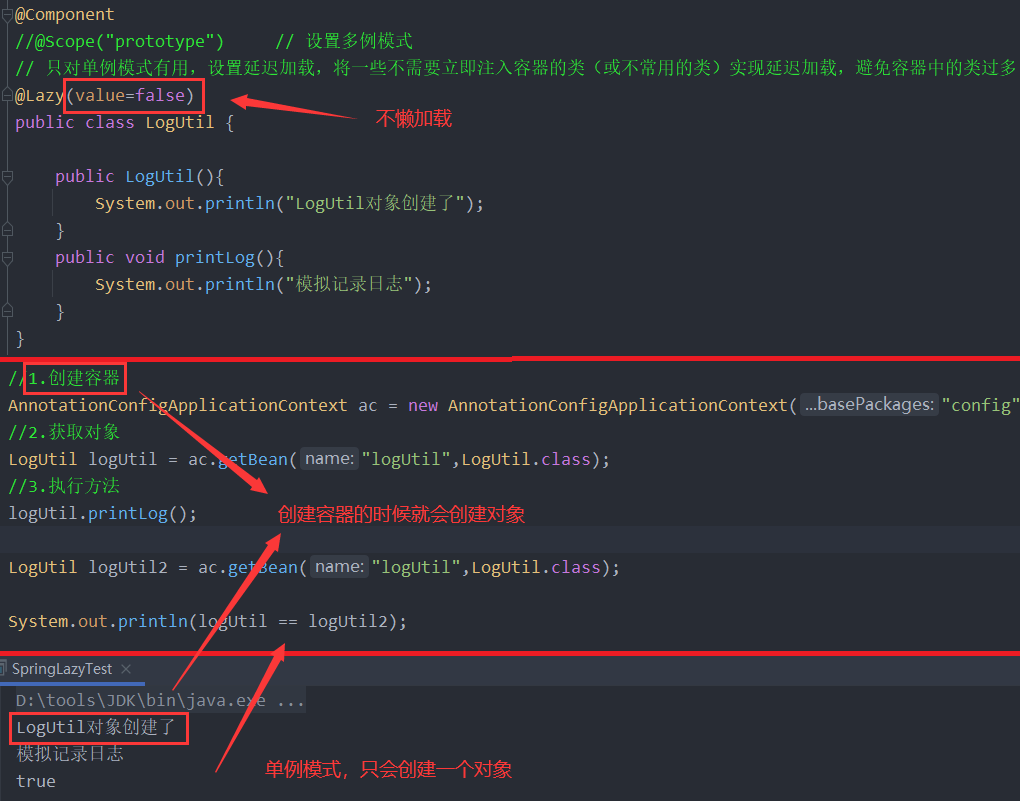
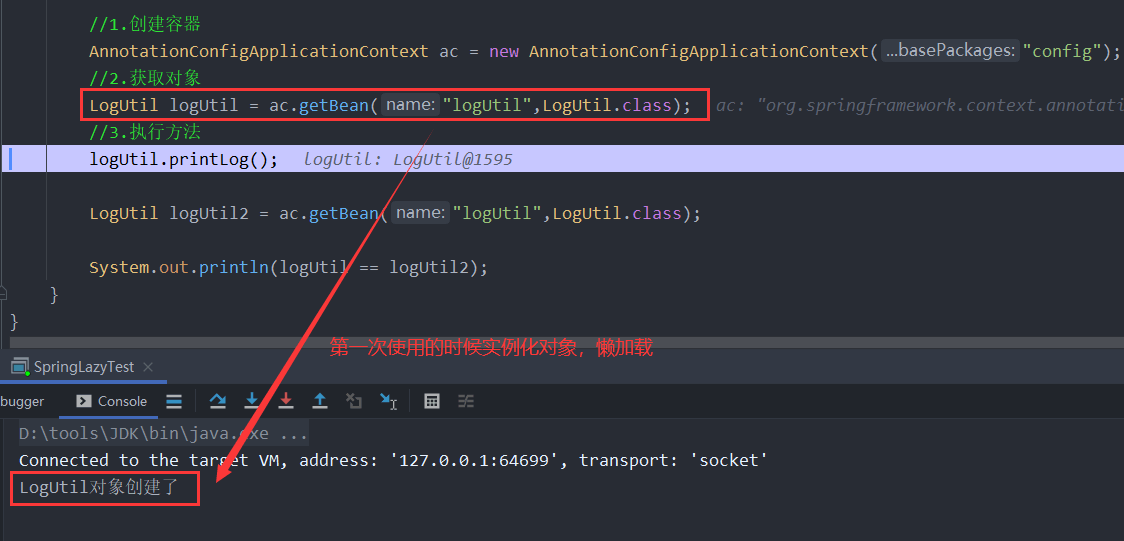
用于指定单例bean对象的创建时机。在没有使用此注解时,单例bean的生命周期与容器相同(创建容器时创建Bean对象)。但是当使用了此注解之后,单例对象的创建时机变成了第一次使用时创建,后续也不再创建了。注意:这不是延迟加载思想(因为不是每次使用时都创建,只是第一次创建的时机改变了)。该注解不适于多例bean,多例bean是每次使用时创建新的Bean对象
2、属性:
value:指定是否采用延迟加载。默认值为true,表示开启。
3、使用场景:
在实际开发中,当我们的Bean是单例对象时,并不是每个都需要一开始都加载到ioc容器之中,有些对象可以在真正使用的时候再加载,当有此需求时,即可使用此注解。值得注意的是,此注解只对单例bean对象起作用,当指定了@Scope注解的prototype取值后,此注解不起作用。
2.2.3、示例
// 模拟记录日志的类@Component//@Scope("prototype") // 设置多例模式// 只对单例模式有用,设置延迟加载,将一些不需要立即注入容器的类(或不常用的类)实现延迟加载,避免容器中的类过多@Lazypublic class LogUtil {public LogUtil(){System.out.println("LogUtil对象创建了");}public void printLog(){System.out.println("模拟记录日志");}}
// spring的配置类@Configuration@ComponentScan("com.itheima")public class SpringConfiguration {}
// 1.创建容器AnnotationConfigApplicationContext ac = new AnnotationConfigApplicationContext("config");// 2.获取对象LogUtil logUtil = ac.getBean("logUtil",LogUtil.class);// 3.执行方法logUtil.printLog();LogUtil logUtil2 = ac.getBean("logUtil",LogUtil.class);System.out.println(logUtil == logUtil2);
2.3、@Conditional
2.3.1、源码
@Target({ElementType.TYPE, ElementType.METHOD})@Retention(RetentionPolicy.RUNTIME)@Documentedpublic @interface Conditional {/*** All {@link Condition Conditions} that must {@linkplain Condition#matches match}* in order for the component to be registered.*/Class<? extends Condition>[] value();}
2.3.2、说明
1、作用:
它的作用是根据条件选择注入的bean对象。
2、属性:
value:用于提供一个Condition接口的实现类,实现类中需要编写具体代码实现注入的条件。
3、使用场景:
当我们在开发时,可能会使用多平台来测试,例如我们的测试数据库分别部署到了linux和windows两个操作系统上面,现在根据我们的工程运行环境选择连接的数据库。此时就可以使用此注解。同时基于此注解引出的@Profile注解,就是根据不同的环境,加载不同的配置信息,详情请参考第五章第9小节@Profile的使用。
2.3.3、示例
// 连接数据库的配置public class JdbcConfig {@Value("${jdbc.driver}")private String driver;@Value("${jdbc.url}")private String url;@Value("${jdbc.username}")private String username;@Value("${jdbc.password}")private String password;// linux系统注入的数据源@Bean("dataSource")@Conditional(LinuxCondition.class)public DataSource createLinuxDataSource(@Value("${linux.driver}") String lDriver,@Value("${linux.url}")String lUrl,@Value("${linux.username}")String lUsername,@Value("${linux.password}")String lPassword){DriverManagerDataSource dataSource = new DriverManagerDataSource(lUrl,lUsername,lPassword);dataSource.setDriverClassName(lDriver);System.out.println(lUrl);return dataSource;}/*** windows系统注入的数据源* @return*/@Bean("dataSource")@Conditional(WindowsCondition.class)public DataSource createWindowsDataSource(){DriverManagerDataSource dataSource = new DriverManagerDataSource();dataSource.setDriverClassName(driver);dataSource.setUrl(url);dataSource.setUsername(username);dataSource.setPassword(password);System.out.println(url);return dataSource;}}
package com.itheima.condition;/*** 自定义规则*/public class LinuxCondition implements Condition {@Overridepublic boolean matches(ConditionContext context, AnnotatedTypeMetadata metadata) {//1.获取环境信息(为了取出当前操作系统是windows还是linux)Environment environment = context.getEnvironment();//2.获取当前系统的名称String osName = environment.getProperty("os.name");//3.判断是否包含windos规则osName="os.Linux";if(osName.contains("Linux")){//需要注册到ioc容器中return true;}//不需要注册到Ioc容器中return false;}}
package com.itheima.condition;/*** 自定义注册bean的条件,windows操作系统注入*/public class WindowsCondition implements Condition {/*** 是否注册到ioc容器中的核心方法* @param context ioc上下文对象* @param metadata* @return 是true的时候,表示注册到ioc容器中,否则不注册*/@Overridepublic boolean matches(ConditionContext context, AnnotatedTypeMetadata metadata) {//1.获取ioc使用的BeanFactory对象ConfigurableListableBeanFactory beanFactory = context.getBeanFactory();//2.获取类加载器ClassLoader classLoader = context.getClassLoader();//3.获取环境信息(为了取出当前操作系统是windows还是linux)Environment environment = context.getEnvironment();//输出所有的系统环境信息if(environment instanceof StandardEnvironment){//转换环境信息StandardEnvironment standardEnvironment = (StandardEnvironment)environment;Map<String,Object> map = standardEnvironment.getSystemProperties();for(Map.Entry<String,Object> me : map.entrySet()){System.out.println(me.getKey()+","+me.getValue());}}//4.获取bean定义信息的注册器BeanDefinitionRegistry registry = context.getRegistry();//5.获取当前系统的名称String osName = environment.getProperty("os.name");osName="os.Linux";//6.判断是否包含windos规则if(osName.contains("Windows")){//需要注册到ioc容器中return true;}//不需要注册到Ioc容器中return false;}}
linux.driver=com.mysql.jdbc.Driverlinux.url=jdbc:mysql://localhost:3306/ssmlinux.username=rootlinux.password=1234-------------------------------------------------------------------------------------jdbc.driver=com.mysql.jdbc.Driverjdbc.url=jdbc:mysql://localhost:3306/spring_day01jdbc.username=rootjdbc.password=1234
3、用于创建对象的注解
3.1、@Component和三个衍生注解
3.1.1、源码
@Target(ElementType.TYPE)@Retention(RetentionPolicy.RUNTIME)@Documented@Indexedpublic @interface Component {// 原生注解,其他注解(controller、service、Repository)都衍生于它,常用于工具类上String value() default "";}
@Target({ElementType.TYPE})@Retention(RetentionPolicy.RUNTIME)@Documented@Componentpublic @interface Controller { // 常用于表现层上@AliasFor(annotation = Component.class)String value() default "";}
@Target({ElementType.TYPE})@Retention(RetentionPolicy.RUNTIME)@Documented@Componentpublic @interface Service { // 常用于业务层上@AliasFor(annotation = Component.class)String value() default "";}
@Target({ElementType.TYPE})@Retention(RetentionPolicy.RUNTIME)@Documented@Componentpublic @interface Repository { // 常用于持久层上@AliasFor(annotation = Component.class)String value() default "";}
3.1.2、说明
1、作用:
这四个注解都是用于修饰类的。是用于把当前类创建一个对象,存入spring的ioc容器中。在实例化时,首选默认无参构造函数。同时支持带参构造,前提是构造函数的参数依赖必须要有值。否则抛异常
2、属性:
value:用于指定存入容器时bean的id。当不指定时,默认值为当前类的名称。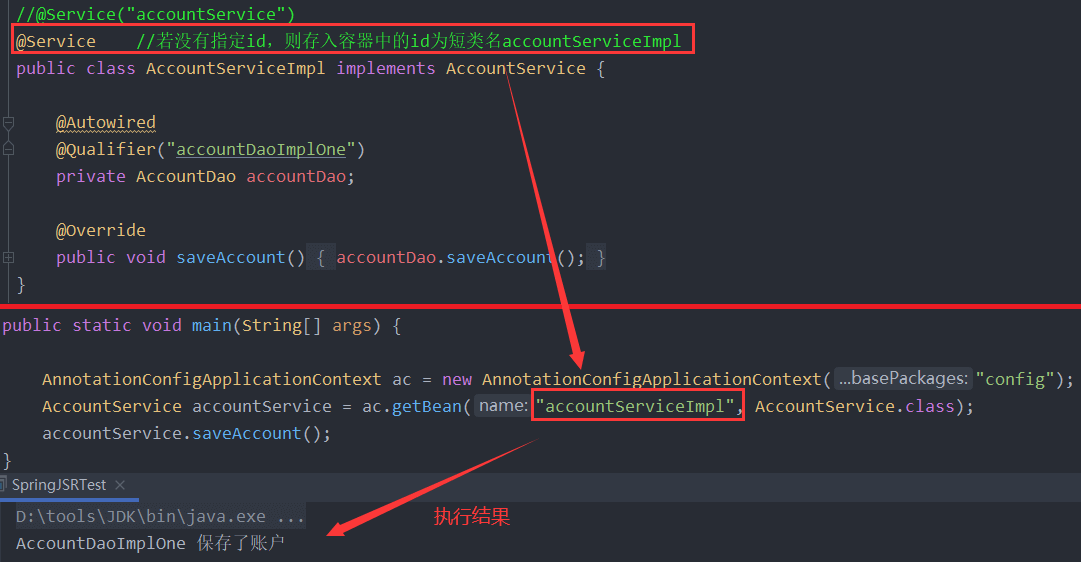
3、使用场景:
当我们需要把自己编写的类注入到Ioc容器中,就可以使用以上四个注解实现。以上四个注解中@Component注解通常用在非三层对象中。而@Controller,@Service,@Repository三个注解一般是针对三层对象使用的,提供更加精确的语义化配置。
需要注意的是,spring在注解驱动开发时,要求必须先接管类对象,然后会处理类中的属性和方法。如果类没有被spring接管,那么里面的属性和方法上的注解都不会被解析。
package config;/*** spring的配置类*/@Configuration@ComponentScan("com.itheima")@Import(JdbcConfig.class)@PropertySource(value = "classpath:jdbc.yml", factory = YmlPropertySourceFactory.class)public class SpringConfiguration{}
package support.factory;/*** 自定义yml文件解析的工厂类*/public class YmlPropertySourceFactory implements PropertySourceFactory {@Overridepublic PropertySource<?> createPropertySource(String name, EncodedResource resource) throws IOException {//1.创建yaml文件解析工厂YamlPropertiesFactoryBean factoryBean = new YamlPropertiesFactoryBean();//2.设置要解析的内容factoryBean.setResources(resource.getResource());//3.把资源解析成properties文件Properties properties = factoryBean.getObject();//4.返回spring提供的PropertySource对象return (name != null ? new PropertiesPropertySource(name,properties): new PropertiesPropertySource(resource.getResource().getFilename(),properties));}}
package config;/*** 和jdbc操作相关的配置:* JdbcTemplate创建* DataSource创建*/public class JdbcConfig {@Value("${jdbc.driver}")private String driver;@Value("${jdbc.url}")private String url;@Value("${jdbc.username}")private String username;@Value("${jdbc.password}")private String password;@Bean("jdbcTemplate1")public JdbcTemplate createJdbcTemplateOne(@Autowired DataSource dataSource){ // 可以不用加@Autowiredreturn new JdbcTemplate(dataSource);}@Bean("jdbcTemplate2")public JdbcTemplate createJdbcTemplateTwo(@Autowired DataSource dataSource){return new JdbcTemplate(dataSource);}@Bean("dataSource")public DataSource createDataSource(){//1.创建数据源对象DriverManagerDataSource dataSource = new DriverManagerDataSource();//2.给属性赋值dataSource.setDriverClassName(driver);dataSource.setUrl(url);dataSource.setUsername(username);dataSource.setPassword(password);//3.返回return dataSource;}}
3.1.3、示例
正确的方式1:使用默认构造函数
/*** 用于记录系统日志* @author 黑马程序员* @Company http://www.itheima.com*/@Componentpublic class LogUtil {/*** 默认无参构造函数*/public LogUtil(){}//可以使用aop思想实现系统日志的记录}
正确的方式2:在构造函数中注入一个已经在容器中的bean对象。
// 此处只是举例:使用JdbcTemplate作为持久层中的操作数据库对象@Repository("userDao")public class UserDaoImpl implements UserDao{private JdbcTemplate jdbcTemplate ;/*** 此时要求容器中必须有JdbcTemplate对象* @param jdbcTemplate*/public UserDaoImpl(JdbcTemplate jdbcTemplate){this.jdbcTemplate = jdbcTemplate;}}
正确的方式3:在构造函数中注入一个读取配置文件获取到的值。
// 用于记录系统日志@Componentpublic class LogUtil {/*** 构造时,注入日志级别* @param logLevel*/public LogUtil(@Value("${log.level}")String logLevel){System.out.println(logLevel);}//可以使用aop思想实现系统日志的记录}
错误的方式:由于logLevel没有值,所以运行会报错。
// 用于记录系统日志@Componentpublic class LogUtil {/*** 构造时,注入日志级别* @param logLevel*/public LogUtil(String logLevel){System.out.println(logLevel);}//可以使用aop思想实现系统日志的记录}
4、用于注入数据的注解
4.1、@Autowired
4.1.1、源码
@Target({ElementType.CONSTRUCTOR, ElementType.METHOD, ElementType.PARAMETER, ElementType.FIELD, ElementType.ANNOTATION_TYPE})@Retention(RetentionPolicy.RUNTIME)@Documentedpublic @interface Autowired {boolean required() default true;}
4.1.2、说明
1、作用:
自动按照类型注入。当ioc容器中有且只有一个类型匹配时可以直接注入成功。当有超过一个匹配时,则使用变量名称(写在方法上就是方法名称)作为bean的id,在符合类型的bean中再次匹配,能匹配上就可以注入成功。当匹配不上时,是否报错要看required属性的取值。
1)若容器中不存在Bean对象,同时设置@Autowired(required = true),则报错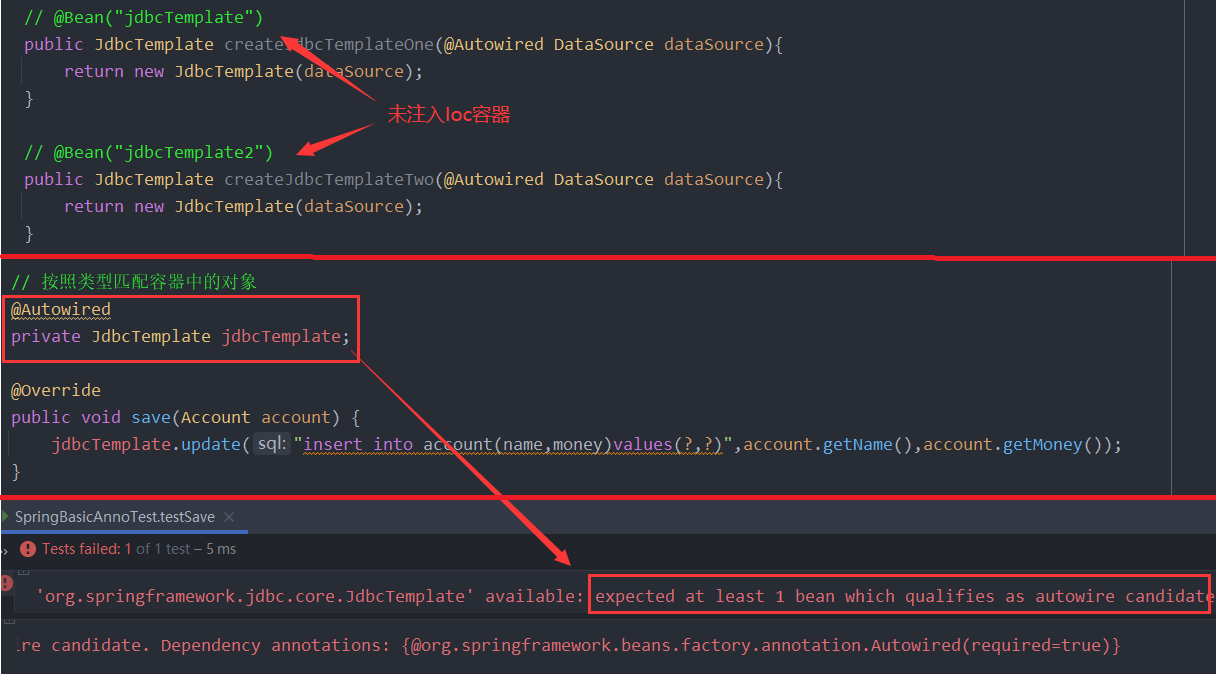
2)若容器中存在多个Bean对象,使用变量名称作为bean的id在容器中再次匹配,若能匹配到相同的,则也会正常执行。若未匹配到,则报错:系统中不存在唯一的对象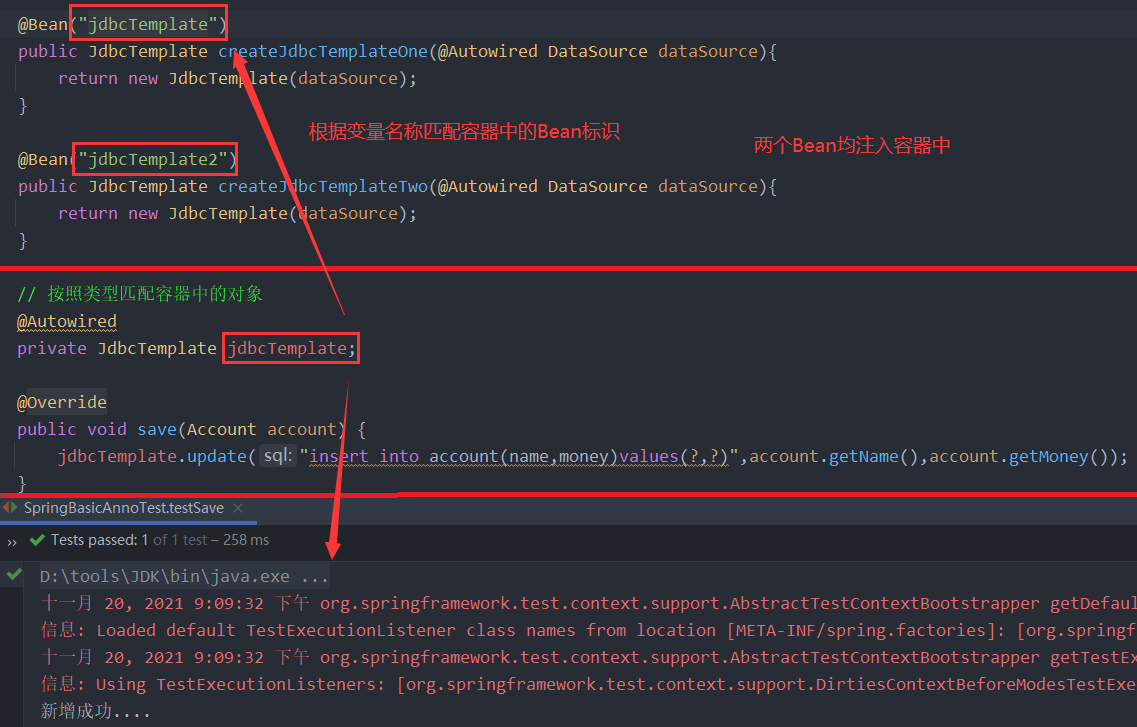

2、属性:
required:是否必须注入成功。默认值是true,表示必须注入成功。当取值为true的时候,注入不成功会报错
3、使用场景:
此注解的使用场景非常之多,在实际开发中应用广泛。通常情况下我们自己写的类中注入依赖bean对象时,都可以采用此注解。
4.1.3、示例
/*** 此处只是举例:使用Jdbc作为持久层中的操作数据库对象*/@Repository("accountDao")public class AccountDaoImpl implements AccountDao{@Autowiredprivate JdbcTemplate jdbcTemplate ;}
4.2、@Qualifier
4.2.1、源码
@Target({ElementType.FIELD, ElementType.METHOD, ElementType.PARAMETER, ElementType.TYPE, ElementType.ANNOTATION_TYPE})@Retention(RetentionPolicy.RUNTIME)@Inherited@Documentedpublic @interface Qualifier {String value() default "";}
4.2.2、说明
1、作用:
当使用自动按类型注入时,遇到有多个类型匹配的时候,就可以使用此注解来明确注入哪个bean对象。注意它通常情况下都必须配置@Autowired注解一起使用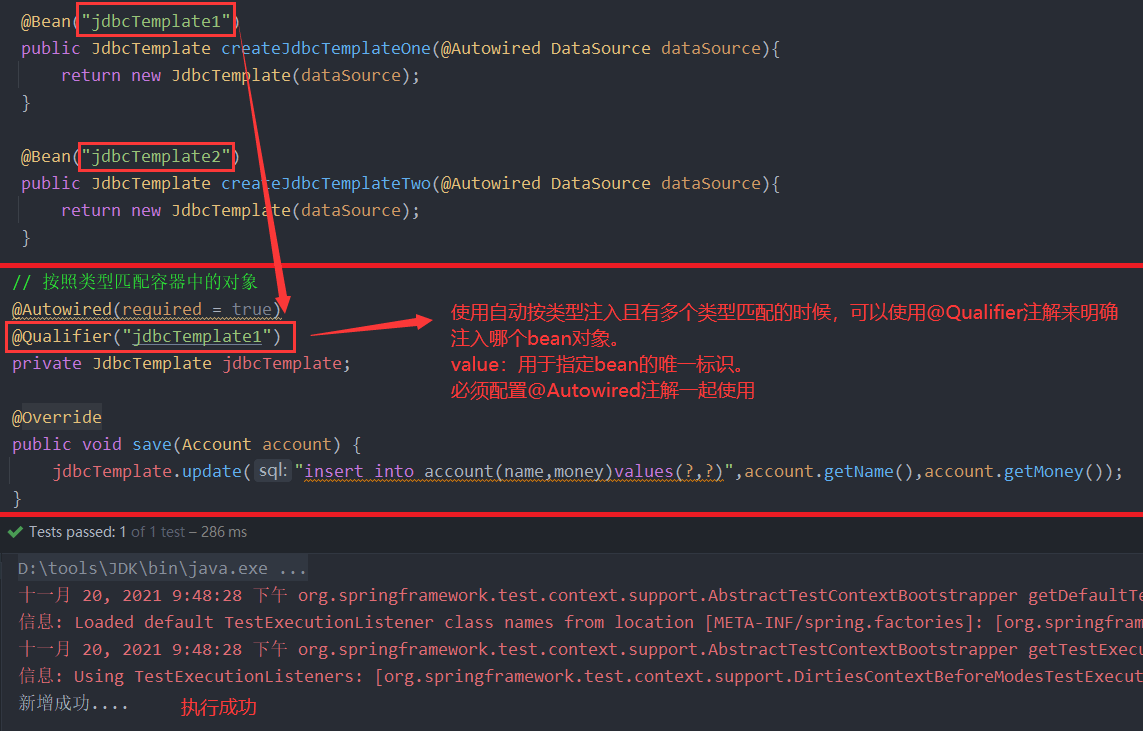
2、属性:
value:用于指定bean的唯一标识。
3、使用场景:
在我们的项目开发中,很多时候都会用到消息队列,我们以ActiveMQ为例。当和spring整合之后,Spring框架提供了一个JmsTemplate对象,它既可以用于发送点对点模型消息也可以发送主题模型消息。如果项目中两种消息模型都用上了,那么针对不同的代码,将会注入不同的JmsTemplate,而容器中出现两个之后,就可以使用此注解注入。当然不用也可以,我们只需要把要注入的变量名称改为和要注入的bean的id一致即可。
4.3、@Resource
4.3.1、源码
@Target({TYPE, FIELD, METHOD})@Retention(RUNTIME)public @interface Resource {String name() default "";String lookup() default "";Class<?> type() default java.lang.Object.class;enum AuthenticationType {CONTAINER,APPLICATION}AuthenticationType authenticationType() default AuthenticationType.CONTAINER;boolean shareable() default true;String mappedName() default "";String description() default "";}
4.3.2、说明
1、作用:
此注解来源于JSR规范(Java Specification Requests),其作用是找到依赖的组件注入到应用来,它利用了JNDI(Java Naming and Directory Interface Java命名目录接口 J2EE规范之一)技术查找所需的资源
1)默认情况下,即所有属性都不指定,它默认按照byType的方式装配bean对象。
2)如果没有指定name,而是指定了type,则按照byType装配bean对象。即跟默认情况一致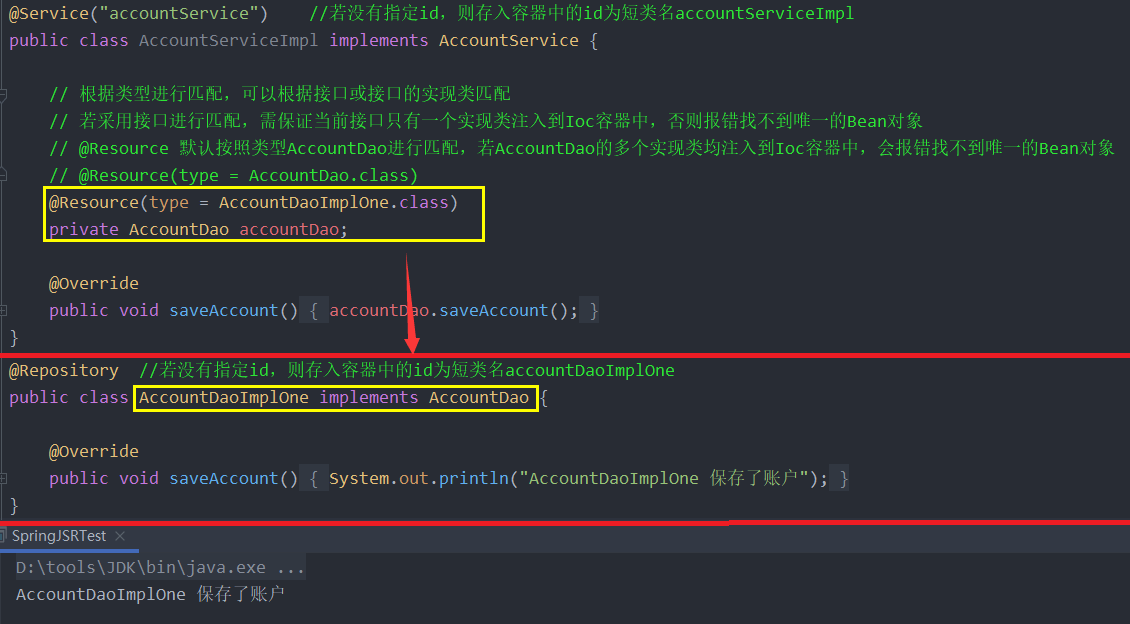
3)如果指定了name,没有指定type,则采用byName。即根据bean的唯一标识进行匹配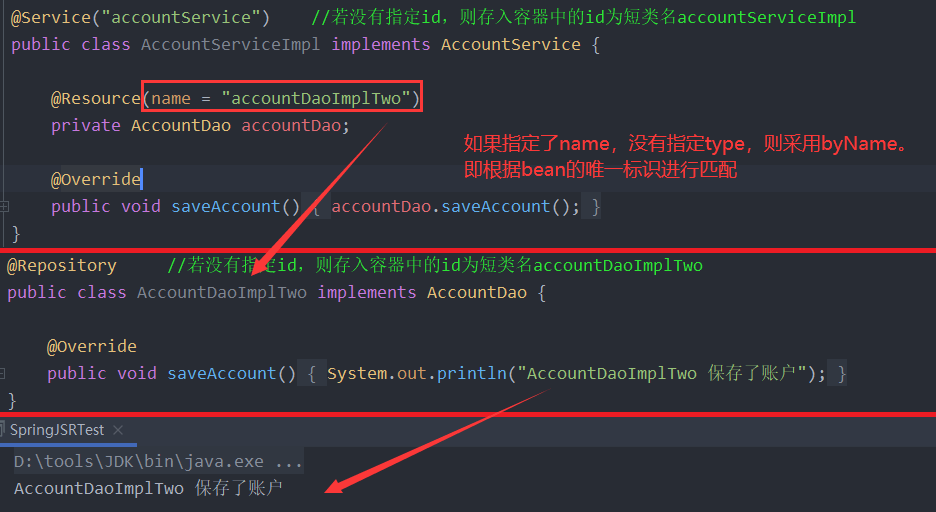
4)当byName和byType都指定了,两个都会校验,有任何一个不符合条件就会报错。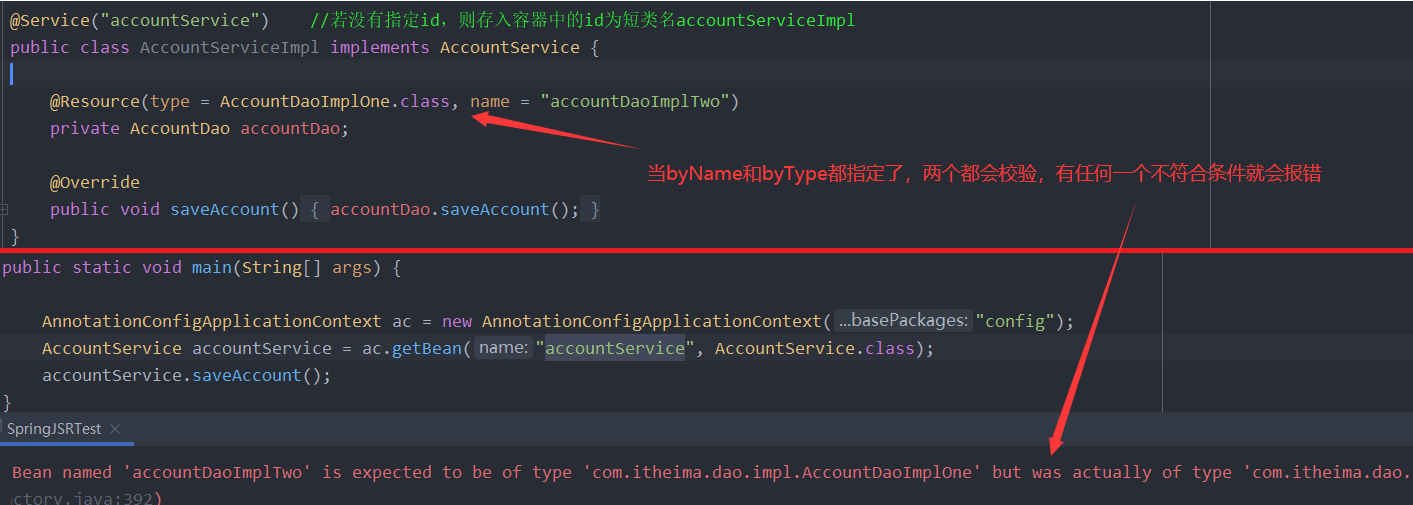
2、属性:
1)name:
资源的JNDI名称。在spring的注入时,指定bean的唯一标识。
2)type:
指定bean的类型。
3)lookup:
引用指向的资源的名称。它可以使用全局JNDI名称链接到任何兼容的资源。
4)authenticationType:
指定资源的身份验证类型。它只能为任何受支持类型的连接工厂的资源指定此选项,而不能为其他类型的资源指定此选项。
5)shareable:
指定此资源是否可以在此组件和其他组件之间共享。
6)mappedName:
指定资源的映射名称。
7)description:
指定资源的描述。
3、使用场景:
当我们某个类的依赖bean在ioc容器中存在多个的时候,可以使用此注解指定特定的bean对象注入。当然我们也可以使用@Autowired配合@Qualifier注入。
4.4、@Value
4.4.1、源码
@Target({ElementType.FIELD, ElementType.METHOD, ElementType.PARAMETER, ElementType.ANNOTATION_TYPE})@Retention(RetentionPolicy.RUNTIME)@Documentedpublic @interface Value {String value();}
4.4.2、说明
1、作用:
用于注入基本类型和String类型的数据。它支持spring的EL表达式,可以通过${} 的方式获取配置文件中的数据。配置文件支持properties、xml和yml文件。
2、属性:
value:指定注入的数据或者spring的el表达式。
3、使用场景:
在实际开发中,像连接数据库的配置,发送邮件的配置等等,都可以使用配置文件配置起来。此时读取配置文件就可以借助spring的el表达式读取。
4.4.3、示例
/*** 连接数据库的配置*/public class JdbcConfig {@Value("${jdbc.driver}")private String driver;@Value("${jdbc.url}")private String url;@Value("${jdbc.username}")private String username;@Value("${jdbc.password}")private String password;/*** windows系统注入的数据源* @return*/@Bean("dataSource")public DataSource createWindowsDataSource(){DriverManagerDataSource dataSource = new DriverManagerDataSource();dataSource.setDriverClassName(driver);dataSource.setUrl(url);dataSource.setUsername(username);dataSource.setPassword(password);return dataSource;}}
jdbc.driver=com.mysql.jdbc.Driverjdbc.url=jdbc:mysql://localhost:3306/spring_day01jdbc.username=rootjdbc.password=1234
4.5、@Inject
4.5.1、源码
@Target({ METHOD, CONSTRUCTOR, FIELD })@Retention(RUNTIME)@Documentedpublic @interface Inject {}
4.5.2、说明
1、作用:
它也是用于建立依赖关系的。和@Resource和@Autowired的作用是一样。在使用之前需要先导入坐标:
<!-- https://mvnrepository.com/artifact/javax.inject/javax.inject --><dependency><groupId>javax.inject</groupId><artifactId>javax.inject</artifactId><version>1</version></dependency>
但是他们之前也有区别:
1)@Autowired:来源于spring框架自身。
默认是byType自动装配,当配合了@Qualifier注解之后,由@Qualifier实现byName装配。它有一个required属性,用于指定是否必须注入成功。
2)@Resource:来源于JSR-250规范。
在没有指定name属性时是byType自动装配,当指定了name属性之后,采用byName方式自动装配;此时若根据名称装配不存在,也不会再根据类型装配
3)@Inject:来源于JSR-330规范。(JSR330是Jcp给出的官方标准反向依赖注入规范)
它不支持任何属性,但是可以配合@Qualifier或者@Primary注解使用。
同时,它默认是采用byType装配,当指定了JSR-330规范中的@Named注解之后,变成byName装配
4)@Qualifier不能单独使用,必须配合@Autowired或@Inject使用
5)@Named也不能单独使用,也必须配合@Autowired或@Inject使用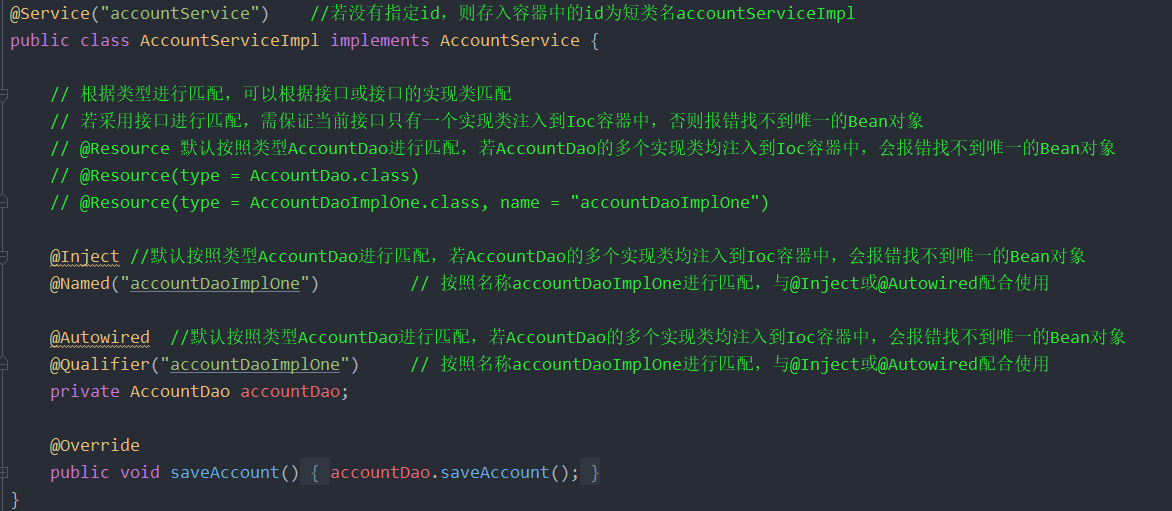
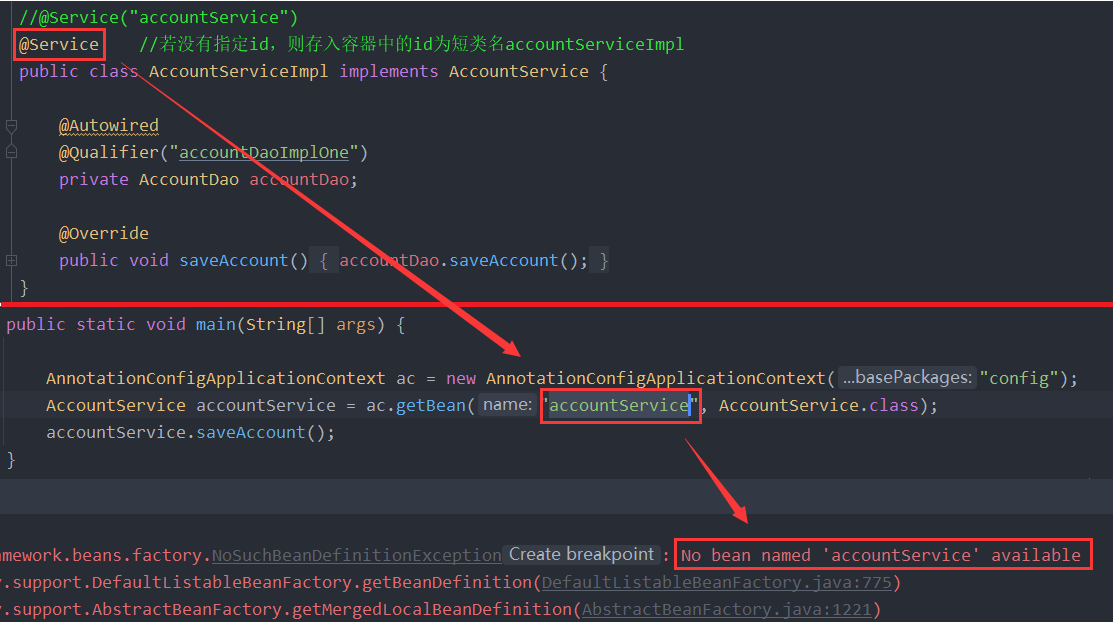
@Service("accountService") //若没有指定id,则存入容器中的id为短类名accountServiceImplpublic class AccountServiceImpl implements AccountService {// 根据类型进行匹配,可以根据接口或接口的实现类匹配// 若采用接口进行匹配,需保证当前接口只有一个实现类注入到Ioc容器中,否则报错找不到唯一的Bean对象// @Resource 默认按照类型AccountDao进行匹配,若AccountDao的多个实现类均注入到Ioc容器中,会报错找不到唯一的Bean对象// @Resource(type = AccountDao.class)// @Resource(type = AccountDaoImplOne.class, name = "accountDaoImplOne")@Inject //默认按照类型AccountDao进行匹配,若AccountDao的多个实现类均注入到Ioc容器中,会报错找不到唯一的Bean对象@Named("accountDaoImplOne") // 按照名称accountDaoImplOne进行匹配,与@Inject或@Autowired配合使用@Autowired //默认按照类型AccountDao进行匹配,若AccountDao的多个实现类均注入到Ioc容器中,会报错找不到唯一的Bean对象@Qualifier("accountDaoImplOne") // 按照名称accountDaoImplOne进行匹配,与@Inject或@Autowired配合使用private AccountDao accountDao;@Overridepublic void saveAccount() {accountDao.saveAccount();}}
@Repository //若没有指定id,则存入容器中的id为短类名accountDaoImplOnepublic class AccountDaoImplOne implements AccountDao {@Overridepublic void saveAccount() {System.out.println("AccountDaoImplOne 保存了账户");}}@Repository //若没有指定id,则存入容器中的id为短类名accountDaoImplTwopublic class AccountDaoImplTwo implements AccountDao {@Overridepublic void saveAccount() {System.out.println("AccountDaoImplTwo 保存了账户");}}
2、属性:无
3、使用场景:
在使用@Autowired注解的地方,都可以替换成@Inject。它也可以出现在方法上,构造函数上和字段上,但是需要注意的是:因为JRE无法决定构造方法注入的优先级,所以规范中规定类中只能有一个构造方法带@Inject注解。
4.5.3、示例
/*** 第一种写法: 写在字段上* 此处只是举例:使用Jdbc作为持久层中的操作数据库对象*/@Repository("userDao")public class UserDaoImpl implements UserDao{@Injectprivate JdbcTemplate jdbcTemplate ;}/*** 第二种写法:写在构造函数上*/@Repository("accountDao")public class AccountDaoImpl implements AccountDao{private JdbcTemplate jdbcTemplate;/*** 此时要求容器中必须有JdbcTemplate对象* @param jdbcTemplate*/@Injectpublic AccountDaoImpl(JdbcTemplate jdbcTemplate){this.jdbcTemplate = jdbcTemplate;}}/*** 第三种写法:配合@Named注解使用*/@Repository("accountDao")public class AccountDaoImpl implements AccountDao{@Inject@Named("jdbcTemplate")private JdbcTemplate jdbcTemplate ;}
4.6、@Primary
4.6.1、源码
@Target({ElementType.TYPE, ElementType.METHOD})@Retention(RetentionPolicy.RUNTIME)@Documentedpublic @interface Primary {}
4.6.2、说明
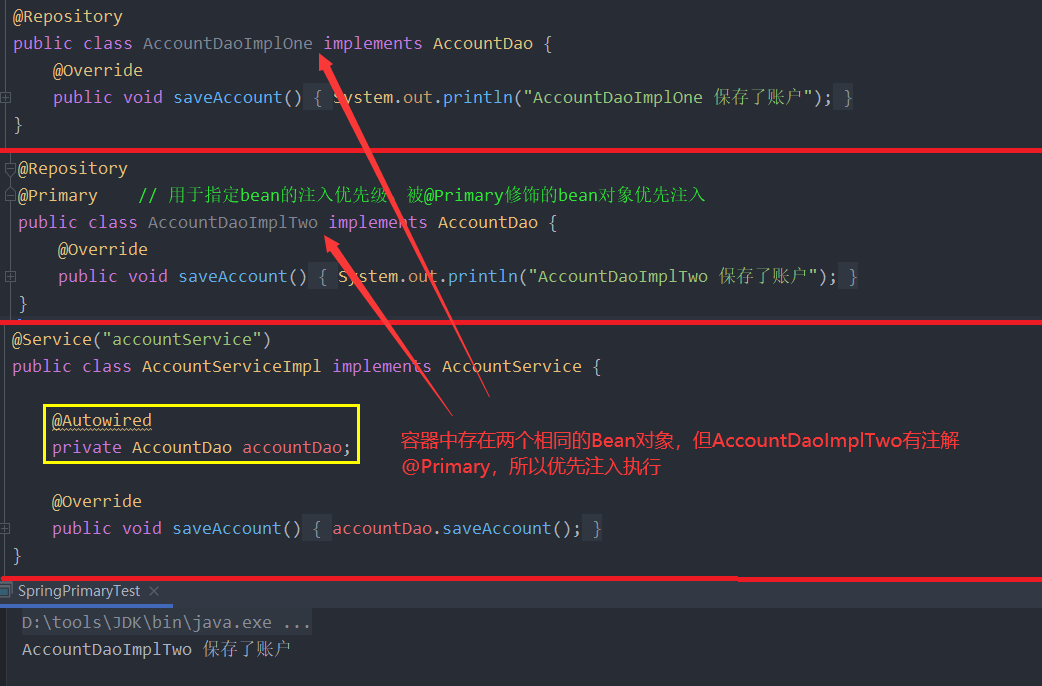
1、作用:用于指定bean的注入优先级。被@Primary修饰的bean对象优先注入
2、属性:无
3、使用场景:
当我们的依赖对象,有多个存在时,@Autowired注解已经无法完成功能,此时我们首先想到的是@Qualifier注解指定依赖bean的id。但是此时就产生了,无论有多少个bean,每次都会使用指定的bean注入。但是当我们使用@Primary,表示优先使用被@Primary注解的bean,但是当不存在时还会使用其他的
4.6.3、示例
5、和生命周期以及作用范围相关的注解
5.1、@Scope
5.1.1、源码
@Target({ElementType.TYPE, ElementType.METHOD})@Retention(RetentionPolicy.RUNTIME)@Documentedpublic @interface Scope {@AliasFor("scopeName")String value() default "";@AliasFor("value")String scopeName() default "";ScopedProxyMode proxyMode() default ScopedProxyMode.DEFAULT;}
5.1.2、说明
1、作用:用于指定bean对象的作用范围
2、属性:
1)value:
指定作用范围的取值。在注解中默认值是””。
但是在spring初始化容器时,会借助ConfigurableBeanFactory接口中的类成员:
String SCOPE_SINGLETON = "singleton";
2)scopeName:
它和value的作用是一样的。
3)proxyMode:
它是指定bean对象的代理方式的。指定的是ScopedProxyMode枚举的值
DEFAULT:默认值。(就是NO)
NO:不使用代理。
INTERFACES:使用JDK官方的基于接口的代理。
TARGET_CLASS:使用CGLIB基于目标类的子类创建代理对象。
3、使用场景:在实际开发中,我们的bean对象默认都是单例的。通常情况下,被spring管理的bean都使用单例模式来创建。但是也有例外,例如Struts2框架中的Action,由于有模型驱动和OGNL表达式的原因,就必须配置成多例的。
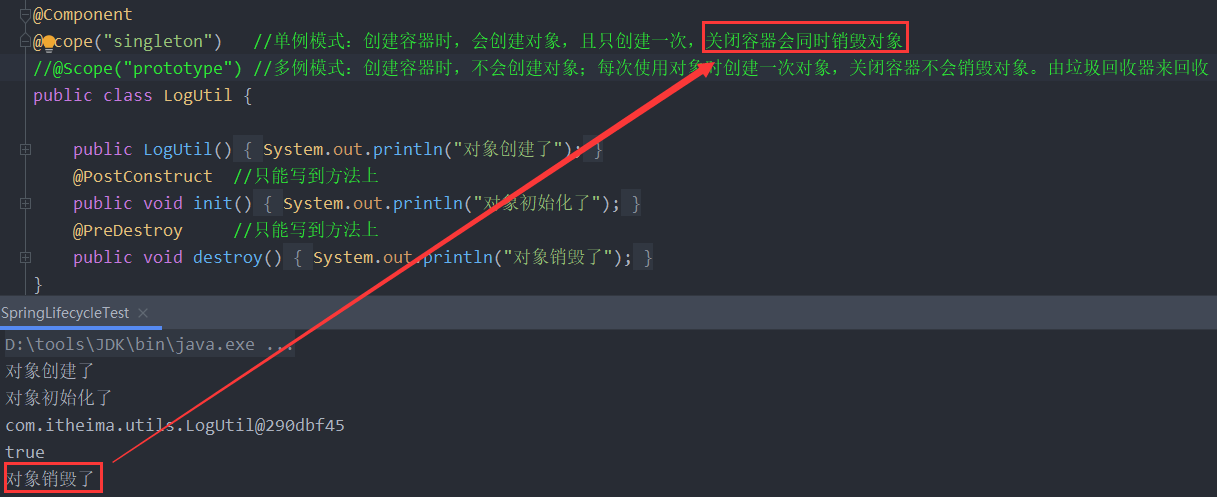
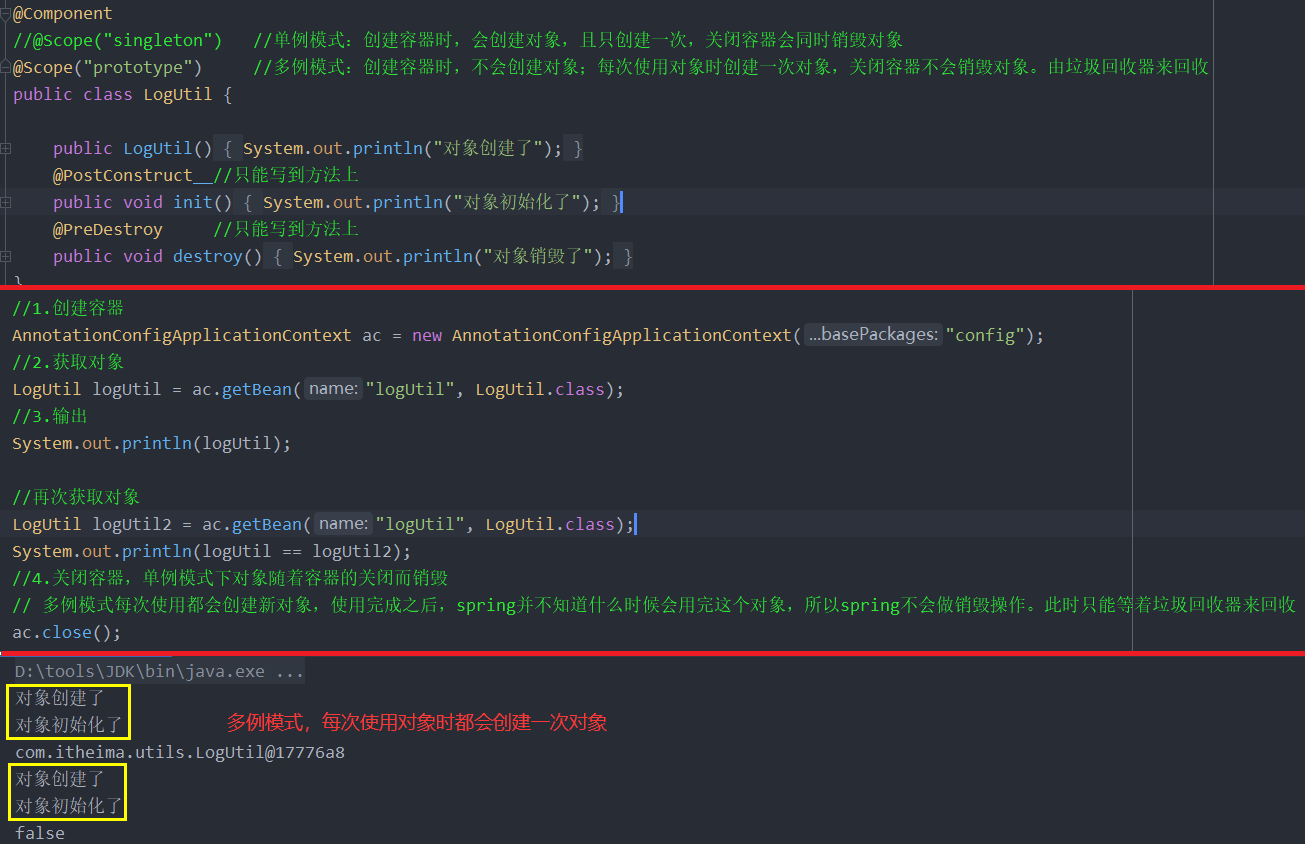
@Component//@Scope("singleton") //单例模式:创建容器时,会创建对象,且只创建一次,关闭容器会同时销毁对象@Scope("prototype") //多例模式:创建容器时,不会创建对象;每次使用对象时创建一次对象,关闭容器不会销毁对象。由垃圾回收器来回收public class LogUtil {public LogUtil(){System.out.println("对象创建了");}}
5.2、@PostConstruct
5.2.1、源码
@Documented@Retention (RUNTIME)@Target(METHOD)public @interface PostConstruct {}
5.2.2、说明
1、作用:用于指定bean对象的初始化方法。只能写到方法上
2、属性:无
3、使用场景:在bean对象创建完成后,需要对bean中的成员进行一些初始化的操作时,就可以使用此注解配置一个初始化方法,完成一些初始化的操作。
5.3、@PreDestroy
5.3.1、源码
@Documented@Retention (RUNTIME)@Target(METHOD)public @interface PreDestroy {}
5.3.2、说明
1、作用:用于指定bean对象的销毁方法。只能写到方法上
2、属性:无
3、使用场景:在bean对象销毁之前,可以进行一些清理操作。
5.3.3、单例模式,关闭容器时销毁对象
5.3.4、多例模式,关闭容器不会销毁对象,需要等待垃圾回收器来回收

若有收获,就点个赞吧
0 人点赞
