 一、讲师管理模块配置
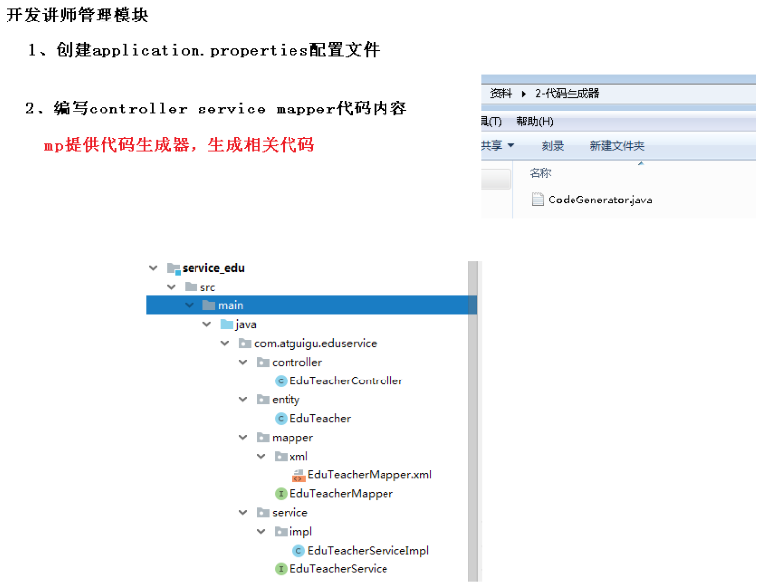
1、在service下面service-edu模块中创建配置文件
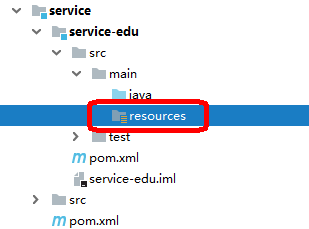
resources目录下创建文件 application.properties
# 服务端口server.port=8001# 服务名spring.application.name=service-edu# 环境设置:dev、test、prodspring.profiles.active=dev# mysql数据库连接spring.datasource.driver-class-name=com.mysql.cj.jdbc.Driverspring.datasource.url=jdbc:mysql://localhost:3306/guli?serverTimezone=GMT%2B8spring.datasource.username=rootspring.datasource.password=root#mybatis日志mybatis-plus.configuration.log-impl=org.apache.ibatis.logging.stdout.StdOutImpl
或者在resources目录下创建文件 application.yml
#### application.ymlspring:application:name: service-eduprofiles:active: dev#### application-dev.ymlserver:port: 8001mybatis-plus:configuration:log-impl: org.apache.ibatis.logging.stdout.StdOutImplmapper-locations: classpath:com/atguigu/service/*/mapper/*.xmlglobal-config:db-config:logic-delete-value: 1logic-not-delete-value: 0spring:datasource:type: com.zaxxer.hikari.HikariDataSourcedriver-class-name: com.mysql.cj.jdbc.Driverurl: jdbc:mysql://localhost:3306/guli?serverTimezone=GMT%2B8username: rootpassword: roothikari:connection-test-query: SELECT 1connection-timeout: 60000idle-timeout: 500000max-lifetime: 540000maximum-pool-size: 12minimum-idle: 10pool-name: GuliHikariPooljackson:date-format: yyyy-MM-dd HH:mm:sstime-zone: GMT+8
2、创建MP代码生成器
在test/java目录下创建包com.atguigu.eduservice,创建代码生成器:CodeGenerator.java
public class getCode {@Testpublic void main1() {// 1、创建代码生成器AutoGenerator mpg = new AutoGenerator();// 2、全局配置GlobalConfig gc = new GlobalConfig();String projectPath = System.getProperty("user.dir");System.out.println(projectPath);gc.setOutputDir(projectPath + "/src/main/java");gc.setAuthor("atguigu");gc.setOpen(false); //生成后是否打开资源管理器gc.setFileOverride(false); //重新生成时文件是否覆盖/** mp生成service层代码,默认接口名称第一个字母有 I* UcenterService* */gc.setServiceName("%sService"); //去掉Service接口的首字母Igc.setIdType(IdType.ID_WORKER); //主键策略gc.setDateType(DateType.ONLY_DATE);//定义生成的实体类中日期类型gc.setSwagger2(true);//开启Swagger2模式mpg.setGlobalConfig(gc);// 3、数据源配置DataSourceConfig dsc = new DataSourceConfig();dsc.setUrl("jdbc:mysql://localhost:3306/guli?serverTimezone=GMT%2B8");dsc.setDriverName("com.mysql.cj.jdbc.Driver");dsc.setUsername("root");dsc.setPassword("root");dsc.setDbType(DbType.MYSQL);mpg.setDataSource(dsc);// 4、包配置PackageConfig pc = new PackageConfig();pc.setParent("com.atguigu");pc.setModuleName("serviceedu"); //包名为:com.atguigu.serviceedupc.setController("controller"); //包名为:com.atguigu.controllerpc.setEntity("entity");pc.setService("service");pc.setMapper("mapper");mpg.setPackageInfo(pc);// 5、策略配置StrategyConfig strategy = new StrategyConfig();strategy.setInclude("edu_teacher"); //数据库表名strategy.setNaming(NamingStrategy.underline_to_camel);//数据库表映射到实体的命名策略strategy.setTablePrefix(pc.getModuleName() + "_"); //生成实体时去掉表前缀strategy.setColumnNaming(NamingStrategy.underline_to_camel);//数据库表字段映射到实体的命名策略strategy.setEntityLombokModel(true); // lombok 模型 @Accessors(chain = true) setter链式操作strategy.setRestControllerStyle(true); //restful api风格控制器strategy.setControllerMappingHyphenStyle(true); //url中驼峰转连字符mpg.setStrategy(strategy);// 6、执行mpg.execute();}}
二、编写后台管理api接口
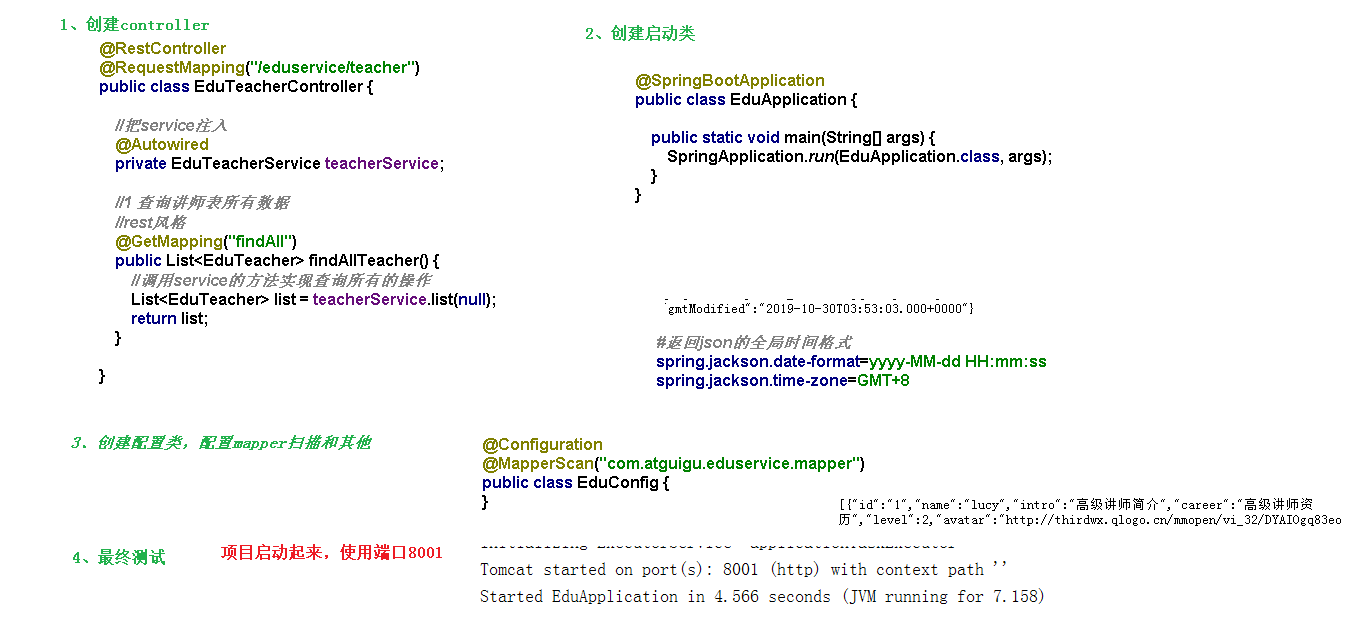
1、编写controller代码
package com.atguigu.eduservice.controller;@Api(description="讲师管理")@RestController@RequestMapping("/eduservice/teacher")//@CrossOriginpublic class EduTeacherController {//访问地址: http://localhost:8001/eduservice/teacher/findAll//把service注入@Autowiredprivate EduTeacherService teacherService;//1 查询讲师表所有数据//rest风格@ApiOperation(value = "所有讲师列表")@GetMapping("findAll")public List<Teacher> list(){return teacherService.list(null);}}
2、创建SpringBoot配置类
在edu包下创建config包,创建MyBatisPlusConfig.java
package com.guli.edu.config;@Configuration@EnableTransactionManagement@MapperScan("com.atguigu.eduservice.mapper") //扫描mapperpublic class MyBatisPlusConfig {}
3、配置SQL执行性能分析插件
/*** SQL 执行性能分析插件* 开发环境使用,线上不推荐。 maxTime 指的是 sql 最大执行时长*/@Bean@Profile({"dev","test"})// 设置 dev test 环境开启public PerformanceInterceptor performanceInterceptor() {PerformanceInterceptor performanceInterceptor = new PerformanceInterceptor();performanceInterceptor.setMaxTime(1000);//ms,超过此处设置的ms则sql不执行performanceInterceptor.setFormat(true);return performanceInterceptor;}
4、创建SpringBoot启动类
创建启动类 EduApplication.java,注意启动类的创建位置
@SpringBootApplicationpublic class EduApplication {public static void main(String[] args) {SpringApplication.run(EduApplication.class, args);}}
5、运行启动类
访问http://localhost:8001/eduservice/teacher
得到json数据
6、统一返回的json时间格式
默认情况下json时间格式带有时区,并且是世界标准时间,和我们的时间差了八个小时
在application.properties中设置
#返回json的全局时间格式spring.jackson.date-format=yyyy-MM-dd HH:mm:ssspring.jackson.time-zone=GMT+8
三、讲师逻辑删除功能
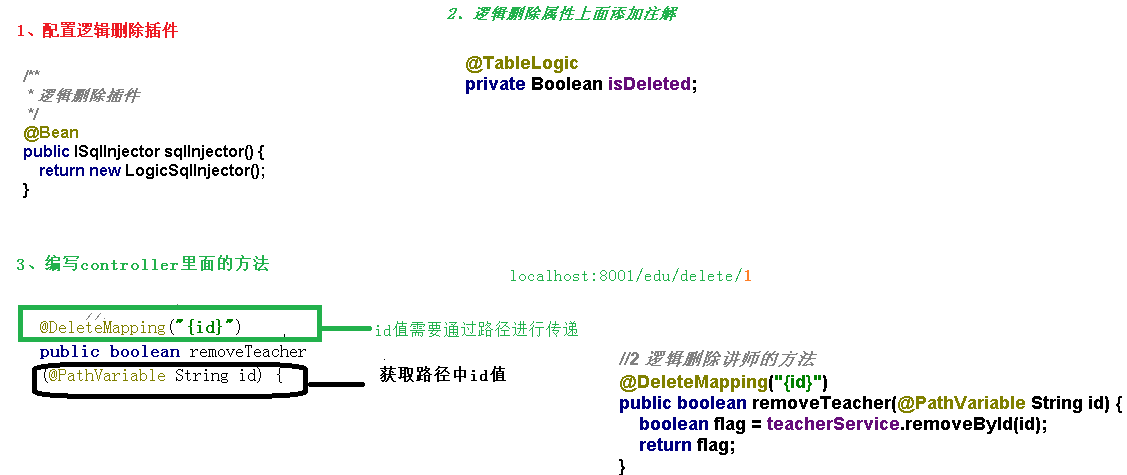
1、配置逻辑删除插件
EduConfig中配置
package com.atguigu.eduservice.config;@EnableTransactionManagement@Configuration@MapperScan("com.atguigu.eduservice.mapper")public class EduConfig {/*** 逻辑删除插件*/@Beanpublic ISqlInjector sqlInjector() {return new LogicSqlInjector();}}
2、逻辑删除属性上面添加注解
EduTeacher中配置
package com.atguigu.eduservice.entity;@Data@ApiModel(value="EduTeacher对象", description="讲师")public class EduTeacher implements Serializable {private static final long serialVersionUID = 1L;@ApiModelProperty(value = "讲师ID")@TableId(value = "id", type = IdType.ID_WORKER_STR)private String id;************@ApiModelProperty(value = "逻辑删除 1(true)已删除, 0(false)未删除")@TableLogicprivate Boolean isDeleted;@ApiModelProperty(value = "创建时间")@TableField(fill = FieldFill.INSERT)private Date gmtCreate;@ApiModelProperty(value = "更新时间")@TableField(fill = FieldFill.INSERT_UPDATE)private Date gmtModified;}
2、EduTeacherController添加删除方法
package com.atguigu.eduservice.controller;@Api(description="讲师管理")@RestController@RequestMapping("/eduservice/teacher")//@CrossOriginpublic class EduTeacherController {//访问地址: http://localhost:8001/eduservice/teacher/findAll//把service注入@Autowiredprivate EduTeacherService teacherService;//2 逻辑删除讲师的方法@DeleteMapping("{id}")public boolean removeById(@PathVariable String id){return teacherService.removeById(id);}}
3、使用postman测试删除
测试结果:数据库中的is_deleted字段被修改为1
四、跨域配置
1、什么是跨域
浏览器从一个域名的网页去请求另一个域名的资源时,域名、端口、协议任一不同,都是跨域 。前后端分离开发中,需要考虑ajax跨域的问题。
2、配置
在Controller类上添加注解
@CrossOrigin //跨域
