https://api.flutter.dev/flutter/widgets/Transform-class.html
transform 可以在其子组件绘制时对齐应用一些矩阵变化来实现一些特效。Matrix4 是一个4D矩阵,通过它我们可以实现各种矩阵操作。
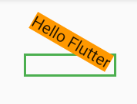
旋转
Matrix4.rotationX 、Matrix4.rotationY 、Matrix4.rotationZ 可以对子组件进行旋转变换。
绕Z轴旋转的话,Matrix4.rotationZ(angle) 可以简化为 Transform.rotate(angle: angle) 。
import "dart:math" as Math;Container(margin: EdgeInsets.only(top: 50, left: 50),decoration: BoxDecoration(border: Border.all(color: Colors.green, width: 2.0),),child: Transform(// 原点位置,默认为左上角alignment: Alignment.topRight, //以右上角为原点// origin: Offset(10, 20), //默认原点为左上角,右移20像素,下移10像素// 旋转坐标参数为弧度,需要用到圆周率π(pi),这样需要用到库:dart:mathtransform: Matrix4.rotationZ(Math.pi / 6), //以原点为基准,顺时针旋转30度child: Container(color: Colors.orange, child: Text('Hello Flutter')),),//等同于:child: Transform.rotate(alignment: Alignment.topRight,angle: Math.pi / 6,child: Container(color: Colors.orange, child: Text('Hello Flutter')),),);
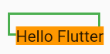
平移
transform: Matrix4.translationValues(x, y, z)Transform.translate() 接收一个offset参数,可以在绘制时沿x、y轴对子组件平移指定的距离。
Container(margin: EdgeInsets.only(top: 50, left: 50),decoration: BoxDecoration(border: Border.all(color: Colors.green, width: 2.0),),// child: Transform(// transform: Matrix4.translationValues(5, 10, 0),// child: Container(color: Colors.orange, child: Text('Hello Flutter')),// ),//等同于child: Transform.translate(offset: Offset(5, 10), //默认原点为左上角,右移5像素,下移10像素child: Container(color: Colors.orange, child: Text('Hello Flutter')),),);
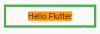
缩放
Matrix4.diagonal3Values(x, y, x)Transform.scale() 对子组件进行缩小或放大。
Container(margin: EdgeInsets.only(top: 50, left: 50),decoration: BoxDecoration(border: Border.all(color: Colors.green, width: 2.0),),// child: Transform(// alignment: Alignment.center,// transform: Matrix4.diagonal3Values(0.5, 0.5, 0.5), //默认原点为左上角// child: Container(color: Colors.orange, child: Text('Hello Flutter')),// ),// 等同于child: Transform.scale(scale: 0.5, //默认原点为中心点,缩小0.5倍child: Container(color: Colors.orange, child: Text('1Hello Flutter')),),);
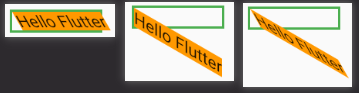
倾斜
skewX() 、skewY() 、skew()
Container(margin: EdgeInsets.only(top: 50, left: 50),decoration: BoxDecoration(border: Border.all(color: Colors.green, width: 2.0),),child: Transform(transform: Matrix4.skewX(Math.pi / 6), //沿X轴倾斜30度// transform: Matrix4.skewY(Math.pi / 6), //沿Y轴倾斜30度// transform: Matrix4.skew(Math.pi / 6, Math.pi / 6), //沿X轴倾斜30度 且 沿Y轴倾斜30度child: Container(color: Colors.orange, child: Text('Hello Flutter')),),);
注意事项
Transform的变换是应用在绘制阶段,而并不是应用在布局(layout)阶段,所以无论对子组件应用何种变化,其占用空间的大小和在屏幕上的位置都是固定不变的,因为这些是在布局阶段就确定的。下面我们具体说明:Row(mainAxisAlignment: MainAxisAlignment.center,children: <Widget>[DecoratedBox(decoration:BoxDecoration(color: Colors.red),child: Transform.scale(scale: 1.5,child: Text("Hello world"))),Text("你好", style: TextStyle(color: Colors.green, fontSize: 18.0),)],)
运行效果如图5-14所示:
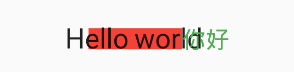
由于第一个Text应用变换(放大)后,其在绘制时会放大,但其占用的空间依然为红色部分,所以第二个Text会紧挨着红色部分,最终就会出现文字重合。- 由于矩阵变化只会作用在绘制阶段,所以在某些场景下,在UI需要变化时,可以直接通过矩阵变化来达到视觉上的UI改变,而不需要去重新触发build流程,这样会节省layout的开销,所以性能会比较好。如之前介绍的
Flow组件,它内部就是用矩阵变换来更新UI,除此之外,Flutter的动画组件中也大量使用了Transform以提高性能。
RotatedBox
RotatedBox和Transform.rotate功能相似,它们都可以对子组件进行旋转变换,但是有一点不同:RotatedBox的变换是在layout阶段,会影响在子组件的位置和大小。
我们将上面介绍Transform.rotate时的示例改一下:
Row(mainAxisAlignment: MainAxisAlignment.center,children: <Widget>[DecoratedBox(decoration: BoxDecoration(color: Colors.red),//将Transform.rotate换成RotatedBoxchild: RotatedBox(quarterTurns: 1, //旋转90度(1/4圈)child: Text("Hello world"),),),Text("你好", style: TextStyle(color: Colors.green, fontSize: 18.0),)],),
效果如左图所示: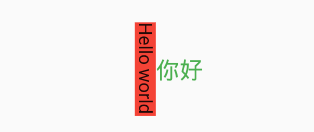 前者:
前者: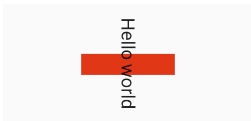
由于RotatedBox是作用于layout阶段,所以子组件会旋转90度(而不只是绘制的内容),decoration会作用到子组件所占用的实际空间上,所以最终就是上图的效果,读者可以和前面Transform.rotate示例对比理解。
赏

若有收获,就点个赞吧
0 人点赞
