var size = MediaQuery.of(context);print(size);print(size.size.width); //480print(size.padding.top); //24 顶部状态栏高度print(size.padding.bottom); // 底部导航栏高度
MediaQueryData(size: Size(480.0, 829.3),devicePixelRatio: 1.5,textScaleFactor: 1.0,platformBrightness: Brightness.light,padding: EdgeInsets(0.0, 24.0, 0.0, 0.0),viewPadding: EdgeInsets(0.0, 24.0, 0.0, 0.0),viewInsets: EdgeInsets.zero,alwaysUse24HourFormat: false,accessibleNavigation: false,highContrast: false,disableAnimations: false,invertColors: false,boldText: false,navigationMode: traditional)
静态化
class Application {static FluroRouter router;static Map<String, dynamic> screen = {};static viewPortSize(context) {final size = MediaQuery.of(context);screen['width'] = size.size.width;screen['height'] = size.size.height;screen['appBarHeight'] = size.padding.top;screen['bottomNavigatorHeight'] = size.padding.bottom;}}
使用
Application.viewPortSize(context);print(Application.screen); //{width: 480.0, height: 829.3333333333334, appBarHeight: 24.0, bottomNavigatorHeight: 0.0}
移除间距
MediaQuery.removePadding({Key key,@required BuildContext context,bool removeLeft = false,bool removeTop = false,bool removeRight = false,bool removeBottom = false,@required Widget child,}) {return MediaQuery(key: key,data: MediaQuery.of(context).removePadding(removeLeft: removeLeft,removeTop: removeTop,removeRight: removeRight,removeBottom: removeBottom,),child: child,);}
应用:移除顶部状态栏间距
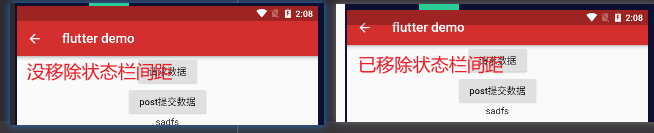
class ApiDemoPage extends StatelessWidget {@overrideWidget build(BuildContext context) {return MediaQuery.removePadding(context: context,removeTop: true, //移除状态栏间距child: Scaffold(appBar: AppBar(title: Text('flutter demo')),body: null,),);}}
SafeArea 异形屏幕适配
现在的手机已经不是方方正正的屏幕了,所以我们在写一些UI的时候可能会受到 刘海屏、水滴屏、iPhoneX底部区域等影响。SafeArea组件就是解决这个问题的。
SafeArea(top: false,bottom: true,left: true,right: false,),
示例1:处理刘海屏
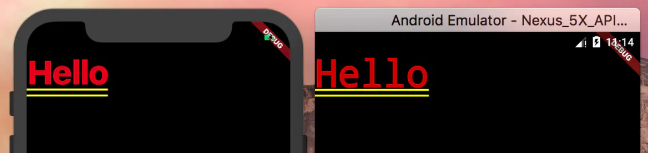
//不加class FlutterAlign extends StatelessWidget {@overrideWidget build(BuildContext context) {return Align(alignment: Alignment(-1, -1),child: Container(child: Text("Hello",),),);}}//加class FlutterAlign extends StatelessWidget {@overrideWidget build(BuildContext context) {return SafeArea(child: Align(alignment: Alignment(-1, -1),child: Container(child: Text("Hello",),),),);}}
示例2:处理iPhone X类似的底部bottom的区域

class FlutterAlign extends StatelessWidget {@overrideWidget build(BuildContext context) {return SafeArea(child: Align(alignment: Alignment(-1, 1),child: Container(child: Text("Hello",),),),);}}

若有收获,就点个赞吧
0 人点赞
