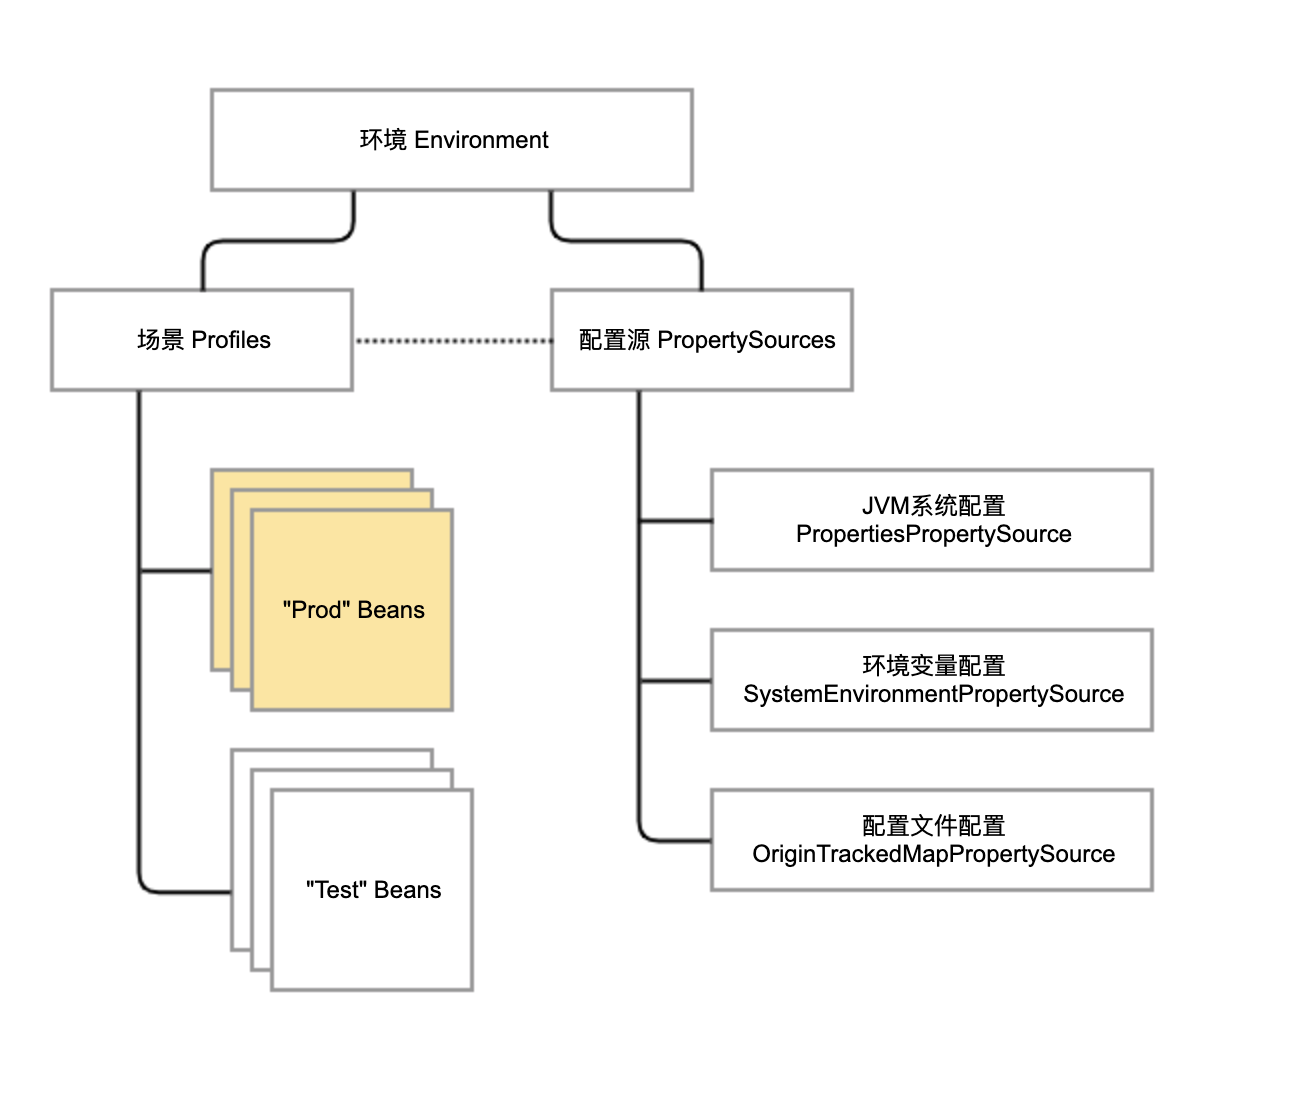
Spring Boot 允许我们将配置进行外部化处理,以便我们使用相同的代码在不同的环境中运行。我们可以使用属性文件、YAML 文件、环境变量和命令行参数来进行外化配置。这些配置中的属性可以通过 @Value 注解直接注入到对应的 Bean 中,也可以通过 Spring 的 Environment 抽象访问,还可以通过 @ConfigurationProperties 绑定到结构化的对象上。
Spring Boot 设计了特殊的加载指定属性文件(PropertySource)的顺序,以允许对属性值进行合理的覆盖。属性值会以下面的优先级进行设置,越靠前优先级越高:
- 命令行参数
- Java 系统属性:System.getProperties()
- 操作系统环境变量
- jar 包外的 Profile-specific 应用属性(application-{profile}.properties 和 YAML 变量)
- jar 包内的 Profile-specific 应用属性(application-{profile}.properties 和 YAML 变量)
- jar 包外的应用配置(application.properties 和 YAML 变量)
- jar 包内的应用配置(application.properties 和 YAML 变量)
- @Coofiguration 类上的 @PropertySource 注解
- 默认属性,即通过 SpringApplication.setDefaultProperties 方法指定的属性
命令行参数配置
命令行参数就是在启动 Spring Boot 项目时通过命令行传递的参数。比如,用如下命令来启动一个 Spring Boot 的项目。
java -jar app.jar --name=SpringBoot
那么,参数 —name=SpringBoot 是如何一步步传递到 Spring 内部的呢?默认情况下,SpringApplication 会将以上类似 name 的命令行参数(以 “—“ 开头)解析封装成一个 PropertySource 对象,并将其添加到
Environment 当中,而命令行参数的优先级要高于其他配置源。
1. 获取命令行参数
下面,我们通过代码来追踪启动过程中整个参数的获取、解析和封装过程。首先,参数通过 SpringApplication 的 run 方法的 args 参数来传递的。在 SpringApplication 的 run 方法中,通过以下操作先将 args 封装到对象 ApplicationArguments 中,然后又将封装后的对象传递到 prepareEnvironment 方法中。
public ConfigurableApplicationContext run(String... args) {...ApplicationArguments applicationArguments = new DefaultApplicationArguments(args);ConfigurableEnvironment environment = prepareEnvironment(listeners, applicationArguments);......}
在 prepareEnvironment 方法中,通过 ApplicationArguments.getSourceArgs() 获得传递的参数数组,并作为参数调用 configureEnvironment 方法,此处获得的 args 依旧是未解析的参数值,代码如下:
private ConfigurableEnvironment prepareEnvironment(SpringApplicationRunListeners listeners,ApplicationArguments applicationArguments) {configureEnvironment(environment, applicationArguments.getSourceArgs());...}protected void configureEnvironment(ConfigurableEnvironment environment, String[] args) {configurePropertySources(environment, args);......}
在 configurePropertySources 方法中才对参数进行了真正的解析和封装:
protected void configurePropertySources(ConfigurableEnvironment environment, String[] args) {// 获得环境中的属性资源信息MutablePropertySources sources = environment.getPropertySources();// 如果默认属性配置存在,则将其放置于属性资源的最后位置if (this.defaultProperties != null && !this.defaultProperties.isEmpty()) {sources.addLast(new MapPropertySource("defaultProperties", this.defaultProperties));}// 如果命令行属性未被禁用且存在if (this.addCommandLineProperties && args.length > 0) {String name = CommandLinePropertySource.COMMAND_LINE_PROPERTY_SOURCE_NAME;// 如果默认属性资源中包含该命令,则通过CompositePropertySource进行处理if (sources.contains(name)) {PropertySource<?> source = sources.get(name);CompositePropertySource composite = new CompositePropertySource(name);composite.addPropertySource(new SimpleCommandLinePropertySource("springApplicationCommandLineArgs", args));composite.addPropertySource(source);sources.replace(name, composite);} else {// 如果默认属性资源中不包含该命令,则将命令行属性放置在第一位sources.addFirst(new SimpleCommandLinePropertySource(args));}}}
下面重点介绍两个内容:参数的优先级和命令行参数的解析
先说参数的优先级,从上面的代码注解中可以看到,configurePropertySources 方法第一步获得环境变量中存储配置信息的 sources;第二步判断默认参数是否为空,如果不为空,则将默认参数放置在 sources 的最后位置,这里已经明显反映了参数的优先级是通过顺序来体现的;第三步,如果命令参数未被禁用,且不为空,则要么将原有默认参数替换掉,要么直接放在第一位,这一步中的替换操作也是另外一种优先级形式的体现。
2. 解析命令行参数
命令行参数的解析用到了 SimpleCommandLinePropertySource 类,它是 PropertySource 抽象类的派生类。查看其构造方法会发现默认使用了 Spring 的 SimpleCommandLineArgsParser 对 args 参数进行解析。
public SimpleCommandLinePropertySource(String... args) {super(new SimpleCommandLineArgsParser().parse(args));}
Spring Boot 对参数类型是有所区分的,可分为:选项参数和非选项参数。选项参数必须以 “—“ 为前缀,参数值可为空,这种参数我们可以通过 Spring Boot 属性处理后使用,比如在执行 jar -jar 命令时,添加选项参数 “—app.name=SpringBoot”,之后可在代码中通过 @Value 属性或其他方式获取到该参数的值。该参数可以通过逗号分隔多个参数值,或多次使用同一个参数来包含多个参数的值。非选项参数并不要求以 “—“ 前缀开始,可自行定义,非选项参数可以是除了传递的 VM 参数之外的其他参数。
以上所说的选项参数和非选项参数的解析最终是在 SimpleCommandLineArgsParser 的 parse 方法中完成的:
public CommandLineArgs parse(String... args) {CommandLineArgs commandLineArgs = new CommandLineArgs();for (String arg : args) {// 解析选项参数,即以 -- 为前缀的参数if (arg.startsWith("--")) {String optionText = arg.substring(2, arg.length());String optionName;String optionValue = null;// 判断是 --foo=bar 的参数格式,还是 --foo 的参数格式,并分别处理获取值if (optionText.contains("=")) {optionName = optionText.substring(0, optionText.indexOf('='));optionValue = optionText.substring(optionText.indexOf('=')+1, optionText.length());} else {optionName = optionText;}if (optionName.isEmpty() || (optionValue != null && optionValue.isEmpty())) {throw new IllegalArgumentException("Invalid argument syntax: " + arg);}commandLineArgs.addOptionArg(optionName, optionValue);} else {// 处理非选项参数commandLineArgs.addNonOptionArg(arg);}}return commandLineArgs;}
可以看到,Spring 对参数的解析是按照指定的参数格式分别解析字符串中的值来实现的。最终,解析的结果均封装在 CommandLineArgs 中。而 CommandLineArgs 类只是命令行参数的简单表示形式,内部分为:选项参数和非选项参数:
class CommandLineArgs {// 存储选项参数private final Map<String, List<String>> optionArgs = new HashMap<>();// 存储非选项参数private final List<String> nonOptionArgs = new ArrayList<>();......}
SimpleCommandLineArgsParser 解析获得的 CommandLineArgs 对象,最终会通过构造函数中的 super 调用被一层层地传递到 PropertySource 类的构造方法,最终封装到对应的属性当中。
public abstract class PropertySource<T> {// 参数类别名称protected final String name;// 参数封装类,即为CommandLineArgsprotected final T source;}
配置文件的加载
Spring Boot 启动时默认会加载 classpath 下的 application.yml 或 application.properties 文件。配置文件的加载过程是利用 Spring Boot 的事件机制来完成的,即通过 SpringApplicationRunListeners 中的 environmentPrepared 方法来启动加载配置文件的事件。在 Spring Boot 默认提供的 spring.factories 文件中注册了一个 ConfigFileApplicationListener 监听器,在启动过程中通过该监听器的回调方法实现资源的加载。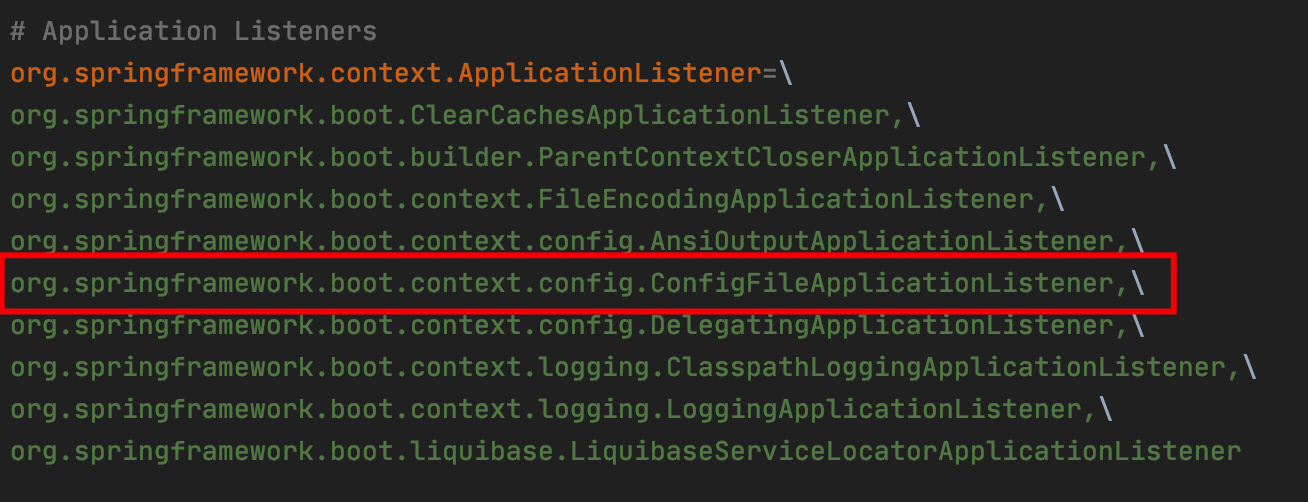
1. ConfigFileApplicationListener
下面,我们通过源代码的追踪来分析这一过程。在上一步中执行完命令行参数的解析后,会触发监听器的 environmentPrepared 回调方法,该方法会发布一个 ApplicationEnvironmentPreparedEvent 事件。
public void environmentPrepared(ConfigurableEnvironment environment) {this.initialMulticaster.multicastEvent(new ApplicationEnvironmentPreparedEvent(this.application, this.args, environment));}
在 META-INF/spring.factories 中注册的 ConfigFileApplicationListener 会监听到对应的事件,并进行相应的处理。处理入口为 onApplicationEvent 方法,具体代码如下:
public class ConfigFileApplicationListener implements EnvironmentPostProcessor, SmartApplicationListener, Ordered {// 默认的加载配置文件路径private static final String DEFAULT_SEARCH_LOCATIONS = "classpath:/,classpath:/config/,file:./,file:./config/";// 默认的配置文件名称private static final String DEFAULT_NAMES = "application";// 激活配置文件的属性名public static final String ACTIVE_PROFILES_PROPERTY = "spring.profiles.active";@Overridepublic void onApplicationEvent(ApplicationEvent event) {// 对应前面发布的事件,执行此业务逻辑if (event instanceof ApplicationEnvironmentPreparedEvent) {onApplicationEnvironmentPreparedEvent((ApplicationEnvironmentPreparedEvent) event);}...}}private void onApplicationEnvironmentPreparedEvent(ApplicationEnvironmentPreparedEvent event) {// 加载注册的EnvironmentPostProcessor处理器List<EnvironmentPostProcessor> postProcessors = loadPostProcessors();postProcessors.add(this);AnnotationAwareOrderComparator.sort(postProcessors);// 遍历并依次调用其 postProcessEnvironment 方法for (EnvironmentPostProcessor postProcessor : postProcessors) {postProcessor.postProcessEnvironment(event.getEnvironment(), event.getSpringApplication());}}
其中 EnvironmentPostProcessor 接口的实现类也是在 META-INF/spring.factories 文件中注册的:
ConfigFileApplicationListener 本身也是 EnvironmentPostProcessor 接口的实现类。查看其 postProcessEnvironment 的实现会发现最后在其内部类 Loader 的 load 方法中进行配置文件的加载操作。
public void postProcessEnvironment(ConfigurableEnvironment environment, SpringApplication application) {addPropertySources(environment, application.getResourceLoader());}protected void addPropertySources(ConfigurableEnvironment environment, ResourceLoader resourceLoader) {RandomValuePropertySource.addToEnvironment(environment);new Loader(environment, resourceLoader).load();}
在 load 方法中会循环遍历 PropertySourceLoader,执行对应的加载逻辑:
private void load(String location, String name, Profile profile, DocumentFilterFactory filterFactory, DocumentConsumer consumer) {for (PropertySourceLoader loader : this.propertySourceLoaders) {if (canLoadFileExtension(loader, location)) {load(loader, location, profile, filterFactory.getDocumentFilter(profile), consumer);return;}}......}
2. PropertySourceLoader
PropertySourceLoader 也是在 META-INF/spring.factories 配置文件中注册的,并且在 Loader 的构造方法中已经通过 SpringFactoriesLoader 的 loadFactories 方法进行了加载。
其中,PropertiesPropertySourceLoader 加载器支持的文件类型为:
@Overridepublic String[] getFileExtensions() {return new String[] { "properties", "xml" };}
而 YamlPropertySourceLoader 加载器支持的文件类型为:
@Overridepublic String[] getFileExtensions() {return new String[] { "yml", "yaml" };}
具体的加载过程则是通过这两个实现类的 load 方法来实现的,通过读取指定路径下、指定文件后缀的配置文件,最终获取到 PropertySource 的列表,其内部封装了加载到的配置属性。
基于 Profile 的文件加载
在日常使用中我们可以通过配置 spring.profiles.active 属性来指定一组不同环境的配置文件,那么 profile 是如何被加载使用的呢?下面就重点分析下 ConfigFileApplicationListener 中关于 profile 的文件加载处理逻辑。
在 ConfigFileApplicationListener 类中单独定义了一个内部类 Profile 用来存储 profile 的相关信息,该类只有两个核心字段:name 用来表示 profile 文件的名称;defaultProfile 用来表示 profile 是否为默认的。
private static class Profile {private final String name;private final boolean defaultProfile;......}
在 ConfigFileApplicationListener 类的处理逻辑中(除了关于配置文件的具体加载)都离不开 profile 的参与,我们先从内部私有类 Loader 的 load 方法开始分析,代码如下:
void load() {// 过滤符合条件的propertiesFilteredPropertySource.apply(this.environment, DEFAULT_PROPERTIES, LOAD_FILTERED_PROPERTY,(defaultProperties) -> {// 创建默认的Profiles双端队列this.profiles = new LinkedList<>();// 创建默认的已处理Profiles列表this.processedProfiles = new LinkedList<>();// 默认设置为未激活this.activatedProfiles = false;this.loaded = new LinkedHashMap<>();// 加载配置文件中指定的profiles属性,默认值为defaultinitializeProfiles();// 遍历profiles,并加载解析while (!this.profiles.isEmpty()) {Profile profile = this.profiles.poll();if (isDefaultProfile(profile)) {addProfileToEnvironment(profile.getName());}// 解析处理profilesload(profile, this::getPositiveProfileFilter,addToLoaded(MutablePropertySources::addLast, false));// 已处理过的放入对应列表this.processedProfiles.add(profile);}load(null, this::getNegativeProfileFilter, addToLoaded(MutablePropertySources::addFirst, true));addLoadedPropertySources();applyActiveProfiles(defaultProperties);});}
下面我们看下,在 initializeProfiles 方法中是如何对默认 profiles 做初始化操作的:
private void initializeProfiles() {// 首先添加一个null,确保其优先级最低,用于后续添加默认profilesthis.profiles.add(null);// 查找环境中 spring.profiles.active 属性配置的 profilesSet<Profile> activatedViaProperty = getProfilesFromProperty(ACTIVE_PROFILES_PROPERTY);// 查找环境中 spring.profiles.include 属性配置的 profilesSet<Profile> includedViaProperty = getProfilesFromProperty(INCLUDE_PROFILES_PROPERTY);// 查找环境中除以上两类之外的其他属性配置的 profilesList<Profile> otherActiveProfiles = getOtherActiveProfiles(activatedViaProperty, includedViaProperty);...// 如果没有任何profiles配置,也就是默认只添加了一个null,则为其添加一个默认的default profilesif (this.profiles.size() == 1) {for (String defaultProfileName : this.environment.getDefaultProfiles()) {Profile defaultProfile = new Profile(defaultProfileName, true);this.profiles.add(defaultProfile);}}}
当执行完 initializeProfiles 方法后,程序执行回到主代码逻辑,此时会遍历 profiles 集合中的值,并逐一进行 load 操作。其中遍历循环过程中调用的 load 方法代码如下:
private void load(Profile profile, DocumentFilterFactory filterFactory, DocumentConsumer consumer) {getSearchLocations().forEach((location) -> {boolean isFolder = location.endsWith("/");Set<String> names = isFolder ? getSearchNames() : NO_SEARCH_NAMES;names.forEach((name) -> load(location, name, profile, filterFactory, consumer));});}
在上面的代码中,主要通过 getSearchLocations 方法获得默认的扫描路径,如果没有特殊指定,就采用常量 DEFAULT_SEARCH_LOCATIONS 中定义的四个路径。而 getSearchNames 方法获得的就是 application 这个默认的配置文件名。然后,逐一遍历加载目录路径及其指定文件名的文件,当扫描到符合条件的文件时程序会进行相应的解析操作。

若有收获,就点个赞吧
0 人点赞
