概述
Vue 中每个组件都是一个 Vue 实例,Vue 实例需要经过创建、初始化数据、编译模板、挂载 DOM、渲染、更新、渲染、卸载等一系列过程,这个过程就是 Vue 的生命周期。同时在这个过程中也会运行一些叫做生命周期钩子的函数,这给了用户在不同阶段添加自己的代码的机会。
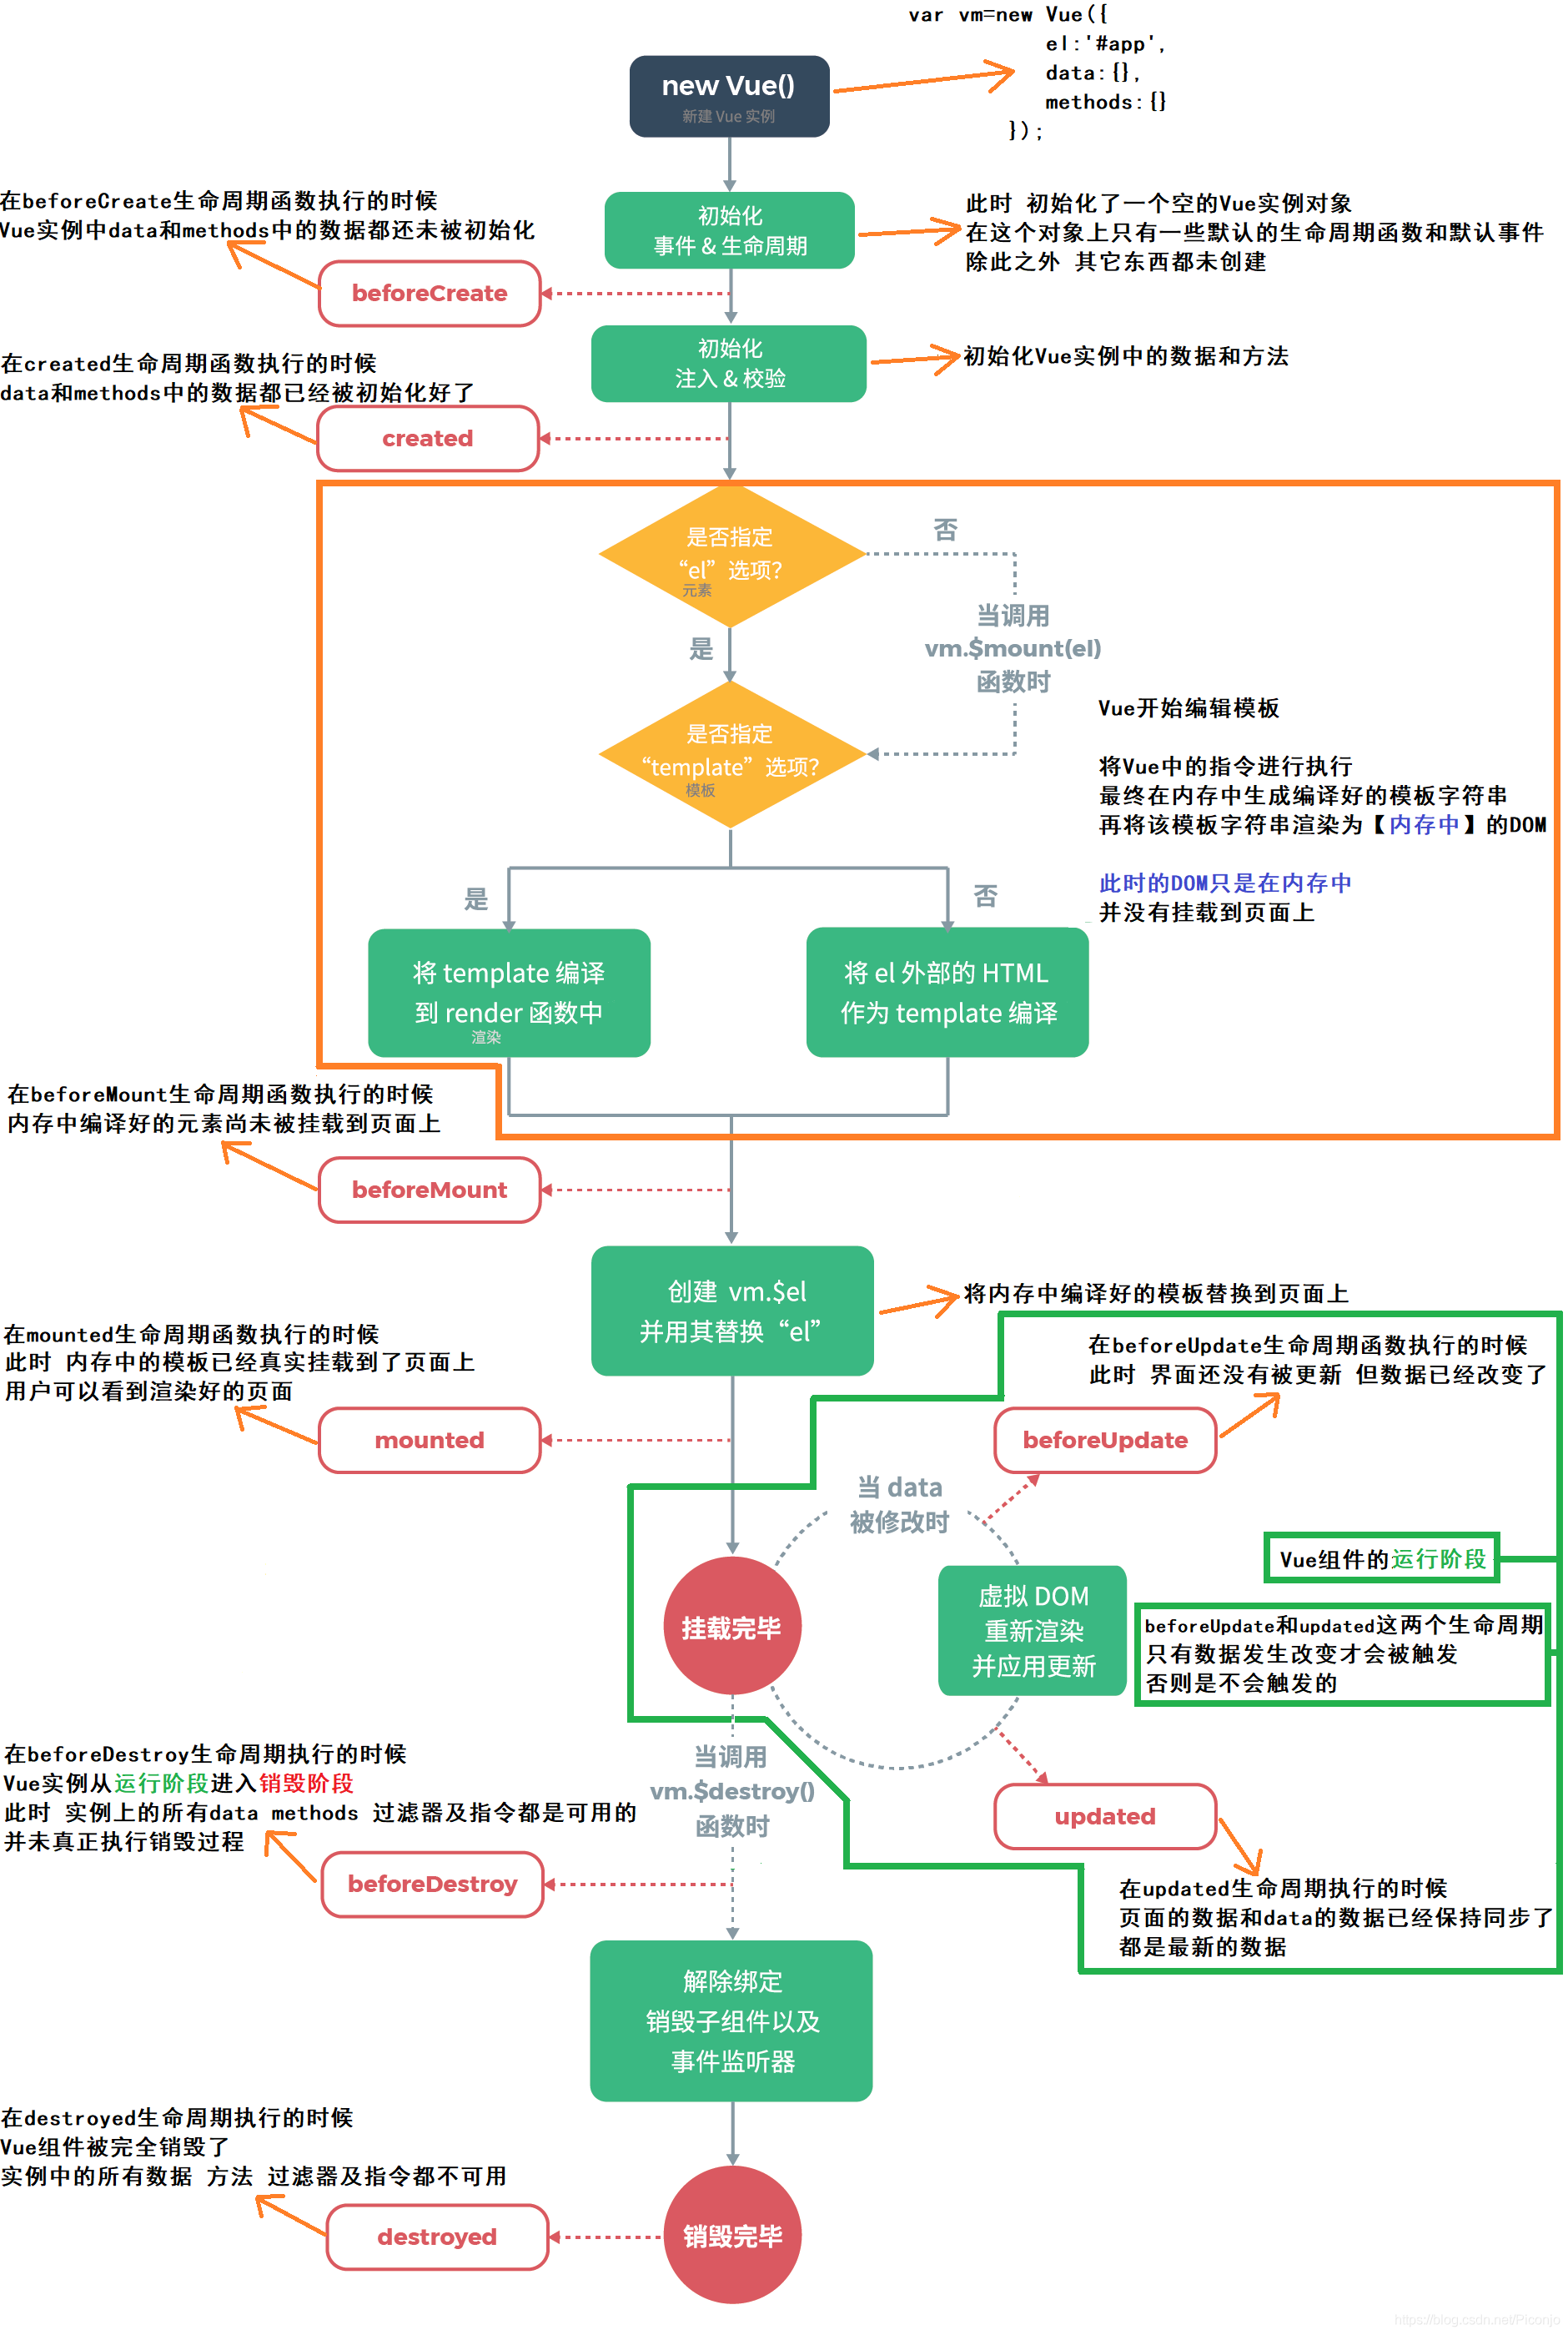
在 Vue 生命周期中有以下钩子函数:
- beforeCreate
- created
- beforeMount
- mounted
- beforeUpdate
- updated
- beforeDestroy
- destroyed
执行顺序
创建过程
创建过程主要涉及 beforeCreate、created、beforeMount、mounted 四个钩子函数
执行顺序依次是:
- Parent beforeCreate
- Parent Created
- Parent BeforeMount
- Child BeforeCreate
- Child Created
- Child BeforeMount
- Child Mounted
- Parent Mounted
更新过程
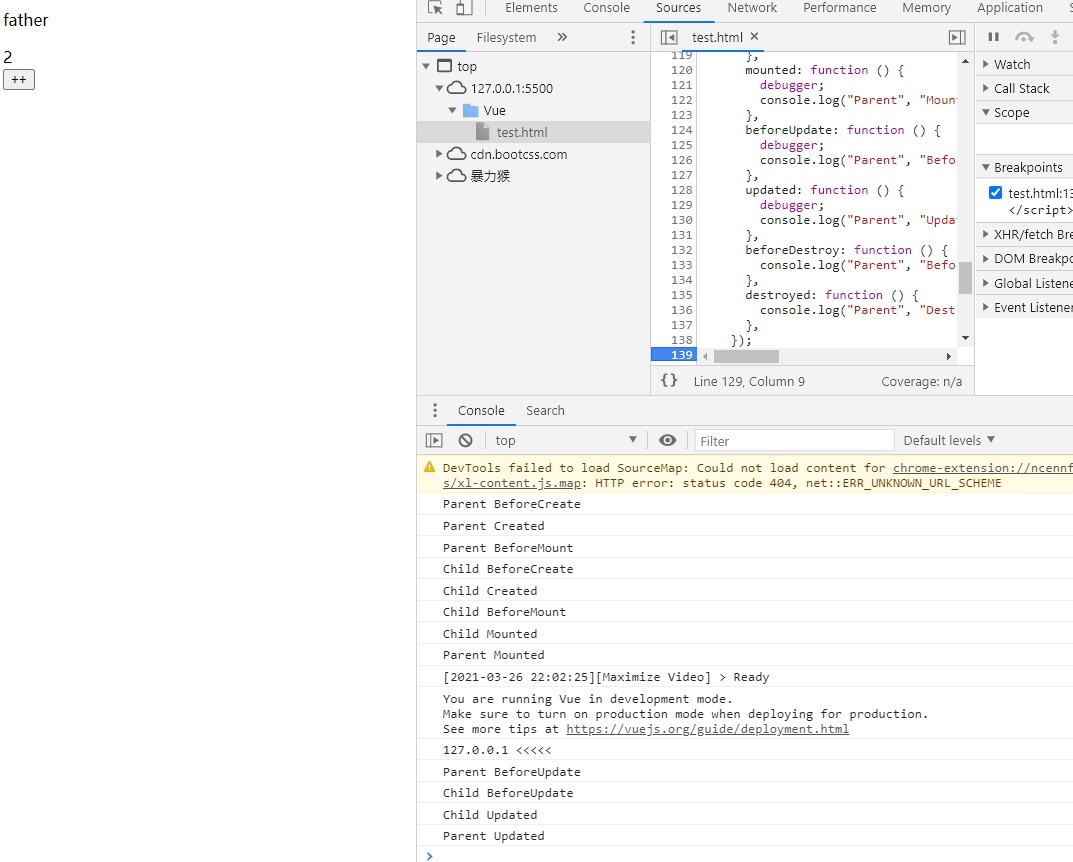
更新过程主要涉及 beforeUpdate、updated 两个钩子函数,当父子组件有数据传递时才会有生命周期的比较
执行顺序依次是:
- Parent BeforeUpdat
- Child BeforeUpdate
- Child Updated
- Parent Updated
销毁过程
销毁过程主要涉及 beforeDestroy、destroyed 两个钩子函数,本例直接调用 vm.$destroy() 销毁整个实例以达到销毁父子组件的目的
执行顺序依次是:
- Parent BeforeDestroy
- Child BeforeDestroy
- Child Destroyed
- Parent Destroyed
示例
<!DOCTYPE html><html><head><title>Vue父子组件生命周期</title></head><body><div id="app"><p>{{message}}</p><child :count="count"></child><button @click="count++">++</button></div></body><script src="https://cdn.bootcss.com/vue/2.4.2/vue.js"></script><script type="text/javascript">var child = {props: {count: {type: Number,default: 0,},},beforeCreate: function () {console.log("Child", "BeforeCreate");},created: function () {console.log("Child", "Created");},beforeMount: function () {console.log("Child", "BeforeMount");},mounted: function () {console.log("Child", "Mounted");},beforeUpdate: function () {console.log("Child", "BeforeUpdate");},updated: function () {console.log("Child", "Updated");},beforeDestroy: function () {console.log("Child", "BeforeDestroy");},destroyed: function () {console.log("Child", "Destroyed");},template: `<div><div>{{count}}</div></div>`,};var vm = new Vue({el: "#app",data: function () {return {count: 1,message: "father",};},components: {child,},beforeCreate: function () {console.log("Parent", "BeforeCreate");},created: function () {console.log("Parent", "Created");},beforeMount: function () {console.log("Parent", "BeforeMount");},mounted: function () {console.log("Parent", "Mounted");},beforeUpdate: function () {console.log("Parent", "BeforeUpdate");},updated: function () {console.log("Parent", "Updated");},beforeDestroy: function () {console.log("Parent", "BeforeDestroy");},destroyed: function () {console.log("Parent", "Destroyed");},});</script></html>
加载时

更新时

销毁时
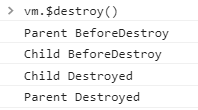
生命周期
给上面的示例加上 debugger
<!DOCTYPE html>
<html>
  <head>
    <title>Vue父子组件生命周期</title>
  </head>

  <body>
    <div id="app">
      <p>{{message}}</p>
      <child :count="count"></child>
      <button @click="count++">++</button>
    </div>
  </body>
  <script src="https://cdn.bootcss.com/vue/2.4.2/vue.js"></script>
  <script type="text/javascript">
    var child = {
      props: {
        count: {
          type: Number,
          default: 0,
        },
      },
      beforeCreate: function () {
        debugger;
        console.log("Child", "BeforeCreate");
      },
      created: function () {
        debugger;
        console.log("Child", "Created");
      },
      beforeMount: function () {
        debugger;
        console.log("Child", "BeforeMount");
      },
      mounted: function () {
        debugger;
        console.log("Child", "Mounted");
      },
      beforeUpdate: function () {
        debugger;
        console.log("Child", "BeforeUpdate");
      },
      updated: function () {
        debugger;
        console.log("Child", "Updated");
      },
      beforeDestroy: function () {
        debugger;
        console.log("Child", "BeforeDestroy");
      },
      destroyed: function () {
        debugger;
        console.log("Child", "Destroyed");
      },
      template: `
            <div>
              <div>{{count}}</div>
            </div>
        `,
    };

    var vm = new Vue({
      el: "#app",
      data: function () {
        return {
          count: 1,
          message: "father",
        };
      },
      components: {
        child,
      },
      beforeCreate: function () {
        debugger;
        console.log("Parent", "BeforeCreate");
      },
      created: function () {
        debugger;
        console.log("Parent", "Created");
      },
      beforeMount: function () {
        debugger;
        console.log("Parent", "BeforeMount");
      },
      mounted: function () {
        debugger;
        console.log("Parent", "Mounted");
      },
      beforeUpdate: function () {
        debugger;
        console.log("Parent", "BeforeUpdate");
      },
      updated: function () {
        debugger;
        console.log("Parent", "Updated");
      },
      beforeDestroy: function () {
        debugger;
        console.log("Parent", "BeforeDestroy");
      },
      destroyed: function () {
        debugger;
        console.log("Parent", "Destroyed");
      },
    });
  </script>
</html>
beforeCreate
从 Vue 实例开始创建到 beforeCreate 钩子执行的过程中主要进行了一些初始化操作,初始化了一个空的 Vue 实例对象,在这个对象上只有一些默认的生命周期函数和默认事件,除此之外其它都未创建。
在 beforeCreate 生命周期钩子执行时组件并未挂载,data、methods 等也并未绑定,此时主要可以用来加载一些与 Vue 数据无关的操作,例如展示一个 loading 等。
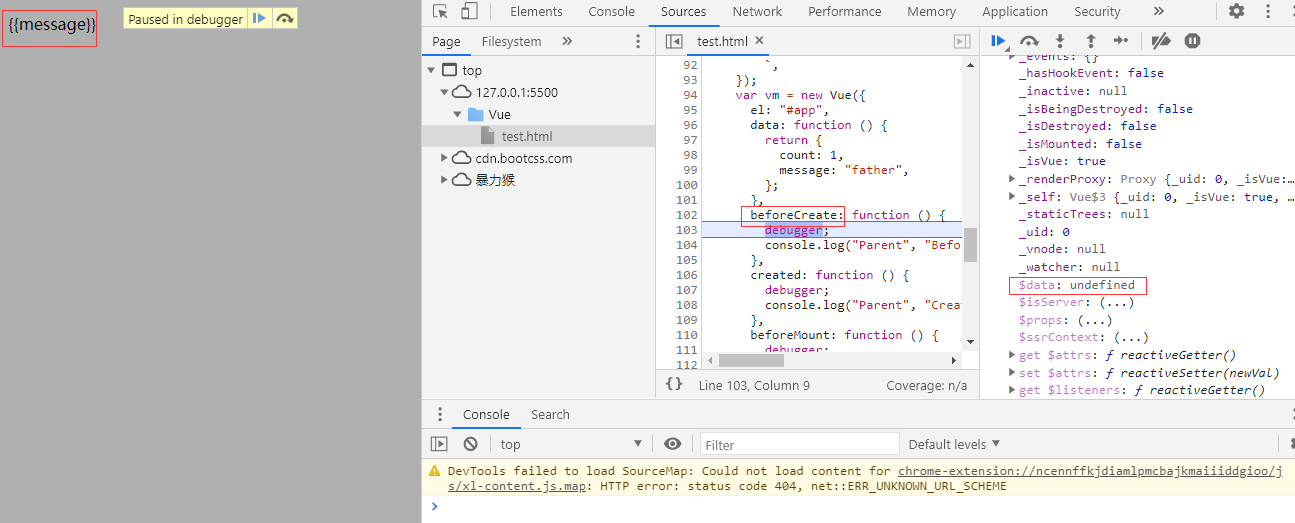
console.log(this.$el);       // undefined
console.log(this.$data);     // undefined
console.log(this.message);   // undefined
created
从 beforeCreate 到 created 的过程中主要完成了数据绑定的配置、计算属性与方法的挂载、watch/event 事件回调等。
在 created 生命周期钩子执行时组件未挂载到到 DOM,属性 $el 目前仍然为 undefined,但此时已经可以开始操作 data 与 methods 等,只是页面还未渲染,在此阶段通常用来发起一个 XHR 请求。
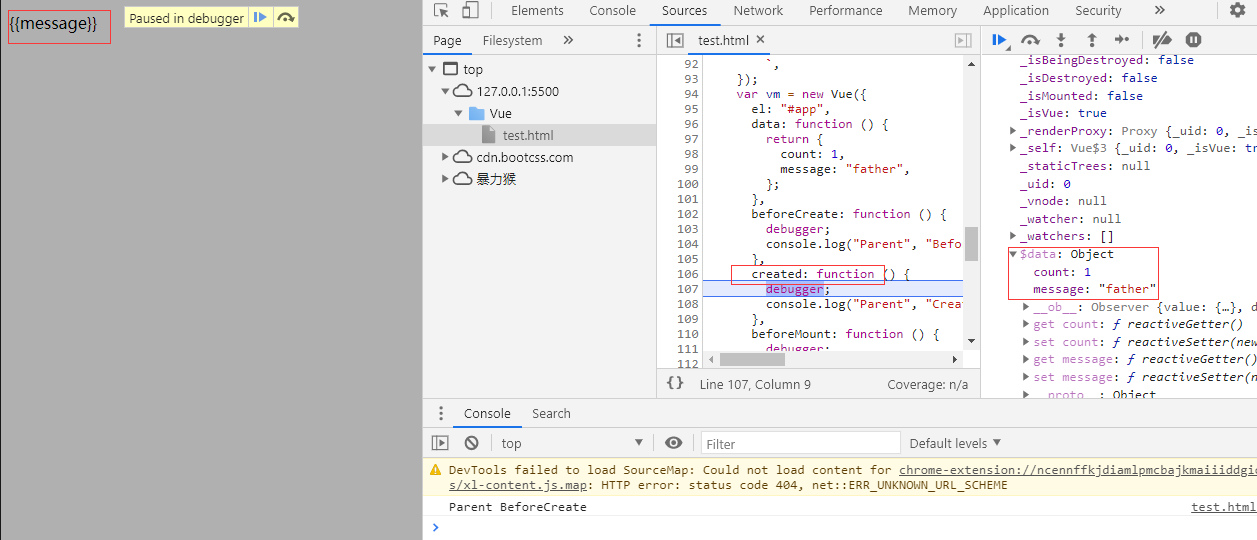
console.log(this.$el);      // undefined
console.log(this.$data);    // {__ob__: Observer}
console.log(this.message);  // father
beforeMount
从 created 到 beforeMount 的过程中主要完成了页面模板的解析,首先会判断对象是否有 el 选项。如果有的话就继续向下编译,如果没有,则停止编译,也就意味着停止了生命周期,直到在该 vue 实例上调用 vm.$mount(el)
在 beforeMount 生命周期钩子执行时 $el 被创建,但是页面只是在内存中,并未作为 DOM 渲染。
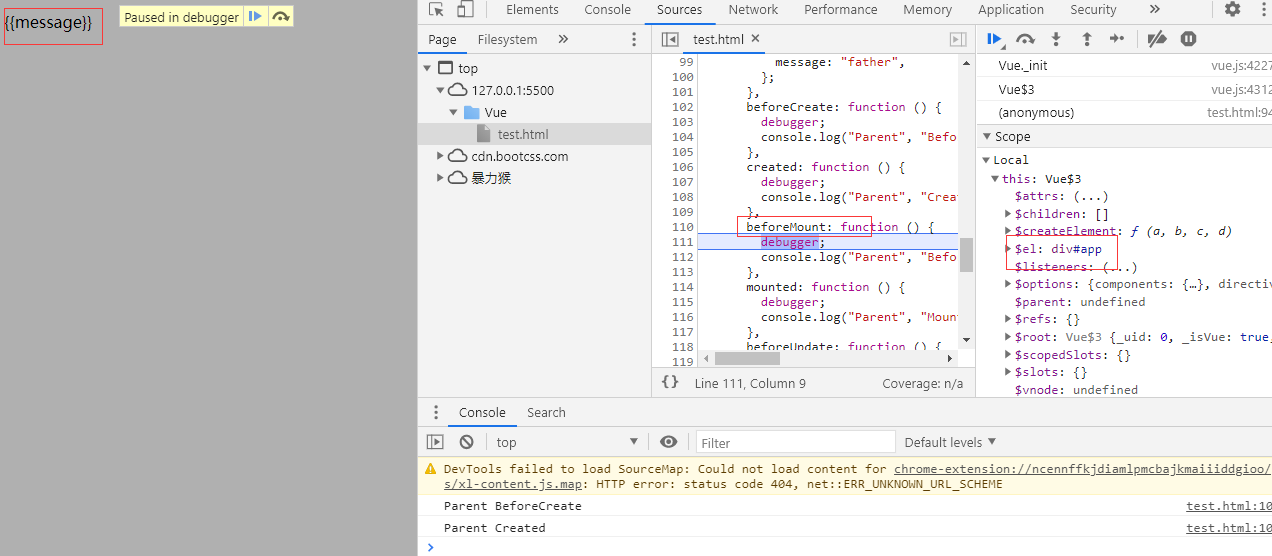
在父组件执行 beforeMount 阶段后,进入子组件的 beforeCreate、created、beforeMount阶段,这些阶段和父组件类似,按下不表。beforeMount 阶段后,执行的是 Mounted 阶段,该阶段时子组件已经挂载到父组件上,并且父组件随之挂载到页面中。
console.log(this.$el);      // <div id="app">...</div>,只存在内存中
console.log(this.$data);    // {__ob__: Observer}
console.log(this.message);  // father
mounted
从 beforeMount 到 mounted 的过程中执行的是将页面从内存中渲染到 DOM 。此时可以执行依赖 DOM 的操作
在 mount 生命周期钩子执行时页面已经渲染完成,组件正式完成创建阶段的最后一个钩子,即将进入运行中阶段。此外关于渲染的页面模板的优先级,是 render 函数 > template 属性 > 外部 HTML。
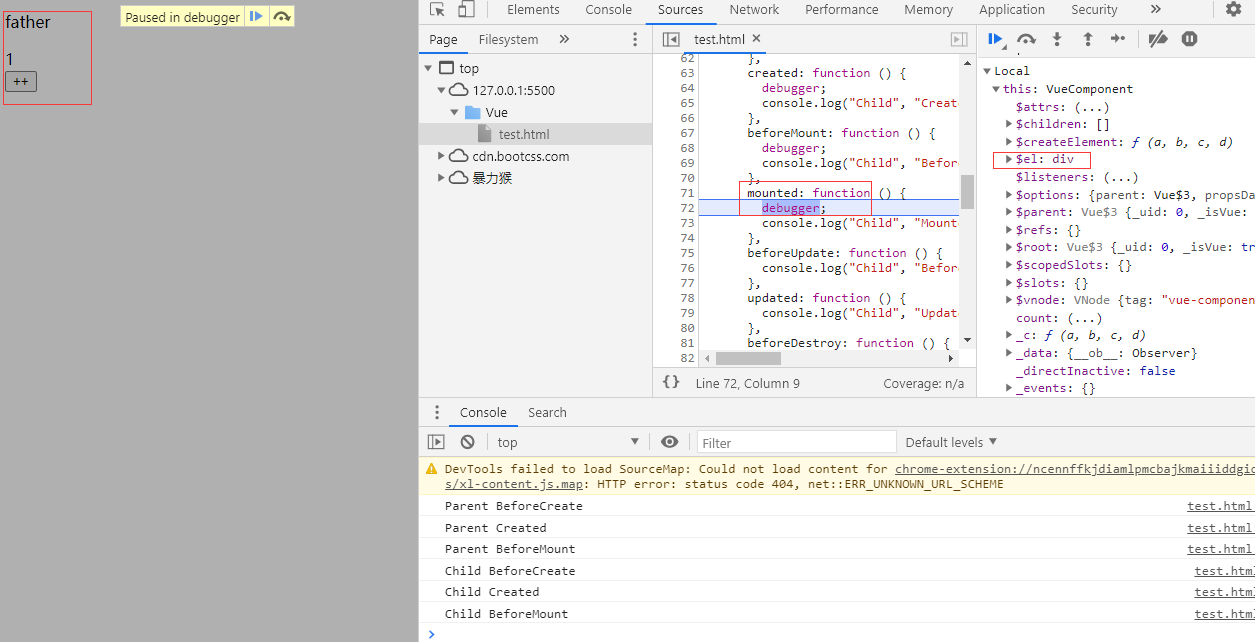
console.log(this.$el);      // <div id="app">...</div>,已经渲染完成
console.log(this.$data);    // {__ob__: Observer}
console.log(this.message);  // father
beforeUpdate
当数据发生更新时 beforeUpdate 钩子便会被调用,此时 Vue 实例中数据已经是最新的,但是在页面中的数据还是旧的,在此时可以进一步地更改状态,这不会触发附加的重渲染过程。
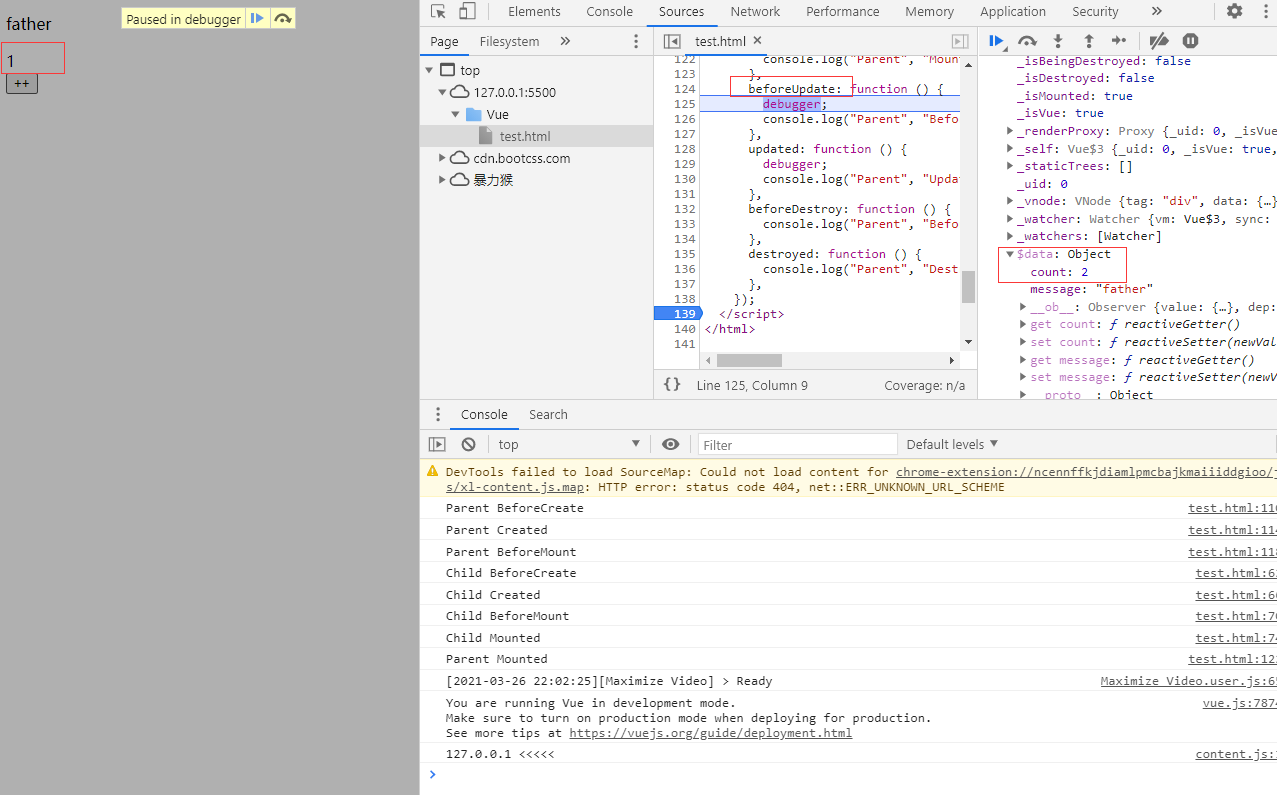
在父组件执行 beforeUpdate 阶段后,进入子组件的 beforeUpdate、updated 阶段,当执行完子组件的 beforeUpdate 阶段时,页面会发生渲染
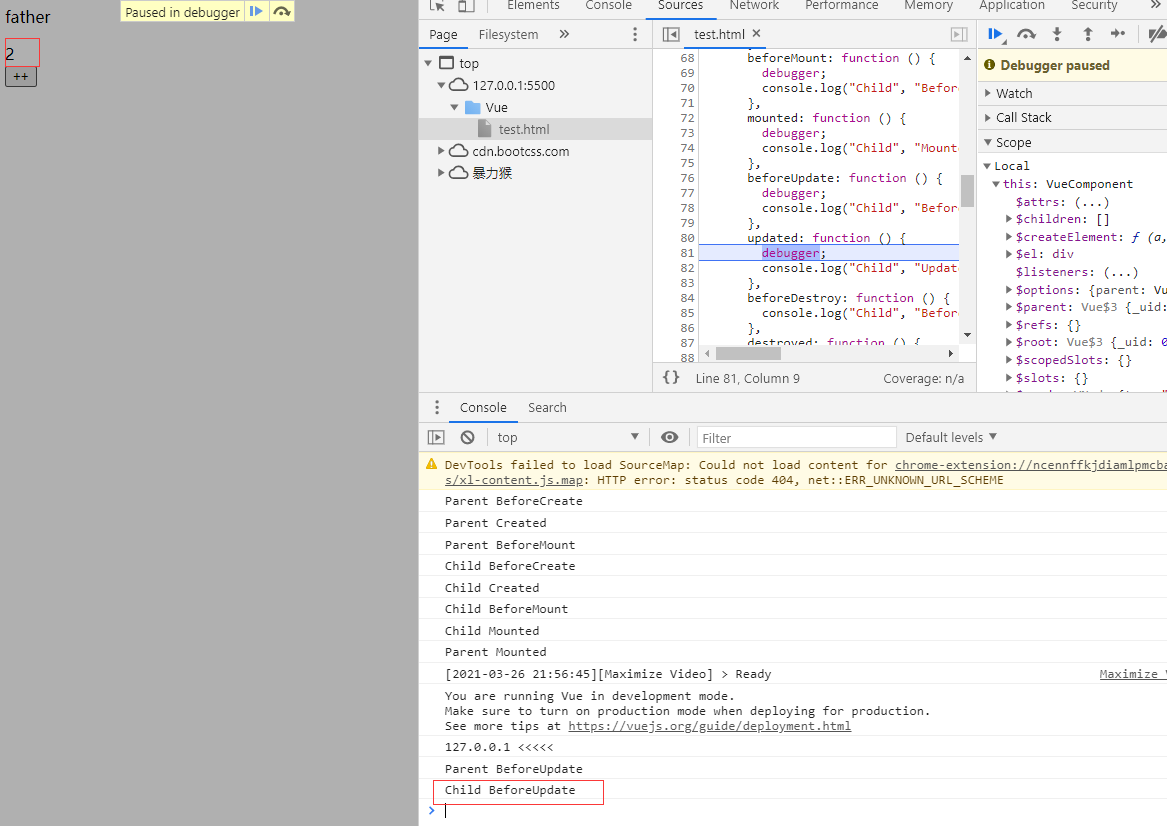
console.log(this.$el);    // <div id="app">...</div>
console.log(this.$data);  // {__ob__: Observer}

// parent BeforeUpdate
console.log(this.count);  // 2,此时并没有渲染

// Child BeforeUpdate
console.log(this.count);  // 2,此时已经渲染在页面上了
updated
当数据发生更新并在 DOM 渲染完成后 updated 钩子便会被调用,在此时页面的数据和 data 的数据已经保持同步了,可以执行依赖于 DOM 的操作。
console.log(this.$el);    // <div id="app">...</div>
console.log(this.$data);  // {__ob__: Observer}
console.log(this.count);  // 2
beforeDestroy
在 Vue 实例被销毁之前 beforeDestroy 钩子便会被调用,在此时实例仍然完全可用。
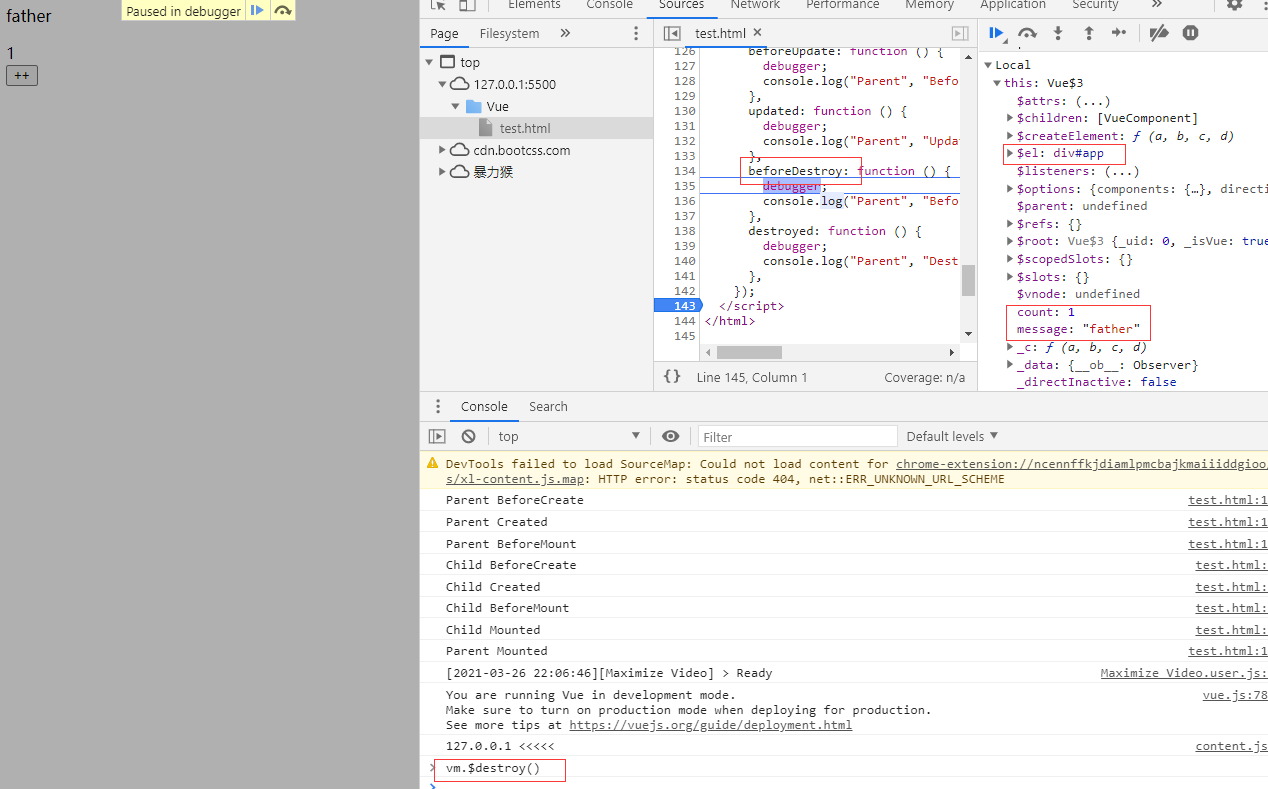
在父组件执行 beforeDestroy 阶段后,进入子组件的 beforeDestroy、destroy 阶段,这些阶段和父组件类似,按下不表。beforeDestroy 阶段后,执行的是 destroy 阶段
vm.$destroy();
console.log(this.$el);      // <div id="app">...</div>
console.log(this.$data);    // {__ob__: Observer}
console.log(this.message);  // father
destroyed
在 Vue 实例被销毁之后 destroyed 钩子便会被调用,在此时 Vue 实例绑定的所有东西都会解除绑定,所有的事件监听器会被移除,所有的子实例也会被销毁,组件无法使用,data 和 methods 也都不可使用,即使更改了实例的属性,页面的 DOM 也不会重新渲染。
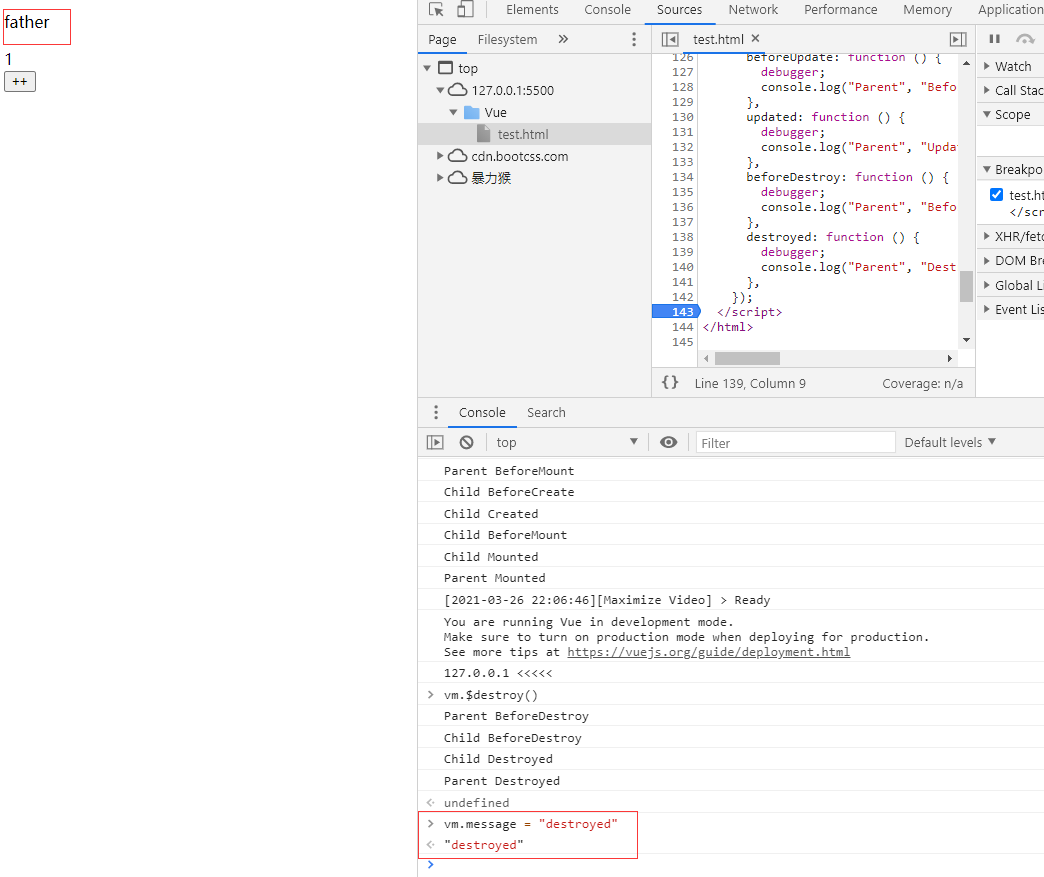
console.log(this.$el);      // <div id="app">...</div>
console.log(this.$data);    // {__ob__: Observer}
console.log(this.message);  // father

