- 介绍(INTRODUCTION)
- NSX 组件(NSX COMPONENTS)
- NSX 的主要组件分为三类:
- 管理平面- NSX管理平面由NSX的集中式网络管理组件NSX管理器构建。它提供单点配置和 REST API 入口点。
- 控制平面- NSX 控制平面在 NSX 控制器群集中运行。NSX 控制器是一种先进的分布式状态管理系统,为 NSX 逻辑交换和路由功能提供控制平面功能。它是网络中所有逻辑交换机的中心控制点,并维护有关所有主机、逻辑交换机 (VXLAN) 和分布式逻辑路由器的信息。
- 数据平面- NSX 数据平面由 NSX vSwitch 组成,该交换机基于 vSphere 分布式交换机 (VDS) 及其附加组件来启用服务。NSX 内核模块、用户空间代理、配置文件和安装脚本打包在 VIB 中,并在虚拟机管理程序内核中运行,以提供服务,如分布式路由和逻辑防火墙,并启用 VXLAN 桥接功能。
- 动手实验交互式仿真:NSX 安装和配置 - 第 1 部分
- 实验室的这一部分被作为动手实验交互式模拟呈现。这将允许您体验在实验室环境中生存过于耗时或资源密集的步骤。在此模拟中,可以使用软件界面,就像与实时环境交互一样。
- 登录到 vSphere Web 客户端Login to the vSphere Web Client
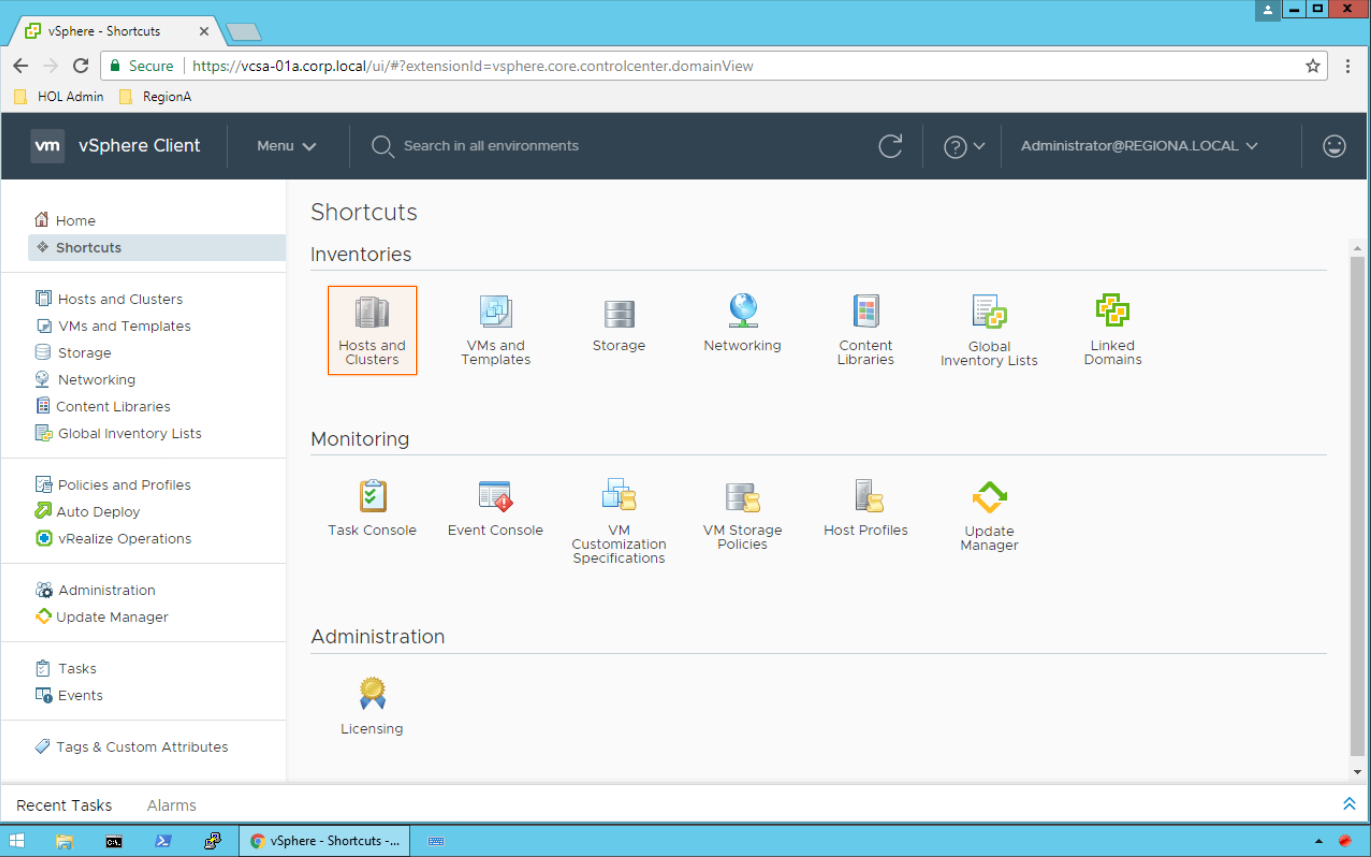
- 在此交互式模拟中,我们将 NSX 管理器部署到区域A01-MGMT01群集。In this Interactive Simulation, we will be deploying NSX Manager to the RegionA01-MGMT01 Cluster.
- ">1.单击”主机和群集”图标。Click on the Hosts and Clusters icon.

- 2.用鼠标右键单击区域A01-MGMT01群集。Click with a right mouse click on RegionA01-MGMT01 cluster.
INTRODUCTION
VMware NSX Data Center is the leading network virtualization platform, bringing the operational model of virtual machines to the network. Just as server virtualization provides extensible control of virtual machines running on a pool of server hardware, network virtualization with NSX Data Center provides a centralized API to provision and configure virtual network services that run on a single physical network.
Logical networks decouple virtual machine connectivity and network services from the physical network, providing customers with the flexibility to place or migrate virtual machines anywhere in the data center while still supporting layer-2 / layer-3 connectivity and layer 4-7 network services.
Within this module we will be using an Interactive Simulation to focus on how to perform the actual deployment of NSX Data Center within your environment. Within the lab environment the actual deployment has already been completed for you.
In the Interactive Simulation, you will see how to:
Deploy the NSX Manager OVA Register NSX with vCenter Configure Syslog and NSX Manager Backups Deploy NSX Controllers Prepare a vSphere Cluster for NSX Configure and verify VXLAN Tunnel End Points (VTEPs) Create VXLAN Network Identifier Pools (VNIs) Create Transport Zones View the health of your NSX environment with the NSX Manager Dashboard
介绍(INTRODUCTION)
VMware NSX数据中心是领先的网络虚拟化平台,将虚拟机的运营模式引入网络。正如服务器虚拟化提供对在服务器硬件池上运行的虚拟机的可扩展控制一样,NSX 数据中心的网络虚拟化提供集中式 API 来预配和配置在单个物理网络上运行的虚拟网络服务。
逻辑网络将虚拟机连接和网络服务与物理网络分离,为客户提供将虚拟机放置在数据中心任意位置的灵活性,同时仍支持第 2 层/ 第 3 层连接和第 4-7 层网络服务。
在本模块中,我们将使用交互式模拟来重点介绍如何在您的环境中执行 NSX 数据中心的实际部署。在实验室环境中,实际部署已完成。
在交互式模拟中,您将看到如何:
部署 NSX 管理器 OVA
使用 vCenter 注册 NSX
配置系统日志和 NSX 管理器备份
部署 NSX 控制器
为 NSX 准备 vSphere 群集
配置和验证 VXLAN 隧道端点 (VTEP)
创建 VXLAN 网络标识符池 (VNIs)
创建传输区域
使用 NSX 管理器仪表板查看 NSX 环境的运行状况
NSX 组件(NSX COMPONENTS)

NSX COMPONENTS
Note that a cloud management platform (CMP) is not a component of NSX, but NSX provides integration into virtually any CMP via the REST API and out-of-the-box integration with VMware CMPs.
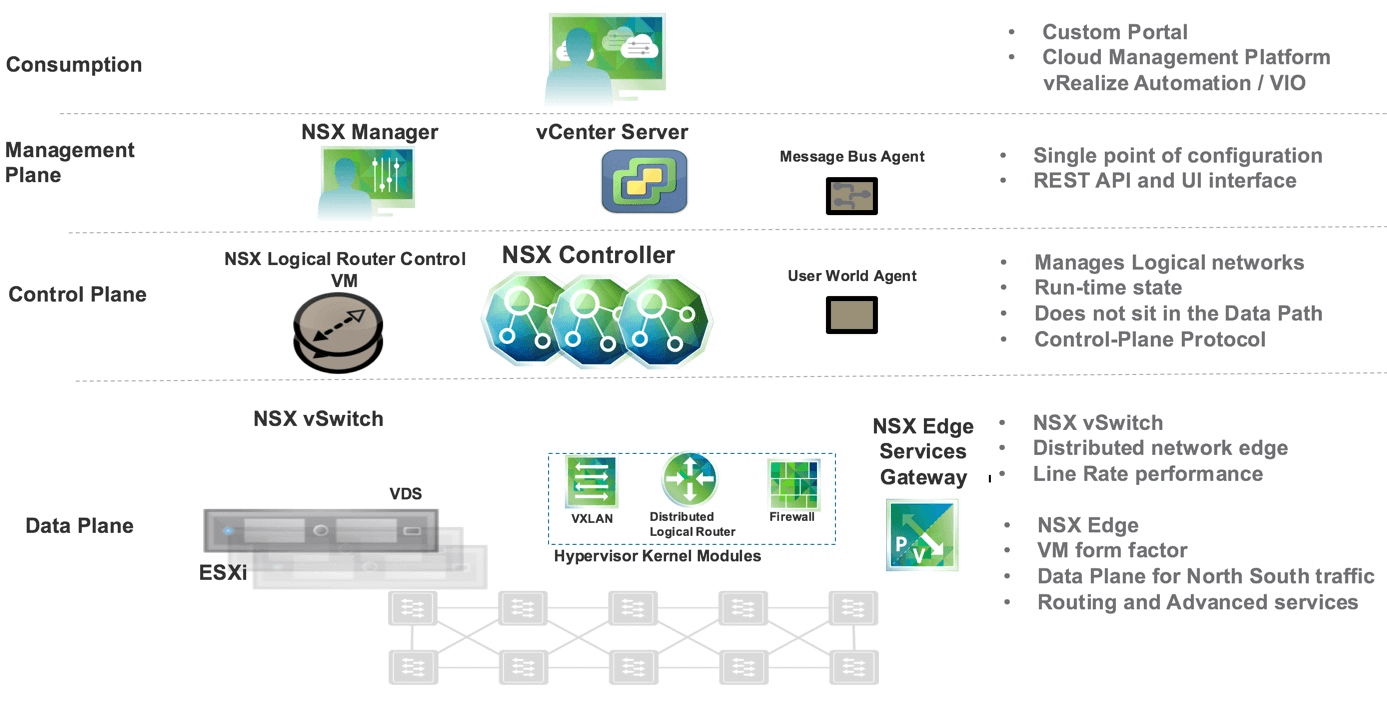
The primary components of NSX are broken down into three categories:
Management Plane - The NSX management plane is built by the NSX Manager, the centralized network management component of NSX. It provides the single point of configuration and REST API entry-points.
Control Plane - The NSX control plane runs in the NSX Controller cluster. The NSX Controller is an advanced distributed state management system that provides control plane functions for NSX logical switching and routing functions. It is the central control point for all logical switches within a network and maintains information about all hosts, logical switches (VXLANs), and distributed logical routers.
Data Plane - The NSX data plane consists of the NSX vSwitch, which is based on the vSphere Distributed Switch (VDS) with additional components to enable services. NSX kernel modules, userspace agents, configuration files, and install scripts are packaged in VIBs and run within the hypervisor kernel to provide services such as distributed routing and logical firewall and to enable VXLAN bridging capabilities.
请注意,云管理平台 (CMP) 不是 NSX 的组成部分,但 NSX 通过 REST API 提供几乎与任何 CMP 的集成,并通过 VMware MMP 进行开箱即用的集成。
NSX 的主要组件分为三类:
管理平面- NSX管理平面由NSX的集中式网络管理组件NSX管理器构建。它提供单点配置和 REST API 入口点。
控制平面- NSX 控制平面在 NSX 控制器群集中运行。NSX 控制器是一种先进的分布式状态管理系统,为 NSX 逻辑交换和路由功能提供控制平面功能。它是网络中所有逻辑交换机的中心控制点,并维护有关所有主机、逻辑交换机 (VXLAN) 和分布式逻辑路由器的信息。
数据平面- NSX 数据平面由 NSX vSwitch 组成,该交换机基于 vSphere 分布式交换机 (VDS) 及其附加组件来启用服务。NSX 内核模块、用户空间代理、配置文件和安装脚本打包在 VIB 中,并在虚拟机管理程序内核中运行,以提供服务,如分布式路由和逻辑防火墙,并启用 VXLAN 桥接功能。
HANDS-ON LABS INTERACTIVE SIMULATION: NSX INSTALLATION AND CONFIGURATION - PART 1
动手实验交互式仿真:NSX 安装和配置 - 第 1 部分
Click Deploy OVF Template. Ensure you have the VMware Client Integration Plug-in installed locally. If not, you will be prompted to install it before proceeding (this is already installed). Click the Local file radio button. Click the Choose Files button. Click the NSX Manager OVA File to select it.
Click Open. Click Next to continue. Click inside the Virtual machine name field and enter nsxmgr-01a. Click Next to continue. Click to expand the RegionA01-MGMT01 cluster. Click the esx-04a.corp.local host to select it. Click Next to continue. This may take a moment while the file is validated. Click Next on the Review Details page to continue. Click the Check Box to accept the license agreements. Click Next to continue. The virtual disk format has been set to Thick Provision Lazy Zeroed and the VM Storage Policy set to Datastore default. Click on the RegionA01-ISCSI01-COMP01 datastore. Click Next. Click the drop-down menu in the Destination Network field. Click the VM-RegionA01-vDS-COMP network for the NSX Manager appliance. Click Next to continue. Customize Template Click in the Password box for CLI “admin” User Password and enter VMware1! Click in the Confirm Password box for CLI “admin” User Password and enter VMware1! Click in the Password box for CLI Privilege Mode Password and enter VMware1! Click in the Confirm Password box for CLI Privilege Mode Password and enter VMware1! Click on the Scroll bar to move down the configuration page. Click in the Hostname field, enter nsxmgr-01a. Click in the Network 1 IPv4 Address field, enter 192.168.110.42 Click in the Network 1 Netmask field, enter 255.255.255.0 Click in the Default IPv4 Gateway field, enter 192.168.110.1 Click on the Scroll bar to move down the configuration page. Click in the DNS Servers list field, enter 192.168.110.10 Click in the Domain Search List field, enter corp.local Click in the NTP Server List field, enter router.corp.local Click the check box to Enable SSH to the NSX Manager appliance. Click on the Scroll bar to move down the configuration page. The VMware Customer Experience Improvement Program has been accepted by default. Click Next to continue. Review your configuration settings. Click the Finish button to start deploying the NSX Manager Appliance. Click on the Recent Tasks pane icon and verify the NSX Manager .OVF is being deployed. Click on the Recent Tasks pane icon once completed to gain more real estate.
实验室的这一部分被作为动手实验交互式模拟呈现。这将允许您体验在实验室环境中生存过于耗时或资源密集的步骤。在此模拟中,可以使用软件界面,就像与实时环境交互一样。
橙色框显示单击的位置,左箭头键和右箭头键也可用于在任一方向上通过模拟。This part of the lab is presented as a Hands-on Labs Interactive Simulation. This will allow you to experience steps which are too time-consuming or resource intensive to do live in the lab environment. In this simulation, you can use the software interface as if you are interacting with a live environment.The orange boxes show where to click, and the left and right arrow keys can also be used to move through the simulation in either direction.
登录到 vSphere Web 客户端Login to the vSphere Web Client
在此交互式模拟中,我们将 NSX 管理器部署到区域A01-MGMT01群集。In this Interactive Simulation, we will be deploying NSX Manager to the RegionA01-MGMT01 Cluster.
1.单击”主机和群集”图标。Click on the Hosts and Clusters icon.
2.用鼠标右键单击区域A01-MGMT01群集。Click with a right mouse click on RegionA01-MGMT01 cluster.
单击”部署 OVF 模板”。
确保在本地安装了 VMware 客户端集成插件。如果没有,系统将提示您在继续之前安装它(已安装)。
单击”本地文件单选”按钮。
单击”选择文件”按钮。
单击 NSX 管理器 OVA 文件以将其选中。
单击”打开”。
单击”下一步”继续。
单击虚拟机名称字段并输入nsxmgr-01a。
单击”下一步”继续。
单击以展开区域A01-MGMT01群集。
单击esx-04a.corp.本地主机以选择它。
单击”下一步”继续。在验证文件时,这可能需要一段时间。
单击”查看详细信息”页上的”下一步”以继续。
单击”复选框”以接受许可协议。
单击”下一步”继续。
虚拟磁盘格式已设置为”厚预配延迟归零”,VM存储策略设置为数据存储默认值。
单击区域A01-ISCSI01-COMP01数据存储。
单击”下一步”。
单击”目标网络”字段中的下拉菜单。
单击 NSX 管理器设备的VM 区域A01-vDS-COMP网络。
单击”下一步”继续。
自定义模板
点击 CLI”管理员”用户密码的密码框中输入VMware1!
点击 CLI”管理员”用户密码的确认密码框,输入VMware1!
点击 CLI 特权模式密码的密码框,输入VMware1!
点击 CLI 特权模式密码的确认密码框,输入VMware1!
单击”滚动”栏可向下移动配置页。
单击”主机名”字段,输入nsxmgr-01a。
在网络1 IPv4 地址字段中单击,输入192.168.110.42
单击”网络 1 网掩码”字段,输入255.255.255.0
单击默认IPv4 网关字段,输入192.168.110.1
单击”滚动”栏可向下移动配置页。
单击DNS 服务器列表字段,输入192.168.110.10
在”域搜索列表”字段中单击,输入公司本地
在NTP 服务器列表字段中单击,输入路由器.corp.local
单击此复选框可启用 SSH到 NSX 管理器设备。
单击”滚动”栏可向下移动配置页。
VMware 客户体验改善计划已被默认接受。
单击”下一步”继续。
查看配置设置。
单击”完成”按钮开始部署 NSX 管理器设备。
单击”最近任务”窗格图标并验证 NSX 管理器。正在部署 OVF。
完成后单击”最近任务”窗格图标以获得更多房地产。

