多线程使用场景
- 通过并行计算提高程序执行性能
- 需要等待网络、I/O 响应导致耗费大量的执行时间,可以采用异步线程的方式来减少阻塞
线程的实现方式
在 Java 中,有多种方式来实现多线程。继承 Thread 类、实现 Runnable 接口、使用 ExecutorService、Callable、Future 实现带返回结果的多线程。如果不需要获取线程的返回结果,推荐使用实现 Runnable 接口的方式。
继承 Thread 类创建线程
看下 Thread 源码,就知道 Thread 是 Runnable 的实现类。
public class ThreadDemo extends Thread {@Overridepublic void run() {System.out.println("继承 Thread 类创建线程");}public static void main(String[] args) {new ThreadDemo().start();}}
实现 Runnable 接口创建线程
public class RunnableDemo implements Runnable {@Overridepublic void run() {System.out.println("实现 Runnable 接口创建线程");}public static void main(String[] args) {new Thread(new RunnableDemo()).start();}}
实现 Callable 接口通过 FutureTask 包装器来创建 Thread
public class CallableDemo1 implements Callable<String> {@Overridepublic String call() throws Exception {return "实现 Callable 接口通过 FutureTask 包装器来创建 Thread";}public static void main(String[] args) {// 使用单个线程处理CallableCallableDemo1 callableDemo = new CallableDemo1();FutureTask<String> futureTask = new FutureTask<>(callableDemo);new Thread(futureTask).start();try {System.out.println(futureTask.get());} catch (InterruptedException | ExecutionException e) {e.printStackTrace();}}}
public class CallableDemo2 implements Callable<String> {@Overridepublic String call() throws Exception {return "实现 Callable 接口通过 FutureTask 包装器来创建 Thread";}public static void main(String[] args) {// 使用线程池处理CallableCallableDemo2 callableDemo = new CallableDemo2();ExecutorService executorService = Executors.newFixedThreadPool(10);Future<String> future = executorService.submit(callableDemo);try {System.out.println(future.get());} catch (InterruptedException | ExecutionException e) {e.printStackTrace();}executorService.shutdown();}}
public class CallableDemo3 implements Callable<String> {@Overridepublic String call() throws Exception {return "实现 Callable 接口通过 FutureTask 包装器来创建 Thread";}public static void main(String[] args) {// 使用ExecutorCompletionService接收线程池执行的结果ExecutorService executorService = Executors.newFixedThreadPool(10);CallableDemo3 callableDemo3 = new CallableDemo3();CompletionService<String> completionService = new ExecutorCompletionService<>(executorService);completionService.submit(callableDemo3);Future<String> future;try {future = completionService.take();System.out.println(future.get());} catch (InterruptedException | ExecutionException e) {e.printStackTrace();}executorService.shutdown();}}
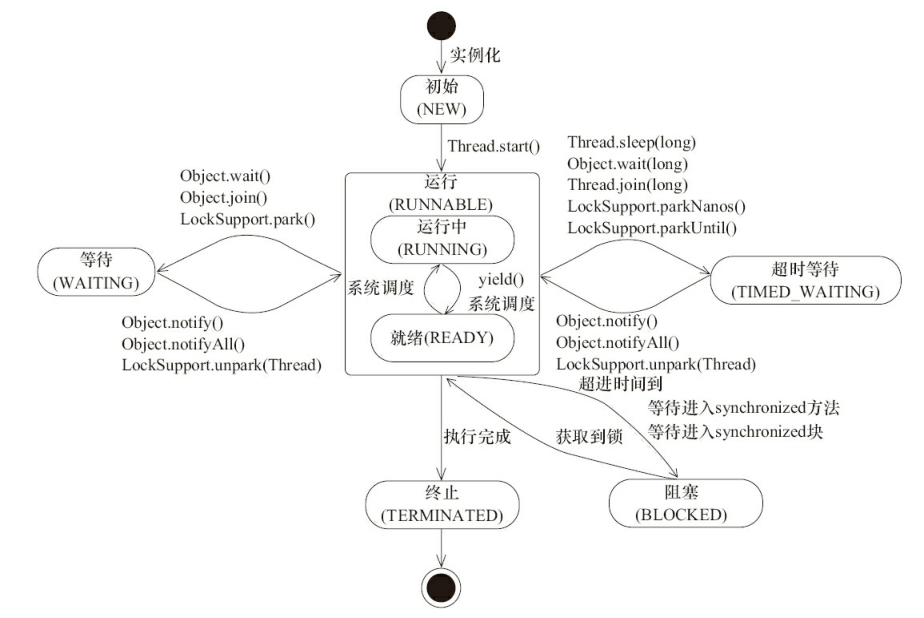
线程的状态
Java 线程在运行的生命周期中可能处于6种不同的状态,在给定的一个时刻,线程只能处于其中的一个状态。
| 状态名称 | 说明 |
|---|---|
| NEW | 初始状态,线程被构建,但是还没有调用 start() 方法 |
| RUNNABLE | 运行状态,Java 线程将操作系统中的就绪和运行两种状态笼统地称作“运行中“ |
| BLOCKED | 阻塞状态,表示线程阻塞于锁 |
| WAITING | 等待状态,表示线程进入等待状态,进入该状态表示当前线程需要等待其他线程做出一些特定动作(通知或中断) |
| TIMED_WAITING | 超时等待状态,该状态不同于 WAITING,它是可以在指定的时间自行返回的 |
| TERMINATED | 终止状态,表示该线程已经执行完毕 |
线程在自身的生命周期中,并不是固定地处于某个状态,而是随着代码的执行在不同的状态之间进行切换,Java 线程状态变迁如图。
下面我们使用 jstack 工具(可以选择打开终端,键入 jstack 或者到 JDK 安装目录的 bin 目录下执行命令),尝试查看示例代码运行时的线程信息,更加深入地理解线程状态,示例代码如下所示。
/*** 线程状态** @author yinjianwei* @date 2019/03/13*/public class ThreadState {public static void main(String[] args) {new Thread(new WaitingThread(), "WaitingThread").start();new Thread(new TimeWaitingThread(), "TimeWaitingThread").start();// 使用两个Blocked线程,一个获取锁成功,另一个被阻塞new Thread(new BlockedThread(), "BlockedThread-1").start();new Thread(new BlockedThread(), "BlockedThread-2").start();}/*** 等待*/static class WaitingThread implements Runnable {@Overridepublic void run() {while (true) {synchronized (WaitingThread.class) {try {WaitingThread.class.wait();} catch (InterruptedException e) {e.printStackTrace();}}}}}/*** 超时等待*/static class TimeWaitingThread implements Runnable {@Overridepublic void run() {while (true) {try {TimeUnit.SECONDS.sleep(100);} catch (InterruptedException e) {e.printStackTrace();}}}}/*** 阻塞*/static class BlockedThread implements Runnable {@Overridepublic void run() {synchronized (BlockedThread.class) {while (true) {try {TimeUnit.SECONDS.sleep(100);} catch (InterruptedException e) {e.printStackTrace();}}}}}}
运行该示例,打开终端或者命令提示符,键入“jps”,输出如下。
13444 ThreadState18292 Jps2308 Test215848 Test210364 ThreadState10924
可以看到运行示例对应的进程ID 是13444,接着再键入“jstack 13444”,部分输出如下所示。
// BlockedThread-2 线程阻塞在获取 BlockedThread.class 的锁上"BlockedThread-2" #13 prio=5 os_prio=0 tid=0x000000001d163000 nid=0x7a4 waiting for monitor entry [0x000000001df5f000]java.lang.Thread.State: BLOCKED (on object monitor)// BlockedThread-1 线程获取到了 BlockedThread.class 的锁"BlockedThread-1" #12 prio=5 os_prio=0 tid=0x000000001d162800 nid=0x3afc waiting on condition [0x000000001de5e000]java.lang.Thread.State: TIMED_WAITING (sleeping)// WaitingThread 线程处于等待状态"WaitingThread" #11 prio=5 os_prio=0 tid=0x000000001d159000 nid=0x3600 in Object.wait() [0x000000001dd5f000]java.lang.Thread.State: WAITING (on object monitor)// TimeWaitingThread 线程处于超时等待状态"TimeWaitingThread" #10 prio=5 os_prio=0 tid=0x000000001d156000 nid=0x3d5c waiting on condition [0x000000001dc5f000]java.lang.Thread.State: TIMED_WAITING (sleeping)
Daemon 线程
Daemon 线程是一种支持型线程,因为它主要被用作程序中后台调度以及支持性工作。这意味着,当一个 Java 虚拟机中不存在非 Daemon 线程的时候,Java 虚拟机将会退出。可以通过调用 Thread.setDaemon(true) 将线程设置为 Daemon 线程。
注意:Daemon 属性需要在启动线程之前设置,不能在启动线程之后设置。
Daemon 线程被用作完成支持性工作,但是在 Java 虚拟机退出时 Daemon 线程中的 finally 块并不一定会执行,示例代码如下所示。
public class DaemonDemo {public static void main(String[] args) {Thread thread = new Thread(new DaemonThread(), "DaemonThread");thread.setDaemon(true);thread.start();}static class DaemonThread implements Runnable {@Overridepublic void run() {try {SleepUtils.second(10);} finally {System.out.println("DaemonThread finally run.");}}}}
运行 DaemonDemo 程序,可以看到在终端上没有任何输出,main 线程(非 Daemon 线程)在启动了线程 DaemonThread 之后随着 main 方法执行完毕而终止,而此时 Java 虚拟机中已经没有非 Daemon 线程,虚拟机需要退出。Java 虚拟机中的所有 Daemon 线程都需要立即终止,因此 DaemonThread 立即终止,但是 DaemonThread 中的 finally 块并没有执行。
注意:在构建 Daemon 线程时,不能依靠 finally 块中的内容来确保执行关闭或清理资源的逻辑。
启动和终止线程
启动线程
线程对象在初始化完成之后,调用 start() 方法就可以启动这个线程。
终止线程
线程的 stop() 方法已经被弃用了,该方法终止所有未结束的方法,包括 run 方法。当线程被终止,立即释放被它锁住的所有对象的锁。这会导致对象处于不一致的状态。例如,假定 TransferThread 在从一个账户向另一个账户转账的过程中被终止,钱款已经转出,却没有转人目标账户,现在银行对象就被破坏了。因为锁已经被释放,这种破坏会被其他尚未停止的线程观察到。
利用中断标志(interrupt)
- void interrupt():向线程发送中断请求。线程的中断状态将被设置为 true。如果目前该线程被一个 sleep 调用阻塞,那么,InterruptedException 异常被抛出。
- static boolean interrupted():测试当前线程(即正在执行这一命令的线程)是否被中断。注意,这是一个静态方法。这一调用会产生副作用——它将当前线程的中断状态重置为 false。
- boolean isInterrupted():测试线程是否被终止。不像静态的中断方法,这一调用不改变线程的中断状态。
public class InterruptDemo {public static void main(String[] args) {InterruptThread interruptThread = new InterruptThread();Thread thread = new Thread(interruptThread);thread.start();try {TimeUnit.SECONDS.sleep(1);} catch (InterruptedException e) {e.printStackTrace();}thread.interrupt();}private static class InterruptThread implements Runnable {private int i;@Overridepublic void run() {while (!Thread.currentThread().isInterrupted()) {i++;}System.out.println(i);}}}
利用 boolean 变量
public class ShutdownDemo {private volatile static boolean stop = false;public static void main(String[] args) {ShutdownThread shutdownThread = new ShutdownThread();Thread thread = new Thread(shutdownThread);thread.start();try {TimeUnit.SECONDS.sleep(1);} catch (InterruptedException e) {e.printStackTrace();}stop = true;}private static class ShutdownThread implements Runnable {private int i;@Overridepublic void run() {while (!stop) {i++;}System.out.println(i);}}}
作者:殷建卫 链接:https://www.yuque.com/yinjianwei/vyrvkf/hfsk8i 来源:殷建卫 - 架构笔记 著作权归作者所有。商业转载请联系作者获得授权,非商业转载请注明出处。

若有收获,就点个赞吧
0 人点赞
