本章介绍 MyBatis 提供的数据源模块,为后面与 Spring 集成做铺垫,从以下三点出发:
- 描述 MyBatis 数据源模块的类图结构;
- MyBatis 是如何集成第三方数据源组件的;
- PooledConnection 设计初衷猜想;
类图结构
MyBatis 数据源部分的代码在 datasource 目录下。
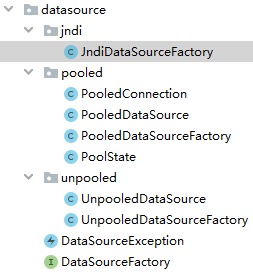
提供了三种类型的数据源实现:unpooled(没有连接池)、pooled(MyBatis 自身实现的连接池)、jndi(依赖 JNDI 服务)
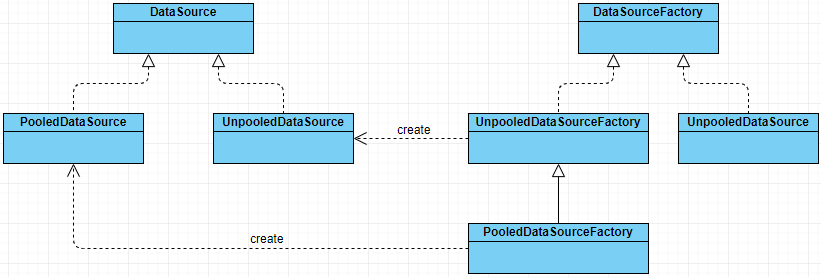
MyBatis 提供了两个 javax.sql.DataSource 接口实现,分别是 PooledDataSource 和 UnpooledDataSource。MyBatis 使用不同的 DataSourceFactory 接口实现创建不同类型的 DataSource。这是工厂方法的典型应用。
MyBatis 数据源的配置方式参考官方文档:https://mybatis.org/mybatis-3/zh/configuration.html#environments
MyBatis 数据源类的具体描述参考《MyBatis 技术内幕》的 2.6 章,这里只简单介绍各个类的主要作用。
- UnpooledDataSourceFactory 类用于创建 UnpooledDataSource 对象,并初始化 UnpooledDataSourceFactory.dataSource 字段,UnpooledDataSourceFactory.setProperties() 方法会完成对 UnpooledDataSource 对象的配置。
- PooledDataSourceFactory 继承了 UnpooledDataSourceFactory,但并没有覆盖 setProperties() 方法和 getDataSource() 方法。两者唯一的区别是 PooledDataSourceFactory 的构造函数会将其 dataSource 字段初始化为 PooledDataSource 对象。
- UnpooledDataSource 实现了 javax.sql.DataSource 接口中定义的 getConnection() 方法及其重载方法,用于获取数据库连接。每次通过 UnpooledDataSource.getConnection() 方法获取数据库连接时都会创建一个新连接。
- PooledDataSource 实现了简易数据库连接池的功能,它创建新数据库连接的功能是依赖其中封装的 UnpooledDataSource 对象实现的。PooledDataSource 并不会直接管理 java.sql.Connection 对象,而是管理 PooledConnection 对象。
- PooledConnection 中封装了真正的数据库连接对象(java.sql.Connection)以及其代理对象,这里的代理对象是通过 JDK 动态代理产生的。
- PoolState 是用于管理 PooledConnection 对象状态的组件,它通过两个 List 集合分别管理空闲状态的连接和活跃状态的连接。
集成第三方框架
MyBatis 数据源模块集成第三方数据源组件比较简单,只需要添加对应的工厂实现类,新的数据源就可以被 MyBatis 使用,不必修改已有的代码。工厂方法模式符合“开-闭”原则。
比如我们要引入 C3P0 数据源,只需要新增工厂实现类:
public class C3P0DataSourceFactory extends UnpooledDataSourceFactory {public C3P0DataSourceFactory() {this.dataSource = new ComboPooledDataSource();}}
在 MyBatis 配置文件中添加相应的数据源配置:
<dataSource type="org.myproject.C3P0DataSourceFactory"><property name="driver" value="org.postgresql.Driver"/><property name="url" value="jdbc:postgresql:mydb"/><property name="username" value="postgres"/><property name="password" value="root"/></dataSource>
这样我们就可以在我们的项目中使用新的数据源了。
在 MyBatis 加载配置文件的时候,会解析配置文件,根据 dataSource 节点配置的内容生成相应的工厂类对象。XMLConfigBuilder#dataSourceElement 源码如下所示:
private DataSourceFactory dataSourceElement(XNode context) throws Exception {if (context != null) {String type = context.getStringAttribute("type");Properties props = context.getChildrenAsProperties();// 根据type属性中配置的类路径生成对应的数据源工厂类DataSourceFactory factory = (DataSourceFactory) resolveClass(type).newInstance();// 为数据源设置配置的属性factory.setProperties(props);return factory;}throw new BuilderException("Environment declaration requires a DataSourceFactory.");}
PooledConnection 设计初衷猜想
PooledConnection 的实现如下:
class PooledConnection implements InvocationHandler {private static final String CLOSE = "close";private static final Class<?>[] IFACES = new Class<?>[] { Connection.class };private final int hashCode;private final PooledDataSource dataSource;private final Connection realConnection;private final Connection proxyConnection;private long checkoutTimestamp;private long createdTimestamp;private long lastUsedTimestamp;private int connectionTypeCode;private boolean valid;/** Constructor for SimplePooledConnection that uses the Connection and PooledDataSource passed in** @param connection - the connection that is to be presented as a pooled connection* @param dataSource - the dataSource that the connection is from*/public PooledConnection(Connection connection, PooledDataSource dataSource) {this.hashCode = connection.hashCode();this.realConnection = connection;this.dataSource = dataSource;this.createdTimestamp = System.currentTimeMillis();this.lastUsedTimestamp = System.currentTimeMillis();this.valid = true;// 创建代理对象this.proxyConnection = (Connection) Proxy.newProxyInstance(Connection.class.getClassLoader(), IFACES, this);}/** Getter for the *real* connection that this wraps** @return The connection*/public Connection getRealConnection() {return realConnection;}/** Getter for the proxy for the connection** @return The proxy*/public Connection getProxyConnection() {return proxyConnection;}/** Required for InvocationHandler implementation.** @param proxy - not used* @param method - the method to be executed* @param args - the parameters to be passed to the method* @see java.lang.reflect.InvocationHandler#invoke(Object, java.lang.reflect.Method, Object[])*/@Overridepublic Object invoke(Object proxy, Method method, Object[] args) throws Throwable {String methodName = method.getName();if (CLOSE.hashCode() == methodName.hashCode() && CLOSE.equals(methodName)) {dataSource.pushConnection(this);return null;} else {try {if (!Object.class.equals(method.getDeclaringClass())) {// issue #579 toString() should never fail// throw an SQLException instead of a RuntimecheckConnection();}return method.invoke(realConnection, args);} catch (Throwable t) {throw ExceptionUtil.unwrapThrowable(t);}}}......}
PooledConnection 类中封装了真正的数据库连接对象(java.sql.Connection)以及其代理对象。PooledDataSource.getConnection() 方法获取的是 proxyConnection 对象,代码实现如下所示。
@Overridepublic Connection getConnection() throws SQLException {return popConnection(dataSource.getUsername(), dataSource.getPassword()).getProxyConnection();}@Overridepublic Connection getConnection(String username, String password) throws SQLException {return popConnection(username, password).getProxyConnection();}
PooledConnection 类为什么要这么设计?一般要强化 Connection 类,添加一些我们自定义的功能,我们会采用装饰器模式,为什么要使用动态代理呢?
因为直接采用装饰器模式,有点麻烦,我们需要把 Connection 类中所有需要用到的方法都要在 PooledConnection 类中暴露出去,说白了就是要重写一遍,比较麻烦,而采用动态代理模式,所有的方法调用都会转到 invoke() 方法执行,我们只需要对特定的方法做一下处理就行,比如这里只对 Connection 的 close() 方法做了特殊处理,其他方法都直接执行 Connection 类中方法。
作者:殷建卫 链接:https://www.yuque.com/yinjianwei/vyrvkf/debkvq 来源:殷建卫 - 架构笔记 著作权归作者所有。商业转载请联系作者获得授权,非商业转载请注明出处。

若有收获,就点个赞吧
0 人点赞
